
Contents
- 1. Introduction
- 2. Main Functions
- 3. Hardware Requirements
- 4. Software Environment
- 5. File Structure
- 6. Description of Key Documents
- 7. Core Ideas of Software Design
- 8. Instructions for Use
- 9. Sample Program
- 10. Notes
- 11. Version Record
- 12. Contact the Developer
- 13. Licensing Agreement
- Appendix 1: Project Source Code Download
- Appendix II: Reference Materials for hardware Modules
- Version Record
1. Introduction
1.1 Project Background
Traditional timing devices feature single functions and lack flexible timing reminder and visual interaction capabilities. This project based on the GraftPort-RP2040 development board, combines the RTC real-time clock module based on the DS1307 chip, the 0.96-inch SSD1306-OLED module and the passive buzzer module to implement an integrated system of "time display - countdown - sound reminder", which addresses the poor interactivity of traditional timing devices. Meanwhile, it incorporates MicroPython 's lightweight task scheduling and exception handling mechanism to ensure stable system operation.
1.2 Overview of the Main Functions of the Project
This project is developed based on MicroPython. Its core function is to obtain accurate time via the RTC real-time clock module of the DS1307 chip, display the current time and countdown in real time through the OLED display screen. When the countdown ends, it triggers a buzzer to emit an alarm sound, which can be stopped via key interrupt; it has built-in automatic garbage collection (GC) to avoid memory leaks, and is equipped with exception capture and rate-limited printing for convenient problem locating.
1.3 Applicable Scenarios or Application Area
- Daily Timekeeping: Serves as a desktop clock, providing time display and scheduled reminder functions;
- Study & Work: Set a countdown timer for study or work sessions to improve Time Management efficiency;
- Teaching Demo: For
MicroPythontask scheduling,I2Ccommunication, interrupt processing and other knowledge points in practical teaching; - Smart Reminder: Integrated into various devices and scenarios that require scheduled reminders.
2. Main Functions
- Real-time time display: The system obtains accurate time via the RTC real-time clock module based on the DS1307 chip, and displays the year, month, day, hour, minute and second on the
OLEDscreen; - Countdown function: supports counting down from a set time and displays the remaining time on the
OLEDscreen; - Audio alarm: When the countdown ends, the buzzer will emit an alarm sound until the user presses the stop button;
- Key press interrupt interaction: The onboard key triggers a falling-edge interrupt, which can toggle the core task between "running/paused";
- Automatic memory management: detects memory usage when idle, and automatically triggers
GCif the memory is below the threshold, preventingMicroPythonfrom crashing due to memory leaks; - Exception Fault Tolerance Mechanism: When an exception is thrown during task execution, the stack trace will be fully printed with rate limiting enabled to prevent log spamming;
- Flexible board-level adaptation: based on
board.pyto realize pin mapping decoupling, supporting subsequent expansion to otherRP2040development boards.
3. Hardware Requirements
3.1 Hardware Required
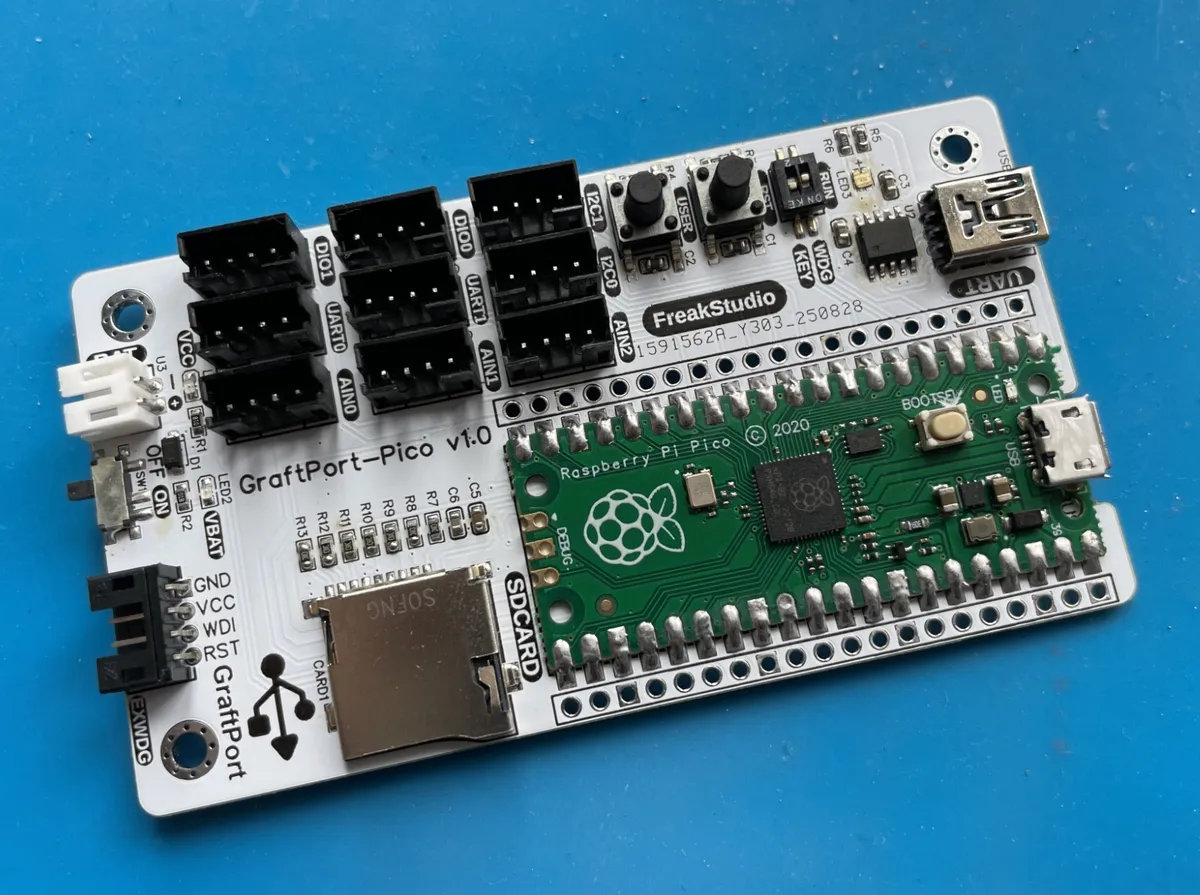
The project is based on the GraftPort-RP2040 development board as the main controller:
The other required modules include:
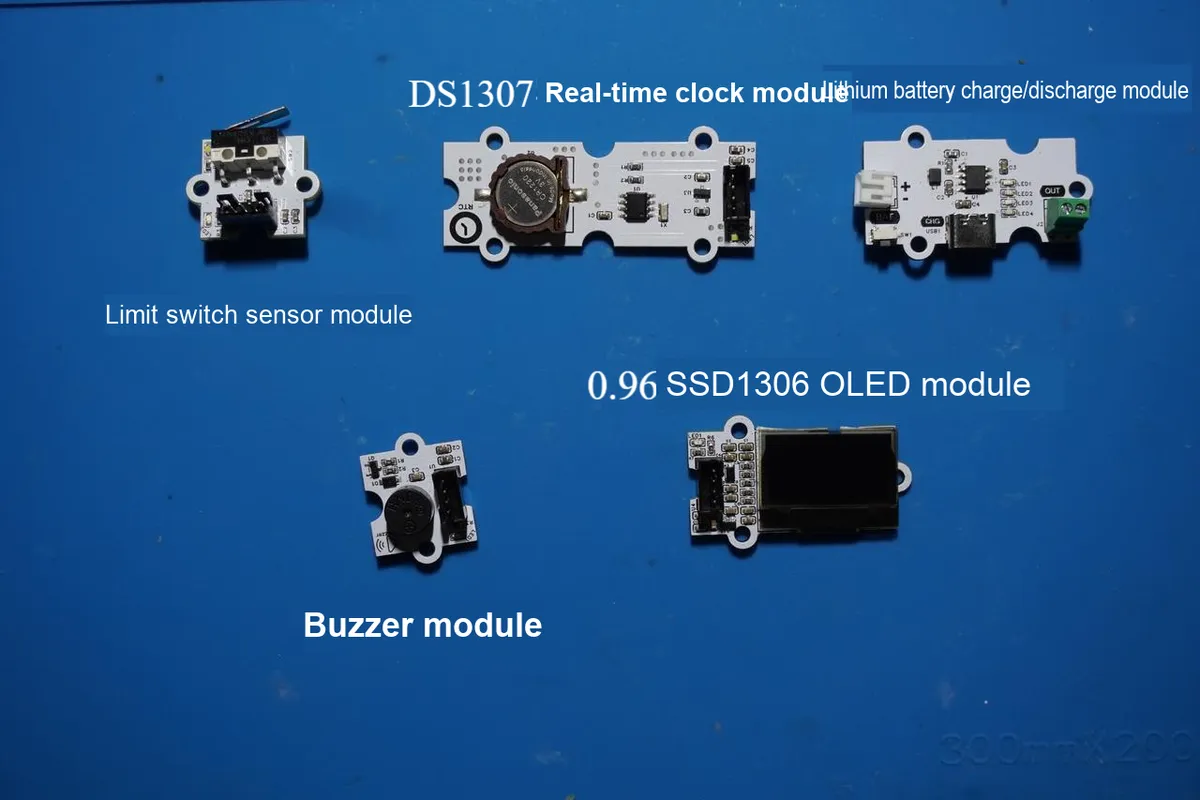
- GraftSense - RTC Real-time Clock Module Based on DS1307 Chip:(
I2CCommunication, Address0x68); - GraftSense 0.96-inch SSD1306 OLED module:(
I2Ccommunication, address0x3Cor0x3D); - GraftSense - Passive Buzzer Module:(digital output, connected to
DIOpin); - GraftSense - Limit Switch Sensor Module:(digital input, connected to
DIOpin); - Onboard button: By default, it uses the fixed pin of the development board (Pin 18, pull-up input) to control the start and stop of tasks;
- Onboard LED: By default, it uses the fixed pin (Pin 25) of the development board for status indication.
3.2 Hardware Connection
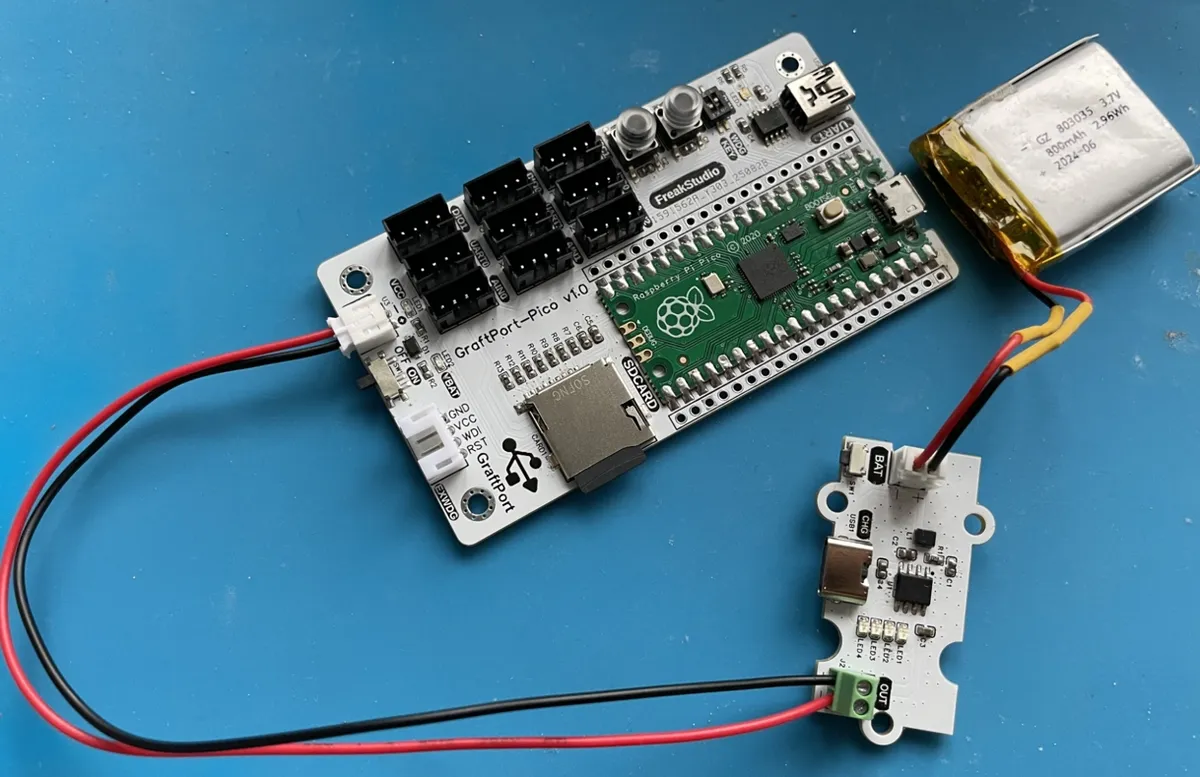
DS1307 Real-Time Clock Module: Connected via PH2.0 connecting cable to the I2C0 interface;
0.96-inch SSD1306-OLED module: connected via PH2.0 connecting cable to I2C1 interface;
Buzzer module: connected via PH2.0 cable to DIO1 interface;
Limit Switch Sensor Module: Connected via PH2.0 connecting cable to DIO0 interface
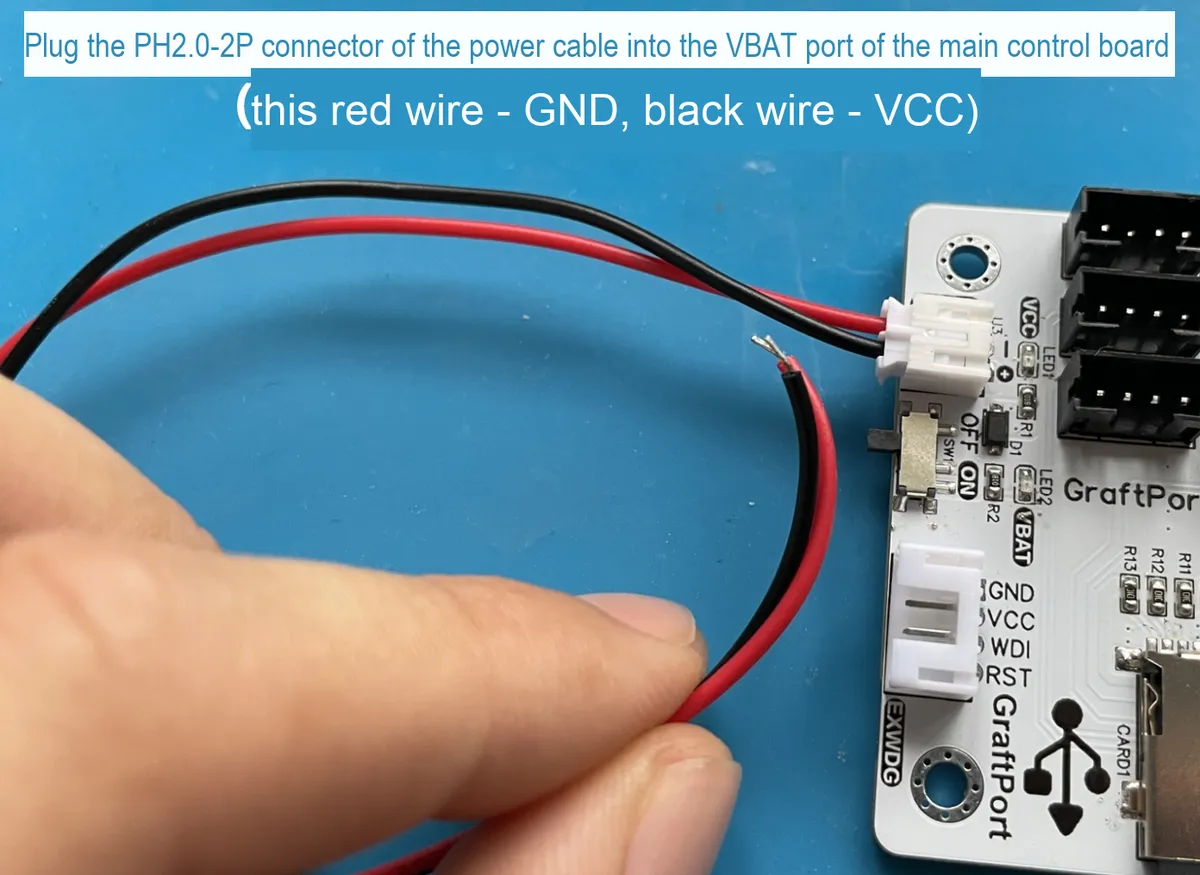
Lithium Battery Charge and Discharge Module: BAT interface connects to the lithium battery, and the OUT interface supplies power to the main control board via a PH2.0-2P connection cable.
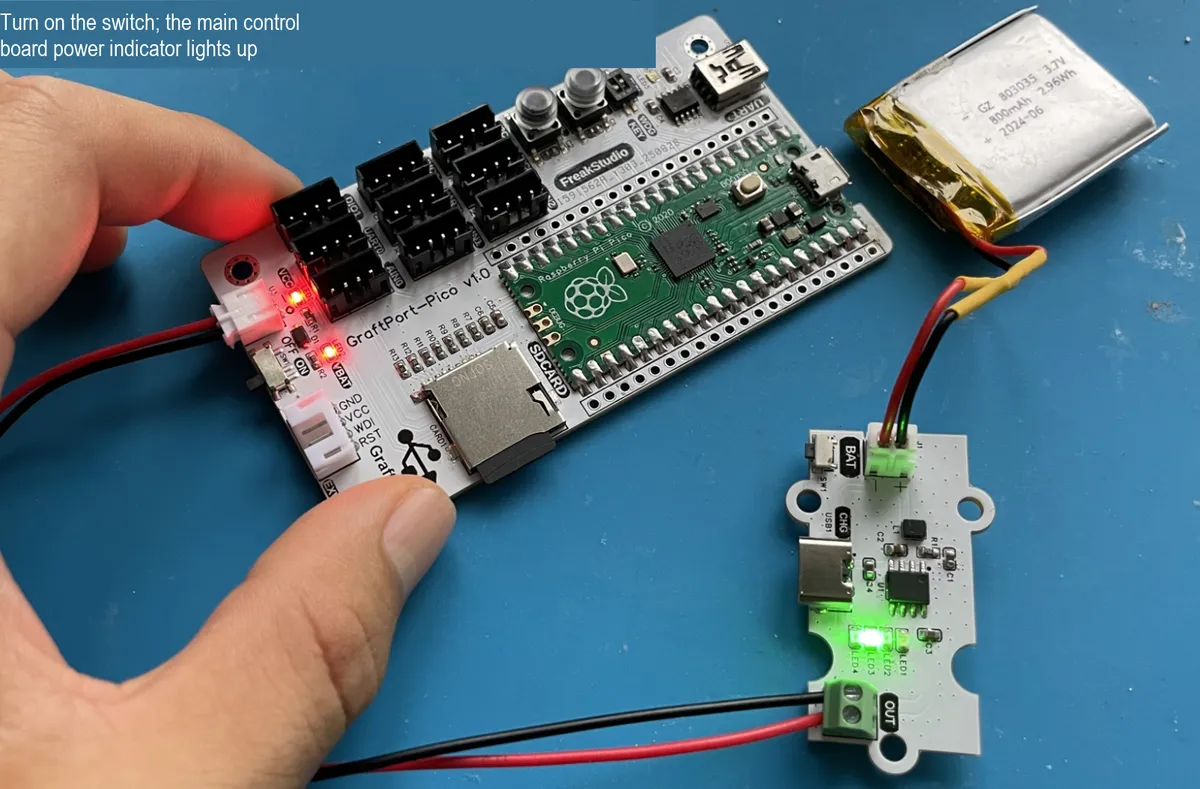
3.3 Structural Assembly
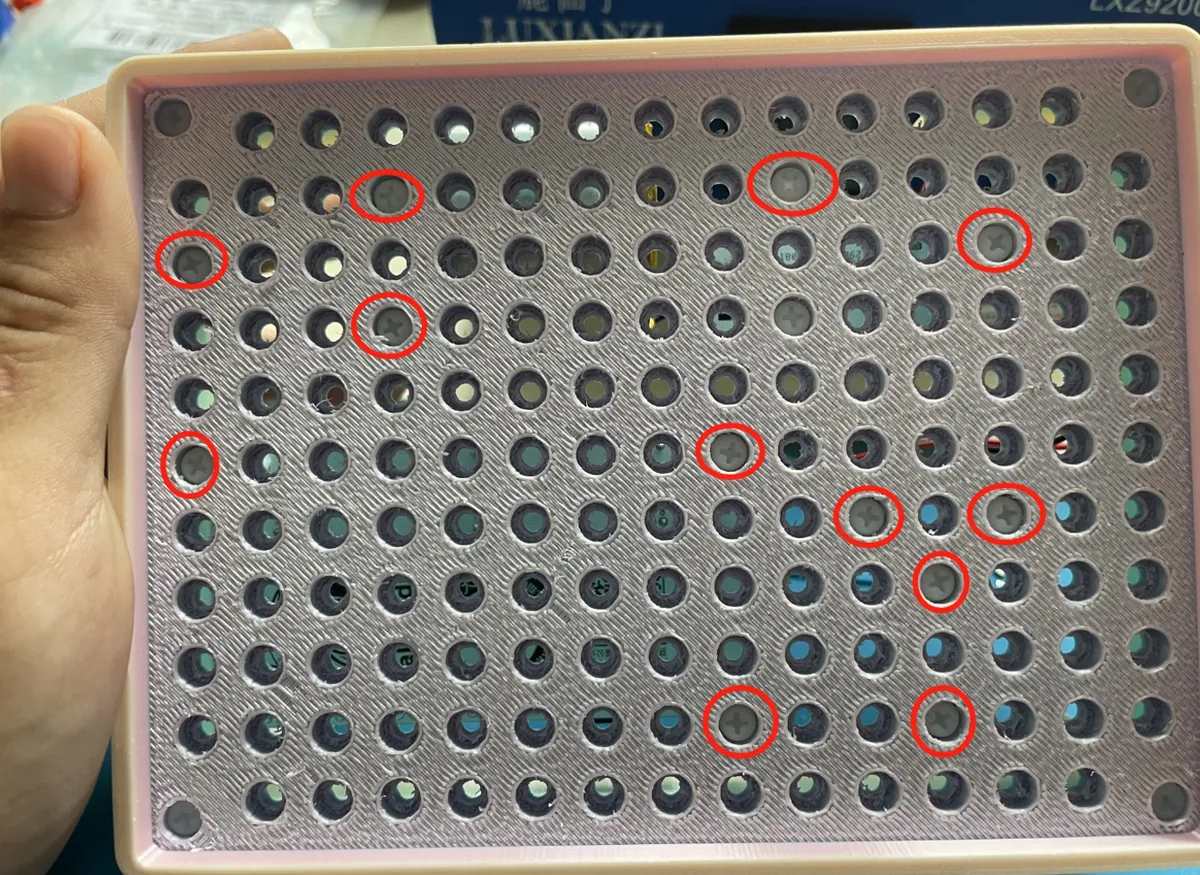
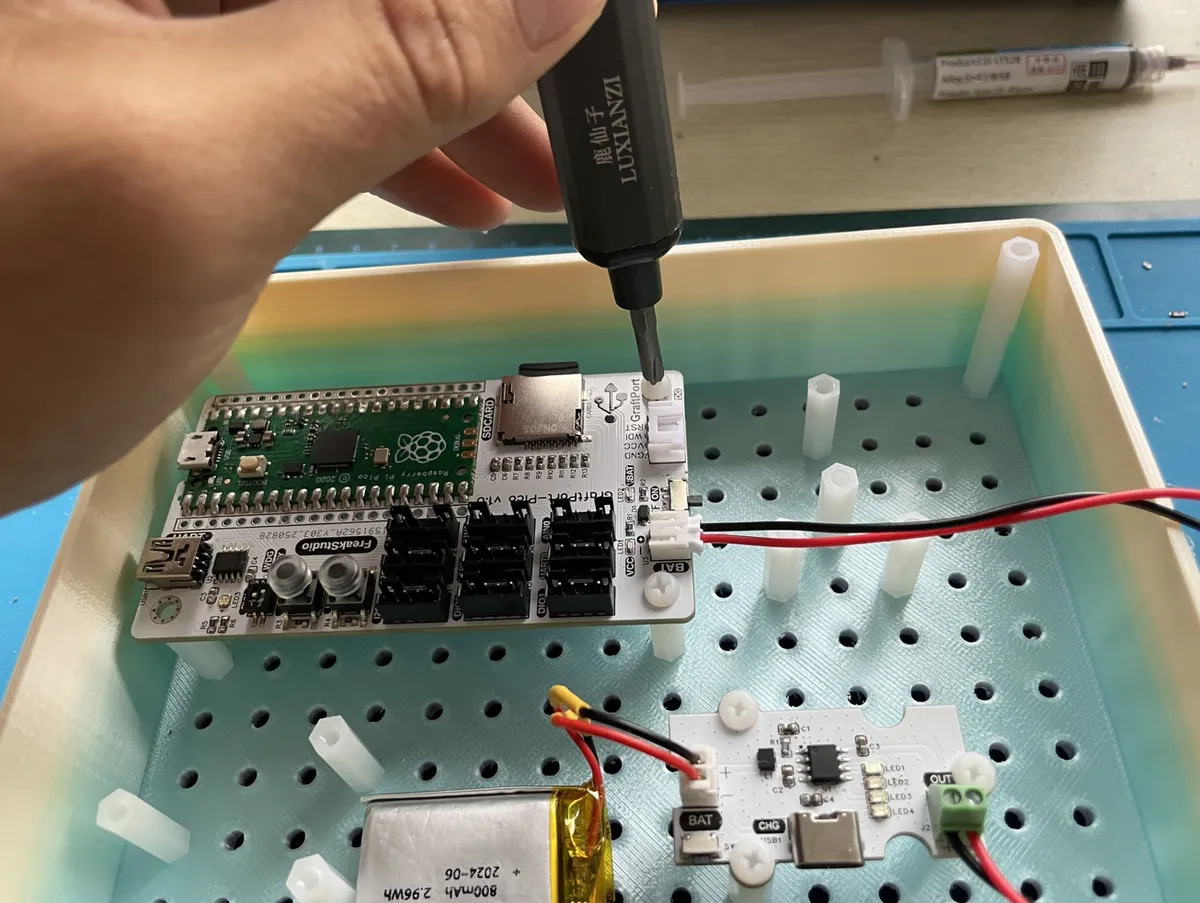
First, use M3 plastic pillars to fix each module and the main control board to the bottom plate of the housing (M3 screw holes are pre-drilled on both the main control board and the housing):
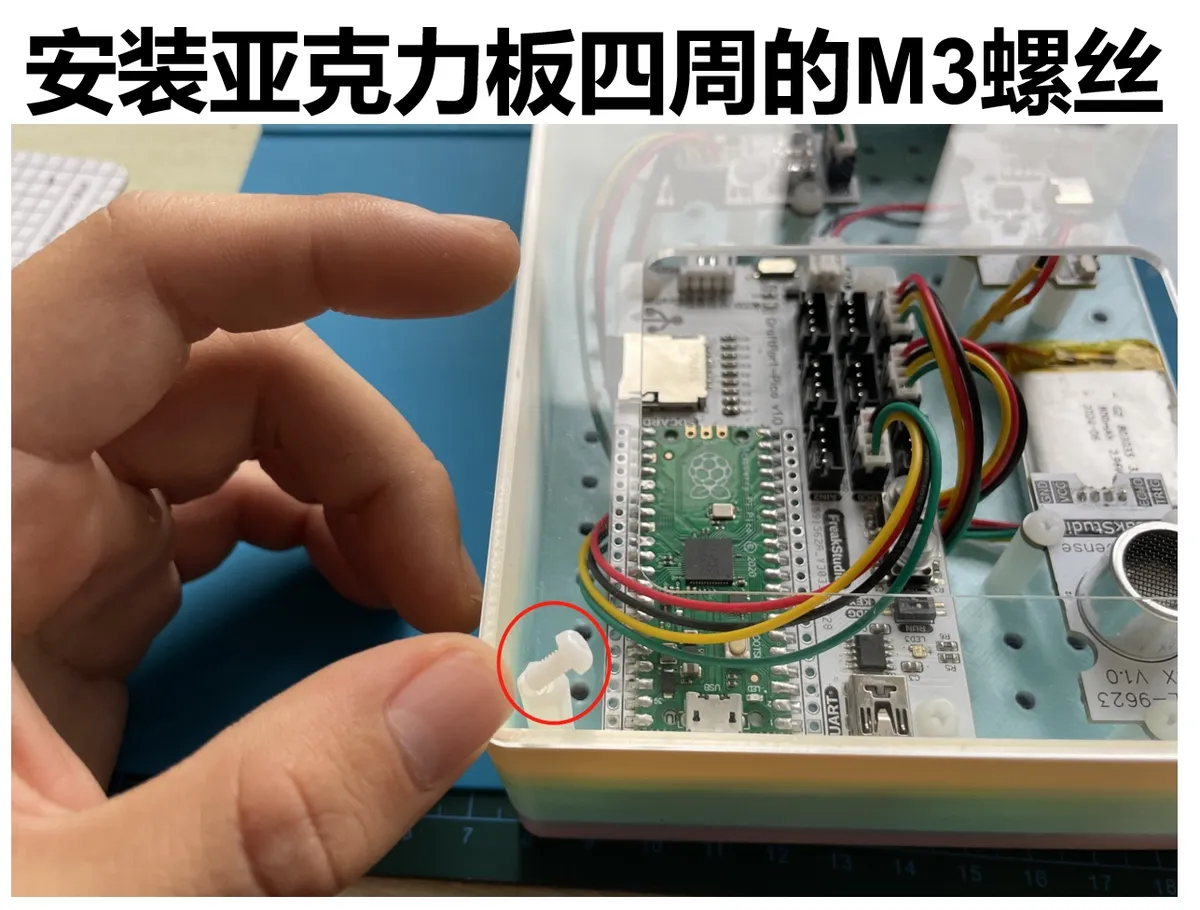
Next, secure the periphery of the housing with M3 plastic pillars, then screw in M3 screws at the corresponding positions to complete the assembly:
3.4 Notes
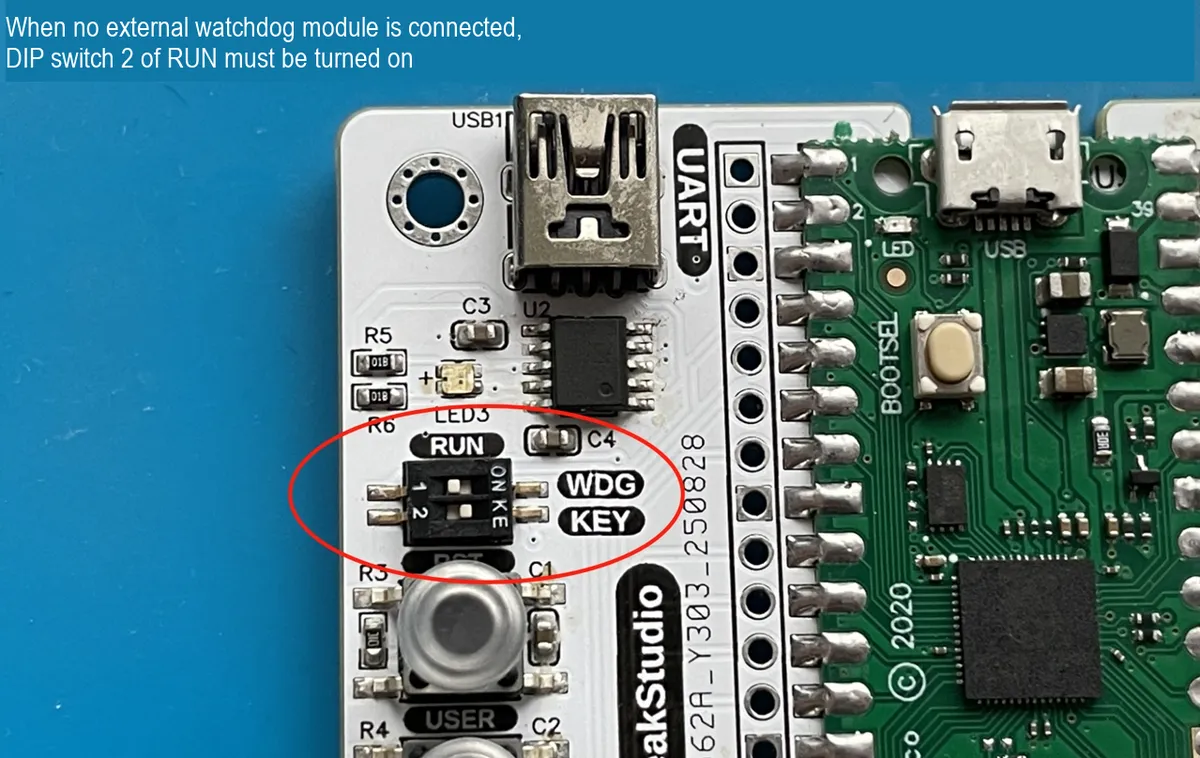
When the main control board is not connected to an external watchdog module, the RUN DIP switch 2 must be turned on:
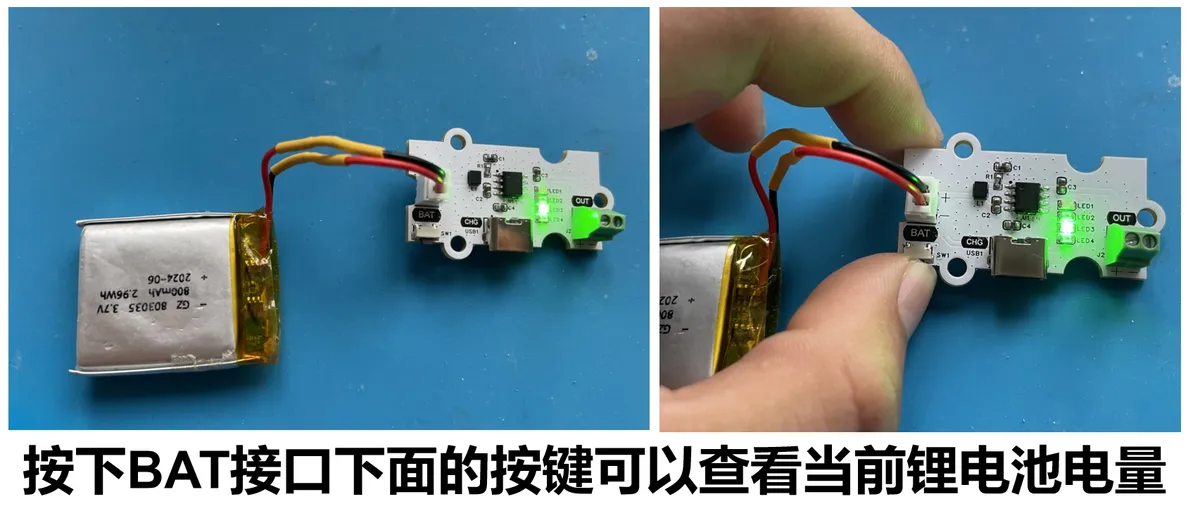
The lithium battery charge-discharge module supports power level display, and you can charge it via the Type-C interface below:
4. Software Environment
- Core Firmware:
MicroPython v1.23.0(adaptation required forGraftPort-RP2040, with support formachine.Pin/I2C/Timermodules and soft timer scheduling); - Development IDE:
PyCharm(used for code writing, uploading and debugging, supportsMicroPython REPLinteraction, and requires the installation of theMicroPythonplugin); - Auxiliary Tools:
Python 3.12+(optional, for running local helper scripts such as firmware flashing scripts);mpy-cross v1.23.0(used to. pyfiles compile to. mpyto reduce the memory usage of the development board, optional);mpremote v0.11.0+(replacesThonnyfor file upload, supports command-line operations, optional);
- Dependency Modules: No additional third-party libraries are required; all drivers (including but not limited to
passive_buzzer_driver.py) are custom-implemented and provided along with the project files.
5. File Structure
countdown_alarm
├─ LICENSE
├─ tools
│  ├─ dependency_analyzer.py
│  ├─ mpy_compiler.py
│  ├─ mpy_uploader.py
│  └─ README.md
├─ firmware
│  ├─ board.py
│  ├─ boot.py
│  ├─ conf.py
│  ├─ main.py
│  ├─ tasks
│  │  ├─ maintenance.py
│  │  ├─ time_task.py
│  │  └─ __init__.py
│  ├─ libs
│  │  ├─ __init__.py
│  │  └─ scheduler
│  │     ├─ scheduler.py
│  │     └─ __init__.py
│  └─ drivers
│     ├─ __init__.py
│     ├─ ssd1306_driver
│     ├─ passive_buzzer_driver
│     └─ DS1307_driver
├─ examples
│  └─ README.md
└─ docs
6. Description of Key Documents
main.py: the project entry point, whose core logic includes:- Power on and delay for 3 seconds (wait for hardware to stabilize), then initialize the onboard
LED,OLED, real-time clock, stop button, buzzer, and keys (including interrupt registration); - Hardware initialization:
OLED,DS1307real-time clock, buzzer, stop button; - Create
TimeTaskinstances (pass in hardware drivers and configuration parameters) and encapsulate them into scheduler tasks with periods of 1 second and 5 seconds; - Initialize
Scheduler(software timer with a scheduling period of 50ms), add tasks and start scheduling, then enter an infinite loop; - Define
button_handlerinterrupt callback (for toggling task start/stop),fatal_hangblocking function (for fatal error handling).
- Power on and delay for 3 seconds (wait for hardware to stabilize), then initialize the onboard
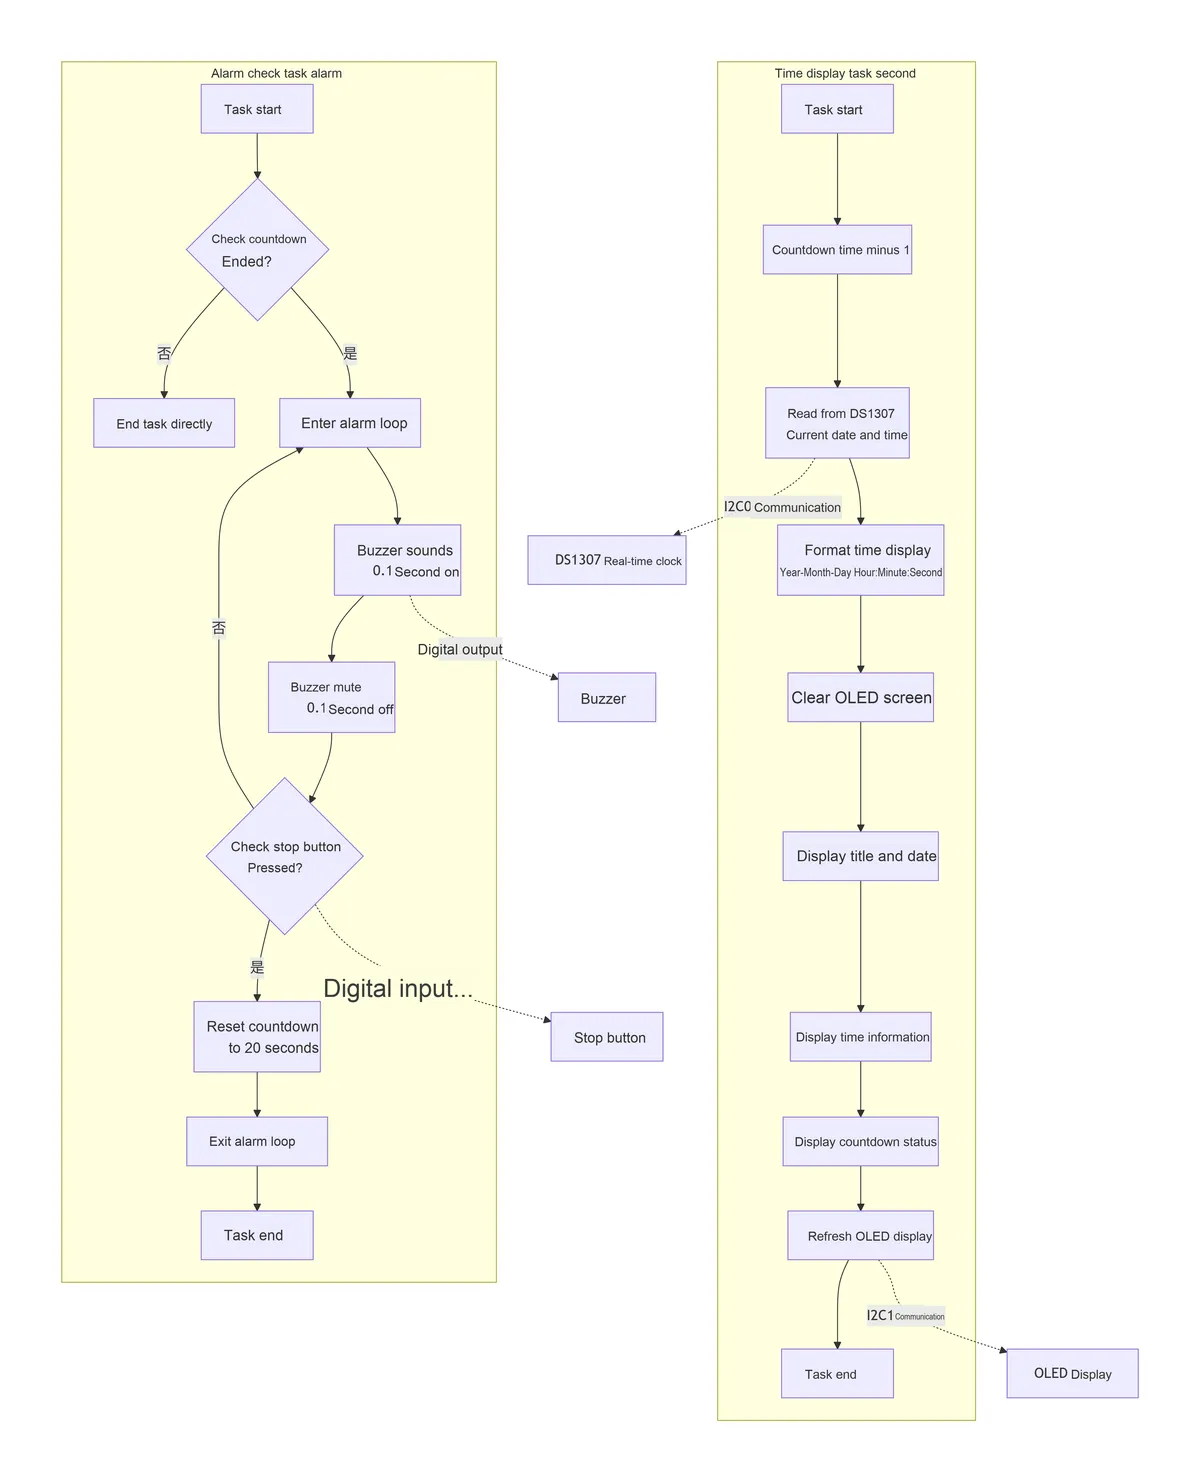
tasks/time_task.py: Core business tasks.TimeTaskclass key logic:__init__: Initialize the hardware instance and countdown time;second: executed once per second, reads the real-time clock and updatesOLEDdisplay;alarm: Executed every 5 seconds to check the countdown status and trigger an alarm.
tasks/maintenance.py: System maintenance module, key functions:task_idle_callbackTriggered when the scheduler is idle; if the detected memory usage is lower thanGC_THRESHOLD_BYTES(100000 bytes by default), it will executegc.collect ();task_err_callback: Triggered when an exception is thrown by a task, it prints the full traceback (preferentially viasys.print_exception), then delays forERROR_REPEAT_DELAY_S(1 second by default) to prevent screen flooding;- Supports reading configuration from
conf.py, uses default values when no configuration is available to ensure compatibility.
drivers/xxx_driver: hardware driver modules, all adopting the "instantiation + method call" pattern:ds1307_driver:The DS1307class communicates viaI2Cand provides adatetimeattribute to retrieve the current time;ssd1306_driver:The SSD1306_I2Cclass controlsI2C-basedOLEDdisplays and provides methods includingfill,text,show, etc.
board.py: a board-level pin mapping module that defines theBOARDSdictionary (including the fixed pins ofGraftPort-RP2040and the mapping ofI2C/DIOinterfaces), provides interfaces such asget_fixed_pinandget_i2c_pins, and realizes the decoupling of board-level configuration and business logic.conf.py: User configuration file. The parameters that need to be manually defined by the user include:I2C_INIT_MAX_ATTEMPTS(number of retries for sensor initialization),I2C_INIT_RETRY_DELAY_S(retry interval in seconds),ENABLE_DEBUG(debug print switch),AUTO_START(whether the task starts automatically). If not defined, the system will use the default values.
7. Core Ideas of Software Design
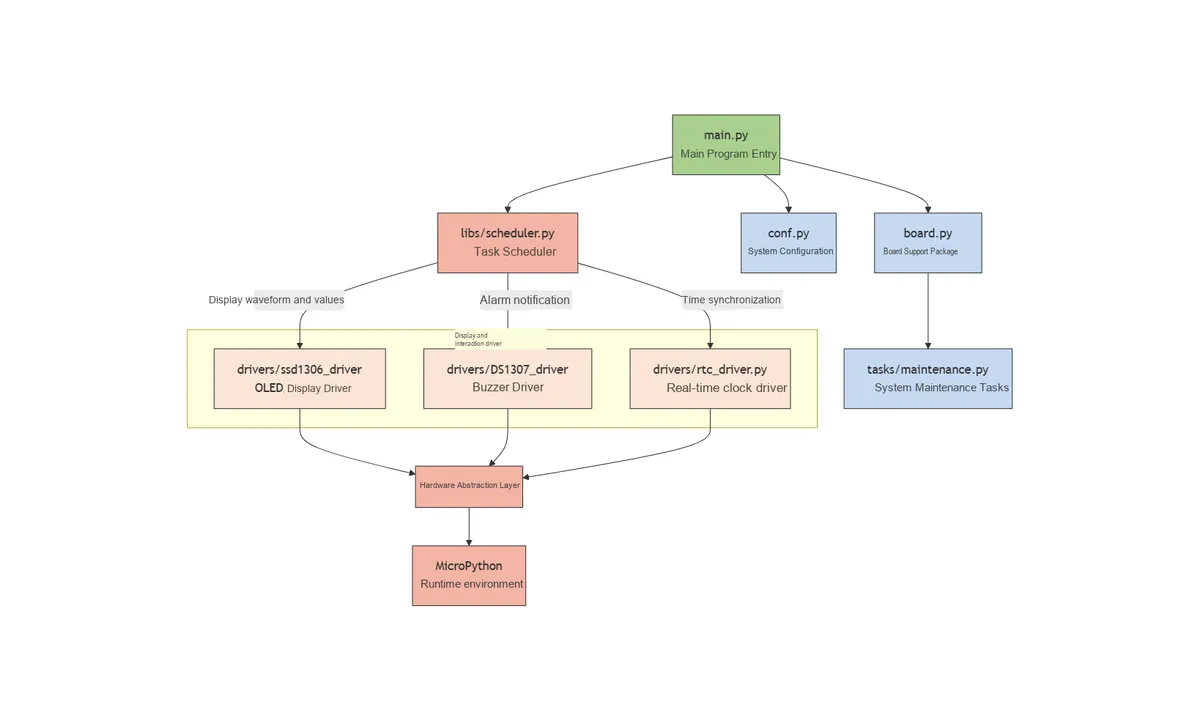
- System layering concept: Adopt a "four-tier architecture" to achieve decoupling and reuse
Hardware Driver Layer (
drivers/): only responsible for low-level hardware control and contains no business logic. For example:the DS1307real-time clock driver only cares about "how to read time data viaI2C" and does not care about "when to display"; theSSD1306 OLEDdriver only cares about "how to draw text and graphics on the screen" and does not care about "what content to display"; the buzzer driver only cares about "how to control GPIO to outputPWMsignals" and does not care about "when to alarm"; the stop button driver only cares about "how to detectGPIOinput status" and does not care about the "business logic after being pressed".- Task Logic Layer (
tasks/): Implements business logic based on the interfaces provided by the driver layer. For example,TimeTaskonly calls theds1307.datetimeattribute to obtain time data, without concerning itself with the I2C address of the real-time clock; it only callsssd1306.text ()andshow ()to display content, without concerning itself with the memory management of theOLED; it only callsbuzzer.value ()to control the alarm sound, without concerning itself with the driver circuit of the buzzer; it only callsstop.value ()to detect the stop signal, without concerning itself with the debouncing algorithm of the button. - Scheduling Control Layer (
libs/scheduler.py): Provides general task management capabilities; - Entry layer (
main.py): responsible for "assembling" all layers, initializing hardware → creating tasks → starting scheduling.
- Task Logic Layer (
- Principles for Module Division: High cohesion, low coupling, facilitating easy maintenance and expansion
- High Cohesion: Each module is only responsible for the Single Responsibility Principle;
- Low coupling: Modules interact through "interfaces" instead of directly manipulating internal variables;
- Scalability: When adding new hardware, you only need to add code at the corresponding layer without modifying the existing logic.
- Core Mechanism: Ensuring System Stability and User Experience
- Task scheduling mechanism: Multi-task coordinated operation is implemented based on soft timers;
- Real-time update mechanism: The time information is updated every second to ensure display accuracy;
- Interactive feedback mechanism: immediate response to key interrupts, with clear and definite alarm status;
- Fault-tolerant mechanism: All critical operations are wrapped with
try-exceptto avoid single points of failure.
- Task execution process: The task execution process is as follows:
8. Instructions for Use
8.1 Hardware Connection
Connect the main control board, each sensor module and the battery according to the connection method specified in the "hardware requirements";
8.2 Run the Project (Using PyCharm + MicroPython Plugin)
Open PyCharm and install the corresponding MicroPython plugin.
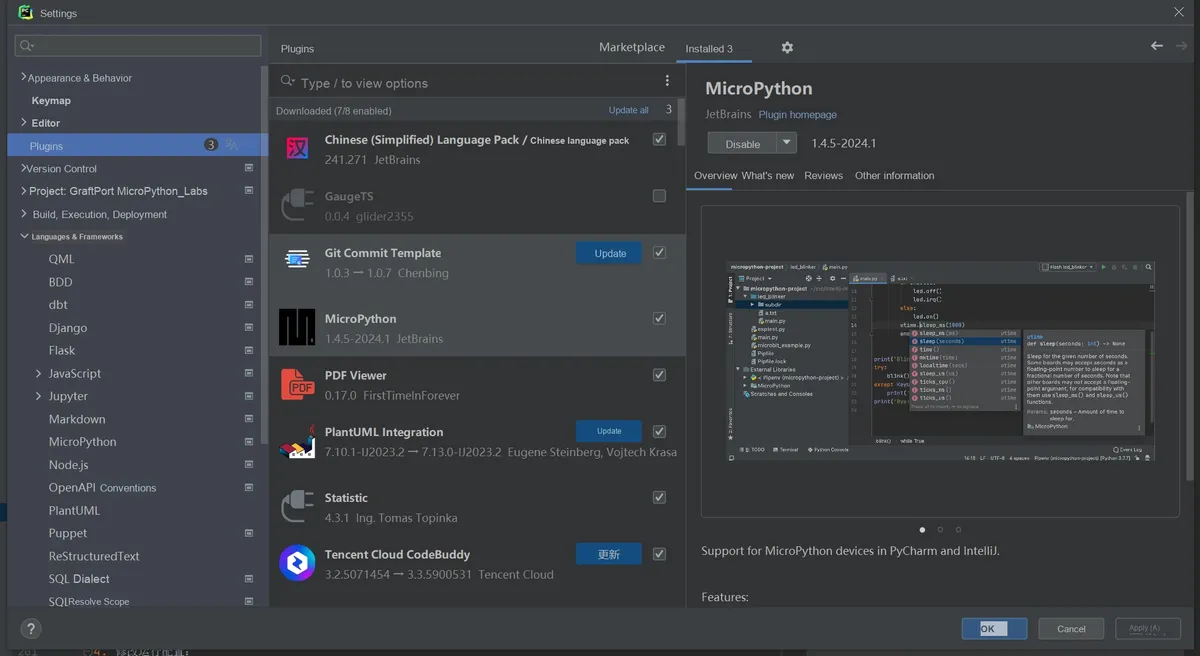
In the plugin, select Target Device (Target Device) as RP2040, and enable Auto-detect device path (Auto-detect device path).
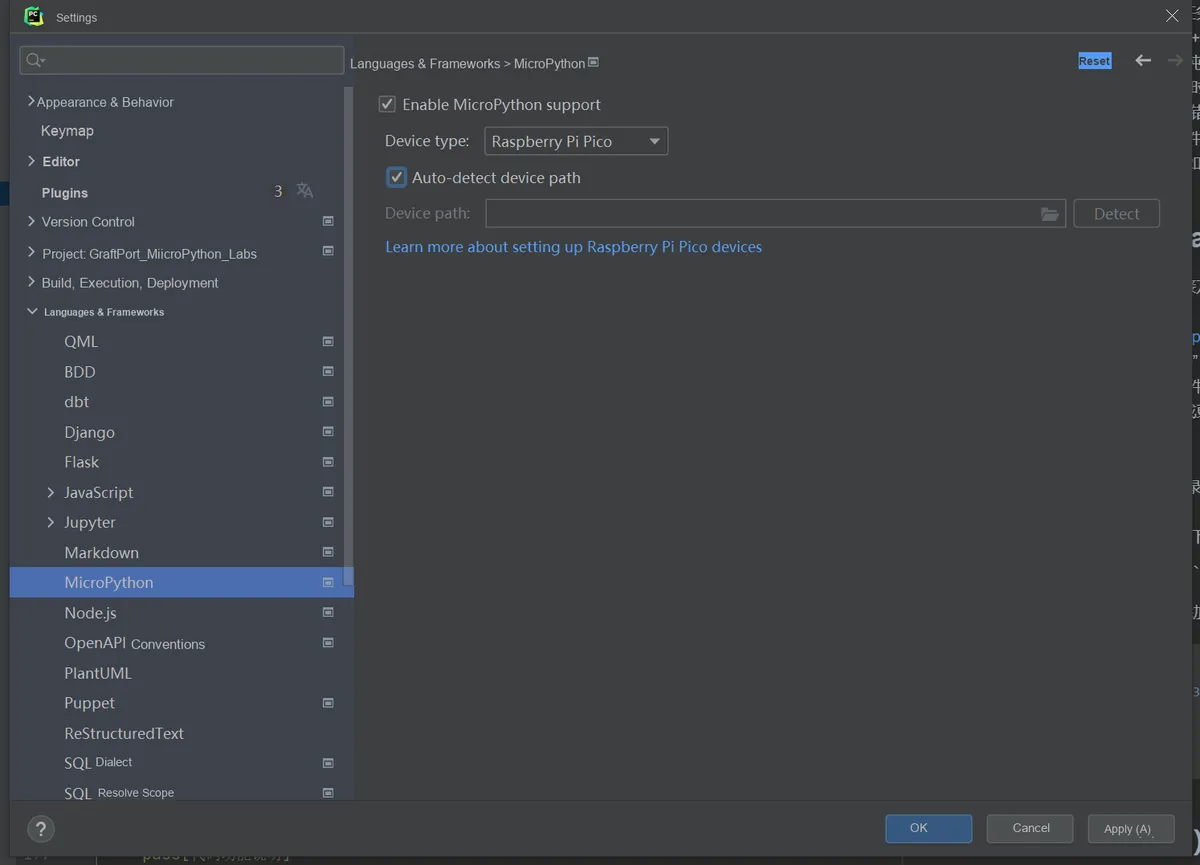
Set Project/firmware as the project root directory.
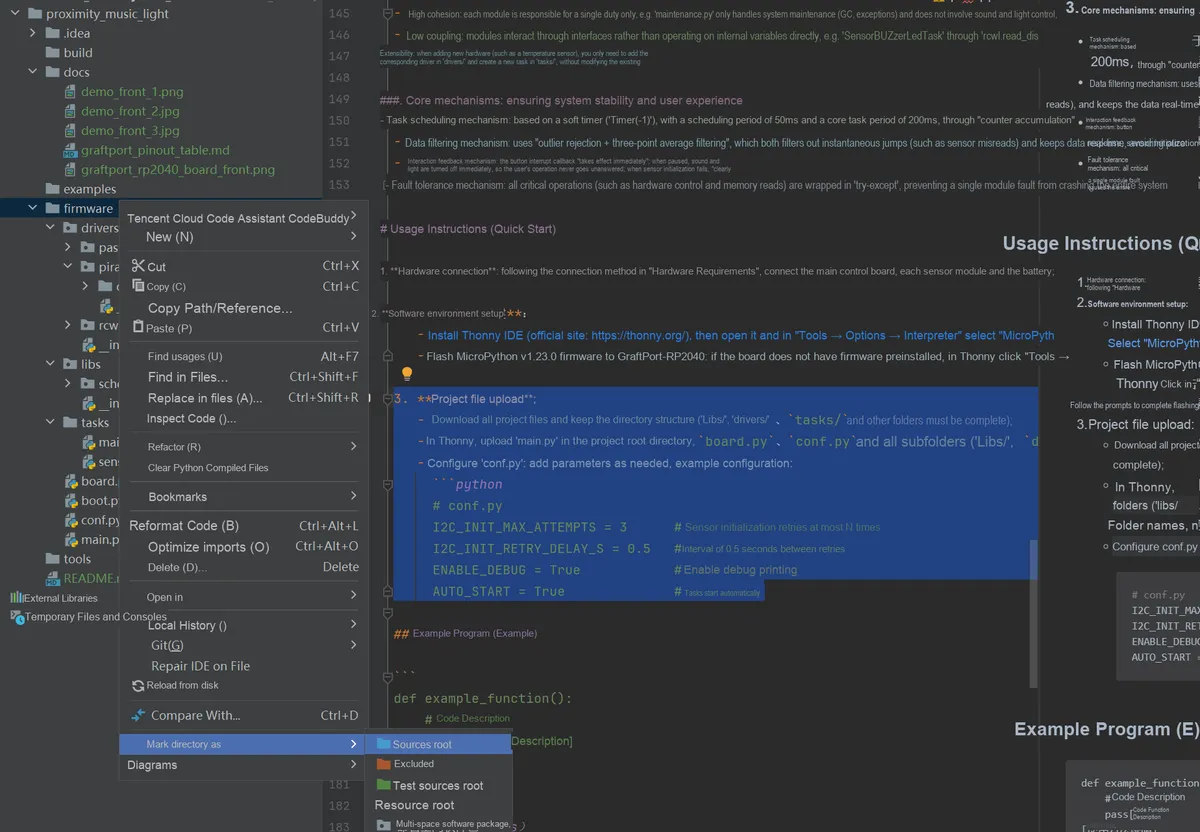
Modify the runtime configuration:
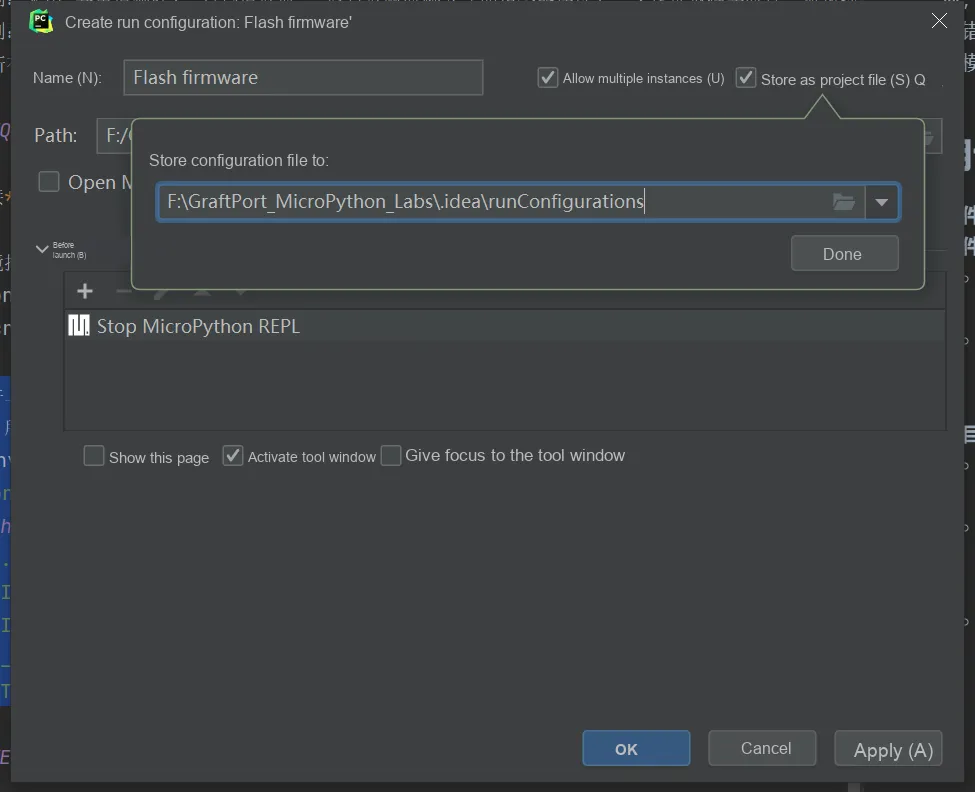
- Check Allow multiple instances (
Allow multiple instances) - Select Store as Project File (
Store as project file) - Click OK to save the configuration.
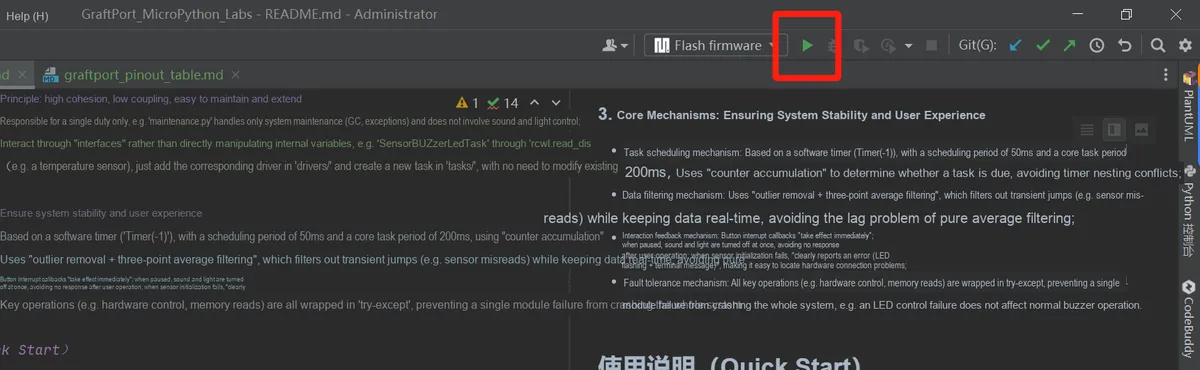
Click the IDE green triangle button in the upper right corner to run, and you can start uploading the firmware and executing the project.
8.3 Modification of Running Configuration
You can configure conf.py, modify or add parameters as needed, for example:
# conf.py example configuration
I2C_INIT_MAX_ATTEMPTS = 3      # Maximum number of sensor initialization retries
I2C_INIT_RETRY_DELAY_S = 0.5   # Interval between retries (seconds)
ENABLE_DEBUG = True            # Whether to enable debug printing
AUTO_START = True              # Whether to run tasks automatically at startup
8.4 Functional Testing
- Time display: Check
OLEDwhether it correctly displays the current time; - Countdown function: Verify that the countdown proceeds and displays correctly;
- Alarm function: Wait for the countdown to end, check whether the buzzer gives an alarm, and verify whether pressing the stop button can stop the alarm;
- Button Toggle: Press the onboard button to pause the task (stop time update), and press it again to resume.
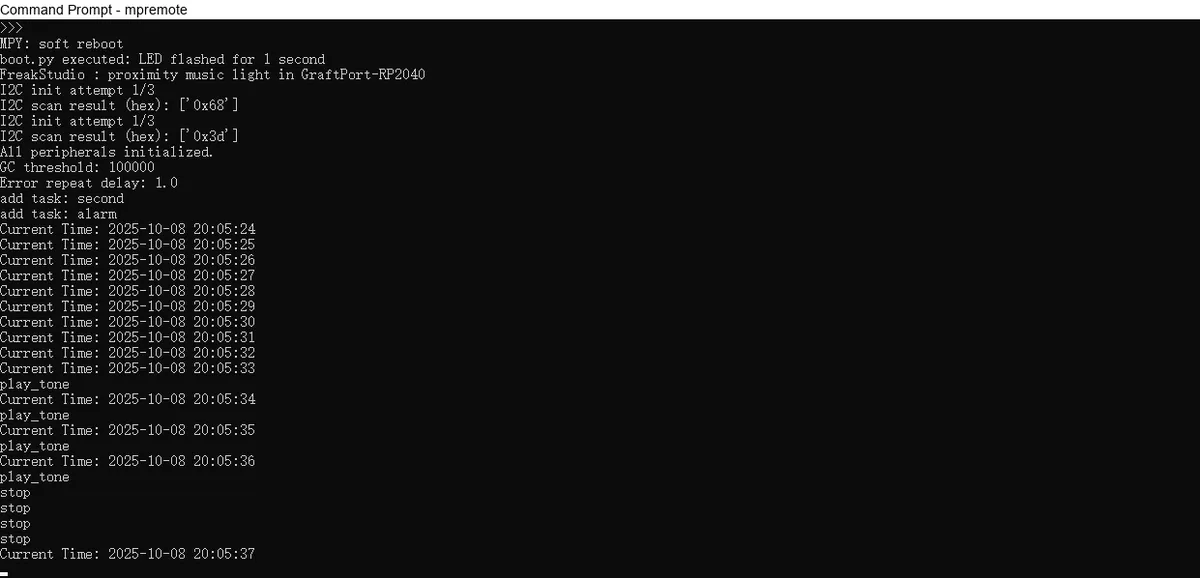
When conf.py is configured unchanged and the hardware connection is normal, the program can run properly.
The terminal output is as follows:
8.5 Debugging and Troubleshooting
- If the function malfunctions, ensure that
ENABLE_DEBUG = True, and then check the debug information in the terminal; - If the time display is abnormal, check the
DS1307module connection and battery power supply; - If
OLEDdoes not display, check whether theI2Caddress is correct (0x3cor0x3d) and whether theI2Cbus is normal; - If the alarm does not work, check the connection status of the buzzer and the stop button.
9. Sample Program
There are no other reference sample codes for this project, you can directly make modifications in the firmware folder.
10. Notes
- Sensor-related:
DS1307module requires battery backup to ensure that the time will not be lost after power-off;- You need to set the correct time when using it for the first time.
- Hardware Connection Related:
- Note
the I2Cdevice address settings to avoid address conflicts; - Pay attention to the polarity when connecting the buzzer.
- Note
- Software Version Related:
MicroPython v1.23.0 or later version must be used;- Debug printing consumes a certain amount of memory, so it is recommended to disable it in formal use scenarios.
- Function Usage Related:
- The task cycle shall be adjusted according to actual needs; an excessively short cycle may increase the system load;
- The alarm volume can be adjusted by changing the driving voltage of the buzzer according to the actual environment.
11. Version Record
- v1.0.0 (2025-11-03): Initial version completed, with basic functions implemented and documentation finished:
- Supports real-time time display
- Supports the countdown function
- Implement the sound alarm and stop functions
12. Contact the Developer
If you have any questions or need assistance, please contact the developer via the following channels :
📧 Email: 10696531183@qq.com
💻 GitHub: https://github.com/FreakStudioCN
13. Licensing Agreement
In this project, except for machine and other MicroPython official modules (MIT License), all driver and extension codes written by the author are released under the Creative Commons Attribution-NonCommercial 4.0 International (CC BY-NC 4.0) Licensing Agreement.
You are free to:
- Share — copy, distribute the work in any medium or in any form
- Derivative Works — to modify, transform, or create based on the Work
Only the following conditions shall be complied with:
- Attribution — You must give appropriate credit, provide a link to the Licensing Agreement, and indicate if changes were made to the original work. You may do so in any reasonable manner, but not in any way that suggests the licensor endorses you or your use.
- Non-commercial Use — You may not use this work for commercial purposes.
- Proper Citation Method — You may clearly indicate the source in code comments, documentation, demo videos or project descriptions.
Copyright © FreakStudio. All rights reserved.
Appendix 1: Project Source Code Download
https://github.com/FreakStudioCN/GraftPort_MicroPython_Labs/tree/main/countdown_alarm
Appendix II: Reference Materials for hardware Modules
GraftSense - RTC Real-Time Clock Module Based on DS1307 Chip
GraftSense 0.96-inch SSD1306 OLED Module
GraftSense - Passive Buzzer Module
GraftSense - Limit Switch Sensor Module
GraftPort - Raspberry Pi Pico Expansion Board (Open Edition Template Files)
Version Record
Document Version | Date of Revision | Modifier | Revised Content |
V1.0.0 | 2025-11-06 | Hou Junhan | Draft the initial version of the document. |
V1.1.0 | 2026-01-04 | Li Zisheng | Final version. |