
Contents
- 1. Firmware Burning
- 1.1 Flashing MicroPython Firmware to Raspberry Pi Pico
- 1.2 MicroPython Firmware Version on Raspberry Pi Pico
- 2. Development Environment Setup Method
- 2.1 PyCharm
- 2.2 VScode (Not Recommended)
- 2.3 Thonny (Recommended for Learning)
- 2.4 Building MicroPython Development Environment Based on VS Code in Linux Environment
- 3. Online simulation platform supporting MicroPython
- 3.1 Wokwi
- 3.2 unicorn
- 4. Graphical Programming of MicroPython
- References
- Install the software
- Version Record
1. Firmware Burning
1.1 Flashing MicroPython Firmware to Raspberry Pi Pico
In most parts of this tutorial, the Raspberry Pi used Pico adopts the MicroPython version firmware: RPI_PICO-20240602-v1.23.0.uf2.
You can download it via the following link: https://micropython.org/download/RPI_PICO/
If you do not want to use the pre-built version — for example, if you want to develop an extended C module for MicroPython — you will need to obtain the source code of MicroPython, modify it, and then cross-compile it to build your own MicroPython firmware binary file.
Introduction to Official MicroPython Firmware Versions
MicroPython officially provides a variety of firmware supporting multiple development boards (such as Pyboard, Raspberry Pi Pico, ESP32, WiPy), which can be downloaded from the following link:
https://micropython.org/download/
Meanwhile, different versions of firmware are also provided for different development boards. Taking pyboard as an example, starting from version v1.9.1, the firmware is divided into the following versions:
- Standard Version (standard)
- Double-precision floating-point version (double FP)
- Threading Version (threading)
- Double-precision floating point + threads
- Web Version (network)
The basic modules are the same across different versions, but each version has its own unique features: for example, the double-precision floating-point version supports floating-point numbers with a higher precision than the 32-bit single-precision floating-point numbers of the standard version; the thread version enables multi-tasking functionality; the network version can connect to an external Ethernet module via the SPI interface.
In addition to being categorized by development board and features, the official MicroPython firmware can also be divided into the following types:
- Official version: A version that has undergone extensive testing and features relatively stable functions
- Historical version: A previous official version with fewer functions than the current official version
- Nightly Build: A test version that includes some of the latest features but may have certain issues
The file names of official releases and historical versions only consist of: development board name + timestamp + version number, for example: ESP32_GENERIC-SPIRAM-20240602-v1.23.0.bin, while the file names of daily builds additionally include the build version number, such as ESP32_GENERIC-SPIRAM-20240608-v1.24.0-preview.34.g5903ee561.bin.
In addition, for some development boards for which the official has not provided firmware but are hardware-compatible, it is rather difficult for beginners to carry out source code porting and compile. At this point, we can download firmware for some other development boards from the Chinese MicroPython Community via the following link:
https://github.com/micropython-Chinese-Community/MicroPython_firmware
Currently, the firmware versions for development boards available in the Chinese community are as follows:
- STMicroelectronics Boards
- STM32L476DISC
- STM32F429DISC
- STM32F4DISC
- STM32F411DISC
- STM32F7DISC
- STM32F769DISC
- NUCLEO_L476RG
- NUCLEO_F091RC
- NUCLEO_F401RE
- NUCLEO_F411RE
- NUCLEO_L432KC
- NUCLEO_F446RE
- NUCLEO_F746ZG
- NUCLEO_F767ZI
- NUCLEO_H743ZI
- nordic
- nRF52840 DK
- PCA10040
- microbit
- TEXAS INSTRUMENTS Boards
- CC3200-LAUNCHXL
- MSP-EXP432P401R
- Third party boards
- PYB Nano V11/V2
- PYBCN V2
- ESP-MP-01
- CANNON
- Neutron
- XMC4700 Relax Kit
- Seeed Arch BLE
- Seeed Arch Link
In addition, the MicroPython Chinese Community also provides some relevant sample codes and materials:
- Common sensor and other component drivers https://github.com/micropython-Chinese-Community/mpy-lib
- MicroPython Task Scheduler
- https://github.com/micropython-Chinese-Community/micropython-simple-scheduler
- https://github.com/micropython-Chinese-Community/micropython-simple-scheduler
- MicroPython Chinese Tutorial:
https://github.com/micropython-Chinese-Community/MicroPython_ChineseReference
https://github.com/micropython-Chinese-Community/MicroPythonChineseReference
When flashing the firmware, we first need to hold down the BOOTSEL button on the Raspberry Pi Pico, then connect the Raspberry Pi Pico to the computer via a USB cable while keeping the button pressed. Note: If the computer does not prompt that a new device is connected, it is very likely that the USB cable you are using is a charging cable instead of a data cable.
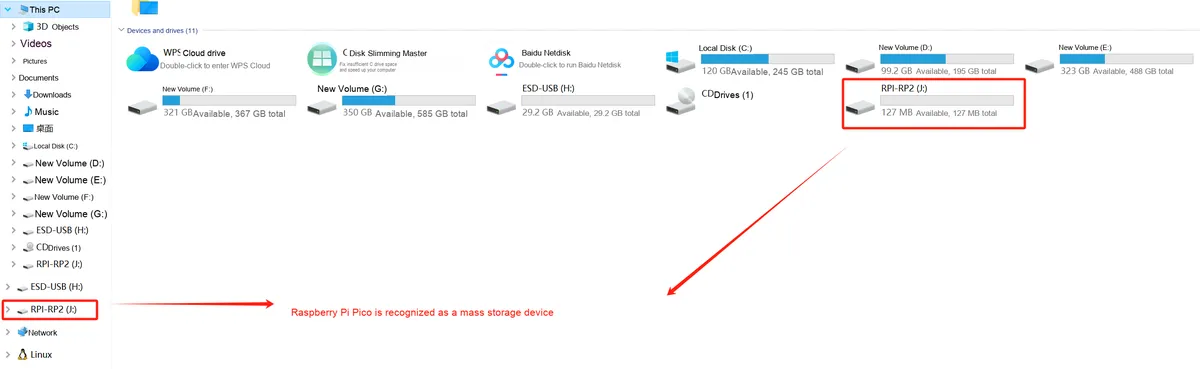
After the Raspberry Pi Pico is connected to the computer via USB, the Pico will be recognized as a mass storage device. Open This PC and you will find a new RPI-RP2 volume appears:
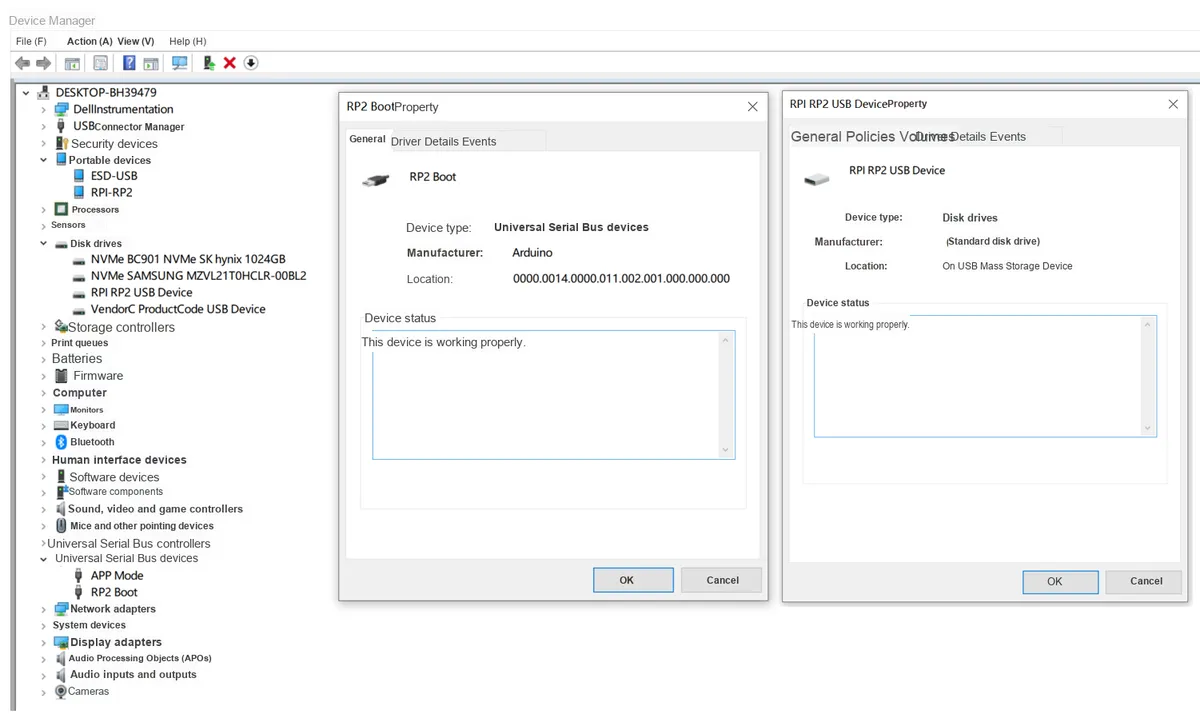
Open Device Manager, and by default two devices will appear: Universal Serial Bus device and disk drive:
Simply drag the prepared firmware RPI_PICO-20240602-v1.23.0.uf2 file into the drive that appears after plugging in the Pico, and this will program the firmware into the flash memory of the Raspberry Pi Pico:
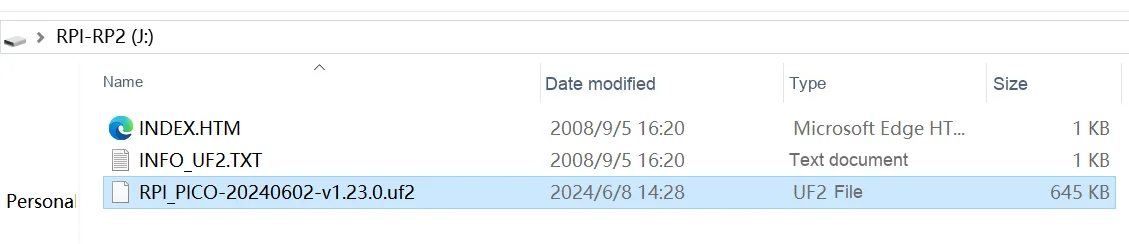
Programming the UF2 file into the flash takes a few seconds. Once completed, the development board will automatically restart, causing the RPI-RP2 drive to disappear, and then MicroPython will start running.
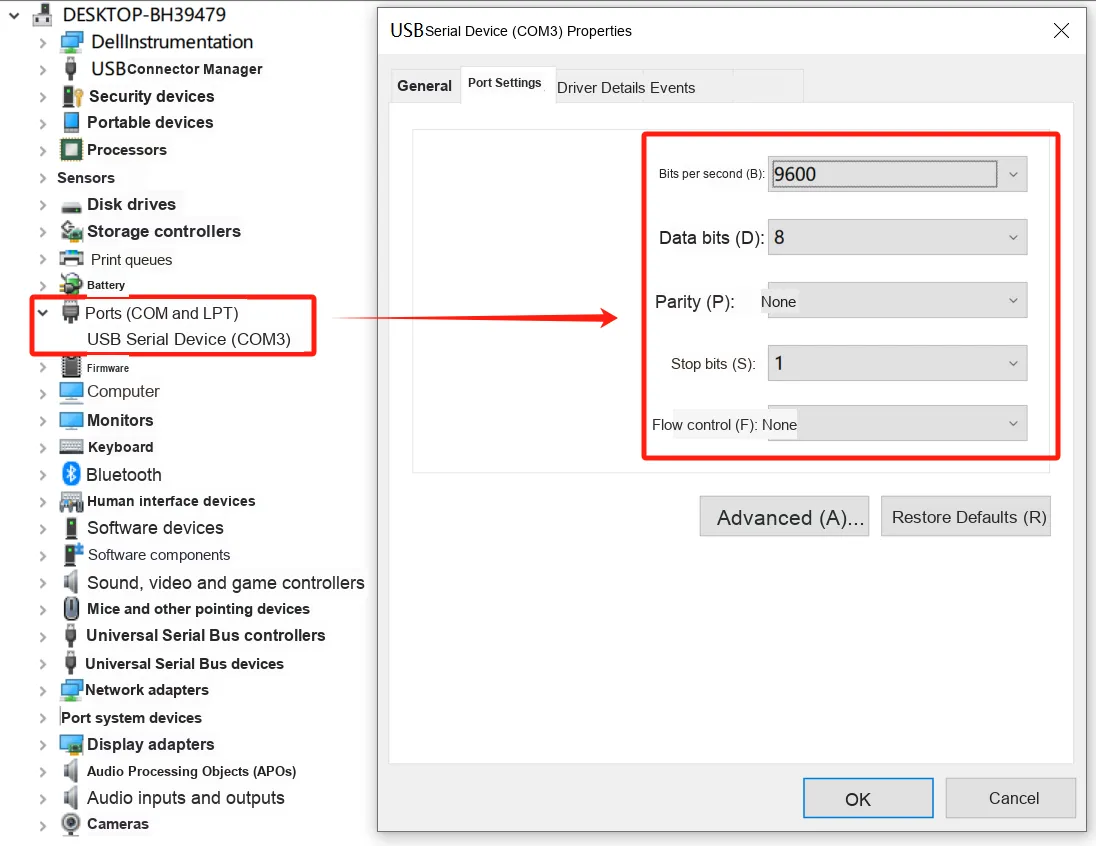
Open Device Manager to check the ports, and you will find a newly appeared COM port in Device Manager. We can use this port (actually the USB virtual serial port on the Raspberry Pi Pico) to access the REPL (similar to a command line) of the Raspberry Pi Pico.
1.2 MicroPython Firmware Version on Raspberry Pi Pico
Some of you may have noticed that the latest version of the MicroPython firmware currently is v1.27.0+, so why do most of the codes in our tutorials use v1.23.0?
Here, we have listed the change table for MicroPython firmware versions v1.23.0 to v1.27.0 for the Raspberry Pi Pico:
| Version (release date) | Main changes related to rp2 / Pico (summary) | Impact on Pico users (brief) | Recommended action |
|---|---|---|---|
| v1.23.0 (≈2024-05/06) (GitHub) | Introduces dynamic USB device (machine.USBDevice); performance optimizations for the VM and runtime (about +10%); improved DMA access to PIO/SPI FIFOs; fixes for threads, lightsleep, UART IRQ latency, etc. | USB device/CDC is more flexible (configurable at runtime); better performance and I/O stability, more reliable lightsleep/IRQ behavior. Positive impact on Pico W network/USB interaction. | If you use USBDevice or deep sleep/IRQ, upgrade and run regression tests (USB behavior under lightsleep, UART interrupt latency). |
| v1.24.0 (2024-10-26) (GitHub) | Supports RP2350 (Pico 2 / RPi Pico2), strengthens the RISC-V native emitter (RV32IMC), unifies TinyUSB CDC code, portable UART IRQ API; rp2 updated to pico-sdk v2.0.0; USB stays active during lightsleep; IPv6 enabled by default, etc. | Native support for the new-generation Pico (Pico 2 / RP2350), including ARM & RISC-V modes. TinyUSB improvements make REPL/boot output more reliable after the host connects; UART IRQ interface behaves more consistently across boards. | If using Pico2/RP2350: flash the appropriate firmware and test RISC-V native features, PIO, PSRAM (if present); migrate UART IRQ code to use the new API; verify TinyUSB boot buffering and REPL behavior. |
| v1.25.0 (2025-04-15) (GitHub) | Adds ROMFS (read-only built-in, memory-mapped filesystem) support (.mpy can be executed in place) and provides the mpremote romfs tool; enables DTLS on rp2 (mbedTLS update) and improves networking and lwIP; enhancements for RP2350 (PIO side_pindir, more flexible SPI, WPA3, etc.). | ROMFS can significantly reduce RAM usage and speed up module imports, suitable for memory-sensitive Pico projects; networking (including DTLS) is more capable on Pico W/2W but uses more memory; RP2350 peripherals and Wi-Fi features are more complete. | Evaluate packaging commonly used libraries/resources into ROMFS (on boards with a ROMFS flash partition, or enable it yourself); if using TLS/DTLS, run memory/concurrency tests; verify WPA3, mDNS and network reliability on Pico W. |
| v1.26.0 (2025-08-09) (GitHub) | rp2: enables compressed error messages (saves ~3 KB); switches back to and uses the pico-sdk alarm pool (sleep/timer improvements); supports machine.I2CTarget (I²C target devices are available on rp2); Thumb/ARM native emitter improvements (RP2040 supports longer jumps). | Smaller firmware size, but error text is more compact; lightsleep and alarm implementations are more stable; I²C target devices can now be implemented in Python on Pico (rp2), with educational/prototyping value; the native compiler can generate larger/more efficient native functions (helps speed). | If you rely on full verbose error logs, note the compressed errors; re-verify low-power features/timers (alarm pool); try machine.I2CTarget for a target prototype (or as a test fixture); if using native, retest the compilation/stack impact. |
| v1.27.0 (2025-12-06) (GitHub) | Fixes DMA channel release logic; PIO supports pin wrap-around, fixes the upper-half pin issue on RP2350B; fixes alternate function configuration for pins numbered above 31; RP2350 adds alternate functions such as UART_AUX/XIP_CS1; enables hashlib.md5; updates TinyUSB to 0.19.0-24; supports Timer soft/hard interrupt callbacks; sys module is fully enabled by default. | DMA resource leak fixed, improving long-running stability; PIO development is more flexible, and high-numbered pin peripheral functions are available on Pico 2; adds MD5 hash capability; USB compatibility and stability improvements; Timer interrupt response is more flexible; sys module features can be used without extra configuration. | Test the stability of DMA-dependent projects (such as PIO data transfer, ADC batch sampling); verify high-numbered pins on Pico 2 and the PIO pin wrap-around feature; use hashlib.md5 for data verification; update USB-related code and test compatibility; adapt to the new Timer soft/hard interrupt callback feature. |
Table 1.1 Overview of Version Differences and Improvements in MicroPython Firmware (v1.23.0 → v1.27.0)
From a teaching perspective, most of the fundamentals of MicroPython remain unchanged: the Python syntax/REPL interaction model, the core machine API concepts (GPIO, ADC, PWM, basic I²C/SPI read and write operations), the module import mechanism, and the debugging/serial interaction workflow all stay consistent between versions v1.23 and v1.27. As a result, classroom examples and exercise code can be reused in the vast majority of cases without modification, or only with minor adjustments.
Only a few low-level or advanced features have changed (e. g., added RP2350 support and RISC-V native emitter, in-place execution of ROMFS. mpy, DTLS/mbedTLS updates, machine.I2CTarget (I²C slave), TinyUSB startup buffer, sys.exit ()/exception behavior and error message compression, etc.), and we will gradually update these new features in subsequent tutorials.
2. Development Environment Setup Method
2.1 PyCharm
PyCharm is an extremely user-friendly Python IDE developed by JetBrains, which is compatible with Windows, macOS and Linux operating systems. For each of these platforms, PyCharm offers two editions, namely the Professional Edition and the Community Edition, and users can choose the one that best suits their needs:
- Professional: Professional version (professional version is recommended), which is powerful and is a paid version
- Community Edition: The community version only supports Python development. It is open-source, free of charge, and sufficient for learning purposes.
Here, the Community Edition is sufficient. For the download and installation of PyCharm as well as the installation of the Chinese localization plugin, please refer to the following link:
https://blog.csdn.net/junleon/article/details/120698578
Chinese Localization for PyCharm
https://blog.csdn.net/VeryDelicious/article/details/118976379
2.1.1 MicroPython Plugin
2.1.1.1 Online Installation of the MicroPython Plugin
First, create a new folder, and I name it here as:
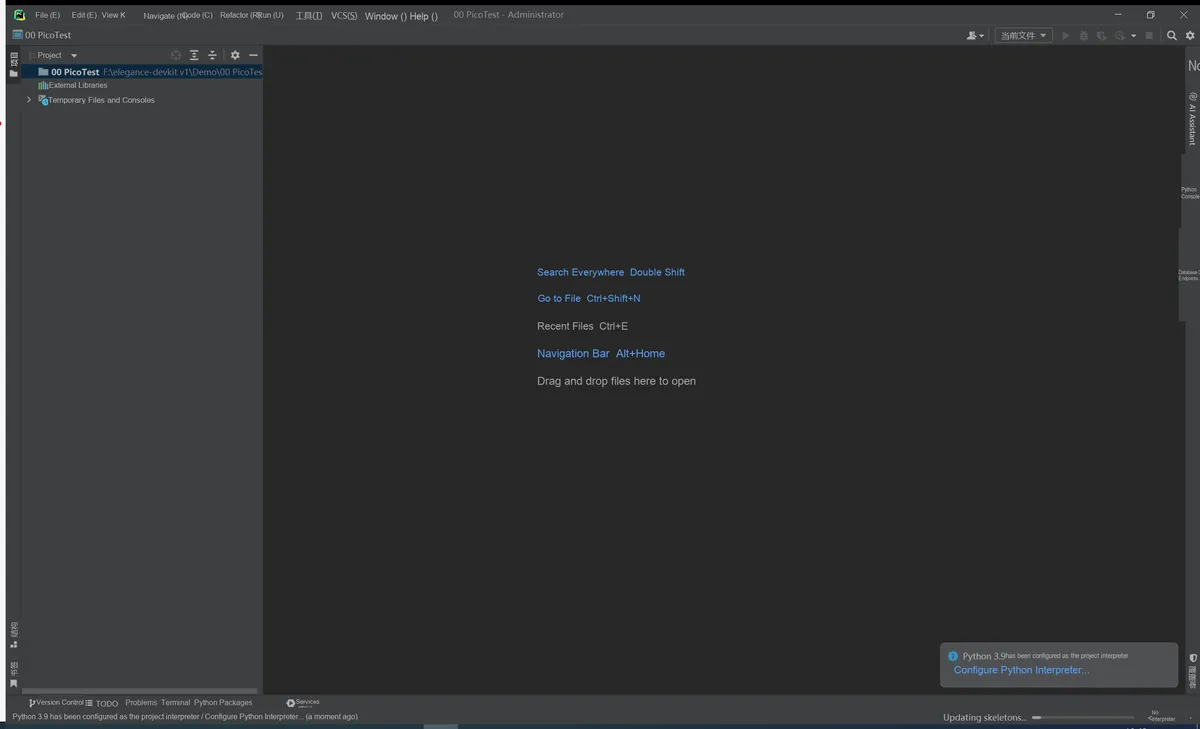
F:\elegance-devkit v1\Demo\00 PicoTestRight-click the mouse and select: Open Folder as PyCharm Project
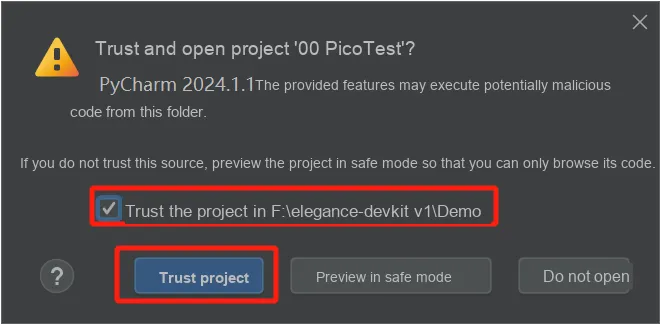
Add "Open Folder as PyCharm Project" to the right-click menu for opening folders
If the "Open Folder as PyCharm Project" option does not appear in the right-click context menu, this is because you did not select the option to add PyCharm to the right-click menu during the PyCharm installation. As a result, you cannot directly select a folder to open it as a PyCharm project; instead, you have to launch PyCharm every time, load an unnecessary project first, and then open the actual folder you want from within PyCharm.
You can fix this by modifying the registry; please refer to the following link:
Add "Open Folder as PyCharm Project" to the right-click menu for opening folders
https://www.bianchengbaodian.com/article/e02e05369cb5d3868fe4d7ddc7e1989e.html
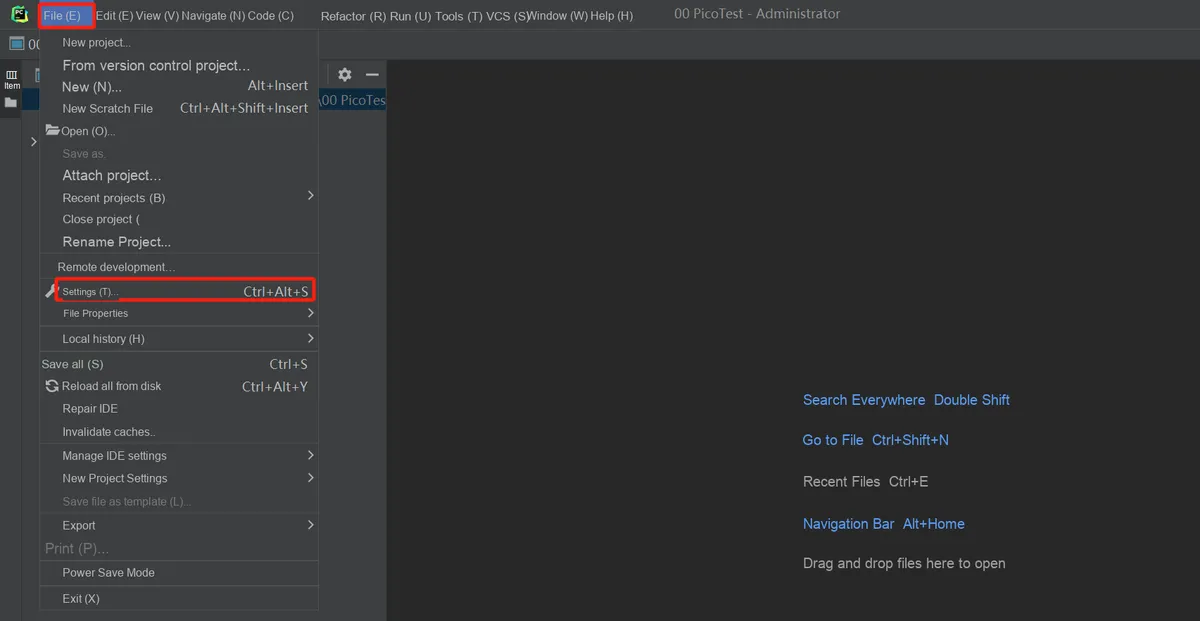
Click - File - Settings:
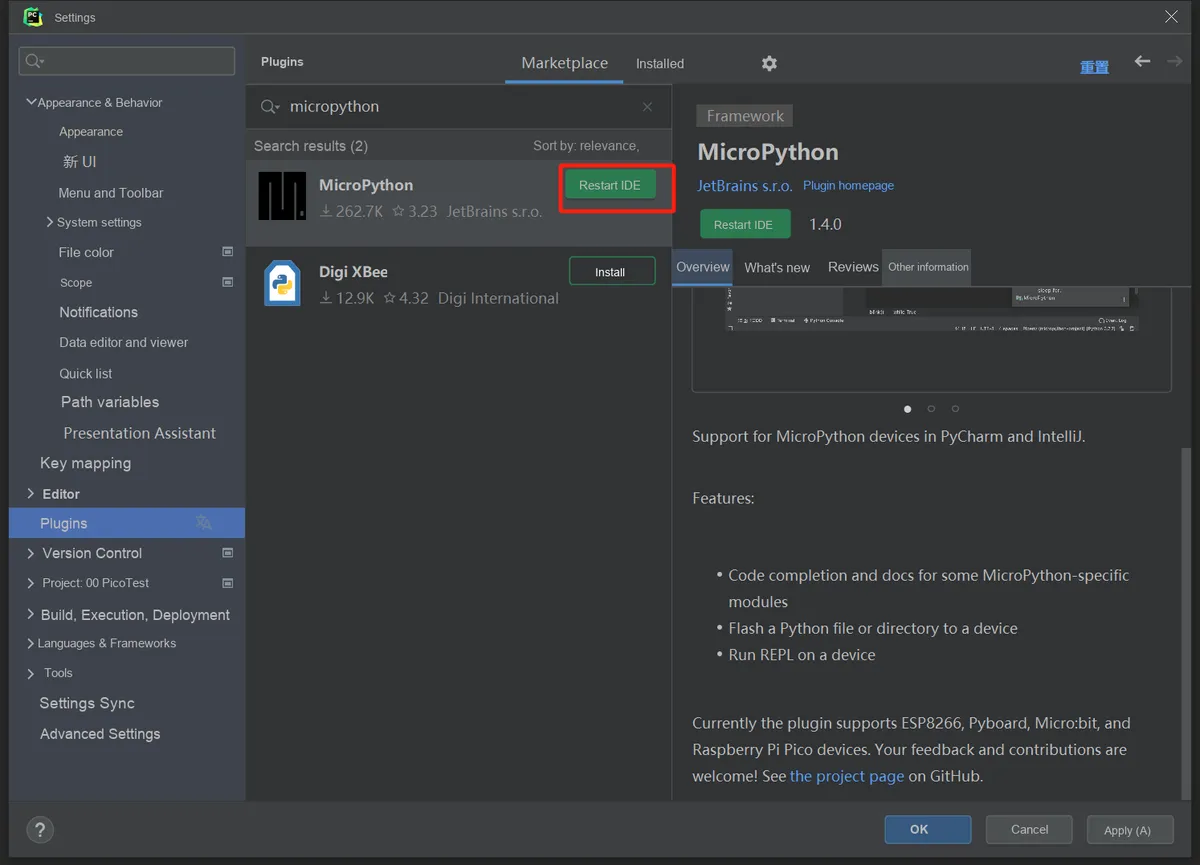
Click [Plugins], enter "micropython" in the "Search" input box; this plugin enables functions including code editing, program flashing, and REPL execution:
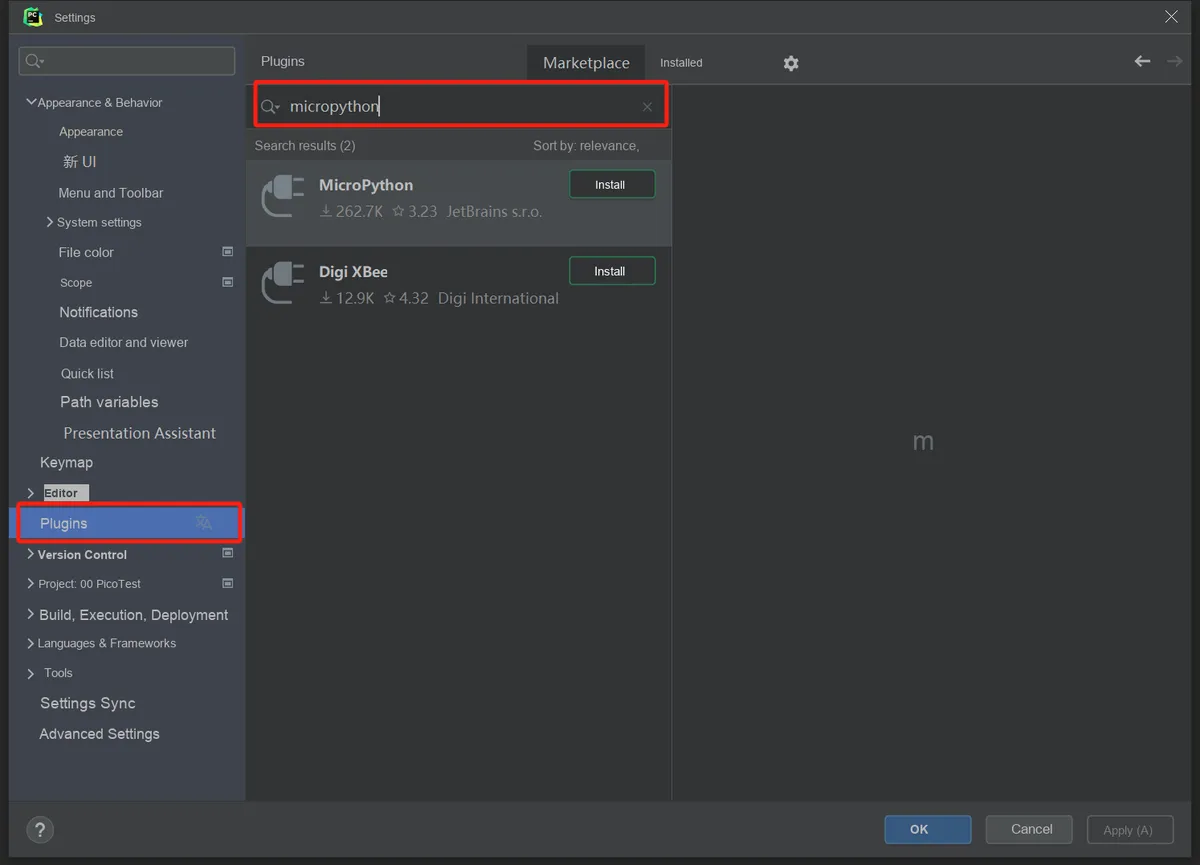
Click Install to install the plugin, and after the installation is complete, click - Restart IDE:
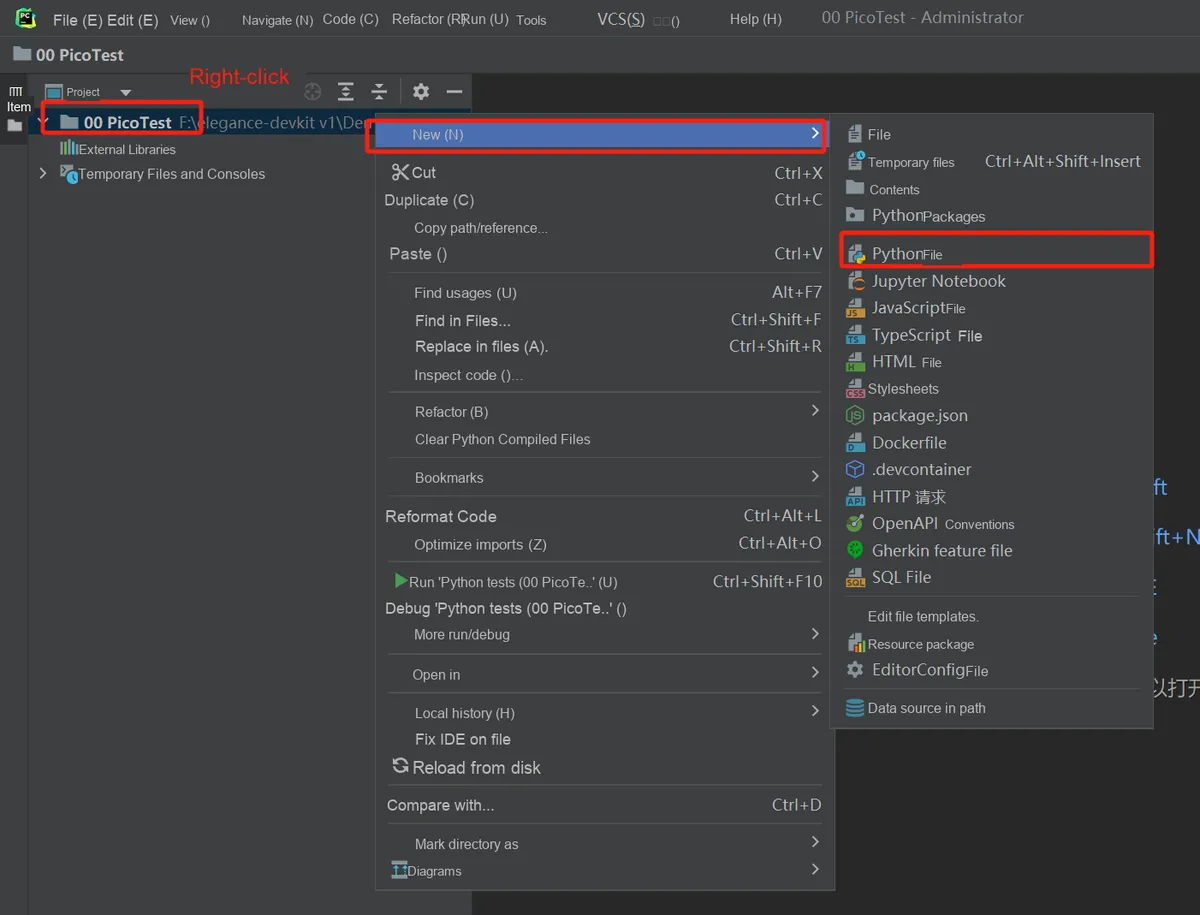
Right-click on a folder, then select New > New Python File:
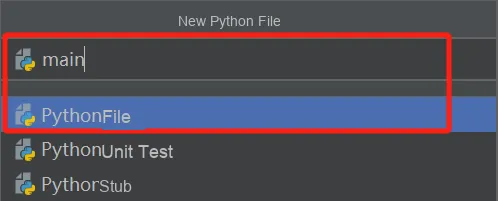
Create a new file named main.py:
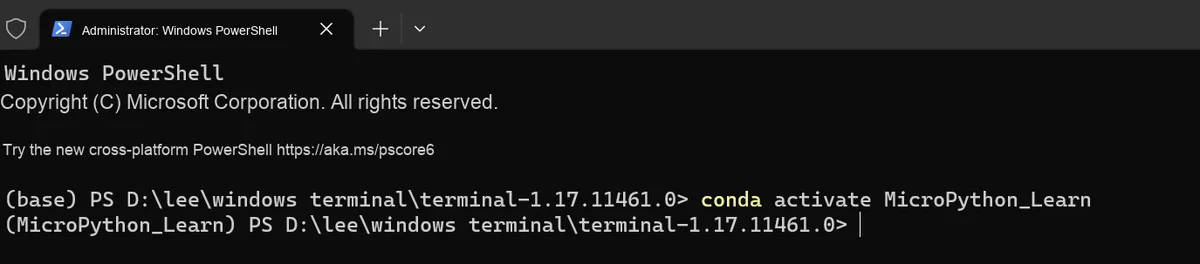
Here, we first use miniconda to create a new environment named MicroPython_Learn, and the Python version we use here is Python 3.12.3:
miniconda
Miniconda is a package and environment management tool that not only manages packages but also isolates and manages environments for different Python versions, similar to the nvm tool for managing Node. js environments.
For the download, installation and specific usage of miniconda, you can refer to the following link:
Tutorial on Introduction, Installation and Usage of Miniconda3
https://blog.csdn.net/weixin_43828245/article/details/124768518
Next, let's go back to the PyCharm interface and click the button at the bottom right to add the interpreter for our current project:
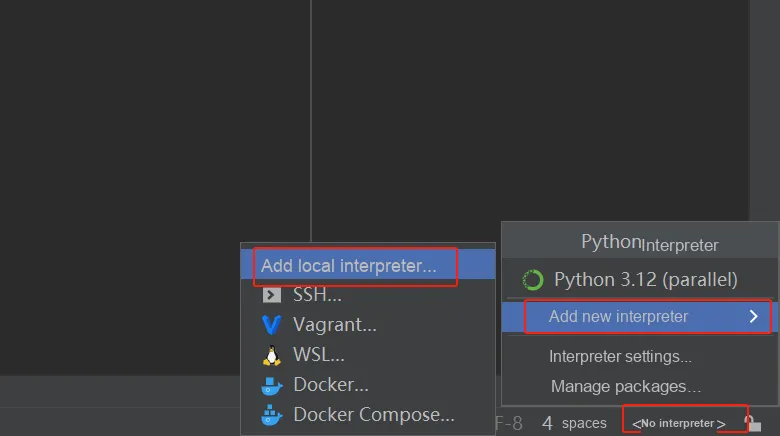
Select the virtual environment option, click the "Existing" option, click the three-dot button on the right side of the interpreter column, select the python.exe file in the virtual environment installation path, and click OK:
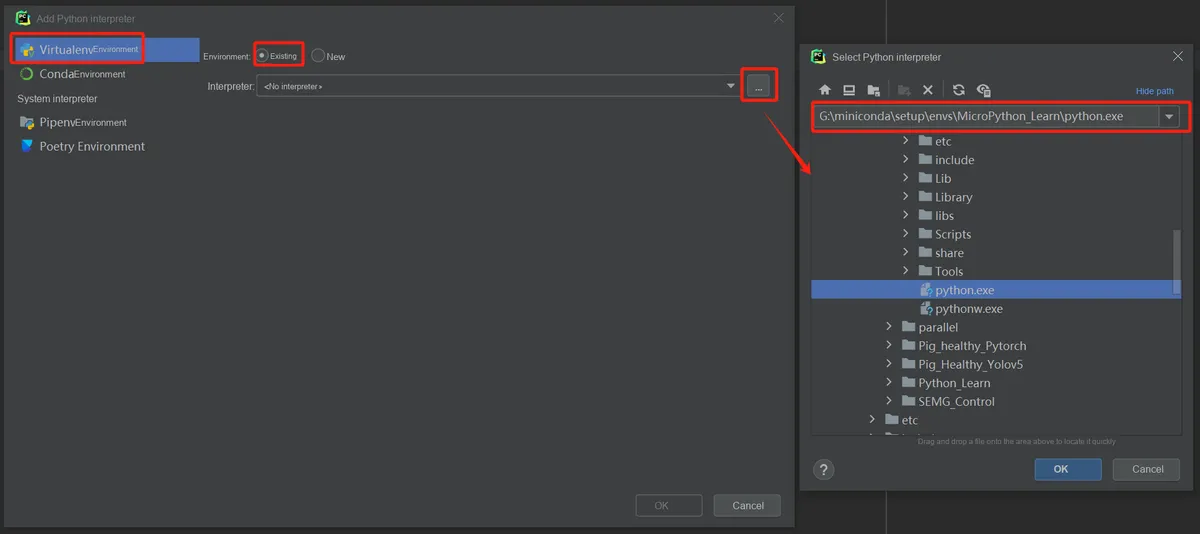
You can see that the name of the current virtual environment appears in the lower right corner of the IDE, indicating that the interpreter has been added successfully:
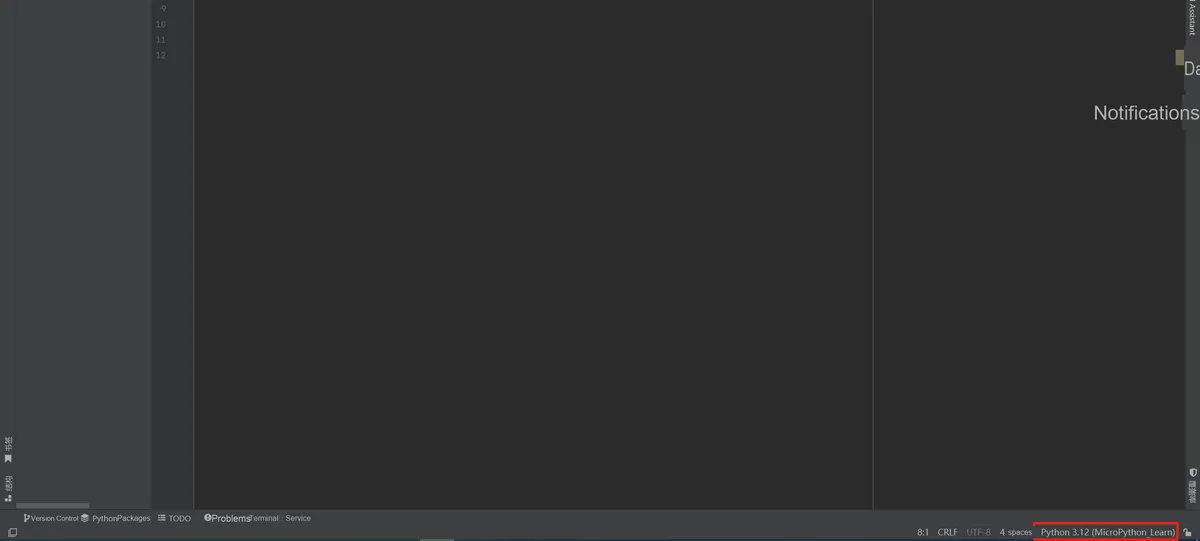
Next, click File > Settings again, select "Languages & Frameworks" > MicroPython, check the "Enable MicroPython support" option, choose Raspberry Pi Pico as the device type, and enter "COM3" in the device path field:
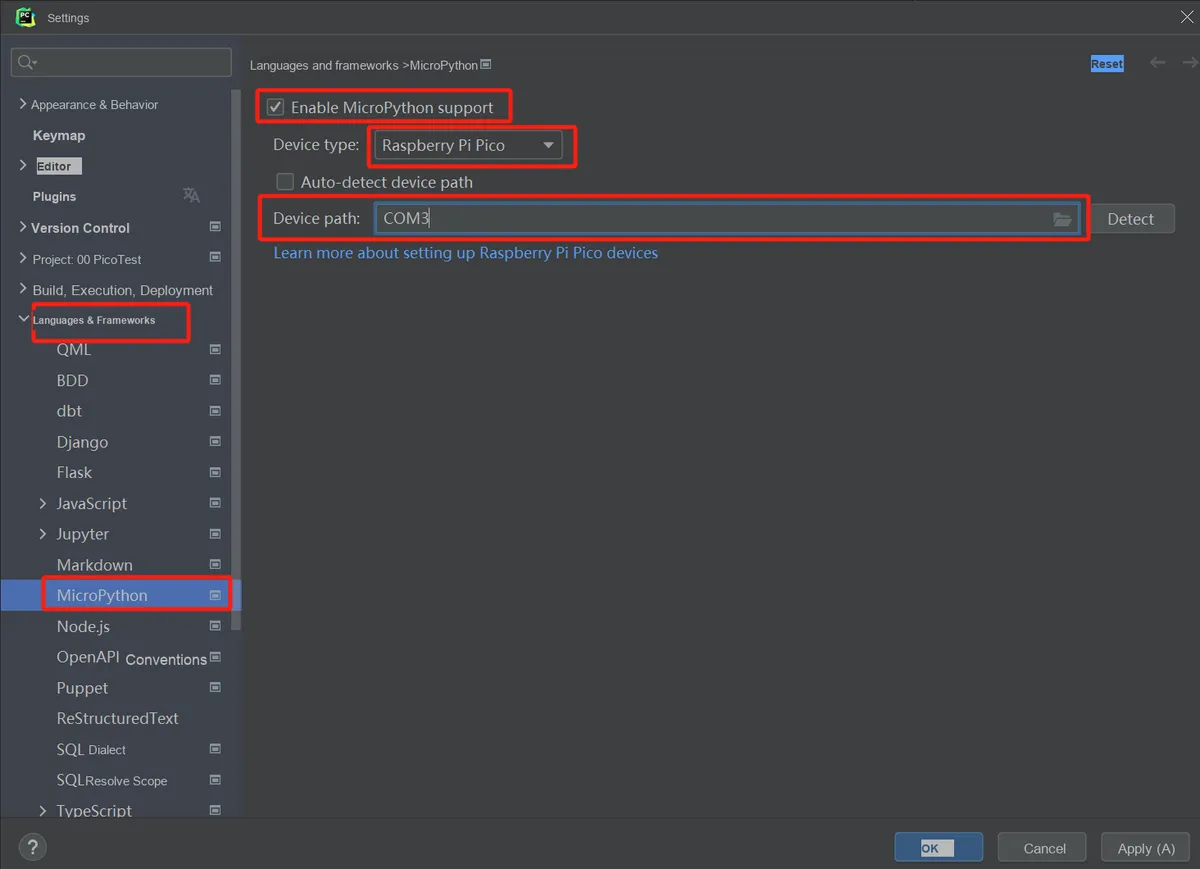
Next, we use the pip command in the command line to install the adafruit-ampy tool:
pip install adafruit-ampy==1.0.5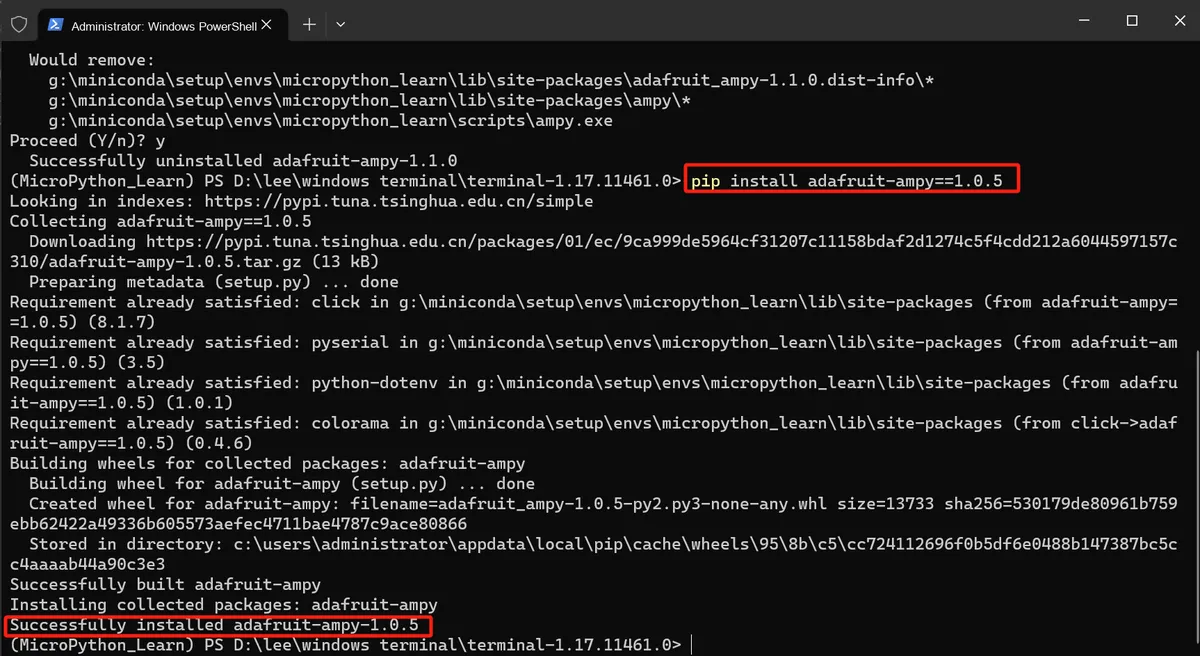
ampy (Adafruit MicroPython Tool)
ampy (Adafruit MicroPython Tool) is a command-line utility that enables interaction with CircuitPython or MicroPython boards via a serial connection. Ampy is designed to be a straightforward command-line tool for managing files and executing code on CircuitPython or MicroPython boards over a serial connection.With ampy, you can send files from your computer to the file system of your development board, download files from the development board to your computer, and even send Python scripts to the development board for execution.
For more usage instructions, please refer to the link: https://www.pypi.com.cn/project/adafruit-ampy/
Some libraries and their version information required for MicroPython development using PyCharm are as follows:
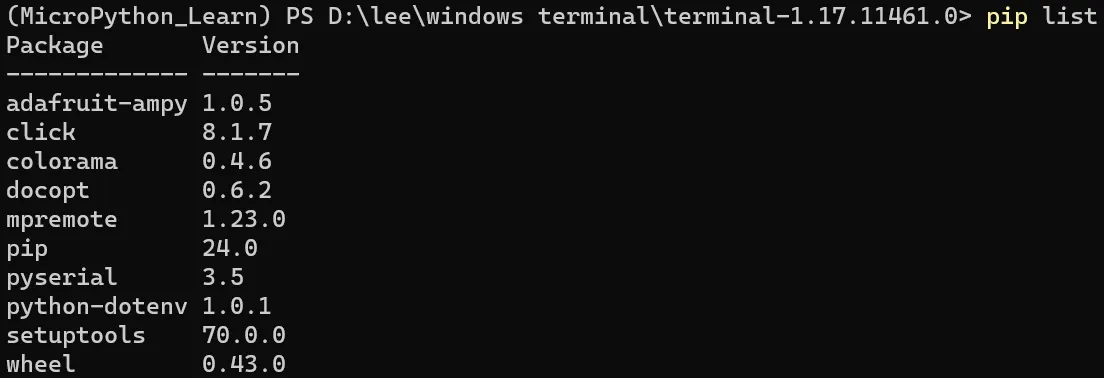
So far, we have completed the setup of the PyCharm IDE Raspberry Pi Pico MicroPython Development Environment. Next, let's test the programming and running of programs with PyCharm by copying the following code into main.py:
# Python env   : MicroPython v1.23.0
# -*- coding: utf-8 -*-
# @Time    : 2024/6/10 6:52 PM
# @Author  : Li Qingshui
# @File    : main.py
# @Description : File for testing the PyCharm MicroPython environment setup. If it runs successfully, the LED on the Raspberry Pi Pico blinks

# ======================================== Import Modules ========================================

# Hardware-related modules
from machine import Pin
# Time-related modules
import time

# ======================================== Global Variables ============================================

# ======================================== Functions ============================================

# ======================================== Custom Classes ============================================

# ======================================== Initialization ==========================================

# Power-on delay of 3 s
time.sleep(3)
# Print debug message
print("FreakStudio: MicroPython Pico Test")

# class machine.Pin(id, mode=-1, pull=-1, *, value=None, drive=0, alt=-1)
# Set pin 25 as a normal output; pin 25 is connected to the onboard LED
# Create a machine.Pin instance named led
led: Pin = Pin(25, Pin.OUT)

# ========================================  Main Program  ============================================

# The following code loops, blinking the LED
while True:
    # Set the pin high: LED on
    led.on()
    # REPL outputs "LED ON"
    print("LED ON")
    # Delay for 1 s
    time.sleep(1)
    # Set the pin low: LED off
    led.off()
    # REPL outputs "LED ON"
    print("LED OFF")
    # Delay for 1 s
    time.sleep(1)
This code is located in the folder of the supporting materials: elegance-devkit v1\Demo\00 PicoTest.
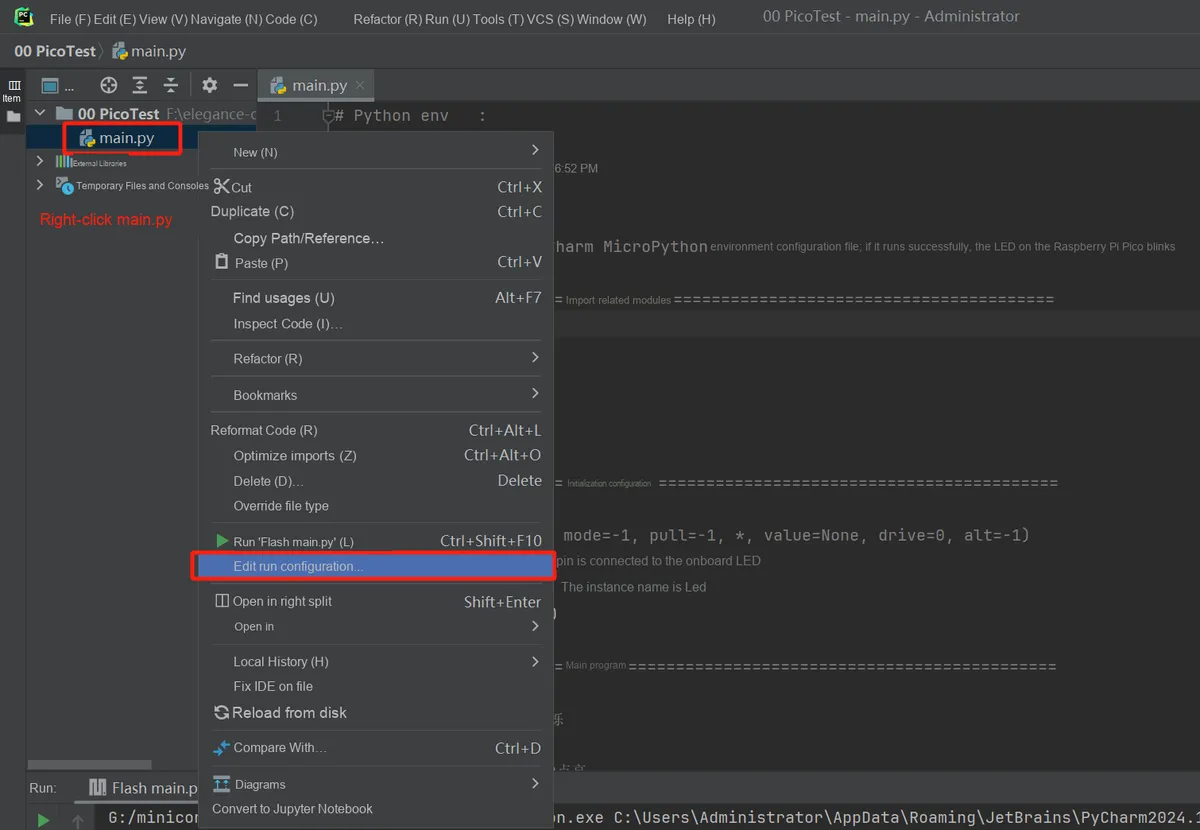
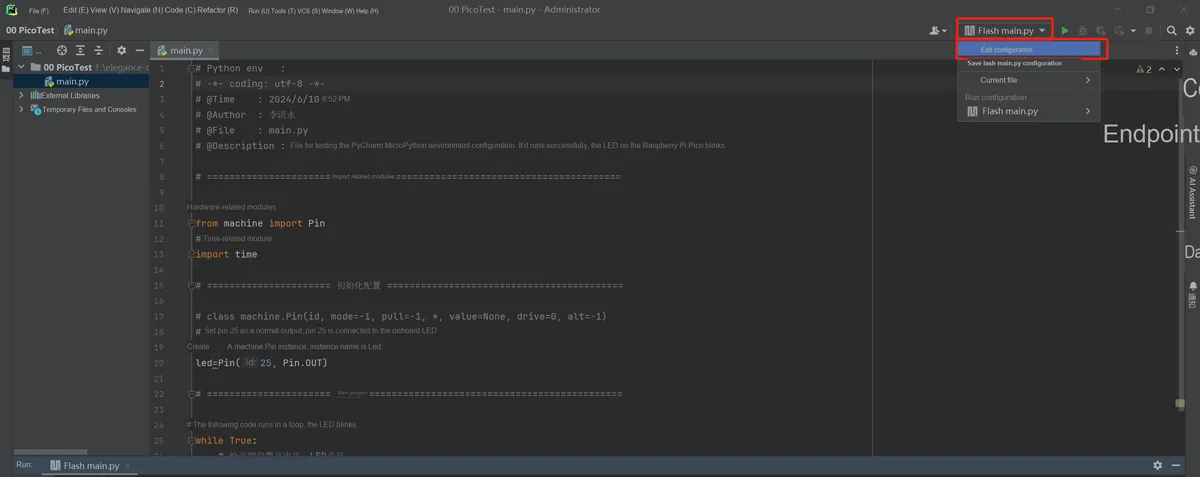
After that, we need to modify the run configuration of the main.py file. Right-click [main.py] in the Project window to bring up a context menu, select [Modify Run Configuration…] from this menu to edit the run configuration, and the "Edit Run Configuration" dialog box will pop up.
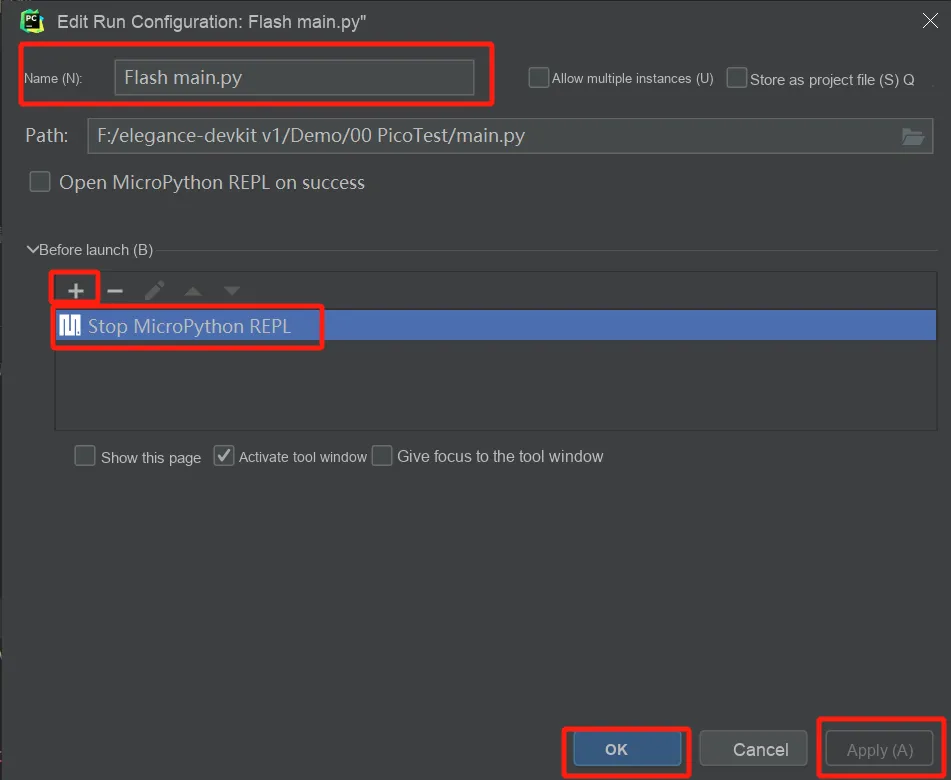
Enter the Flash program file name in the "Name" edit box, here enter Flash main.py, click the Apply button, and then click the Confirm button.
You can also edit the running configuration in the upper right corner:
Click the green arrow in the upper right corner to start running the MicroPython program:
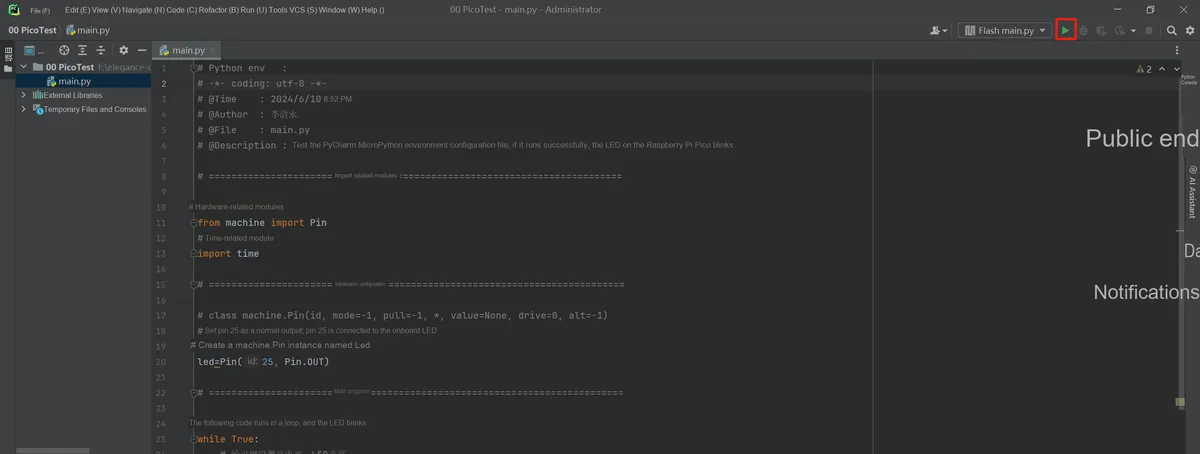
You can view the program download progress in the "Run" terminal:

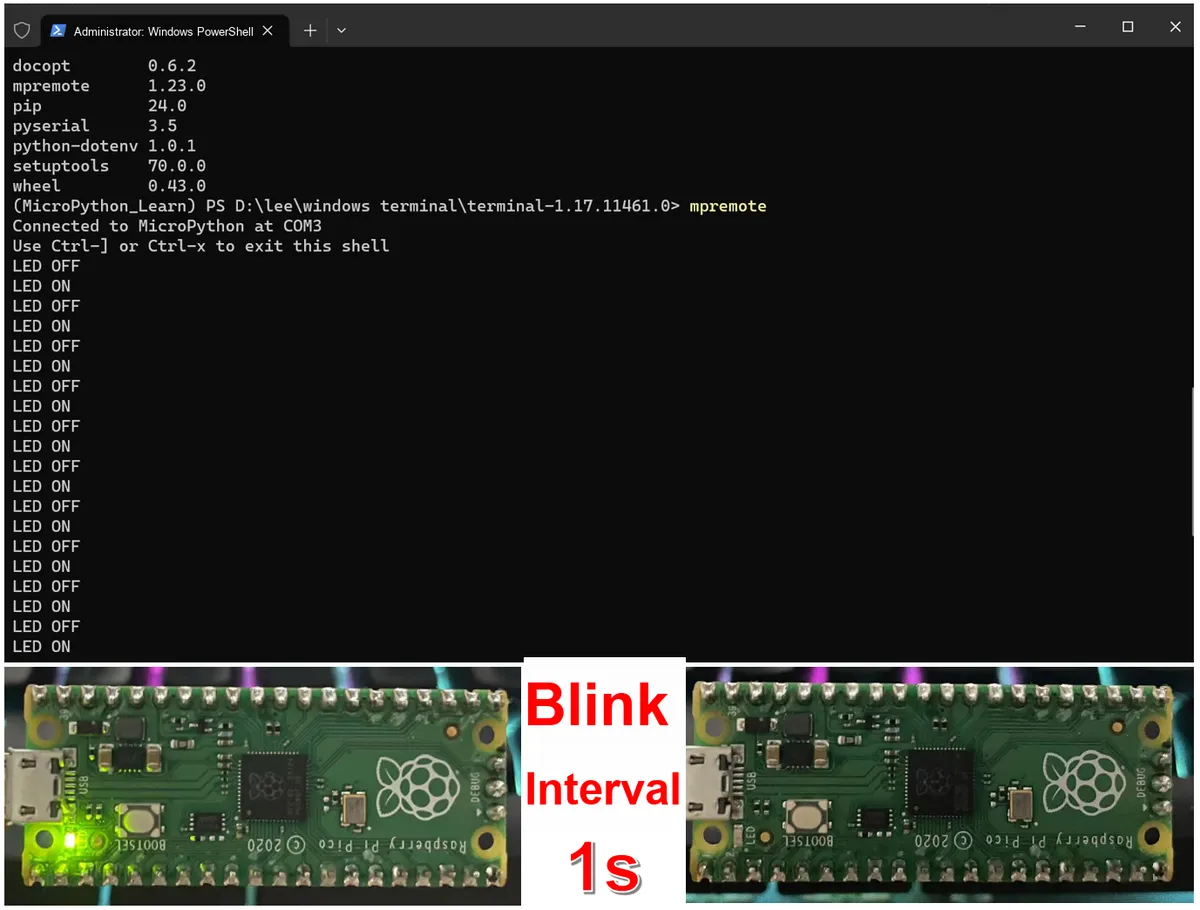
You can see the green LED on the Pico development board blinking at an interval of 1 second. When you run mpremote in the command line, you will see the debug information from the code being output continuously:
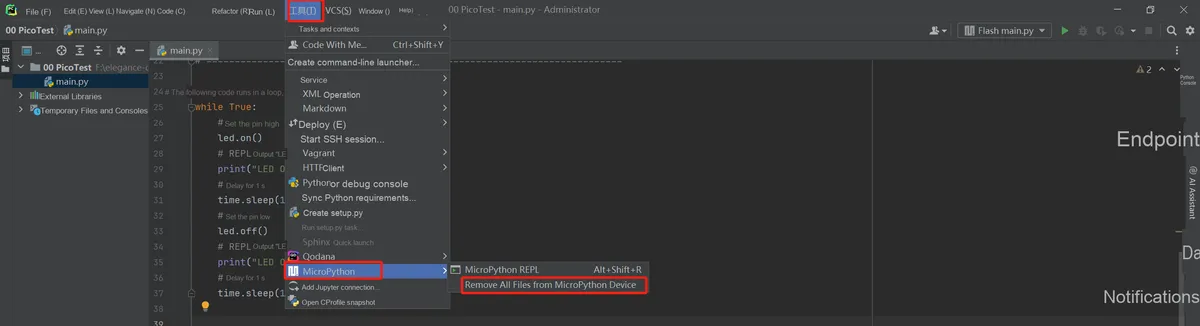
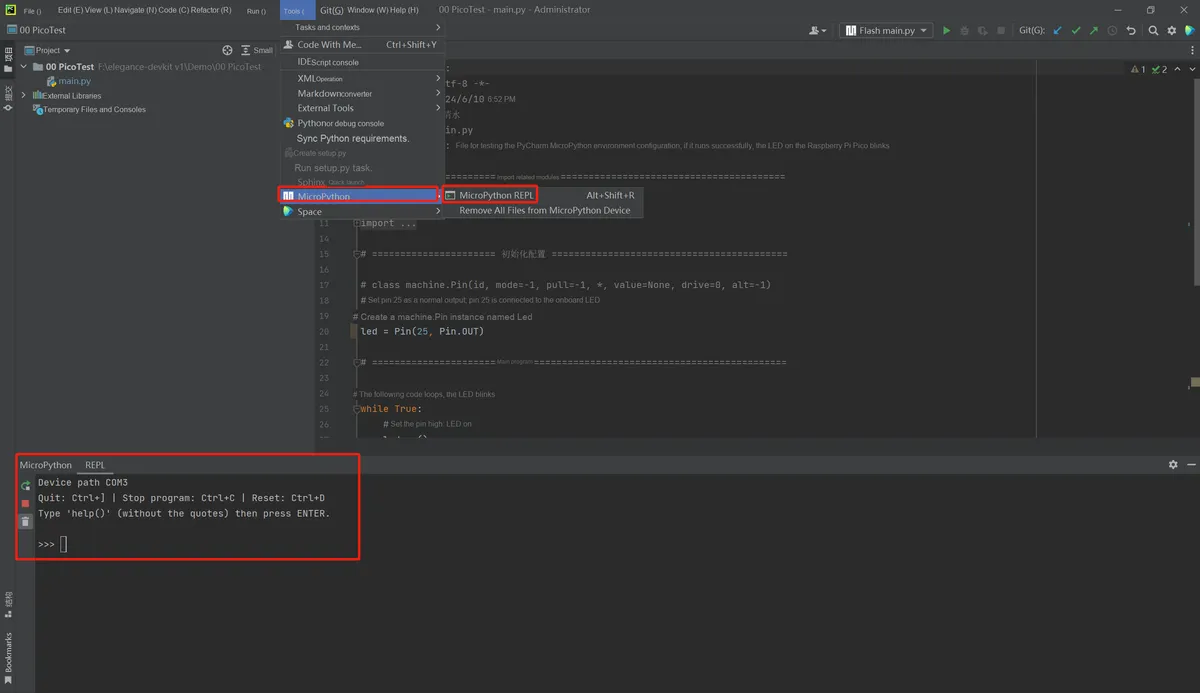
When we don't want the Raspberry Pi Pico development board to execute this program, we can click Remove All Files from MicroPython Device under the MicroPython option in the tools menu of Pycharm IDE to remove the program flashed in the Pico:
Alternatively, after opening the mpremote remote connection tool in the command line, press the ctrl+ c key:
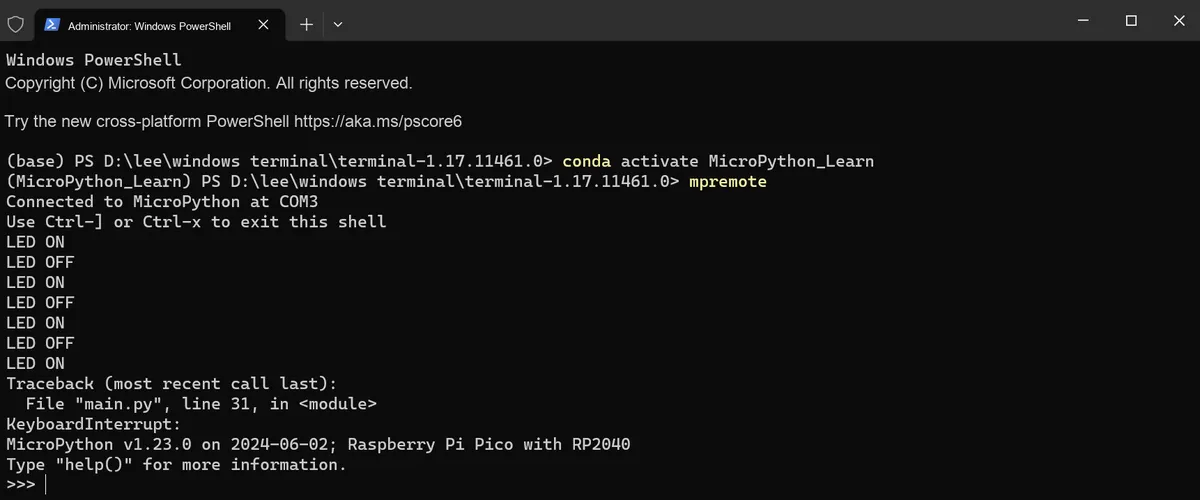
We can also connect to the REPL of Raspberry Pi Pico in PyCharm:
2.1.2.1 Offline Installation of the MicroPython Plugin
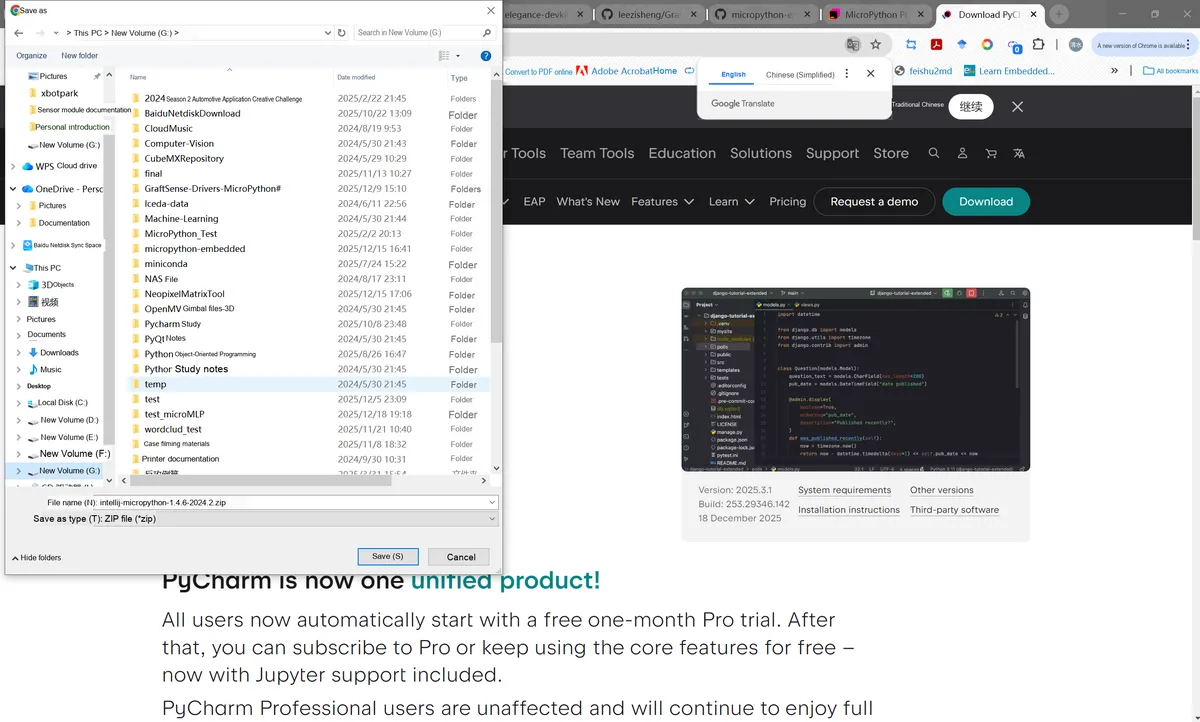
This plugin will no longer be available after 2025 and cannot be found via search in the plugin panel, but we can still install it via an offline method:
https://plugins.jetbrains.com/plugin/9777-micropython/versions/stable
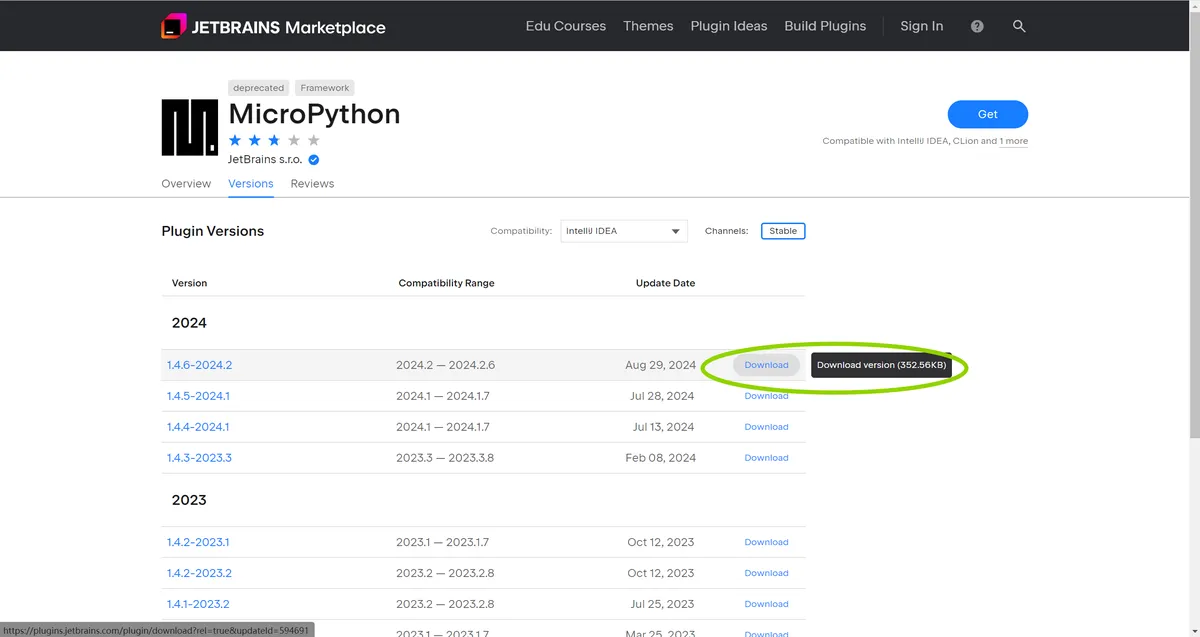
Locate the MicroPython plugin page on the JetBrains Marketplace (as shown in Figure 1), and select the plugin version compatible with your current PyCharm version (for example, 1.4.6-2024.2 in the figure corresponds to the PyCharm 2024.2 series), then click "Download" to download the plugin's ZIP Compressed Packet (save it to a local folder):
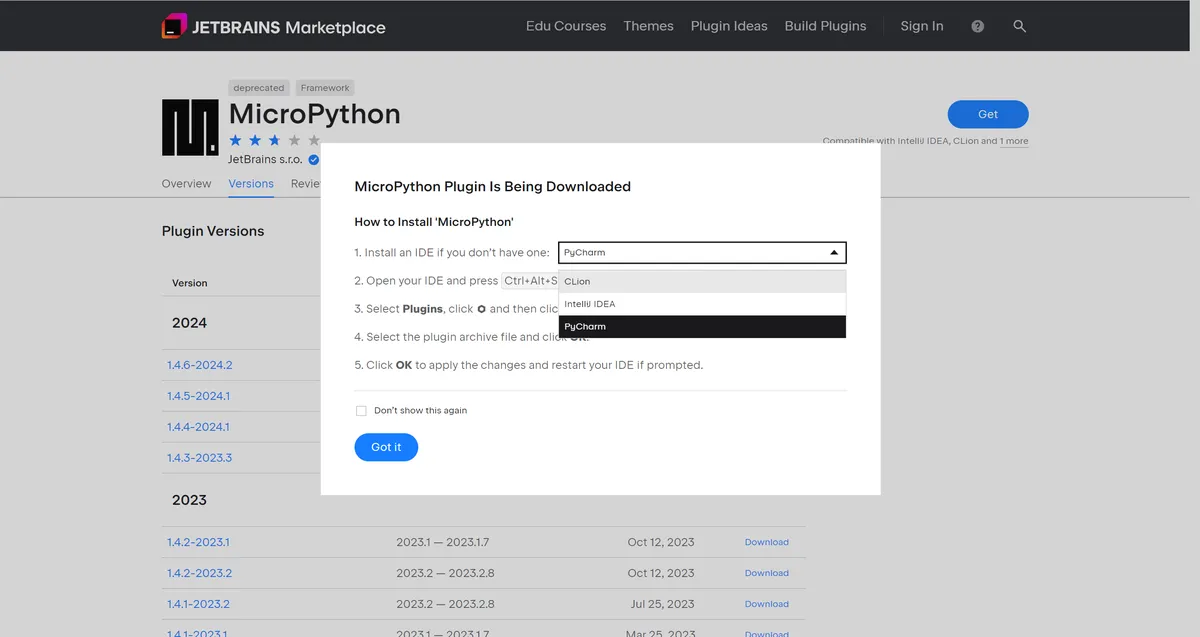
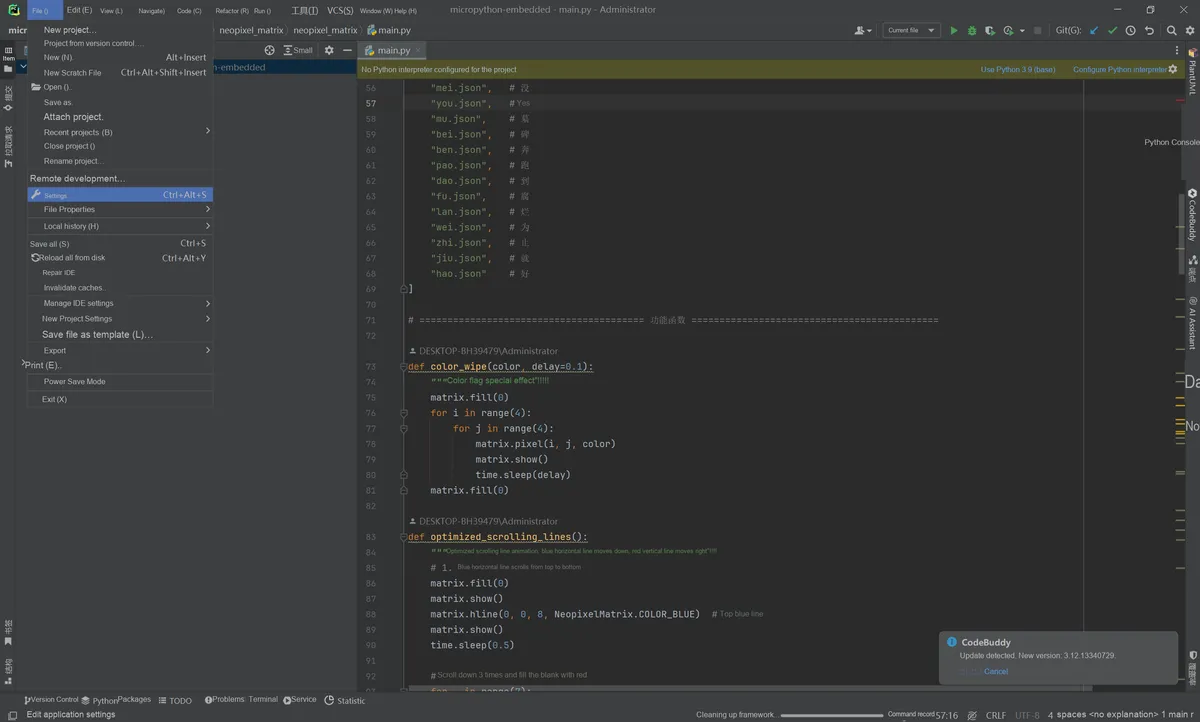
In PyCharm, click "File" > "Settings" in the top menu bar (or press the shortcut key Ctrl+ Alt+ S):
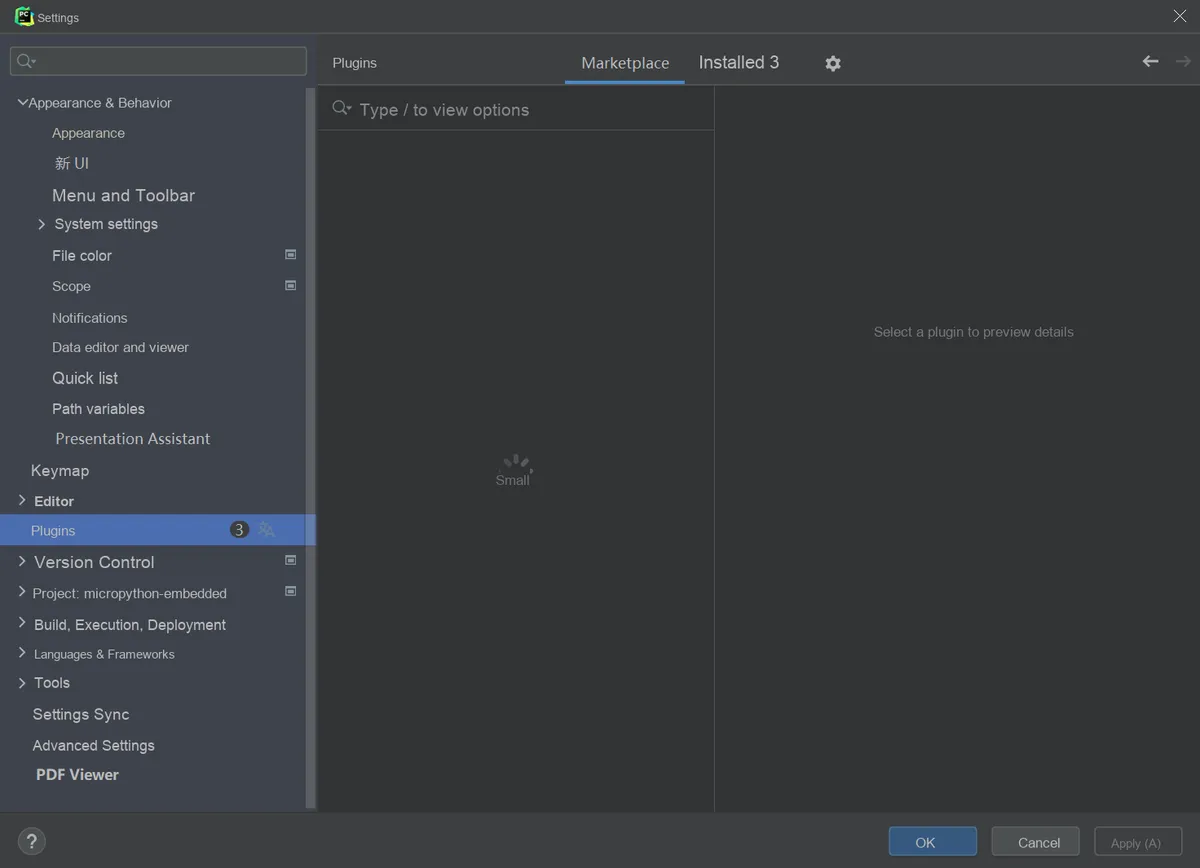
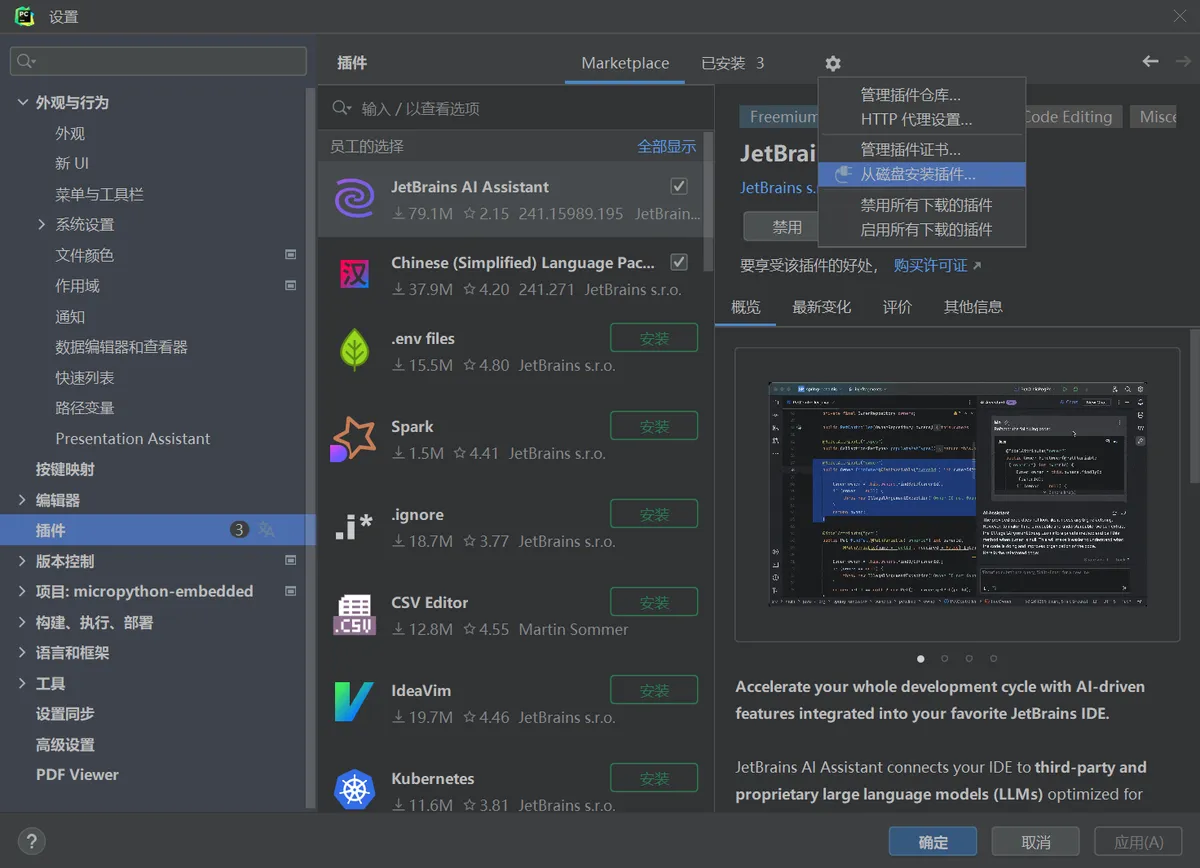
In the left sidebar of the settings interface, select "Plugins", click the gear icon in the upper right corner, and then select "Install Plugin from Disk" in the dropdown menu:
In the pop-up file selection window, locate the previously downloaded MicroPython plugin ZIP package, select it, and then click "OK":
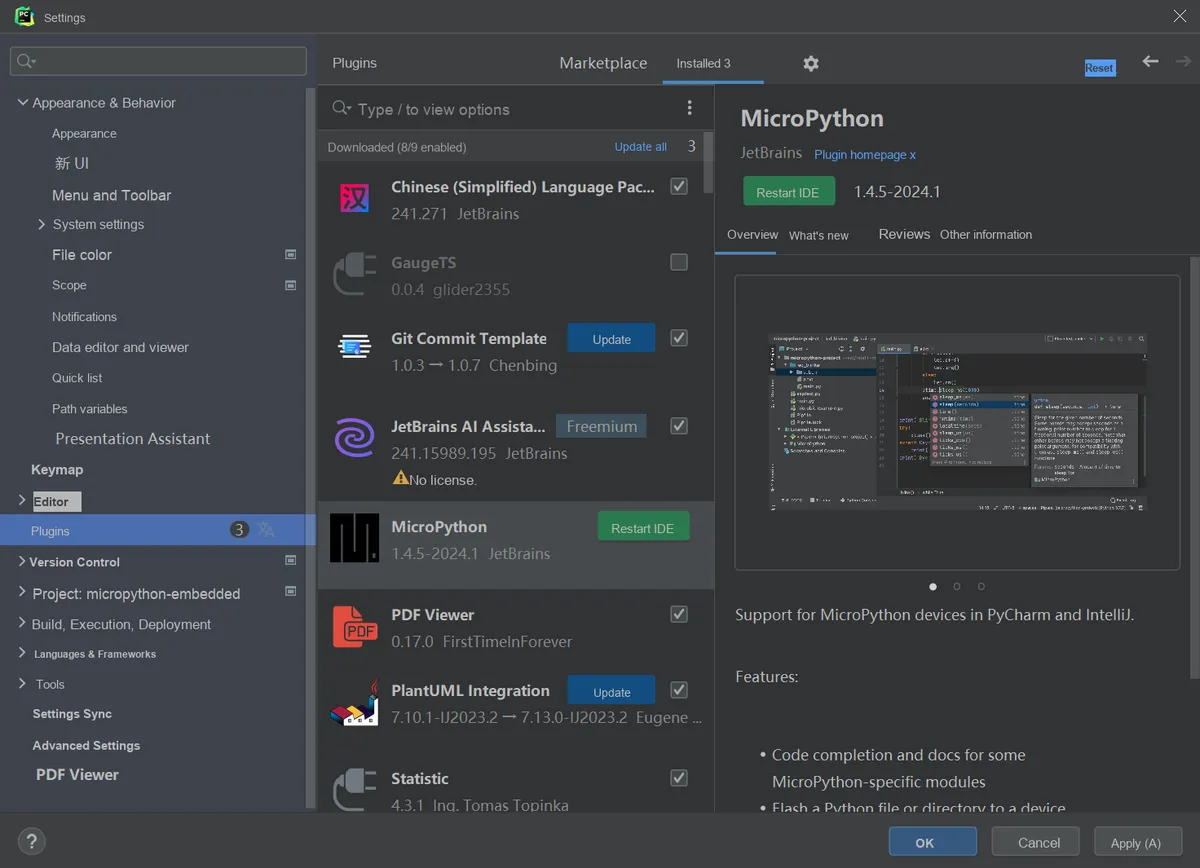
The plugin will be installed automatically. After the installation is complete, the "Restart IDE" button will appear on the interface (as shown in Figure 8). Click this button to restart PyCharm, and the plugin will take effect.
2.1.2 MicroPython Tool Plugin
After JetBrains integrated the Community Edition and Professional Edition of PyCharm in 2025, it carried out a lightweight adjustment to its plugin system. The original MicroPython plugin was officially optimized and upgraded to MicroPython Tool (which integrates the core functions of the original plugin + new features of PyCharm), becoming the officially recommended MicroPython development plugin adapted to the new version of PyCharm, with more unified functions and stronger compatibility:
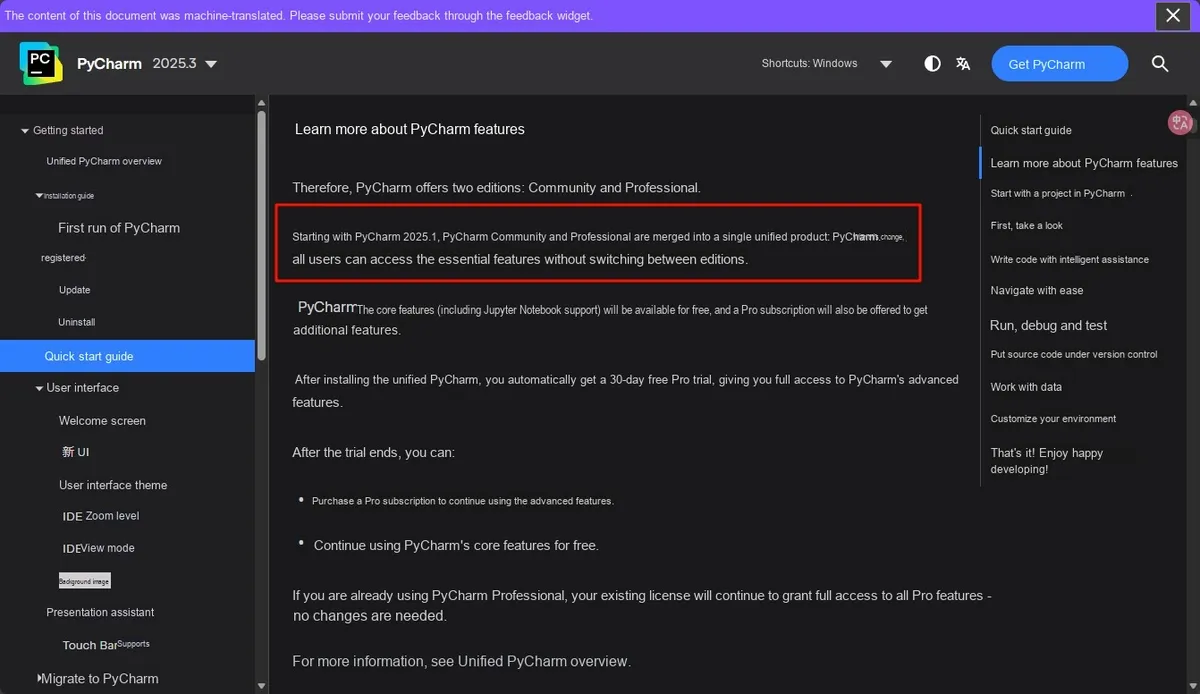
Enter the IDE:
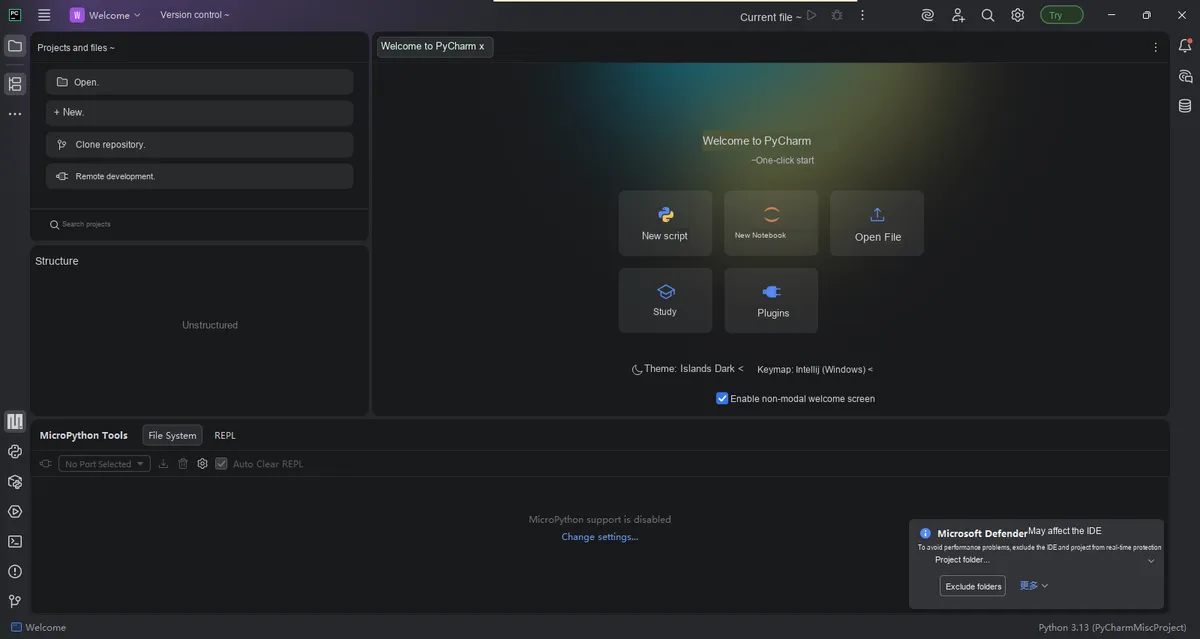
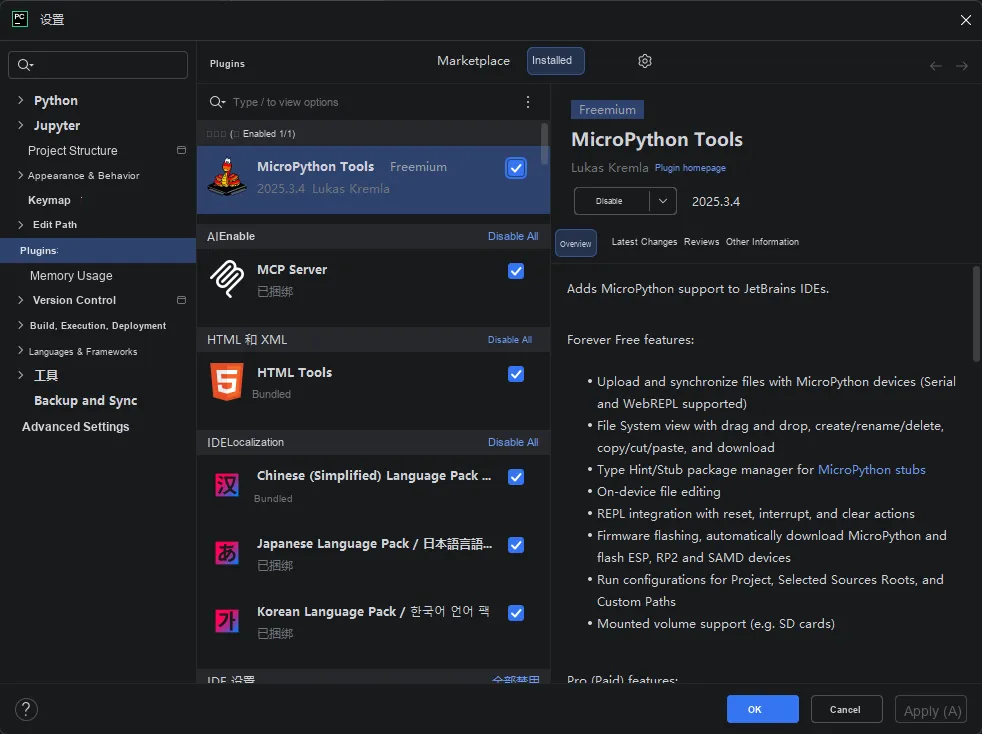
Next, let's proceed with the plugin installation:
- Open the integrated PyCharm, and click "File" in the top menu bar → "Settings"(shortcut key
Ctrl+ Alt+ S); - Select "Plugins" from the left navigation bar, and you will be directed to PyCharm's Extension Marketplace;
- Enter
MicroPython Toolin the search box to find the corresponding plugin.
After installation, connect a MicroPython development board (such as ESP32/ESP8266/Raspberry Pi Pico/STM32) to your computer via a USB cable, launch the plugin, and select the connection method in the pop-up configuration window:
- Serial Port: Select the serial port corresponding to the development board (e. g. COM3), and set the baud rate (default is 115200, which is compatible with most development boards);
- WebREPL: If the development board is connected to WiFi, enter the IP address, port (default: 23), username and password (if any) of the development board.
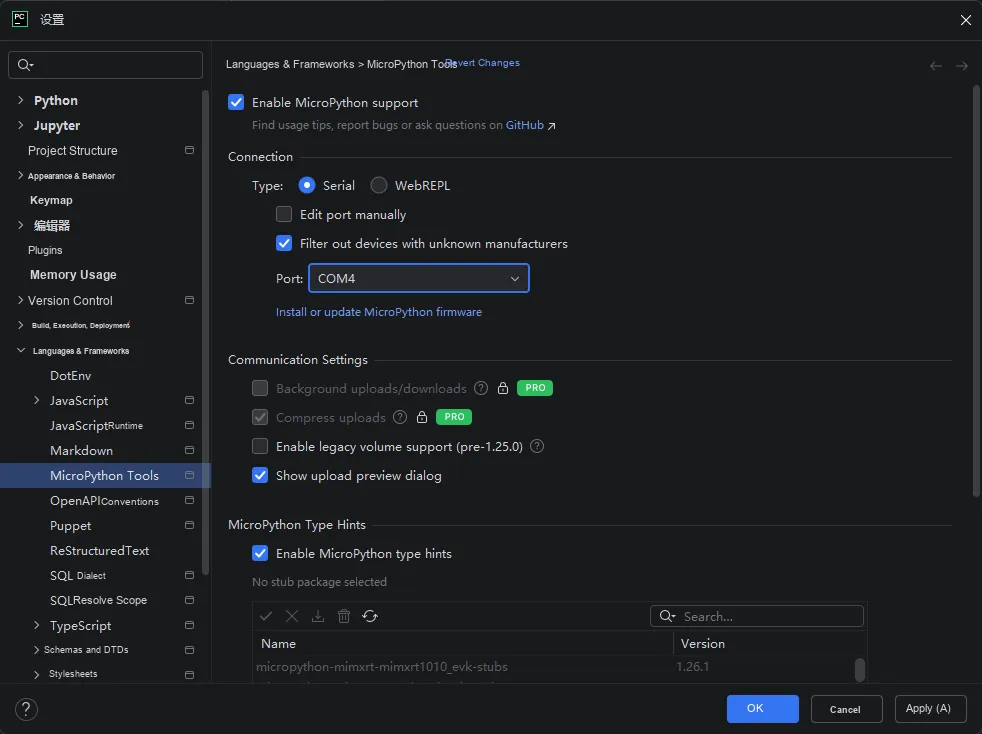
The other options in this MicroPython Tools settings interface function as follows (explained by section):
- Master toggle at the top:
Enable MicroPython support— this is the master switch for all MicroPython features; once checked, PyCharm will activate all MicroPython-related functions (such as serial connection, code upload, REPL terminal, etc.). If left unchecked, the plugin remains effectively inactive. - Connection (Connection Settings Area)
- Type: Serial / WebREPL
Serial: Select this option when connecting the development board via a serial cable (the most common method, e. g. connecting ESP32/Pico via USB);WebREPL: Select this option to connect via a wireless web interactive terminal (you need to enable the WebREPL function on the development board first, which is suitable for scenarios without a serial cable).
- Edit port manually: When checked, you can manually enter the serial port Port Number (by default, available ports are automatically identified; if the automatic identification is inaccurate, you can fill it in manually, for example, change COM4 to COM5).
- Filter out devices with unknown manufacturers: Filter out devices marked as "unknown manufacturer" to prevent irrelevant serial port devices on the computer (such as the virtual serial ports of certain USB devices) from being misidentified as development boards, thus reducing interference.
- Install or update MicroPython firmware: This is the entry for installing/updating the firmware of the development board. After clicking, you can flash the latest MicroPython system firmware to the development board.
- Communication Settings (Communication Settings Area)
- Options marked with
PROare features from the original Professional Edition (some of which may require a paid subscription to access after PyCharm's consolidation):Background uploads and downloads: When enabled, code uploads and downloads will run in the background without interfering with your concurrent coding work.Compress uploads: When enabled, code files will be compressed before uploading, which can speed up the upload of large files.
Enable legacy volume support (pre-1.25.0): Compatible with the storage function of old MicroPython firmware versions prior to 1.25.0 (only check this option if the firmware on your development board is a very outdated version).Show upload preview dialog: Before uploading the code, a file preview dialog will pop up to display the list of files to be uploaded. You can confirm the list before proceeding with the upload to avoid uploading the wrong files.- MicroPython Type Hints (Type Hints Area)
Enable MicroPython type hints: When enabled, PyCharm will provide MicroPython-specific code completion and syntax checking (for example, when writingmachine.Pin, parameters will be automatically prompted).No stub package selected+ the stub packages below: A "stub package" is a file that stores type information for the MicroPython API. Select the corresponding stub package (such as the one in the screenshotmicroPython-mimxrt. .. stubs) to get more accurate code prompts (adapted to the API of a specific development board).
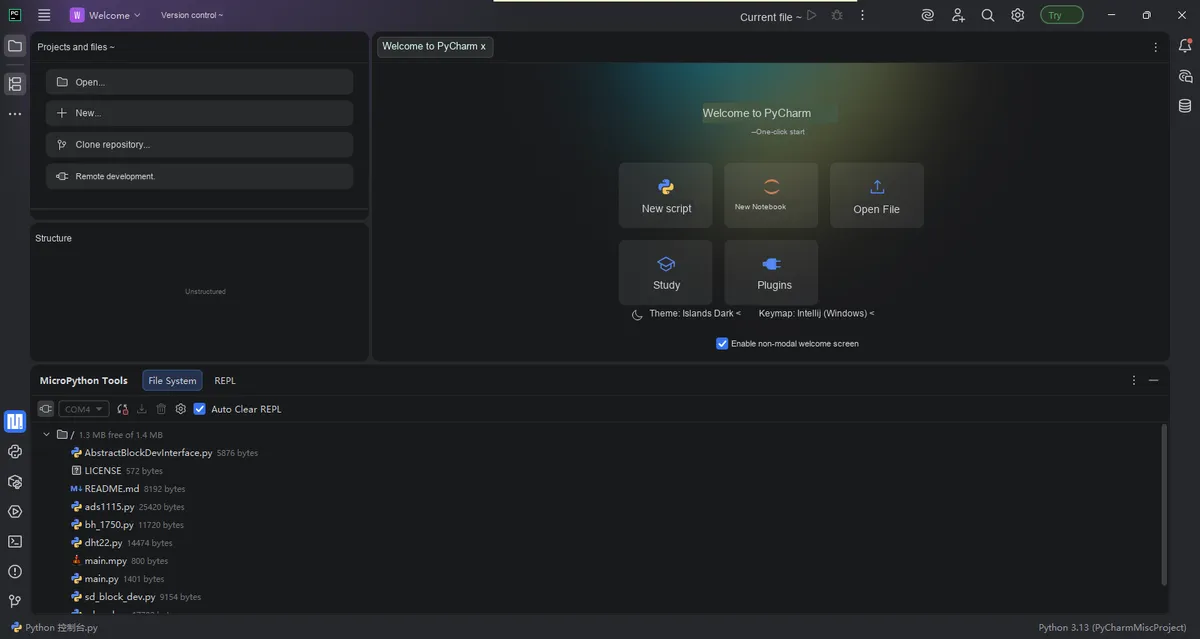
In the File System panel below, you can find the "management interface" for the internal files of the development board, which allows you to directly view and operate all files stored in the connected development board (for example, the main.py and dht22.py shown in the figure are code files on the development board):
- View Files: The panel will list all current files/folders of the development board (including their sizes and names), and the refresh button (the circular arrow icon) can synchronize the latest file list;
- Upload Files: Click the "Upload Icon"(usually an upward arrow) to transfer files/folders from your local PyCharm to the development board (for example, transfer the prepared
main.pyto the development board for execution); - Download File: Select a file on the development board and click the "Download Icon"(downward arrow) to save the file from the development board locally (e. g., to back up the code on the development board);
- Delete Files: Select the target file and click the "Trash Can Icon" to delete redundant files on the development board (Note: Deleting by mistake will cause code loss, please operate with caution);
- Other operations: Right-clicking on a file also allows you to perform basic file management tasks such as renaming and creating a new folder.
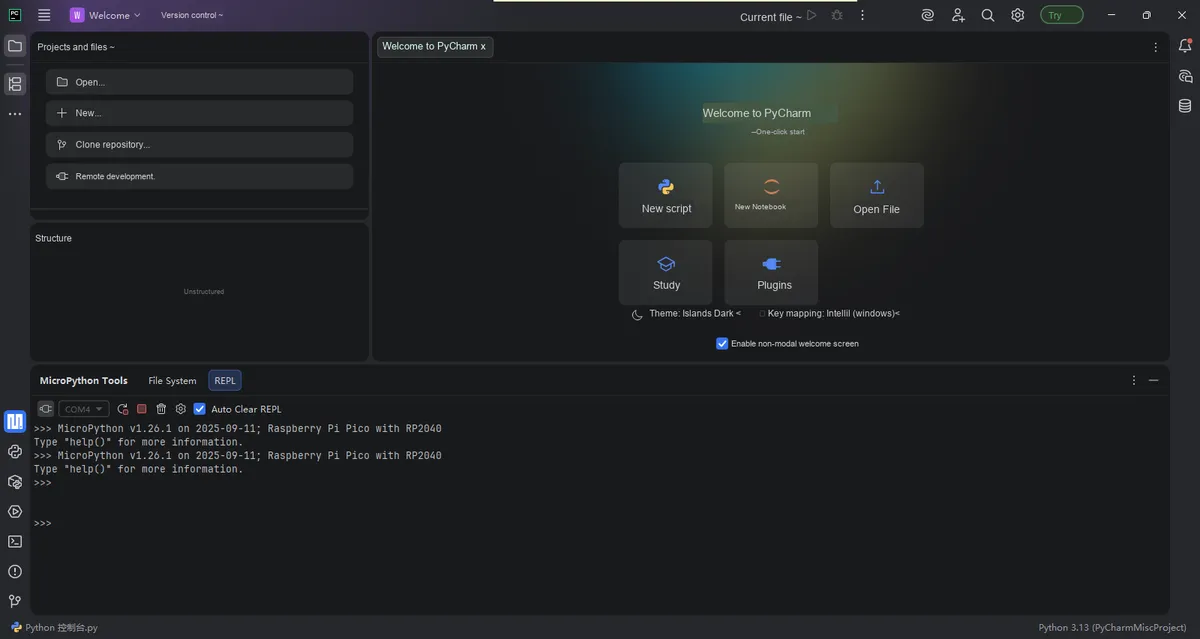
REPL is the "real-time command line" of the development board. After a successful connection, it will display the MicroPython version of the development board (as shown in the figure MicroPython v1.26.1 on Raspberry Pi Pico), which allows you to directly input code and execute it immediately. It is a tool for quickly debugging hardware and testing code snippets.
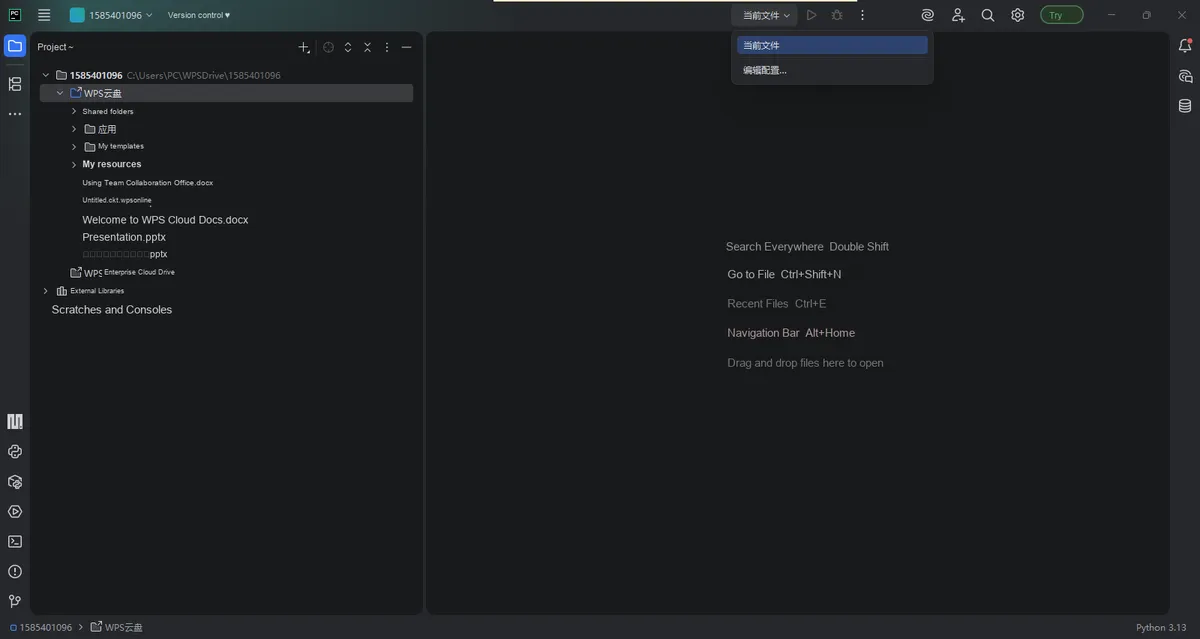
The "Current File" menu at the top serves as the entry to access the "Run/Debug Configurations", and the core configuration for subsequent file flashing is initiated from here.
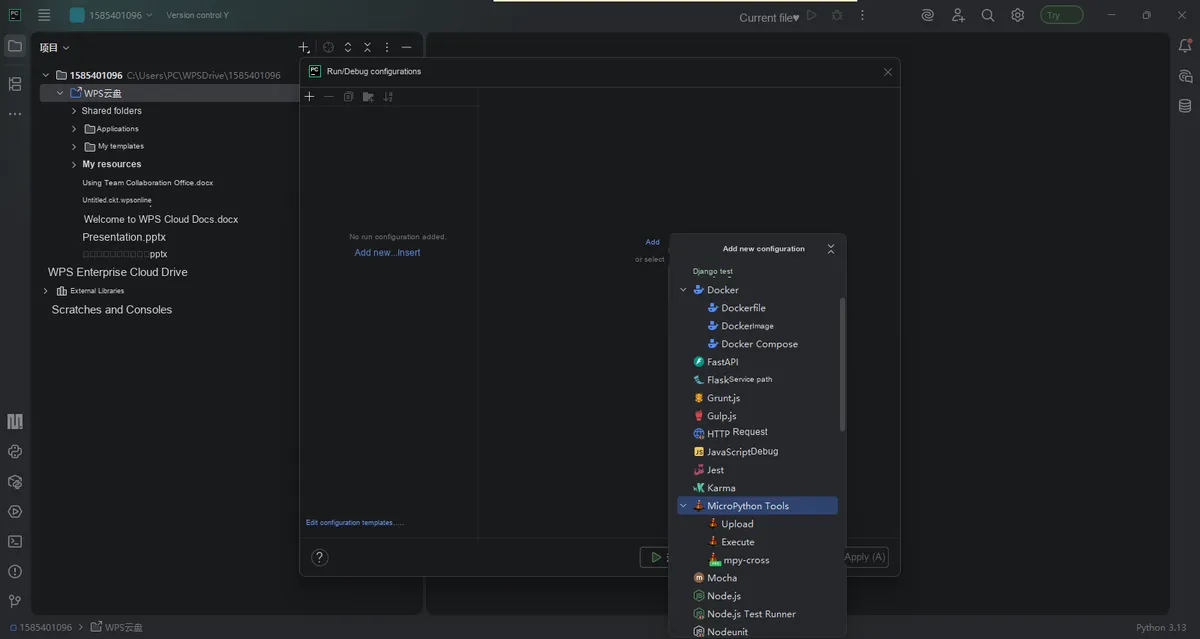
This is the creation interface for "Run/Debug Configurations", which is a prerequisite operation before burning files:
- Click "Current File" at the top → select "Edit Configurations", and the "Run/Debug Configurations" window will pop up;
- Click the "+(Add)" button in the upper left corner of the window → select "MicroPython Tools", and 3 function options will appear:
Upload: Burn (upload) files/projects to the development board (this is the "burning" function you need);Execute: After uploading the file, execute the file directly on the development board;Compile: First compile the Python code into MicroPython bytecode (in. mpy format, which saves more space on the development board and runs faster), then upload it.
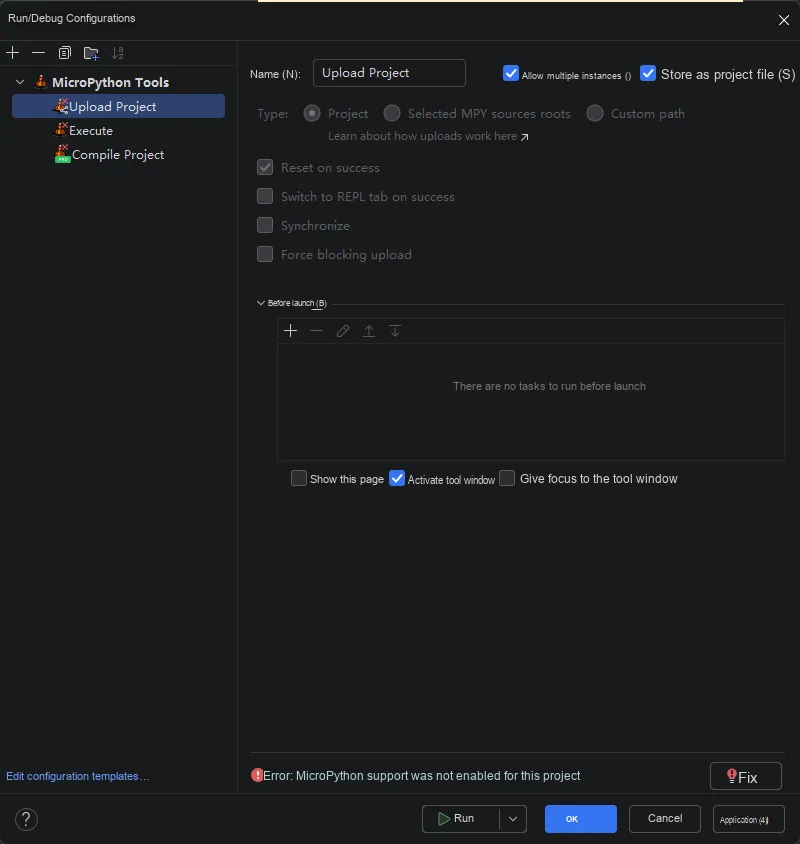
This is the core configuration interface for single-file / multi-file programming, and you can execute the programming once the configuration is completed:
- Select the programming range (Type option):
Project: Burn all files of the entire project (suitable for multi-file projects);Selected MPY sources roots: Only flash the selected files/folders (suitable for single files or partial files);Custom path: Customize the file path to be flashed.
- Burning auxiliary options:
Reset on success: Automatically reboot the development board after successful flashing (to run the code immediately);Switch to REPL tab on success: Automatically switch to the REPL terminal after flashing is completed, making it convenient to debug code immediately.
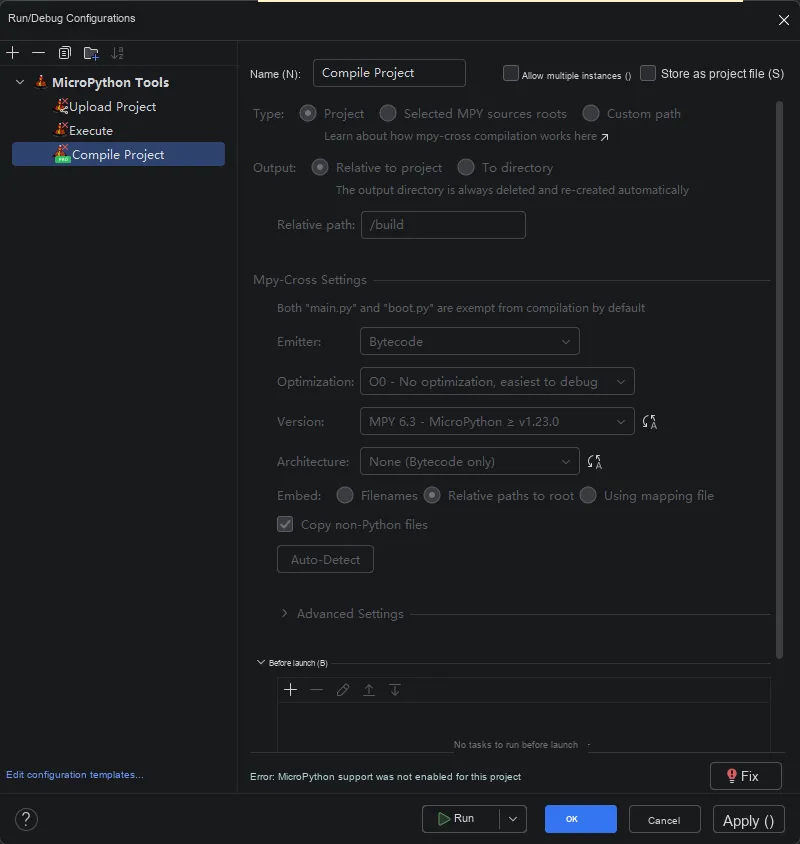
This is the configuration interface of "Compile Project"(it is not direct flashing, but an optimization step for flashing):
- For Type, select
Projectto compile all files in the entire project (multi-file); selectSelected MPYto compile only the part of files you specified; - The "MicroPython support was not enabled for this project" at the bottom is the critical error: you must first enable MicroPython support for the current project, otherwise you cannot configure flashing / compile.
2.2 VScode (Not Recommended)
Visual Studio Code (hereinafter referred to as VSCode) is a lightweight yet powerful cross-platform open-source code editor (IDE) that supports Windows, OS X and Linux. It has built-in support for JavaScript, TypeScript and Node.js, and features a rich plugin ecosystem, through which other languages such as C++, C#, Python and PHP can be supported by installing corresponding plugins.
You can refer to the following link for the download and installation of VSCode:
Install VSCode on Win10 and Configure the Python Environment
https://www.cnblogs.com/waff/p/VScode-Python.html
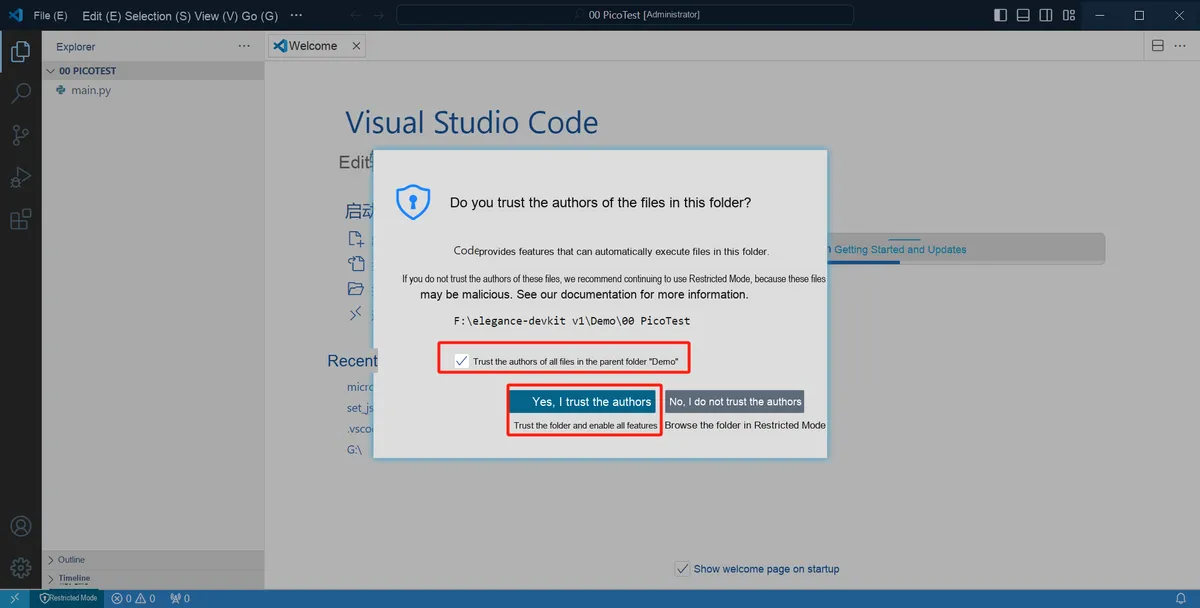
Then right-click on an empty space in the folder and select "Open Folder with VSCode":
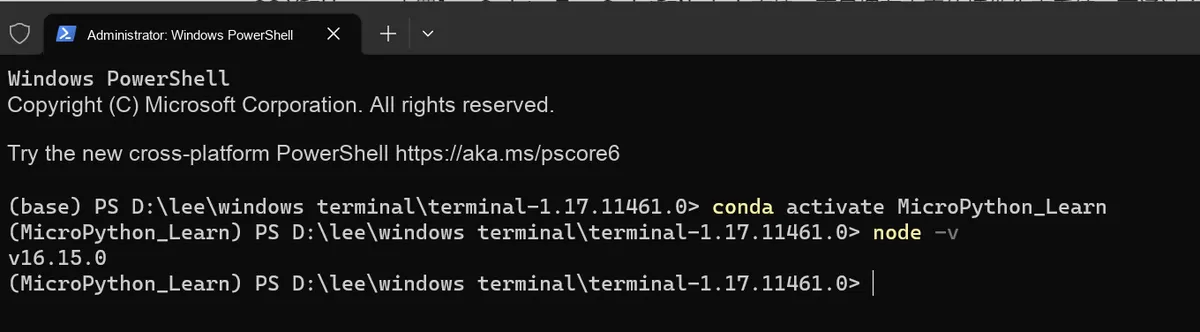
First, we need to install the Node. js dependency to support the Pymakr plugin required for embedded MicroPython programming, which can be downloaded and installed via the following link: https://nodejs.org/en/ After the installation is complete, check the Node version number via the CMD command to confirm whether the installation is successful.
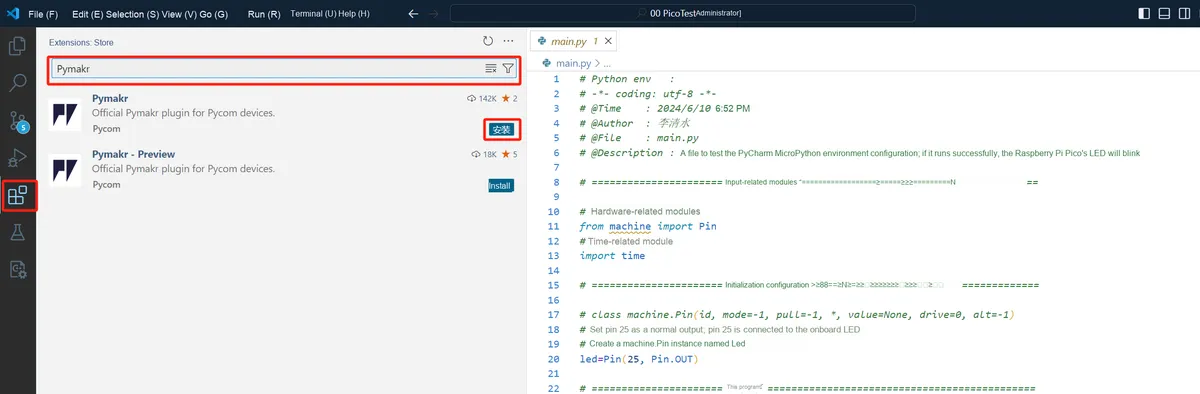
Then click the Extensions icon in the left menu bar to enter the plugin search interface, type "Pymakr" to search for the relevant plugin, and click "Install" to proceed with the installation:
After the installation is complete, close VSCode. When you reopen VSCode, the pymakr.json configuration file will automatically open by default, and we need to modify it and save the changes. If the json file does not pop up automatically, press Ctrl + Shift + P, type pymakr, and select Global settings to bring it up.
Add "Open File with VSCode" to the right-click menu for opening folders
If the "Open with VS Code" option does not appear in the right-click context menu, this is because you did not select the option to add VS Code to the right-click menu during the VS Code installation, which makes it impossible to select a folder to open as a VS Code project. As a result, you have to launch VS Code every time, load an unnecessary project first, and then open the file you actually want from within VS Code.
You can fix this by modifying the registry; please refer to the following link:
Set up to open files and folders with VSCode via right-click in Windows Settings
https://blog.csdn.net/m0_45219210/article/details/123664120
Add "Open File and Folder with VSCode" to the Right-Click Menu in VSCode [Windows]
https://blog.csdn.net/qq_37596943/article/details/131781224
For the specific process, please refer to the following link:
MicroPython Programming with Visual Studio Code
https://docs.tpyboard.com/zh/latest/tpyboard/tutorial/vscode/
2.3 Thonny (Recommended for Learning)
Thonny is a new Python IDE for learning and teaching programming that can make program visualization a natural part of the beginner's workflow. Its prominent features include various ways of stepping through code, step-by-step expression evaluation, intuitive visualization of the call stack, and modes for explaining the concepts of references and heap. It supports educational research by logging user actions to replay or analyze the programming process. It is free to use and open to extensions.
It has the following characteristics:
- It supports all platforms (Windows, Mac, Linux)
- It supports Simplified Chinese, which is very friendly to students who are not good at English.
- It features a clean and straightforward interface, with all its built-in functions designed entirely for beginners.
- It comes with Python 3 built in, so beginners don't need to install Python separately or configure the environment additionally.
- Its debugging interface is extremely intuitive, and it can outperform 90% of the editors on the market.
- One of its highlights is that it provides a debugging mode with finer granularity than lines of code.
- It supports syntax highlighting, which should be a basic feature.
- It supports code completion (unfortunately, it is manual rather than automatic)
- It comes with a built-in graphical package manager that is extremely simple and user-friendly.
You can refer to the tutorial for downloading and installing Thonny:
(Latest) How to directly download and install Thonny (an editor for Python)
https://blog.csdn.net/m0_57202121/article/details/135958433
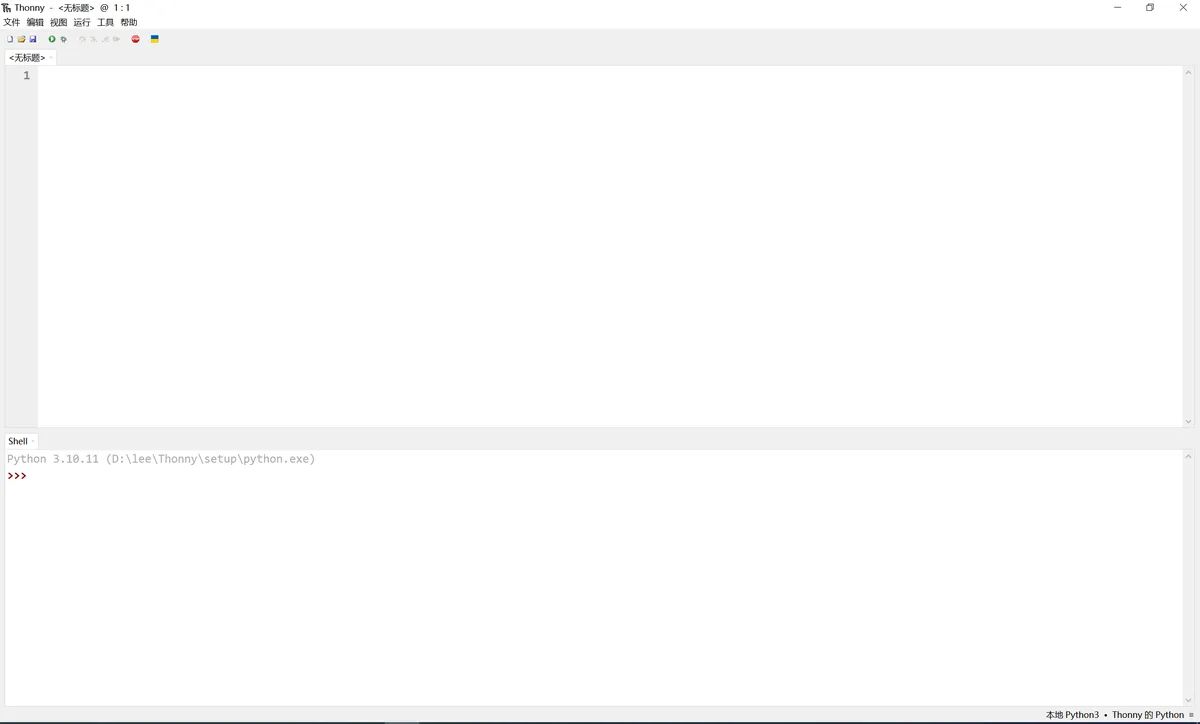
After the download and installation are complete, we first launch the Thonny IDE:
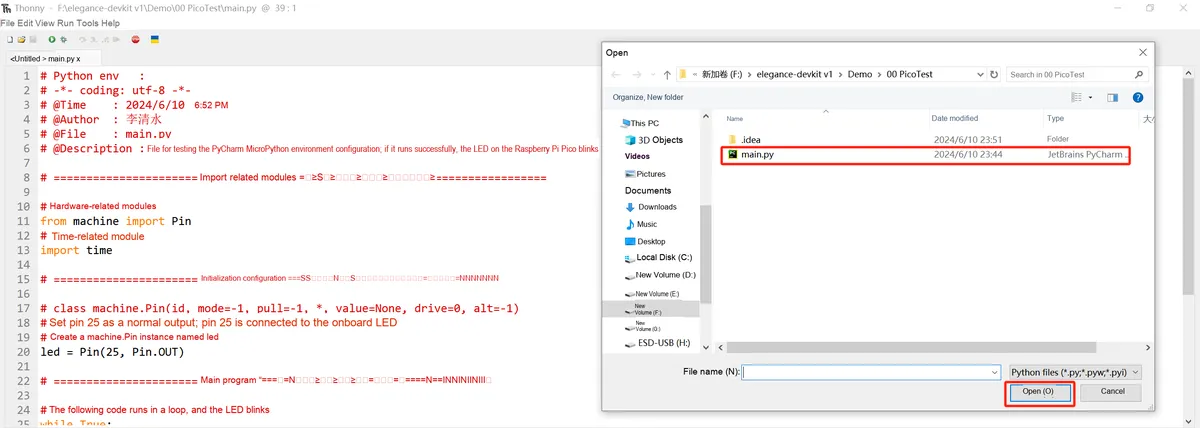
Then open our MicroPython program, using the same path as the one applied in PyCharm above:
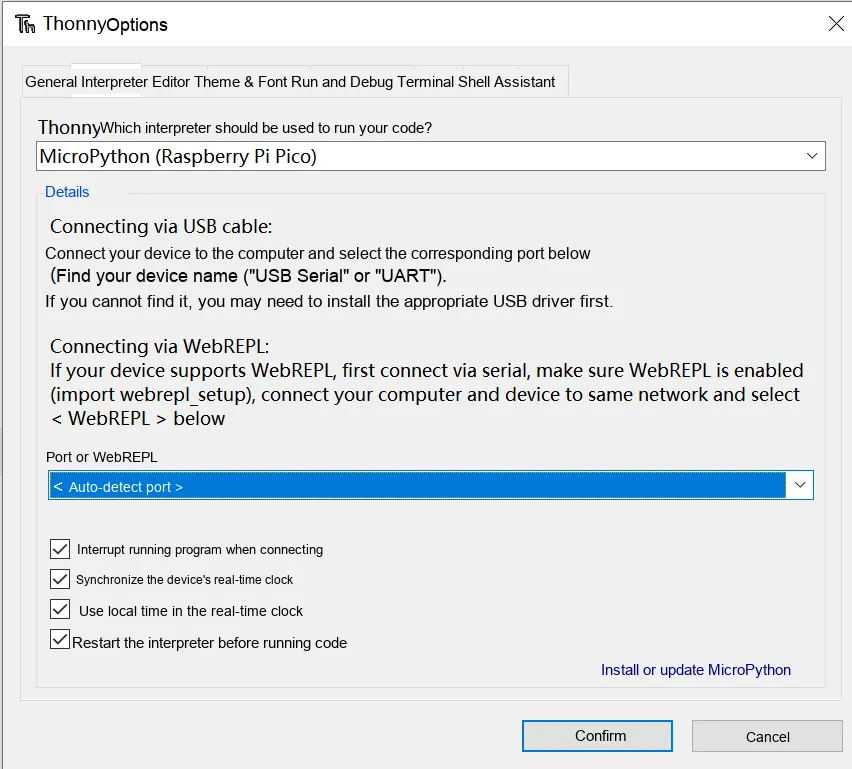
Then click the Python version number in the bottom right corner of Thonny, and select the corresponding Python interpreter: MicroPython (Raspberry Pi Pico):
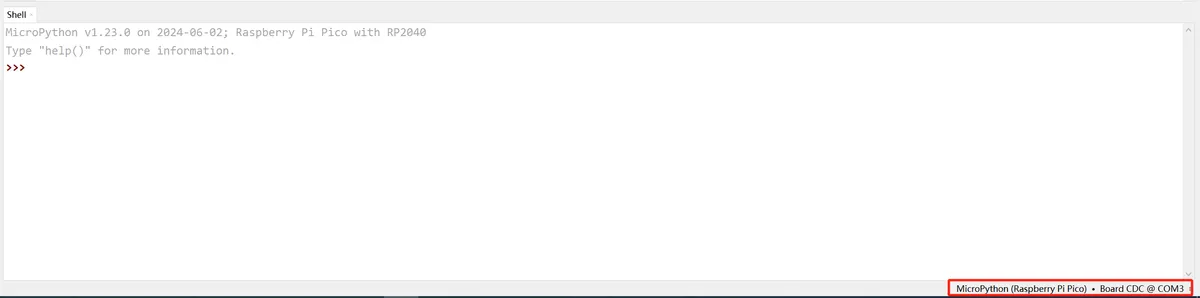
Click to configure the interpreter, and just configure it as follows:
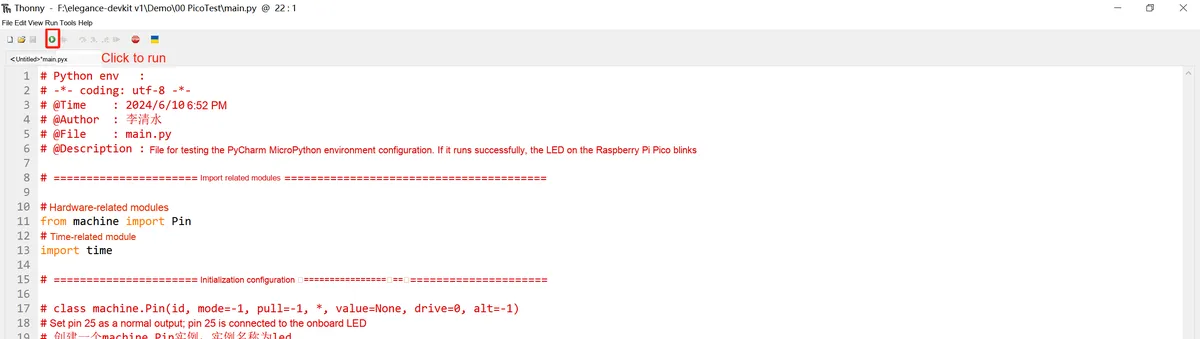
Click the run button in the upper left corner:
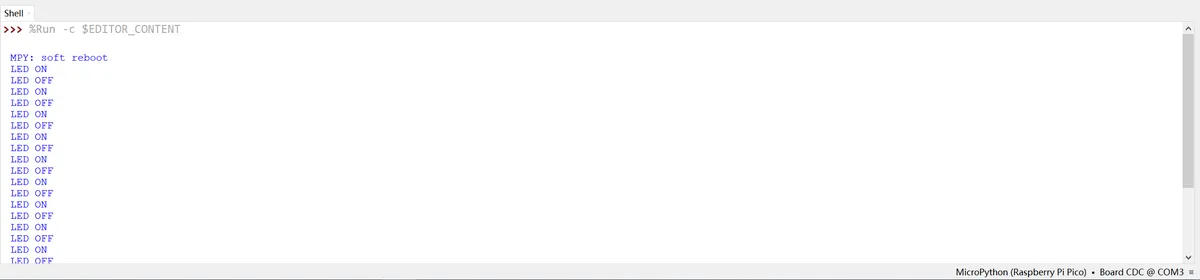
You can see the LED blinking, while the terminal outputs debug information:
Use the "Save As" option in the file to save the test program. At this point, you need to select a storage location:
- This PC
- Raspberry Pi Pico
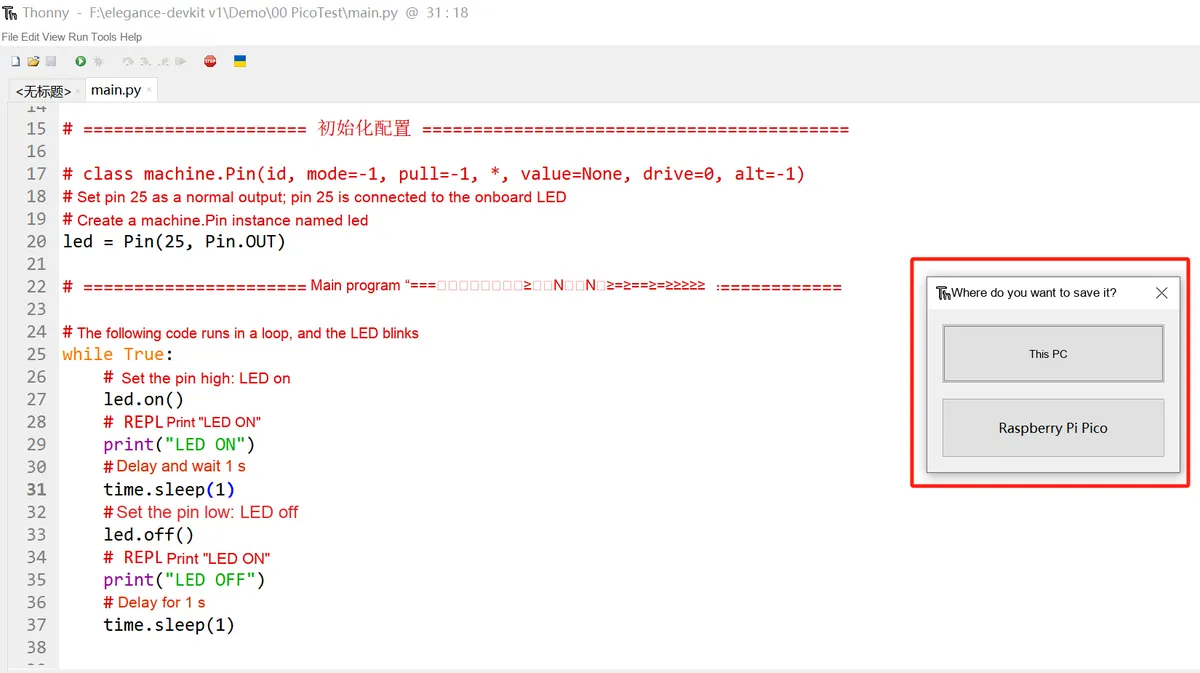
You can choose different storage locations. Just select the corresponding storage space when reopening it in the future.
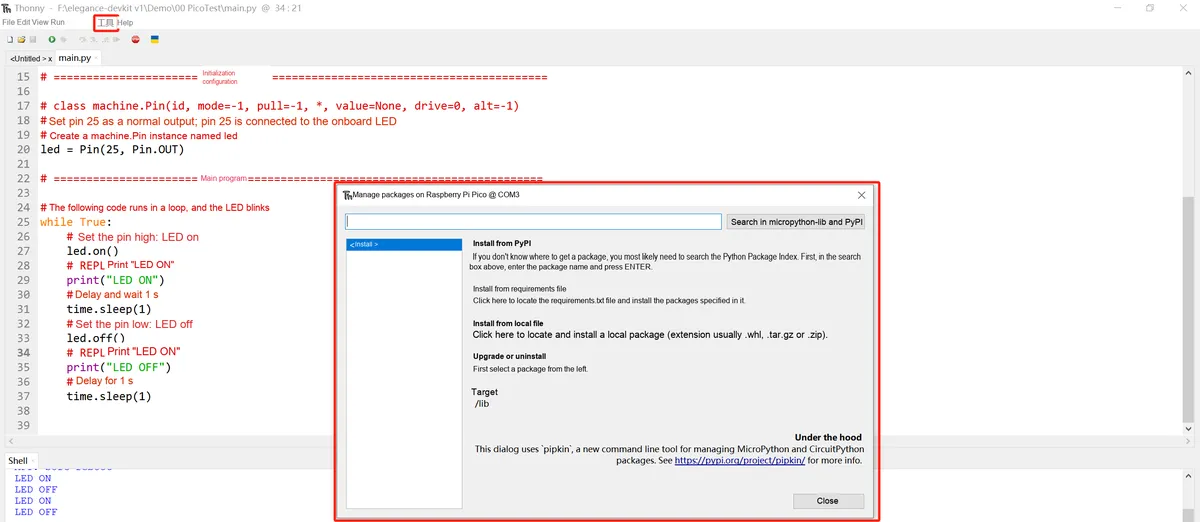
Thonny comes with a built-in visual package manager that makes it easy for beginners to install and uninstall various third-party Python packages. You can open it by clicking *Tools* -> *Manage Packages* at the top of the IDE:
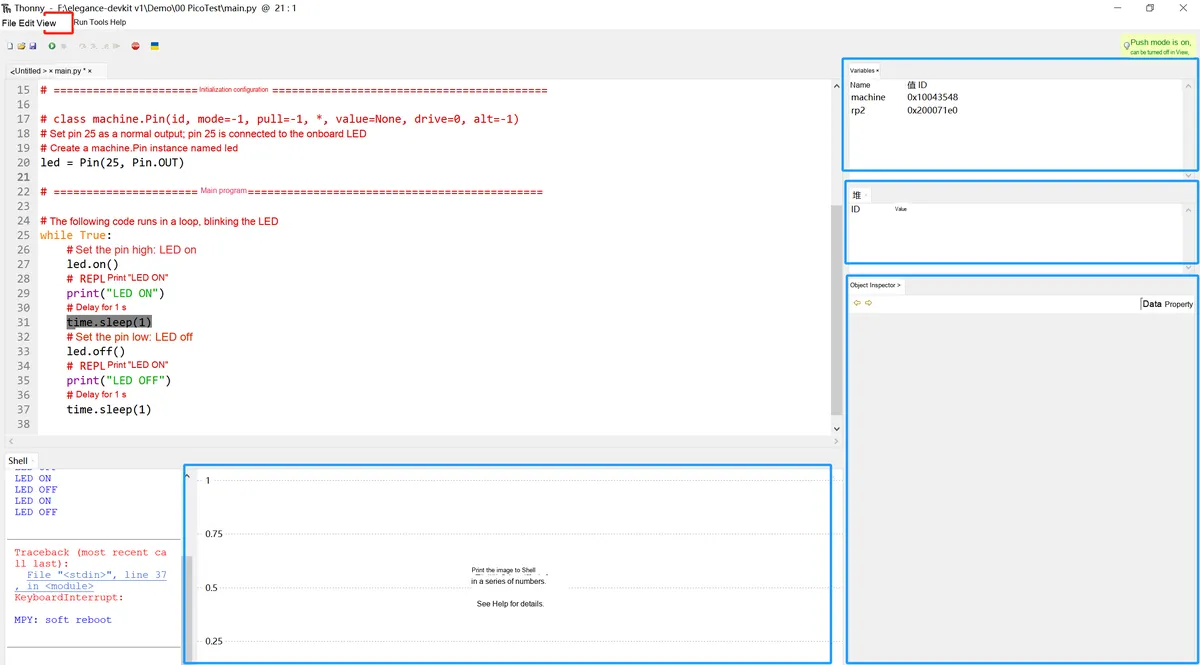
In addition, we can click "View" at the top of the IDE to display multiple windows such as Plotter, stack, Variables, and Object Inspector, which facilitates program debugging:
2.4 Building MicroPython Development Environment Based on VS Code in Linux Environment
2.4.1 Setup of MicroPython Development Environment on Linux (Container-based)
For details, please refer to: Building MicroPython Development Environment on Linux (Container-based)
Here, we use VSCode with Dev Container (containerized Development Environment) for MicroPython development. The container communicates with physical boards (such as /dev/ttyACM0, /dev/ttyUSB0, etc.) via mpremote, keeping the code synchronized with the host machine's folders.
Placing the Development Environment in Docker + VSCode Dev Containers and using it together with mpremote for joint debugging with the device can deliver a workflow that is repeatable, consistent and low-maintenance: team members do not need to install complex dependencies on their respective hosts, and can directly start the container to get the same toolchain (mpremote, Python, mpy-cross, etc.);Containerization also isolates device access, permissions, and dependencies to avoid polluting the host system. Meanwhile, it enables real-time synchronization between code and devices via workspace mounting, significantly accelerating iteration and debugging between the host machine and target board, and facilitating quick onboarding for new users as well as stable delivery.
Points to note:
Dockerprovides a runtime environment for containers; by default, containers are isolated from the host, so you need to explicitly expose devices (such as/dev/ttyACM0) to the container or configure them indevcontainer.json.- Serial devices typically belong to the
dialoutgroup; adding a user to this group grants direct access to the serial port. - After joining the
linuxgroup, you usually need to log out/reboot or usenewgrpto activate the group permissions. mpremote(recommended) is a modern tool for interacting withMicroPythondevices, supporting common operations such asREPL, file upload, andmount.
Update the package index and install common tools before starting:
sudo apt update
sudo apt install -y docker.io git
# Optional: if VSCode is not installed, first install the .deb from the official website and then use apt, or install it with your distribution's package manager
Next, we add user permissions (for serial ports and Docker), and first check the permissions of the device:
ls -l /dev/ttyACM0
# Example output: crw-rw---- 1 root dialout 166, 0  Sep 3 15:52 /dev/ttyACM0
Then add yourself to the docker and dialout groups:
sudo usermod -aG docker $USER
sudo usermod -aG dialout $USER
To activate a new group identity, you need to log out, log back in, or restart your computer; alternatively, you can use newgrp for temporary activation (valid for the current shell):
newgrp docker
newgrp dialout
Next, install the VSCode extension: Dev Containers (search for it in the Marketplace and install it), then place the https://codeberg.org/eoelab/cenv/src/branch/main/Denv/upython directory's. devcontainer folder into your workspace.
In the VSCode menu, select: Remote-Containers: Open Folder in Container. ..(or select "Open in Container" in the lower right corner):
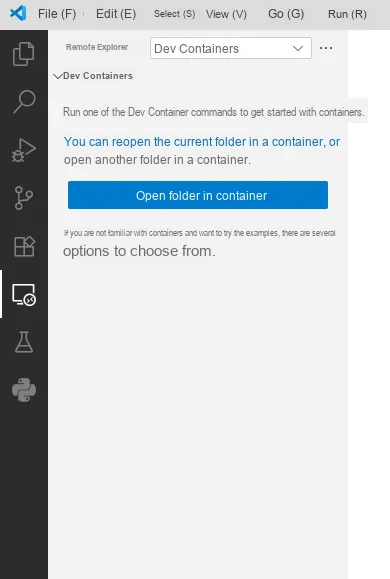
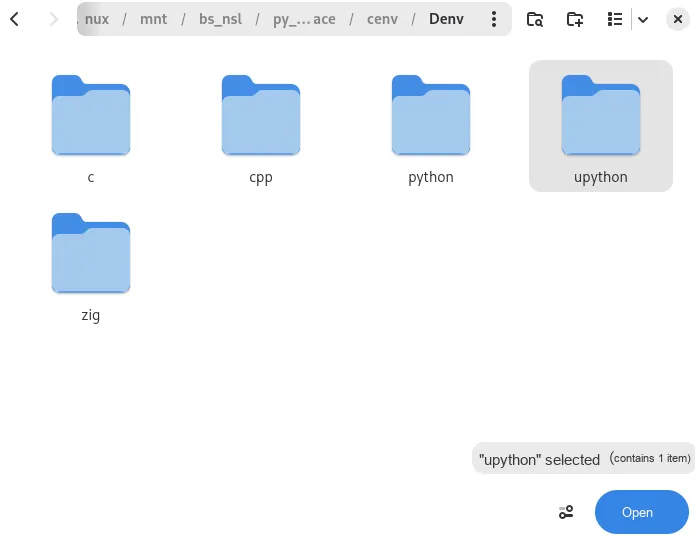
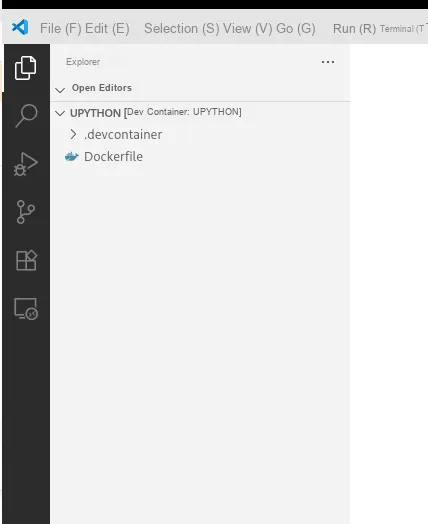
Wait for the container to build and initialize (the first time will pull the mirror and install dependencies), and you will see the development container name displayed in the lower left corner, as well as the log panel of Dev Containers:

Develop in the container terminal or VSCode editing window just as you would on the host machine. Common mpremote commands:
# Show the mpremote version to check that it is available
mpremote --version

# Connect to the device and open the REPL (replace with your device)
mpremote connect /dev/ttyACM0 repl

# Run a single file on the device (no upload needed)
mpremote connect /dev/ttyACM0 run main.py

# Upload a file directly to the device
mpremote connect /dev/ttyACM0 fs put main.py :/main.py

# Mount a host directory on the device (good for quick iteration)
mpremote connect /dev/ttyACM0 mount . run main.py

# Terminate the current task: Ctrl+C (on the command line)
If your devcontainer.json has mapped the device to the container, mpremote can directly access the device by using /dev/ttyACM0 inside the container. If no mapping is configured, mpremote will prompt a device not found error or a permission error.
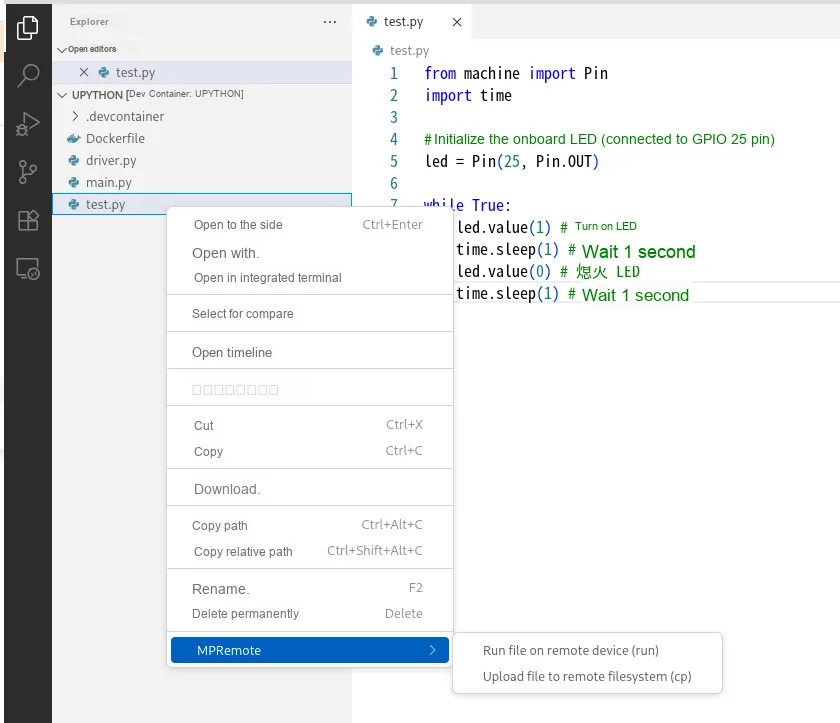
For a single file, simply right-click and select mpremote > Run file on remote device to execute it:
For multi-file/project development, open a terminal and run mpremote mount. run main.py to get started:
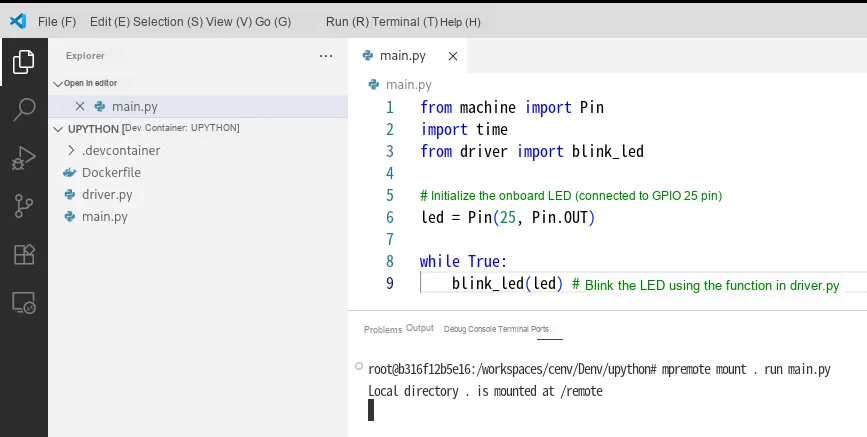
Use ctrl+ c to terminate the current task. You can switch the file to be executed at any time simply by running the command again, no extra copying is needed, and it stays in sync with the host file, making it ideal for development scenarios.
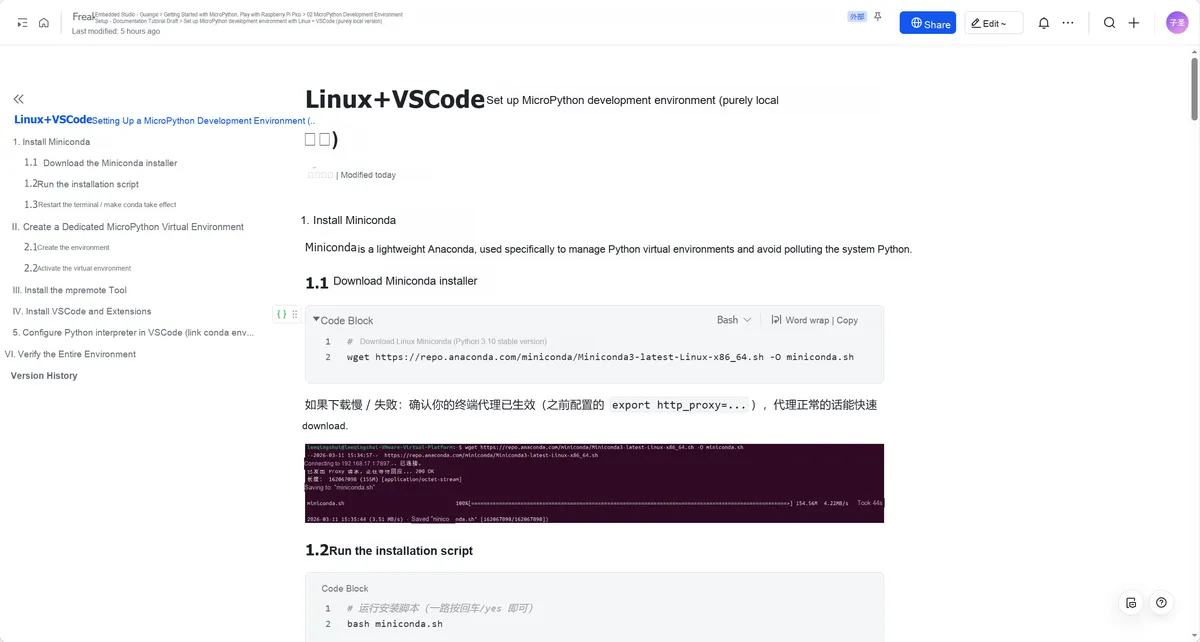
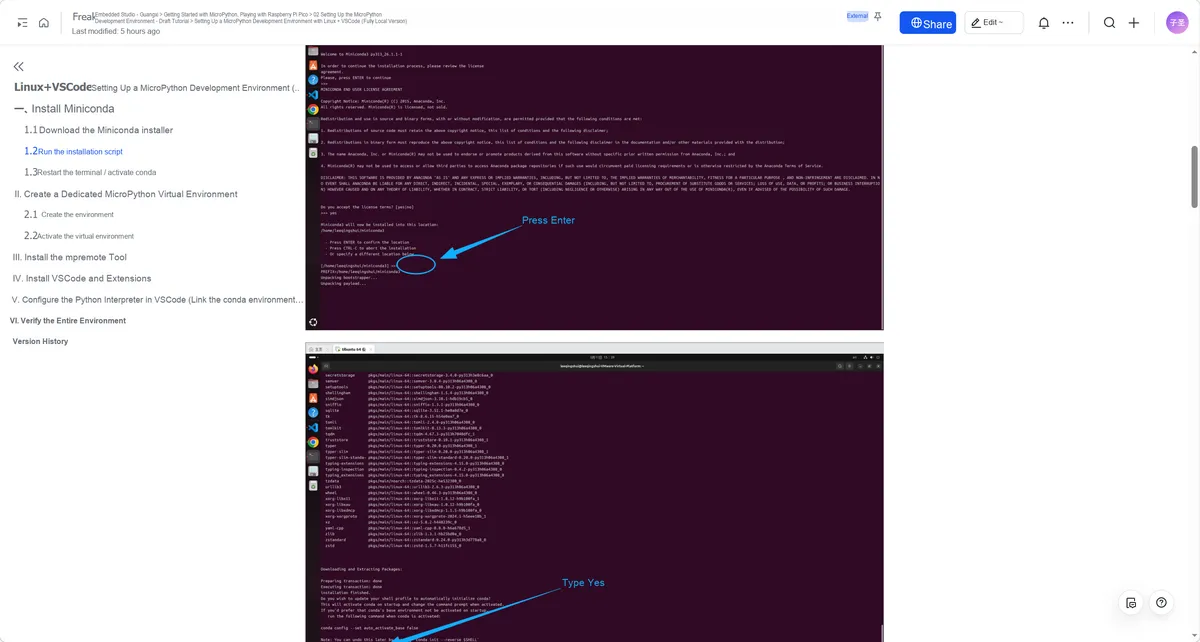
2.4.2 Building MicroPython Development Environment on Linux+ VSCode (Pure Local Version)
Building MicroPython Development Environment with Linux and VSCode (Pure Local Version)
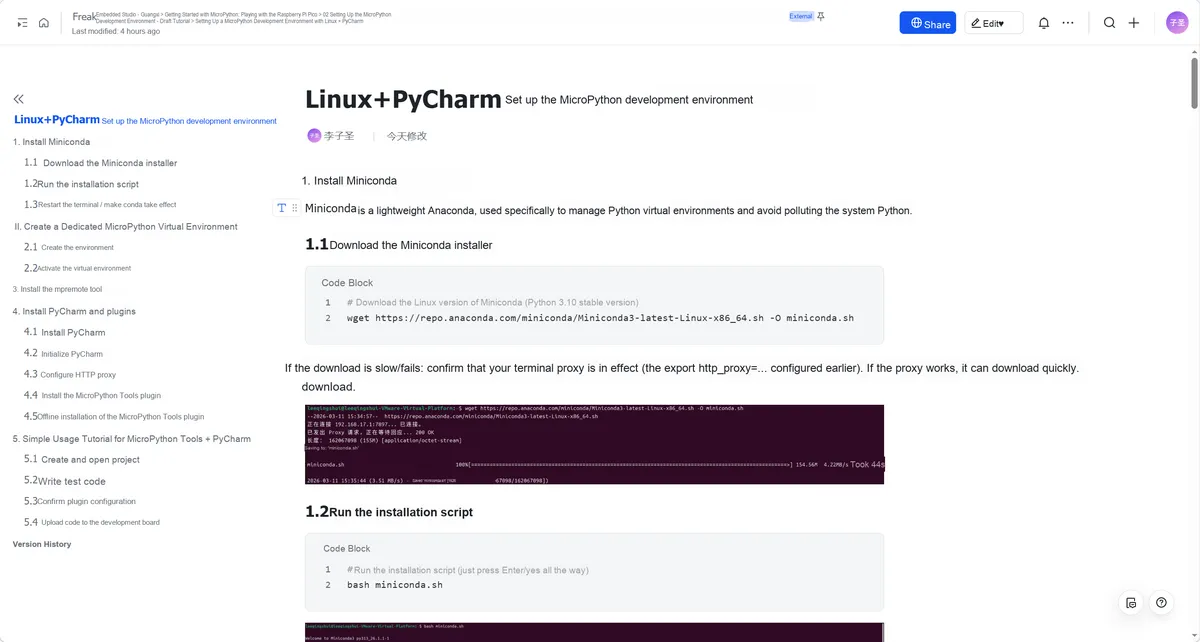
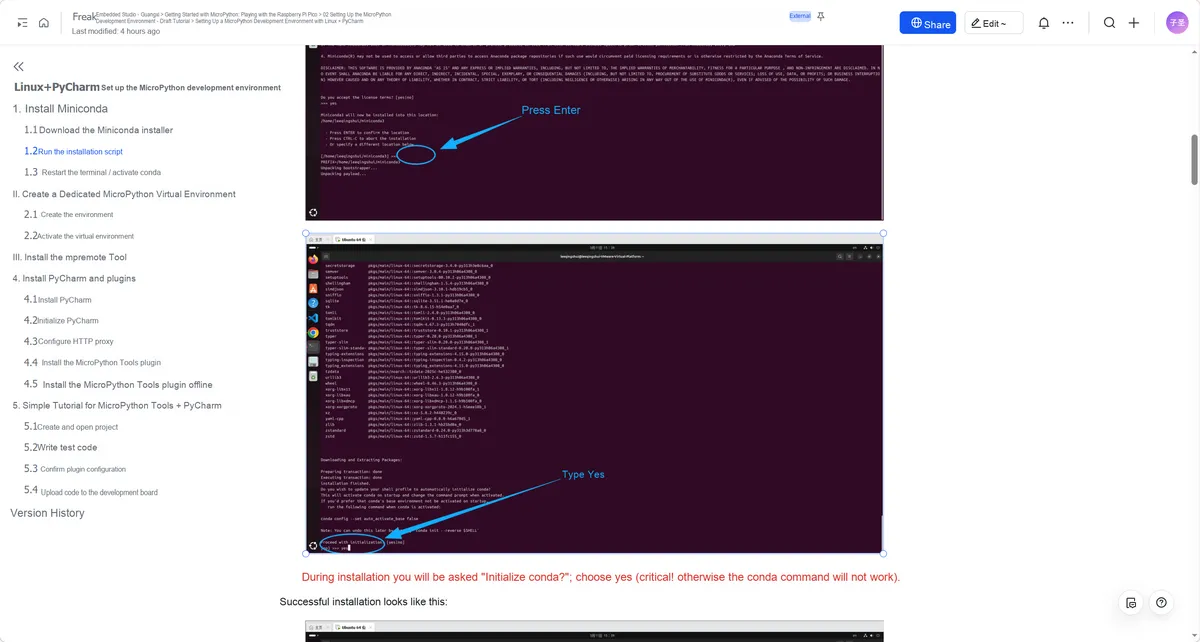
2.4.3 Build MicroPython Development Environment with Linux and PyCharm
Building MicroPython Development Environment with Linux and PyCharm
3. Online simulation platform supporting MicroPython
When it comes to learning embedded systems, a good development board is indispensable. But what if you don't have an embedded (MCU) development board at hand and are eager to learn embedded knowledge? In this case, we can use some online simulation platforms to complete the relevant learning of embedded knowledge. An online simulation platform can be understood as a simulation of a real microcontroller and peripheral sensors, where we can complete code writing, flashing and running, and observe the working status of the microcontroller and sensors at the same time.Here, we recommend two online simulation platforms that support MicroPython, namely Wokwi and Unicorn.
3.1 Wokwi
Wokwi is a powerful and practical free-to-use online simulator for embedded systems and Internet of Things applications, which allows users to build detailed circuit diagrams and write and run code in real time for mainstream microcontrollers such as ESP32, STM32, Arduino and Raspberry Pi Pico in a virtual environment without the need for actual physical hardware.For enterprise-level engineering project development, although Wokwi may seem to have limited functions in some high-complexity or specific hardware interaction scenarios, it undoubtedly provides an extremely convenient and low-cost learning and Development Environment for electronic DIY enthusiasts, school teaching and remote home-based developers.
With the Wokwi platform, learners and developers can easily drag and drop various electronic components to build Modularization circuit designs just like physical operations, and write and debug programs via the integrated code editor. Such a simulation process not only eliminates the risk of hardware damage that may be caused by physical debugging, but also greatly lowers the cost threshold for technical education — learners no longer need to invest a large amount of money in purchasing various development boards and supporting components to master the knowledge of different modules.All in all, Wokwi, as an all-in-one online service, simplifies the design and debugging of embedded programming and IoT projects, catering to the entry-level needs of beginners while facilitating flexible practical exploration for advanced users.
And according to the introduction on Wokwi's official website, it not only supports online simulation, enabling the entire process of editing and running simulations to be completed in the cloud, but also supports local editing and compiling of programs in the form of a VScode plugin, after which the binary files can be run on the simulation platform, which well protects the security of developers' program codes.
At the same time, Wokwi also has some special features, including:
- WiFi Simulation - The simulation project can connect to the Internet. You can use MQTT, HTTP, NTP and many other network protocols
- Virtual Logic Analyzer - Capable of capturing digital signals (such as UART, I2C, SPI) during simulation and analyzing them on your computer
- Powerful GDB Emulation - A robust debugger for Arduino and Raspberry Pi Pico designed for advanced users
- SD Card Emulation - Files and directories can be stored and retrieved using code
The website of Wokwi is: https://wokwi.com/
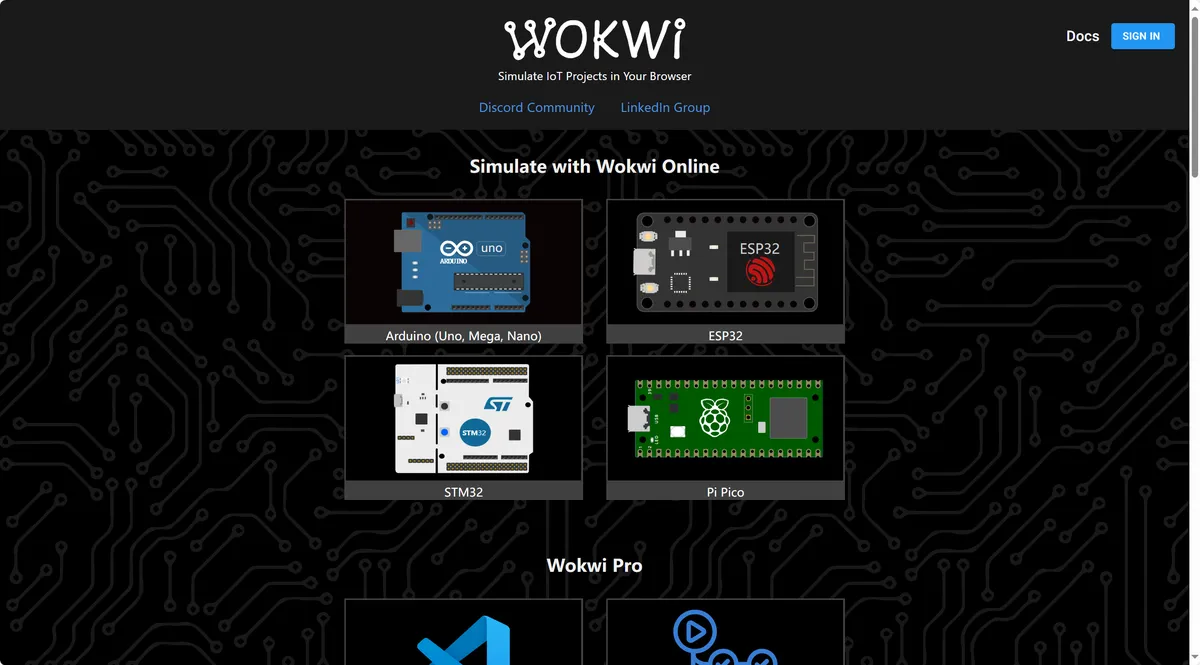
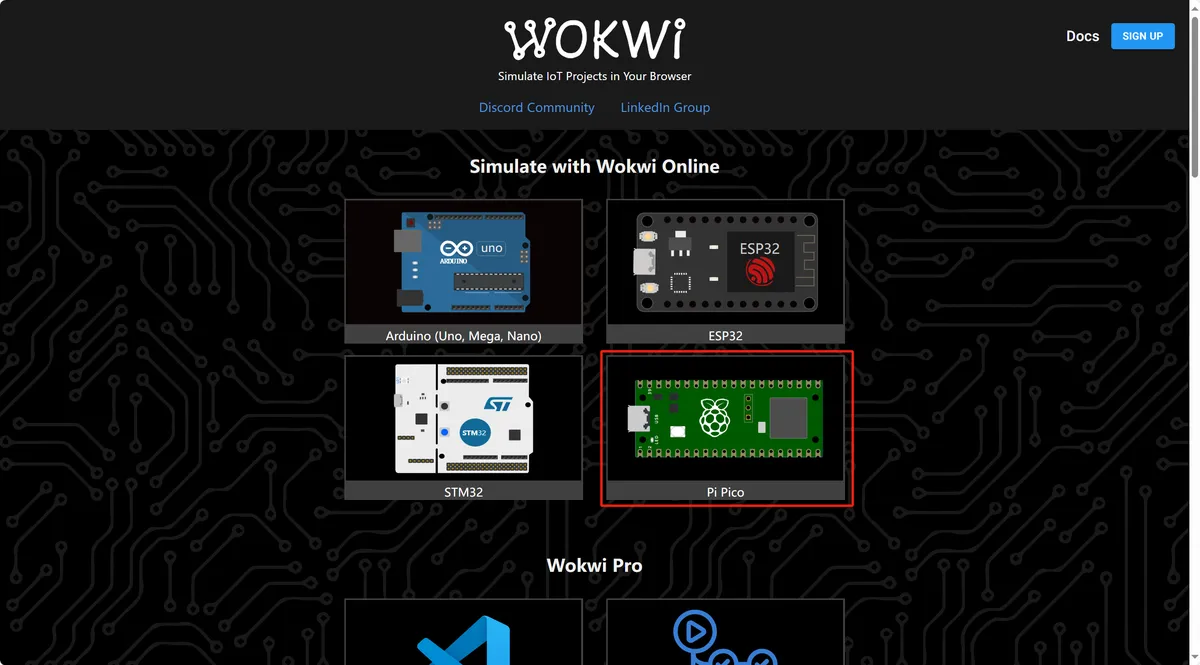
Here, we choose the Raspberry Pi Pico development board and click on any MicroPython routine:
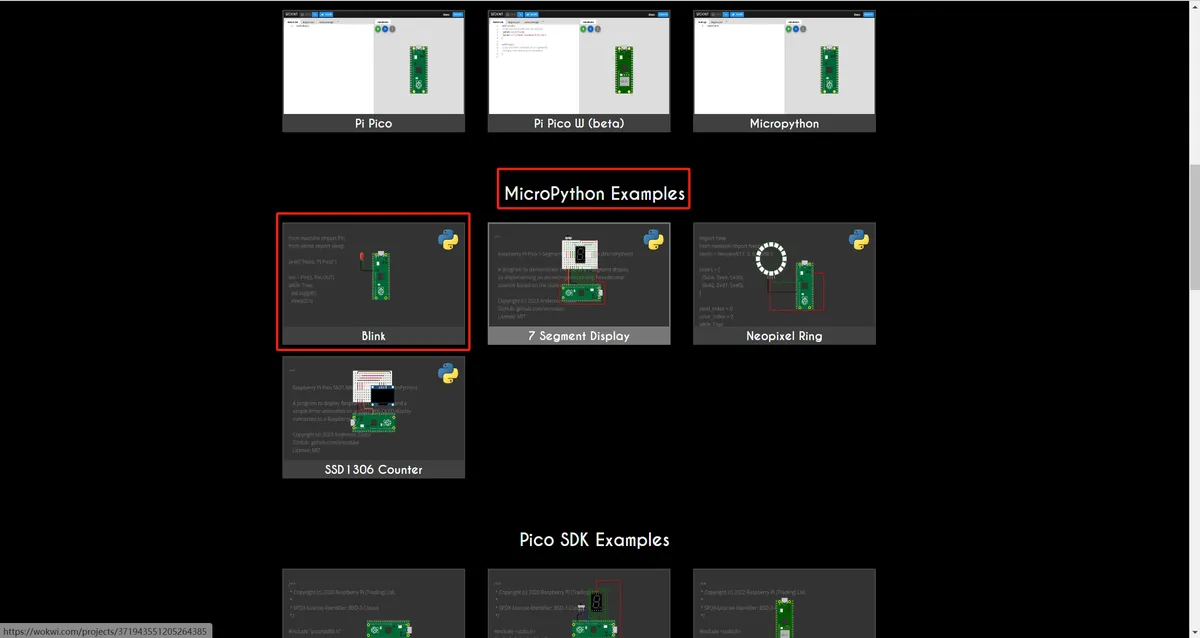
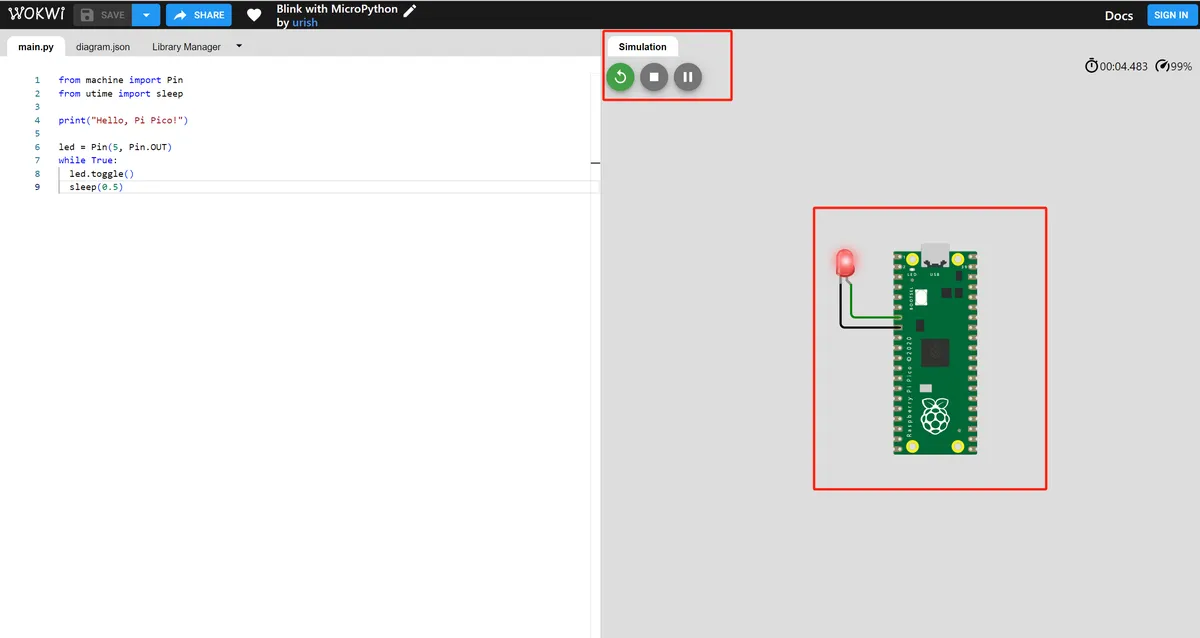
Here we select the "Blink" LED blinking example, click the green button to run it, and you will see the LED blink:
3.2 unicorn
Unicorn is a lightweight, cross-platform, and multi-architecture CPU emulator framework, which allows us to focus better on CPU operations while ignoring the differences between machine devices. Just imagine that we can apply it to these scenarios: for instance, when we simply need to simulate code execution instead of requiring a physical CPU to perform those operations, or when we want to analyze malicious code and detect virus signatures in a safer manner, or when we aim to verify the functionality of certain code during the reverse engineering process, using a CPU emulator can greatly facilitate our work.
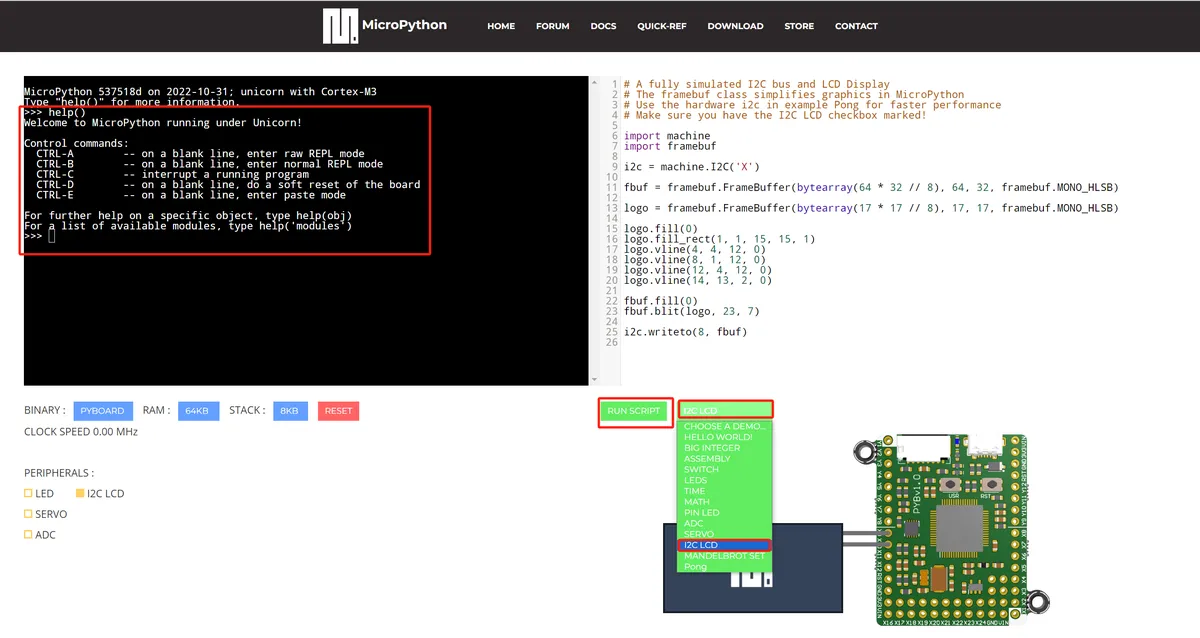
MicroPython unicorn contains the MicroPython port for this virtual microcontroller, available at: https://micropython.org/unicorn/
We open MicroPython unicorn, select an example program of "I2C LCD", click to run, and we can see that icons are displayed on the LCD screen.
4. Graphical Programming of MicroPython
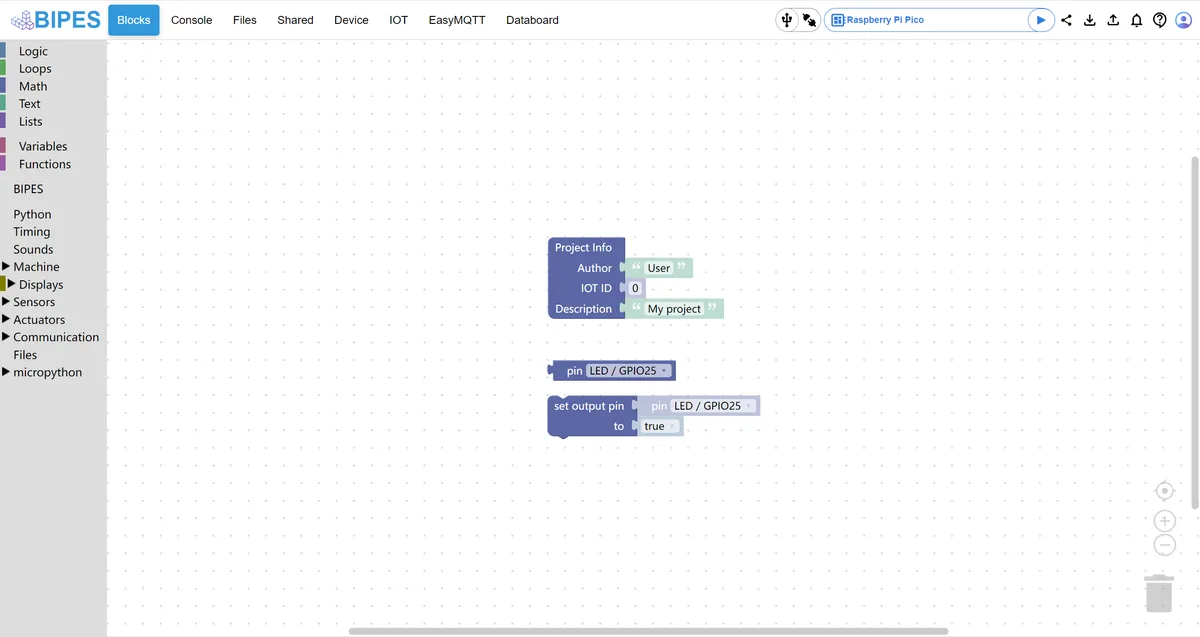
bipes is a beginner-friendly tool for MicroPython hardware development: it is a browser-based online tool that requires no local software installation. Users can directly drag and drop the graphical blocks on the left (such as those in categories like logic, hardware control, sensors, etc.) to piece together MicroPython code — as shown in the figure, the "set output pin" block is used to control the on-board LED (GPIO25 pin) of the Raspberry Pi Pico to light up.
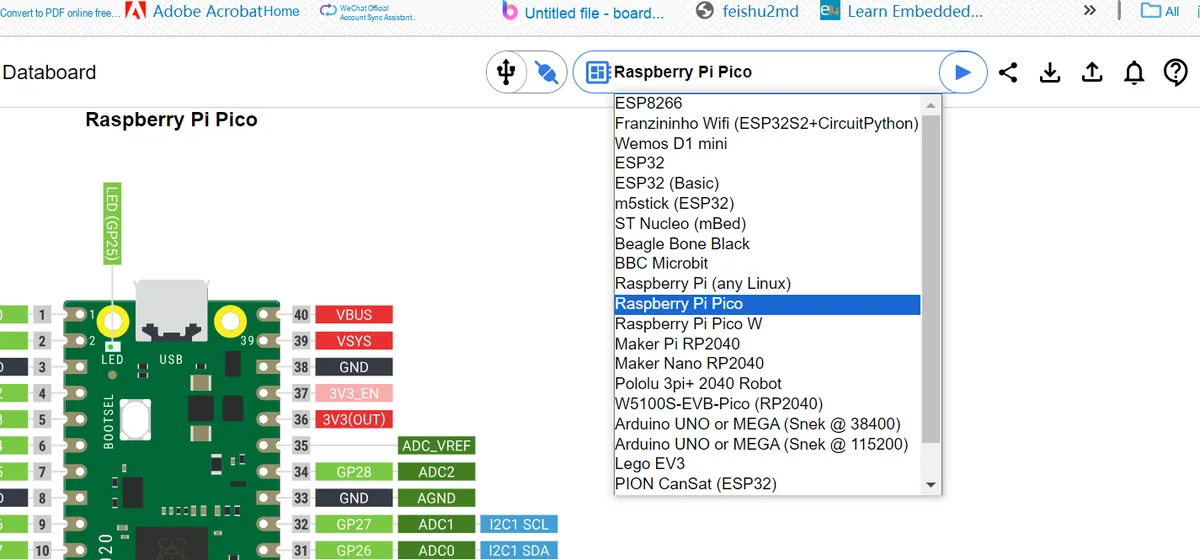
BIPES supports a variety of development boards (including ESP8266, ESP32, and Raspberry Pi Pico), and can connect to microcontrollers via Wi-Fi or serial port.
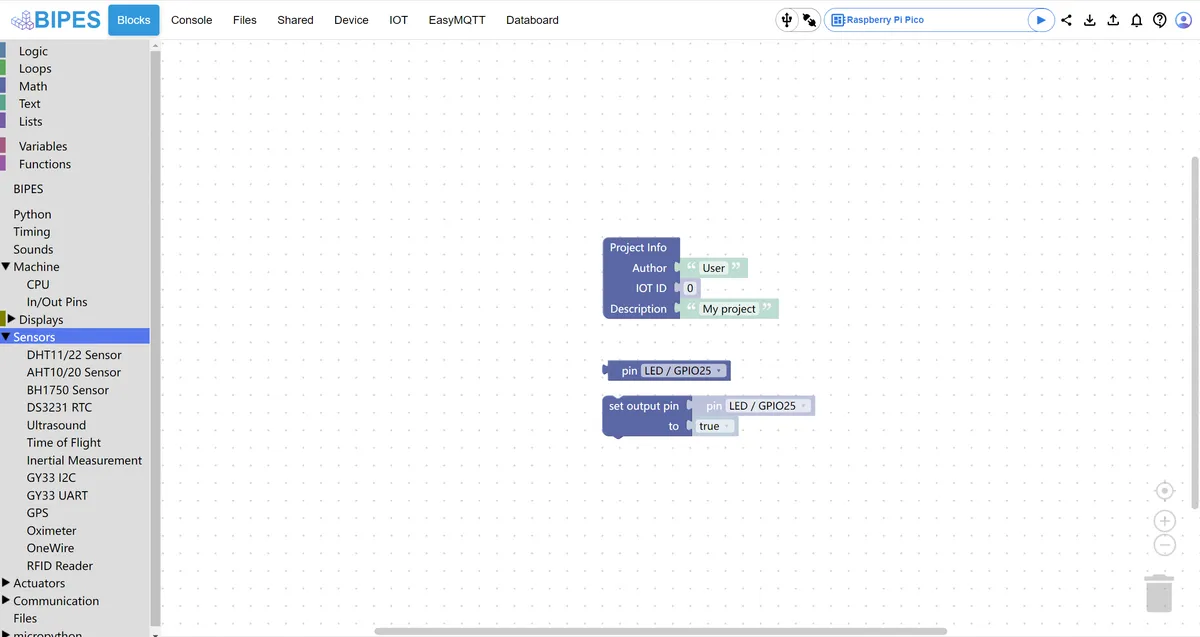
The left-side menu provides dedicated blocks for multiple sensors such as DHT11/22 (temperature and humidity), ultrasonic sensors, gyroscopes, and more.
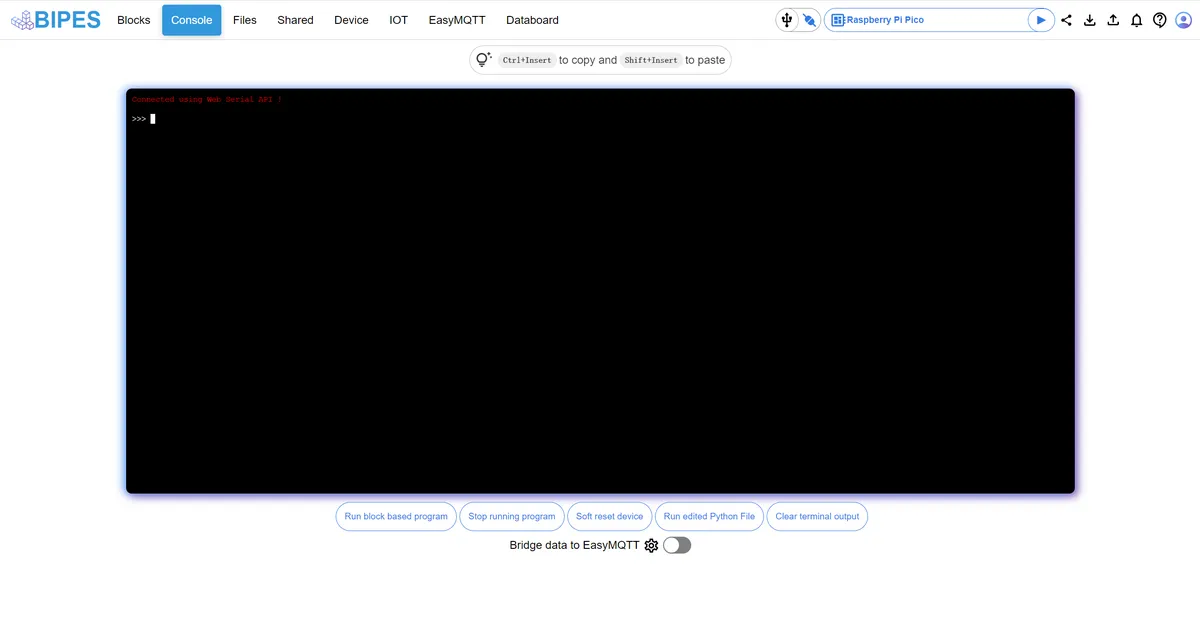
It is also equipped with a device interaction and log viewing area:
- The top area displays the device connection status (the text "Connected using Web Serial API" in the figure indicates that the Pico is already connected);
- Bottom Button Functions:
Run block-based program: Run the program you have built with blocks;Soft reset the device: Soft reboot the development board (for use when the program freezes);Run edited Python File: Run the Python code file that you have manually edited;
- Here you can view the program running logs and error messages in real time, and also directly input MicroPython commands to interact with the device.
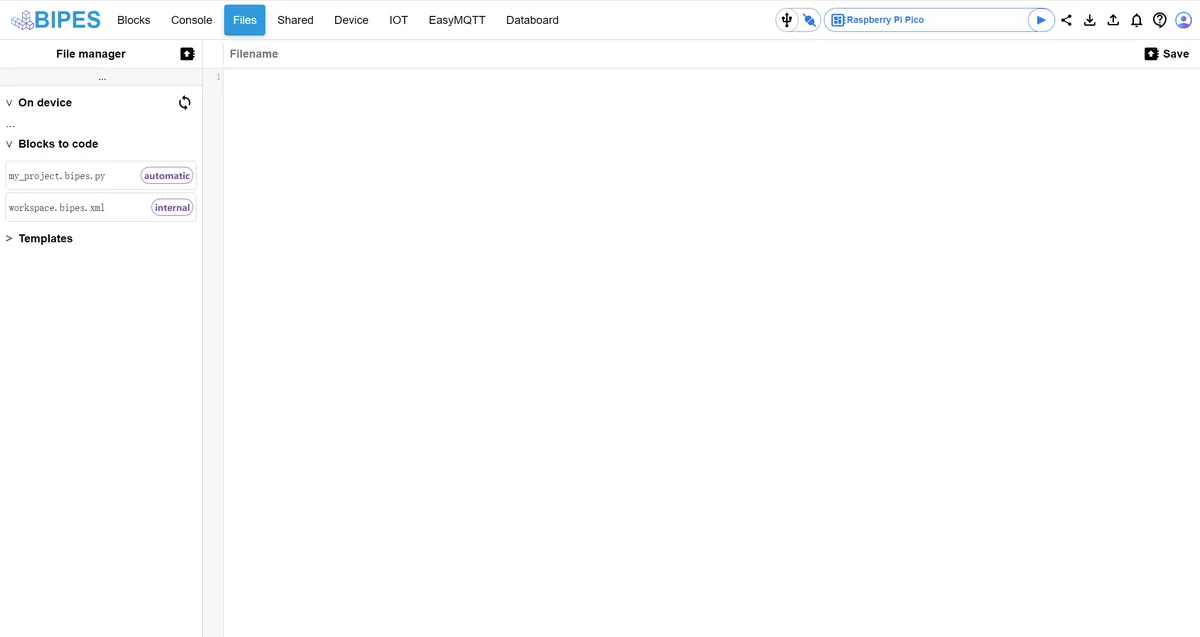
We can also manage files between the development board and the local machine:
- The left side is divided into 3 areas:
On device: Files stored internally on the development board (you can upload, download or delete files on the development board here);Blocks to code: code files automatically generated by blocks (. bipes.pyis a runnable Python file, andworkspace.bipes.xmlis a block configuration file);Templates: Official project templates (for quickly building functions directly via templates);
- Operation: For example, to save the
. pyfile generated by the blocks to the development board, just select theOn devicearea and click the upload button.
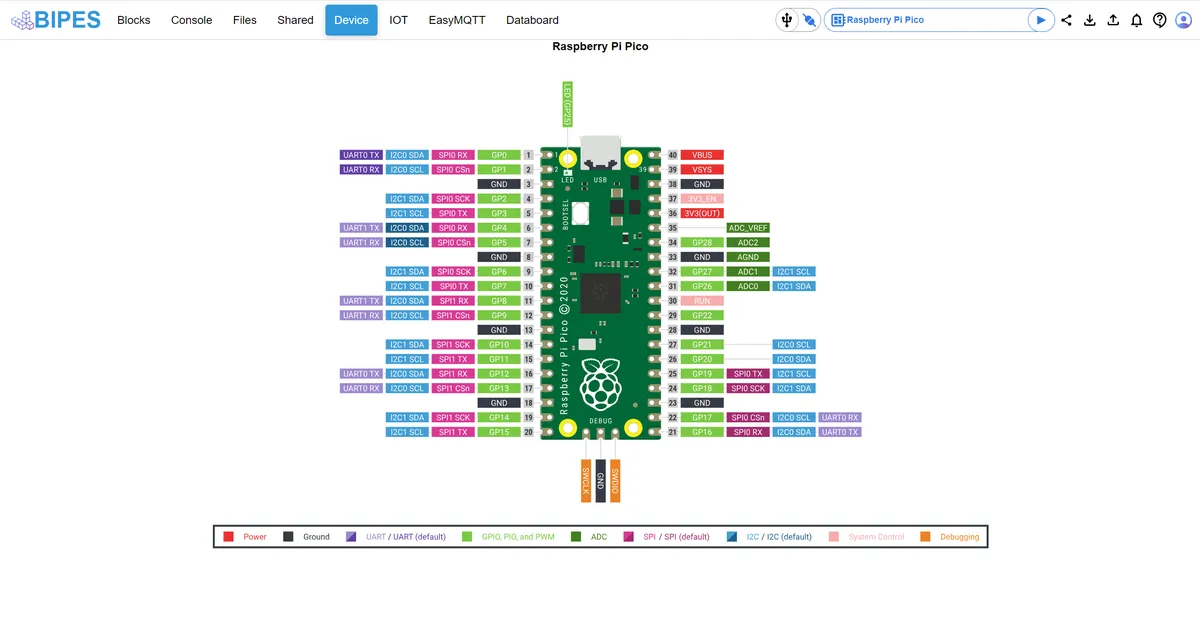
This website also provides a Device tab, which is the reference area for development board pins, displaying the complete pinout of the Raspberry Pi Pico, with different colors corresponding to different functions (for example, GPIO is marked in green and I2C in blue).
References
- Micropython: Flashing Firmware to Pico and Configuring VsCode Development Environment https://blog.csdn.net/qq_45779334/article/details/118557985
- Practice on Usage and Control Programming of Raspberry Pi Pico Expansion Interfaces Based on PyCharm and MicroPython
https://blog.csdn.net/yuanzywhu/article/details/113483661
- How to Use PyCharm With Raspberry Pi Pico W and MicroPython
https://www.instructables.com/How-to-Use-PyCharm-With-Raspberry-Pi-Pico-W-and-Mi/
- Raspberry Pi Pico Python SDK: A MicroPython environment for RP2040 microcontrollers
Chapter 1. The MicroPython Environment
- Set up the Thonny software environment for developing PI Pico https://blog.csdn.net/zhuoqingjoking97298/article/details/114064833
- Getting Started with MicroPython
- JetBrains/intellij-micropython https://github.com/JetBrains/intellij-micropython
- Announcing the MicroPython Plugin for PyCharm
https://blog.jetbrains.com/pycharm/2018/01/micropython-plugin-for-pycharm/
- Introducing Thonny, a Python IDE for learning programming https://dl.acm.org/doi/10.1145/2828959.2828969
Install the software
pycharm-professional-2024.1.1.exe (714.7 MB): third-party installer, download it from the publisher
Activation tool.rar 104 KB
Version Record
Version Number | Modifier | Time | Content |
v1.0.0 | Li Zisheng | 2025/09/16 | Document initialized, based on MicroPython version V1.23.0. |
v1.1.0 | Li Zisheng | 2025/12/05 | Add a figure caption. |
v1.2.0 | Li Zisheng | 2025/12/19 | Added Section 4: 4. Graphical Programming with MicroPython and Installation & Usage of the MicroPython Tool Plugin |
v1.2.1 | Li Zisheng | 2025/12/27 | Added the introduction to the MicroPython v1.27.0 firmware. |
v1.3.0 | Li Zisheng | 2026/03/11 | Added the environment setup methods for VSCode and PyCharm in the Linux environment. |