
Contents
- I. Install Miniconda
- 1.1 Download the Miniconda installer
- 1.2 Run the installation script
- 1.3 Restart the terminal / make conda take effect
- 2. Create a dedicated MicroPython virtual environment
- 2.1 Create an Environment
- 2.2 Activate the virtual environment
- 3. Install the mpremote tool
- IV. Install PyCharm and Plugins
- 4.1 Install PyCharm
- 4.2 Initialize PyCharm
- 4.3 Configure HTTP Proxy
- 4.4 Install the MicroPython Tools plugin
- 4.5 Offline Installation of the MicroPython Tools Plugin
- 5. A Simple Guide to Using MicroPython Tools with Pycharm
- 5.1 Create and Open a Project
- 5.2 Writing Test Code
- 5.3 Confirm Plugin Configuration
- 5.4 Upload the code to the development board
- Version Record
I. Install Miniconda
Miniconda is a lightweight version of Anaconda, designed specifically for managing Python virtual environments to prevent contamination of the system's Python installation.
1.1 Download the Miniconda installer
# Download the Linux version of Miniconda (Python 3.10 stable release)
wget https://repo.anaconda.com/miniconda/Miniconda3-latest-Linux-x86_64.sh -O miniconda.sh
If the download is slow or fails: confirm that your terminal proxy is active (the export http_proxy=. .. you configured earlier), and the download will be fast if the proxy is working properly.

1.2 Run the installation script
# Run the install script (just press Enter/yes all the way through)
bash miniconda.sh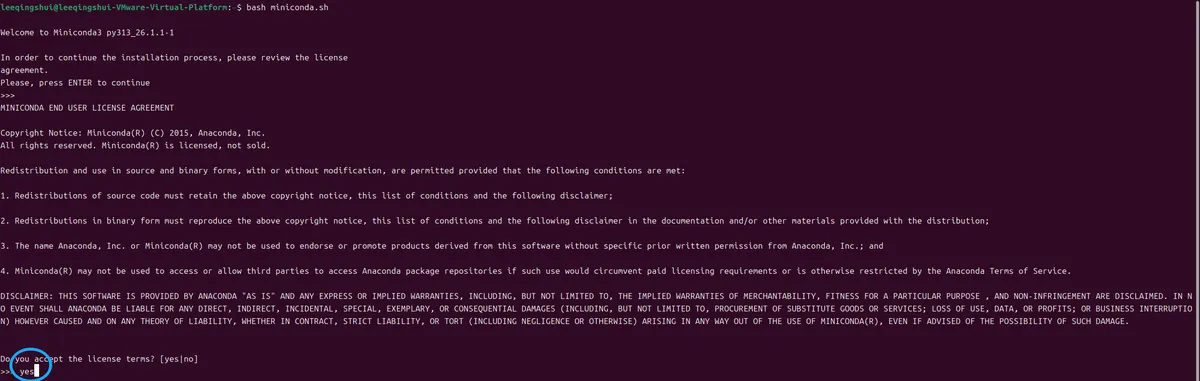
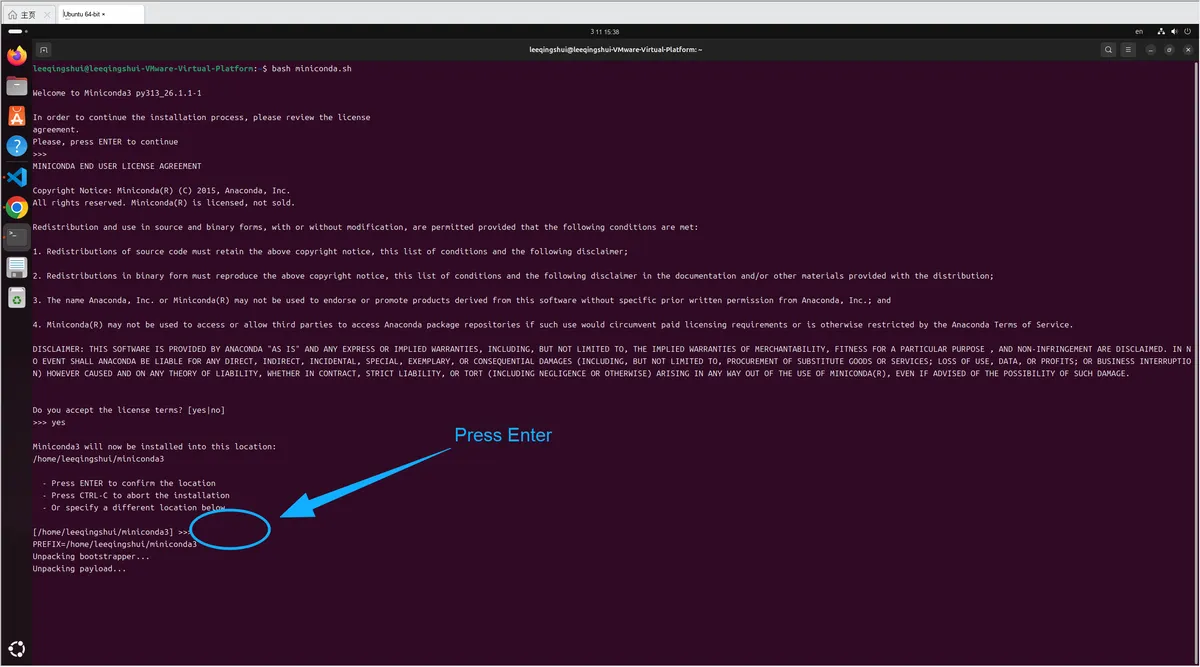
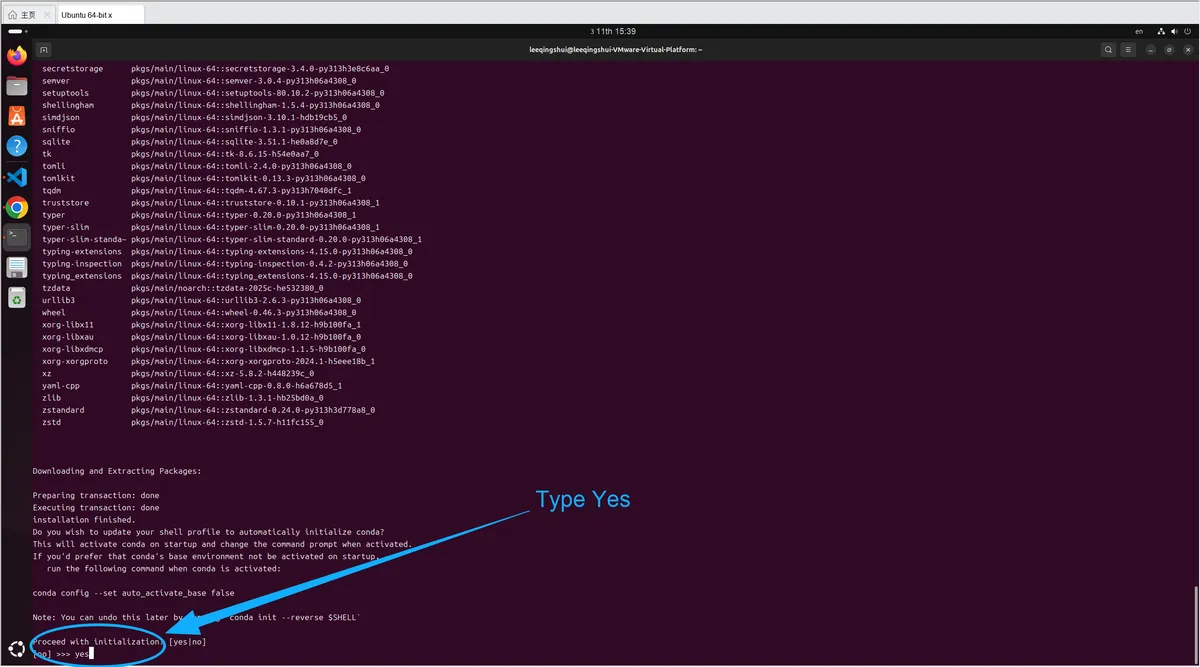
During the installation process, you will be asked "Whether to initialize conda", please select yes (critical! Otherwise the conda command will not be available).
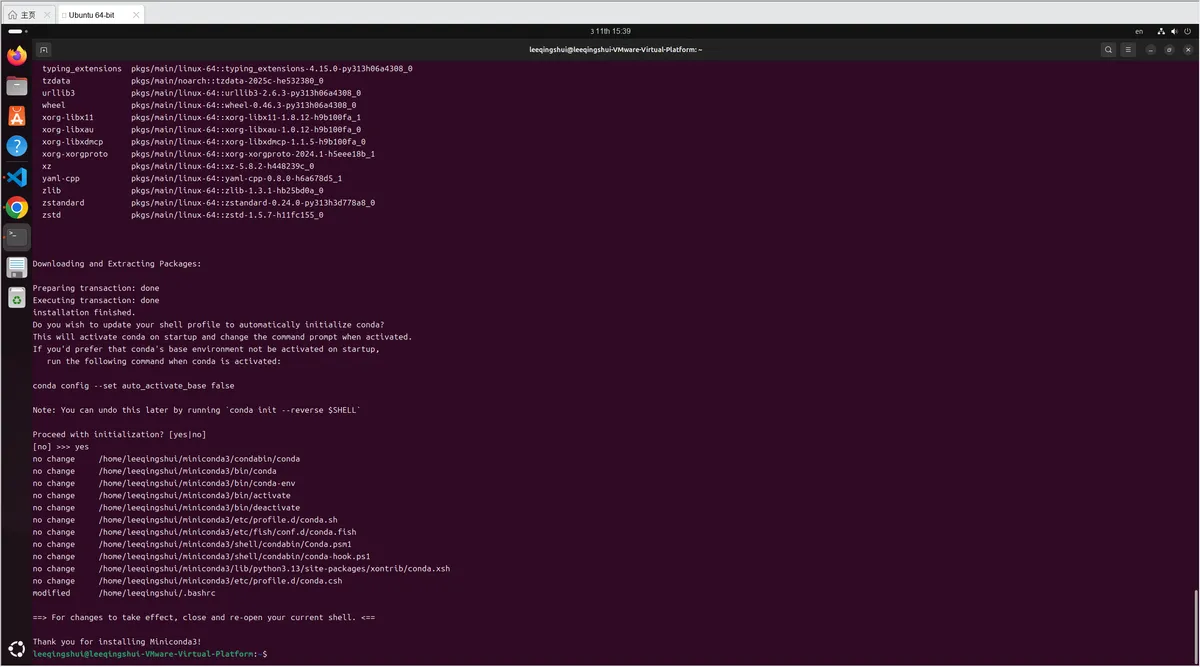
The successful installation result is shown as follows:
1.3 Restart the terminal / make conda take effect
After the installation is complete, close the current terminal, open a new terminal, and enter the following command:
conda --version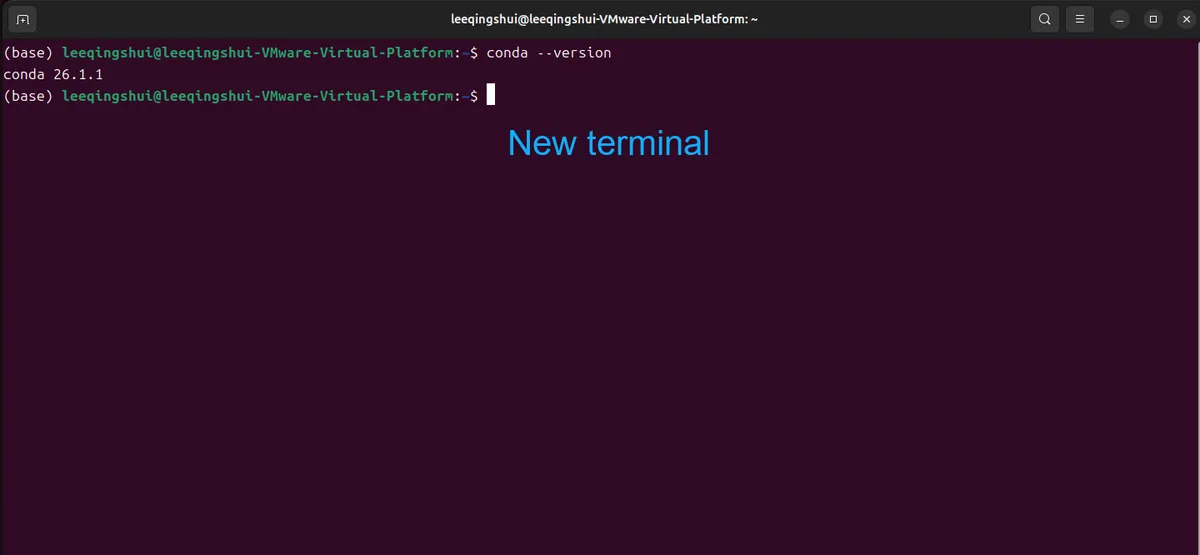
can output version numbers like conda 23.x.x, which indicates that Miniconda has been installed successfully.
2. Create a dedicated MicroPython virtual environment
Use conda to create an isolated environment to avoid conflicts with other Python projects.
2.1 Create an Environment
# Create an environment named "micropython" with Python version 3.12
conda create -n micropython python=3.12 -y
The parameters are defined as follows:
-n micropython: environment name (can be customized, e. g.,mpy)-y: Automatically confirm all installations without manually entering yes.
Note that after running this command, it may not work properly. You need to accept the terms of service of the official channel first. Let's accept the terms before proceeding to create the environment:
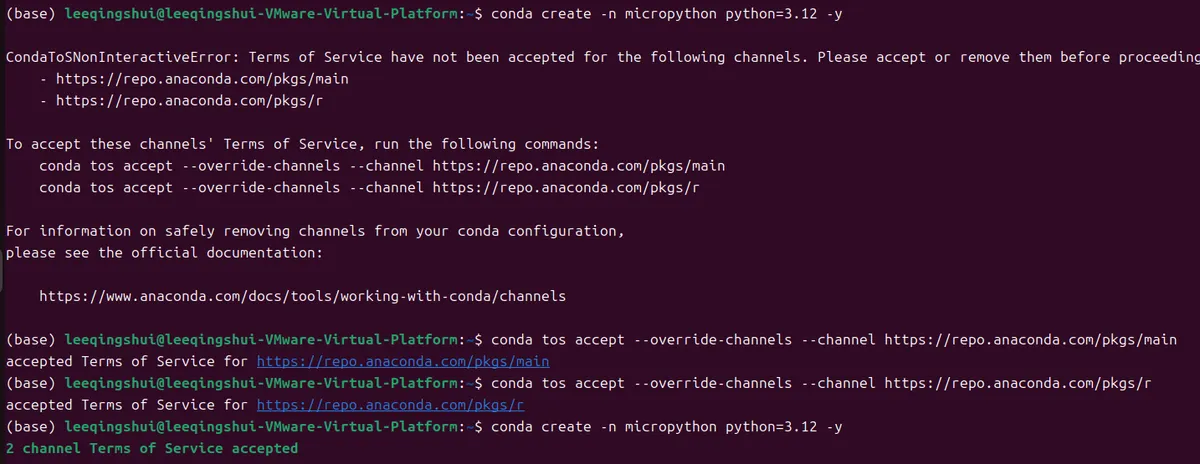
After the terms acceptance is completed, you can just execute the previous creation command.
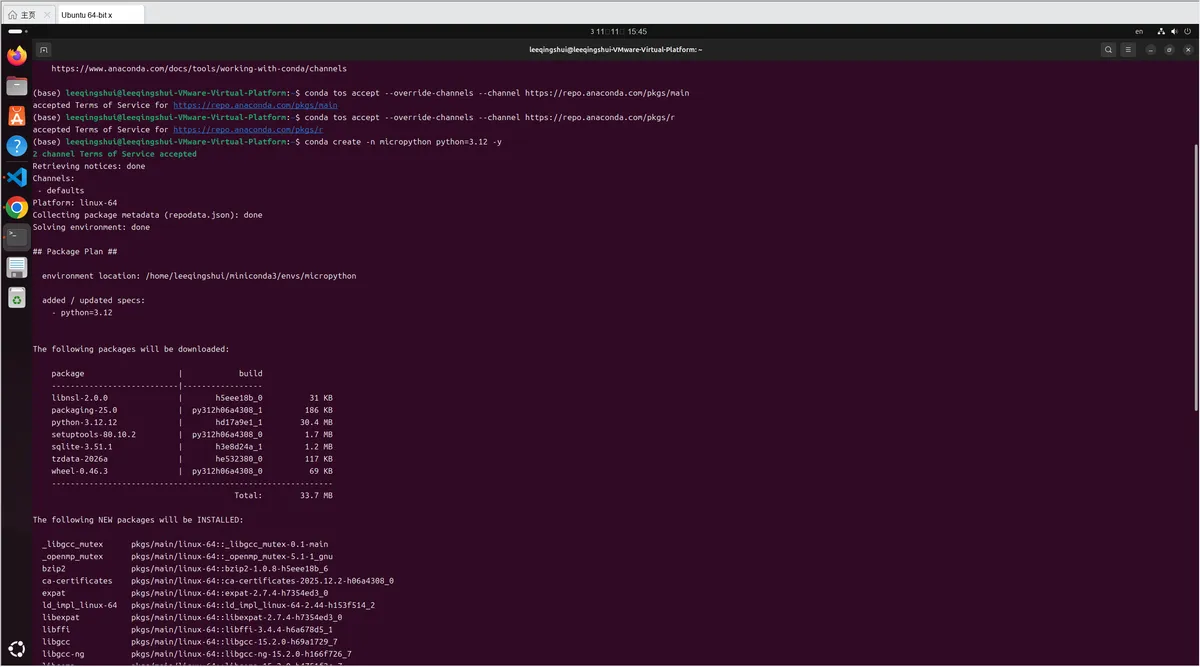
Here is how to use the environment:
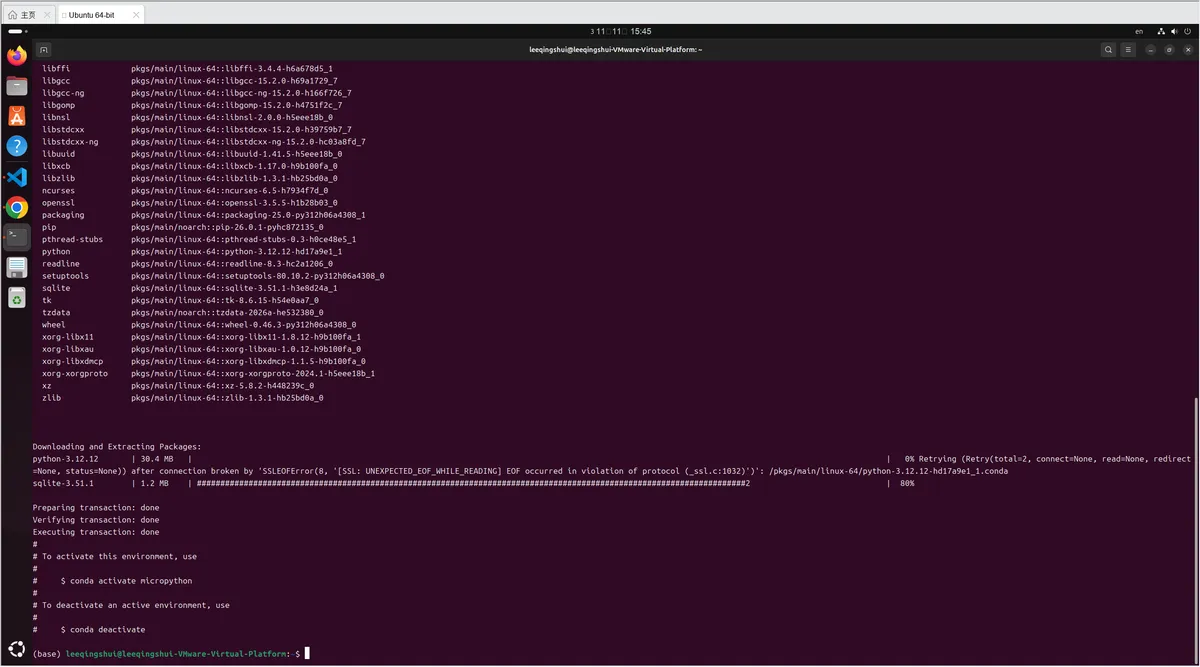
2.2 Activate the virtual environment
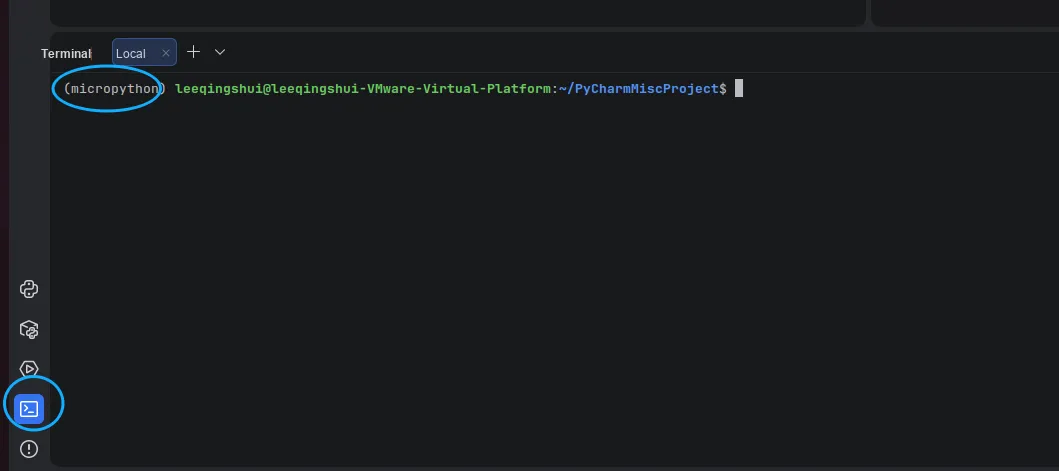
# Activate the environment (the terminal prefix will become (micropython))
conda activate micropython
All subsequent operations must be performed after the environment is activated.
3. Install the mpremote tool
mpremote is the official remote operation tool for MicroPython, which is used to transfer code to development boards, run code, and perform debugging.
# Install mpremote in the activated conda environment
pip install mpremote
Verify the installation: Enter mpremote --version, if the version number is output → the installation is successful.
Next, configure serial port permissions for mpremote (to avoid the "Permission Denied" error):
# Add the current user to the serial port group (dialout)
sudo usermod -aG dialout $USER
# Reboot for it to take effect (a reboot is required!)
sudo reboot
IV. Install PyCharm and Plugins
4.1 Install PyCharm
On Ubuntu system, we can install PyCharm via the snap package manager:
First update the software sources and install the snapd service:
sudo apt update && sudo apt install -y snapd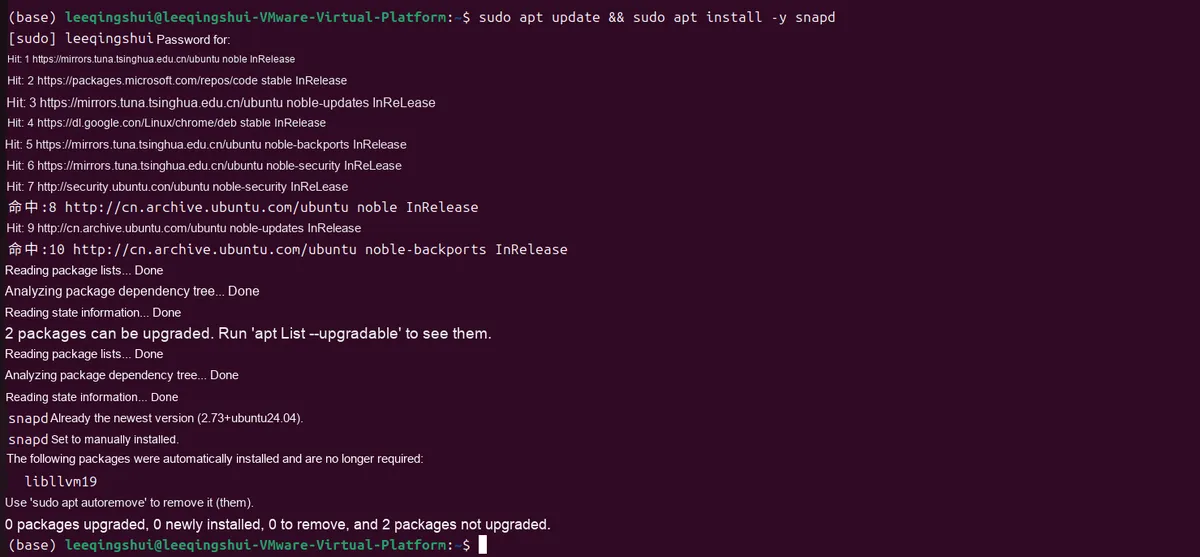
Execute the PyCharm installation command:
sudo snap install pycharm --classic
Wait for the command to finish executing, and then the installation of PyCharm will be completed.
4.2 Initialize PyCharm
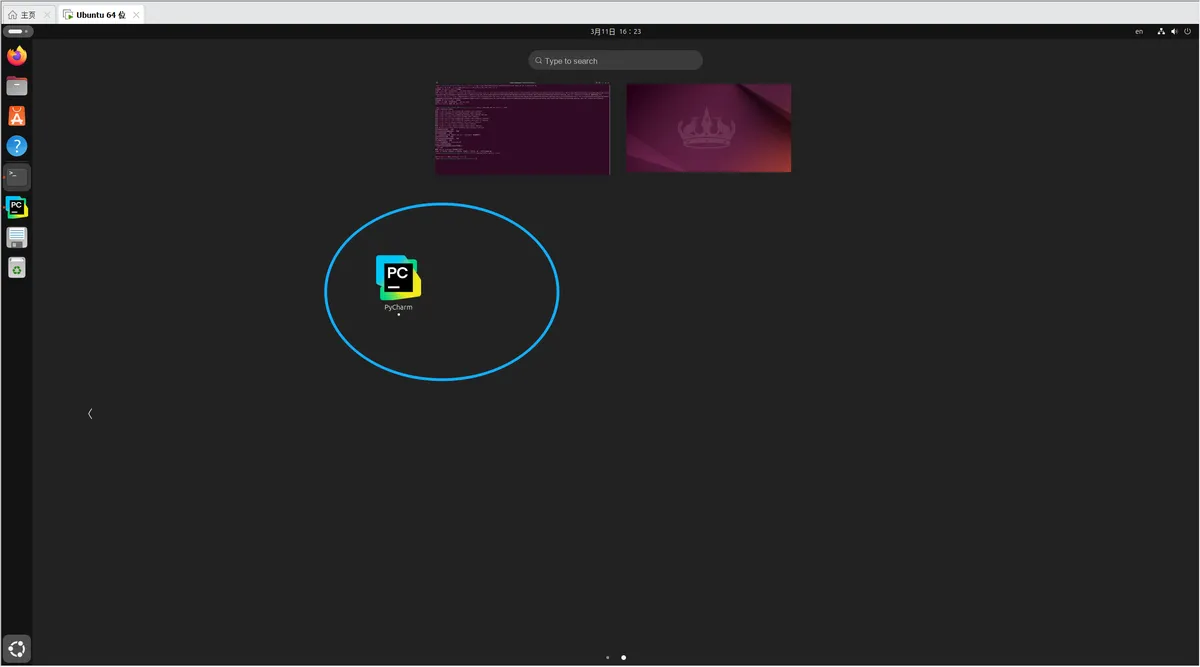
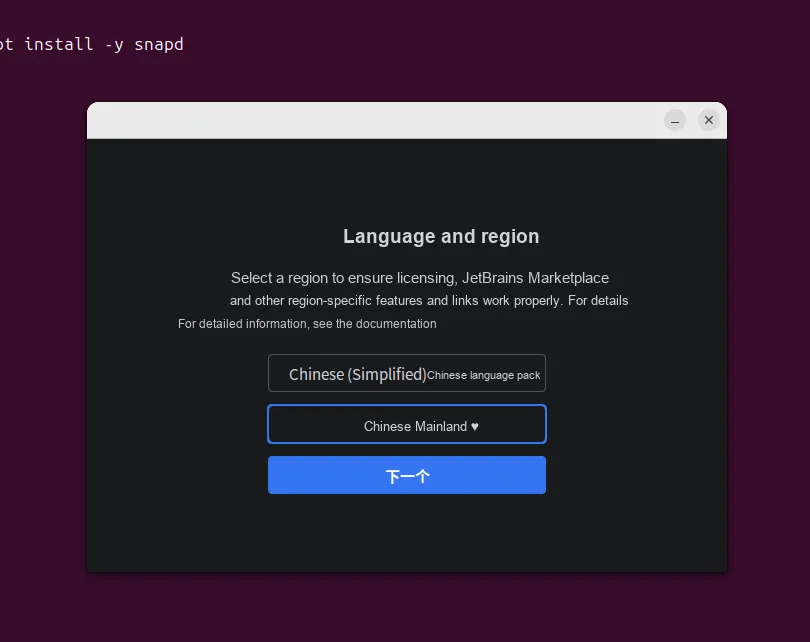
Locate the PyCharm icon in the application list and launch it; the first launch will take you to the language and region settings interface:
- Language Selection:
Chinese (Simplified) Language Pack - Region Selection:
Chinese Mainland - Click "Next" to continue.
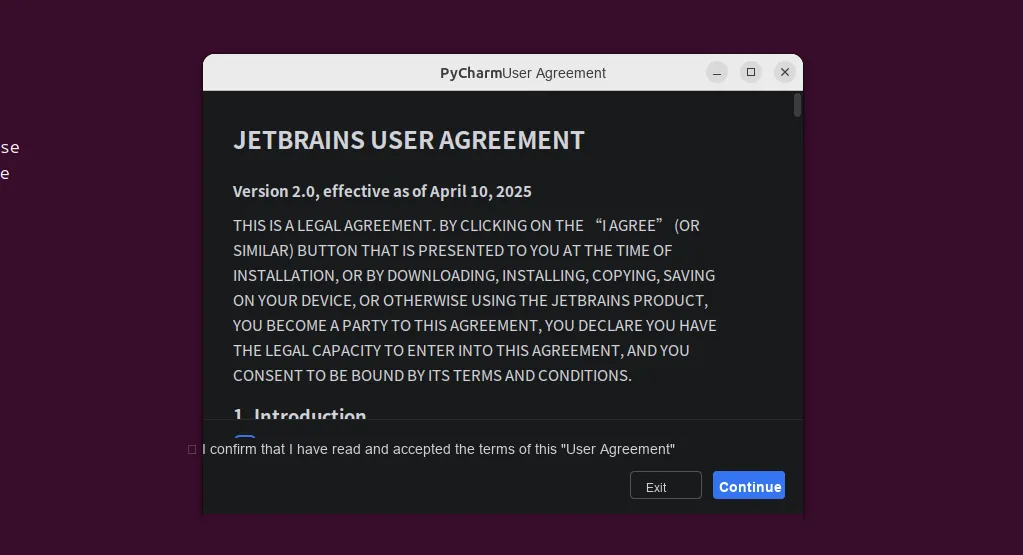
Read and agree to the JetBrains User Agreement, check the box "I confirm that I have read and accept the terms of this User Agreement", click "Continue", and wait for PyCharm to finish initialization.
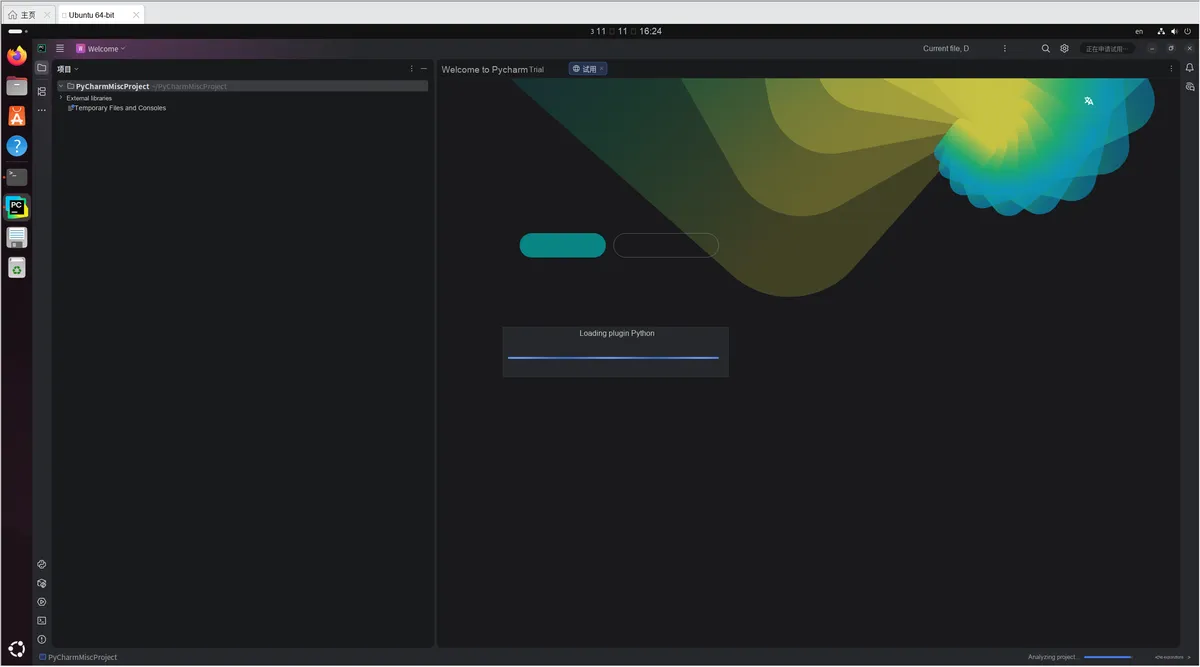
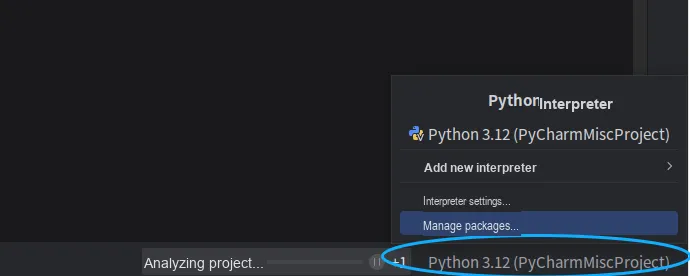
After entering the main interface of PyCharm, click the Python interpreter selection bar in the lower right corner (e. g. Python 3.12 (PyCharmMiscProject)), then select "Add New Interpreter" → "Add Local Interpreter".
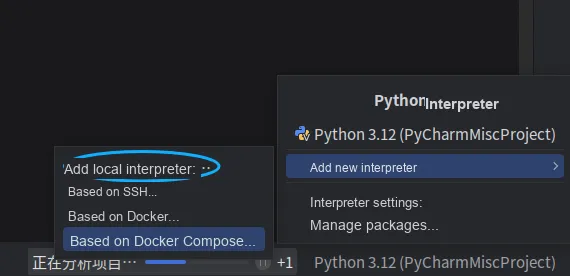
In the "Add Python Interpreter" window, select "Existing Environment" and locate the Python path of the virtual environment that was previously created via Miniconda for micropython:
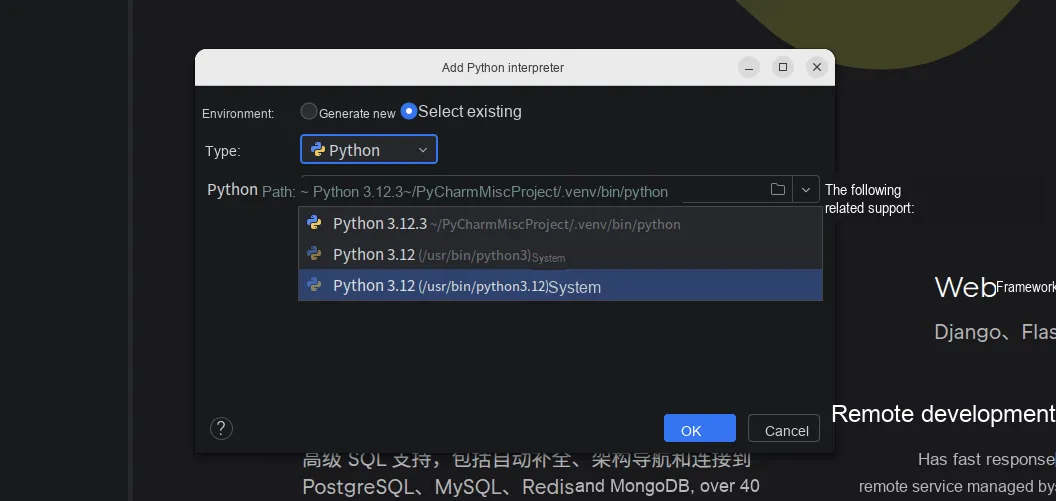
/home/leeqingshui/miniconda3/envs/micropython/bin/pythonClick "OK" to complete the binding of the virtual environment.
4.3 Configure HTTP Proxy
To access the JetBrains Extension Marketplace, you need to configure the Clash proxy:
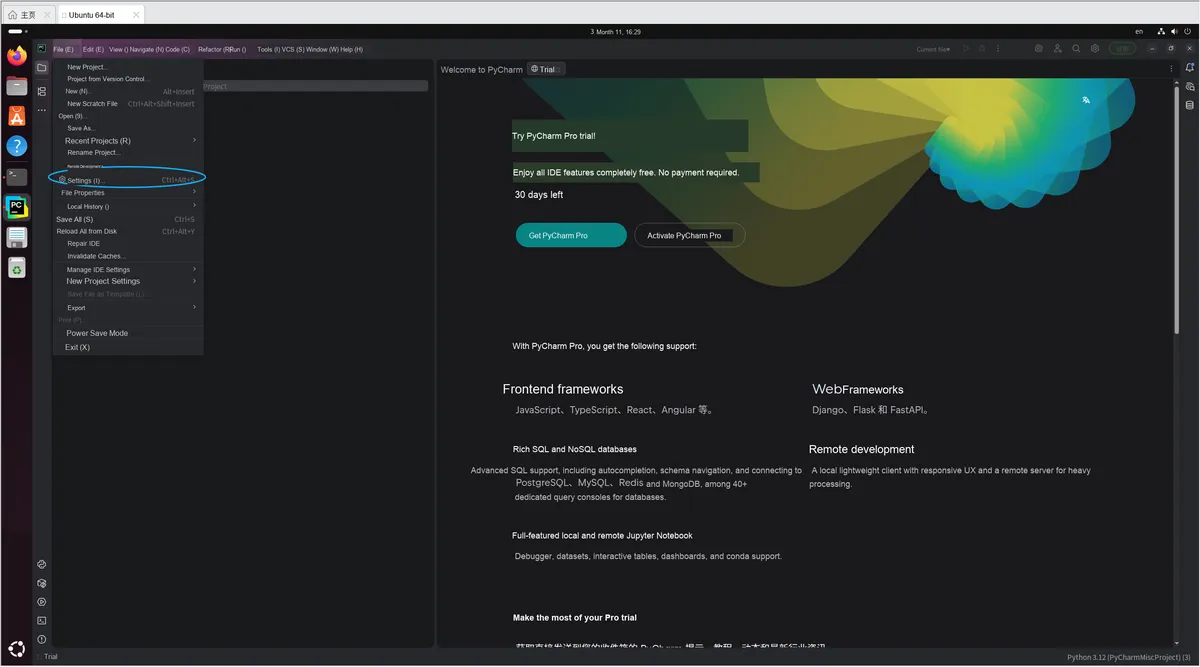
- Open PyCharm Settings:
- Shortcut Key:
Ctrl + Alt + S - Or click "File" → "Settings" in the upper left corner
- Shortcut Key:
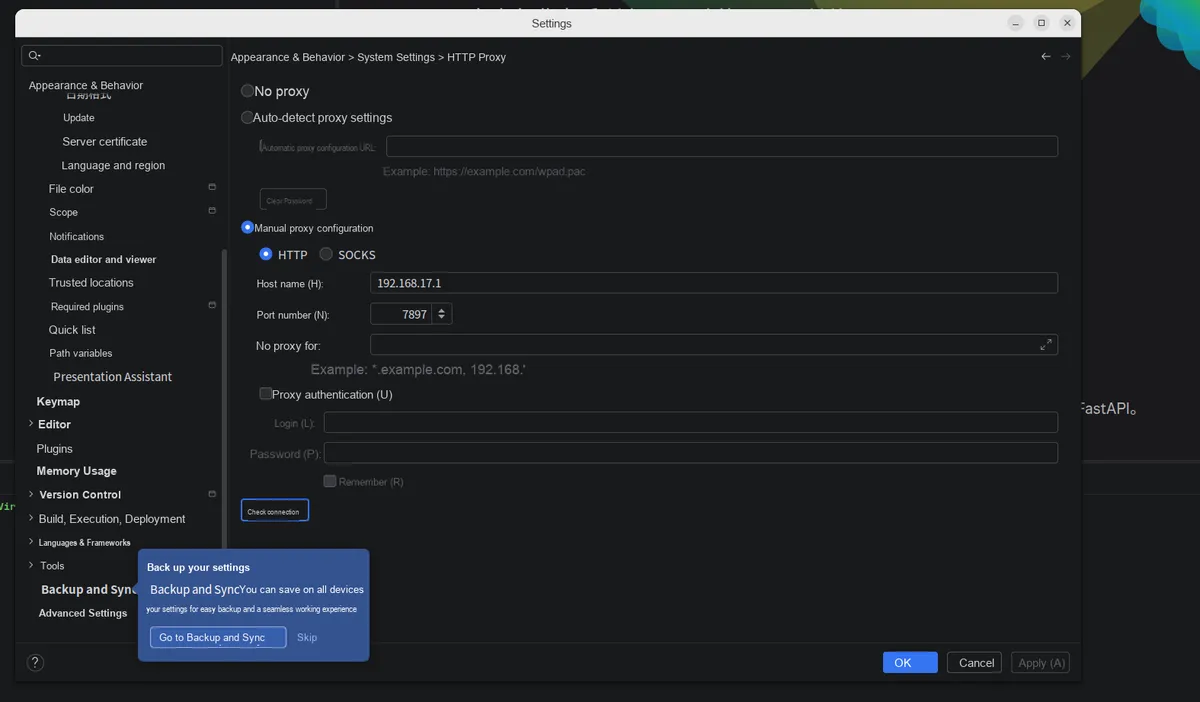
- In the left menu, expand the following items in sequence:
Appearance and Behavior→System Settings→HTTP Proxy. - Select "Manual proxy configuration", and select the protocol as
HTTP, then fill in the following:- Host Name:
192.168.17.1 - Port Number:
7897
- Host Name:
- Click "OK" to save the proxy configuration.
4.4 Install the MicroPython Tools plugin
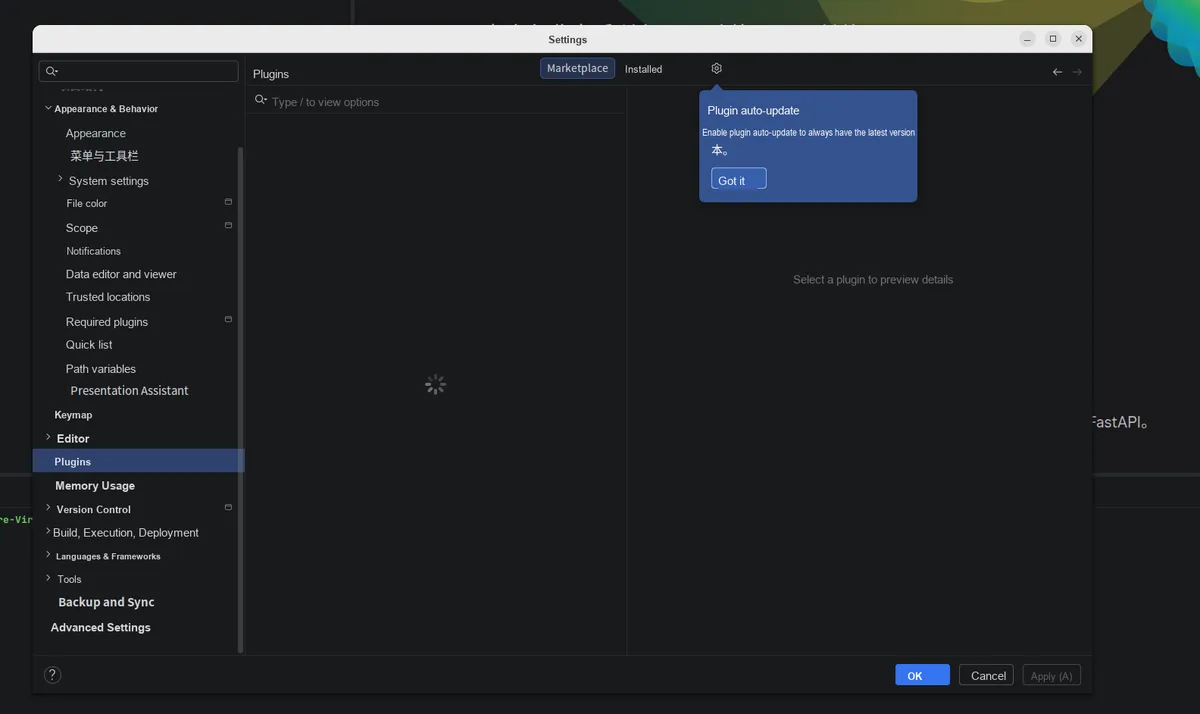
Reopen the settings interface, navigate to the "Plugins" tab, and switch to the "Marketplace" section:
Enter micropython in the search box, then locate the MicroPython Tools extension:
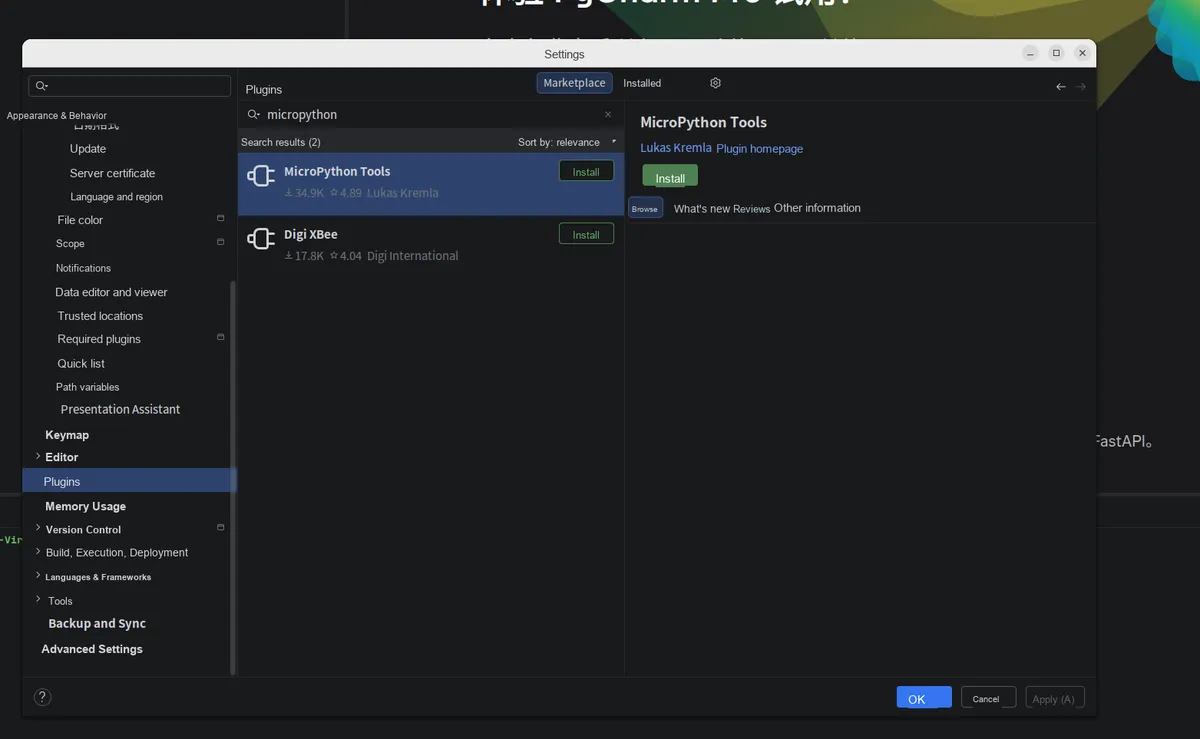
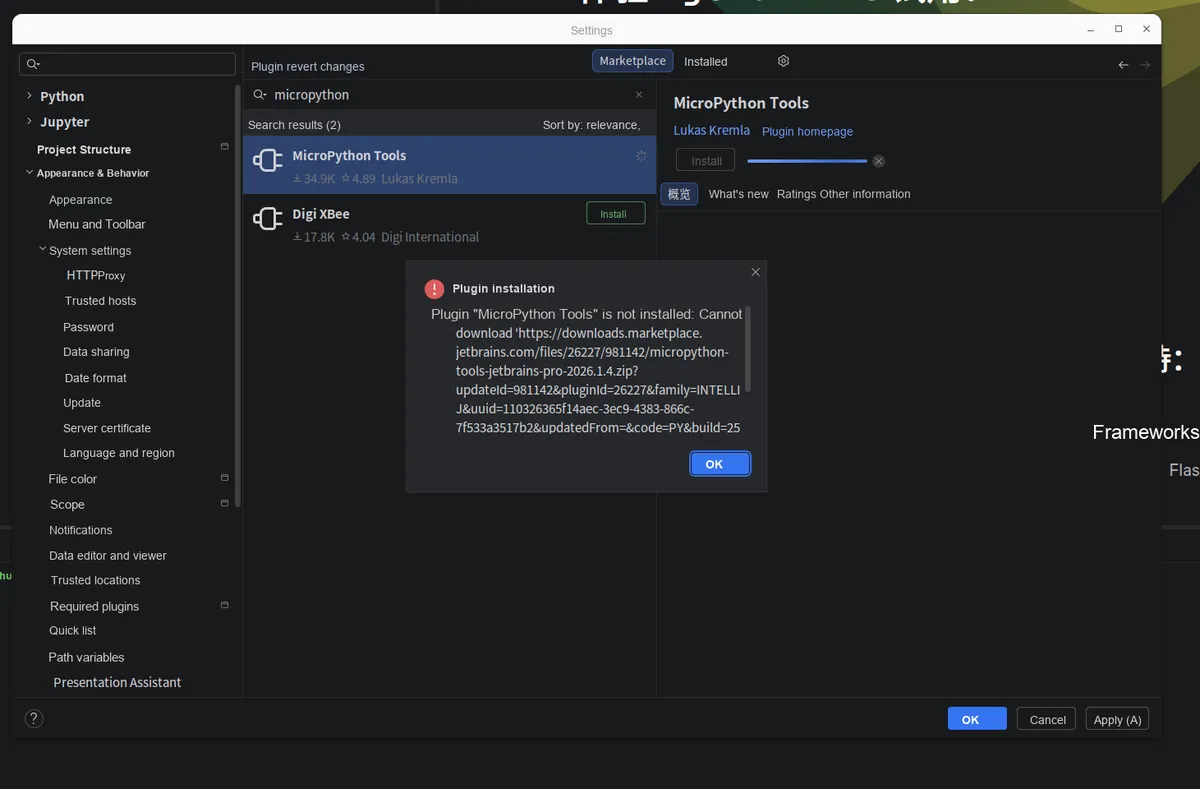
Click "Install", wait for the plugin to finish downloading and installing, then restart PyCharm for the changes to take effect.
4.5 Offline Installation of the MicroPython Tools Plugin
If the online plugin installation fails, we can complete the configuration via the offline installation method:
Open the Chrome browser in Ubuntu (with Clash proxy configured) and visit the MicroPython Tools page on the JetBrains Extension Marketplace: https://plugins.jetbrains.com/plugin/2
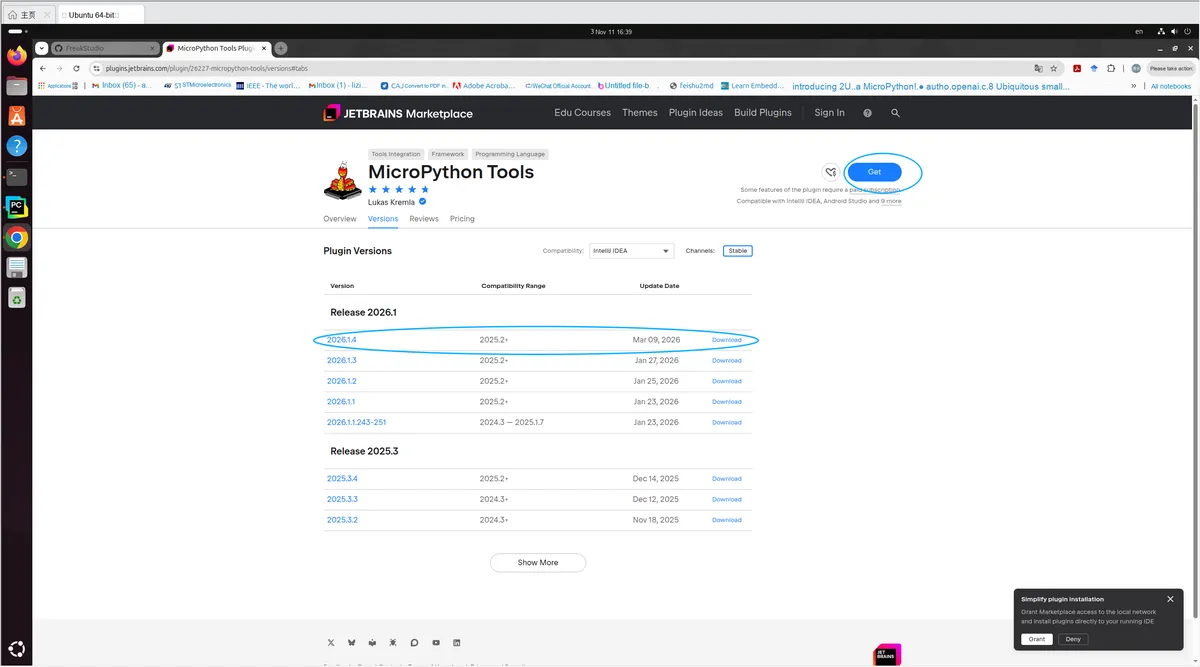
In the "Versions" tab, locate the installation package corresponding to your PyCharm version (e. g., micropython-tools-jetbrains-pro-2026.1.4.zip) and click "Download" to download it.
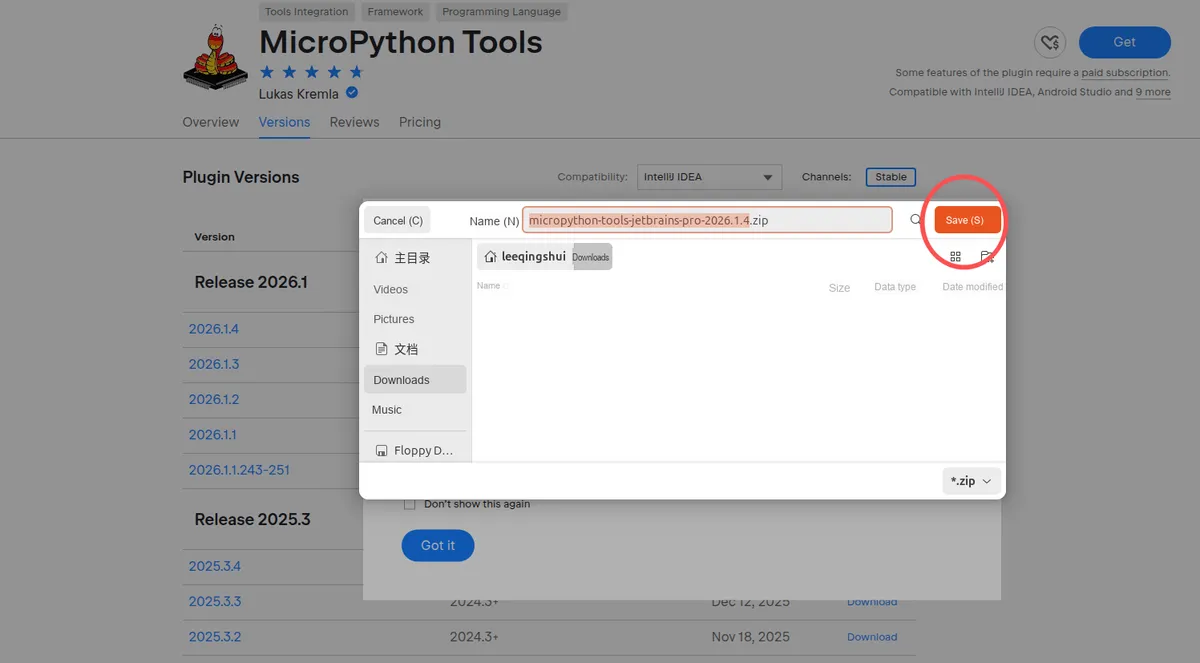
Save the. zip installation package locally (e. g., the "Downloads" folder).
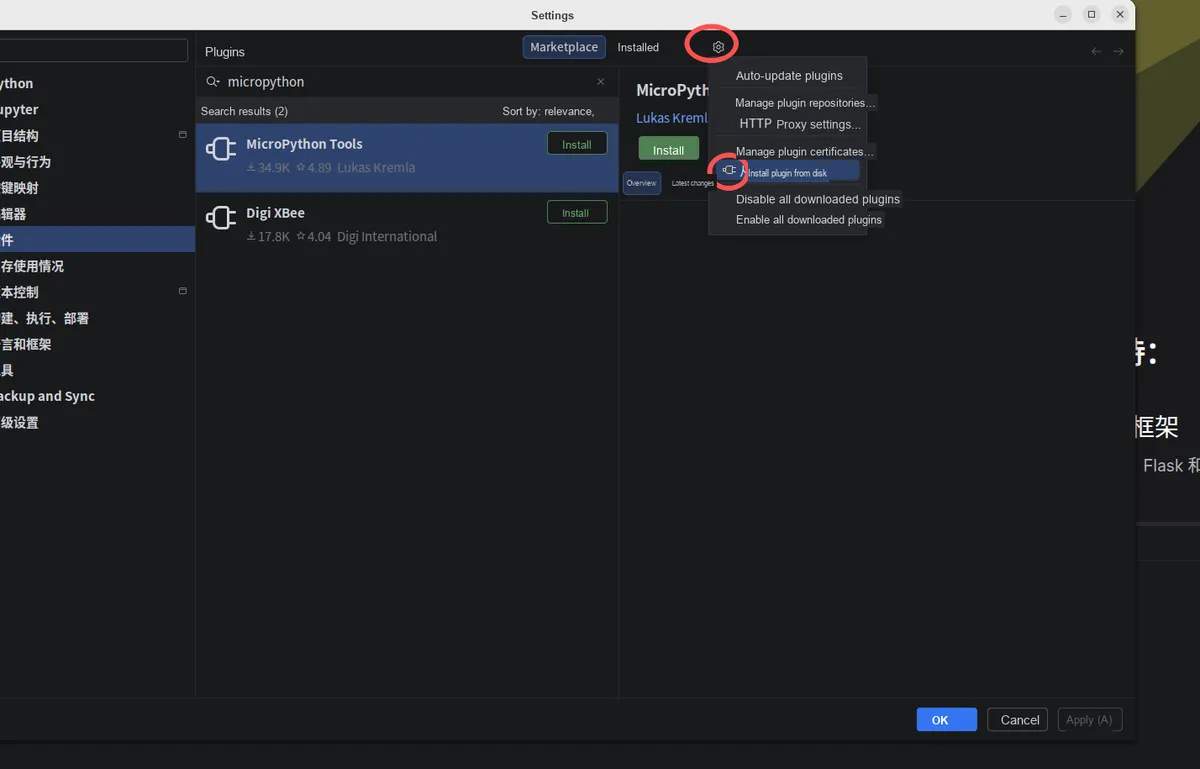
Go back to PyCharm and open the plugin settings page:
- Shortcut key:
Ctrl+ Alt+ S→ select "Plugins" - Click the gear icon in the upper right corner of the plugin page, and select "Install Plugin from Disk".
- In the pop-up file selection window, locate the
. zipinstallation package you just downloaded, select it and click "OK"
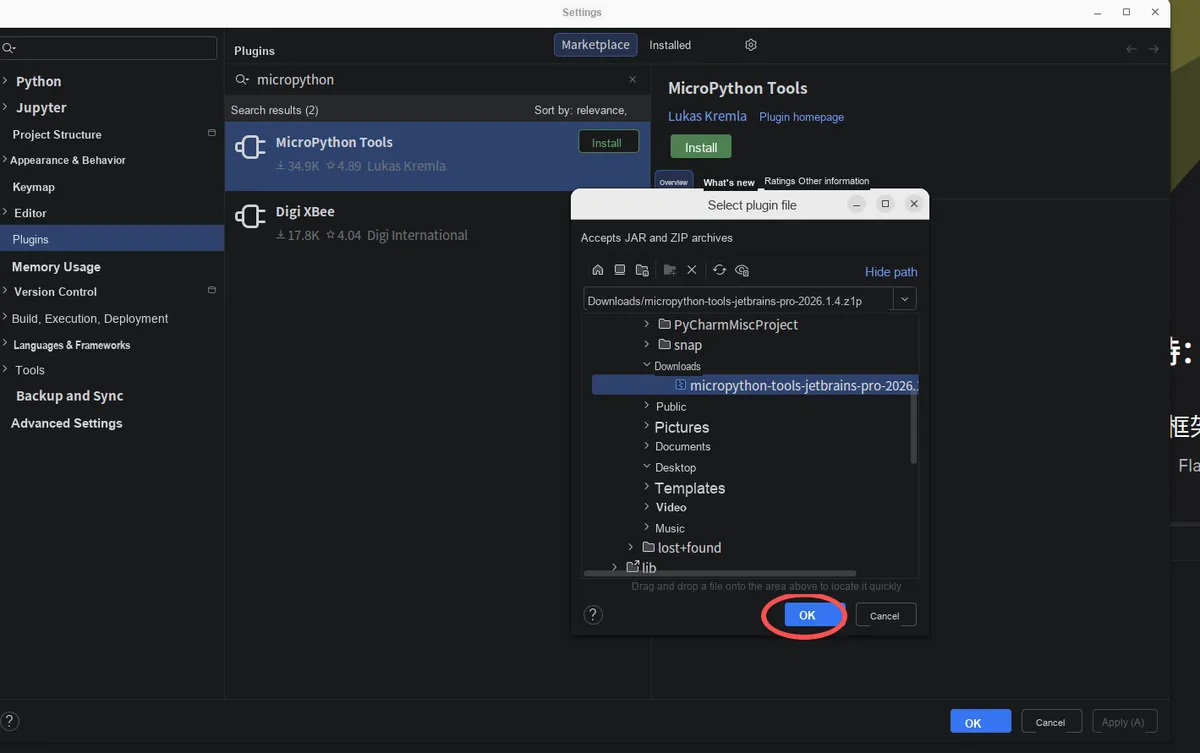
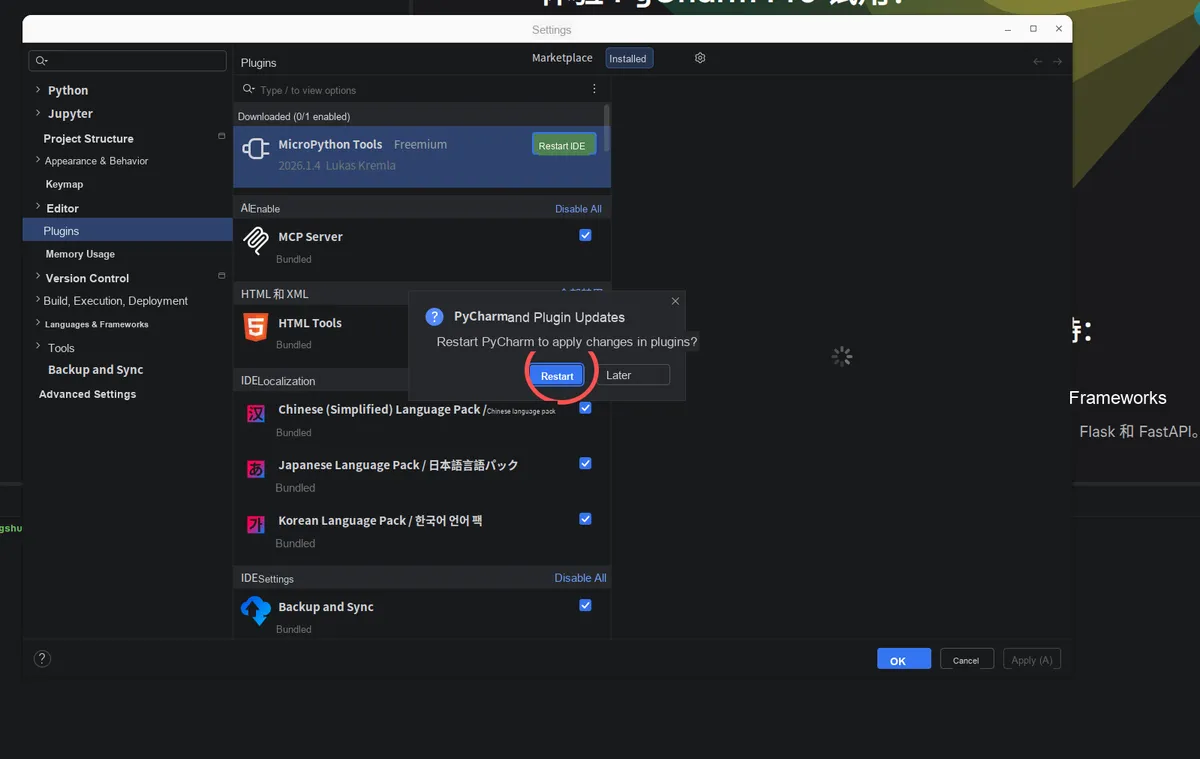
After the plugin is installed, PyCharm will prompt you to "Restart IDE", click "Restart".
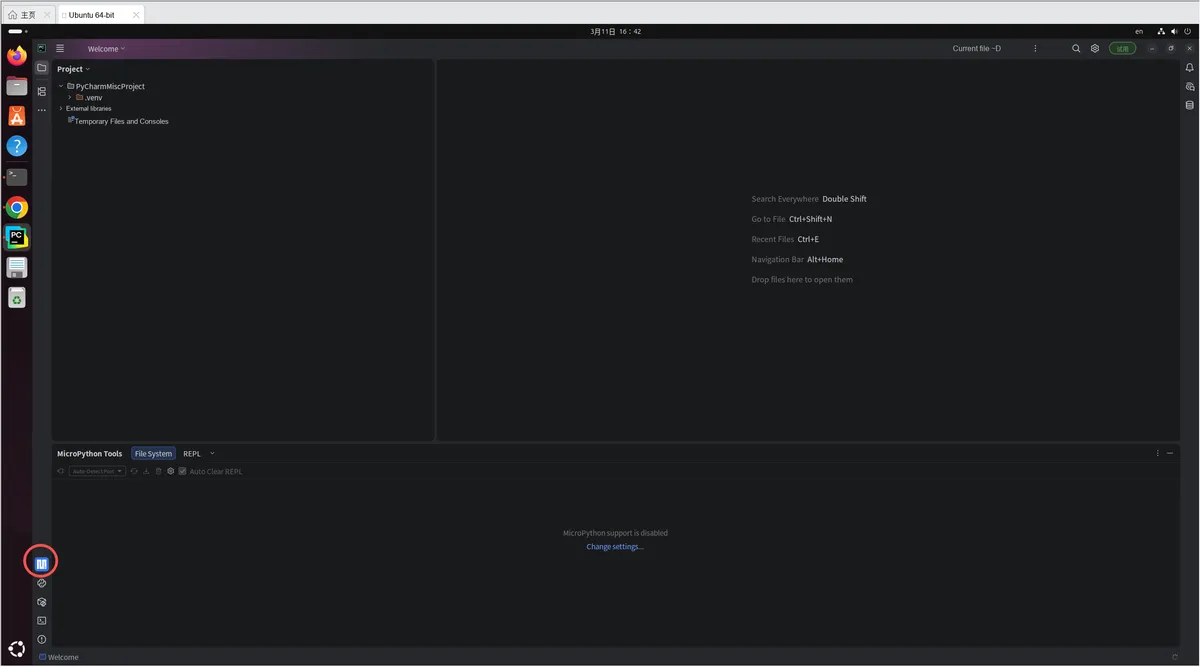
Wait for PyCharm to finish restarting, then the MicroPython Tools plugin will be loaded properly.
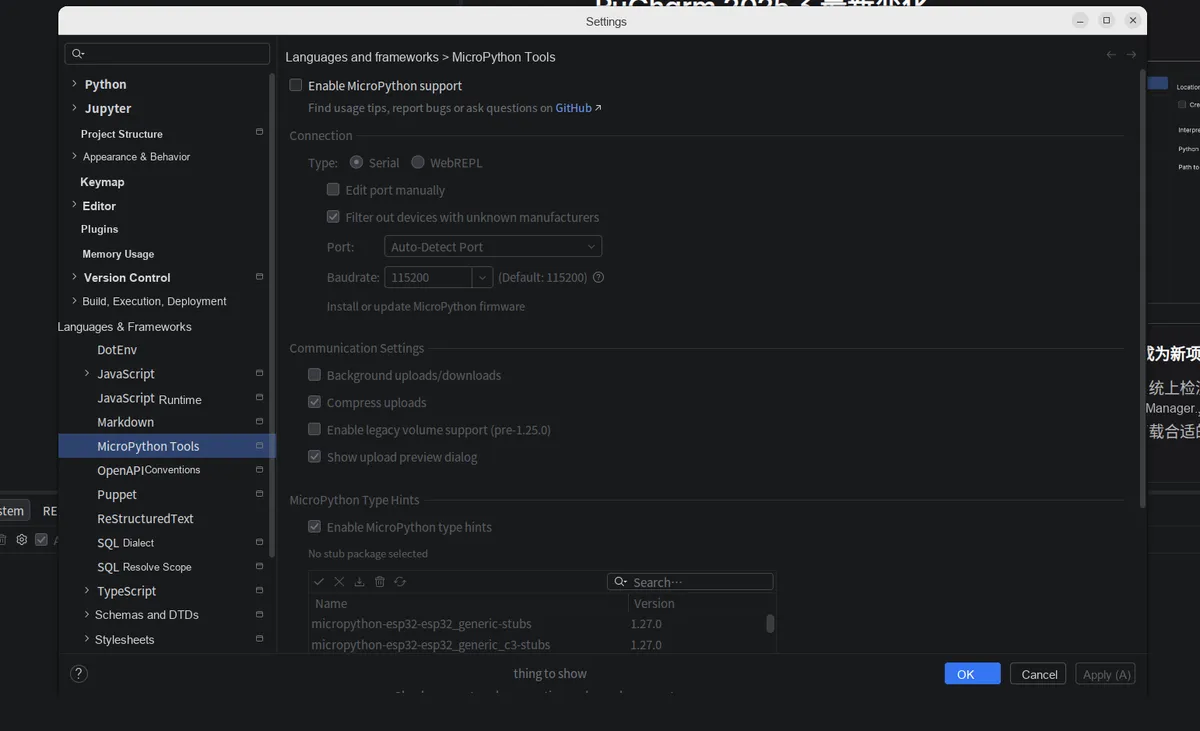
- After restarting, open Settings → "Languages & Frameworks" → "MicroPython Tools".
- Check the box labeled "Enable MicroPython support" to activate the plugin function.
- Configure connection parameters:
- Connection Type: Select
Serial(serial port) orWebREPL - Port: You can select "Auto-Detect Port" for automatic identification
- Baud rate: Default
115200(consistent with the development board)
- Connection Type: Select
- You can install the MicroPython type stub package for the corresponding development board below (such as
micropython-esp32-esp32_generic_c3-stubs) to improve the code completion experience. - Click "OK" to save the configuration.
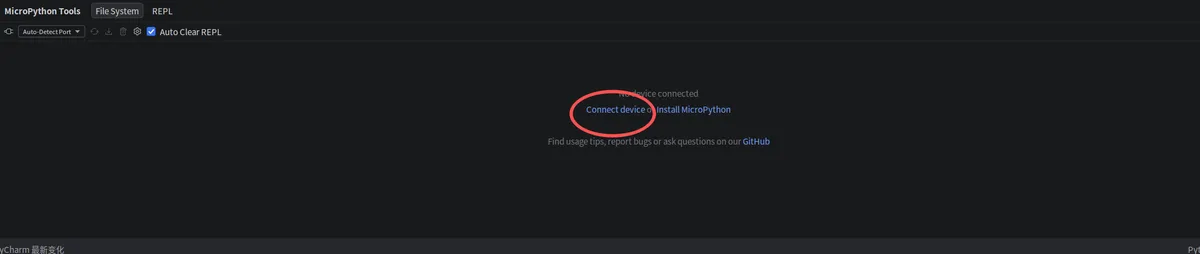
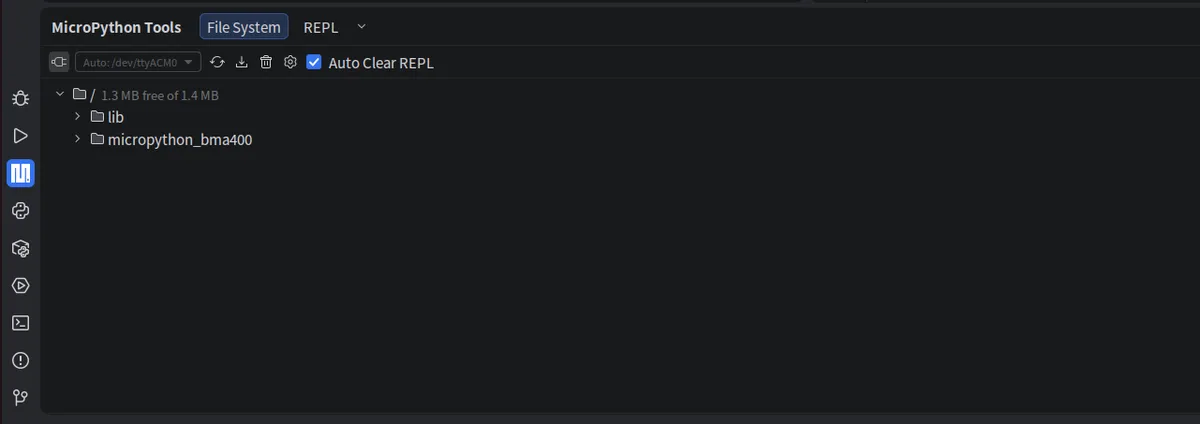
Next, you can connect the development board:
- Open the "MicroPython Tools" panel at the bottom of PyCharm.
- Click "Connect device" and select the connected development board device.
- Once the connection is established, you can manage the files on the development board via the "File System" and conduct interactive programming in the "REPL" environment.
5. A Simple Guide to Using MicroPython Tools with Pycharm
5.1 Create and Open a Project
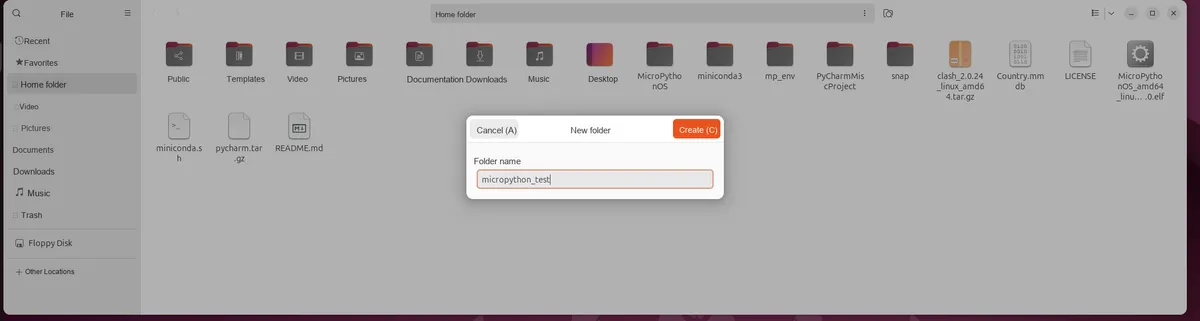
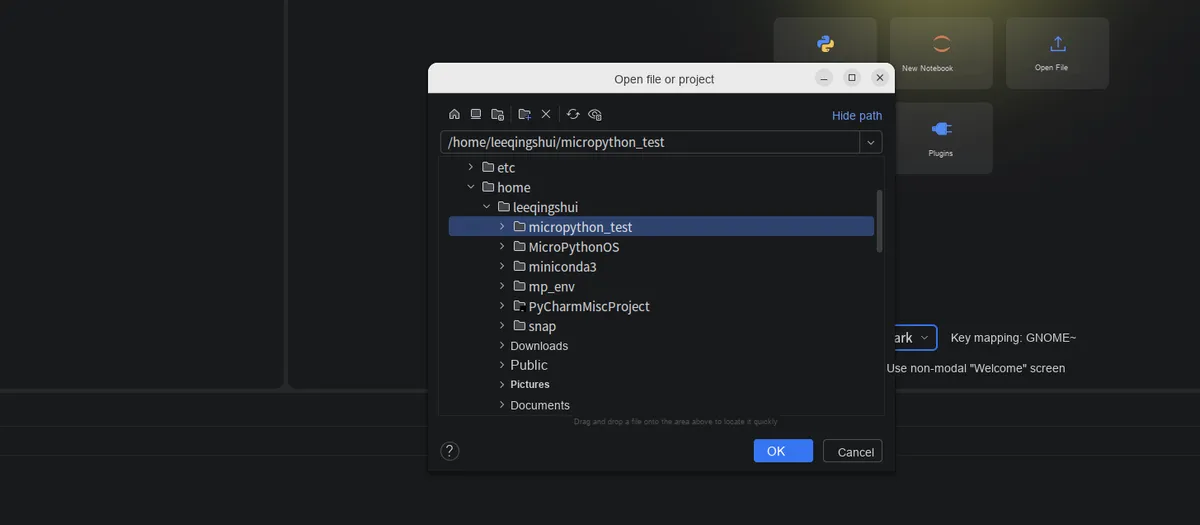
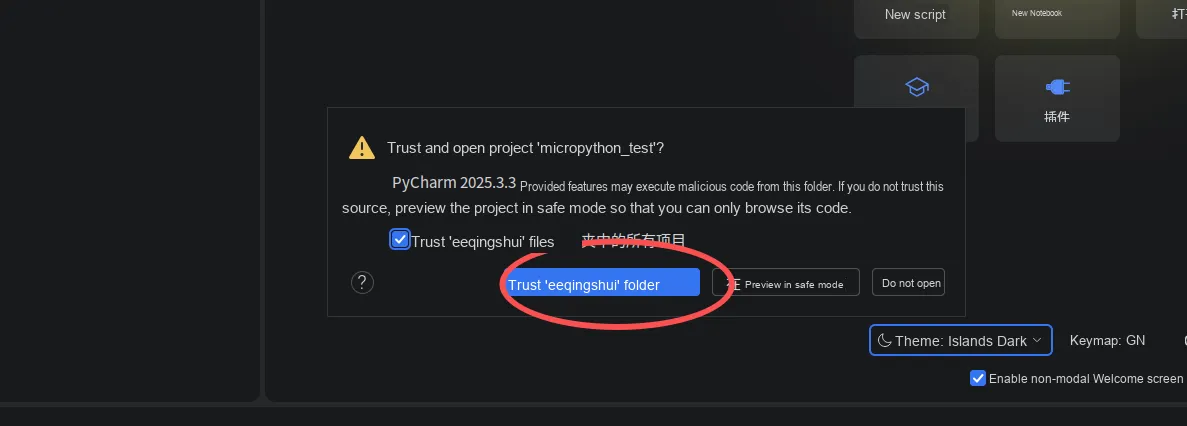
The steps are as follows:
- Create a new project folder (e. g.
micropython_test) in the file manager to store MicroPython code. - Launch PyCharm, select "Open", locate and select the project folder you just created, then click "OK".
- In the pop-up trust prompt box, check "Trust all items in the 'leeqingshui' folder", click "Trust 'leeqingshui' folder" to complete the project trust setup.
5.2 Writing Test Code
Create a new Python file in the project (e. g. main.py), and write simple test code (taking lighting the LED on the development board as an example):
# Turn on the development board LED
from machine import Pin
Pin(25, Pin.OUT).value(1)
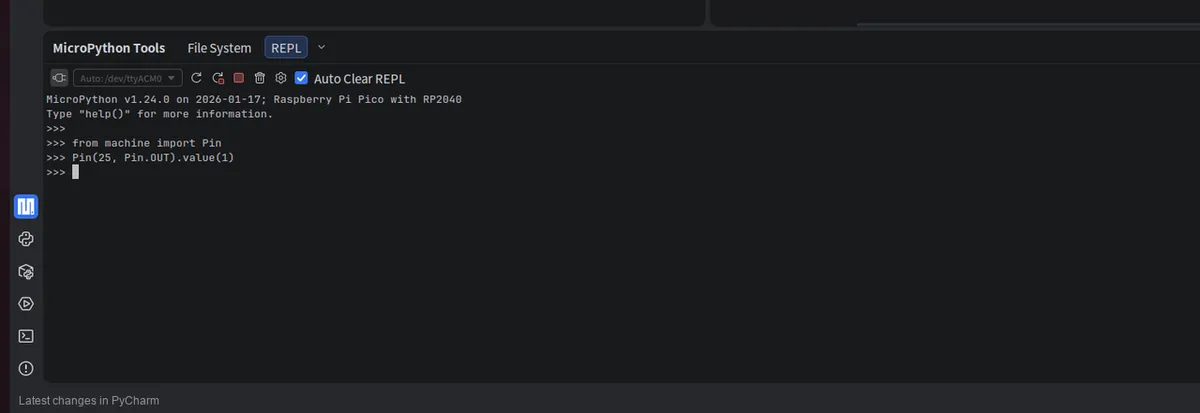
In the REPL panel of the "MicroPython Tools" at the bottom, you can directly input code for interactive debugging to verify the code logic.
5.3 Confirm Plugin Configuration
Open the PyCharm settings (shortcut key Ctrl+ Alt+ S), and navigate to "Languages & Frameworks" → "MicroPython Tools".
- Make sure that "Enable MicroPython support" is checked, and configure the connection parameters according to your development board:
- Connection Type:
Serial(Serial Port Connection) - Port:
Auto-Detect Port(Auto-identification) - Baud Rate:
115200(consistent with the default setting of the development board)
- Connection Type:
- You can check the "Enable MicroPython type hints" option to install the type hint package for a better code completion experience, then click "OK" to save the configuration.
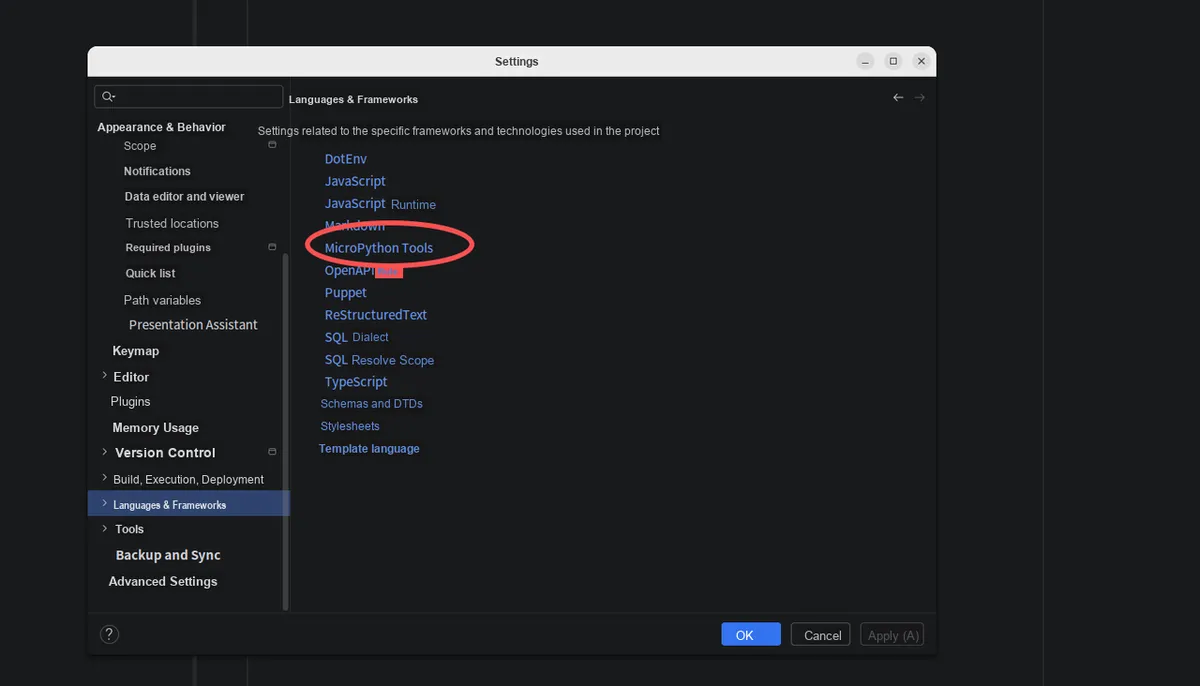
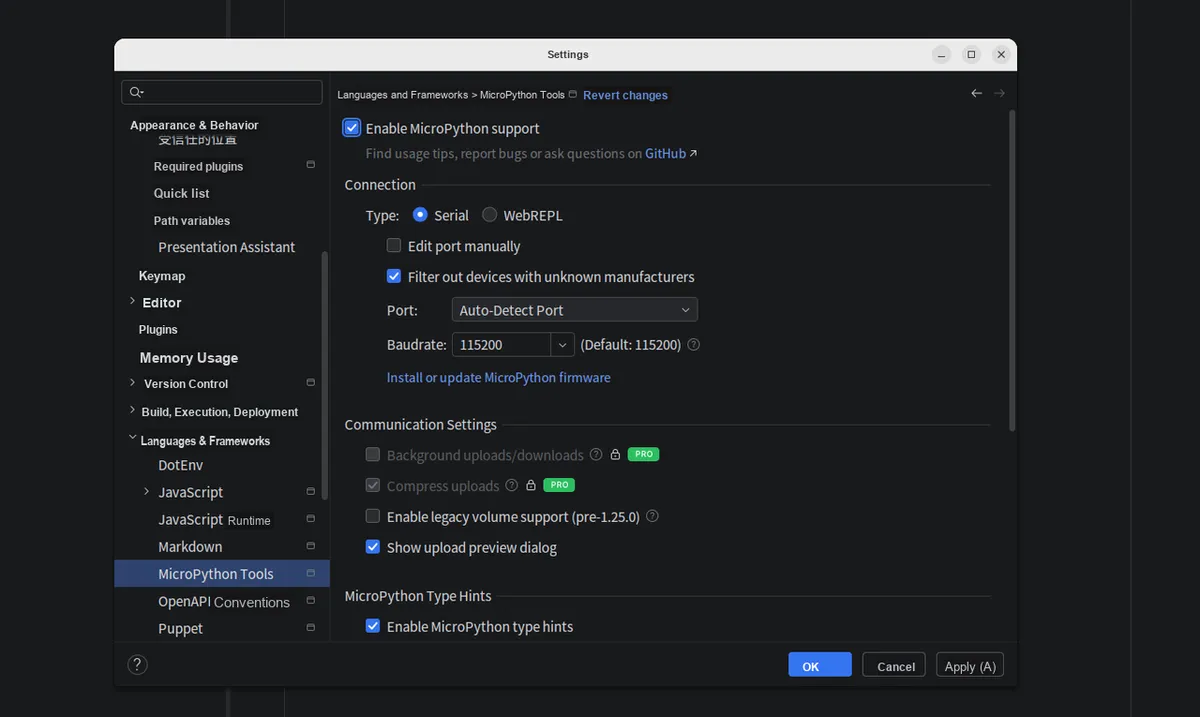
5.4 Upload the code to the development board
Right-click the code file (e. g. main.py), then select "Upload File to MicroPython Device" → "Upload to Device Root "/"".
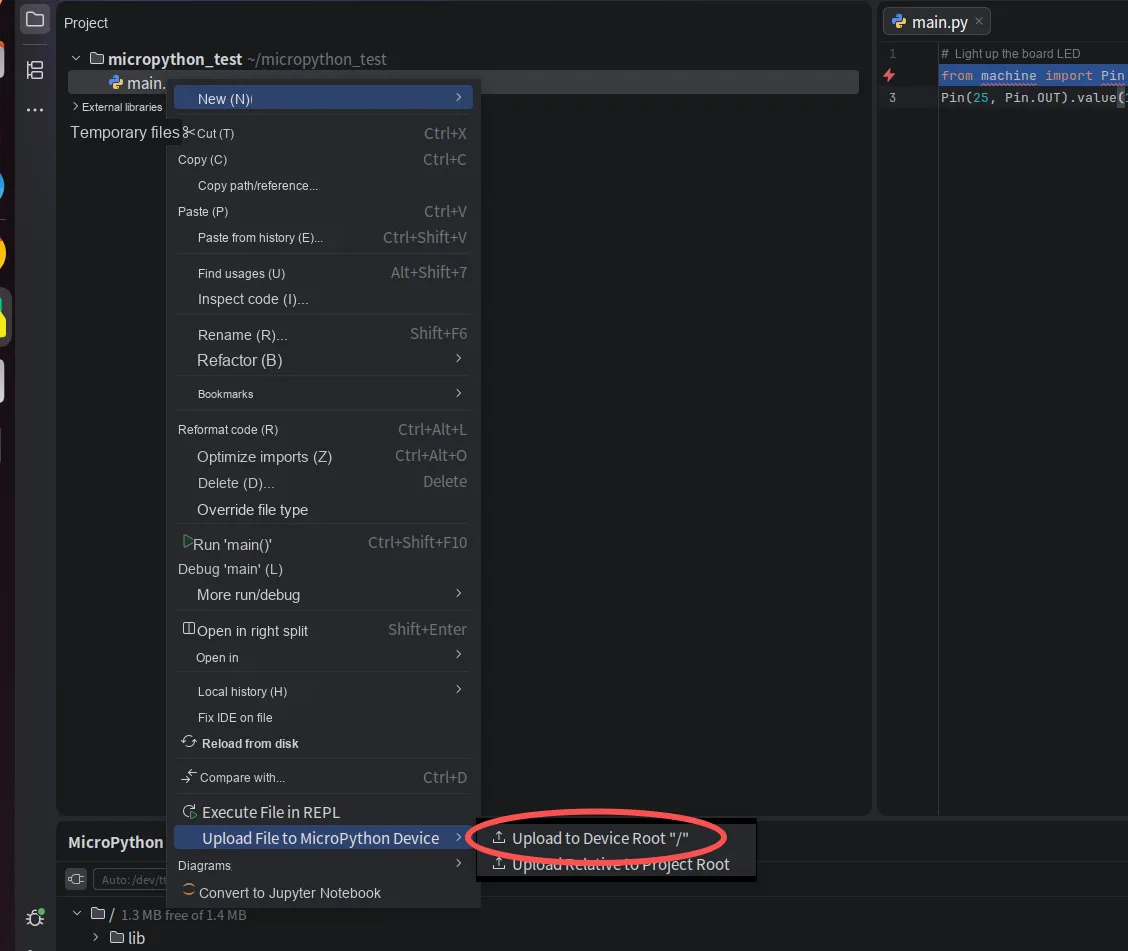
In the pop-up "Upload Preview" window, confirm that the local file matches the target path of the development board, then click "Upload" to start the uploading process.
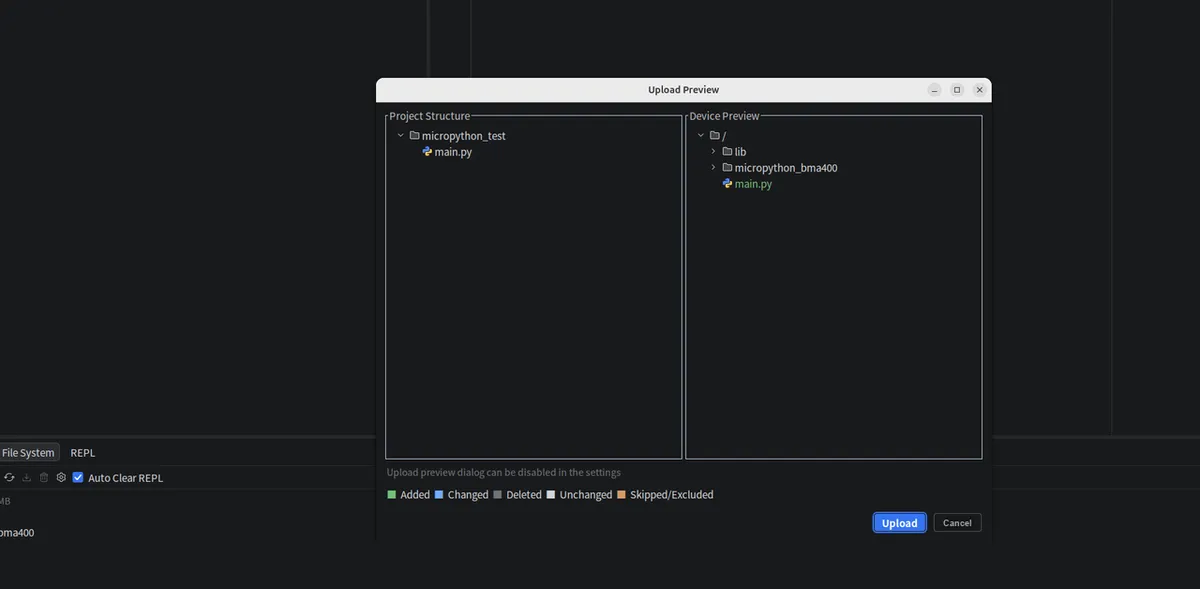
After the upload is complete, in the "File System" panel of "MicroPython Tools", you can see that there is already a file under the root directory of the development board: main.py.
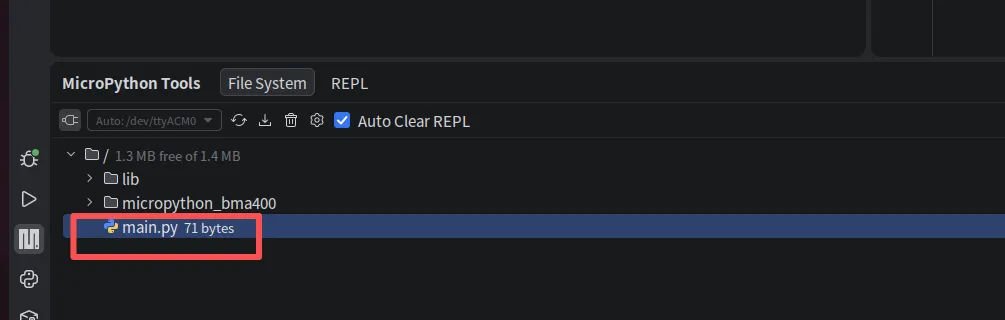
Restart the development board, and the code will run automatically. You will observe that the LED lights up, which indicates that both the environment configuration and code upload are successful.
Version Record
Version Number | Revision Date | Modifier | Modified Content |
v1.0 | 2026-03-11 | Lee Eonyong | Initialization version. |