Contents
Abstract:
This article mainly introduces how to use multiple inheritance when creating custom classes in Python, as well as the concepts and error-prone points of diamond inheritance, and also explains how to use the PyQtGraph library to plot the data received via the serial port.
Original Link:
Recommended from previous issues:
You who study embedded systems still don't know Object Oriented? ?!
More exciting content can be found here:
Speed Up Your Python: A Quick Guide to Python Parallel Computing
Understand the Debugging Principle of CM3 Microcontroller in One Article
The "Secret Martial Arts Manual" for Computer Science Competitions
Document and Code Acquisition:
You can download the document via the following link:
https://github.com/leezisheng/Doc
This document mainly introduces how to use Python for Object Oriented programming, and requires readers to have a basic understanding of Python syntax and microcontroller development. Compared with other blogs or books that explain Python Object Oriented programming, this document is more detailed and focuses on embedded host computer applications, taking the common serial port data transmission and reception, data processing, dynamic graph drawing of host computer and slave computer as application examples, and uses Sourcetrail code software for visual code reading to facilitate readers' understanding.
The link to obtain the relevant sample code is as follows:
https://github.com/leezisheng/Python-OOP-Demo
Main Text
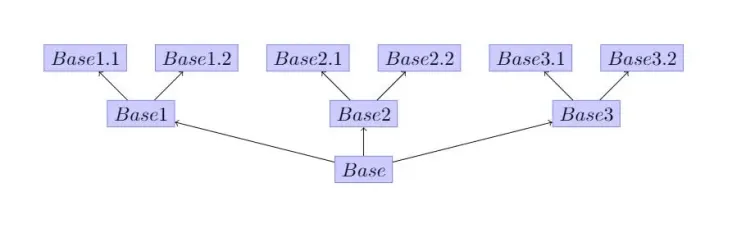
In Python, a class can inherit from more than one parent class, which is called multiple inheritance in Python, and the syntax of multiple inheritance is similar to that of single inheritance:
class SubclassName(BaseClass1, BaseClass2, BaseClass3, ...):
    pass
Of course, all the parent classes inherited by a subclass can likewise have their own parent classes, which results in an inheritance hierarchy diagram as shown below:
Multiple inheritance is most commonly used to create objects that incorporate two entirely distinct sets of behaviors. For instance, when designing an object that connects to a scanner and sends scanned documents via fax, this object may inherit from two completely separate `scanner` and `faxer` objects.
For MasterClass, we expect it to be equipped with a plotting function that can dynamically draw curves based on the sensor data received via the serial port; to achieve this, we leverage the PyQtGraph library, a pure Python graphical GUI library that fully exploits the high-quality graphics rendering capabilities of PyQt and PySide as well as the high-performance scientific computing and processing capabilities of NumPy, and is widely applied in the fields of mathematics, science and engineering.
Compared with matplotlib, PyQtGraph is more suitable for Data Acquisition and analysis applications.
We use the following two commands to install the PyQtGraph library and its dependency library PyQt5:
pip install pyqtgraph
pip install PyQt5
pip install numpy
Here, we first define a plotting class and its methods, with the sample code provided as follows:
class PlotClass:
    # Plot class initialization
    def __init__(self,wintitle:str="Basic plotting examples",plottitle:str="Updating plot",width:int=1000,height:int=600):
        # Qt application instance object
        self.app        = None
        # Window object
        self.win        = None
        # Set the window title
        self.title      = wintitle
        # Set the window size
        self.width      = width
        self.height     = height
        # Sensor data
        self.value      = 0
        # Counter variable
        self.__count    = 0
        # Sensor data cache list
        self.valuelist  = []
        # Plot curve
        self.curve      = None
        # Plot layer object
        self.plotob     = None
        # Plot layer title
        self.plottitle  = plottitle
        # Qt application and window initialization
        self.appinit()

    # Application initialization
    def appinit(self):
        # Create a Qt application and return its instance object
        self.app = pg.mkQApp("Plotting Example")
        # Create a multi-panel graphic
        # show: (bool) If True, show the widget immediately after it is created.
        # title: (str or None) If specified, sets the window title for this widget.
        self.win = pg.GraphicsLayoutWidget(show=True, title=self.title)
        # Set the window size
        self.win.resize(self.width, self.height)
        # Make global window settings; setConfigOptions configures multiple parameters at once
        # antialias enables anti-aliasing, useNumba accelerates the image
        pg.setConfigOptions(antialias=True, useNumba=True)

        # Add a plot layer
        self.plotob = self.win.addPlot(title=self.plottitle)
        # Add a curve
        self.curve = self.plotob.plot(pen='y')

    # Receive data
    def GetValue(self,value):
        self.value = value
        # Add to the data cache list
        self.valuelist.append(value)

    # Update the curve data
    def DataUpdate(self):
        # Simulate drawing a sine curve
        # Update the counter variable
        self.__count = self.__count + 0.1
        self.value = np.sin(self.__count)
        self.GetValue(self.value)
        # Convert the data into a graph
        self.curve.setData(self.valuelist)

    # Set the timed update
    def SetUpdate(self,time:int = 100):
        # Create a timer object
        timer = QtCore.QTimer()
        # When the timer ends, trigger the DataUpdate method
        timer.timeout.connect(self.DataUpdate)
        # Start the timer
        timer.start(time)
        # Enter the main event loop and wait
        pg.exec()

if __name__ == '__main__':
    # Create a PlotClass object; initialization is completed automatically
    p = PlotClass()
    # Set the timed update task
    p.SetUpdate()
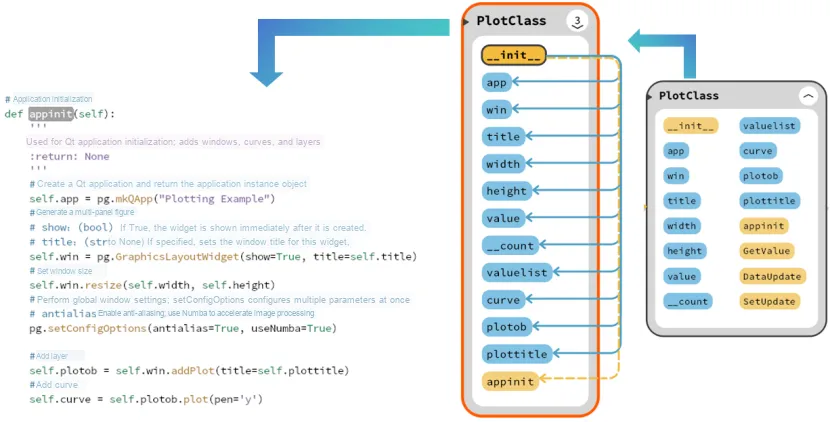
Here, we have defined the following properties and methods:
Properties/Methods | Function |
wintitle | Window Title |
plottitle | Layer Title |
width | window width |
height | Window Height |
app | Qt application instance object |
win | Window Object |
value | Sensor Data |
__count | counter variable |
valuelist | Sensor Data Cache List |
curve | Plotting Curve |
plotob | Layer Object |
appinit(self) | Used for initializing Qt applications, adding windows, curves and layers |
GetValue(self,value) | Used to receive sensor data and add it to the cache list |
DataUpdate(self) | Used for periodic curve update, here we simulate and draw a sine curve |
SetUpdate(self,time:int = 100) | Set up a scheduled update task |
First, we complete the initialization operations in __init__ and appinit (), including the initialization of in-class attributes, Qt application instances, window layers and curves:
Next, we create a timer object and set a scheduled task in the SetUpdate method. When the set delay time elapses, the DataUpdate method is called, in which the data curve is updated. In this example, we use the __count attribute to increment the value each time, so that it draws a sine curve.
Do you want to set to enter the main event loop and wait at the same time to keep the Qt interface displayed:
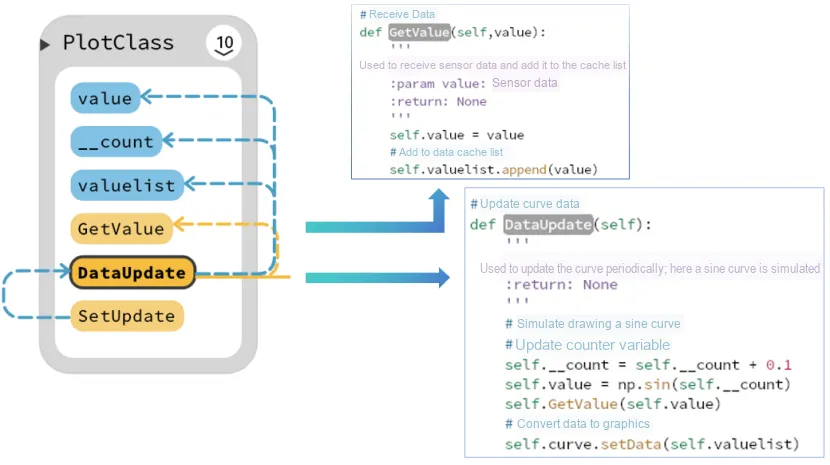
Here, we create an object in the main function and start the timed refresh curve to run, the result is as follows:
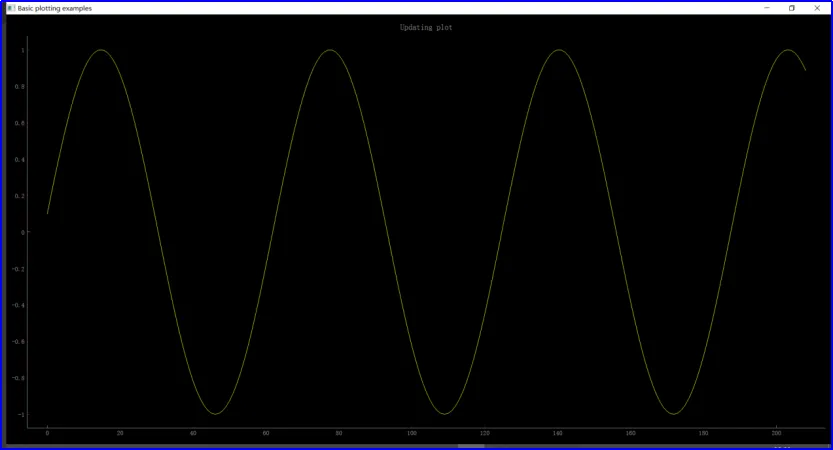
Here, we want the MasterClass to have both serial communication and plotting capabilities, so we need to use multiple inheritance: the MasterClass inherits from both the SerialClass and the PlotClass. With multiple inheritance, a single subclass can acquire all the features of multiple parent classes at the same time.
The sample code is as follows:
class MasterClass(SerialClass,PlotClass):
    # Class variables:
    #   BUSY_STATE  - busy state - 0
    #   IDLE_STATE  - idle state - 1
    BUSY_STATE, IDLE_STATE = (0, 1)

    # Class variables:
    #   START_CMD       - start command      -0
    #   STOP_CMD        - stop command      -1
    #   SENDID_CMD      - send ID command    -2
    #   SENDVALUE_CMD   - send data command   -3
    START_CMD, STOP_CMD, SENDID_CMD, SENDVALUE_CMD = (0, 1, 2, 3)

    # Class initialization
    def __init__(self,state:int = IDLE_STATE,port:str = "COM17",wintitle:str="Basic plotting examples",plottitle:str="Updating plot",width:int=1000,height:int=600):
        # Call the __init__ methods of the different parent classes separately
        SerialClass.__init__(self,port)
        PlotClass.__init__(self,wintitle,plottitle,width,height)
        self.valuequeue   = queue.Queue(10)
        self.__masterstatue = state
        # Flag indicating initialization is complete
        self.INIT_FLAG = False

    @classmethod
    def MasterInfo(cls):
        print("Info : "+str(cls))

    # Start the host
    def StartMaster(self):
        super().OpenSerial()
        logging.info("START MASTER :"+self.dev.port)

    # Stop the host
    def StopMaster(self):
        super().CloseSerial()
        logging.info("CLOSE MASTER :" + self.dev.port)

    # Receive the sensor ID
    def RecvSensorID(self):
        sensorid = super().ReadSerial()
        logging.info("MASTER RECIEVE ID : " + str(sensorid))
        return sensorid

    # Receive the sensor data
    def RecvSensorValue(self):
        data = super().ReadSerial()
        logging.info("MASTER RECIEVE DATA : " + str(data))
        self.valuequeue.put(data)
        return data

    # Host sends a command
    def SendSensorCMD(self,cmd):
        super().WriteSerial(str(cmd))
        logging.info("MASTER SEND CMD : " + str(cmd))

    # Host returns its working state -
    def RetMasterStatue(self):
        return self.__masterstatue

    # Override the parent class's DataUpdate method
    def DataUpdate(self):
        self.SendSensorCMD(self.SENDVALUE_CMD)
        self.value = self.RecvSensorValue()
        self.WriteSerial("Recv:"+str(self.value))
        self.GetValue(self.value)
        self.curve.setData(self.valuelist)

if __name__ == "__main__":
    # Initialize the object
    m = MasterClass(state = MasterClass.IDLE_STATE,
                    port = "COM17",
                    wintitle = "Basic plotting examples",
                    plottitle = "Updating plot",
                    width = 1000,
                    height = 600)
    m.StartMaster()
    m.SendSensorCMD(MasterClass.SENDID_CMD)
    m.RecvSensorID()
    # Set the timed update task
    m.SetUpdate()
We can see the relationships between the two parent classes and subclasses, as well as the attributes and methods of different classes as follows:
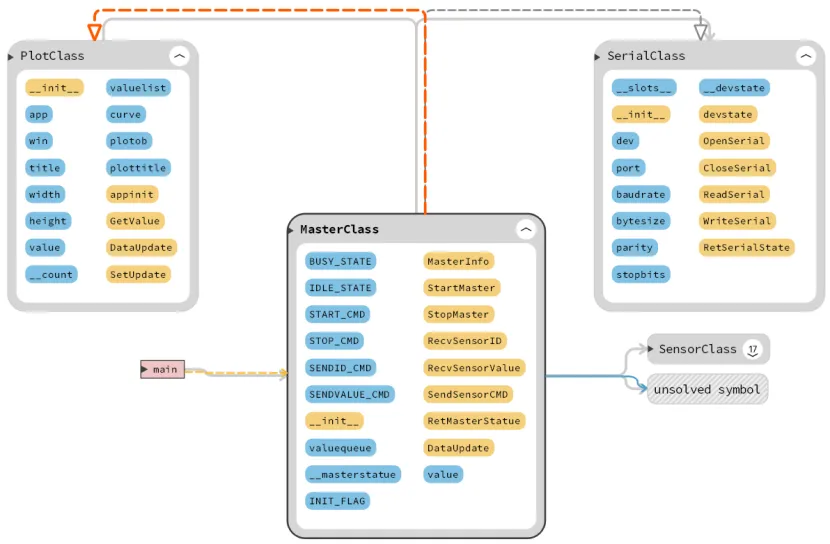
First, we use the following statement to indicate that MasterClass inherits from SerialClass and PlotClass:
class MasterClass(SerialClass,PlotClass):Next, we call the __init__ methods of different parent classes respectively in the initialization method of MasterClass:
        SerialClass.__init__(self,port)
        PlotClass.__init__(self,wintitle,plottitle,width,height)
Meanwhile, we override the DataUpdate method of the parent class in MasterClass: first send a data query command, then wait to receive data, send the received data and store it in the data cache list after the data reception is completed, and update the curve periodically after setting a scheduled task.
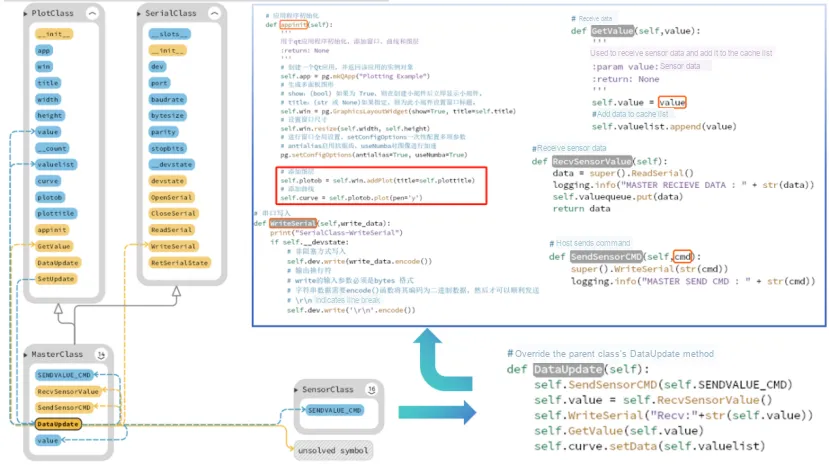
The following is the running effect, from which we can see that the curve is updated normally after the data is received:
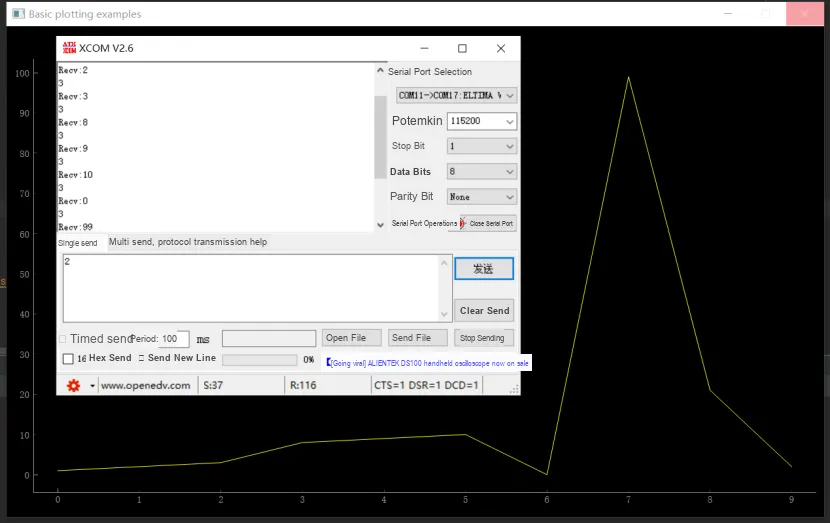
During the testing process, we can observe that the Qt window may become unresponsive. This is because the main UI thread is single-threaded: if a time-consuming operation is executed in the main UI thread — for instance, when clicking a button triggers its response function to query data from the database, and the query takes several seconds or even tens of seconds for a large dataset — the main UI thread will keep waiting for the response function to return and get blocked inside the function, making it unable to respond to other interface messages or events, and the interface will freeze and become unresponsive. This issue can be avoided by using Python's multithreading or multiprocessing, which will be covered later.
It can be seen that when creating objects containing two sets of completely different behaviors, if the interfaces of the two classes are different, the subclass can run perfectly normally; however, if the interfaces of the two classes overlap, simultaneous inheritance may cause confusion. The best approach is to avoid such situations, re-analyze the system to see if the multiple inheritance relationship can be removed and replaced with other association or composition designs.
Also bear in mind that you should avoid manually calling the initialization method of the parent class in the initialization method of a subclass as much as possible, as this will prevent diamond inheritance from being handled correctly. It is recommended to use Python's built-in super () function, and Python defines a standard Method Resolution Order (MRO) for classes. Initializing the parent class with the super () function ensures that the common superclass in a diamond inheritance hierarchy is only initialized once, while the MRO determines the initialization order among the superclasses.
For details about the specific scenarios and invocation order when calling methods with the same name in multiple inheritance, please refer to the following link:
https://pythonhowto.readthedocs.io/zh-cn/latest/object.html#id29