Contents
Abstract:
In this article, we mainly explain how to add methods to custom classes, the basic usage of the pyseria library (serial data transmission and reception, properties and methods of the serial.Serial class), the usage method of the VSPDPro virtual serial port software, etc. , and use the custom serial port class to perform serial data transmission and reception with the PC host.
Source Link:
Previous Recommendations:
You who are learning embedded systems still don't know Object Oriented? ?!
More exciting content can be found here:
Speed Up Your Python: A Quick Guide to Python Parallel Computing
Understand the Debugging Principle of CM3 Microcontroller in One Article
The "Secret Martial Arts Manual" for Computer Science Competitions
Access to Documents and Code
You can access the following link to download the document:
https://github.com/leezisheng/Doc
This document mainly introduces how to use Python for Object Oriented programming, and requires readers to have a basic understanding of Python syntax and microcontroller development. Compared with other blogs or books that explain Python Object Oriented programming, this document is more detailed and focuses on embedded host computer applications. It takes the common serial port data transmission and reception, data processing, dynamic graph drawing and other functions between the host computer and the lower computer as application examples, and uses the Sourcetrail code software to visually read the code to facilitate readers' understanding.
The link to obtain the relevant sample code is as follows: https://github.com/leezisheng/Python-OOP-Demo
Body Text
As we can see from the previous section, we have added serial port-related attributes such as serial device name, baud rate, and data bits to the SerialClass class. However, it should be noted that the core of Object Oriented programming lies in the interaction between different objects. What we are concerned about is that triggering certain behaviors can cause attributes to change or generate interaction with the outside world. Defining a function in a class is equivalent to defining a method of the class. Recall that when we use the serial port on a microcontroller, we often perform operations such as opening the serial port, sending data, receiving data, and closing the serial port; the serial port operations on the PC side are similar to those on the microcontroller.Here we first add methods to the class, omitting the specific implementation for now; the code is as follows:
class SerialClass:

    # Note: the special method "__init__" has two underscores before and after it!!!
    def __init__(self,port,baudrate,bytesize,parity,stopbits):
        self.devport        = port
        self.devbaudrate    = baudrate
        self.devbytesize    = bytesize
        self.devparity      = parity
        self.devstopbits    = stopbits

    # Open the serial port
    def OpenSerial(self):
        # TODO: open serial port method to be completed
        pass

    # Close the serial port
    def CloseSerial(self):
        # TODO: open serial port method to be completed
        pass

    # Serial port read
    def ReadSerial(self):
        # TODO: serial port read method to be completed
        pass

    # Serial port write
    def WriteSerial(self):
        # TODO: serial port write method to be completed
        pass
In this case, we can use the `dir (obj)` method to get all the attribute and method names of the class object instance, and `dir (obj)` returns a list. We use a for loop to print them, and the code is as follows:
# serdev is an instance of the SerialClass class
for item in dir(serdev):
    print(item)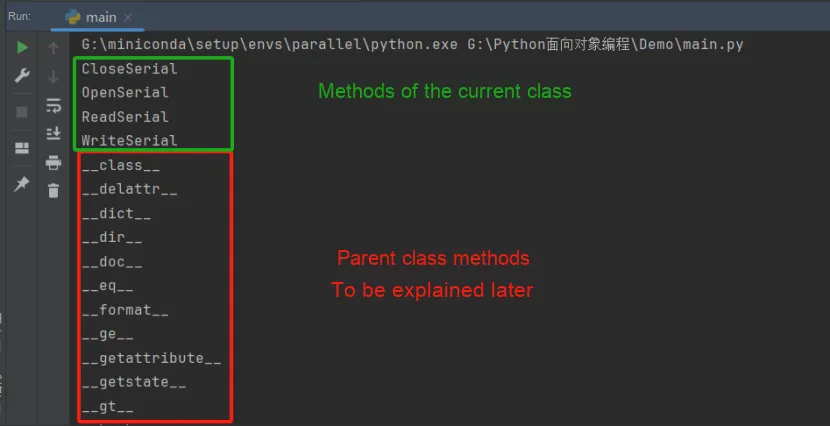
As you can see, we have added specific methods to the serial port class. Here, you may wonder: how exactly should these methods be implemented? Do we have to call the operating system's driver function to read the serial port and reinvent the wheel for data parsing? Of course not — Python's powerful third-party libraries have everything we need. Well, here it comes:
pyserial: A Practical Python Library for Serial Communication
pySerial is a third-party module in Python for operating serial ports, which supports multiple platforms such as Windows, Linux, OSX, and BSD. To use the pySerial module, you must first ensure that your Python version is higher than Python 2.7 or Python 3.4. Additionally, if you are using a Windows system, you must use Windows 7 or a later version.
Installing pySerial is straightforward — simply run a single command: pip install pyserial. Once the installation is complete, you only need to import the module in your Python code with the import serial statement.
The main class in pySerial is `serial.Serial`, and the official documentation describes it as follows:
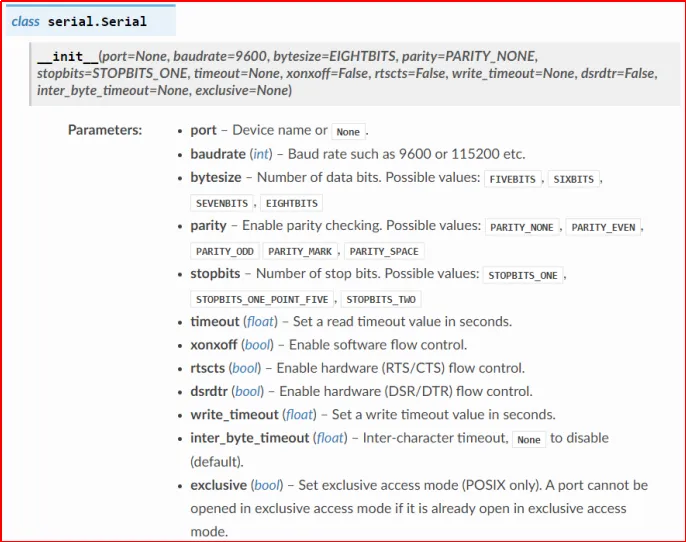
The meanings of common parameters are as follows:
Parameter Name | Meaning |
port | Define the device name |
baudrate | Baud Rate: In serial communication, the baud rate refers to the number of symbols transmitted per second, with the unit being baud. It determines the speed and efficiency of data transmission. For normal communication between the transmitting and receiving parties in serial communication, they must adopt the identical baud rate. Typical values are: 9600,19200,38400,57600,115200. |
bytesize | Data bits: Data bits refer to the actual number of data bits transmitted in each data packet, which represents the amount of valid information carried in each packet. Common data bit lengths include 5 bits, 7 bits and 8 bits. Typical values are: FIVEBITS, SIXBITS, SEVENBITS, EIGHTBITS. |
parity | Set the parity bit: Parity check is an error detection method used to check whether errors occur during data transmission, and you can select even parity or odd parity. Typical values: PARITY_NONE, PARITY_EVEN, PARITY_ODD PARITY_MARK, PARITY_SPACE. |
stopbits | A stop bit refers to an extra bit added at the end of a data packet to mark the end of the packet. The length of a stop bit can be 1 bit, 1.5 bits or 2 bits. Typical values: STOPBITS_ONE, STOPBITS_ONE_POINT_FIVE, STOPBITS_TWO. |
timeout | Set the read timeout value (in seconds): the optional parameters are -0, None, and x. |
write_timeout | Set the write timeout value (in seconds): the optional parameters are -0, None, and x. timeout = None: Wait indefinitely / until the requested number of bytes have been received. timeout = 0: non-blocking mode, returns immediately in any case, returning zero or more, up to the requested number of bytes. |
The common methods of the serial.Serial class are as follows:
Method Name | Function |
serial.open() | Open the serial port |
serial.close() | Close the serial port |
serial.isOpen() | Determine whether the serial port is open |
serial.write(data) | Write serial port data data |
serial.read(size) | Read size pieces of data from the serial port |
serial.flushInput() | Clear the data in the input buffer |
serial.flushOutput() | Abort the current output and clear the data in the output buffer |
serial.inWaiting() | Determine the currently received data |
serial.readline() | Read a line of data ending with \n; if there is no \n, keep reading and block. |
Now let's look at our sample code:
class SerialClass:
    def __init__(self,devport,devbaudrate,devbytesize,devparity,devstopbits):
        # Pass in the serial.Serial() class directly
        self.dev             = serial.Serial()
        self.dev.port        = devport
        self.dev.baudrate    = devbaudrate
        self.dev.bytesize    = devbytesize
        self.dev.parity      = devparity
        self.dev.stopbits    = devstopbits

    def OpenSerial(self):
        self.dev.open()

    def CloseSerial(self):
        self.dev.close()

    def ReadSerial(self):
        # Read by line in non-blocking mode
        data = self.dev.readline()
        # The received data is binary; decode it into a unicode string using utf-8
        # Convert the string to int
        data = int(data.decode('utf-8', 'replace'))
        return data

    def WriteSerial(self,write_data):
        # Write in non-blocking mode
        self.dev.write(write_data.encode())
        # The input parameter of write must be in bytes format,
        # String data needs to be encoded into binary data with the encode() function
        # \r\n means carriage return and line feed
        self.dev.write('\r\n'.encode())
Here you can see that for the convenience of explanation, we directly call the functions in the pyserial library to complete functions such as opening, closing, reading and writing of the serial port:
- In the initialization function, we define the self.dev attribute as the serial port device to receive the serial port object, which means self.dev is essentially an instance of the serial.Serial class; after that, we use other input parameters to configure the serial communication parameters for self.dev, thus completing the creation of the serial port device object.
- In the functions for opening and closing the serial port, we use the statements self.dev.open () and self.dev.close (), which are equivalent to directly calling the serial.open () and serial.close () methods;
- The key point lies in the sending and receiving functions, and there are two points that require special attention:
① The serial port receives binary data. If the received data consists entirely of English characters, it is necessary to decode the binary data into a unicode string using UTF-8 encoding. If the data contains Chinese characters, it is recommended to decode the binary data into a unicode string using GB18030 encoding instead.
Meanwhile, sometimes errors or garbled characters may occur due to the presence of Chinese characters or poor contact in the serial port transmission cable, which will trigger an error if decoded directly. To ensure smooth decoding of serial port prints and avoid such issues, simply add "replace" to the parameters of decode. This parameter functions to automatically replace any characters that fail to be decoded with a question mark ? when errors are encountered during the decoding process.
② In serial port transmission, the documentation of pyserial specifies that the input parameter of write must be in bytes format (i. e., binary data). In Python 3, there is a clear distinction between strings and binary data streams: text is always stored in Unicode encoding and represented by the str type, while binary data is represented by the bytes type. Therefore, string data needs to be encoded into binary data via the encode () function before it can be sent successfully.
The methods of the serial port class have already been written, so how should we test them next? Do we need to buy a microcontroller and a USB-to-TTL module to connect to a computer to test the methods of the serial port class? (Of course not, just kidding)
When developing the host computer software for communication with a single-chip microcomputer, if you use the single-chip's serial port for actual debugging, you will at least need an additional USB-to-serial adapter to enable serial communication between the single-chip and the computer. After that, you also need to run a serial port-related program on the single-chip to keep track of the data transmission status, which undoubtedly increases the development difficulty. In this case, we can use virtual serial port software, which is a program that simulates physical serial interfaces. It fully replicates the functions of hardware COM interfaces, and will be recognized by the operating system and serial applications as real ports.In real life, virtual serial ports have a wide range of uses. For example, they facilitate debugging when your application detects serial input data. Another example is serial communication between multiple applications.
Here we use the VSPDProv6.9 software to create virtual serial ports. For the software download and installation tutorial, please click the link: https://www.xue51.com/soft/9349.html
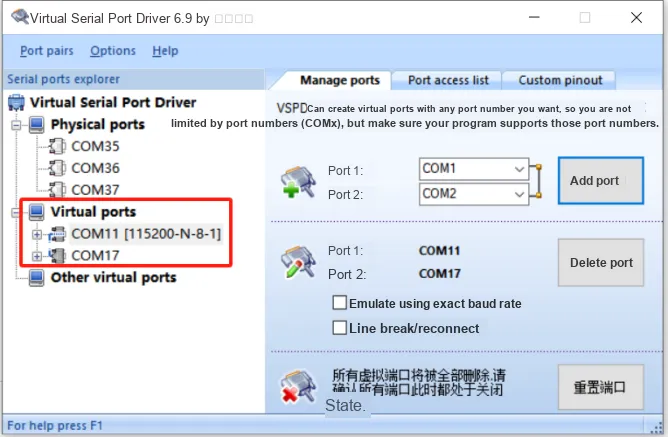
Here we create two interconnected serial ports, com11 and com17. Virtual serial ports need to be created in pairs to specify their connection relationship, just like the male and female connectors of various cables. After we set up the virtual serial port connection, we can use them for communication, and we can choose any serial port assistant software to communicate with the Python serial port class we wrote.Here, we choose the XCOM software for testing. For the installation and download tutorial of the XCOM software, please click the link: https://blog.csdn.net/qq_41573860/article/details/103796913
Open the XCOM software, and we will first configure the relevant serial port parameters, as shown in the following figure:
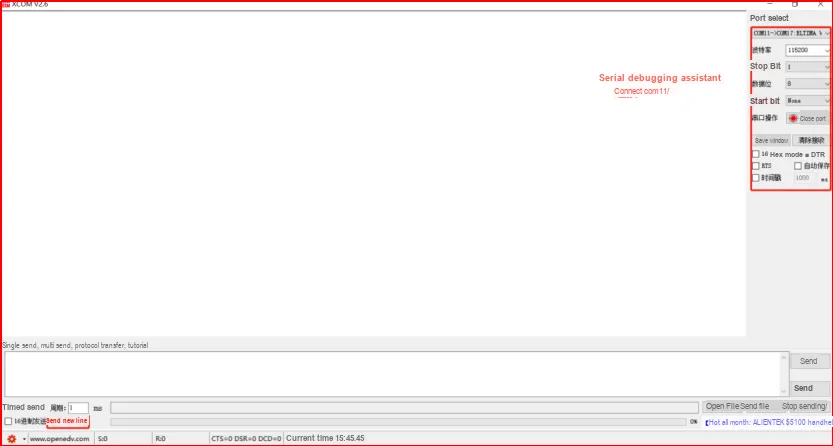
At this point, we create a serial port device instance in the Python program and connect to com17; the code is as follows:
# Create an instance of the serial port class
serdev = SerialClass(devport     = "COM17",
                     devbaudrate = 115200,
                     devbytesize = serial.EIGHTBITS,    # Data length is 8 bits
                     devparity   = serial.PARITY_NONE,  # No parity
                     devstopbits = serial.STOPBITS_ONE  # 1 stop bit
                    )
We first try to implement the serial port transmission function using Python. Here we define a count variable with an initial value of 0, which increments after each transmission is completed, and the serial port will be closed after looping 100 times. The code is as follows:
serdev.OpenSerial()
count = 0
while True:
    # A global variable must be used, otherwise count is a new variable on every loop iteration
    # For the reason, look up variable lifetime and scope on your own
    count = count + 1
    serdev.WriteSerial(str(count))
    if(count == 100):
        break
serdev.CloseSerial()
print("device close")
The running results are as follows:
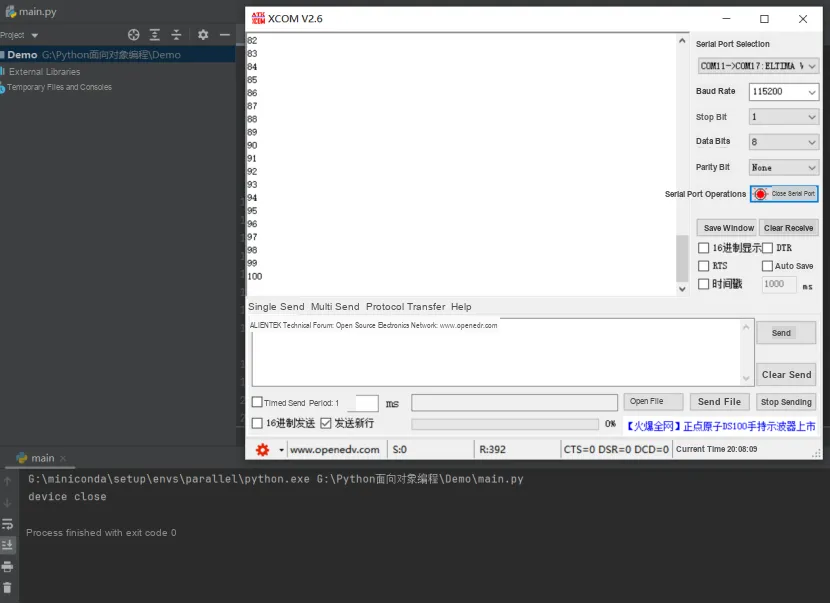
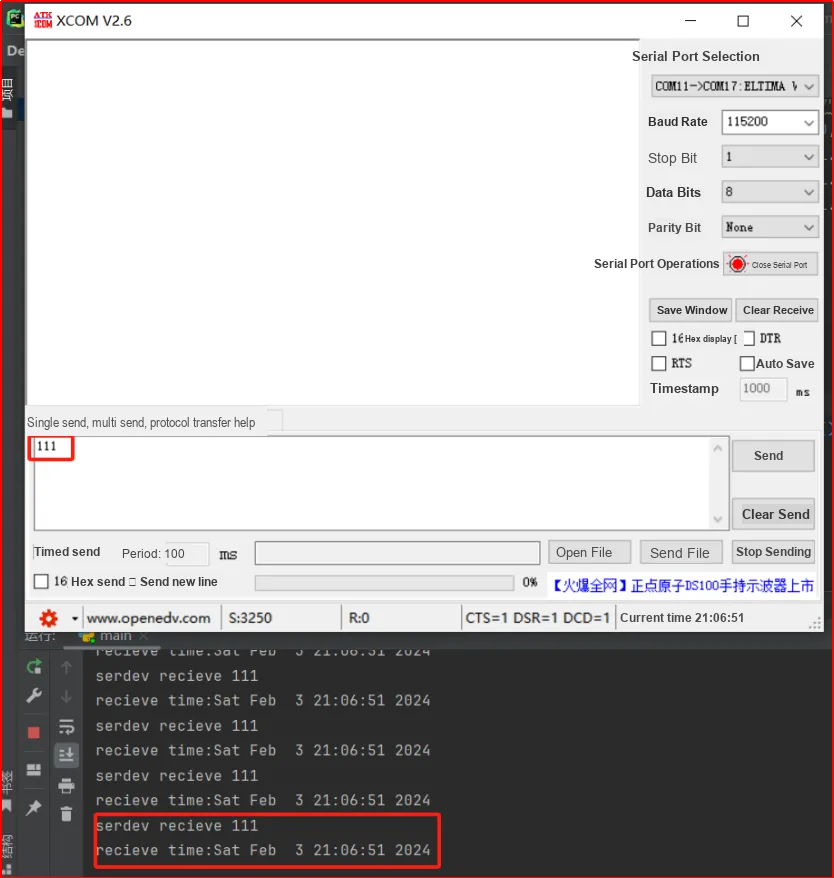
Next, we will try to implement the serial port receiving function with Python. We send data periodically in xcom, and perform polling to receive and print the received data in Python. Here we import the time library and print the receiving time. The time library is the standard library for time processing in Python, and it is the most basic time processing library. The time library is mainly used for timing and obtaining system time. The time.ctime () function is used to obtain the current Coordinated Universal Time, in the form of "Weekday-Month-Day-Hour-Minute-Second-Year".
Sample code and configuration are as follows:
import time
while True:
    data = serdev.ReadSerial()
    print("serdev recieve %d"%data)
    print("recieve time:"+str(time.ctime()))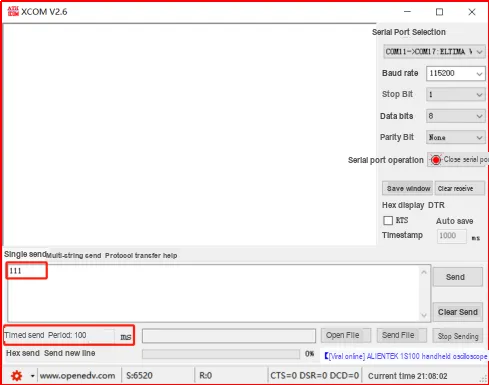
The running results are as follows: