Contents
- I. Module Introduction
- 2. Introduction to Main Chips
- 2.1 Chip Overview
- 2.2 Pin Definition
- 2.3 Functional Block Diagram
- 2.4 Performance Parameters
- 2.5 Reference Circuit
- 2.6 Chip Configuration
- 2.7 Communication Interfaces and Related Protocols
- 2.8 PCB Routing Precautions
- III. Circuit Engineering
- 3.1 Circuit Source Engineering
- 3.2 Module Usage Instructions
- 3.3 Application Experiment
- 4. Drivers
- 5. BOM & Recommended Alternative Parts
- VI. Revision History
- VII. Relevant Materials
- 7.1 Chip Datasheet
- 7.2 Unique Icons for PCB Silk Screen
I. Module Introduction
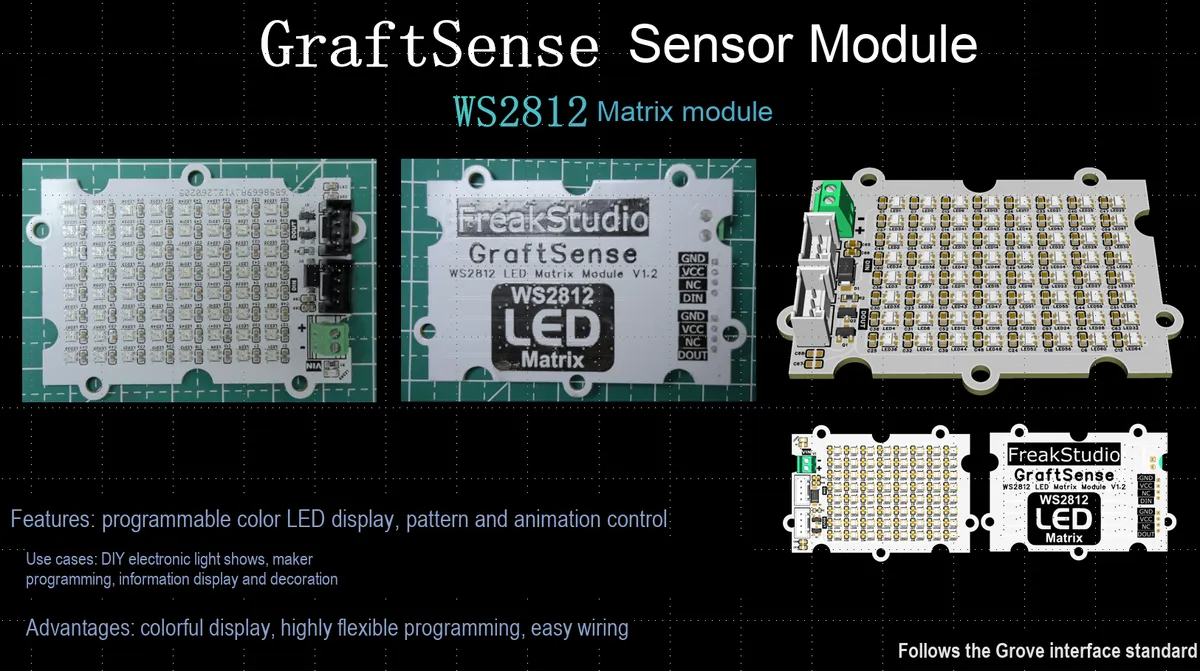
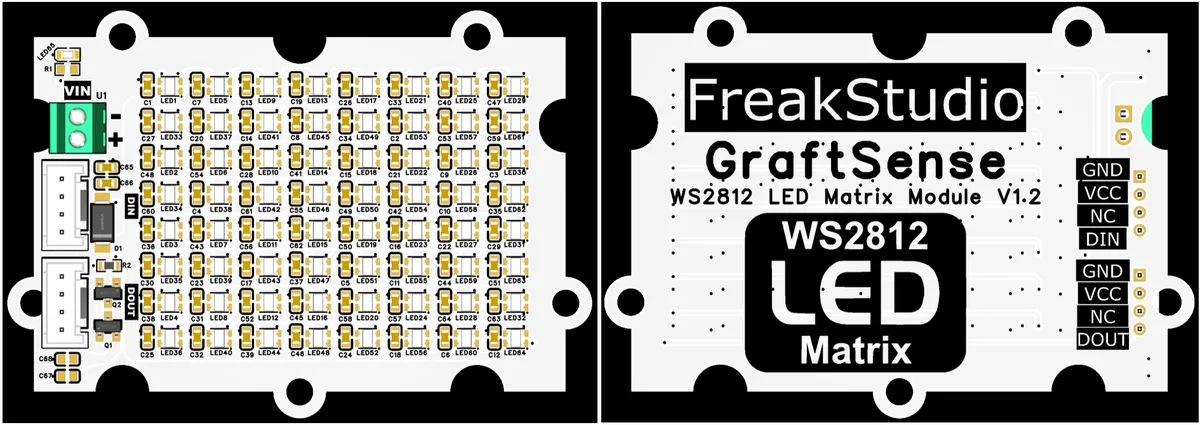
The WS2812 matrix module is an 8×8 matrix module composed of 64 WS2812B-2020 RGB lamp beads. Each lamp bead has a built-in control chip, and only one data line is required to control any number of cascaded dynamic effects. The WS2812B 's DIN and DOUT pins are respectively led out via independent 4×PH2.0 terminals. This module supports rich color display and dynamic effects, and is suitable for scenarios such as lighting art, intelligent display, and decorative lighting, providing a flexible RGB lighting matrix solution for creative electronic projects.
2. Introduction to Main Chips
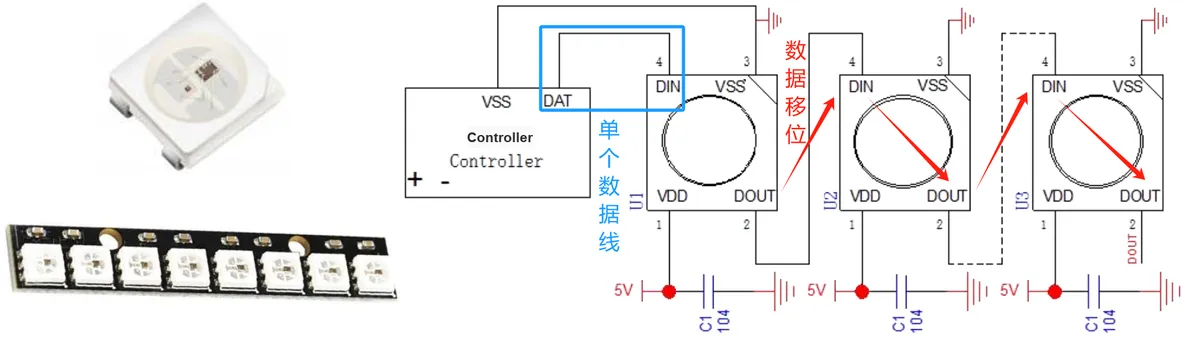
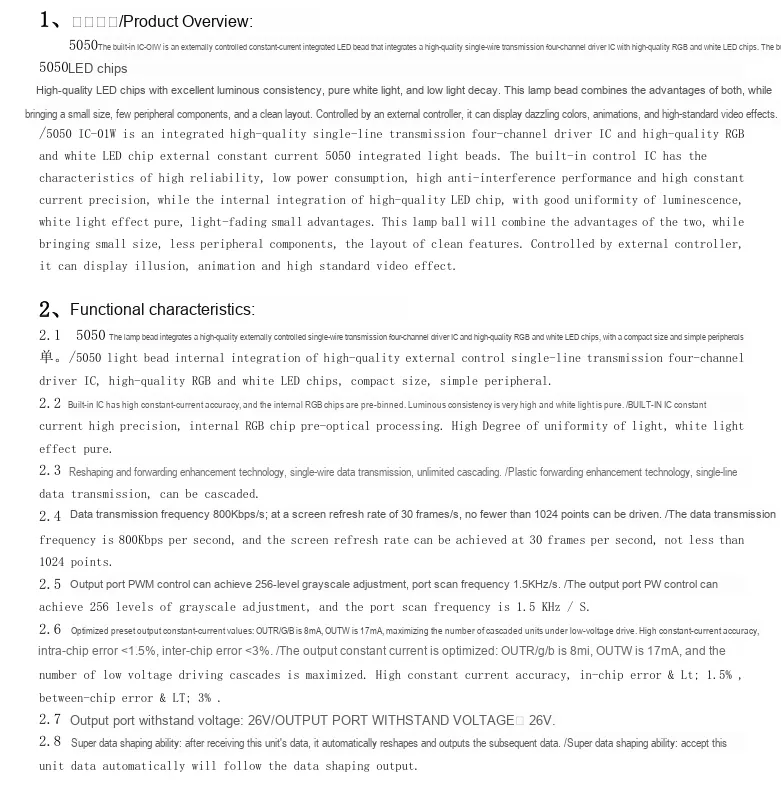
WS2812 LED is a type of individually addressable RGB LED under the Neopixel ecosystem, and we can control multiple WS2812 RGB tricolor LEDs through a single data line. The working principle of WS2812 is to transmit 24-bit RGB color data to each LED bead one by one via a single data line. Each WS2812 chip incorporates a shift register for receiving and forwarding data. After receiving a complete frame of RGB data, the corresponding color will be displayed on this LED bead.By connecting multiple WS2812 LEDs in series, flexibly programmable LED strips, LED matrices and other forms can be constructed. Common applications include decorative lighting, LED displays, smart lamps and the like.
WS2812 's main features include:
- High integration: A single
WS2812LED chip integratesRGBthree-colorLEDand a control chip, which can be controlled with only a single data line - Series control: Multiple
WS2812lamp beads can be used in series to formLEDlight strips orLEDarrays - Programming Control: By programming to control data signals, independent dimming and color control for each
LEDcan be realized. - Low power consumption: operating voltage is 5V, power consumption of a single
LEDis only 60mW - High Brightness:
LEDemits high brightness, with a maximum brightness ranging from 6500 to 8000 mcd - Compact size: The package measures only 5.0mm x 5.0mm x 1.6mm
2.1 Chip Overview
2.2 Pin Definition
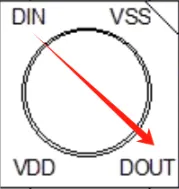
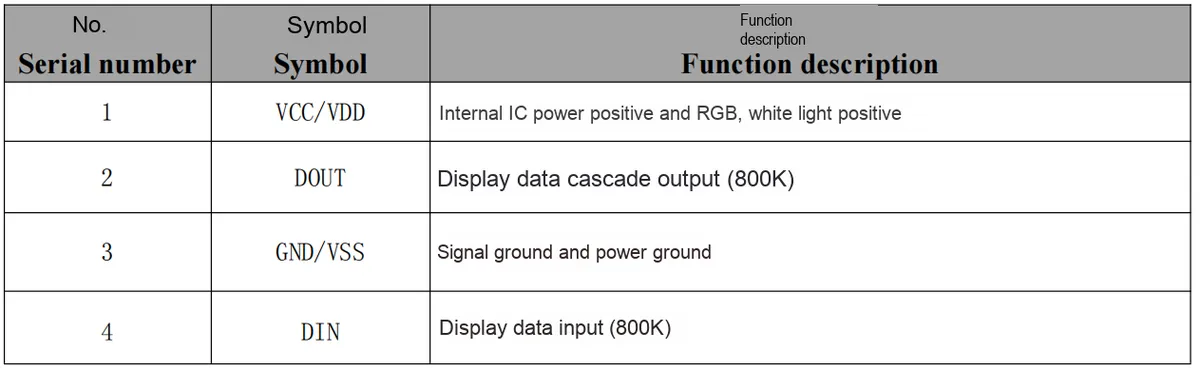
The WS2812 has four pins, and their functions are as follows:
2.3 Functional Block Diagram
None.
2.4 Performance Parameters
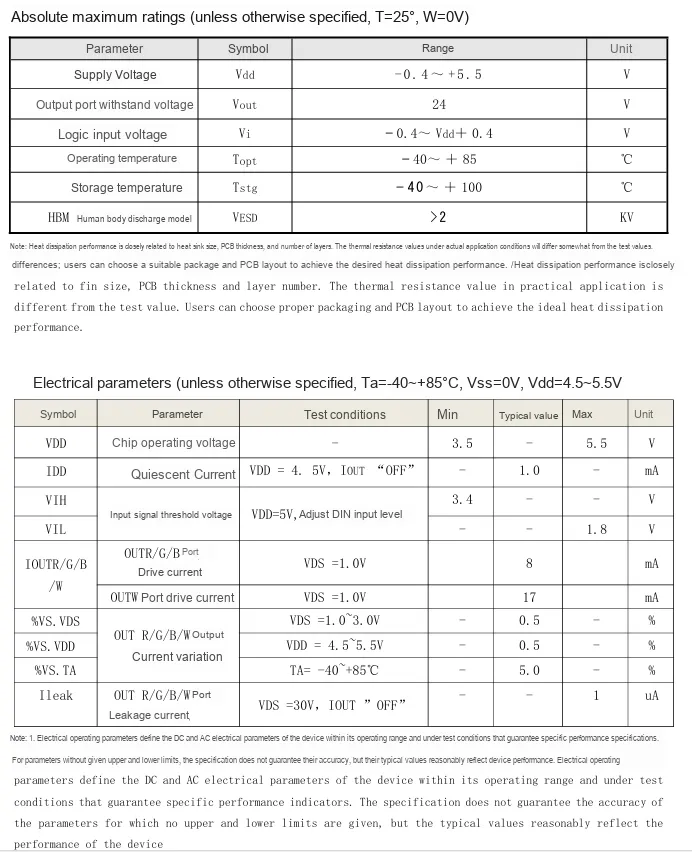
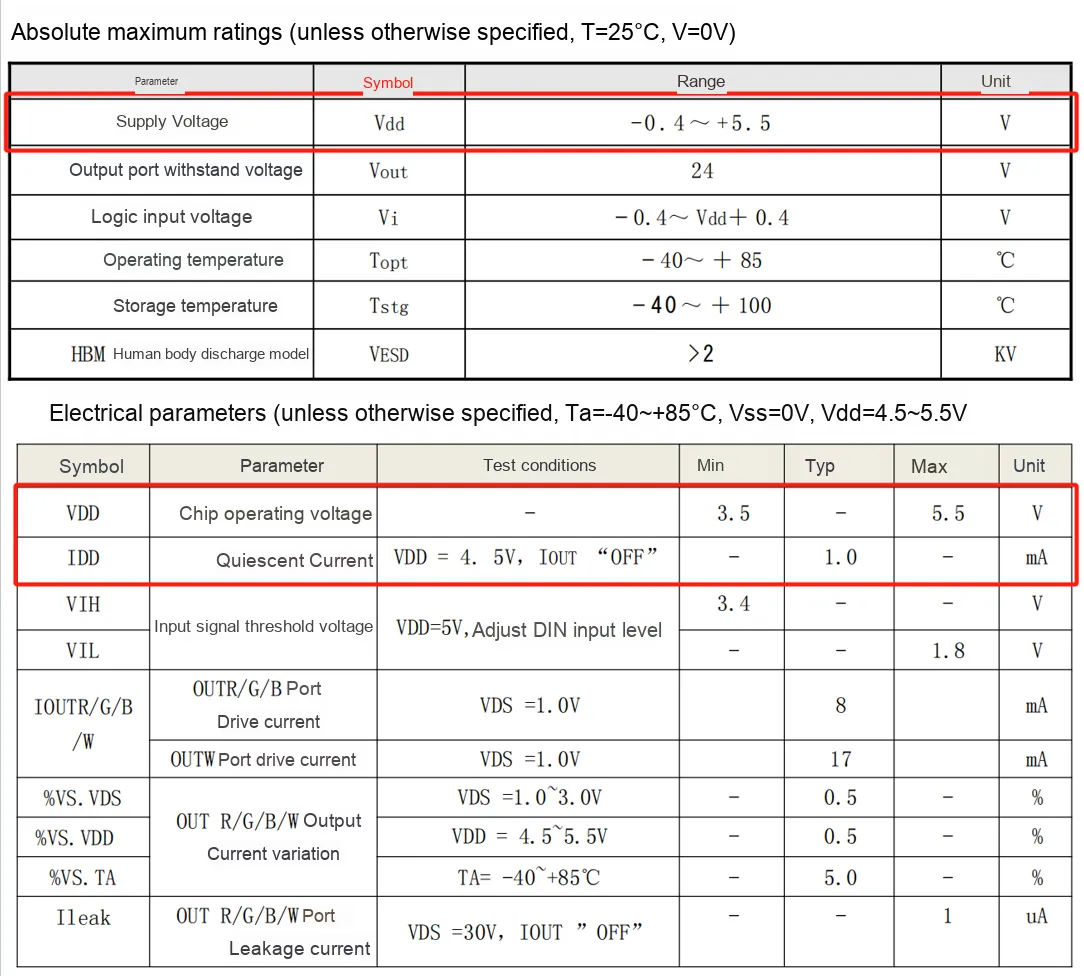
The following is a partial summary of the table:
- Maximum Ratings (
Ta= 25∘C,Vs= 0):- Power supply voltage: -0.4 to + 5.5V; withstand voltage of output port: 24V;
- Logic input voltage - 0.4 to
Vdd+ 0.4V; - Operating Temperature: -40 to + 85°C;
- Storage temperature: -40~+ 100℃;
HBMHuman Body Model > 2kV.
- Electrical Characteristics (
Ta= −40∼+ 85∘C,Vss= 0,Vdd= 4.5∼5.5V):- Chip operating voltage: 3.5~5.5V;
- Typical quiescent current: 1.0 mA (
VDD= 4.5 V,IOUTset toOFF) - Input signal threshold voltage
VIH≥ 3.4 V,VIL≤ 1.8 V (VDD= 5 V); OUTR/G/Btypical driving current 8mA,OUTWtypical driving current 17mA (VDS= 1.0V);- Output current variation %
VS. VDSTypical 0.5%, %VS. VDDTypical 0.5%, %VS. TATypical 5.0%; OUTport leakage current max. 1μA (VDS= 30V,IOUTinOFFstate).
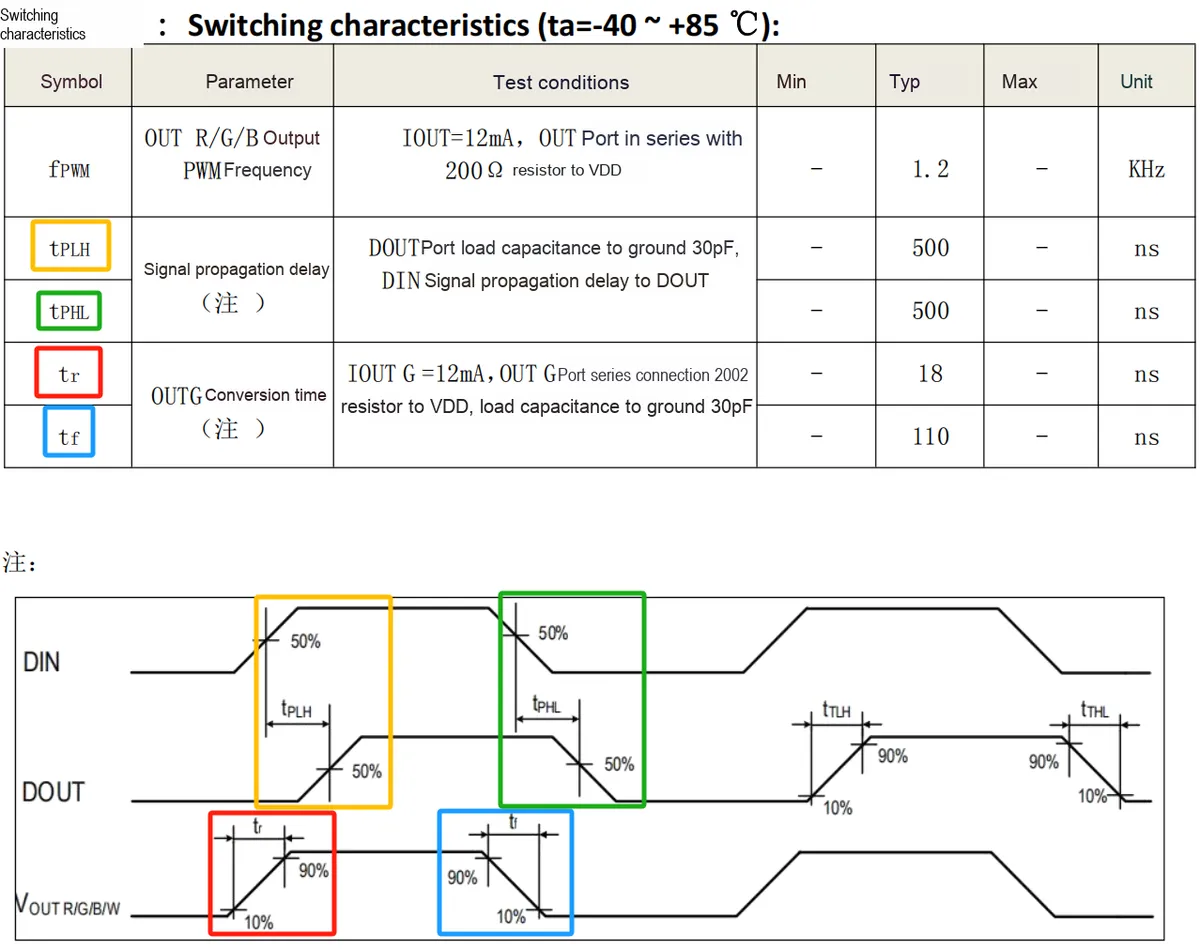
The following is a partial summary of the table:
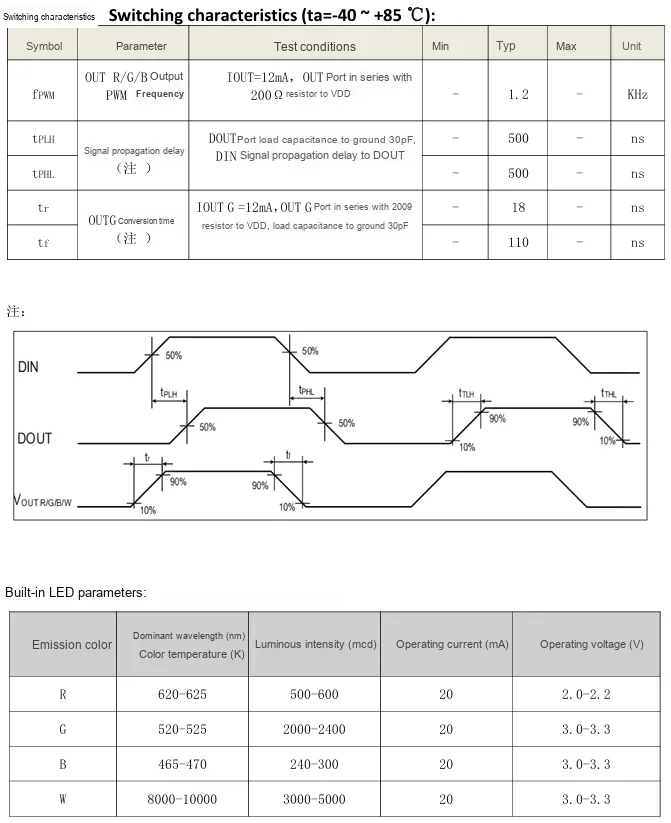
- Switching characteristics (
ta=−40 to + 85°C):PWMtypical frequency is 1.2kHz.- Typical signal transmission delay is 500ns.
OUTGTransition Time: Typical rise time 18ns, typical fall time 110ns.
- Built-in
LEDParameters:R: dominant wavelength 620-625nm, luminous intensity 500-600mcd, operating current 20mA, operating voltage 2.0-2.2V.G: Dominant wavelength 520-525nm, luminous intensity 2000-2400mcd, operating current 20mA, operating voltage 3.0-3.3V.B: Dominant wavelength 465-470nm, luminous intensity 240-300mcd, operating current 20mA, operating voltage 3.0-3.3V.W: Color temperature 8000-10000K, luminous intensity 3000-5000mcd, operating current 20mA, operating voltage 3.0-3.3V.
2.5 Reference Circuit
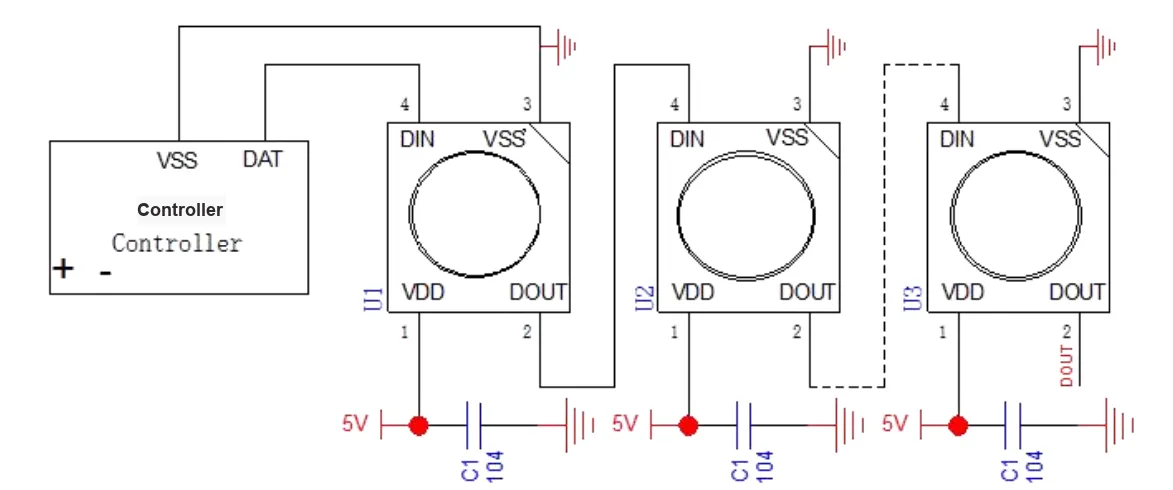
2.6 Chip Configuration
WS2812B-5050RGB No additional configuration is required during use.
2.7 Communication Interfaces and Related Protocols
WS2812B-5050RGB adopts the communication mode of unipolar return-to-zero code, and each symbol must have a low level:
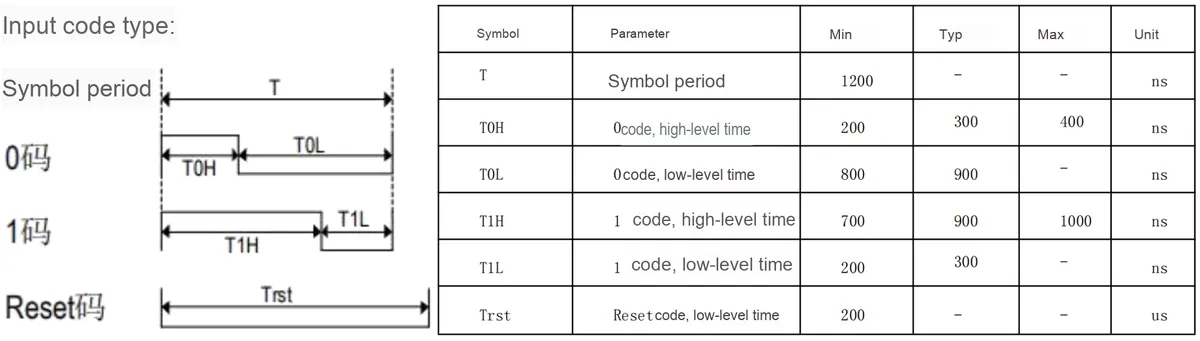
Unipolar Return-to-Zero Code
Unipolar return-to-zero code refers to a coding scheme where high level and zero level represent binary 1 and 0 respectively: "0" is represented by no voltage, while "1" is represented by a constant positive voltage whose duration is shorter than the time width of one symbol, i. e., a narrow pulse is transmitted. The midpoint of each symbol period is the sampling time, and the decision threshold is set at half the amplitude level.
It has the following features:
- Unipolar: The signal has only two states, high level (1) and low level (0), with no negative level.
- Return-to-zero: There will be a low-level state between each symbol, which is referred to as "return-to-zero"
- Symbol time: the time length of each symbol is equal
- Symbol value: Each symbol is either at a high level or a low level.
The encoding rules for unipolar return-to-zero code are as follows:
- When encoding "1", the output is a high level that occupies the entire symbol duration.
- When encoding "0", the output remains at a low level for the entire symbol duration.
- There is a low-level period (return-to-zero period) between every two symbols.
You can refer to the following link for the Sequence Diagram of its encoding method:
https://en.wikipedia.org/wiki/File:Digital_signal_encoding_formats-en.svg
After the chip is powered on and reset, the DIN terminal receives data transmitted from the controller:
- First, the incoming 24-bit data is extracted by the first chip and then sent to the data latch inside the chip.
- The data latch inside the chip generates duty ratio control signals with different duty cycles at the OUTR, OUTG, and OUTB control terminals based on the received 24-bit data, so as to make the LED produce different colors.
- The remaining data, after being shaped and amplified by the internal shaping processing circuit, is forwarded and input to the next cascaded chip via the DO port, and the signal decreases by 24 bits after transmission through each chip.
- When the chip does not receive the RESET signal input from the DIN terminal, the output of the OUTR, OUTG and OUTB pins remains unchanged; when the RESET signal is received, each control terminal will change its output according to the received data.
The chip adopts automatic shaping and forwarding technology, so that the cascade number of this chip is not limited by signal transmission, but only restricted by the requirement of signal transmission speed.
Its Communication Protocol is: reset signal + 24-bit data of the first chip + 24-bit data of the second chip +. .. + 24-bit data of the Nth chip. The data is transmitted with the highest bit first and in the order of GRB (different WS2812 chips have different color orders, which should be subject to the datasheet):

Among them, bits R0-R7 control the red light color output, bits G0-G7 control the green light color output, and bits B0-B7 control the blue light color output. Since each LED bead needs to store 24-bit RGB color data, when the LED strip is long and there are a large number of LED beads, the video memory data will occupy a large amount of RAM space.
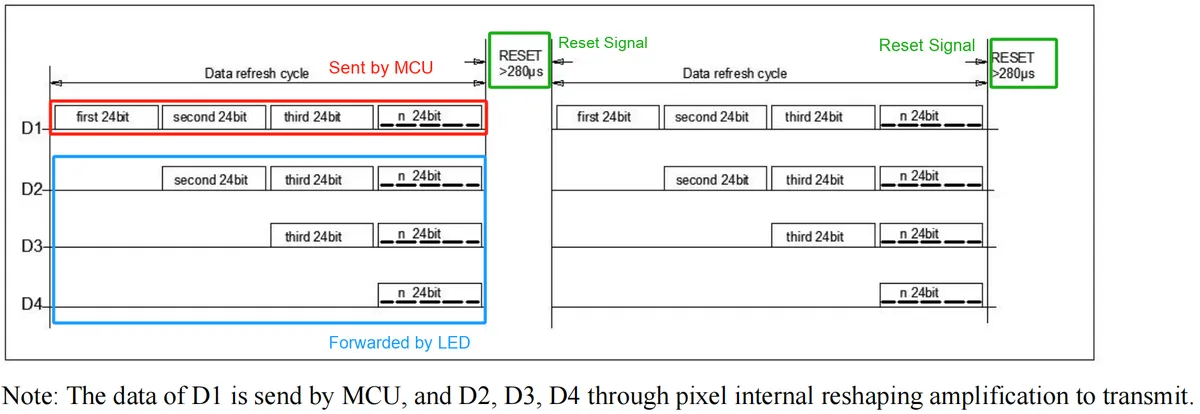
Among these, D1 is the data sent from the MCU side, while D2, D3 and D4 are the data automatically shaped and forwarded by the cascade circuit. The controller can continuously transmit 24-bit RGB control signals: after the first LED bead intercepts the first 24 bits of data, it displays the data on its own LED, shapes the remaining data and then sends it to the second LED bead. The second LED bead will intercept the second set of 24-bit data for display, and continue to forward the remaining data until the last set of data is displayed.
The electrical parameters of WS2812 are as follows:
2.8 PCB Routing Precautions
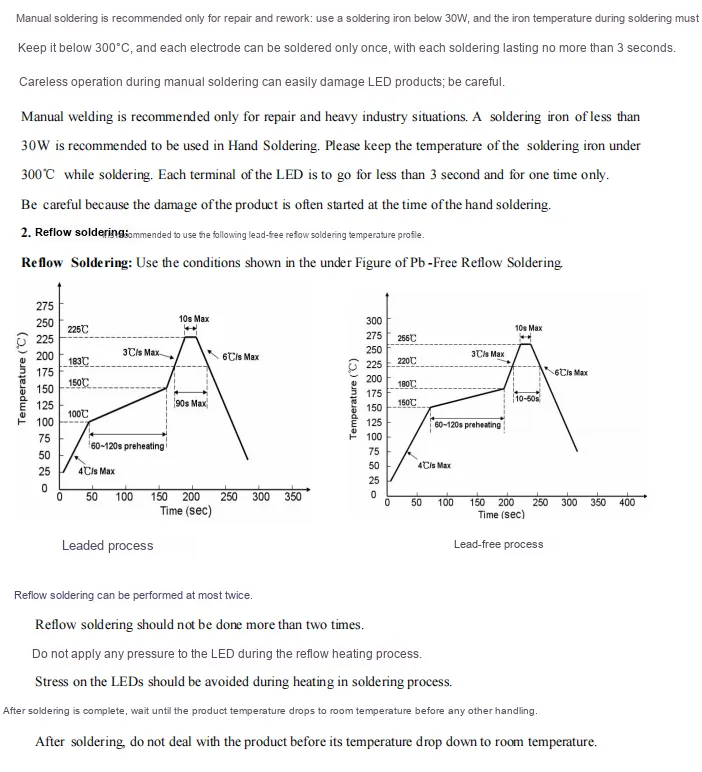
WS2812B-5050RGB PCB wiring precautions. The following is WS2812B-5050RGB soldering precautions description.
III. Circuit Engineering
3.1 Circuit Source Engineering
To obtain the circuit source project, please follow the official account [Freak Embedded].
3.2 Module Usage Instructions
SCH_WS2812 Matrix Module-v1.2_2026-02-13.pdf 2.6 MB
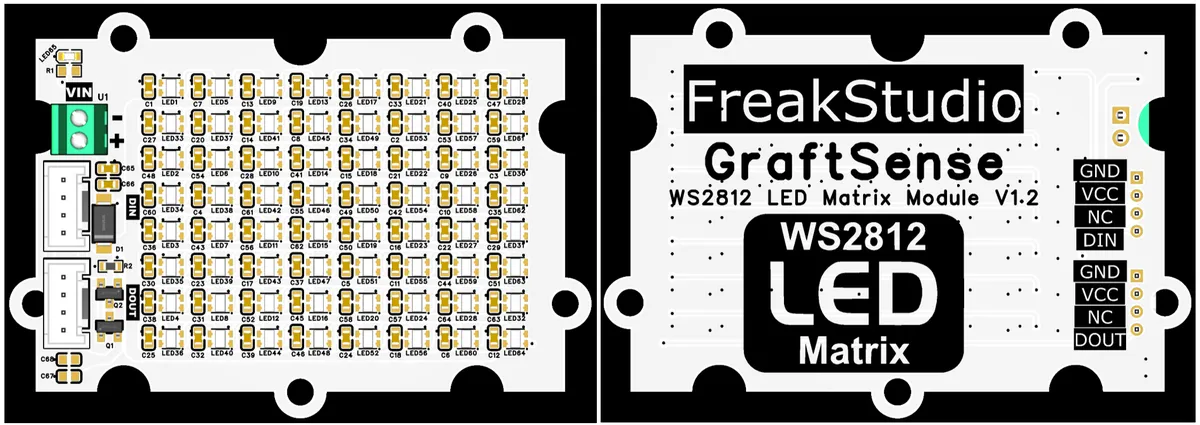
This module adopts a single-wire serial communication interface: only one data line is required to realize data transmission such as color display and dynamic effects for 8×8 WS2812 RGB lamp beads, and it is compatible with the IO level of common main controllers;The DOUT interface equipped on the module can be used for cascading multiple WS2812 matrix modules — it transmits the output data of the current module to the DIN port of the next module, so as to expand a light matrix of larger size. It is suitable for scenarios such as creative light displays for maker projects, smart display panels, and decorative lighting, providing the system with flexible RGB light matrix control and scale expansion capabilities.
Note: Since this module uses 64 WS2812B-2020 RGB LEDs, when powered by 5V, the maximum output power may reach 3W. Therefore, please ensure that the connected power supply can deliver a maximum output current of 1A.
3.3 Application Experiment
Here, we use the GraftPort-RP2040 development board for testing, and connect the WS2812 matrix module to communicate with the main controller via the DIO interface.
Here, we first use the HY2.0-4P connection cable to connect the module to the GraftPort-RP2040 development board's DIO0 interface:
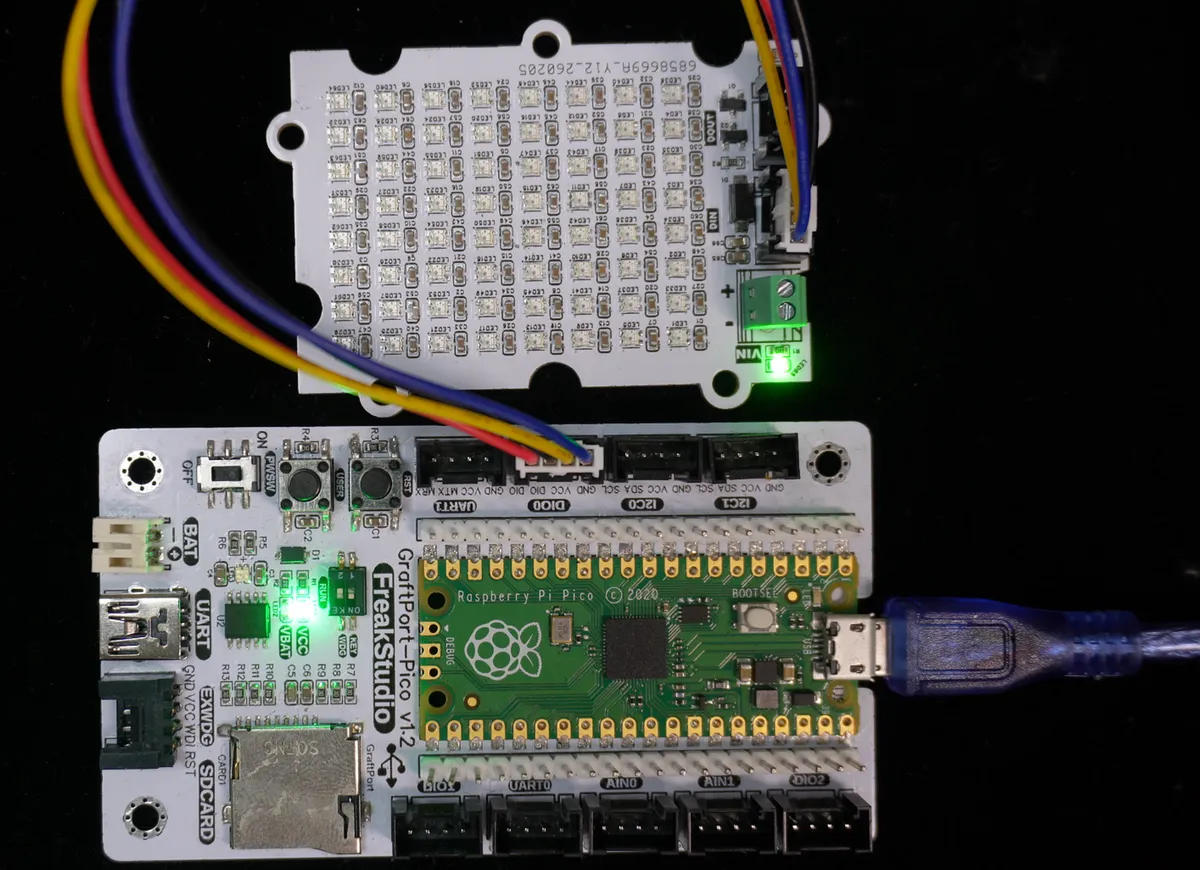
The module connections are shown in the following table:
Development Board Pins | Module Pins | Description |
Pin 6 |
| Communication signal output interface on MCU |
Pin 7 |
| - |
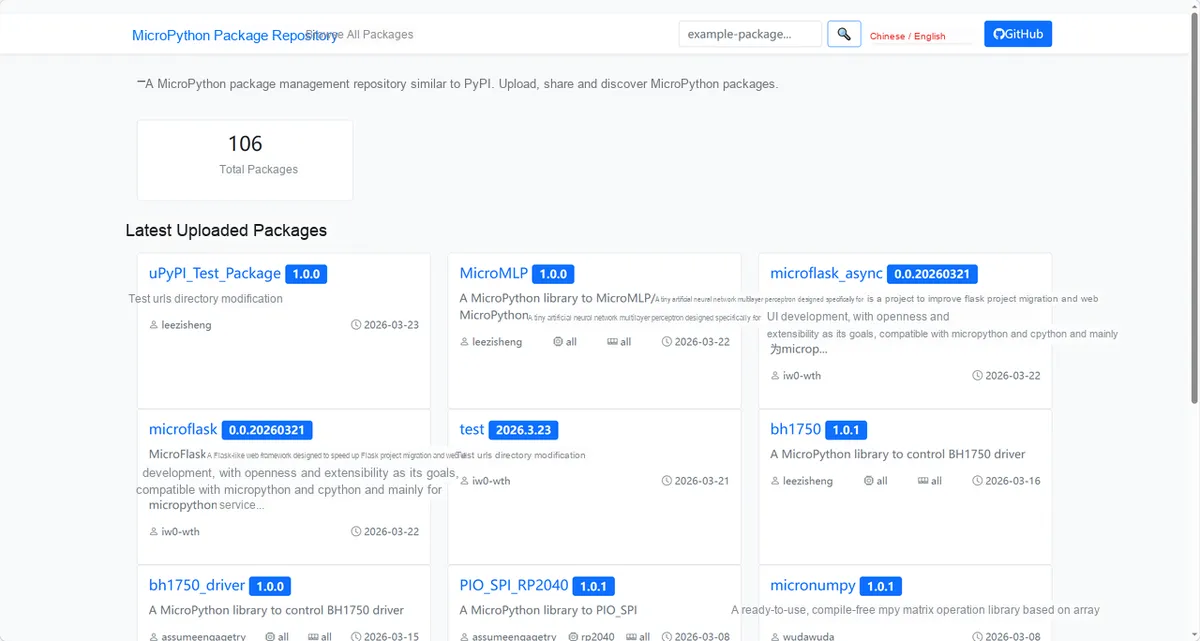
Here, we need to search for the relevant driver packages on uPyPI: https://upypi.net/zh/
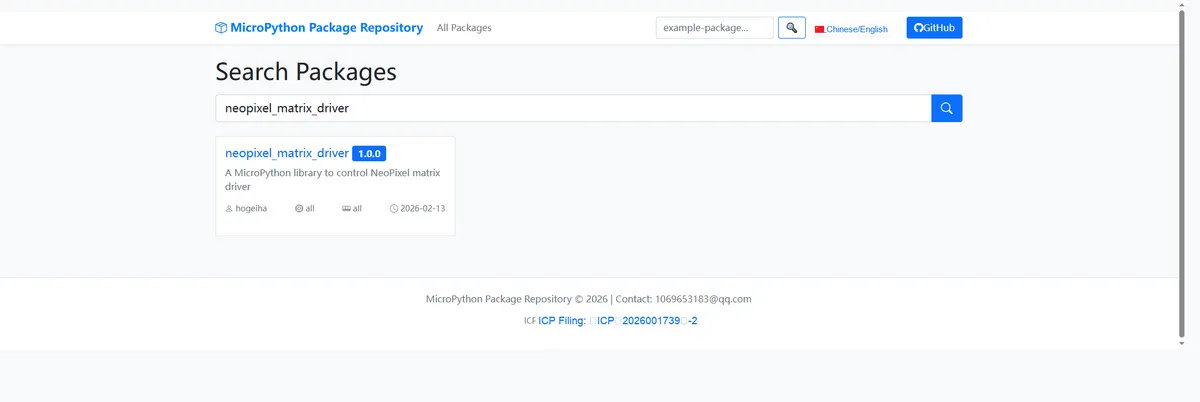
Enter neopixel_matrix_driver to search, and the following will be displayed:
Click to copy the local installation command:
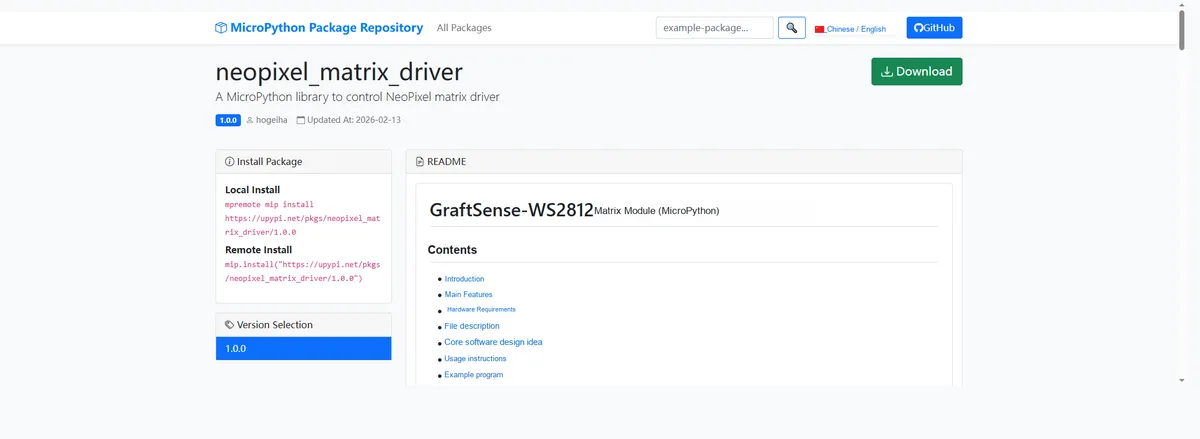
Here, we can import the module driver library code via the mip tool. Below are the usage commands for the mpremote tool:
mpremote mip install github:FreakStudioCN/GraftSense-Drivers-MicroPython/lighting/neopixel_matrix_driverImport the WS2812 LED Matrix Driver and Animation Library - MicroPython Driver Code, then copy the following main.py code into our project:
# Python env   : MicroPython v1.23.0
# -*- coding: utf-8 -*-
# @Time    : 2025/4/14 10:44 AM
# @Author  : Li Qingshui
# @File    : main.py
# @Description : Test code for the WS2812 matrix driver library

# ======================================== Import Modules =========================================

# Import hardware-related modules
from machine import Pin
# Import the WS2812 driver module
from neopixel_matrix import NeopixelMatrix
import math
from array import array
import random
import time
import os
import json

# ======================================== Global Variables ============================================

# Modified: added matrix size configuration (default 8x8, can be changed to match the actual LED panel)
MATRIX_WIDTH = 8    # Matrix width (number of columns)
MATRIX_HEIGHT = 8   # Matrix height (number of rows)

json_img1 = json.dumps({
    # 4x4 image data example, cycling red, green, blue, purple
    "pixels": [0xF800, 0x07E0, 0x001F, 0xF81F] * 4,
    "width": 4,
    "description": "test image1"
})

json_img2 = json.dumps({
    # 4x4 image data example, color order reversed
    "pixels": [0x001F, 0xF81F, 0x07E0, 0xF800] * 4,
    "width": 4,
    "description": "test image2"
})

json_img3 = json.dumps({
    # 4x4 image data example, another arrangement
    "pixels": [0x07E0, 0xF800, 0xF81F, 0x001F] * 4,
    "width": 4,
    "description": "test image3"
})

# Put the image data into a list
animation_frames = [json_img1, json_img2, json_img3]

# ======================================== Functions ============================================

def color_wipe(color, delay=0.1):
    """
    Color fill effect: light up the entire matrix pixel by pixel, forming a running-light effect.

    Args:
        color (int): Fill color, in RGB565 format.
        delay (float): Interval between lighting each pixel (seconds), default 0.1 s.

    Notes:
        - The matrix is cleared after the function finishes.
        - The effect is similar to "pixels lighting up in order from left to right, top to bottom".

    ==========================================

    Color fill effect: Light up the entire matrix pixel by pixel, creating a flowing light effect.

    Args:
        color (int): Fill color in RGB565 format.
        delay (float): Interval time for each pixel to light up (seconds), default 0.1s.

    Notes:
        - The matrix will be cleared after the function completes.
        - The effect is similar to "pixels lighting up from left to right, top to bottom".
    """
    matrix.fill(0)
    # Modified: replaced hard-coded 8 with the global size variable
    for i in range(MATRIX_WIDTH):
        for j in range(MATRIX_HEIGHT):
            matrix.pixel(i, j, color)
            matrix.show()
            time.sleep(delay)
    matrix.fill(0)

def optimized_scrolling_lines():
    """
    Optimized scrolling line animation: contains two animation stages.

    1. A blue horizontal line scrolls from top to bottom, with blank areas filled in green
    2. A red vertical line scrolls cyclically from left to right on a cyan background

    Notes:
        - The matrix is cleared automatically after the animation ends.
        - Uses partial refresh and cyclic scrolling to improve performance.

    ==========================================

    Optimized scrolling line animation: Contains two stages of animation effects.

    1. Blue horizontal line scrolls from top to bottom, empty areas filled with green
    2. Red vertical line scrolls cyclically from left to right on cyan background

    Notes:
        - The matrix will be automatically cleared after the animation ends.
        - Uses partial refresh and cyclic scrolling to improve performance.
    """
    # 1. Blue horizontal line scrolls from top to bottom
    matrix.fill(0)
    matrix.show()
    # Modified: adapt to different widths, line length is now half the matrix width (keeping the original 4/8 ratio)
    hline_length = MATRIX_WIDTH
    matrix.hline(0, 0, hline_length, NeopixelMatrix.COLOR_BLUE)
    matrix.show()
    time.sleep(0.5)

    # Modified: scroll count adapts to matrix height (original 3 for 8 rows, now height//3)
    scroll_times = MATRIX_HEIGHT
    for _ in range(scroll_times):
        matrix.scroll(0, 1, clear_color=NeopixelMatrix.COLOR_GREEN)
        matrix.show()
        time.sleep(0.3)

    # 2. Red vertical line scrolls cyclically from left to right
    matrix.fill(0)
    # Left red line
    matrix.fill(NeopixelMatrix.COLOR_CYAN)
    # Modified: vertical line height adapts to half the matrix height (keeping the original 2/4 ratio)
    vline_height = MATRIX_HEIGHT
    matrix.vline(0, 0, vline_height, NeopixelMatrix.COLOR_RED)
    matrix.show()
    time.sleep(0.5)

    # Modified: scroll count adapts to matrix width (original 8 for 8 columns, now matrix width)
    for _ in range(MATRIX_WIDTH):
        matrix.scroll(1, 0, wrap=True)
        matrix.show()
        time.sleep(0.2)

    # 3. Clear at the end
    matrix.fill(0)
    matrix.show()

def animate_images(matrix, frames, delay=0.5):
    """
    Play an animation in a loop using multiple JSON-format image data.

    Args:
        matrix (NeopixelMatrix): NeopixelMatrix object instance.
        frames (list): List containing JSON-format image data (elements can be strings or dicts).
        delay (float): Display time per frame (seconds), default 0.5 s.

    Notes:
        - The function plays the animation in an infinite loop.
        - The display is refreshed automatically before each frame switch.

    ==========================================

    Cyclically play animation using multiple JSON format image data.

    Args:
        matrix (NeopixelMatrix): Instance of NeopixelMatrix object.
        frames (list): List containing JSON format image data (elements can be strings or dictionaries).
        delay (float): Display time per frame (seconds), default 0.5s.

    Notes:
        - The function will play animation frames in an infinite loop.
        - The display will be automatically refreshed before each frame switch.
    """
    while True:
        for frame in frames:
            # Display the current frame
            matrix.show_rgb565_image(frame)
            matrix.show()
            # Wait for a set time, then switch to the next frame
            time.sleep(delay)

def load_animation_frames():
    """
    Load 30 frames of animation data from files, named "test_image_frame_000000.json" to "test_image_frame_000029.json".

    Returns:
        list: List containing 30 frames of data, each element is a parsed JSON dict.
              Frames that fail to load are replaced with blank frames (all black).

    Notes:
        - If a file does not exist or fails to load, a blank frame is inserted automatically.
        - Each blank frame is a 4x4-pixel all-black matrix.

    ==========================================

    Load 30 frames of animation data from files, with naming format "test_image_frame_000000.json"
    to "test_image_frame_000029.json".

    Returns:
        list: List containing 30 frame data, each element is a parsed JSON dictionary.
              Frames that fail to load will be replaced with blank frames (all black).

    Notes:
        - If a file does not exist or fails to load, a blank frame will be automatically inserted.
        - Each blank frame is a 4x4 pixel all-black matrix.
    """
    frames = []
    for i in range(30):
        # Zero-pad to generate file names: test_image_frame_000000.json to test_image_frame_000029.json
        filename = "test_image_frame_{:06d}.json".format(i)
        try:
            with open(filename) as f:
                frames.append(json.load(f))
        except Exception as e:
            print("Error loading frame {}: {}".format(filename, e))
            # Modified: blank frame size adapts to the global configuration (to fix it at 4x4, change back to [width:4, height:4])
            frames.append({"pixels": [0]*(MATRIX_WIDTH*MATRIX_HEIGHT), "width": MATRIX_WIDTH, "height": MATRIX_HEIGHT})
    return frames

def play_animation(matrix, frames, fps=30):
    """
    Play the animation with precise frame rate control.

    Args:
        matrix (NeopixelMatrix): NeopixelMatrix object instance.
        frames (list): List of frame data, where each element is an image data dictionary.
        fps (int): Target frame rate (frames/second), default 30.

    Notes:
        - The function plays the animation in an infinite loop.
        - Uses time difference calculation to achieve precise frame rate control.
        - Frame rate debug output can be enabled by changing False to True.

    ==========================================

    Play animation with precise frame rate control.

    Args:
        matrix (NeopixelMatrix): Instance of NeopixelMatrix object.
        frames (list): List of frame data, each element is an image data dictionary.
        fps (int): Target frame rate (frames/second), default 30.

    Notes:
        - The function will play the animation in an infinite loop.
        - Uses time difference calculation to achieve precise frame rate control.
        - Frame rate debug output can be enabled by changing False to True.
    """
    frame_delay = 1 / fps
    last_time = time.ticks_ms()

    while True:
        for frame in frames:
            start_time = time.ticks_ms()

            # Display the current frame
            matrix.show_rgb565_image(frame)
            matrix.show()

            # Precise frame rate control
            elapsed = time.ticks_diff(time.ticks_ms(), start_time)
            remaining = max(0, frame_delay * 1000 - elapsed)
            time.sleep_ms(int(remaining))

            # Frame rate debug output (optional)
            if False:
                # Set to True to print the actual frame rate
                current_time = time.ticks_ms()
                actual_fps = 1000 / max(1, time.ticks_diff(current_time, last_time))
                print("FPS: {:.1f}".format(actual_fps))
                last_time = current_time

# ======================================== Custom Classes ============================================

# ======================================== Initialization ==========================================

time.sleep(3)
print("FreakStudio:WS2812 LED Matrix Test")
# Modified: replace hard-coded 8x8 with global size variable
matrix = NeopixelMatrix(MATRIX_WIDTH, MATRIX_HEIGHT, Pin(6), layout=NeopixelMatrix.LAYOUT_ROW, brightness=0.2, order=NeopixelMatrix.ORDER_BRG, flip_v=True)
matrix.fill(0)
matrix.show()

# ========================================  Main Program  ===========================================

# Draw blue horizontal line
# matrix.hline(0, 0, 4, matrix.COLOR_BLUE)
# Draw red vertical line
# matrix.vline(1, 1, 2, matrix.COLOR_GREEN)
# matrix.vline(2, 2, 2, matrix.COLOR_GREEN)
# matrix.show()

# matrix.load_rgb565_image('test_image.json', 0, 0)
# matrix.show()

# animate_images(matrix, animation_frames, delay=0.5)

color_wipe(matrix.COLOR_GREEN)
optimized_scrolling_lines()
Burn the code, and the effect is as follows:
It can be seen that the WS2812 matrix performs the display exactly as expected in our code.
4. Drivers
neopixel_matrix_driver.rar 14 KB
5. BOM & Recommended Alternative Parts
None.
VI. Revision History
Document Version | Date of Modification | Modifier | Revised Content |
v1.0 | 2025-11-13 | Zero Kōkō | Initialize Document |
v1.1 | 2025-12-29 | Li Zisheng | Added application experiments and production files |
v1.2 | 2026-02-13 | Li Zisheng | The circuit engineering has been updated. |
v1.3 | 2026-03-29 | Xin Ruili | Modified the application experiment section. |
VII. Relevant Materials
7.1 Chip Datasheet
C965555_RGB+LED(Built-in IC)_WS2812B-2020_Datasheet_WJ1503332.PDF 837 KB
WS2812B-5050RGB Manual.pdf 1.3 MB
7.2 Unique Icons for PCB Silk Screen