Contents
- I. Module Introduction
- II. Introduction to Major Chips
- 2.1 Chip Overview
- 2.2 Pin Definition
- 2.3 Functional Block Diagram
- 2.4 Performance Parameters
- 2.5 Reference Circuit
- 2.6 Chip Configuration
- 2.7 Communication Interfaces and Related Protocols
- 2.8 PCB Routing Precautions
- III. Circuit Engineering
- 3.1 Circuit Source Engineering
- 3.2 Module Usage Instructions
- 3.3 Application Experiment
- IV. Drivers
- 5. BOM & Recommended Alternative Parts
- VI. Revision History
- VII. Relevant Materials
- 7.1 Chip Datasheet
- 7.2 Unique Icons for PCB Silkscreen
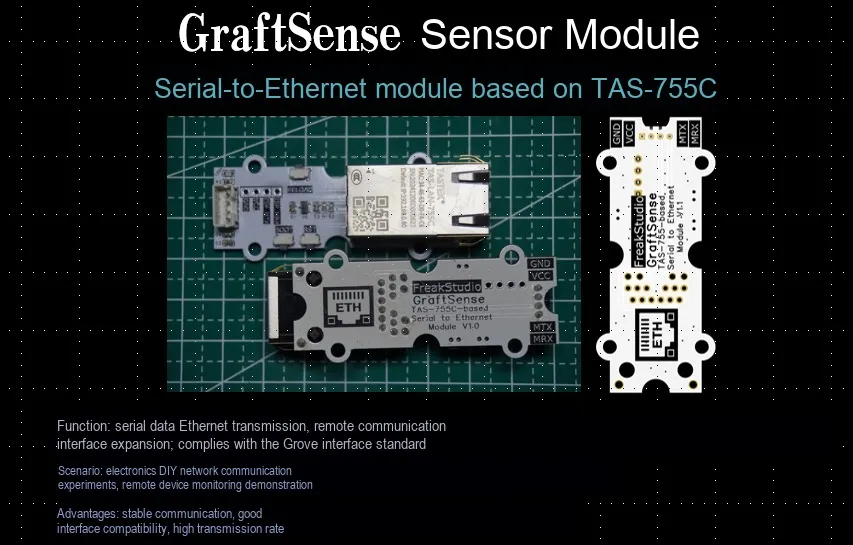
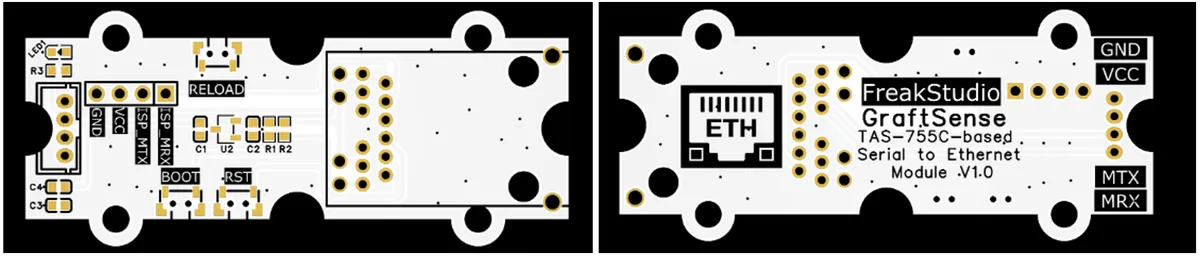
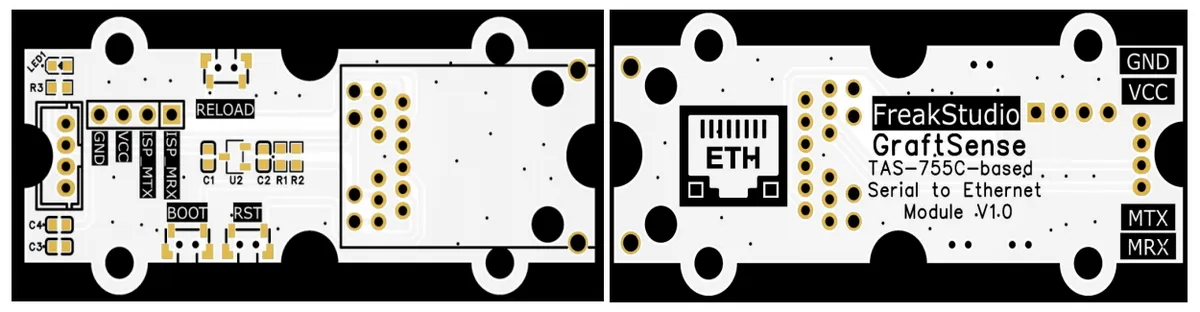
I. Module Introduction
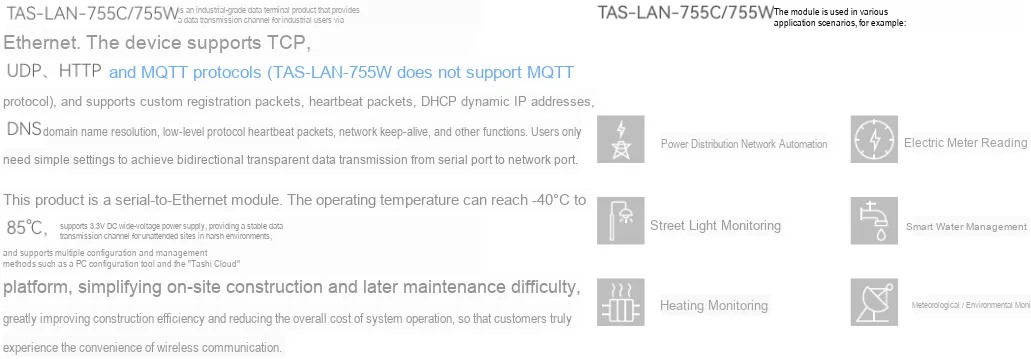
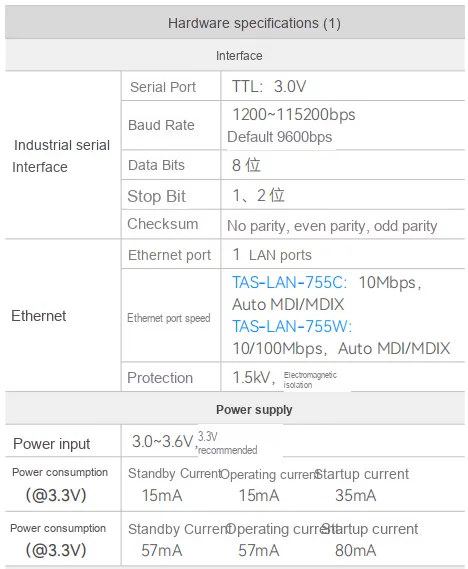
The TAS-755C-based serial-to-Ethernet module is a product designed on the basis of TAS-LAN-755C. As a serial-to-Ethernet module, it supports a maximum power supply of 8V and 3V communication level, and is compatible with TCP, UDP, HTTP and MQTT (excluding the TAS-LAN-755W) protocols. It also supports functions such as DHCP dynamic IP and DNS domain name resolution. The serial port baud rate is selectable from 1200 to 115200 bps; the operating current is 15mA both in standby and working status, and the starting current is 35mA. It is also equipped with a command mode button, a firmware burning interface, etc. It is suitable for embedded, industrial control and other scenarios requiring serial device networking, and facilitates the development and debugging of embedded systems.
II. Introduction to Major Chips
Adopt the TAS-755C-based serial-to-Ethernet module.
2.1 Chip Overview
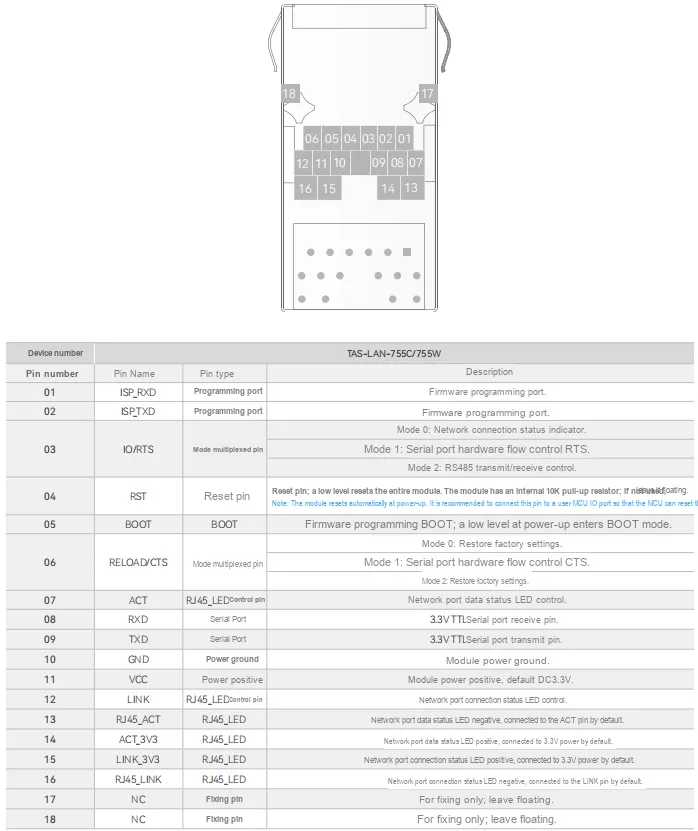
2.2 Pin Definition
2.3 Functional Block Diagram
None.
2.4 Performance Parameters
2.5 Reference Circuit
None.
2.6 Chip Configuration
None.
2.7 Communication Interfaces and Related Protocols
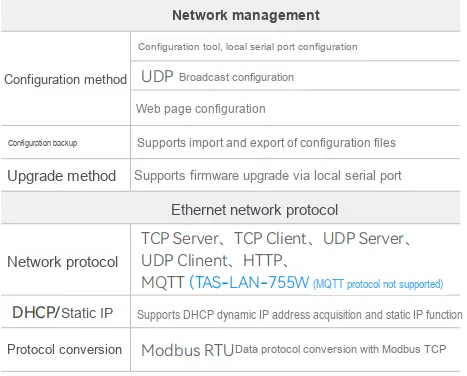
2.7.1 Serial Port and Basic Configuration
| Command | Send (example) | Typical response (example) | Parameter summary | Default | Notes / caution |
|---|---|---|---|---|---|
| AT+UARTCFG | AT+UARTCFG=115200,1,0,0\r\n | OK; query: +UARTCFG: 115200,1,0,0 OK | Baud rate (115200...1200, TTL supports 230400), data bits (0:7, 1:8), parity (0/1/2), stop bits (0:1, 1:2) | +UARTCFG:9600,1,0,0 | Parameters must be within the allowed range; all caps recommended |
| AT+UARTTIME | AT+UARTTIME=20\r\n | OK; query: +UARTTIME: 20 OK | Packetization time in ms (0-255, 0 = default) | +UARTTIME:0 | Recommended: 0 |
| AT+MACADDR | AT+MACADDR=D8-B0-4C-E1-BE-10\r\n | OK; query: +MACADDR: D8-B0-4C-E1-BE-10 OK | MAC (6 bytes, separated by -, hexadecimal) | Device has its own unique IEEE MAC | The first byte must be even; can only be changed via serial port (not UDP/web page) |
2.7.2 IP / Network / TCP / UDP / Mode
| Command | Send (example) | Typical response | Parameter summary | Default | Notes / caution |
|---|---|---|---|---|---|
| AT+IPCONFIG | AT+IPCONFIG=0,192.168.1.80,192.168.1.1,255.255.255.0,114.114.114.114\r\n | OK; query returns multiple lines of IP/GW/SUB/DNS | MODE: 0 = static, 1 = DHCP; followed by IP/GW/SUB/DNS | +IPCONFIG:0,192.168.0.80,192.168.0.1,255.255.255.0,192.168.0.1 | When DHCP is in effect, the local IP/GW/DNS settings are ignored; if DHCP fails to obtain an address, 0.0.0.0 is shown |
| AT+TCPCFG | AT+TCPCFG=0,8234,0,192.168.0.201\r\n or with a domain name AT+TCPCFG=0,10067,0,"cloud.tastek.cn"\r\n | Query: +TCPCFG:0,8234,0,192.168.0.201 | Local port, remote port (valid for Client), working mode (0-9), remote address (IP/domain name) | +TCPCFG: 10123,10123,0,192.168.0.73 | Working mode: 0 TCP Client, 1 TCP Server, 2 UDP Client, 3 UDP Server, 4 dual-server transparent transmission, 5 IGMP, 6 DTU cloud, 7 IOT cloud (unavailable), 8 HTTP transparent transmission, 9 MQTT |
| AT+SECONDSERVERADDRES | AT+SECONDSERVERADDRES=0,10067,"cloud.tastek.cn"\r\n | OK; query: +SECONDSERVERADDRES:0,10067,"cloud.tastek.cn" | Second local port, remote port, remote address (domain name ≤128 bytes) | +SECONDSERVERADDRESS:10193,10123,0.0.0.0 (example) | Valid only in dual-server connection mode; compatible with legacy commands |
2.7.3 UDP Broadcast and Discovery (Local Area Network Automation)
| Operation | Send (example) | Device response (example) | Description / caution |
|---|---|---|---|
| Broadcast discovery | UDP broadcast at+tas → port 8081 | Multiple devices respond to the broadcast: +EquipmentIP:... / +CGMR:... / +EquipmentMAC:... / +ENCRYPT:0 OK | Used to discover device IP/MAC/version, etc. |
| Broadcast to enter command mode | UDP broadcast +MAC:00EDE7FA56A3+++ → 8081 (+++ without carriage return) | Device broadcast: OK | MAC is 12 consecutive hex characters without -. After entering, AT commands with the MAC prefix can be sent |
| Broadcast configuration command | Example: +MAC:00EDE7FA56A3AT+UARTCFG=9600,1,0,0\r\n | OK | Over UDP, prefix commands with +MAC:device MAC; each command should still end with \r\n |
2.7.4 HTTP / Web Configuration
| Command / operation | Send (example) | Typical response | Parameters / description |
|---|---|---|---|
| AT+PATH | AT+PATH="/server/device/login"\r\n | OK; query: +PATH:"/server/device/login" OK | Set HTTP path (length 0-128) |
| AT+HTTPCFG | AT+HTTPCFG=1,1,0\r\n | OK; query: +HTTPCFG:1,1,0 OK | Network status (0/1), method (0 POST / 1 GET), whether to return the header (1/0) |
| AT+HTTPHEAD | AT+HTTPHEAD=10,"1234567890"\r\n | OK; query: +HTTPHEAD:10,"1234567890" OK | HTTP header length 0-128; content is written into the packet according to the length |
| Web page | Open http://192.168.0.80 in a browser (default) | Page interaction | The computer and device must be on the same subnet; if the device is in TCP Server mode, web page configuration may compete with the TCP Client for the socket, so pause the client before configuring |
2.7.5 Heartbeat / Registration / Polling / Poll
| Command | Send | Response | Parameter summary | Default | Notes |
|---|---|---|---|---|---|
| AT+KEEPALIVE | AT+KEEPALIVE=1,0,heart,30\r\n | OK; query: +KEEPALIVE:1,0,heart,30 OK | Enable (0-2), format (0 ASCII / 1 HEX), content, interval in seconds (1-65535) | +KEEPALIVE:0,0,heart,0 | Heartbeat is included; it must be converted to HEX to be processed; if there is interaction, the timer is refreshed |
| AT+REGIS | AT+REGIS=1,0,1,151232\r\n | OK; query: +REGIS:1,0,1,151232 OK | Type (0/1/2), send mode (0/1/2), format (0/1), content | +REGIS:0,0,0,regis | When type=1, use MAC (subsequent fields are invalid); note the serial port's maximum upload of 512 bytes and its packet-splitting behavior |
| AT+POLL | AT+POLL=1,10\r\n | OK; query: +POLL:1,10 OK | Polling enable (0/1), interval in seconds (0-65535) | +POLL:0,0 | Polling starts after the network cable is plugged in and the IP is obtained |
| AT+POLLSTR | AT+POLLSTR=1,1,1,"3132333435"\r\n | OK; query lists all +POLLSTRn entries | Index (1-10), enable (0/1), CRC (0/1), HEX string (0-24 HEX bytes) | Multiple entries empty | HEX string length must be even; CRC optional (Modbus-CRC16) |
2.7.6 Modbus/TCP Conversion
| Command | Send | Response | Parameter | Default | Notes |
|---|---|---|---|---|---|
| AT+TCPMODBUS | AT+TCPMODBUS=1\r\n | OK; query: +TCPMODBUS:1 OK | 1 enables Modbus RTU ↔ TCP conversion, 0 transparent | +TCPMODBUS:0 | When enabled, the network port uses Modbus TCP and the serial port uses Modbus RTU; maximum upload 255 bytes; CRC low byte first |
2.7.7 MQTT Related
| Command | Send | Response | Parameter/Range | Default | Notes |
|---|---|---|---|---|---|
| AT+CLINETID (or CLIENTID variant) | AT+CLINETID="mqtt client id"\r\n | OK; query: +CLINETID:"mqtt client id" OK | ClientID length 0–128 bytes | +CLINETID:"clientid" | The document spells it CLINETID; note that both spellings must be supported |
| AT+USERPWD | AT+USERPWD="username","userpwd"\r\n | OK; query: +USERPWD:"username","userpwd" OK | Username 0–64, password 0–128 bytes | +USERPWD:"20060248","123456" | Storage area is shared with DTUCLOUD; warn about overwrite risk before writing |
| AT+MQTTSUB | AT+MQTTSUB="subTopic"\r\n | OK; query: +MQTTSUB:"subTopic" OK | Topic 0–64 bytes | +MQTTSUB:"sTopic" | QoS supports only 0; messages from all topics are printed to the serial port (filtering required) |
| AT+MQTTPUB | AT+MQTTPUB="pubTopic"\r\n | OK; query: +MQTTPUB:"pubTopic" OK | Topic 0–64 bytes | +MQTTPUB:"pTopic" | QoS supports only 0 |
| AT+CLEANSSION | AT+CLEANSSION=0\r\n | OK; query: +CLEANSSION:0 OK | 0/1 | +CLEANSSION:1 | Clean session flag |
| AT+RETAIN | AT+RETAIN=1\r\n | OK; query: +RETAIN:1 OK | 0/1 | +RETAIN:0 | MQTT retained message flag |
| AT+MQTTKEEP | AT+MQTTKEEP=120\r\n | OK; query: +MQTTKEEP:120 OK | 60–65535 seconds | +MQTTKEEP:120 | Minimum recommended 60 seconds |
2.7.8 Data Header / + IPD / Network Transmission Related
| Command | Send | Response | Parameter | Default | Notes |
|---|---|---|---|---|---|
| AT+CIPHEAD | AT+CIPHEAD=1\r\n | OK; query: +CIPHEAD:1 OK | Enable 0/1 | +CIPHEAD:0 | When enabled, network pass-through data to the serial port has the format +IPD,datalen:data (read based on datalen to prevent packet sticking) |
| AT+LINKDELAY | AT+LINKDELAY=10\r\n | OK; query: +LINKDELAY:10 OK | TIME in seconds (0-65535, 0 disables) | +LINKDELAY:3 | Valid only in TCP Client mode; after disconnection, wait TIME before reconnecting |
2.7.9 Logs / Status / Probes / Pin Multiplexing
| Command | Send | Response | Parameter | Default | Notes |
|---|---|---|---|---|---|
| AT+LOG | AT+LOG=1,1,0\r\n | OK; query: +LOG:1,1,0 OK | A network status (0/1), B power-on prompt (0/1), C abnormal restart prompt (0/1) | — | Setting takes effect immediately |
| AT+STATUS | AT+STATUS=1\r\n | OK; query: +STATUS:1 OK | EN (0/1) | — | EN=1 is equivalent to AT+LOG=1,1,1; if only some logs are enabled, AT+STATUS? returns 0 |
| AT+PINMUX | AT+PINMUX=2\r\n | OK; query: +PINMUX:2 OK | 0 network indicator; 1 hardware flow control; 2 RS485 DE/RE | +PINMUX:0 | After changing, pay attention to hardware wiring and flow control logic |
2.7.10 Restart / Save / Export Device Information
| Command | Send | Response | Description |
|---|---|---|---|
| AT&W | AT&W\r\n | OK | Save the current configuration to NVM; after receiving OK, restart with AT+CFUN=1,1 or save via the web page; do not power off immediately after saving, to avoid failure |
| AT+CFUN=1,1 | AT+CFUN=1,1\r\n | OK → device restarts | Recommended to restart with this command after saving to ensure it takes effect |
| AT+ALL? | AT+ALL?\r\n | Returns multiple lines with all current configuration (see the example you gave) | Export all parameters for backup/comparison |
2.7.11 Timeout / Auto-restart Related (Reliability Protection)
| Command | Send | Response | Parameter | Default | Notes |
|---|---|---|---|---|---|
| AT+DSCTIME | AT+DSCTIME=40\r\n | OK; query: +DSCTIME:120 OK | 0 disabled, or 10–65535 seconds | +DSCTIME:120 | Automatically restart if no connection is established within X seconds (UDP is connected by default) |
| AT+ACKTIME | AT+ACKTIME=20\r\n | OK; query: +ACKTIME:20 OK | 0 disabled, or 1–65535 seconds | +ACKTIME:1800 | Restart if there is no downlink data within X seconds; not effective when there is no network |
| AT+PORTTIME | AT+PORTTIME=20\r\n | OK; query: +PORTTIME:20 OK | 0 disabled, or 10–65535 seconds | +PORTTIME:1800 | Restart if there is no uplink data to the network within X seconds; not effective when there is no network |
| AT+RESTTIME | AT+RESTTIME=600\r\n | OK; query: +RESTTIME:600 OK | 0 disabled, or 10–2592000 seconds | +RESTTIME:0 | Periodic scheduled restart (seconds) |
2.7.12 Cloud Computing Platform / DTU / Web Login
| Command | Send | Response | Parameters / description | Default | Notes |
|---|---|---|---|---|---|
| AT+DTUCLOUD | AT+DTUCLOUD="20060248","123456"\r\n or AT+DTUCLOUD=1,"20060248","123456"\r\n | OK; query: +DTUCLOUD:"20060248","123456" | Mode 0/1/2; account 1–64; password 1–128 | +DTUCLOUD:"20060248","123456" | If cloud working mode (1) is used, the working mode is locked to DTU cloud (unlock with AT+DTUCLOUD=0,...); account/password are shared with the MQTT area |
| AT+WEBLOGIN | AT+WEBLOGIN="admin","admin"\r\n | OK; query: +WEBLOGIN:"admin","admin" OK | Account/password each 1–12 bytes | +WEBLOGIN:"admin","12345678" | Web login credentials |
- Write Procedure: Write → Query and confirm item by item (
?) → Save with AT&W → Reboot via AT+ CFUN= 1,1. Do not power off immediately after saving. - Perform strict verification on the length/format/range (IP, port, MAC, HEX string, time value, topic and ID length).
- Note: Memory reuse conflict: The storage space for DTUCLOUD and MQTT username/password may be reused. Please prompt the user and perform a backup before writing data via
AT+ ALL?. - For UDP broadcast configuration, you need to first
at+ tasto discover devices and resolve MAC addresses, then+ MAC:. ..+++to enter command mode. Broadcast and web-based configuration are insecure; please add isolation/authentication for production network segments. - Enable
AT+ CIPHEAD, the data received via the serial port will be prefixed with+ IPD, datalen:. You must read the data according to the length specified by datalen to avoid the packet sticking problem. - A small number of spelling/historical compatibility items exist in the document (e. g.,
CLINETIDandCLIENTID). The script should perform a query for confirmation immediately after writing, and support compatible parsing of the device's returned results.
2.8 PCB Routing Precautions
None.
III. Circuit Engineering
3.1 Circuit Source Engineering
To obtain the source project of the circuit, please follow the official account [Freak Embedded]
3.2 Module Usage Instructions
The schematic diagram of this module is shown below:
SCH_Schematic1_Serial-to-Ethernet Module Based on TAS-755C-V1.0.0_2025-10-24.pdf 2.1 MB
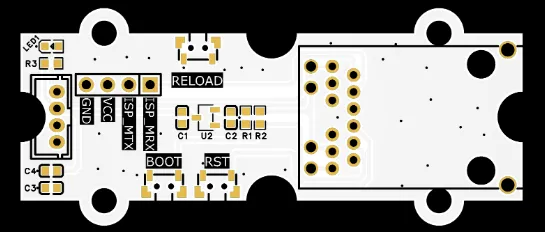
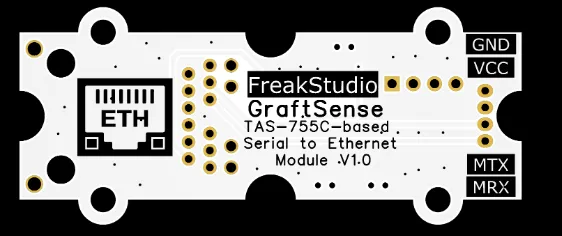
In this module, MRX (corresponding to the UART RXD pin of the MCU) is physically connected to the TAS-LAN-755C TXD pin, and MTX (corresponding to the UART TXD pin of the MCU) is physically connected to the TAS-LAN-755C RXD pin; this follows the "cross-transmit-receive" rule of UART serial communication — the transmit terminal (TX) of each communication party must be connected to the receive terminal (RX) of the counterpart, and this design ensures correct bidirectional UART serial data transmission between the MCU and TAS-LAN-755C.
It is particularly important to note that when using this module, MRX is directly connected to the UART RXD of the MCU, and MTX is directly connected to the UART TXD of the MCU. Do not cross-connect them under any circumstances.
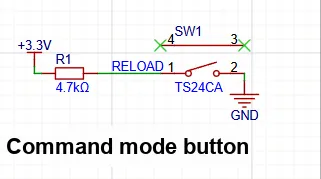
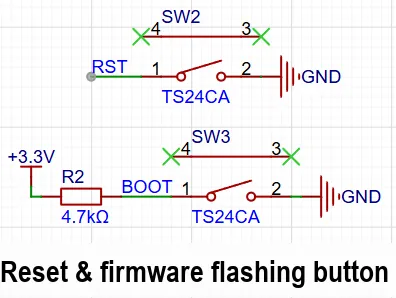
As shown in the figure above, the module is equipped with three keys SW1 to SW3, and their functions are described as follows: SW1 serves as the control key for TAS-LAN-755C to enter the command mode. SW2 and SW3 function as the reset pin and firmware burning pin respectively.
TAS-LAN-755C It will automatically reset upon power-up, and there is a built-in 10kΩ pull-up resistor inside, so no additional pull-up resistor is added for SW2.
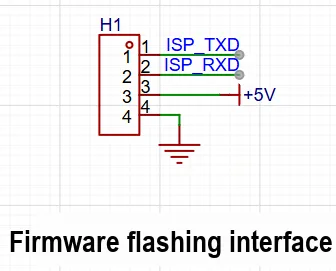
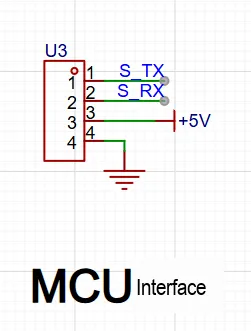
In the schematic diagram, two serial port interfaces are reserved, one is the serial port interface for firmware burning, and the other is the serial port interface for data interaction with MCU.
3.3 Application Experiment
Here, we use the GraftPort-RP2040 development board for testing, and the TAS-755C-based serial-to-Ethernet module uses the UART interface to communicate with the main controller.
Here, we first use the HY2.0-4P cable to connect the module to the GraftPort-RP2040 development board's UART0 interface:
The module connections are shown in the table below:
Development Board Pins | Module Pins | Description |
Pin 16 |
|
|
Pin 17 |
|
|
Then connect the Ethernet port to the router.
Here, we need to search for the relevant driver packages on uPyPI: https://upypi.net/zh/
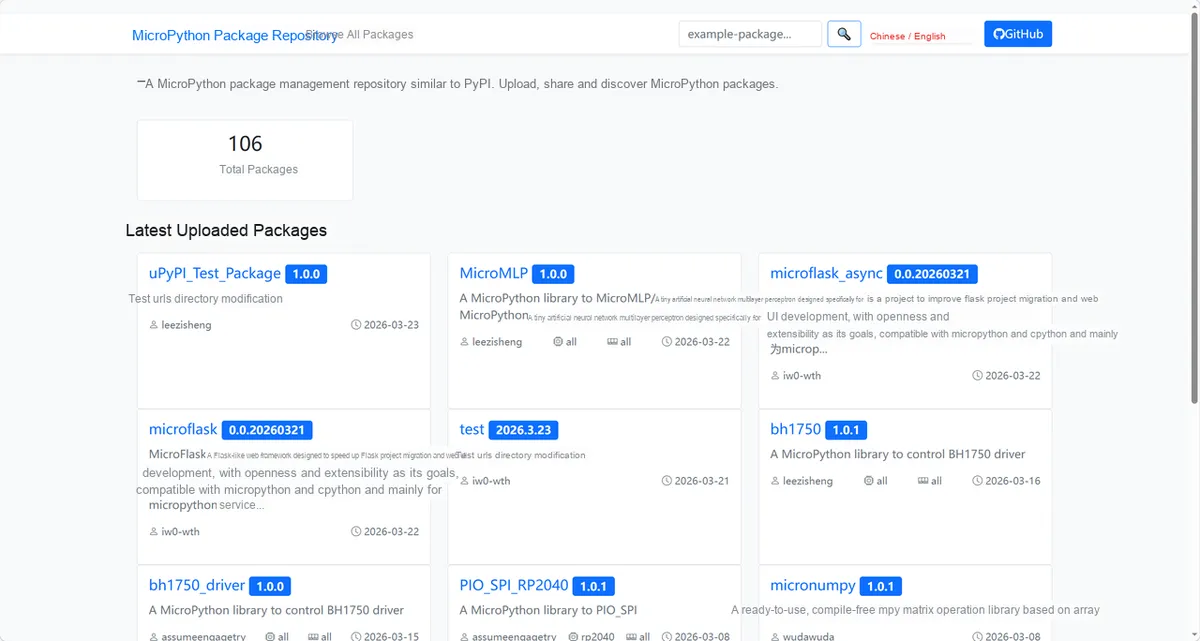
Enter tas755c_driver to search, and the following will be displayed:
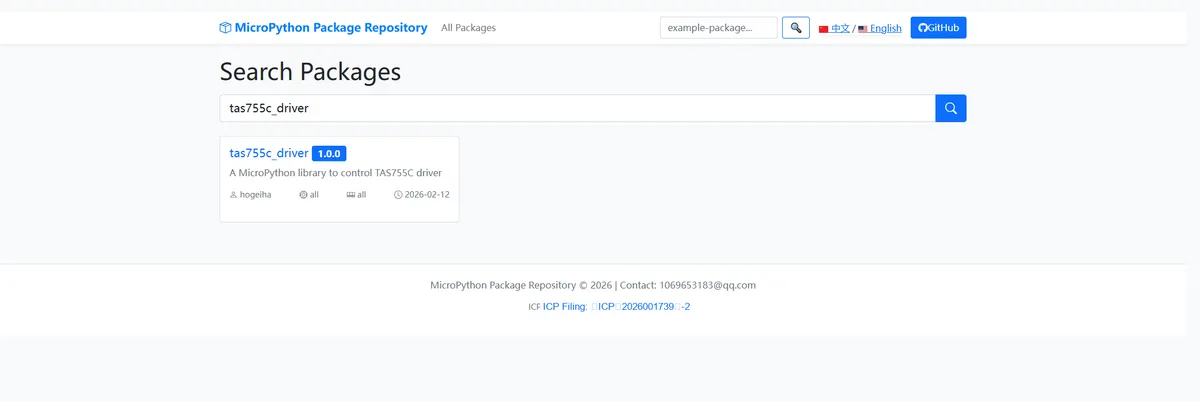
Click to copy the local installation command:
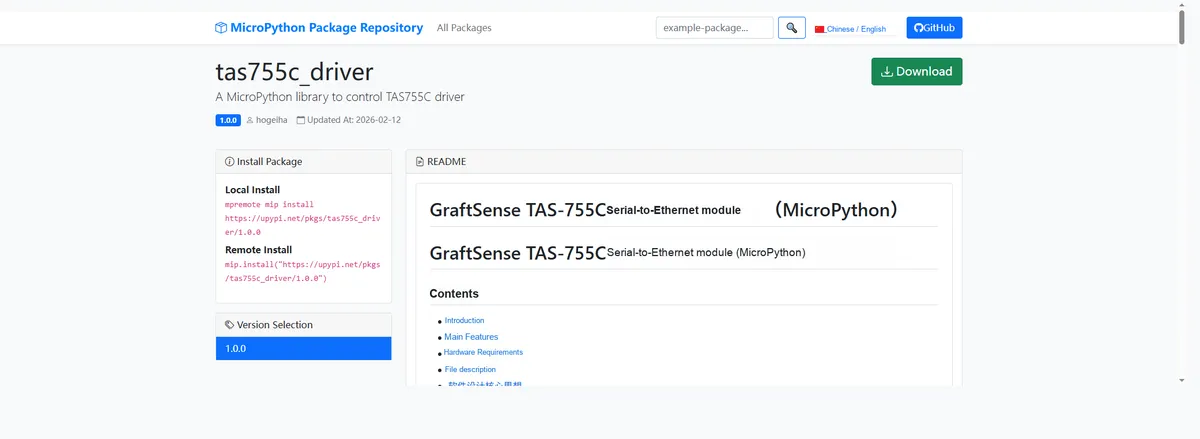
Here, we can use the mip tool to import module driver library code. The following are the usage commands for the mpremote tool:
mpremote mip install github:FreakStudioCN/GraftSense-Drivers-MicroPython/communication/tas755c_driverImport the TAS-755C driver library - MicroPython driver code, then copy all the files into our project:
3.3.1 Web Backend Configuration
After configuring the tas.set_ip_config Ethernet module's IP via this method, you can access the device's backend. This configuration needs to adapt to the actual network environment at the user's site; it is recommended to set it with reference to the output result of the Windows CMD command executed in the same network environment ipconfig.
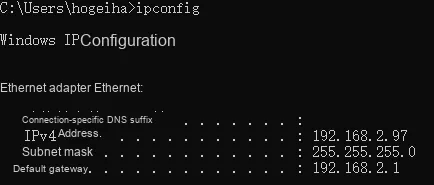
All subsequent sample programs will include the following initialization section
# Configure the IP parameters of the tas
tas.set_ip_config(
    # (0=Static, 1=DHCP)
    mode=0,
    # Static IP of the tas device
    ip="192.168.2.251",
    # Gateway address
    gateway="192.168.2.1",
    # Subnet mask
    subnet="255.255.255.0",
    # DNS server address (Alibaba Cloud public DNS is used here)
    dns="223.5.5.5"
)

# Configure TCP/UDP parameters
tas.set_tcp_config(
    # Local port of the tas device
    local_port=8080,
    # Remote service port
    remote_port=9000,
    # 0=TCP Client 1=TCP SERVER 2=UDP Client 3=UDP SERVER 8=HTTP mode
    mode=0,
    # Remote server IP (same as the IP of the communicating host; the user must check and change it)
    # To resolve a domain name, add quotes '"domain name"'
    # An IP address does not need quotes "IP address"
    remote_address='"www.cnblogs.com"'
)
In any mode, you can access the web backend via the configured IP Address
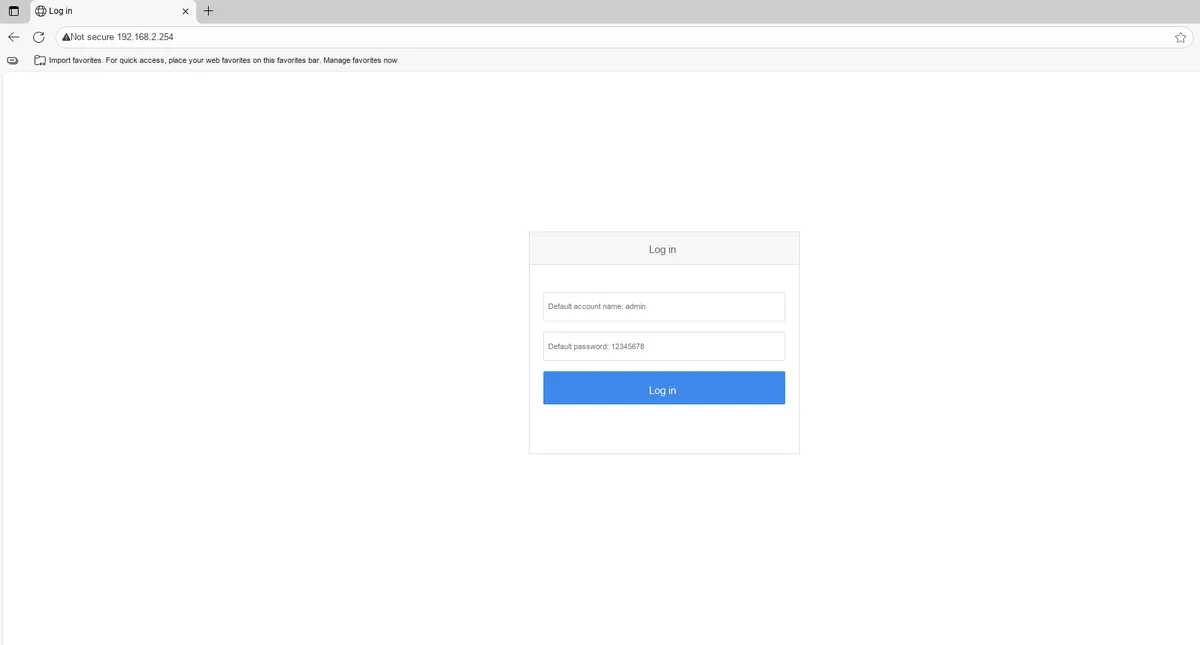
After entering the default password to access the backend, you can graphically set the module parameters (a restart is required for the settings to take effect after completion)
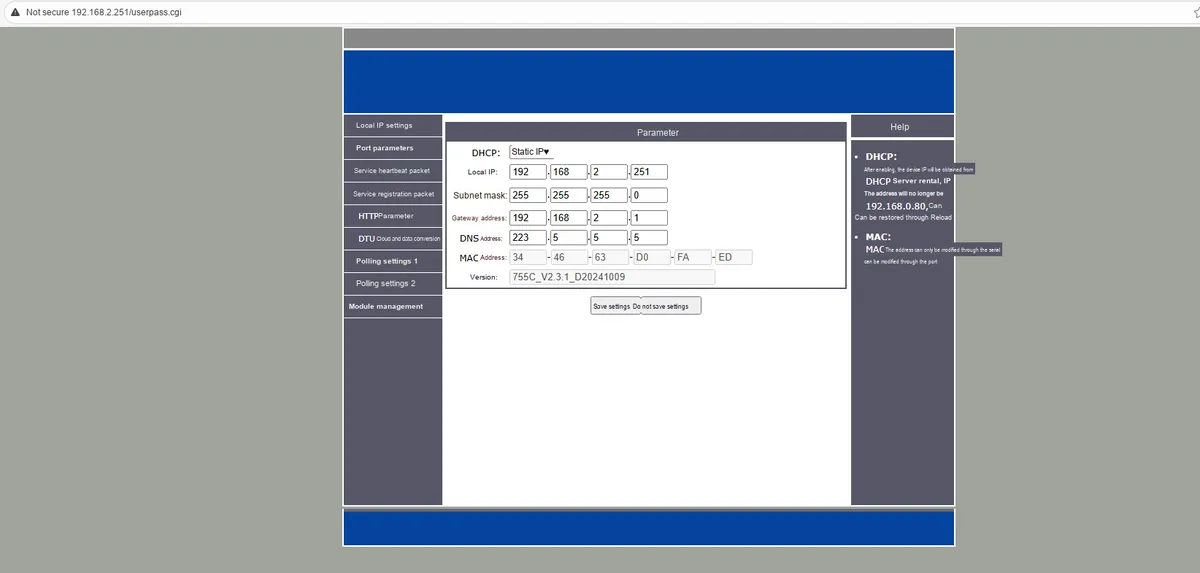
3.3.2 DNS Domain Name Resolution Experiment
Import the MicroPython driver code for the TAS-755C-based serial-to-Ethernet module
DNS The specific code for the domain name resolution example is as follows
# Python env   : MicroPython v1.23.0
# -*- coding: utf-8 -*-
# @Time    : 2025/9/5 10:11 PM
# @Author  : ben0i0d
# @File    : tcp_client.py
# @Description : tas755c DNS domain name resolution test file

# ======================================== Import Modules =========================================

# Import hardware-related modules
import time
from machine import UART, Pin
# Import the third-party driver module
from tas_755c_eth import TAS_755C_ETH

# ======================================== Global Variables ============================================

# ======================================== Functions ============================================

# ======================================== Custom Classes =============================================

# ======================================== Initialization configuration ===========================================

# This example first opens the target server's TCP, then runs this client example
# Power-on delay of 3 s
time.sleep(3)
# Print debug information
print("FreakStudio:tas755c dns test")

# Initialize UART communication (adjust TX/RX according to the actual hardware wiring)
uart0 = UART(0, baudrate=9600, tx=Pin(16), rx=Pin(17))
# Create a TAS_755C instance
tas = TAS_755C_ETH(uart0)
# Switch to AT mode
tas.enter_command_mode()

# Configure the IP parameters of the tas
tas.set_ip_config(
    # (0=Static, 1=DHCP)
    mode=0,
    # Static IP of the tas device
    ip="192.168.2.251",
    # Gateway address
    gateway="192.168.2.1",
    # Subnet mask
    subnet="255.255.255.0",
    # DNS server address (Alibaba Cloud public DNS is used here)
    dns="223.5.5.5"
)

# Configure TCP/UDP parameters
tas.set_tcp_config(
    # Local port of the tas device
    local_port=8080,
    # Remote service port
    remote_port=9000,
    # 0=TCP Client 1=TCP SERVER 2=UDP Client 3=UDP SERVER 8=HTTP mode
    mode=0,
    # Remote server IP (same as the IP of the communicating host; the user must check and change it)
    # To resolve a domain name, add quotes '"domain name"'
    # An IP address does not need quotes "IP address"
    remote_address='"www.cnblogs.com"'
)

# Save the current settings and restart to apply the configuration
tas.save()
tas.restart()
time.sleep(5)

# Switch to AT mode
tas.enter_command_mode()

# View the current configuration to check whether it took effect
print(tas.get_ip_config())
print(tas.get_tcp_config())

# ========================================  Main Program  ===========================================

while True:
    # Switch to AT mode
    tas.enter_command_mode()
    # Confirm that entering command mode succeeded
    if tas.enter_command_mode()[0]:
        # Raw data
        TCPCFG = tas.get_tcp_config()
        # Split and extract
        parts = TCPCFG[1].split(',')
        ip = parts[3]  # Take the IP directly
        domain = parts[4].strip('"')  # Take the domain name and strip the quotes
        # Output the result
        # IP: 120.26.186.247
        print("IP:", ip)
        # Domain name: www.cnblogs.com
        print("Domain Name:", domain)
        time.sleep(5)
Burn the code, open the terminal, and use REPL to connect to the main controller, then enter the following code:
# Run dns.py as the main program, a unified entry point for dispatching driver examples
import dns
The output is as follows:
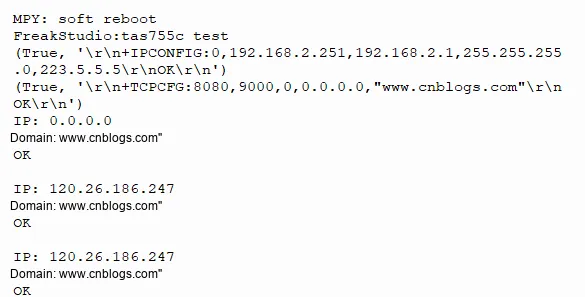
Go to the domain name lookup website https://www.boce.com/ enter www.cnblogs.com to perform a query
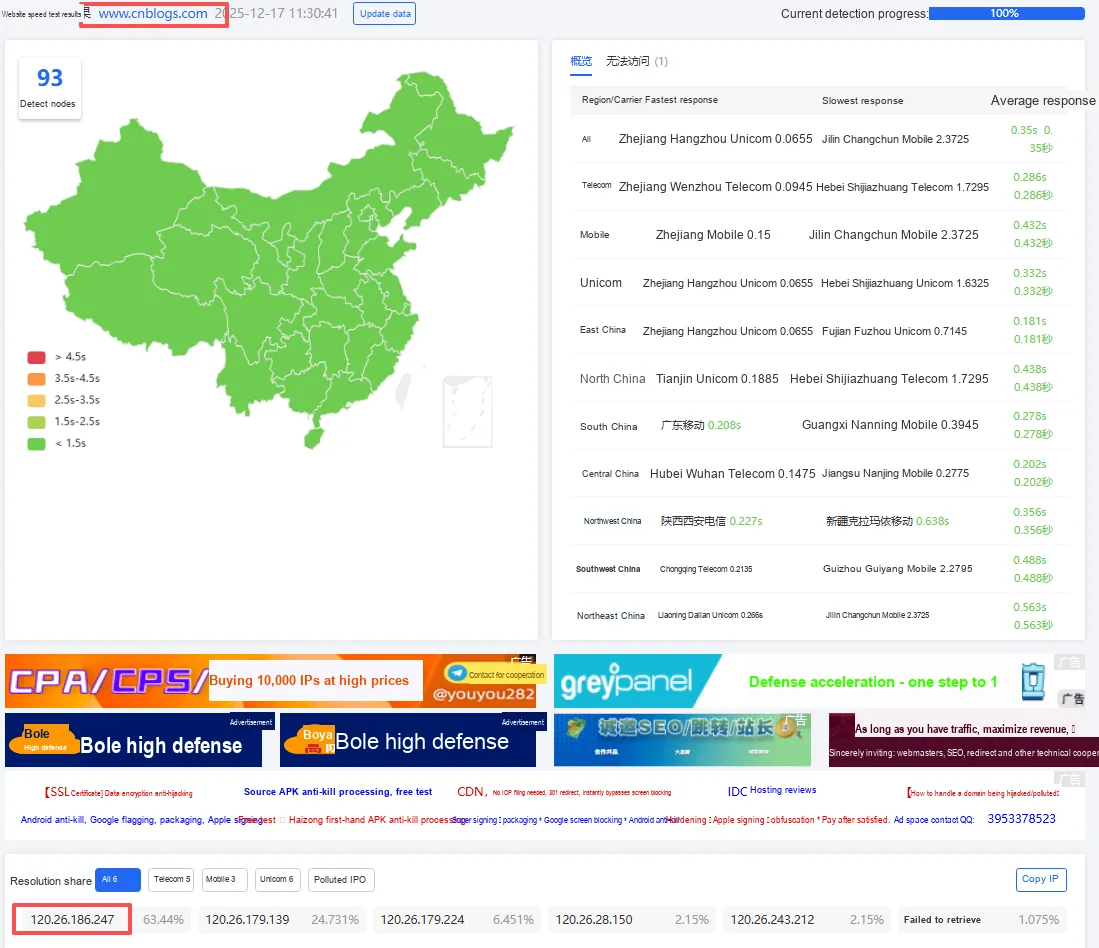
As you can see, we have resolved www.cnblogs.com and obtained its IP Address as 123.26.186.247
3.3.3 UDP SERVER Experiment
After importing the MicroPython driver code for the TAS-755C-based serial-to-Ethernet module, enter the following in the REPL:
# Run udp_server.py as the main program, a unified entry point for dispatching driver examples
import udp_server
udp_server.py The specific code is as follows:
# Python env   : MicroPython v1.23.0
# -*- coding: utf-8 -*-
# @Time    : 2025/9/5 10:11 PM
# @Author  : ben0i0d
# @File    : udp_server.py
# @Description : tas755c server test file

# ======================================== Import Modules =========================================

# Import hardware-related modules
import time
from machine import UART, Pin
# Import the third-party driver module
from tas_755c_eth import TAS_755C_ETH

# ======================================== Global Variables ============================================

# ======================================== Functions ============================================

# ======================================== Custom Classes =============================================

# ======================================== Initialization configuration ===========================================

# Power-on delay of 3 s
time.sleep(3)
# Print debug information
print("FreakStudio:tas755c server test")

# Initialize UART communication (adjust TX/RX according to the actual hardware wiring)
uart0 = UART(0, baudrate=9600, tx=Pin(16), rx=Pin(17))
# Create an HC14_Lora instance
tas = TAS_755C_ETH(uart0)
# Switch to AT mode
tas.enter_command_mode()

# Configure the IP parameters of the tas
tas.set_ip_config(
    # (0=Static, 1=DHCP)
    mode=0,
    # Static IP of the tas device
    ip="192.168.2.251",
    # Gateway address
    gateway="192.168.2.1",
    # Subnet mask
    subnet="255.255.255.0",
    # DNS server address
    dns="223.5.5.5"
)

# Configure TCP/UDP parameters
tas.set_tcp_config(
    # Local port of the tas device
    local_port=8080,
    # Remote service port
    remote_port=9000,
    # 0=TCP Client 1=TCP SERVER 2=UDP Client 3=UDP SERVER 8=HTTP mode
    mode=3,
    # Remote server IP (same as the IP of the communicating host; the user must check and change it)
    # To resolve a domain name, add quotes '"domain name"'
    # An IP address does not need quotes "IP address"
    remote_address="192.168.2.97"
)

# Save the current settings and restart to apply the configuration
tas.save()
tas.restart()
time.sleep(5)

# Switch to AT mode
tas.enter_command_mode()

# View the current configuration to check whether it took effect
print(tas.get_ip_config())
print(tas.get_tcp_config())

# Switch back to data mode
tas.enter_data_mode()

# ========================================  Main Program  ===========================================

while True:
    if tas.has_data():
        tas.send_data("Data received!")
        print(tas.read_data().decode('utf-8'))
Download Network Debugging Assistant
NetAssist.exe 641 KB
We configure the network debugging assistant with the protocol type set to UDP, and the remaining configurations are as shown in the figure:
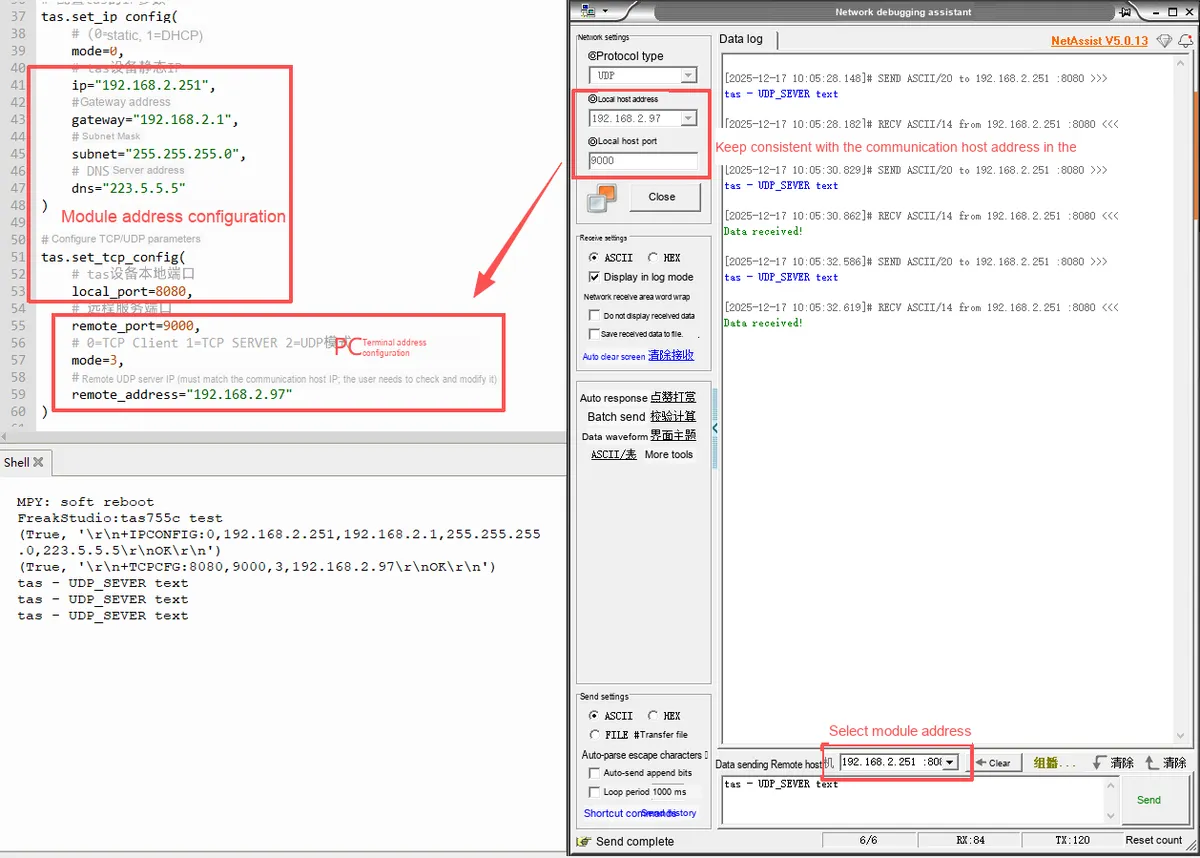
After the configuration is complete, click the Open button and send any data in the Network Debugging Assistant dialog box:
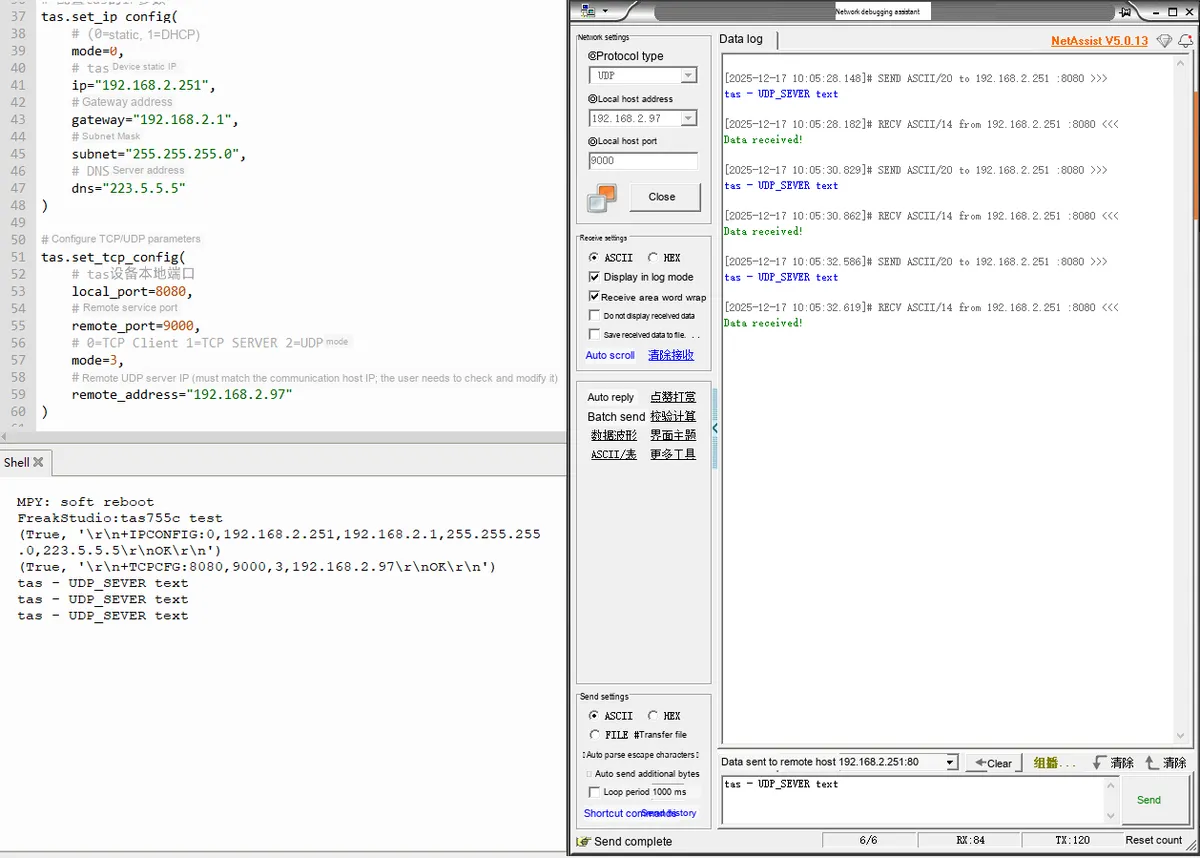
The terminal output the data we sent, and the main control sent back a message confirming that it had received the data.
3.3.4 UDP Client Experiment
After importing the TAS-755C-based Serial-to-Ethernet Module - MicroPython Driver Code, enter the following in the REPL:
# Run udp_client.py as the main program, a unified entry point for dispatching driver examples
import udp_client
udp_server.py The specific code is as follows:
# Python env   : MicroPython v1.23.0
# -*- coding: utf-8 -*-
# @Time    : 2025/9/5 10:11 PM
# @Author  : ben0i0d
# @File    : udp_client.py
# @Description : tas755c udp_client test file

# ======================================== Import Modules =========================================

# Import hardware-related modules
import time
from machine import UART, Pin
# Import the third-party driver module
from tas_755c_eth import TAS_755C_ETH

# ======================================== Global Variables ============================================

# ======================================== Functions ============================================

# ======================================== Custom Classes =============================================

# ======================================== Initialization configuration ===========================================

# Power-on delay of 3 s
time.sleep(3)
# Print debug information
print("FreakStudio:tas755c udp_client test")

# Initialize UART communication (adjust TX/RX according to the actual hardware wiring)
uart0 = UART(0, baudrate=9600, tx=Pin(16), rx=Pin(17))
# Create an HC14_Lora instance
tas = TAS_755C_ETH(uart0)
# Switch to AT mode
tas.enter_command_mode()

# Configure the IP parameters of the tas
tas.set_ip_config(
    # (0=Static, 1=DHCP)
    mode=0,
    # Static IP of the tas device
    ip="192.168.2.251",
    # Gateway address
    gateway="192.168.2.1",
    # Subnet mask
    subnet="255.255.255.0",
    # DNS server address
    dns="223.5.5.5"
)

# Configure TCP/UDP parameters
tas.set_tcp_config(
    # Local port of the tas device
    local_port=8080,
    # Remote service port
    remote_port=9000,
    # 0=TCP Client 1=TCP SERVER 2=UDP Client 3=UDP SERVER 8=HTTP mode
    mode=2,
    # Remote server IP (same as the IP of the communicating host; the user must check and change it)
    # To resolve a domain name, add quotes '"domain name"'
    # An IP address does not need quotes "IP address"
    remote_address="192.168.2.97"
)

# Save the current settings and restart to apply the configuration
tas.save()
tas.restart()
time.sleep(5)

# Switch to AT mode
tas.enter_command_mode()

# View the current configuration to check whether it took effect
print(tas.get_ip_config())
print(tas.get_tcp_config())

# Switch back to data mode
tas.enter_data_mode()

# ========================================  Main Program  ===========================================
while True:
    if tas.has_data():
        tas.send_data("Data received!")
        print(tas.read_data().decode('utf-8'))
Download the Network Debugging Assistant
NetAssist.exe 641 KB
We configure the network debugging assistant with the protocol type set to UDP, and the remaining configurations are as shown in the figure:
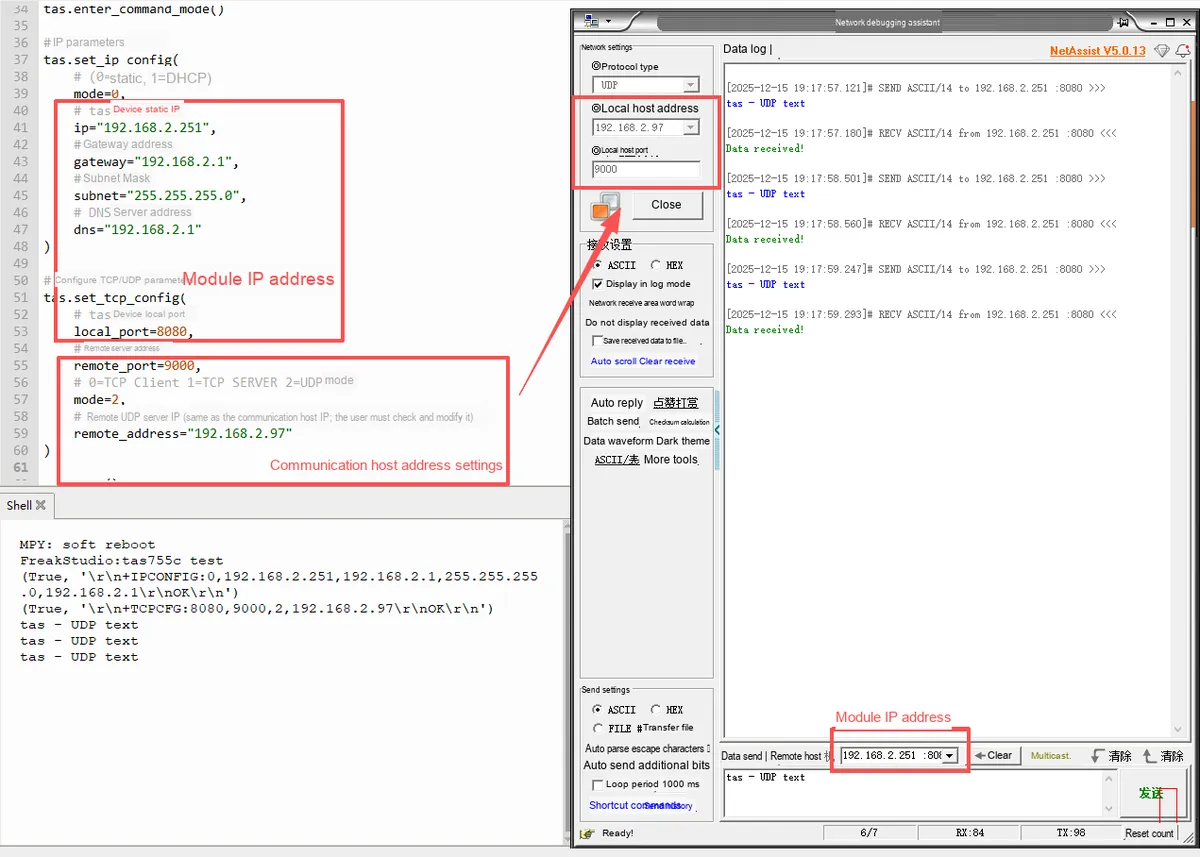
After the configuration is complete, click the Open button and send any data in the Network Debugging Assistant dialog box:
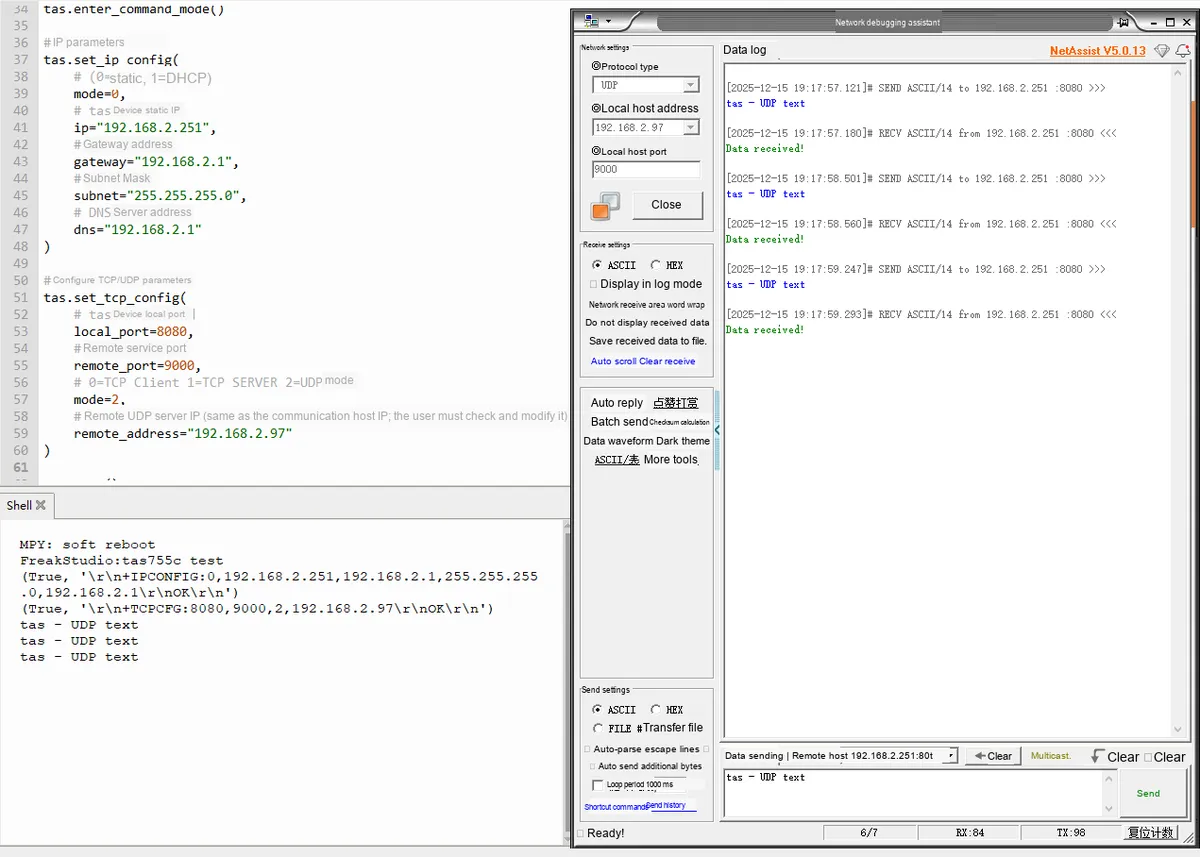
The terminal output the data we sent, and the main control sent back a message confirming that it had received the data.
3.3.5 TCP Client Experiment
After importing the TAS-755C-based Serial-to-Ethernet Module - MicroPython Driver Code, enter the following in the REPL:
# Run tcp_client.py as the main program, a unified entry point for dispatching driver examples
import tcp_client
tcp_client.py The specific code is as follows:
# Python env   : MicroPython v1.23.0
# -*- coding: utf-8 -*-
# @Time    : 2025/9/5 10:11 PM
# @Author  : ben0i0d
# @File    : tcp_client.py
# @Description : tas755c tcp_client test file

# ======================================== Import Modules =========================================

# Import hardware-related modules
import time
from machine import UART, Pin
# Import the third-party driver module
from tas_755c_eth import TAS_755C_ETH

# ======================================== Global Variables ============================================

# ======================================== Functions ============================================

# ======================================== Custom Classes =============================================

# ======================================== Initialization configuration ===========================================

# This example first opens the target server's TCP, then runs this client example
# Power-on delay of 3 s
time.sleep(3)
# Print debug information
print("FreakStudio:tas755c tcp_client test")

# Initialize UART communication (adjust TX/RX according to the actual hardware wiring)
uart0 = UART(0, baudrate=9600, tx=Pin(16), rx=Pin(17))
# Create a TAS_755C instance
tas = TAS_755C_ETH(uart0)
# Switch to AT mode
tas.enter_command_mode()

# Configure the IP parameters of the tas
tas.set_ip_config(
    # (0=Static, 1=DHCP)
    mode=0,
    # Static IP of the tas device
    ip="192.168.2.251",
    # Gateway address
    gateway="192.168.2.1",
    # Subnet mask
    subnet="255.255.255.0",
    # DNS server address
    dns="223.5.5.5"
)

# Configure TCP/UDP parameters
tas.set_tcp_config(
    # Local port of the tas device
    local_port=8080,
    # Remote service port
    remote_port=9000,
    # 0=TCP Client 1=TCP SERVER 2=UDP Client 3=UDP SERVER 8=HTTP mode
    mode=0,
    # Remote server IP (same as the IP of the communicating host; the user must check and change it)
    # To resolve a domain name, add quotes '"domain name"'
    # An IP address does not need quotes "IP address"
    remote_address="192.168.2.97"
)

# Save the current settings and restart to apply the configuration
tas.save()
tas.restart()
time.sleep(5)

# Switch to AT mode
tas.enter_command_mode()

# View the current configuration to check whether it took effect
print(tas.get_ip_config())
print(tas.get_tcp_config())

# Switch back to data mode
tas.enter_data_mode()

# ========================================  Main Program  ===========================================

while True:
    if tas.has_data():
        tas.send_data("Data received!")
        print(tas.read_data().decode('utf-8'))
Download the Network Debugging Assistant
NetAssist.exe 641 KB
We configure the network debugging assistant as follows: since the module acts as the Client, our network debugging assistant serves as the server, and the protocol type is TCP Server; the remaining configurations are shown in the figure:
Configure the communication host address to be consistent with that of the server.
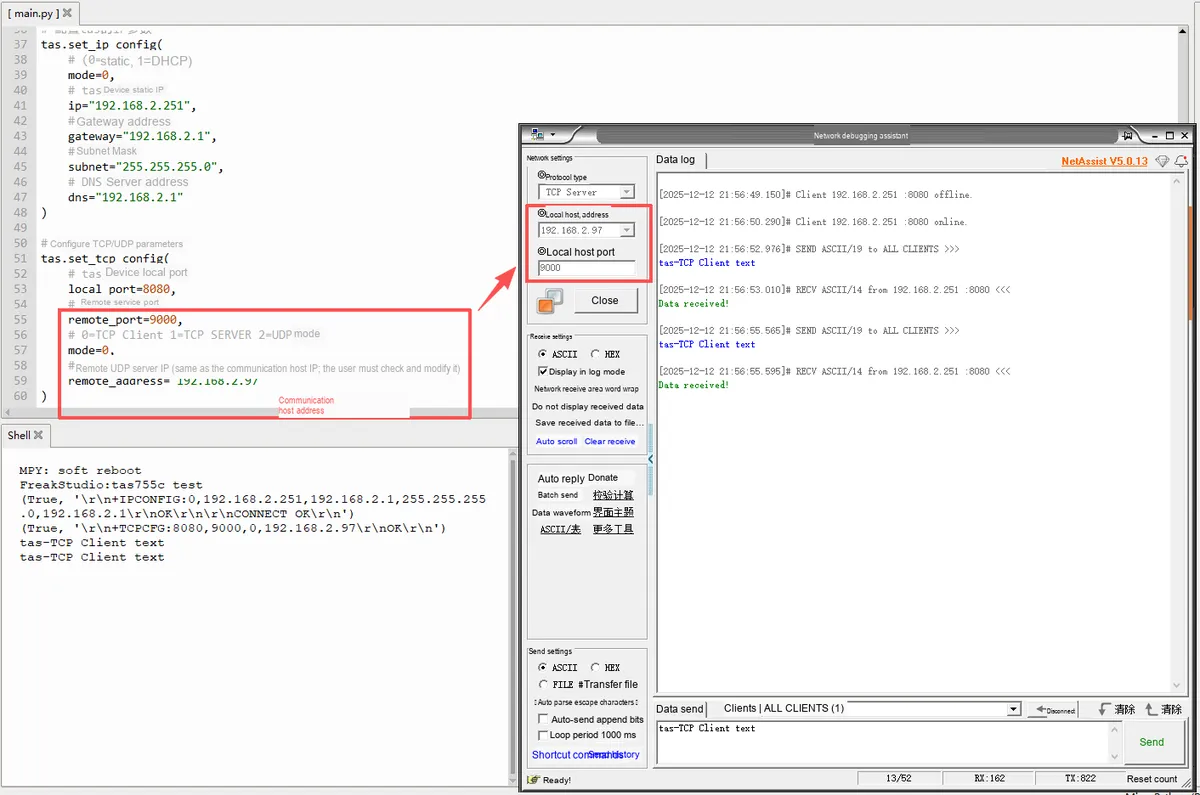
After the configuration is complete, click the Open button and send any data in the Network Debugging Assistant dialog box:
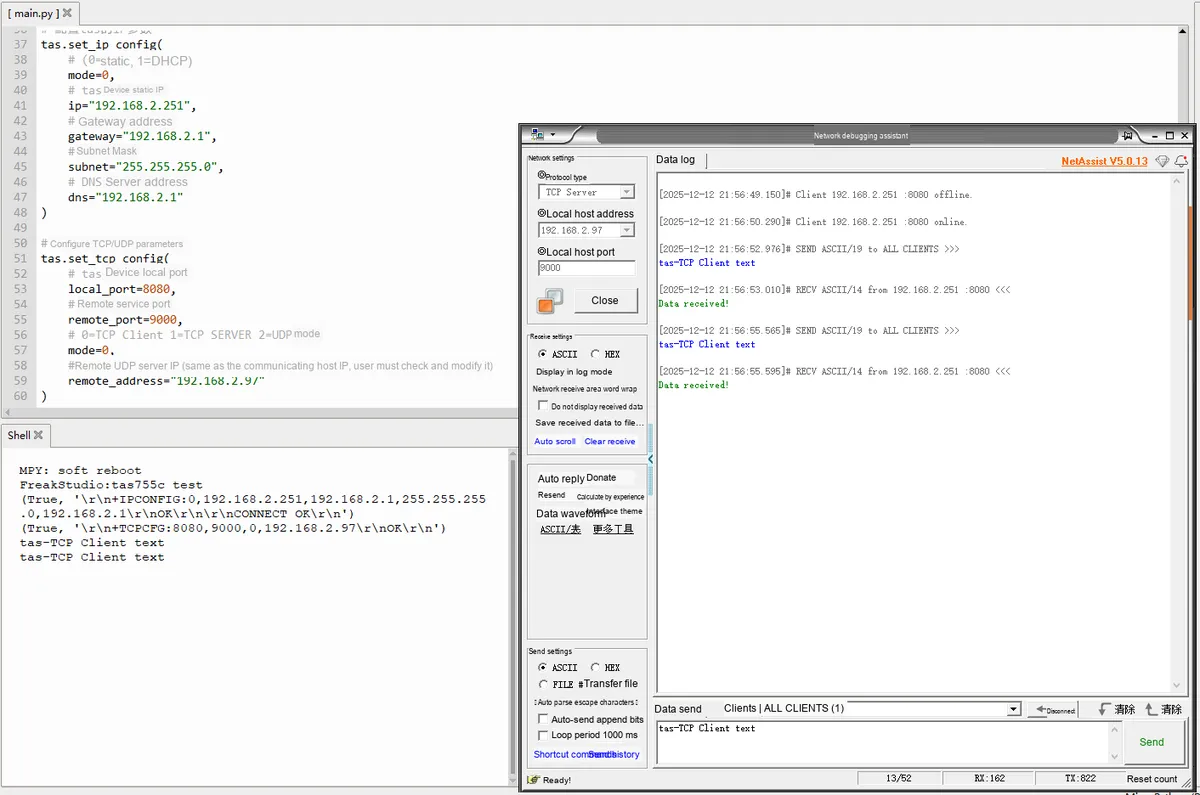
The terminal output the data we sent, and the main control sent back a message confirming that it had received the data.
3.3.6 TCP Server Experiment
After importing the MicroPython driver code for the TAS-755C-based serial-to-Ethernet module, enter the following in the REPL:
# Run tcp_server.py as the main program, a unified entry point for dispatching driver examples
import tcp_server
tcp_server.py The specific code is as follows:
# Python env   : MicroPython v1.23.0
# -*- coding: utf-8 -*-
# @Time    : 2025/9/5 10:11 PM
# @Author  : ben0i0d
# @File    : tcp_server.py
# @Description : tas755c tcp_server test file

# ======================================== Import Modules =========================================

# Import hardware-related modules
import time
from machine import UART, Pin
# Import the third-party driver module
from tas_755c_eth import TAS_755C_ETH

# ======================================== Global Variables ============================================

# ======================================== Functions ============================================

# ======================================== Custom Classes =============================================

# ======================================== Initialization configuration ===========================================

# Power-on delay of 3 s
time.sleep(3)
# Print debug information
print("FreakStudio:tas755c tcp_server test")

# Initialize UART communication (adjust TX/RX according to the actual hardware wiring)
uart0 = UART(0, baudrate=9600, tx=Pin(16), rx=Pin(17))
# Create a TAS_755C instance
tas = TAS_755C_ETH(uart0)
# Switch to AT mode
tas.enter_command_mode()

# Configure the IP parameters of the tas
tas.set_ip_config(
    # (0=Static, 1=DHCP)
    mode=0,
    # Static IP of the tas device
    ip="192.168.2.251",
    # Gateway address
    gateway="192.168.2.1",
    # Subnet mask
    subnet="255.255.255.0",
    # DNS server address
    dns="223.5.5.5"
)

# Configure TCP/UDP parameters
tas.set_tcp_config(
    # Local port of the tas device
    local_port=8080,
    # Remote service port
    remote_port=9000,
    # 0=TCP Client 1=TCP SERVER 2=UDP Client 3=UDP SERVER 8=HTTP mode
    mode=1,
    # Remote server IP (same as the IP of the communicating host; the user must check and change it)
    # To resolve a domain name, add quotes '"domain name"'
    # An IP address does not need quotes "IP address"
    remote_address="192.168.2.97"
)

# Save the current settings and restart to apply the configuration
tas.save()
tas.restart()
time.sleep(5)

# Switch to AT mode
tas.enter_command_mode()

# View the current configuration to check whether it took effect
print(tas.get_ip_config())
print(tas.get_tcp_config())

# Switch back to data mode
tas.enter_data_mode()

# ========================================  Main Program  ===========================================

while True:
    if tas.has_data():
        tas.send_data("Data received!")
        print(tas.read_data().decode('utf-8'))
Download Network Debugging Assistant
NetAssist.exe 641 KB
We configure the network debugging assistant as follows: since the module acts as the Client, our network debugging assistant serves as the server, and the protocol type is TCP Client; the remaining configurations are shown in the figure:
The remote host address configuration is consistent with the device address.
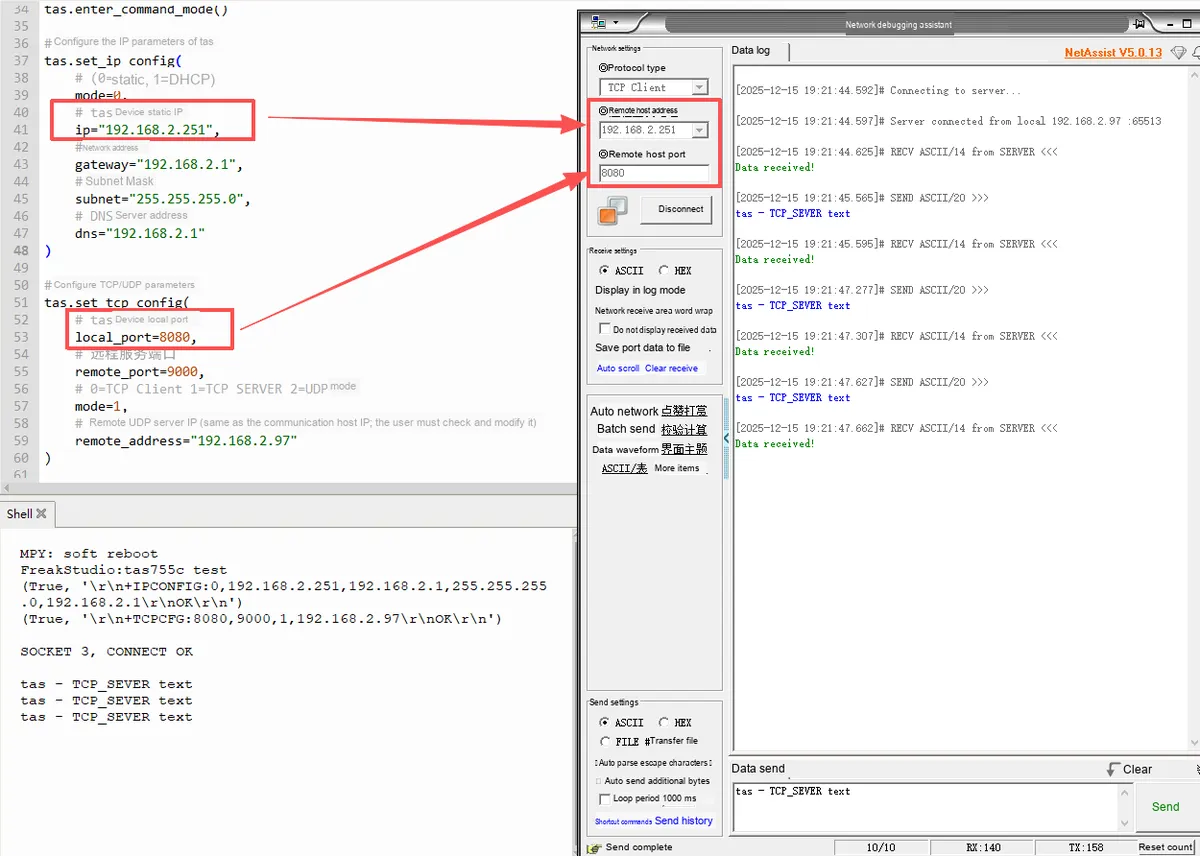
After the configuration is complete, click the Open button and send any data in the network debugging assistant dialog box:
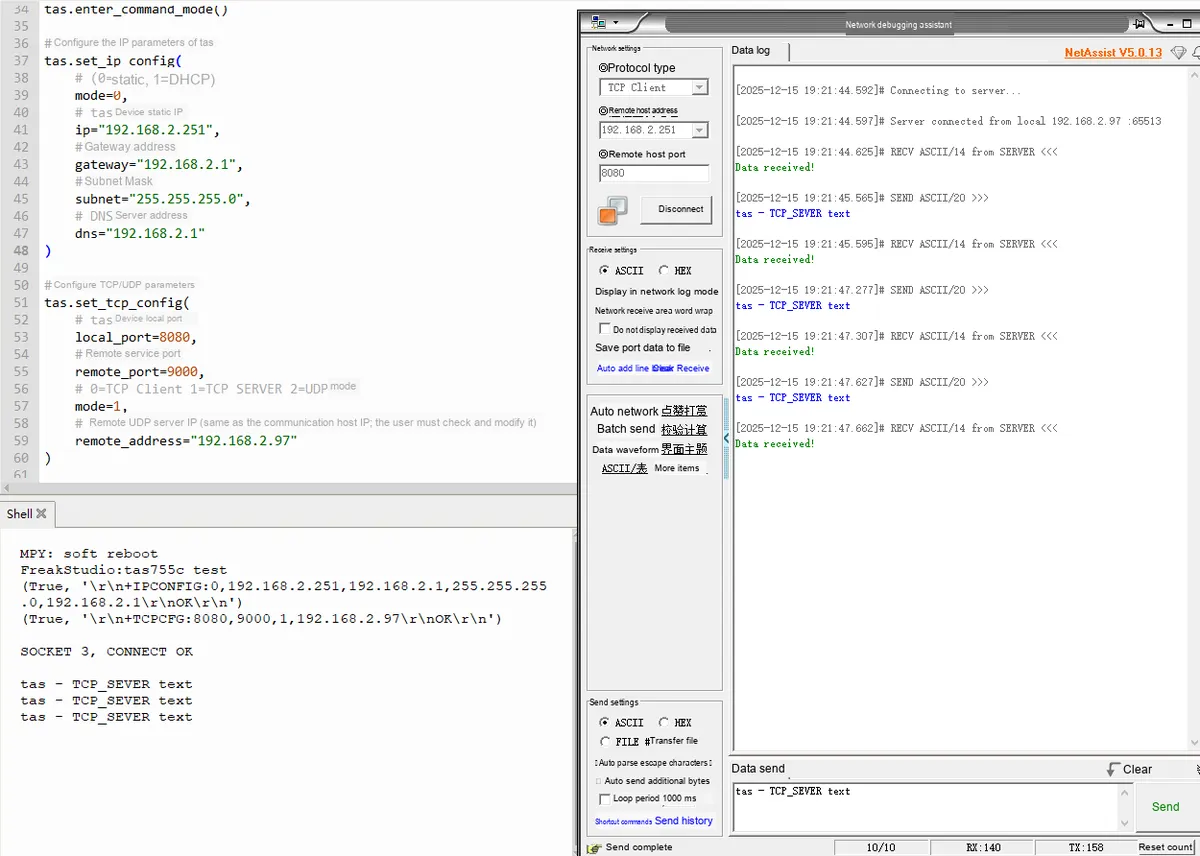
The terminal outputs the data we sent, and the main control sends back a message indicating that the data has been received.
3.3.7 HTTP Request Experiment
We use the MicroPython driver code for the TAS-755C-based serial-to-Ethernet module, where the host computer runs the HTTP server file
http_server folder http_serve.py, the specific code is as follows:
# Python env   : Python v3.13
# -*- coding: utf-8 -*-
# @Time    : 2025/9/5 10:11 PM
# @Author  : 侯钧瀚
# @File    : http_sever.py
# @Description : Simple HTTP server example code
# ======================================== Import Modules =========================================

from http.server import BaseHTTPRequestHandler, HTTPServer
from socketserver import TCPServer
import socket
import sys
import os

# ======================================== Global Variables ============================================


HOST = "0.0.0.0"  # 0.0.0.0 allows access from all network devices (use localhost or 127.0.0.1 for local only)
PORT = 8080        # Listening port (recommend choosing an unused port such as 8000/8080/9090)

# ======================================== Functions ============================================

# ======================================== Custom Classes =============================================

# Completely disable standard error output
class DevNull:
    def write(self, msg):
        pass
    def flush(self):
        pass

class SimpleHTTPRequestHandler(BaseHTTPRequestHandler):
    """Custom request handler, overrides the GET request logic"""

    def _set_response(self, status_code=200, content_type="text/html"):
        """Set the HTTP response headers (status code, content type, etc.)"""
        self.send_response(status_code)
        self.send_header("Content-type", content_type)
        self.send_header("Server", "Python-Simple-HTTP-Server")  # Server identifier
        self.end_headers()  # End the response headers (must be called)

    def do_GET(self):
        """Handle GET requests (core logic)"""
        # 1. Print the request log (console output)
        client_ip, client_port = self.client_address  # Get the client IP and port
        print(f"\n[新请求]")
        print(f"  客户端: {client_ip}:{client_port}")
        print(f"  方法: {self.command}")  # Request method (GET/POST, etc.)
        print(f"  路径: {self.path}")    # Request path (such as / or /test)
        print(f"  协议: {self.request_version}")

        # 2. Build the response content (HTML format supported, customizable)
        response_html = f"""
        <html>
            <head><title>Python Simple HTTP Server</title></head>
            <body style="text-align: center; margin-top: 50px;">
                <h1>✅ Server responded successfully!</h1>
                <p>Request information:</p>
                <p>Client IP: {client_ip}:{client_port}</p>
                <p>Request method: {self.command}</p>
                <p>Request path: {self.path}</p>
                <p>Server port: {PORT}</p>
                <hr>
                <p style="color: #666;">Powered by Python http.server</p>
            </body>
        </html>
        """

        # 3. Send the response (set the response headers first, then send the content)
        self._set_response(status_code=200)  # 200 = Success
        # Convert the string to a byte stream (HTTP transmission requires bytes)
        self.wfile.write(response_html.encode("utf-8"))

    def do_POST(self):
        """Handle POST requests"""
        # 1. Print the request log
        client_ip, client_port = self.client_address
        print(f"\n[新请求]")
        print(f"  客户端: {client_ip}:{client_port}")
        print(f"  方法: {self.command}")
        print(f"  路径: {self.path}")
        print(f"  协议: {self.request_version}")

        # 2. Read the POST data
        content_length = int(self.headers['Content-Length']) if self.headers.get('Content-Length') else 0
        post_data = self.rfile.read(content_length).decode('utf-8') if content_length > 0 else ''
        print(f"  POST 数据: {post_data}")

        # 3. Build the response content
        response_html = f"""
        <html>
            <head><title>Python Simple HTTP Server</title></head>
            <body style="text-align: center; margin-top: 50px;">
                <h1>✅ POST request handled successfully!</h1>
                <p>Request information:</p>
                <p>Client IP: {client_ip}:{client_port}</p>
                <p>Request method: {self.command}</p>
                <p>Request path: {self.path}</p>
                <p>POST data: {post_data}</p>
                <p>Server port: {PORT}</p>
                <hr>
                <p style="color: #666;">Powered by Python http.server</p>
            </body>
        </html>
        """

        # 4. Send the response
        self._set_response(status_code=200)
        self.wfile.write(response_html.encode("utf-8"))

    def log_message(self, format, *args):
        """Disable the default log (optional, avoids redundant console output)"""
        return


def run_simple_http_server():
    """Start the HTTP server"""
    # Create a TCP server instance (bind host + port, specify the request handler)
    server_address = (HOST, PORT)
    httpd = TCPServer(server_address, SimpleHTTPRequestHandler)

    # Print the startup information
    print(f"📡 Python 简单 HTTP 服务器已启动")
    print(f"  访问地址: http://{socket.gethostbyname(socket.gethostname())}:{PORT}")
    print(f"  本地访问: http://localhost:{PORT} 或 http://127.0.0.1:{PORT}")
    print(f"  提示: 按 Ctrl+C 关闭服务器")

    try:
        # Keep listening for requests (blocking mode)
        httpd.serve_forever()
    except KeyboardInterrupt:
        # Catch the Ctrl+C signal and shut down the server gracefully
        print(f"\n🔌 正在关闭服务器...")
        httpd.server_close()  # Close the server connection
        print(f"✅ 服务器已关闭")

# ======================================== Initialization ==========================================

# ========================================  Main Program  ===========================================
sys.stderr = DevNull()
if __name__ == "__main__":
    run_simple_http_server()
A terminal will pop up after opening, and the access address may vary slightly depending on the user's network environment:
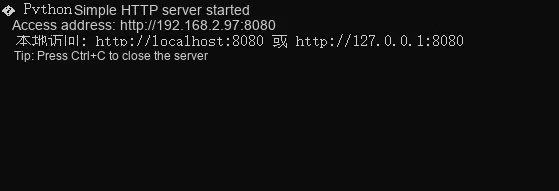
After importing the files in the code folder of the TAS-755C-based serial port to Ethernet module-MicroPython driver code , enter in the REPL :
# Run http_test.py as the main program, a unified entry point for dispatching driver examples
import http_test
http_test.py The specific code is as follows:
# Python env   : MicroPython v1.23.0
# -*- coding: utf-8 -*-
# @Time    : 2025/9/5 10:11 PM
# @Author  : ben0i0d
# @File    : http_test.py
# @Description : tas755c HTTP test file

# ======================================== Import Modules =========================================

# Import hardware-related modules
import time
from machine import UART, Pin
# Import the third-party driver module
from tas_755c_eth import TAS_755C_ETH

# ======================================== Global Variables ============================================

# ======================================== Functions ============================================

# ======================================== Custom Classes =============================================

# ======================================== Initialization configuration ===========================================

# This example first opens the target server's TCP, then runs this client example
# Power-on delay of 3 s
time.sleep(3)
# Print debug information
print("FreakStudio:tas755c http test")

# Initialize UART communication (adjust TX/RX according to the actual hardware wiring)
uart0 = UART(0, baudrate=9600, tx=Pin(16), rx=Pin(17))
# Create a TAS_755C instance
tas = TAS_755C_ETH(uart0)
# Switch to AT mode
tas.enter_command_mode()

# Configure the IP parameters of the tas
tas.set_ip_config(
    # (0=Static, 1=DHCP)
    mode=0,
    # Static IP of the tas device
    ip="192.168.2.251",
    # Gateway address
    gateway="192.168.2.1",
    # Subnet mask
    subnet="255.255.255.0",
    # DNS server address (Alibaba Cloud public DNS is used here)
    dns="223.5.5.5"
)

# Configure TCP/UDP parameters
tas.set_tcp_config(
    # Local port of the tas device
    local_port=8080,
    # Remote service port
    remote_port=8080,
    # 0=TCP Client 1=TCP SERVER 2=UDP Client 3=UDP SERVER 8=HTTP mode
    mode=8,
    # Remote server IP (same as the IP of the communicating host; the user must check and change it)
    # To resolve a domain name, add quotes '"domain name"'
    # An IP address does not need quotes "IP address"
    remote_address='192.168.2.97'
)

tas.set_http_config(
    # Network status (0=Disabled, 1=Enabled).
    net_status=1,
    # Request method (0=POST, 1=GET).
    method=0,
    # Whether to return the header (0=No, 1=Yes).
    header_return=1
)

# Save the current settings and restart to apply the configuration
tas.save()
tas.restart()
time.sleep(5)

# Switch to AT mode
tas.enter_command_mode()

# View the current configuration to check whether it took effect
print(tas.get_ip_config())
print(tas.get_tcp_config())

# Switch back to data mode
tas.enter_data_mode()
# Send HTTP request test data
tas.send_data("http.request.test")

# ========================================  Main Program  ===========================================

while True:
    # Read data
    if tas.has_data():
        print(tas.read_data().decode('utf-8'))
        time.sleep(5)
Here are the key settings users need to pay attention to:
tas.set_http_configparametermethodsetting allows manual modification of the request method;tas.set_tcp_configparameters must be consistent with the server access address;
# Configure TCP/UDP parameters
tas.set_tcp_config(
    # Local port of the tas device
    local_port=8080,
    # Remote service port
    remote_port=8080,
    # 0=TCP Client 1=TCP SERVER 2=UDP Client 3=UDP SERVER 8=HTTP mode
    mode=8,
    # Remote server IP (same as the IP of the communicating host; the user must check and change it)
    # To resolve a domain name, add quotes '"domain name"'
    # An IP address does not need quotes "IP address"
    remote_address='192.168.2.97'
)

tas.set_http_config(
    # Network status (0=Disabled, 1=Enabled).
    net_status=1,
    # Request method (0=POST, 1=GET).
    method=0,
    # Whether to return the header (0=No, 1=Yes).
    header_return=1
)
After running the code, we will send a request according to the settings and print the received message in the terminal:
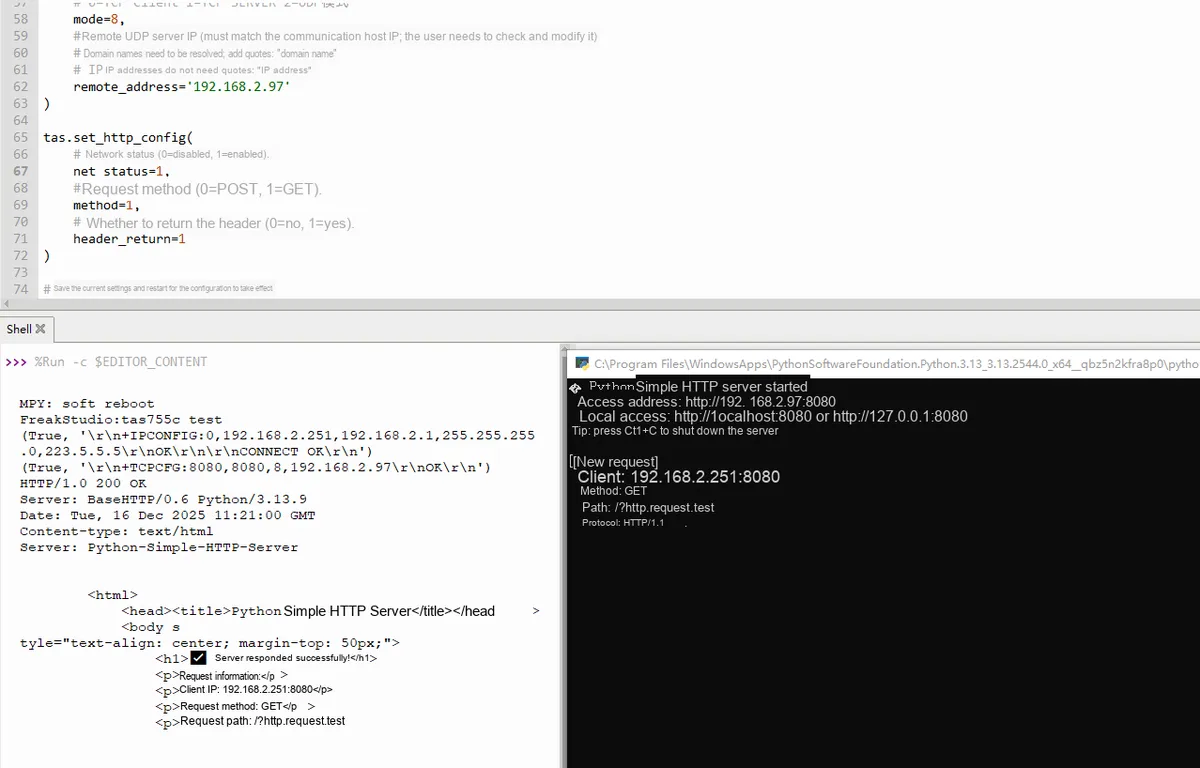
It can be seen that when method= 1, the request uses the GET method;
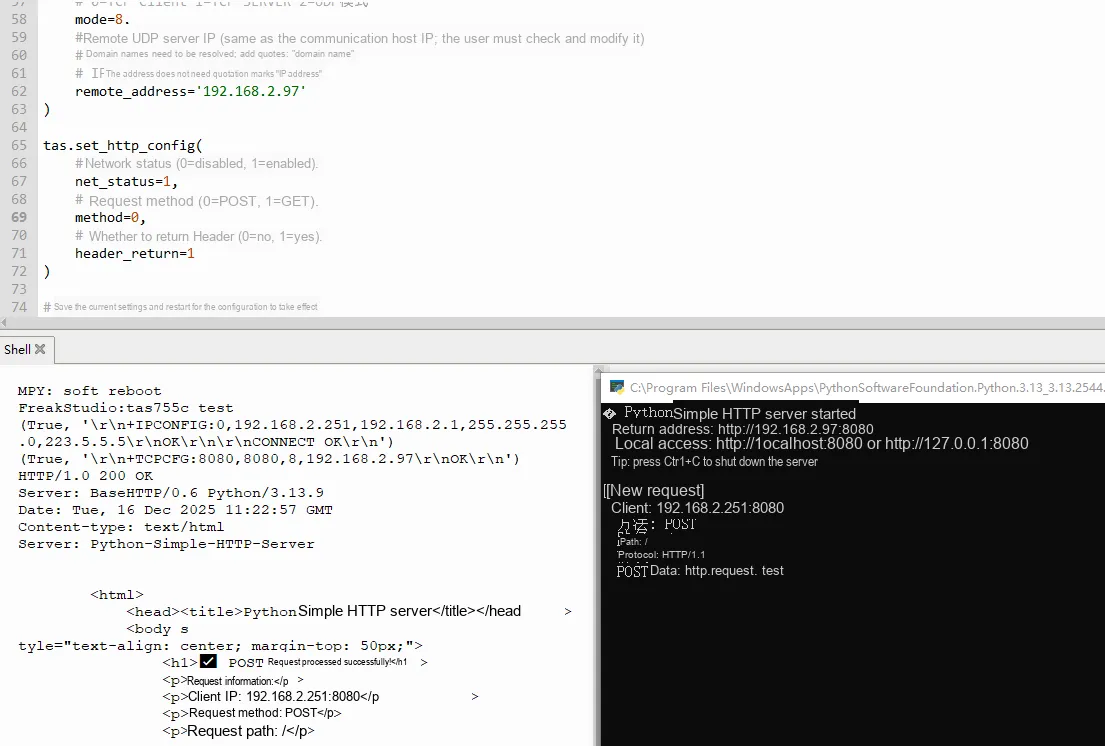
It can be seen that when method= 0, the request uses the POST method.
Download Network Debugging Assistant
NetAssist.exe 641 KB
We configure the network debugging assistant with the protocol type set to UDP, and the remaining configurations are as shown in the figure:
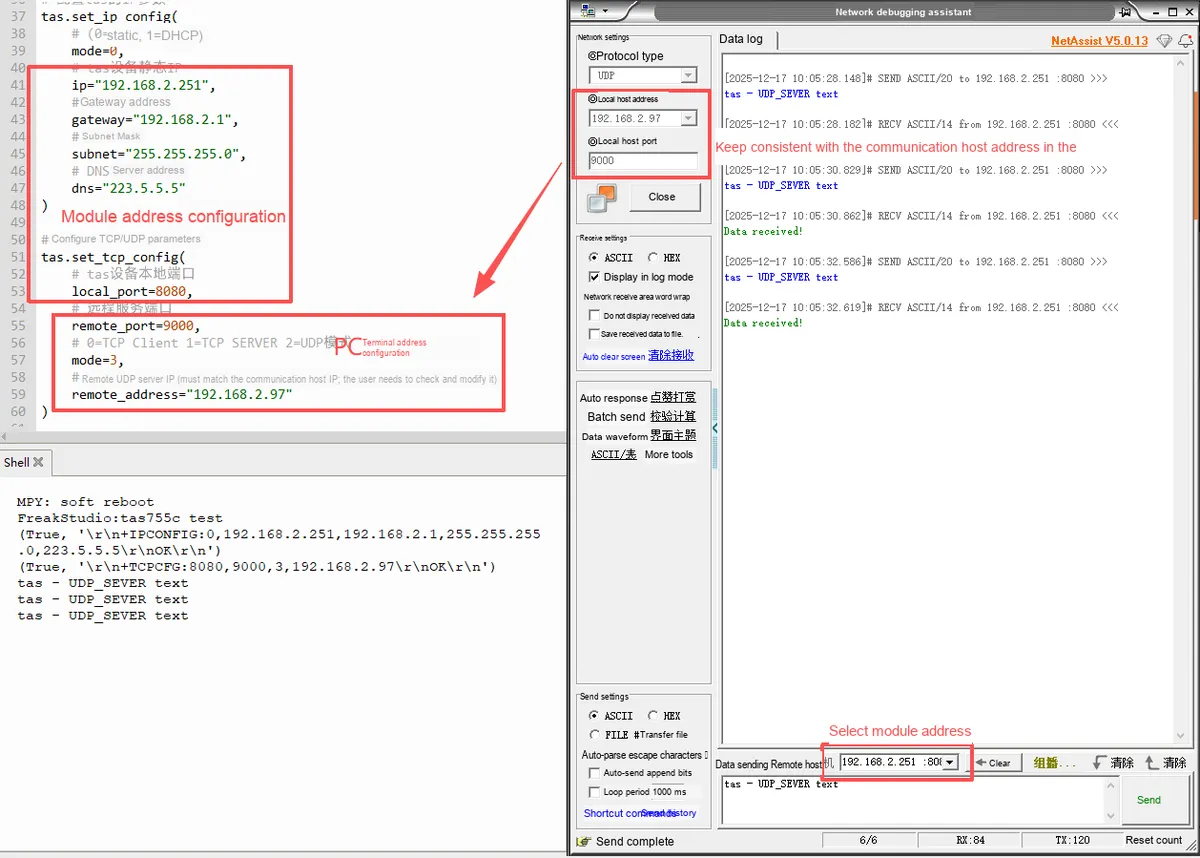
After the configuration is complete, click the Open button, and then send any data in the Network Debugging Assistant dialog box:
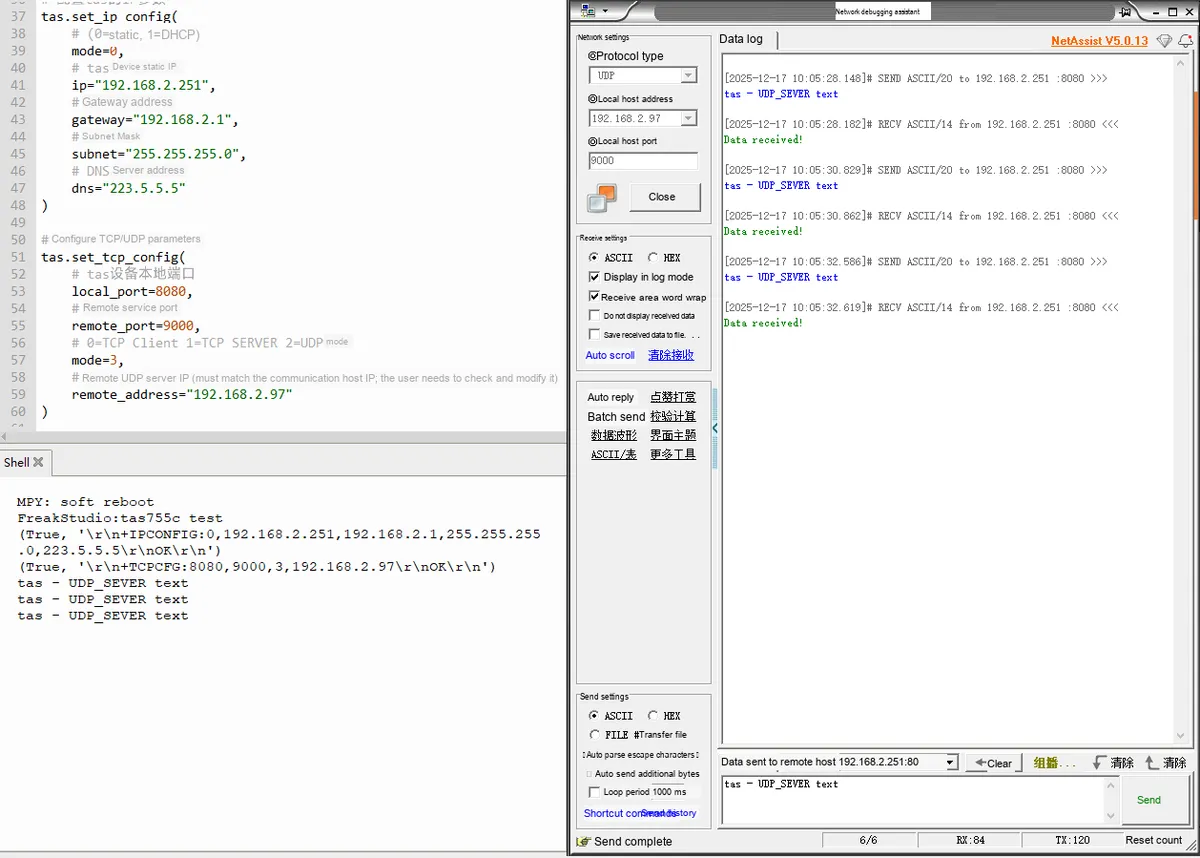
The terminal output the data we sent, and the main controller sent back a message confirming the received data.
IV. Drivers
tas755c_driver.zip 23 KB
5. BOM & Recommended Alternative Parts
None.
VI. Revision History
Document Version | Date of Modification | Modifier | Modified Content |
v1.0 | 2025-10-24 | Ling Gaoxing | Initialize the document |
v1.1 | 2025-12-29 | Li Zisheng | Added application experiments and production files |
v1.2 | 2025-12-31 | Xin Ruili | Create an open version of the document based on the internal document version v1.1. |
v1.3 | 2026-03-29 | Xin Ruili | Modified the application experiment section. |
VII. Relevant Materials
7.1 Chip Datasheet
Configuration Software
Tool V4.9.4 D202301216.exe 9.6 MB
Package Design:
05_Package Design.rar 2.7 MB
Datasheet:
TAS-LAN-755C_Datasheet V1.0.1.pdf 4.3 MB
TAS-LAN-755C_AT Command Set_V1.0.1.pdf 597 KB
TAS-LAN-755C&755W Product Datasheet V1.0.1.pdf 382 KB
7.2 Unique Icons for PCB Silkscreen