
Contents
- I. Introduction
- 2. Introduction to the WebSocket Protocol
- 2.1 Basic Concepts
- 2.2 Workflow of WebSocket
- 2.3 Data Frame Format of WebSocket
- 2.4 WebSocket Interfaces
- III. Introduction to the async_websocket_client Library
- 3.1 Basic Concepts
- 3.2 Quick Test
- 4. Implement TTS speech synthesis by connecting to iFlytek Development Platform via WebSocket
- 4.1 Introduction to Iflytek Open Platform and Acquisition of API Key
- 4.2 Driver Library Installation
- 5. Implement ASR speech recognition by connecting to the Xunxinghuo speech recognition large model via WebSocket
- 5.1 Basic Knowledge
- 5.2 Preparations Before the Experiment
- 5.3 Experimental Case
- References
- Version Record
I. Introduction
Anyone who first comes into contact with WebSocket will ask the same question: we already have the HTTP protocol, so why do we need another one? What benefits can it bring?
In our previous tutorial, we developed an HTTP protocol-based web server using HTML on the Raspberry Pi Pico to control the hardware pins of the Raspberry Pi Pico:
https://freakstudio.cn/node/019bd0cf-8ca7-7e97-83fe-0b29d55c6f5c
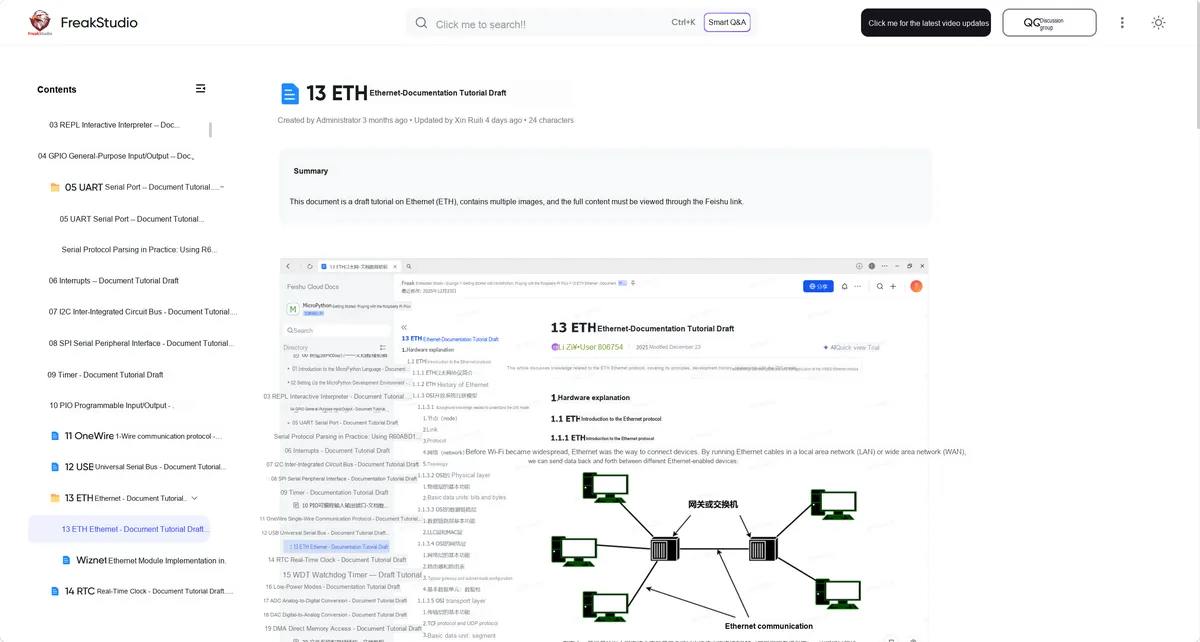
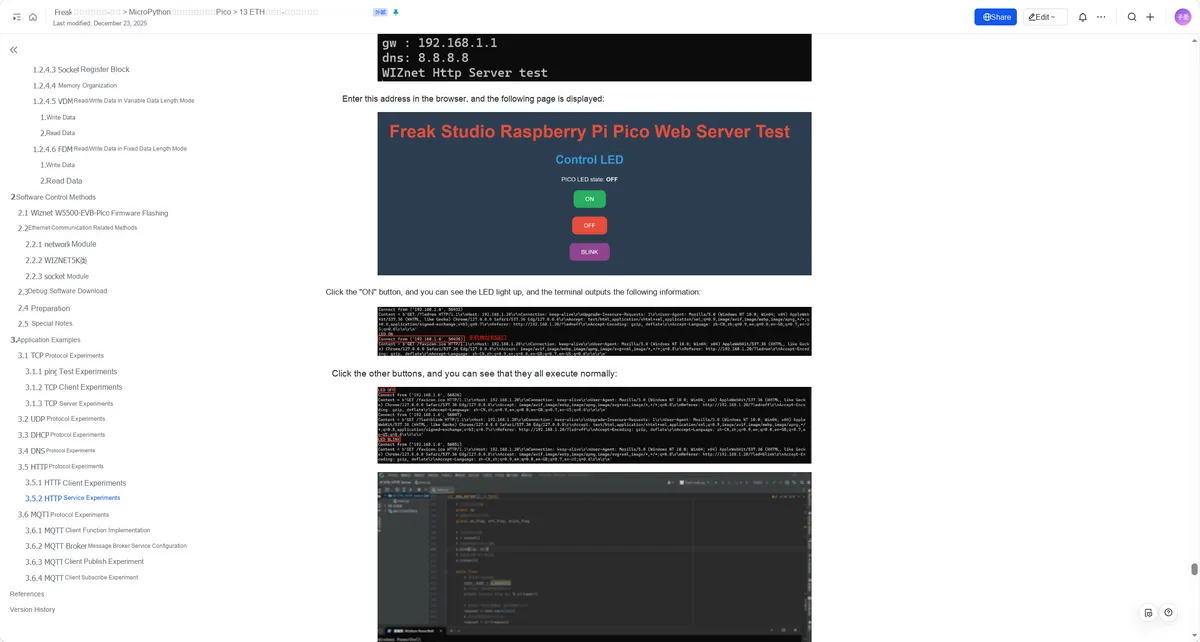
This approach is extremely straightforward, yet its drawbacks are equally pronounced: every form submission necessitates a full round-trip network transmission (i. e., a page refresh), which introduces noticeable latency. This round-trip communication is highly detrimental to user experience, as the delay may prompt users to click repeatedly or perceive the interface as unresponsive.
The core pattern of the HTTP protocol is request-response: the browser initiates a request, and the server returns a response after processing it. It is a half-duplex communication, which allows data transmission in only one direction at a time, and a new handshake connection needs to be established for each communication.
For many embedded projects, this protocol is fully sufficient: for example, configuring the parameters of a development board via a browser and then letting the board run independently for a period of time, but consider the following two scenarios:
- Real-time temperature and humidity recording and display: If HTTP is used, the browser must continuously polling (e. g., request data once every 1 second) so that the server can return the latest temperature and humidity values; this will bring about several problems:
- High request frequency wastes bandwidth and MCU resources;
- Data has latency (depending on the polling interval);
- Increased device power consumption (due to frequent network communication).
- Online network chat room: If HTTP is used, the Client needs to constantly polling the server for new messages (e. g., making a request every few hundred milliseconds). This is not only inefficient, but also causes:
- A large number of invalid requests (in most cases, there are no new messages);
- Increased server load;
- There is significant message latency, leading to a poor user experience.
As you can see, it is not friendly to use HTTP communication in scenarios where the server needs to push new messages to all Clients immediately once they are available.
Then, we can actually opt for another better solution: establish and maintain a persistent connection between the browser and the server to achieve full-duplex communication.
In this mode, both the Client and the server can actively send data at any time, without being restricted by the one-way communication mechanism of HTTP "request-response", thus avoiding the performance waste and latency issues caused by frequent polling.
This communication method is particularly suitable for scenarios that require real-time data updates and instant interactive feedback, such as real-time monitoring, online chat, remote control, etc.
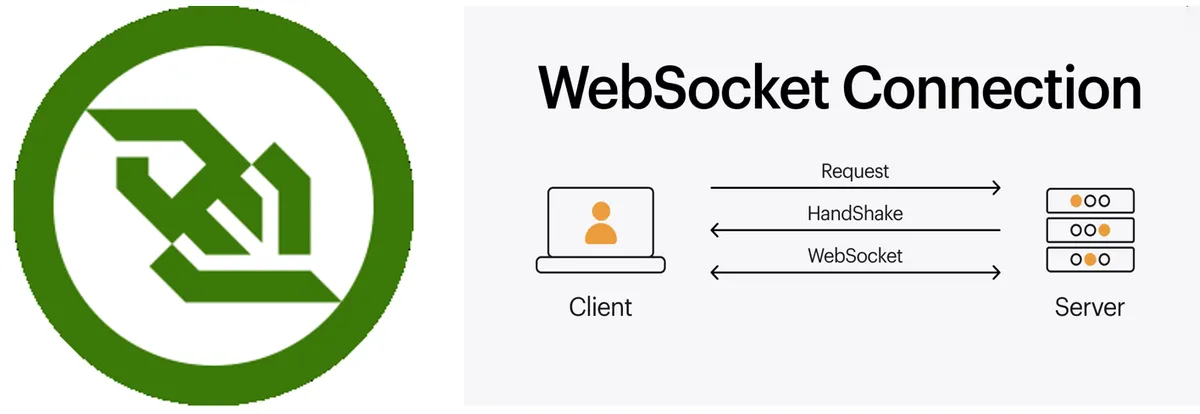
And the core protocol that enables this capability is WebSocket.
2. Introduction to the WebSocket Protocol
2.1 Basic Concepts
It was born in 2008, and became an international standard in 2011:
- WebSocket first appeared in the HTML5 specification under the name
TCPConnectionas a placeholder for a TCP-based socket API, designed to address the need for native TCP communication on the browser side. - Prior to the emergence of WebSocket, full-duplex communication over port 80 on the browser side relied on Comet channels technology, which suffered from two core drawbacks:
- It features high implementation complexity and high deployment and maintenance costs;
- Due to the additional overhead introduced by the TCP three-way handshake and HTTP request headers, the transmission efficiency is extremely low in small-message scenarios.
- In June 2008, Michael Carter led a series of technical discussions and produced the first protocol version named "WebSocket", whose core objective was to address the pain points of Comet technology without undermining network security assumptions;
- Subsequently, Ian Hickson collaborated with Michael Carter to finalize the name "WebSocket", which was then officially incorporated into the HTML5 specification by Ian Hickson.
Currently all browsers have native support for it, no additional plugins are required, including Google Chrome, Firefox, Microsoft Edge, Internet Explorer, Safari and Opera. It belongs to true two-way equal communication, supports the server to actively push information to the Client, and also supports the Client to actively send messages to the server. It is one of the mainstream server push technologies.
Its technical features include:
- Built based on the TCP protocol, the server-side features simple implementation logic and strong adaptability.
- Perfectly compatible with the HTTP ecosystem, shares ports 80 (ws) and 443 (wss) by default;
- The handshake phase uses the HTTP protocol, which is not easily blocked by networks and can smoothly pass through various HTTP proxy servers.
- Lightweight data format, low communication overhead and high efficiency;
- Supports bidirectional transmission of text and binary data, covering various data scenarios such as text, files, audio and video.
- No same-origin restriction: Client can establish connections with any server, breaking through the restriction of browser same-origin policy;
- Protocol identifier: ws (unencrypted), wss (encrypted, similar to HTTPS). Communication addresses follow the URL specification. Example:
ws://example.com:80/some/path.
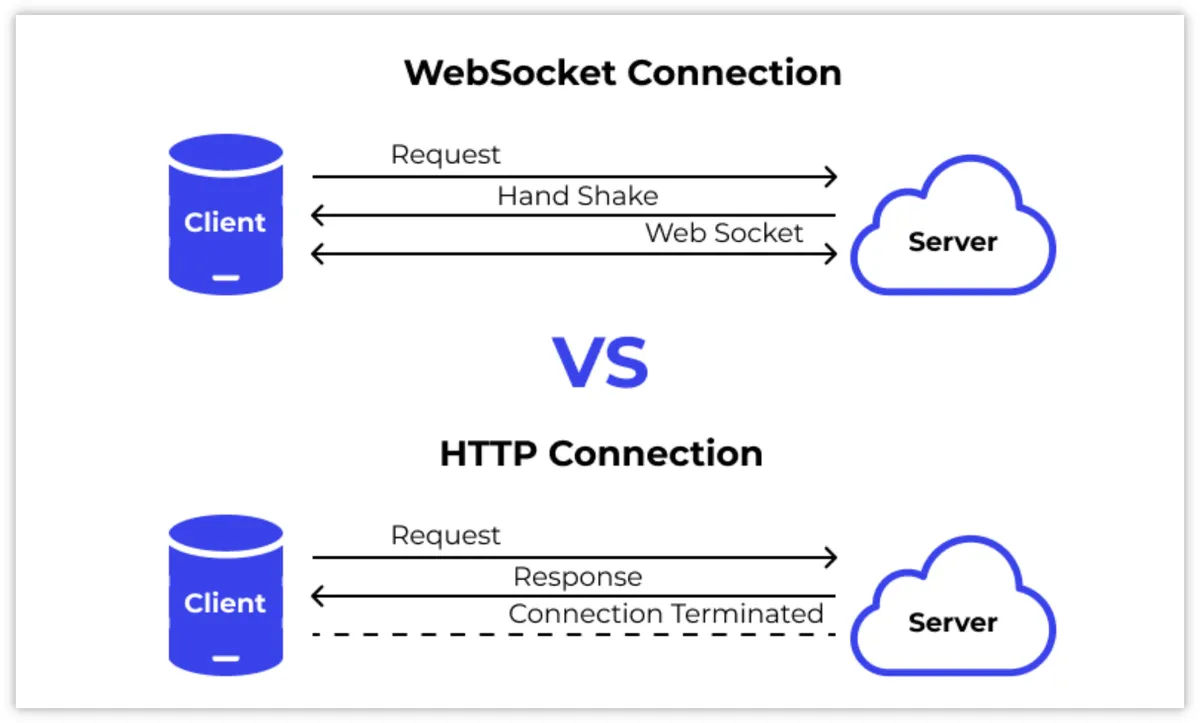
In a nutshell, WebSocket is built on TCP, uses HTTP compatibility as a bridge, and centers on bidirectional real-time communication. Featuring low latency, high flexibility and free cross-domain capability, it is a perfect fit for real-time interaction scenarios between browsers and servers.
2.2 Workflow of WebSocket
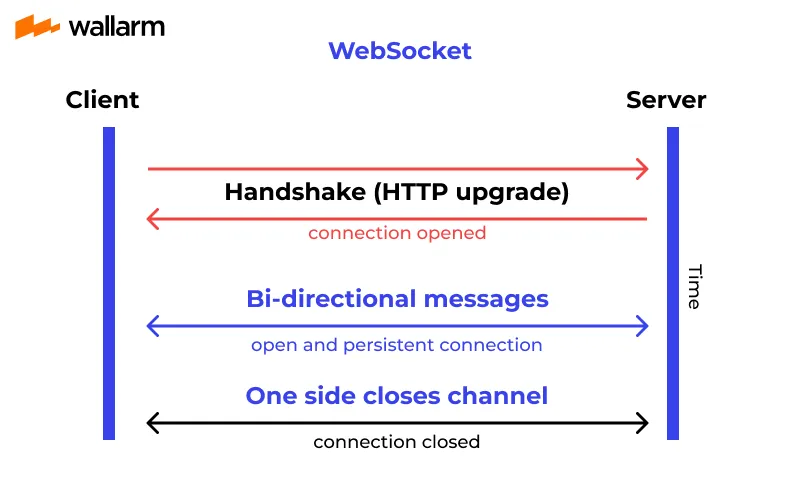
It can be divided into the following three stages:
- Handshake Phase: HTTP protocol upgrade to establish a persistent connection (the red process in the diagram)
- The Client initiates an HTTP upgrade request: it sends an HTTP request carrying the
Upgrade: websocketheader and a random keySec-WebSocket-Keyto the server, applying to upgrade the current HTTP connection to a WebSocket connection. - The server responds with a handshake confirmation: generates a response key via the agreed algorithm
Sec-WebSocket-Accept, and returns it to the Client to complete the protocol upgrade. - Formal connection established: After the Client verifies the response key, the persistent TCP long connection takes effect, marked in the diagram
connection opened(connection already opened), and the handshake phase is completed.
- The Client initiates an HTTP upgrade request: it sends an HTTP request carrying the
- Data transmission phase: full-duplex bidirectional real-time communication (the blue process in the figure)
- Persistent long connection takes effect: after the handshake is completed, the Client and the server maintain
open and persistent connection, and there is no need to repeatedly establish a connection during the whole process. - Bidirectional real-time message transmission: Both parties can actively send text/binary data to each other at any time to realize true full-duplex communication; the server can actively push data, completely getting rid of the Client polling limitation of traditional HTTP.
- Heartbeat keepalive mechanism: The two parties exchange control frames periodically via
Ping(heartbeat request)/Pong(heartbeat response) to maintain the connection alive and prevent the persistent connection from being disconnected by network devices due to idleness.
- Persistent long connection takes effect: after the handshake is completed, the Client and the server maintain
- Closure Phase: Gracefully terminate the connection (the black process in the diagram)
- Either party initiates a closure request: the Client or the server may actively send
Closecontrol frame to request to close the WebSocket connection. - Two-way confirmation shutdown: After the peer receives the shutdown request, it returns a
Closeresponse frame to complete the two-way confirmation. - Formal connection closure: After mutual confirmation, the TCP persistent connection is completely disconnected, as marked in the diagram
connection closed(connection closed), and the communication process ends.
- Either party initiates a closure request: the Client or the server may actively send
2.3 Data Frame Format of WebSocket
2.3.1 Overview of Data Frame
After WebSocket completes the handshake to establish a persistent connection, all communications take "data frames (Frame)" as the minimum transmission unit — whether it is service data or connection control instructions, all are encapsulated in binary frames for transmission:
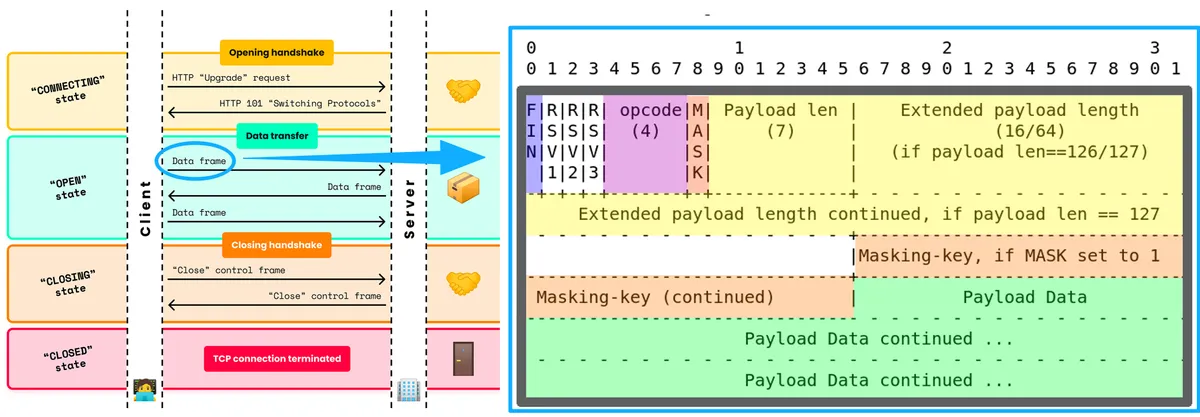
WebSocket data frames are in binary format, which are generally divided into two major parts: the frame header (Header) and the payload (Payload). The frame header is further split into the fixed header (the first 2 bytes / 16 bits) and the variable extended header (which varies dynamically according to length and mask). The structure is as follows:
| Offset (bit) | Field | Size (bit) | Core function |
|---|---|---|---|
| 0 | FIN | 1 | Marks whether this is the last frame of the message |
| 1-3 | RSV1/RSV2/RSV3 | 1 each (3 total) | Reserved bits, default 0, used for protocol extension |
| 4-7 | Opcode | 4 | Marks the frame type (data / control frame) |
| 8 | Masked | 1 | Marks whether masking is applied |
| 9-15 | Payload length | 7/7+16/7+64 | Payload length in bytes |
| Variable | Masking key | 0/32 | Masking key (present only when Masked=1) |
| Variable | Payload | Variable | Actual transmitted data (extension data + application data) |
Wherein:
- Frame header: contains
FIN,Opcode,Masked,Payload lengthand other core fields, which are used for frame parsing and type control.FINfield (1 bit, offset 0): indicates whether the current frame is the last frame of the complete message, and is used for message sharding.- Value Rule:
1: The last frame, indicating the completion of message transmission;0: sharding frame, indicating that the message is not complete and there are subsequent data frames.
- Corresponding sharding mechanism:
- Non-sharding message: single frame,
FIN= 1andOpcode≠0; - sharding message: first frame
FIN= 0,Opcode≠0(defines the message type), intermediate frameFIN= 0,Opcode= 0(continuation frame), final frameFIN= 1,Opcode= 0(continuation frame, marks the end).
- Non-sharding message: single frame,
- Supports large message sharding transmission, which is suitable for embedded devices with limited memory (such as Raspberry Pi Pico W) and enables sending messages while generating them without caching the complete message.
- Value Rule:
RSV1/RSV2/RSV3fields (1 bit each, offset 1-3):- Reserved bits, reserved for protocol extension, must be set to 0 by default, and a non-zero value is only used when the Client and the server have negotiated an extension (such as compression) during the handshake phase.
- Corresponding compression extension:
permessage-deflateThe compression extension is negotiated during the handshake viaSec-WebSocket-Extensions: permessage-deflate. When enabled, the data frame will haveRSV1= 1, indicating that the payload is compressed data.
Opcodefield (4 bits, offset 4-7): defines the frame type and determines the parsing method of the payload, which is divided into non-control frames (data frames) and control frames two major categories.MaskedField (1 bit, offset 8):- Function: Indicates whether the frame has undergone masking processing.
- Mandatory Rules:
- All frames from Client to server:
Masked must be 1(masking is mandatory); - All frames from server to Client:
Masked must be 0(masking is prohibited).
- All frames from Client to server:
- Masking Principle: A 32-bit (4-byte) random
Masking keyis used to perform XOR operation on each byte of the payload.
Payload lengthfield (7/7+ 16/7+ 64bit, starting at offset 9):- Function: Indicates the byte length of the payload (extended data + application data)
0-125: The length is directly represented with 7 bits, which is suitable for small messages of ≤125 bytes;126: The subsequent 16 bits (2 bytes) indicate the length, which is suitable for medium messages ranging from 126 to 65535 bytes;127: The subsequent 64 bits (8 bytes) indicate the length, which is suitable for large messages larger than 65535 bytes (the most significant bit must be 0, unsigned).
- Byte order: big-endian, for unsigned integers.
- Advantages: Short headers for small messages and long headers for large messages to maximize bandwidth savings.
- Function: Indicates the byte length of the payload (extended data + application data)
Masking keyfield (32 bits, optional):- Only present when
Masked= 1, it is a 4-byte random number. The Client must generate a new random key for every frame it sends, and must not use a fixed one. - Function: Cooperate with the Masked field to complete the masking process from Client to server.
- Only present when
- Payload: The service data actually transmitted (e. g., chat messages, sensor data, control instructions):
- It is divided into two parts:
- Extension data: Present only when extensions (e. g., compression) have been negotiated, with its length defined by the extension;
- Application Data: Actual business data, such as chat messages, sensor data, and control commands.
- Total length = the value of the Payload length field.
- It is divided into two parts:
2.3.2 Opcode Field Classification and Meanings
Opcode The field classification and meanings are as follows:
| Category | Opcode (hex) | Frame type | Core function | Fragmentable? |
|---|---|---|---|---|
| Non-control frame (Data frame) | 0x00 | Continuation frame | Middle / last frame of a fragmented message | Yes |
| 0x01 | Text frame | Payload is UTF-8 encoded text | Yes | |
| 0x02 | Binary frame | Payload is binary data (e.g., sensor data, files) | Yes | |
| 0x03-0x07 | Reserved | Reserved for future non-control frame extensions | - | |
| Control frame | 0x08 | Close frame | Initiates / responds to closing the connection | No |
| 0x09 | Ping frame | Heartbeat request, checks that the connection is alive | No | |
| 0x0A | Pong frame | Response to Ping, confirms the connection is normal | No | |
| 0x0B-0x0F | Reserved | Reserved for future control frame extensions | - |
Among them, the core features of control frames are no sharding, a maximum payload length of 125 bytes, higher priority than data frames, and they are used for managing connection status.
2.3.3 Detailed Explanation of Control Frames
Control frames are used to manage connection states, with Opcode values ranging from 0x08 to 0x0F, do not support sharding, and have a maximum payload size of 125 bytes:
| Frame type | Opcode | Purpose | Process and rules | Engineering value |
|---|---|---|---|---|
| Close frame | 0x08 | Initiates or responds to closing the connection, completing the closing handshake | After one side sends a Close frame, the other side must send a Close frame back, and then both sides close the TCP connection. The payload is optional: the first 2 bytes are the close status code (big-endian unsigned), followed by the close reason in UTF-8 encoding, and the total length should be ≤ 123 bytes. Common status codes include: 1000 normal closure, 1001 going away, 1002 protocol error, 1003 unsupported data type, 1006 abnormal closure, 1007 invalid data, 1009 message too big, 1011 internal server error. | Makes the connection closing process more orderly and avoids the state confusion caused by a "direct disconnect" |
| Ping frame | 0x09 | Heartbeat request, checks that the connection is alive and measures round-trip delay | Either side can send a Ping frame; the payload can carry arbitrary data (such as a timestamp). The side that receives a Ping must send a Pong frame back as soon as possible, with the payload identical to the Ping's. | Periodic heartbeats prevent long-lived connections from being dropped by firewalls or proxies, improving connection stability for embedded devices |
| Pong frame | 0x0A | Response to a Ping frame, confirms the connection is normal; can also be sent unsolicited as a heartbeat | After receiving a Ping, a Pong must be sent back with the payload identical to the Ping's; a Pong can also be sent unsolicited when there is no Ping. | Makes it easy to confirm the link is working, and can also be used as a lightweight heartbeat mechanism |
2.3.4 Sharding Transmission
WebSocket supports splitting a large message into multiple frames for transmission via sharding, with the core rules as follows:
- Non-sharding message: transmitted in a single frame, with
FIN= 1andOpcode≠0, suitable for small messages. - Sharding message: Transmission is completed with no fewer than 2 frames, rules:
- First frame:
FIN= 0,Opcode≠0(defines the message type, e. g. text / binary); - Intermediate frame:
FIN= 0,Opcode= 0(continuation frame, inherits the message type of the first frame); - Final frame:
FIN= 1,Opcode= 0(continuation frame, marking the end of the message).
- First frame:
- Core Values :
- Adapt to embedded devices (e. g. Pico W): With limited memory, there is no need to cache complete large messages; instead, perform sharding and send while generating;
- Supports streaming transmission: for example, Real Time Communication, which is sent while being collected;
- Avoid large messages blocking the connection: control frames (Ping/Pong) can be interspersed to ensure the connection remains alive.
2.3.5 Companding
The standard extension for WebSocket (RFC 7692) compresses data messages using the DEFLATE algorithm to reduce bandwidth consumption and improve transmission efficiency.
During the handshake phase, the Client and the server negotiate to enable compression via the Sec-WebSocket-Extensions: permessage-deflate header.
After compression is enabled, the first frame of the data message has RSV1= 1, indicating that the payload is compressed data and the receiver needs to decompress it.
2.4 WebSocket Interfaces
The WebSocket interface is a core tool for a Client (such as a browser) to establish, manage and terminate a WebSocket connection. The following is an implementation based on JavaScript, which provides five categories of interfaces: constructor, method, event, property and constant.
| Type | Name | Description |
|---|---|---|
| Constructor | ws = new WebSocket(url [, protocols ]) | Starts the connection handshake 1. url (string, required): contains the communication target address, with the following rules: - Scheme: must be ws, wss, http, or https; - Must include the target host (Host); - Optional port: if not specified, ws/http use port 80 and wss/https use port 443; - Optional path and query parameters (query); - Must not include a fragment (the content after #); 2. protocols (string / array of strings, optional): used as the value of the Sec-WebSocket-Protocol header field during the handshake, to negotiate subprotocols; 3. Exceptions: - SyntaxError: thrown when URL parsing fails, the scheme format is wrong, an illegal fragment is included, or protocols contains duplicate strings. |
| Method | ws.send(data) | Sends a data message 1. Parameter: data must be a string, Blob, ArrayBuffer, or ArrayBufferView; 2. Return value: none (undefined); 3. Exceptions: - InvalidStateError: thrown when the connection is in the CONNECTING (handshaking) state; 4. Note: if the data cannot be sent (for example, the buffer is full), the connection is closed and an error event is fired. |
| ws.close([ code ] [, reason ]) | Starts the closing handshake 1. Optional parameter code: close status code, must be 1000 (normal closure) or 3000~4999 (application-defined), default 1000; 2. Optional parameter reason: close reason string, UTF-8 encoded length ≤ 123 bytes, default empty string; 3. Return value: none (undefined); 4. Exceptions: - InvalidAccessError: thrown when the value of code does not meet the requirements; - SyntaxError: thrown when the encoded length of reason exceeds 123 bytes; 5. Note: - If the connection is in the OPEN or CONNECTING state, the state is set to CLOSING and the closing handshake starts; - If it is already in the CLOSING or CLOSED state, nothing happens (the closing handshake has already started). | |
| Event | ws.onopen = (event) => {} / ws.addEventListener("open", ...) | Handshake success event: fired after the handshake completes and the connection is established; the event type is Event. |
| ws.onmessage = (event) => {} / ws.addEventListener("message", ...) | Message received event: fired only when the connection state is OPEN; the event type is MessageEvent: 1. event.data: the received data, whose type corresponds to the data format: - Text data: string; - Binary data: Blob or ArrayBuffer (determined by binaryType); 2. event.origin: the URL of the connection (containing only scheme, host, and port). | |
| ws.onclose = (event) => {} / ws.addEventListener("close", ...) | Connection closed event: fired after the underlying TCP connection is closed; the event type is CloseEvent: 1. event.code: close status code (integer); 2. event.reason: close reason (string); 3. event.wasClean: whether a graceful close was completed (true if the TCP connection was closed after the closing handshake completed, otherwise false); 4. Special rules: - If the close frame carries a payload, event.code/event.reason are taken from the payload; - With no payload, code is 1005 (no close code received) and reason is empty; - If no close frame is received, code is 1006 (abnormal closure) and reason is empty. | |
| ws.onerror = (event) => {} / ws.addEventListener("error", ...) | Connection error event: fired when the connection is closed due to an error; the event type is Event. | |
| Attribute | ws.binaryType (string) | Binary data type: specifies the type used to receive binary data in onmessage. The initial value is "blob" (Blob object); it can be changed to "arraybuffer" (ArrayBuffer object). |
| Read-only attribute | ws.url (string) | WebSocket connection URL: the URL passed to the constructor; the scheme is converted automatically: http/https become ws/wss respectively. |
| ws.bufferedAmount (number) | Bytes of data pending transmission: the total number of bytes of application data (text + binary) queued via send() but not yet sent to the network; - reset to 0 after the data is sent; - when the connection is closed, it only keeps increasing (is not reset). | |
| ws.protocol (string) | Negotiated subprotocol. The subprotocol accepted by the server; an empty string if protocols was not specified in the constructor. | |
| ws.extensions (string) | Negotiated extensions. The WebSocket extensions accepted by the server; empty if there are none. | |
| ws.readyState (number) | Connection state. Indicates the current WebSocket connection state; the initial value is CONNECTING. The corresponding constants are as follows: | |
| Constant | WebSocket.CONNECTING = 0 | Connecting. The handshake is in progress; the connection has not been established yet. |
| WebSocket.OPEN = 1 | Connected. The handshake succeeded; the client and server can send and receive messages in both directions. | |
| WebSocket.CLOSING = 2 | Closing. The closing handshake is in progress (close() was called or a close message was received). | |
| WebSocket.CLOSED = 3 | Closed. The underlying TCP connection is fully closed. |
WebSocket interfaces can be divided into five categories according to their functions, and the interfaces of each category cooperate with each other to form a complete communication control logic:
- Constructor (
Constructor): It is mainly used to initializeWebSocketinstances, initiate the connection handshake with the server, and serves as the starting point for establishingWebSocketcommunication. It requires passing the target URL and an optional subprotocol parameter; the URL must comply with specific format specifications, otherwise a syntax error will be triggered. - Methods (
Method): Provide the capability for active operation of connections, which mainly includes two core methods: sending data (send) and closing the connection (close). When sending data, attention should be paid to the data format and connection status; when closing the connection, a valid status code and closure reason must be specified to avoid exceptions. - Event (
Event): Used to listen for various status changes and data events of WebSocket connections, it is a core method for passively responding to connection status. It includes four core events: connection success (open), data reception (message), connection closure (close), and connection error (error). By binding event callback functions, real-time monitoring of connection status and business logic processing can be realized. - Attribute (
Attribute): Used to configure or obtain parameters related to the WebSocket connection. It mainly includes the binary data receiving type (binaryType), which can be modified according to business requirements to adapt to different binary data processing scenarios. - Read-only attribute (
Read-only attribute): Used to obtain the unmodifiable status and parameters of a WebSocket connection, such as the connection URL, the number of bytes of data to be sent, the negotiated sub-protocol, the connection status, etc. , providing a basis for development debugging and status judgment. - Constants (
Constant): They define four core states of a WebSocket connection corresponding to different communication phases. You can obtain the current state via the read-only readyState attribute to judge whether the connection is available for sending and receiving data, whether it is in the closing process, etc.
It should be noted that the use of all interfaces depends on WebSocket the current connection status (readyState). For example, the send data (send) method can only be called when the connection is in the "connected"(OPEN) state, otherwise an exception will be triggered; the behavior of closing the connection (close) also varies in different states, so the interface specification must be strictly followed.
III. Introduction to the async_websocket_client Library
3.1 Basic Concepts
This is a lightweight asynchronous WebSocket Client library designed specifically for MicroPython that implements the core functions of the WebSocket protocol (RFC 6455), supporting ws://(plaintext) and wss://(TLS encrypted) connections:
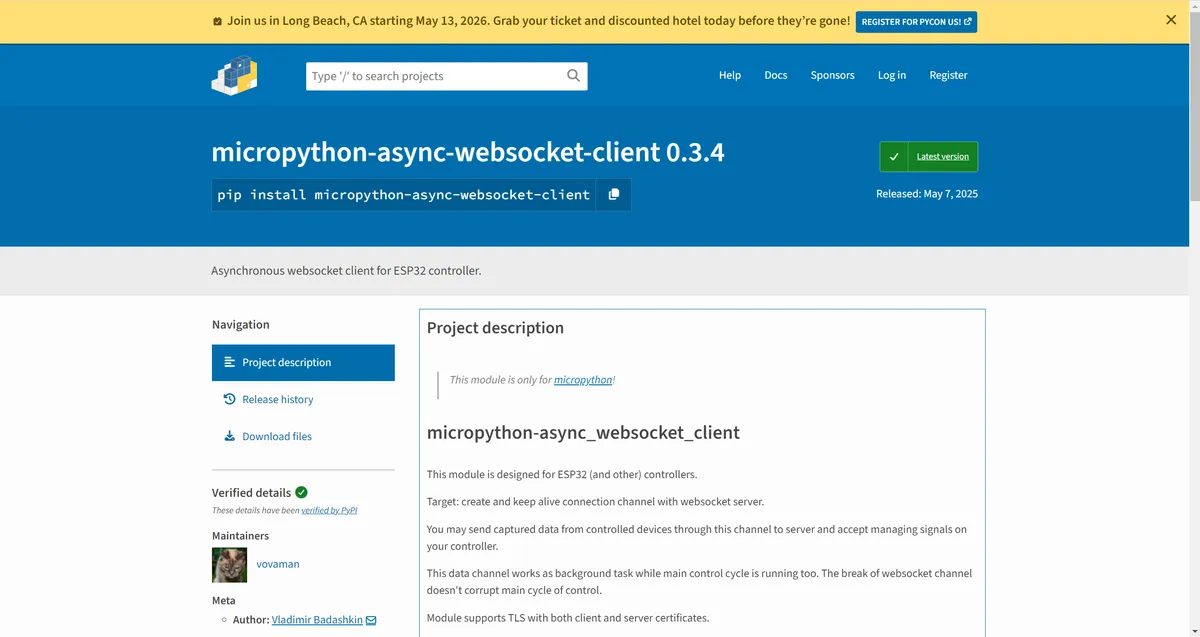
Source Code Repository: https://pypi.org/project/micropython-async-websocket-client
provides the following capabilities:
| Function | Description |
|---|---|
| Async IO support | Based on the MicroPython asyncio implementation; non-blocking communication that does not occupy the MCU main loop, and can handle multiple tasks such as TTS and sensor data at the same time |
| Dual protocol support | Supports both ws:// (default port 80) and wss:// (default port 443), with custom CA certificates and mutual authentication |
| Full frame handling | Implements the standard WebSocket frame format, supporting all types of operations: text/binary messages, PING/PONG heartbeat, close frames, etc. |
| Thread safety | Uses asyncio.Lock to protect the connection state, avoiding connection errors caused by concurrent operations from multiple coroutines |
| MicroPython optimization | Adapted to the resource limits of embedded environments: constants defined with const, non-blocking sockets, minimal memory usage |
Its core class is: AsyncWebsocketClient
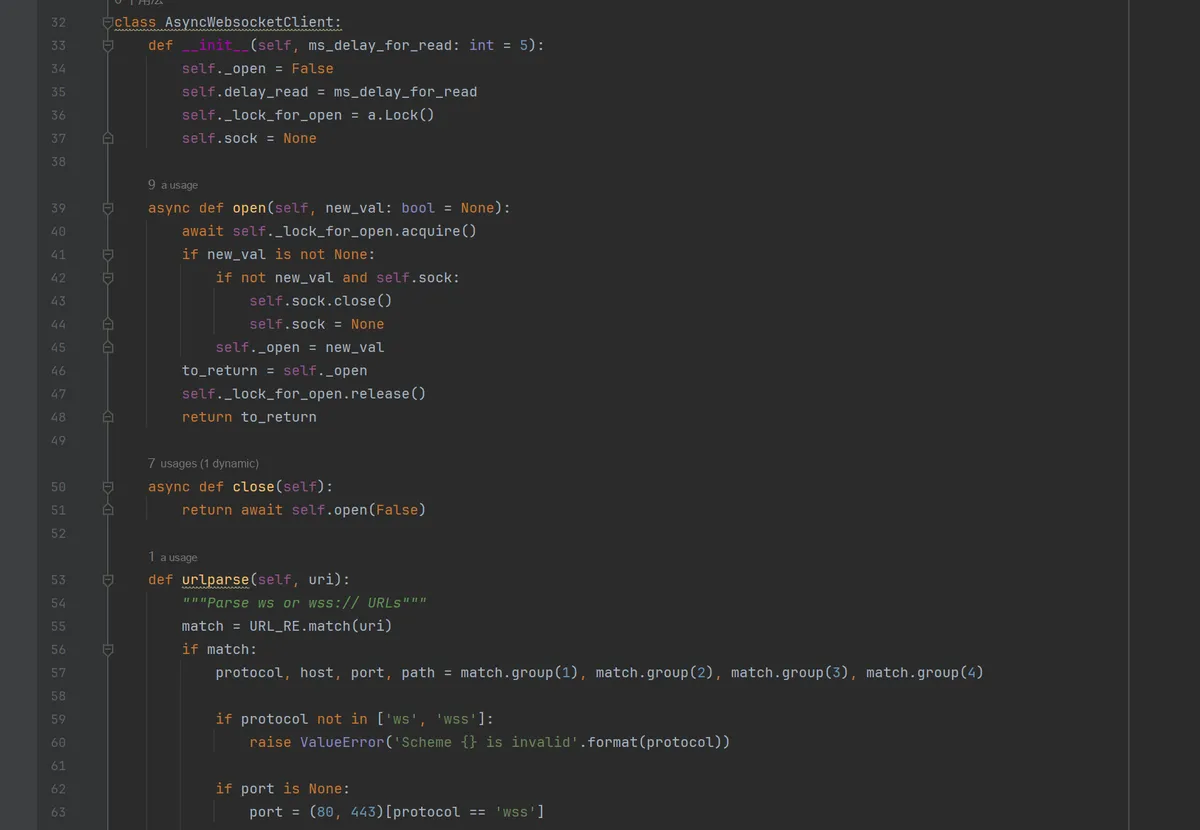
Wherein the entry parameters of the initialization method are as follows:
def __init__(self, ms_delay_for_read: int = 5)ms_delay_for_read: Polling interval (in milliseconds) for non-blocking socket reading. This value can be set smaller when the hardware performance is higher, and the default value of 5ms is adapted for most MCUs.
The core methods are as follows:
| Method | Function | Usage example |
|---|---|---|
| handshake(uri, headers=[], ...) | Establish a WebSocket connection and complete the HTTP handshake upgrade | await client.handshake("ws://example.com/ws") |
| send(buf) | Send a message (supports str/bytes, automatically distinguishes text/binary frames) | await client.send("hello world") / await client.send(b"\x01\x02") |
| recv() | Receive a message (blocking; returns str/bytes, returns None when the connection is closed) | msg = await client.recv() |
| close() | Close the connection safely | await client.close() |
| open(new_val=None) | Get/set the connection state (for internal use; close() is recommended externally) | is_connected = await client.open() |
The definitions of common constants are as follows:
- Opcode (
Opcodes):OP_TEXT(text frame),OP_BYTES(binary frame),OP_PING/OP_PONG(heartbeat),OP_CLOSE(close) - Close Code (
Close Codes):CLOSE_OK(normal closure),CLOSE_GOING_AWAY(Client disconnect),CLOSE_TOO_BIG(message too large) and others, compliant withRFC 6455standard
3.2 Quick Test
Here, we use the Raspberry Pi Pico 2W development board for testing with the help of an external website: websocket-tester
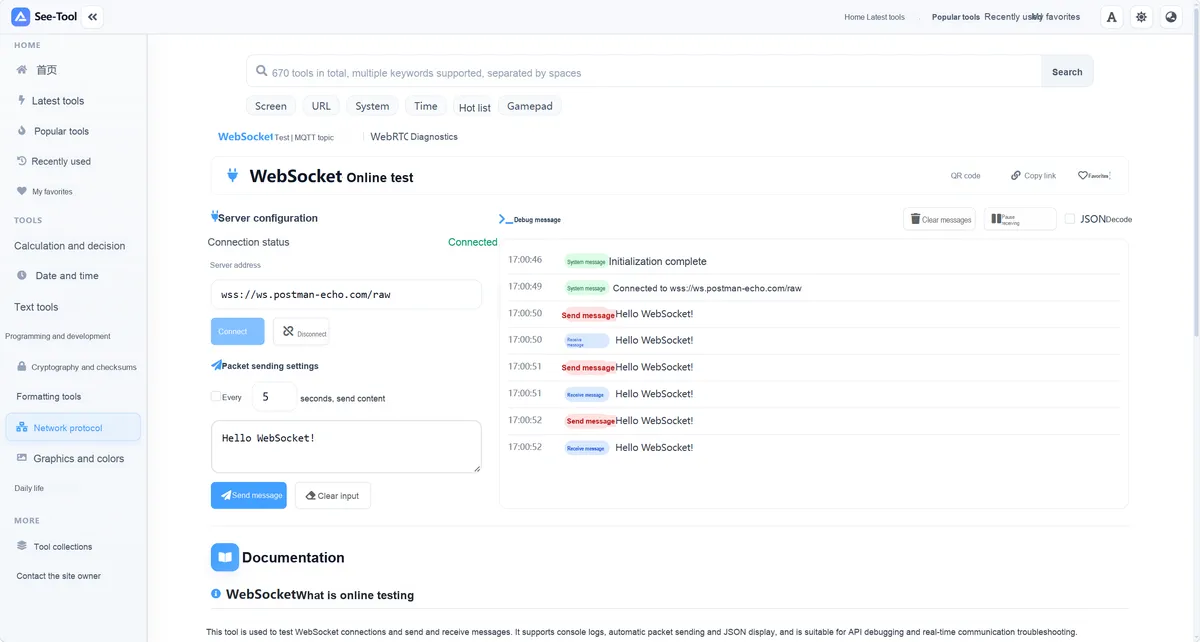
This is a tool under the "Network Protocol" category in the See-Tool toolkit WebSocket online testing tool. You can input service addresses such as wss:// ws.postman-echo.com/raw to establish a connection. It supports manual message sending or scheduled automatic packet sending, and allows you to view real-time sending/receiving logs and JSON parsing in the debugging panel on the right. It is suitable for interface joint debugging, real-time communication troubleshooting and WebSocket connectivity verification.
The address is: https://see-tool.com/websocket-tester
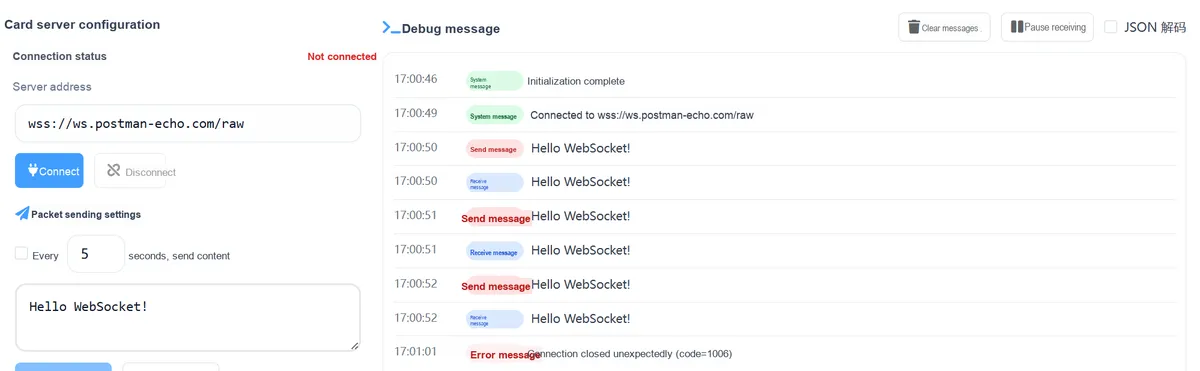
This is a standard test scenario based on Postman's official WebSocket echo server, whose core logic is that the Client sends whatever content, and the server will echo it back exactly as it is.
Here, we first search for the WebSocket library on upypi and install it:
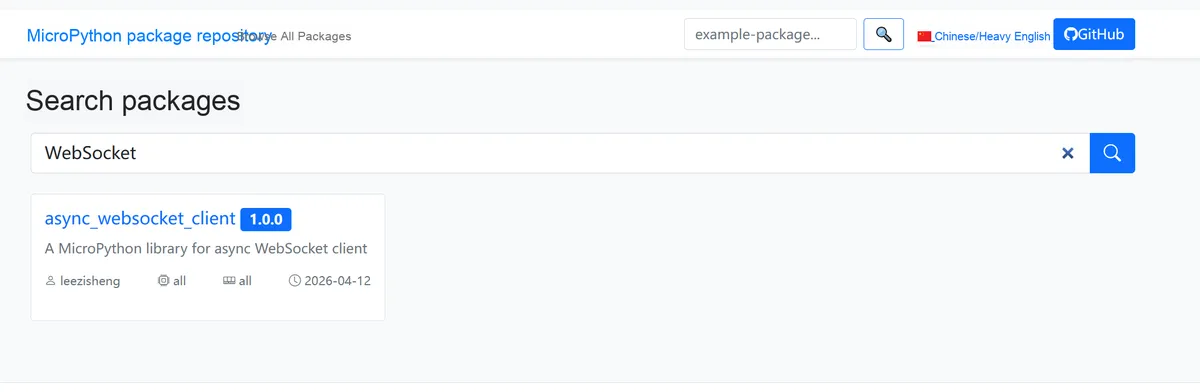
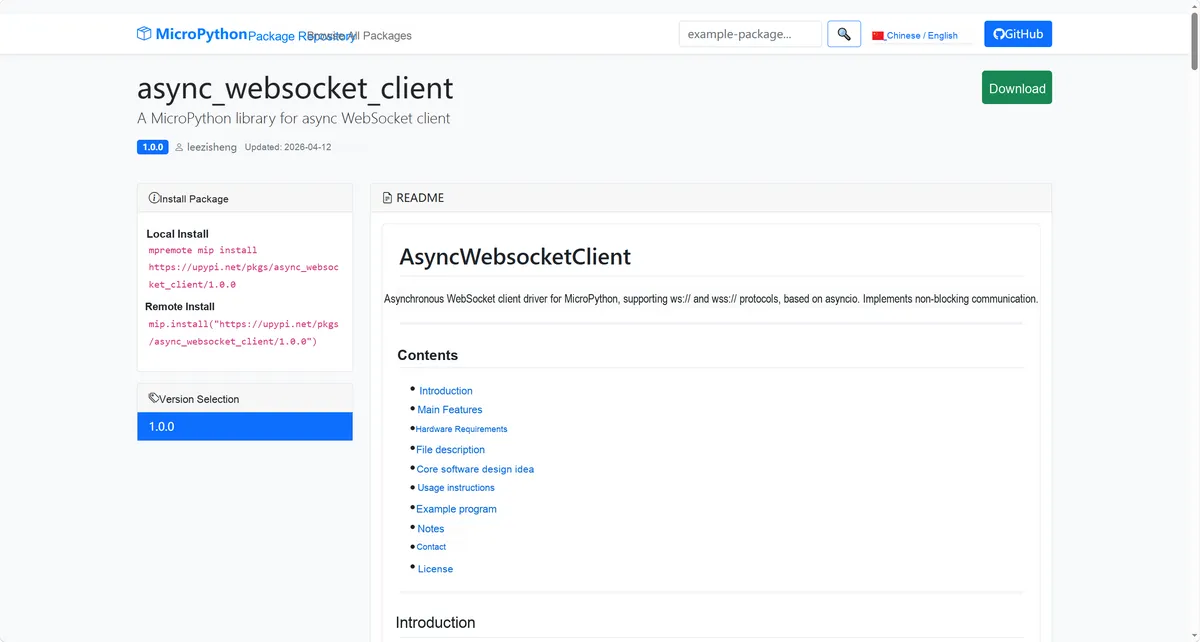
https://upypi.net/en/pkgs/async_websocket_client/1.0.0
Copy the installation command:
mpremote mip install https://upypi.net/pkgs/async_websocket_client/1.0.0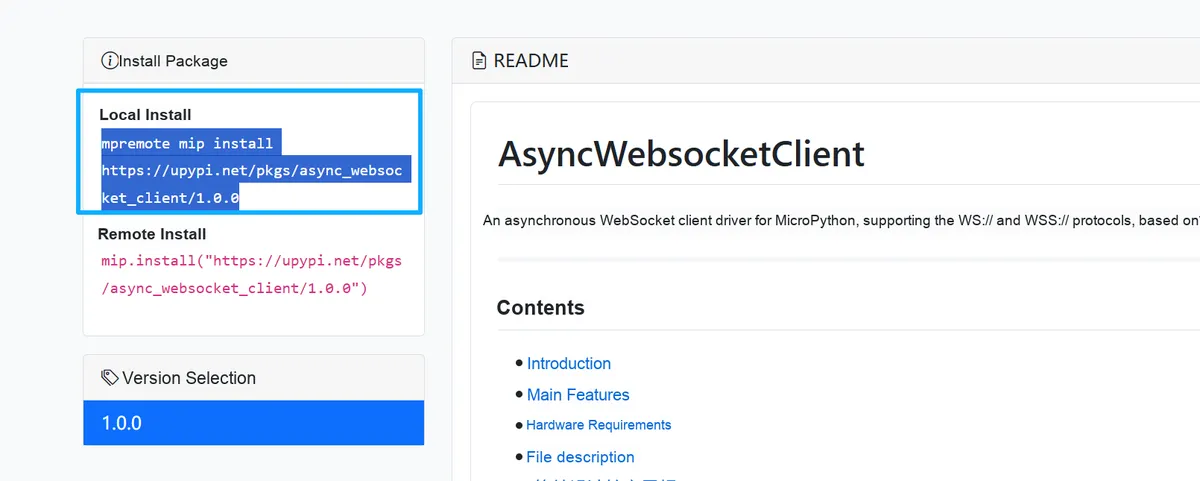

Here, we will flash the following main.py file to the Raspberry Pi Pico 2W:
# Python env   : MicroPython v1.23.0
# -*- coding: utf-8 -*-
# @Time    : 2026/04/12
# @Author  :
# @File    : main.py
# @Description : Async WebSocket client usage example for MicroPython

# ======================================== Import Modules =========================================

import network
import asyncio
import machine
import time
from async_websocketclient import AsyncWebsocketClient  # Import your WebSocket library

# ======================================== Global Variables ============================================

# Configure WiFi (replace with your WiFi info)
WIFI_SSID     = "Y/OURSPACE"
WIFI_PASSWORD = "qc123456789"

# Test server address (Postman Echo)
TEST_URL = "wss://ws.postman-echo.com/raw"

# ======================================== Functions ============================================

def connect_wifi():
    """
    Connect to WiFi and return the network object.

    Returns:
        network.WLAN: the connected WLAN object; returns None if the connection fails.

    ==========================================

    Connect to WiFi and return the network object.

    Returns:
        network.WLAN: Connected WLAN object; None if connection fails.
    """
    # Initialize WiFi in STA mode (client mode)
    wlan = network.WLAN(network.STA_IF)
    wlan.active(True)

    # Avoid reconnecting
    if not wlan.isconnected():
        print(f"Connecting to WiFi: {WIFI_SSID}")
        wlan.connect(WIFI_SSID, WIFI_PASSWORD)

        # Wait for connection (up to 10 seconds)
        timeout = 10
        while not wlan.isconnected() and timeout > 0:
            time.sleep(1)  # Replace utime.sleep with time.sleep
            timeout -= 1
            print(f"Connecting... {timeout}s remaining")

        if wlan.isconnected():
            # Print connection info (IP, subnet mask, gateway, DNS)
            ip_info = wlan.ifconfig()
            print(f"WiFi connected")
            print(f"IP: {ip_info[0]}")
            print(f"Gateway: {ip_info[2]}")
            print(f"DNS: {ip_info[3]}")
        else:
            print("WiFi connection failed")
            return None
    else:
        print("WiFi already connected")

    return wlan

async def websocket_test():
    """
    Main logic of the WebSocket test: connect, send, receive, and close in order.

    ==========================================

    Main WebSocket test logic: connect, send, receive, and close in sequence.
    """
    global ws_client

    try:
        # 1. Connect to WiFi
        if not connect_wifi():
            return

        # 2. Connect to the WebSocket server
        print("Connecting: {}".format(TEST_URL))
        await ws_client.handshake(TEST_URL)
        print("WebSocket connected (WSS)")

        # 3. Send a test message
        test_message = "Hello from Pico2W!"
        print("Sending: {}".format(test_message))
        await ws_client.send(test_message)

        # 4. Receive messages in a loop
        for count in range(5):
            print("\nWaiting for message ({})...".format(count + 1))
            response = await ws_client.recv()

            if response:
                print("Received: {}".format(response))
                # Send the next message
                next_msg = "Pico count: {}".format(count + 1)
                await ws_client.send(next_msg)
                await asyncio.sleep(1)
            else:
                print("No message received, connection may be closed")
                break

        # 5. Close the connection
        print("\nTest complete, closing connection...")
        await ws_client.close()
        print("Connection closed")

    except Exception as e:
        print("\nException: {} - {}".format(type(e).__name__, e))
        await ws_client.close()

# ======================================== Custom Classes ============================================

# ======================================== Initialization configuration ===========================================

# Initialize the WebSocket client
ws_client = AsyncWebsocketClient(ms_delay_for_read=5)

# ========================================  Main Program  ===========================================

# Run the main program
if __name__ == "__main__":
    asyncio.run(websocket_test())
Burn the code, and the running result is as follows
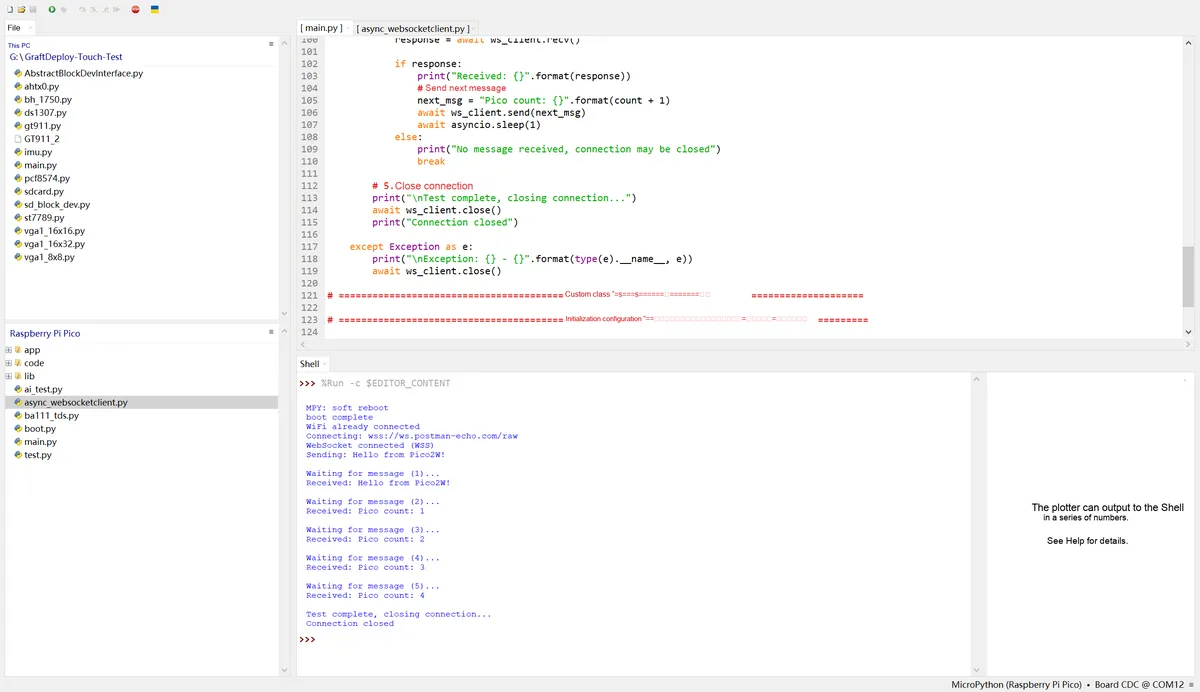
This is the test result of the asynchronous WebSocket Client library written and successfully run on the Raspberry Pi Pico2W:
The code successfully connected to wss:// ws.postman-echo.com/raw echo server, completing the whole process of WiFi connection, WebSocket handshake, text message sending and receiving. The Pico sent count messages in sequence and received the correct echo from the server, then closed the connection normally.
4. Implement TTS speech synthesis by connecting to iFlytek Development Platform via WebSocket
4.1 Introduction to Iflytek Open Platform and Acquisition of API Key
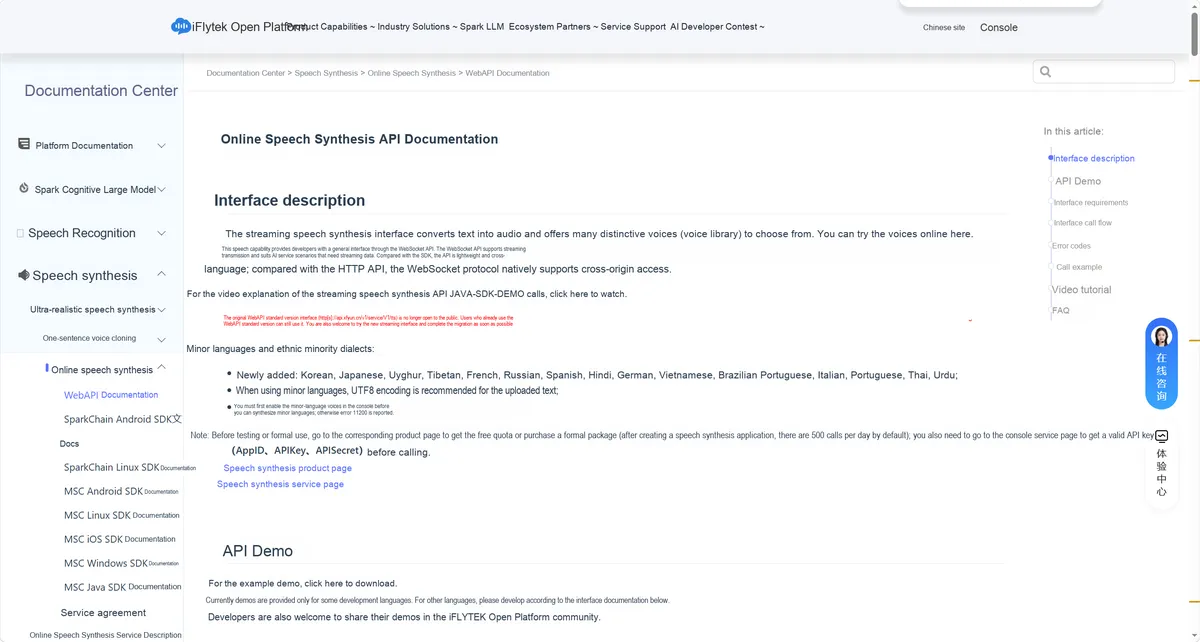
of iFLYTEK Open Platform the online Text-to-Speech (TTS) service is an AI capability that converts text information into natural and smooth human voices. It offers over 100 featured voice characters (voice libraries) for selection, supports multilingual, multi-dialect and Chinese-English mixed input, allows flexible configuration of audio parameters, and is widely applied in scenarios such as news reading, travel navigation, smart hardware, and notification broadcasting.
The core of this service provides a Websocket streaming API interface, which boasts native cross-origin advantages over traditional HTTP APIs, and features greater lightweightness and cross-language compatibility compared to SDKs, making it suitable for AI service scenarios requiring streaming data transmission; the standard version interface of the original WebAPI is no longer open to the public, stock users can continue to use it, and the platform also recommends developers to migrate to the new streaming interface.
The service additionally supports multiple minority and regional languages such as Korean, Japanese, Uyghur and Tibetan. When using the service, UTF-8 encoding shall be adopted and the corresponding speaker permission shall be enabled in the Console;Users can enjoy a free trial (with a default quota of 500 free calls per day) or purchase an official package. Before making calls, valid credentials such as AppID, APIKey, and APISecret need to be obtained from the Console. Meanwhile, the platform provides complete API documentation, cross-platform SDK Demos, and technical support, and is also equipped with derivative capabilities including one-sentence voice cloning, highly human-like speech synthesis, long-text speech synthesis, and offline speech synthesis, covering diverse speech synthesis requirements.
Click the link: https://www.xfyun.cn/services/online_tts
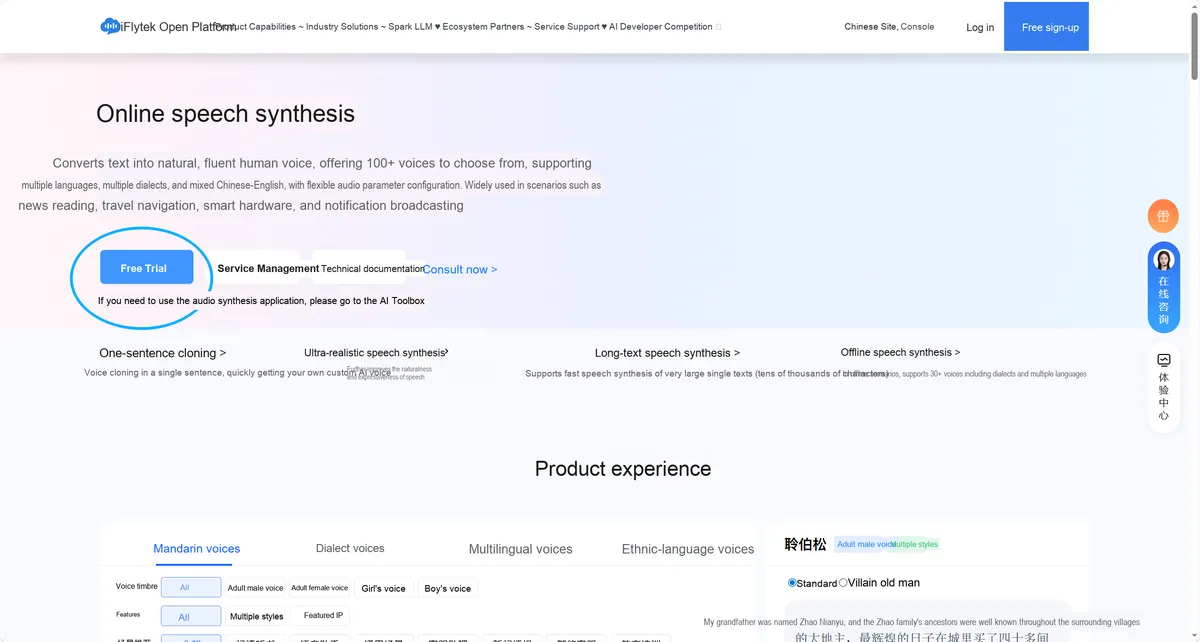
Click the selected "Free Trial" button, which is the first step to initiate service activation and obtain API permissions.
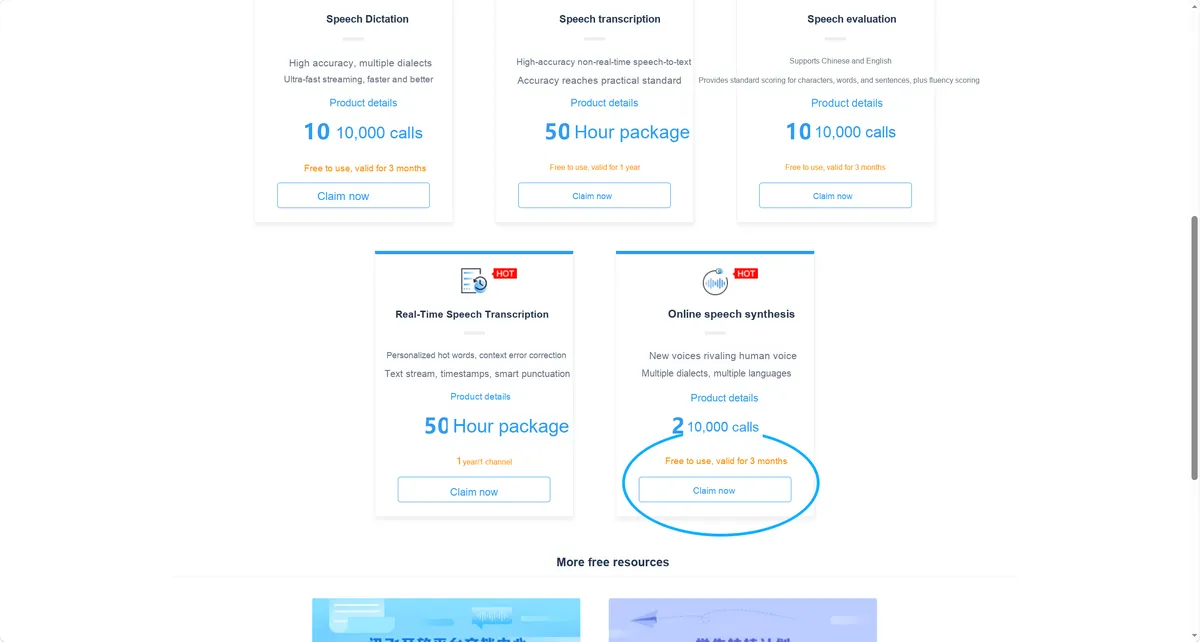
This page is the free service application page of iFLYTEK Open Platform, where new users can claim the free trial quota for online speech synthesis (20,000 interactions, valid for 3 months). Click the highlighted "Claim Now" button to complete the application for the free service, obtain the basic calling permission for this service, and get ready for subsequent application creation and key acquisition.
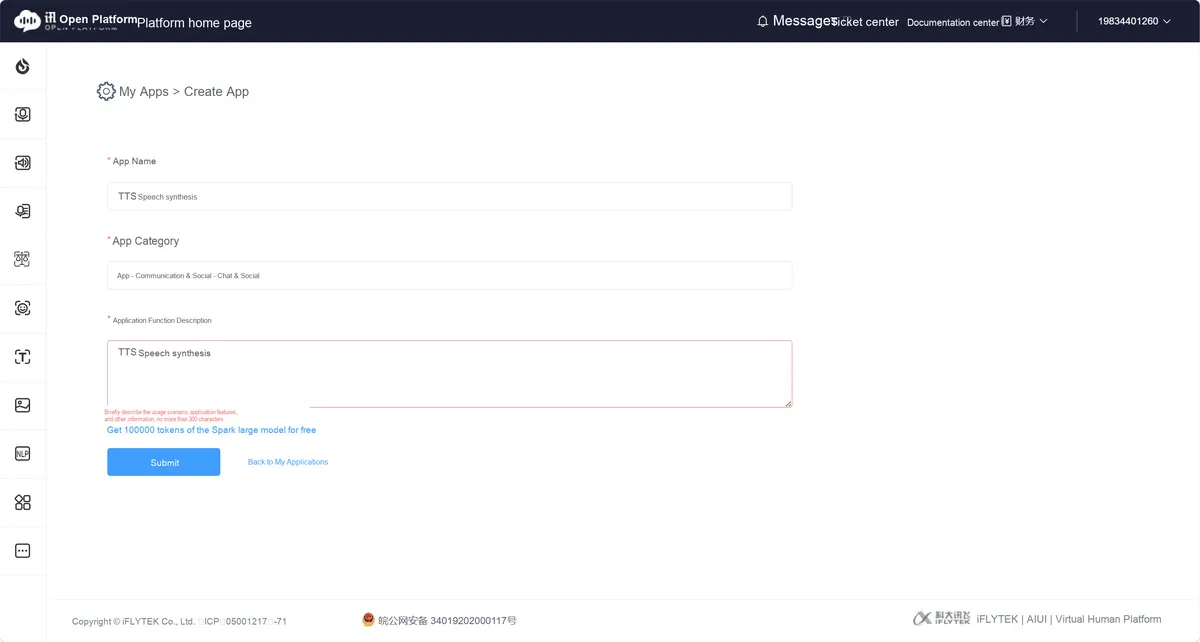
After entering the Console, you need to create a dedicated application to generate a unique API credential.
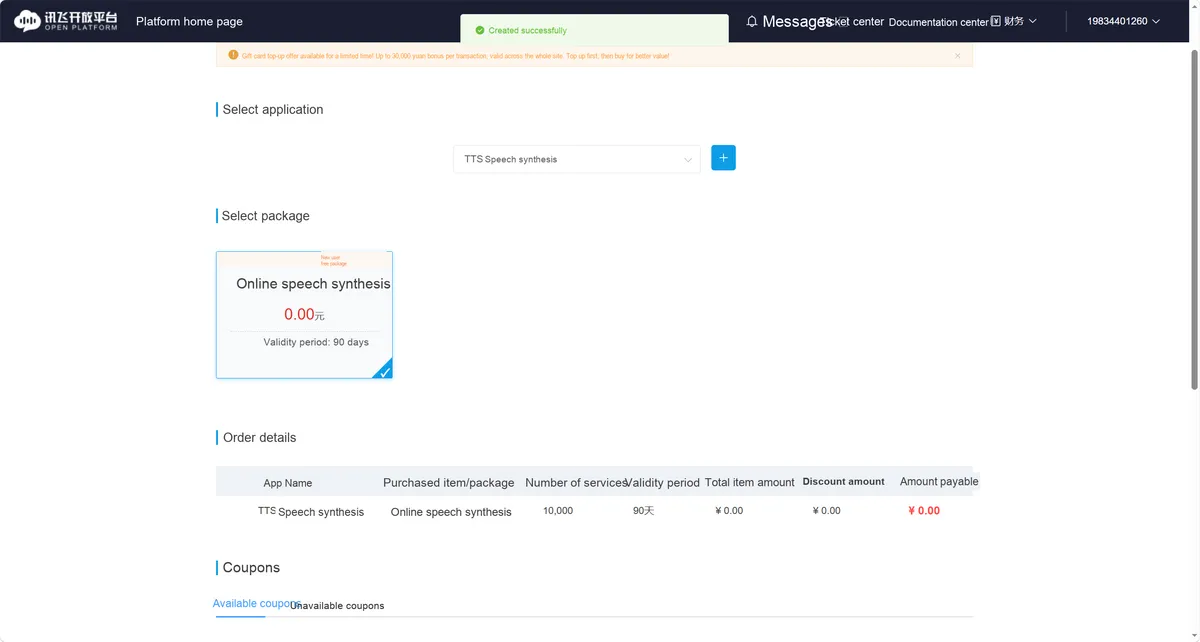
After the application is created successfully, the system will automatically match the free package for new users (online speech synthesis, CNY 0, valid for 90 days, with a service quota of 10,000 times). After confirming the package information, you can complete the service activation and officially obtain the speech synthesis API calling qualification of this application.
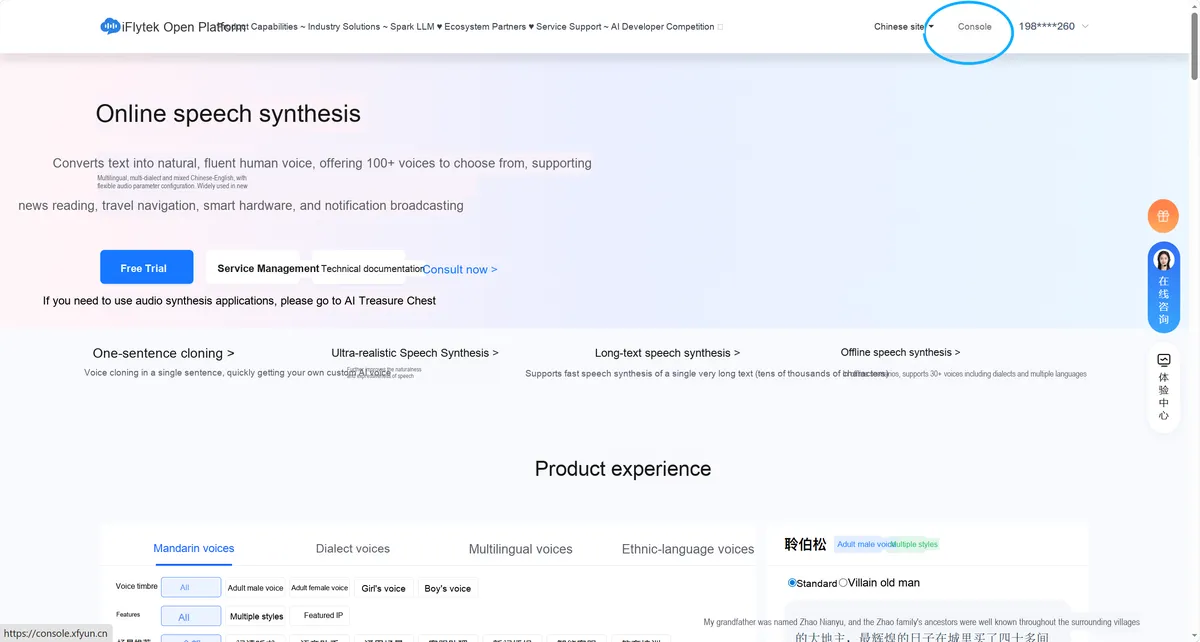
After completing the service activation, click the highlighted "Console" button in the upper right corner of the page to enter the developer backend of the iFlytek Open Platform, which serves as the core operation portal for managing all applications, checking service usage and obtaining API keys.
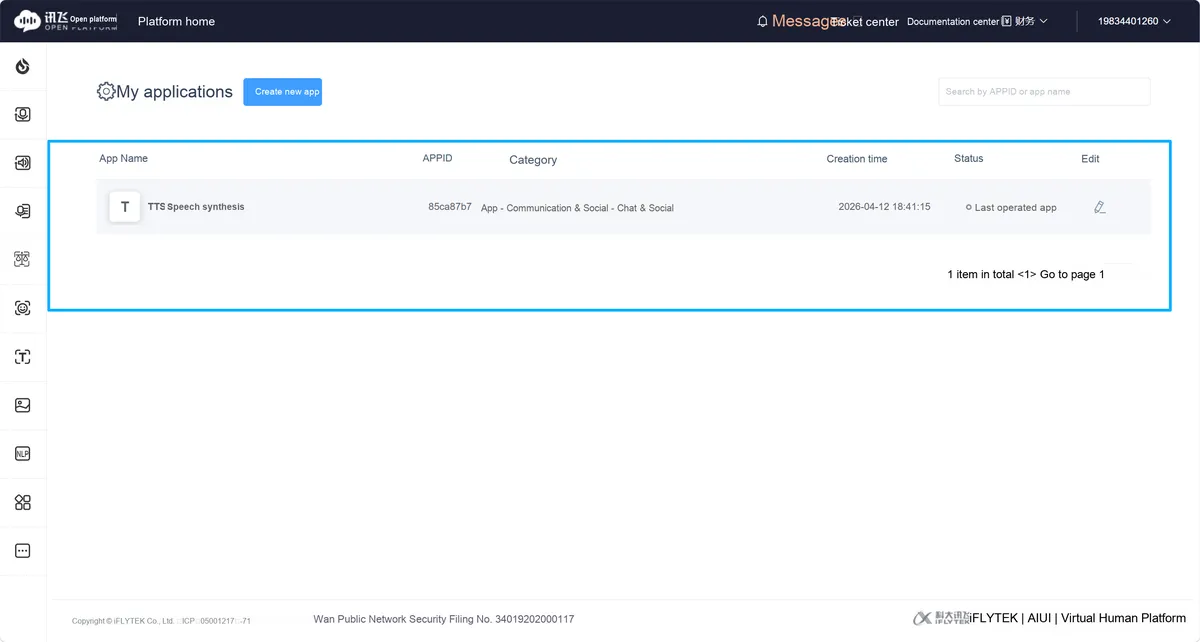
On the "My Apps" page of the Console, you can view all created apps. Click the selected "TTS Speech Synthesis" app to enter the detail page of this app and further obtain the API key information of the speech synthesis service.
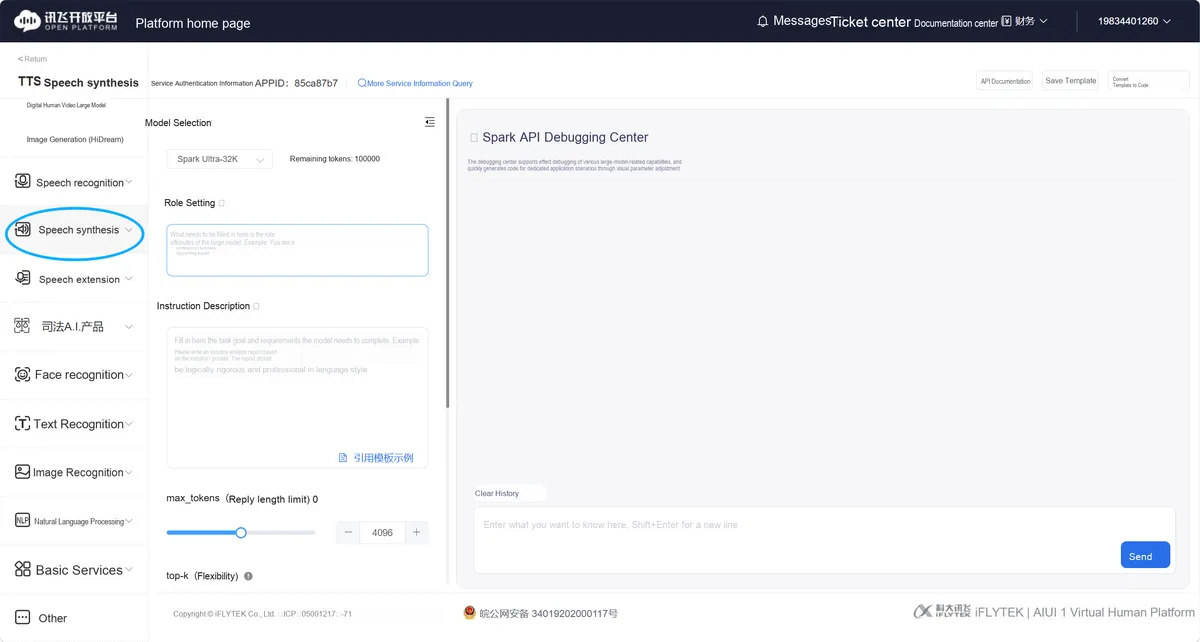
After entering the app details page, click the highlighted "Speech Synthesis" menu in the left function bar to expand the sub-options of services related to speech synthesis, then select "Online Speech Synthesis" to access the service details page and obtain the API authentication information.
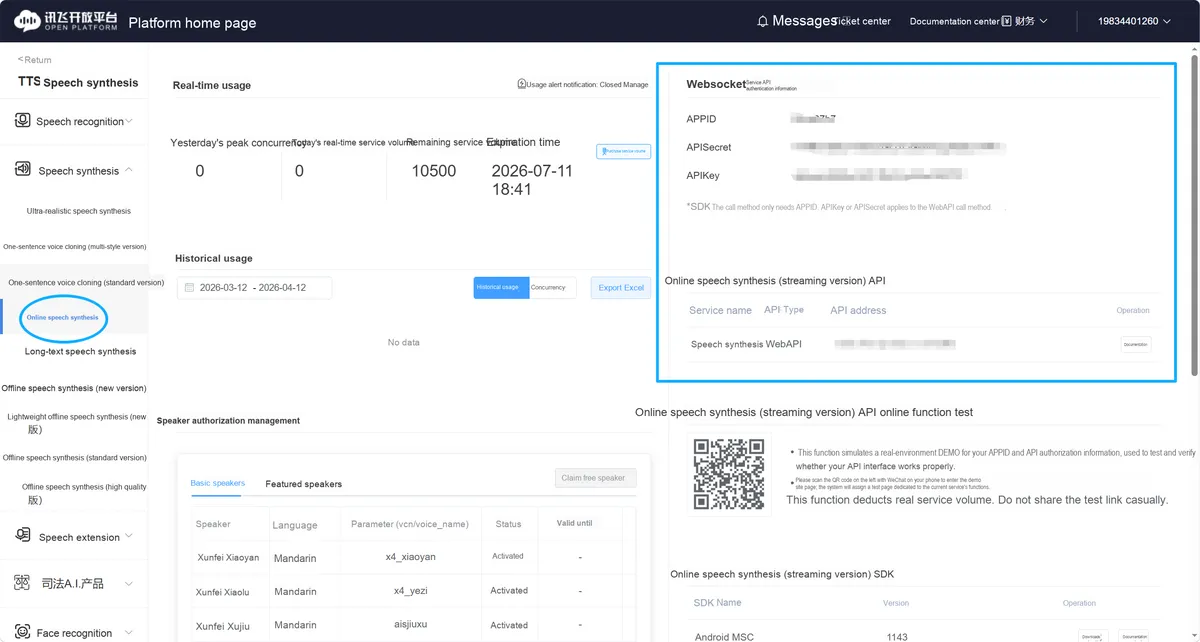
On the detail page of the online text-to-speech service, in the selected area of "Websocket Service Interface Authentication Information", you can obtain all the core credentials required for calling the API: APPID, APIKey, and APISecret. These three parameters are the mandatory keys for calling the online text-to-speech streaming API, and completing this step means you have successfully obtained the API calling permission.
4.2 Driver Library Installation
Search for upypi ( https://upypi.net/ ) for xfyun_tts:
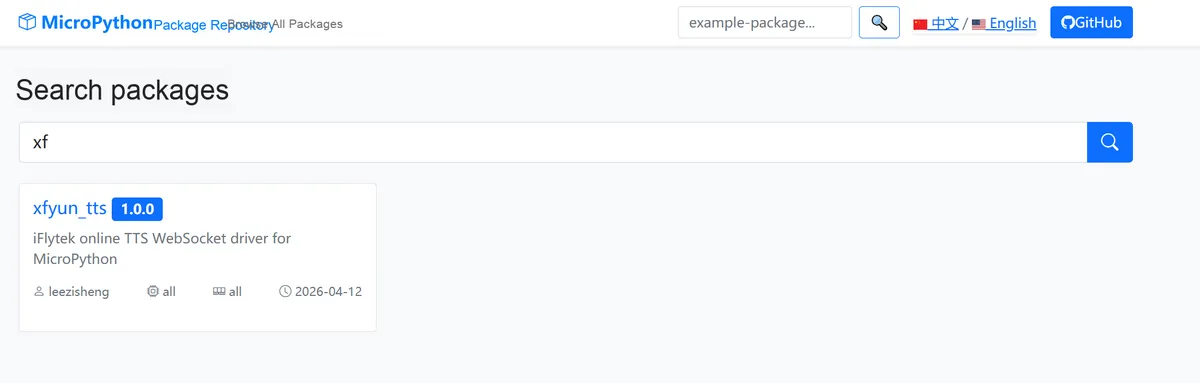
This is an iFlytek online Text-to-Speech (TTS) driver for MicroPython, which connects to the iFlytek Open Platform via WebSocket to synthesize text into PCM or WAV audio files in real time, and has been verified on the Raspberry Pi Pico 2W.
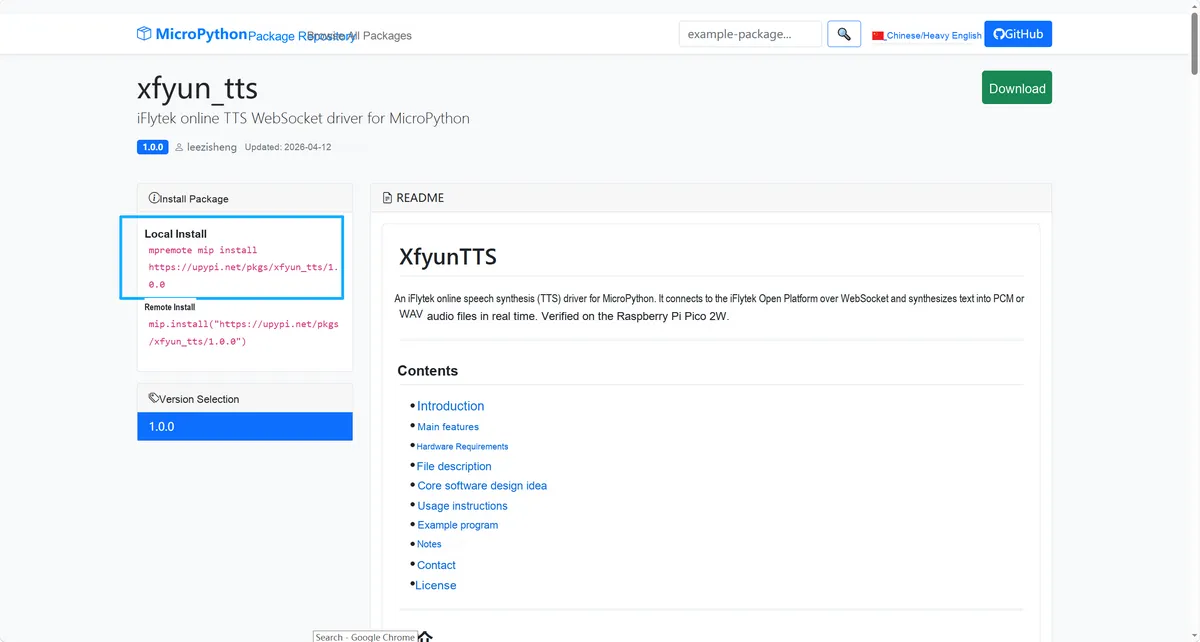
Copy the installation command:
mpremote mip install https://upypi.net/pkgs/xfyun_tts/1.0.0Enter the following in the terminal to execute:

Then complete the configuration items related to WIFI and API in the code below, and flash it into the microcontroller:
# Python env   : MicroPython v1.23.0
# -*- coding: utf-8 -*-
# @Time    : 2026/04/12
# @Author  : leeqingsui
# @File    : main.py
# @Description : iFlytek TTS usage example for MicroPython on Raspberry Pi Pico 2W
# @License : MIT

# ======================================== Import Modules =========================================

import network
import asyncio
import time
import ntptime
from xfyun_tts import XfyunTTS

# ======================================== Global Variables ============================================

WIFI_SSID     = "your_wifi_ssid"
WIFI_PASSWORD = "your_wifi_password"

APPID      = "your_appid"
API_KEY    = "your_api_key"
API_SECRET = "your_api_secret"

OUTPUT_FILE = "output.pcm"
OUTPUT_WAV  = "output.wav"

# ======================================== Functions ============================================

def connect_wifi():
    """
    Connect to WiFi and return the network object.

    Returns:
        network.WLAN: the connected WLAN object; returns None if the connection fails.

    ==========================================

    Connect to WiFi and return the network object.

    Returns:
        network.WLAN: Connected WLAN object; None if connection fails.
    """
    wlan = network.WLAN(network.STA_IF)
    wlan.active(True)

    if not wlan.isconnected():
        print("Connecting to WiFi:", WIFI_SSID)
        wlan.connect(WIFI_SSID, WIFI_PASSWORD)

        timeout = 15
        while not wlan.isconnected() and timeout > 0:
            time.sleep(1)
            timeout -= 1
            print("Connecting...", timeout, "s remaining")

        if wlan.isconnected():
            ip_info = wlan.ifconfig()
            print("WiFi connected")
            print("IP:", ip_info[0])
            print("Gateway:", ip_info[2])
        else:
            print("WiFi connection failed")
            return None
    else:
        print("WiFi already connected")

    return wlan


def sync_ntp():
    """
    Synchronize the system time via NTP to provide an accurate timestamp for Xfyun API authentication signatures.
    Try multiple NTP servers in turn; if all fail, print a warning but do not interrupt the flow.

    ==========================================

    Sync system time via NTP for iFlytek API authentication signature.
    Tries multiple NTP servers in order; prints a warning if all fail.
    """
    servers = ("ntp.aliyun.com", "ntp.tencent.com", "pool.ntp.org")
    for host in servers:
        try:
            ntptime.host = host
            ntptime.settime()
            t = time.gmtime()
            print("NTP synced via {}: {}-{:02d}-{:02d} {:02d}:{:02d}:{:02d} UTC".format(
                host, t[0], t[1], t[2], t[3], t[4], t[5]))
            return
        except Exception as e:
            print("NTP failed ({}):".format(host), e)
    print("NTP sync unavailable; signature timestamp may be rejected.")


async def run_tts(text):
    """
    Call XfyunTTS to synthesize the given text in streaming mode and write the PCM data directly to a local file.

    Args:
        text (str): The text to synthesize.

    ==========================================

    Synthesize the given text using XfyunTTS in streaming mode,
    writing PCM data directly to a local file.

    Args:
        text (str): Text to synthesize.
    """
    print("Synthesizing:", text)
    total = await tts.synthesize(text, filepath=OUTPUT_FILE)

    if total:
        print("Saved", total, "bytes ->", OUTPUT_FILE)
    else:
        print("Synthesis failed: no audio data received.")


async def run_tts_wav(text):
    """
    Call XfyunTTS to synthesize the given text in streaming mode and write the audio with a WAV header directly to a local file.
    The WAV file can be opened directly on a PC with any player, with no need to specify format parameters.

    Args:
        text (str): The text to synthesize.

    ==========================================

    Synthesize the given text using XfyunTTS in streaming mode,
    writing a WAV file (with header) directly to local storage.
    The WAV file can be opened on PC by any audio player without extra parameters.

    Args:
        text (str): Text to synthesize.
    """
    print("Synthesizing (WAV):", text)
    total = await tts.synthesize(text, filepath=OUTPUT_WAV)

    if total:
        print("Saved", total, "bytes PCM +44 bytes header ->", OUTPUT_WAV)
    else:
        print("Synthesis failed: no audio data received.")

# ======================================== Custom Classes ============================================

# ======================================== Initialization configuration ===========================================

tts = XfyunTTS(
    app_id     = APPID,
    api_key    = API_KEY,
    api_secret = API_SECRET,
)

# ========================================  Main Program  ===========================================

if __name__ == "__main__":
    time.sleep(3)
    print("--- FreakStudio iFlytek TTS Demo ---")

    if not connect_wifi():
        print("Aborting: WiFi unavailable.")
    else:
        sync_ntp()

        # Demo 1: raw PCM output
        asyncio.run(run_tts("Hello, I am Xiaozhi. Nice to meet you."))

        # Demo 2: WAV output — open output.wav directly on PC to verify
        asyncio.run(run_tts_wav("Hi there, this is a WAV format test from Pico 2W."))
Open the terminal and the display is as follows:
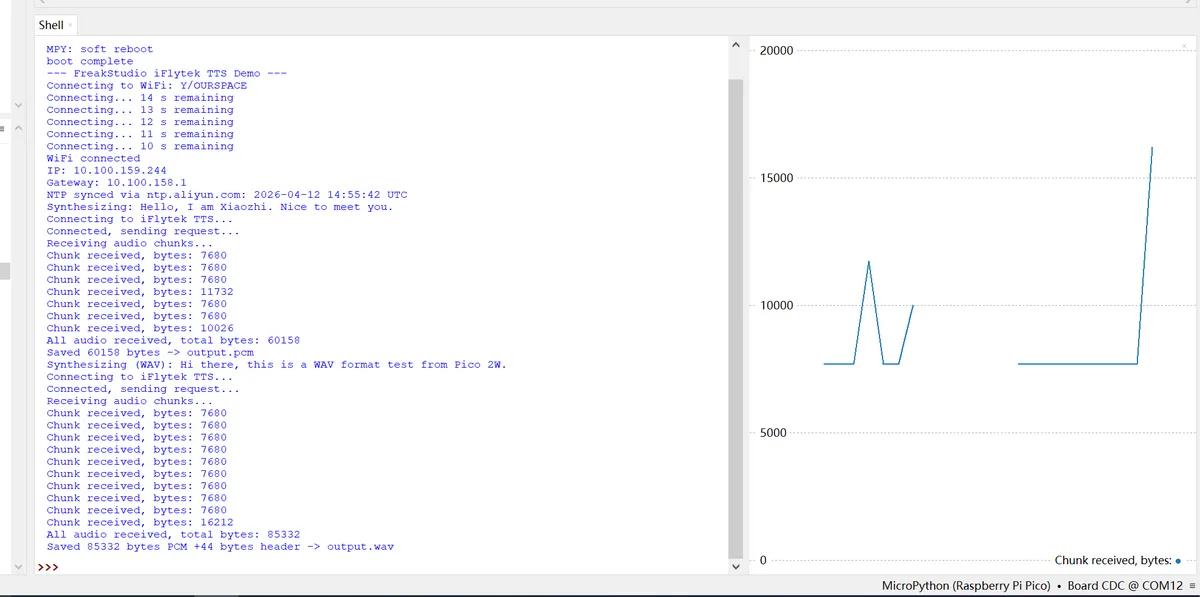
This is the complete serial log of the iFlytek TTS program running on the Raspberry Pi Pico 2W, which fully presents the end-to-end process of two speech synthesis operations:
- First synthesized text
Hello, I am Xiaozhi. Nice to meet you.. Cumulatively received 60158 bytes of audio data, saved asoutput.pcm; - Second synthesized text
Hi there, this is a WAV format test from Pico 2W., a total of 85332 bytes of data have been received, a WAV file header is added on the basis of PCM, and it is saved asoutput.wav.
The log fully verifies that the entire process functions, including WiFi connection, NTP time synchronization, TTS streaming connection, audio block reception, and file saving, are all normal.
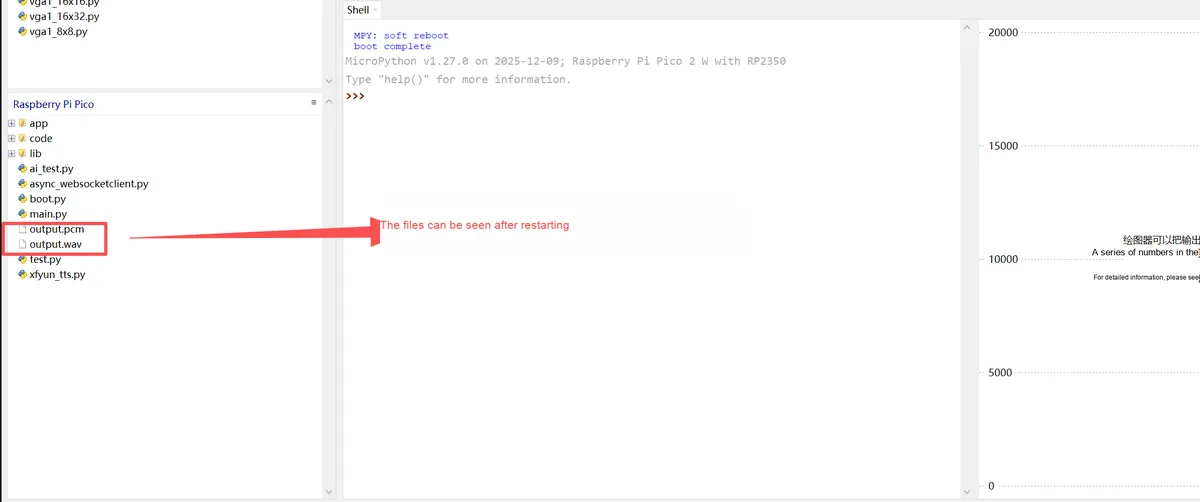
This is the file list interface of the Raspberry Pi Pico 2W after a restart, and the box-selected output.pcm and output.wav are the final audio files generated by two speech synthesis runs, which verifies that the program can still stably generate and save audio after a restart.
Wherein:
Output.pcmis the raw PCM bare data without a file header ;output.wavis a universal audio format with a standard WAV file header added, which can be played directly.
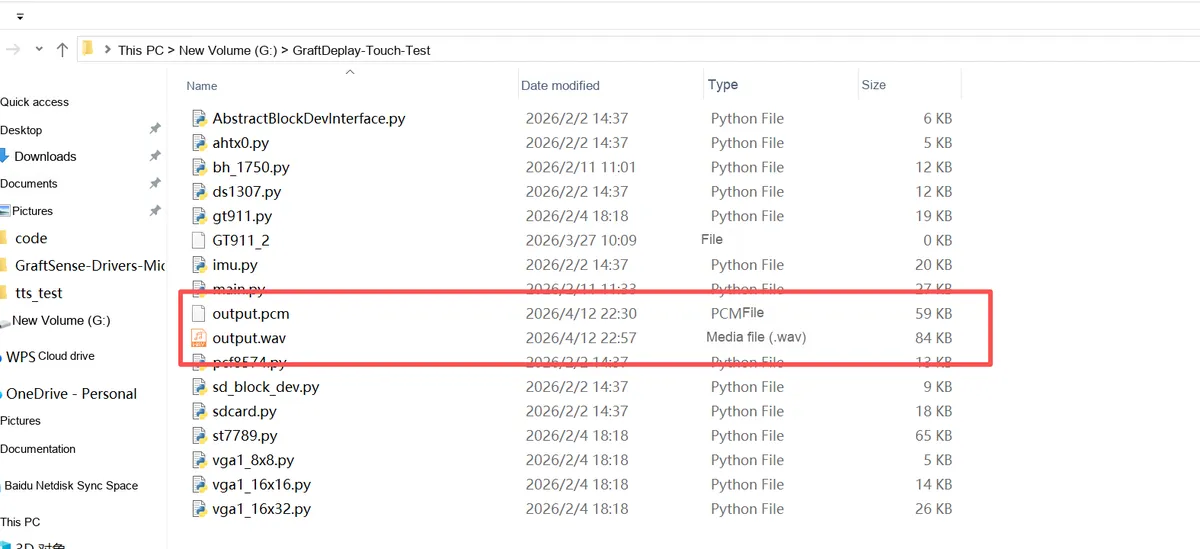
This is the file list after exporting the audio files generated by the Raspberry Pi Pico to a Windows computer. The selected output.pcm (59KB, PCM format) and output.wav (84KB, WAV format) are the final products of speech synthesis. The WAV file is slightly larger than the PCM file because it contains a 44-byte standard file header, and can be played directly on a computer with a common player, while the PCM file requires a dedicated tool to play or convert the format.
The documents are as follows:
output.wav 83 KB
output.pcm 59 KB
We can play PCM audio files on the website: https://pcm.qer.im/ :
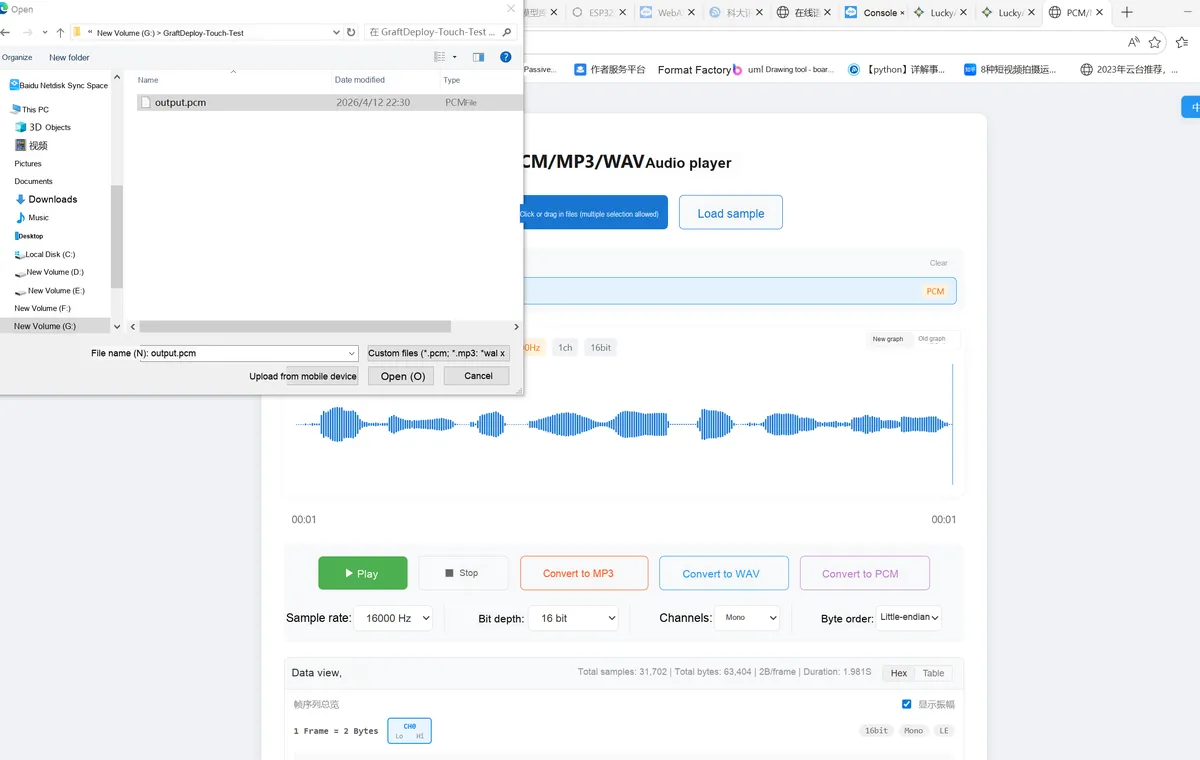
This is the file selection interface of the online PCM audio player ( https://pcm.qer.im/ ), and the selected output.pcm is the original audio file exported from Raspberry Pi. This tool solves the problem that PCM files have no file header and cannot be played directly by ordinary players; it supports direct import of PCM files and is used to verify the audio content of speech synthesis.
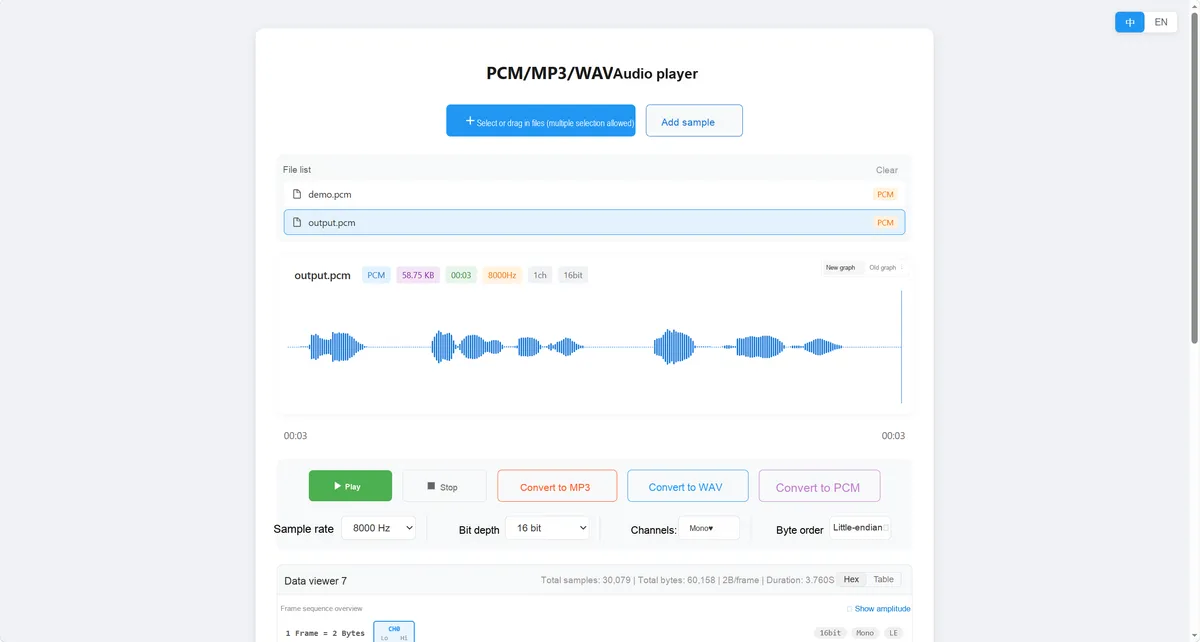
Use the online tool https://pcm.qer.im/ to import the output.pcm file exported from the Raspberry Pi, and you can directly play the original PCM audio. It also supports converting PCM to common formats such as WAV and MP3 for convenient subsequent use.
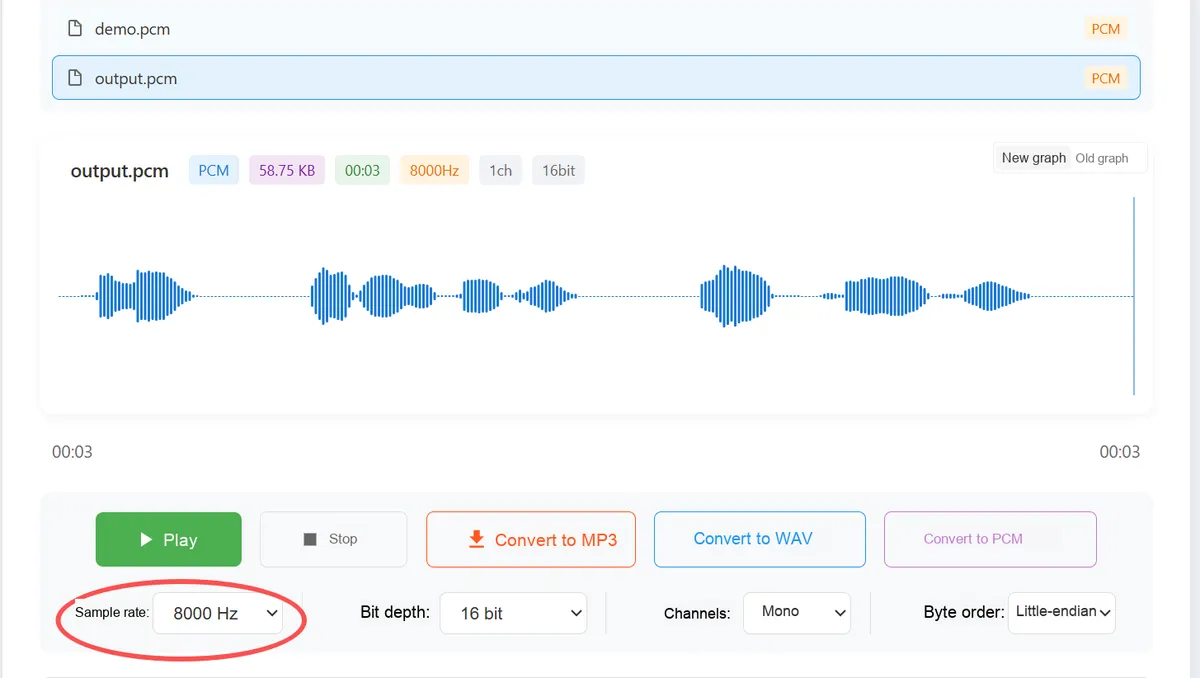
This is the parameter configuration area of the online PCM player, and the selected sampling rate: 8000 Hz is the core parameter for playing output.pcm, which must be completely consistent with the audio parameters returned by the iFLYTEK TTS API and the configuration of the Raspberry Pi program (the supporting parameters are 16-bit bit depth, mono, and little-endian order) to correctly decode and play audio, restore the content of speech synthesis, and it is the key to the normal playback of PCM files.
We can then see that all steps have been completed.
5. Implement ASR speech recognition by connecting to the Xunxinghuo speech recognition large model via WebSocket
5.1 Basic Knowledge
5.1.1 Introduction

The Spark ASR Large Model is an intelligent speech-to-text tool featuring high precision and multilingual adaptation, with core capabilities covering real-time speech transcription, long audio transcription, and multilingual and dialect recognition scenarios. The model supports accurate transcription of short audio clips up to 60 seconds, and can simultaneously recognize 37 foreign languages and 202 Chinese dialects. It can also intelligently and synchronously output numbers, punctuation, and case, balancing recognition accuracy and reading fluency; in terms of deployment, it provides Public Cloud interfaces and private deployment solutions to flexibly meet enterprise-level requirements.
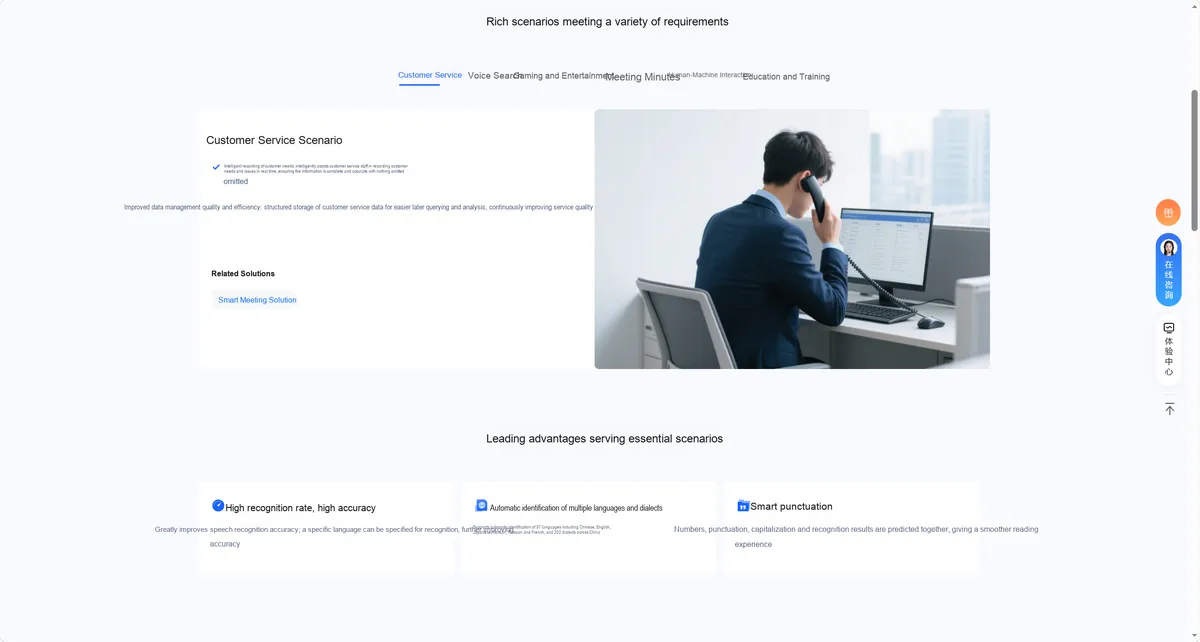
Platform Address: https://www.xfyun.cn/services/speech_big_model
5.1.2 Interface Introduction
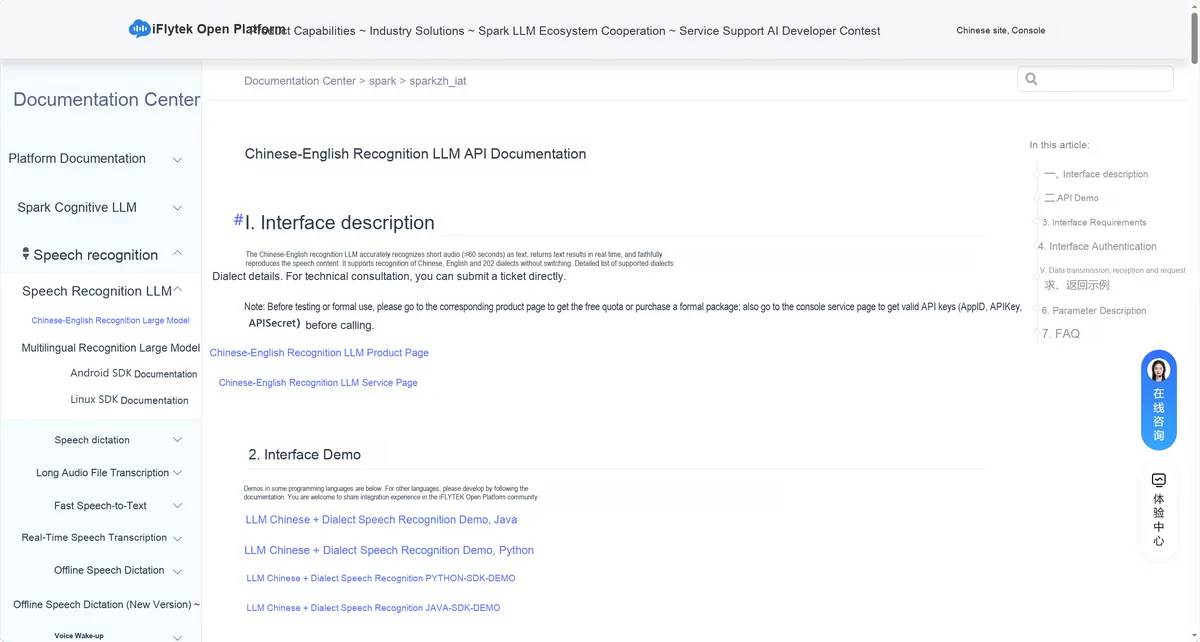
This is the Sogao Open Platform Chinese-English recognition large model API official Development Document, which serves as the core reference guide for developers to integrate this speech recognition capability:
- The document specifies that this interface can accurately transcribe short audio clips of no more than 60 seconds into text, supports real-time recognition of Chinese, English and 202 dialects without switching, and truly restores the content of the speech;
- It also fully covers the requirements of the entire interface development process: before calling, you need to obtain free credits on the product page or place an order to purchase a formal package, then go to the Console service page to obtain
AppID,APIKey,APISecretand other valid credentials before making a call; - In addition, interfaces for mainstream development languages such as Java and Python are also provided
DemoandSDKexamples, covering all development links including interface descriptions, authentication rules, parameter configuration, data transmission, and common issues, to help developers quickly integrate this speech recognition capability into their own projects.
Model Address: https://www.xfyun.cn/doc/spark/spark_zh_iat.html
5.1.3 Demo Interpretation
Here is the Python demo for large model-based Chinese + dialect speech recognition:
# -*- coding:utf-8 -*-
#
#   author: iflytek
#
#  This demo was tested in the following environment: Windows + Python3.7
#  The third-party libraries and versions installed when this demo ran successfully are listed below. You can install them one by one, or copy them into a new txt file and install them all at once with pip:
#   cffi==1.12.3
#   gevent==1.4.0
#   greenlet==0.4.15
#   pycparser==2.19
#   six==1.12.0
#   websocket==0.2.1
#   websocket-client==0.56.0
#
#  语音听写流式 WebAPI 接口调用示例 接口文档(必看):https://doc.xfyun.cn/rest_api/语音听写(流式版).html
#  Reference post for the webapi dictation service (must read): http://bbs.xfyun.cn/forum.php?mod=viewthread&tid=38947&extra=
#  How to use hotwords in the streaming speech dictation WebAPI service: after logging in to the open platform https://www.xfyun.cn/, go to Console -- My Applications --- Speech Dictation (Streaming) --- Service Management -- Personalized Hotwords,
#  Set hotwords
#  Note: Hotwords only increase the recognition weight of the words during recognition. Be aware that this improves the recognition rate of the corresponding terms, but it is not absolute; the actual effect depends on your own testing.
#  How to try dialects in the streaming speech dictation WebAPI service: after logging in to the open platform https://www.xfyun.cn/, go to Console -- My Applications --- Speech Dictation (Streaming) --- Service Management -- Recognition Language List
#  You can add languages or dialects; after adding, the parameter value of that dialect will be displayed
#  Error code link: https://www.xfyun.cn/document/error-code (must read when code returns an error code)
# # # # # # # # # # # # # # # # # # # # # # # # # # # # # # # # # # # # # # # # # # # # # # # # # # # # # # # # # # # #
import _thread as thread
import time
from time import mktime

import websocket

import base64
import datetime
import hashlib
import hmac
import json
import ssl
from datetime import datetime
from urllib.parse import urlencode
from wsgiref.handlers import format_date_time

STATUS_FIRST_FRAME = 0  # Identifier of the first frame
STATUS_CONTINUE_FRAME = 1  # Identifier of the middle frames
STATUS_LAST_FRAME = 2  # Identifier of the last frame


class Ws_Param(object):
    # Initialization
    def __init__(self, APPID, APIKey, APISecret, AudioFile):
        self.APPID = APPID
        self.APIKey = APIKey
        self.APISecret = APISecret
        self.AudioFile = AudioFile
        self.iat_params = {
            "domain": "slm", "language": "zh_cn", "accent": "mandarin","dwa":"wpgs", "result":
                {
                    "encoding": "utf8",
                    "compress": "raw",
                    "format": "plain"
                }
        }

    # Generate the url
    def create_url(self):
        url = 'ws://iat.xf-yun.com/v1'
        # Generate a timestamp in RFC1123 format
        now = datetime.now()
        date = format_date_time(mktime(now.timetuple()))

        # Concatenate the strings
        signature_origin = "host: " + "iat.xf-yun.com" + "\n"
        signature_origin += "date: " + date + "\n"
        signature_origin += "GET " + "/v1 " + "HTTP/1.1"
        # Encrypt with hmac-sha256
        signature_sha = hmac.new(self.APISecret.encode('utf-8'), signature_origin.encode('utf-8'),
                                 digestmod=hashlib.sha256).digest()
        signature_sha = base64.b64encode(signature_sha).decode(encoding='utf-8')

        authorization_origin = "api_key=\"%s\", algorithm=\"%s\", headers=\"%s\", signature=\"%s\"" % (
            self.APIKey, "hmac-sha256", "host date request-line", signature_sha)
        authorization = base64.b64encode(authorization_origin.encode('utf-8')).decode(encoding='utf-8')
        # Combine the request's authentication parameters into a dictionary
        v = {
            "authorization": authorization,
            "date": date,
            "host": "iat.xf-yun.com"
        }
        # Concatenate the authentication parameters to generate the url
        url = url + '?' + urlencode(v)
        # print("date: ",date)
        # print("v: ",v)
        # This prints the url used when establishing the connection. When referring to this demo, you can uncomment the print above to compare whether the url generated with the same parameters matches the one generated by your own code
        # print('websocket url :', url)
        return url


# Handle a received websocket message
def on_message(ws, message):
    message = json.loads(message)
    code = message["header"]["code"]
    status = message["header"]["status"]
    if code != 0:
        print(f"请求错误:{code}")
        ws.close()
    else:
        payload = message.get("payload")
        if payload:
            text = payload["result"]["text"]
            text = json.loads(str(base64.b64decode(text), "utf8"))
            text_ws = text['ws']
            result = ''
            for i in text_ws:
                for j in i["cw"]:
                    w = j["w"]
                    result += w
            print(result)
        if status == 2:
            ws.close()


# Handle a websocket error
def on_error(ws, error):
    print("### error:", error)


# Handle websocket close
def on_close(ws, close_status_code, close_msg):
    print("### closed ###")


# Handle websocket connection established
def on_open(ws):
    def run(*args):
        frameSize = 1280  # Audio size of each frame
        intervel = 0.04  # Interval between audio sends (unit: s)
        status = STATUS_FIRST_FRAME  # Audio status info, indicating whether the audio is the first frame, a middle frame, or the last frame

        with open(wsParam.AudioFile, "rb") as fp:
            while True:

                buf = fp.read(frameSize)
                audio = str(base64.b64encode(buf), 'utf-8')

                # End of file
                if not buf:
                    status = STATUS_LAST_FRAME
                # Handle the first frame
                if status == STATUS_FIRST_FRAME:

                    d = {"header":
                        {
                            "status": 0,
                            "app_id": wsParam.APPID
                        },
                        "parameter": {
                            "iat": wsParam.iat_params
                        },
                        "payload": {
                            "audio":
                                {
                                    "audio": audio, "sample_rate": 16000, "encoding": "raw"
                                }
                        }}
                    d = json.dumps(d)
                    ws.send(d)
                    status = STATUS_CONTINUE_FRAME
                # Handle a middle frame
                elif status == STATUS_CONTINUE_FRAME:
                    d = {"header": {"status": 1,
                                    "app_id": wsParam.APPID},
                         "parameter": {
                             "iat": wsParam.iat_params
                         },
                         "payload": {
                             "audio":
                                 {
                                     "audio": audio, "sample_rate": 16000, "encoding": "raw"
                                 }}}
                    ws.send(json.dumps(d))
                # Handle the last frame
                elif status == STATUS_LAST_FRAME:
                    d = {"header": {"status": 2,
                                    "app_id": wsParam.APPID
                                    },
                         "parameter": {
                             "iat": wsParam.iat_params
                         },
                         "payload": {
                             "audio":
                                 {
                                     "audio": audio, "sample_rate": 16000, "encoding": "raw"
                                 }}}
                    ws.send(json.dumps(d))
                    break

                # Simulate the audio sampling interval
                time.sleep(intervel)


    thread.start_new_thread(run, ())


if __name__ == "__main__":
    # Fill in the relevant information correctly here when testing and it can run

    wsParam = Ws_Param(APPID='', APISecret='',
                       APIKey='',
                       AudioFile=r'')
    websocket.enableTrace(False)
    wsUrl = wsParam.create_url()
    ws = websocket.WebSocketApp(wsUrl, on_message=on_message, on_error=on_error, on_close=on_close)
    ws.on_open = on_open
    ws.run_forever(sslopt={"cert_reqs": ssl.CERT_NONE})
The Python integration process of iFLYTEK Spark Speech Transcription Streaming API can be summarized as follows:
- First, prepare the Python 3.7 runtime environment and install the third-party dependency libraries of the versions specified in the code; then obtain the APPID, APIKey and APISecret keys from the iFlytek Open Platform, and get the audio file to be recognized ready;
- Then, authentication and encryption are completed via the key to generate the WebSocket connection URL;
- Then create a WebSocket Client and establish a connection with the server. After the connection is successful, frame the audio file according to a fixed frame size, and stream the audio data in the format of the first frame, intermediate frames and the last frame;
- Finally, receive and parse the recognition result returned by the server, extract and output the text content, and automatically close the connection after the recognition is completed.
During the process, you can refer to the official error codes for troubleshooting, and you can also configure hotwords, languages and dialects on the platform.
5.1.4 Interface Requirements
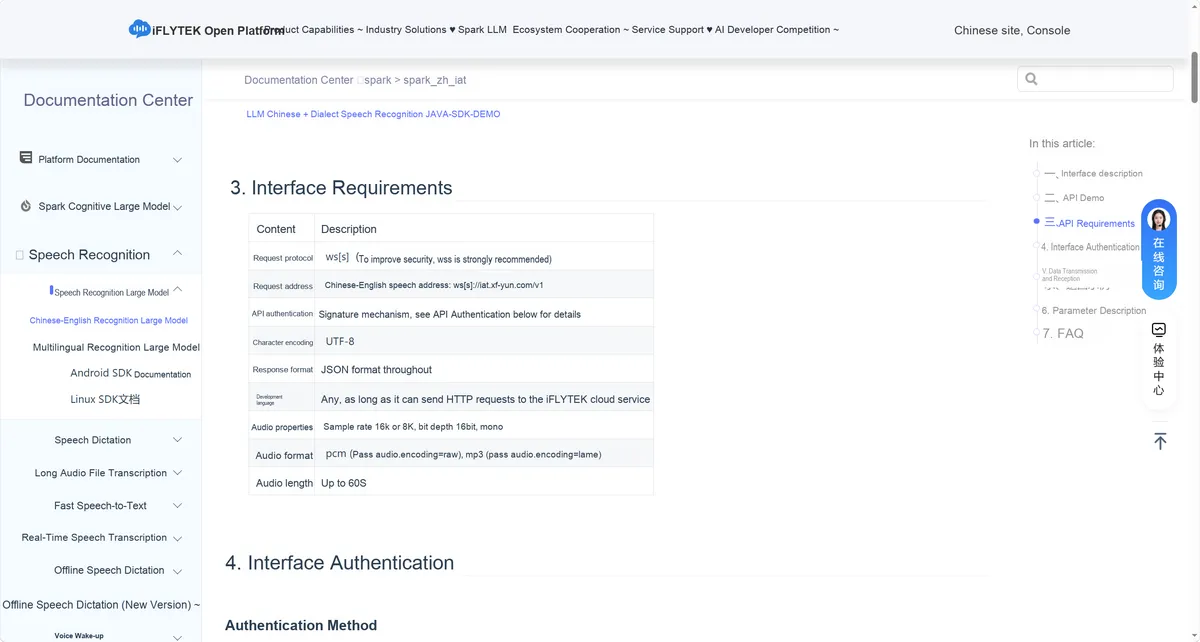
This section mainly describes the requirements for API interfaces, including:
- Basic Protocol and Call Address:
- Supported request protocols:
ws(WebSocket)/wss(encrypted WebSocket). It is highly recommended to use wss for enhanced security. - Request URL:
ws[s]://iat.xf-yun.com/v1(Exclusive interface for Chinese-English speech recognition)
- Supported request protocols:
- General Specifications and Authentication Requirements:
- Interface Authentication: A signature authentication mechanism is adopted, and authentication information must be generated in accordance with official rules before calling.
- Character Encoding: Uniformly use
UTF-8encoding - Response Format: The results returned by the server are uniformly in
JSONformat - Development Language: No restrictions. Any language capable of sending HTTP requests to the Xunfei Xinghuo service can be used for development.
- Audio Parameter Requirements:
- Audio properties: supported sampling rates are 16kHz or 8kHz, bit depth is 16bit, and audio is mono
- Audio formats: supported
PCM(parameter required:audio.encoding= raw),MP3(parameter required:audio.encoding= lame) - Audio duration: A single audio segment to be recognized shall not exceed 60 seconds at maximum
5.1.4.1 Interface Authentication
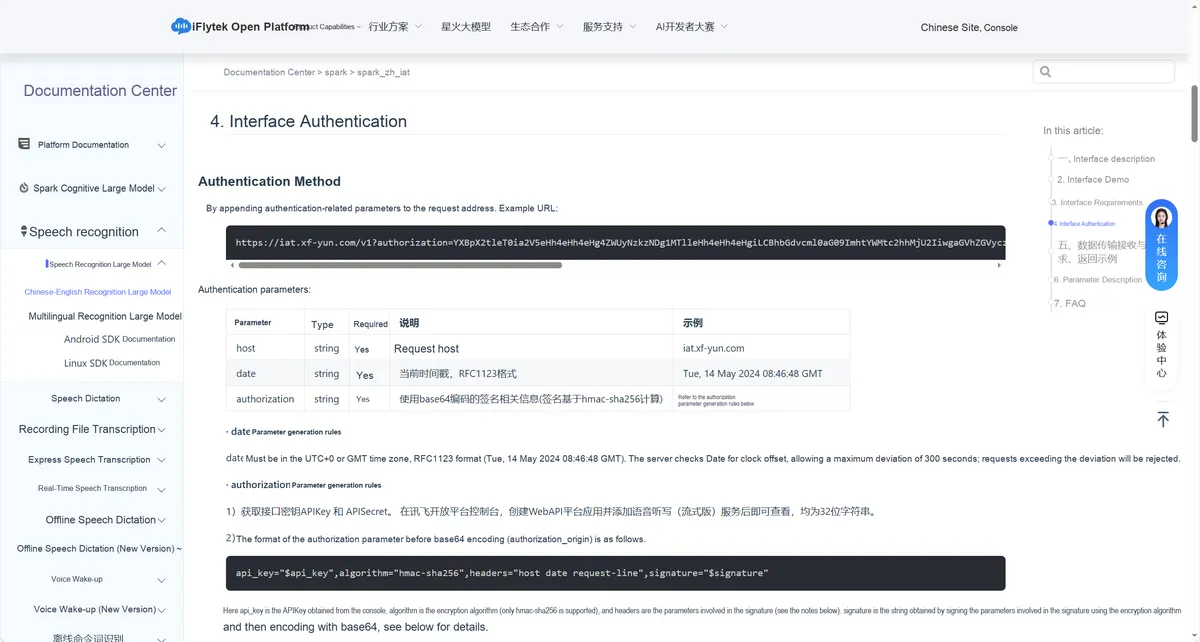
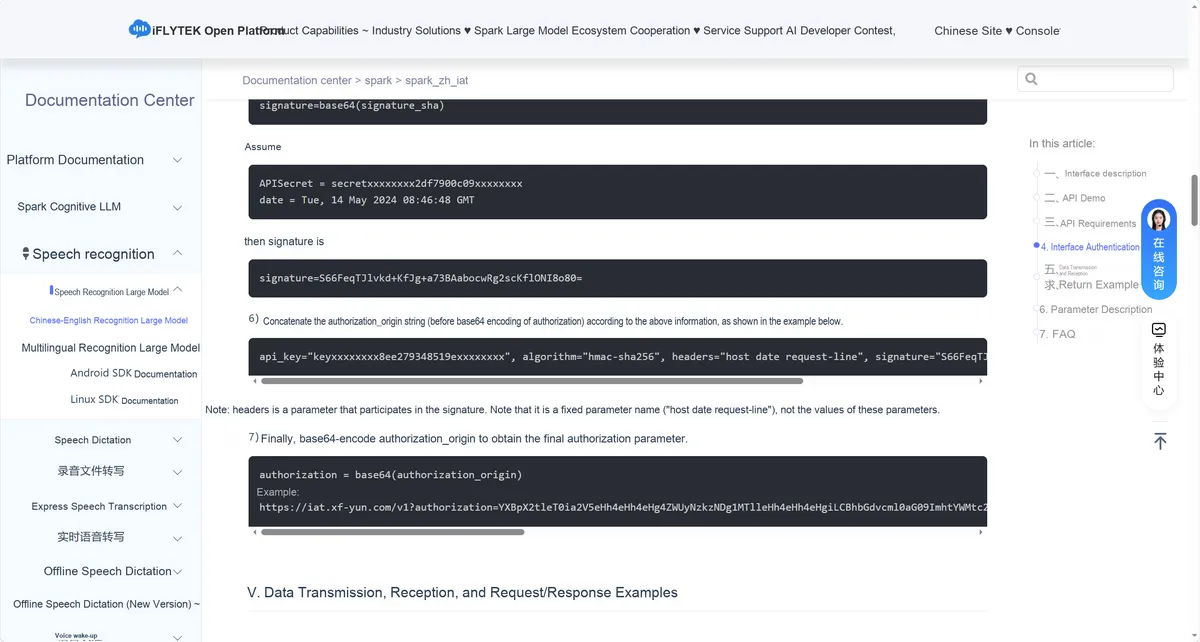
This interface adopts the URL parameter authentication mechanism, which serves as a prerequisite security check for service invocation: by appending 3 mandatory authentication parameters to the WebSocket request address, it implements triple security protection of "identity verification + tamper resistance + replay protection", and only legally authorized users can successfully invoke the interface.
Description of Required Authentication Parameters:
| Parameter name | Type | Required | Core description | Constraints / example |
|---|---|---|---|---|
| host | string | Yes | Request host | Fixed as iat.xf-yun.com |
| date | string | Yes | Timestamp | Must be in the UTC+0/GMT time zone, following the RFC1123 format (example: Tue, 14 May 2024 08:46:48 GMT); the server allows a maximum time deviation of 300 seconds (5 minutes), and requests exceeding it are rejected directly |
| authorization | string | Yes | Signature information | A signature string computed with the hmac-sha256 algorithm and then Base64-encoded; the core of authentication |
authorization The complete parameter generation steps are as follows:
In the iFLYTEK Open Platform Console, complete the following operations to obtain 2 32-bit core keys:
- Create a WebAPI platform application
- Activate the "Speech Dictation (Streaming Version)" service
- View and save:
APIKey(identity identifier),APISecret(signature key, must be kept strictly confidential)
Generate compliance date parameters:
- Format requirement: Strictly comply with the RFC1123 standard, and the time zone must be UTC+ 0/GMT
- Validation Rule: The server will check the deviation between the local time and the server time, and intercept timeout requests directly. Please ensure that the local time is synchronized.
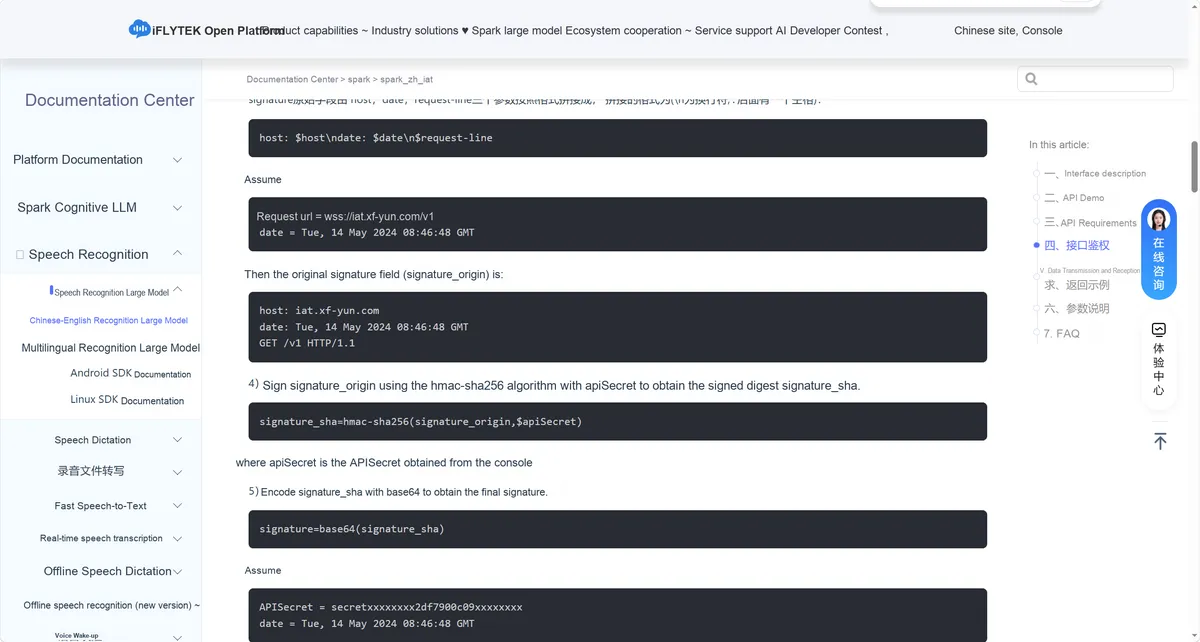
Construct the signature original field (signature_origin): Concatenate 3 parameters according to fixed rules (\n is the newline character, and there must be 1 space retained after:):
host: $host\n
date: $date\n
$request-line
Field Description:
$host: fixed toiat.xf-yun.com$date: RFC1123 format time generated in Step 2$request-line: Fixed asGET /v1 HTTP/1.1(corresponding to the interface request path)
Example:
host: iat.xf-yun.com
date: Tue, 14 May 2024 08:46:48 GMT
GET /v1 HTTP/1.1
Next, use the hmac-sha256 encryption algorithm to perform encrypted signing on APISecret as the key, for signature_origin:
signature_sha = hmac-sha256(signature_origin, $apiSecret)Perform signature_sha Base64 encoding to obtain a signature string that can be used for concatenation.
Concatenate in the fixed format (note that quotation marks and spaces must not be missing or incorrect, headers is a fixed parameter name and cannot be modified):
api_key="$api_key", algorithm="hmac-sha256", headers="host date request-line", signature="$signature"- Key Note:
headerstakes a fixed string"host date request-line", which only indicates the parameter names involved in signing, not the actual values of the parameters.
Perform authorization_origin Base64 encoding to obtain the final authorization parameter that can be spliced into the URL
The final request format is (it is recommended to use the wss encryption protocol to improve security):
ws[s]://iat.xf-yun.com/v1?authorization={authorization}&date={date}&host={host}5.1.4.2 Data Transmission Example
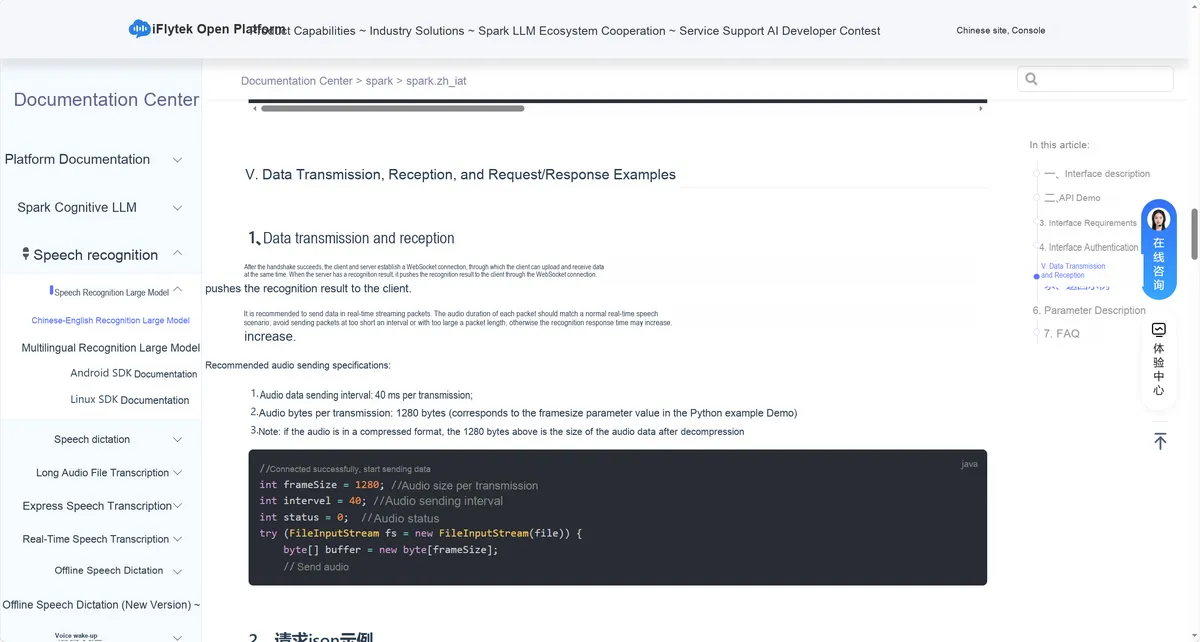
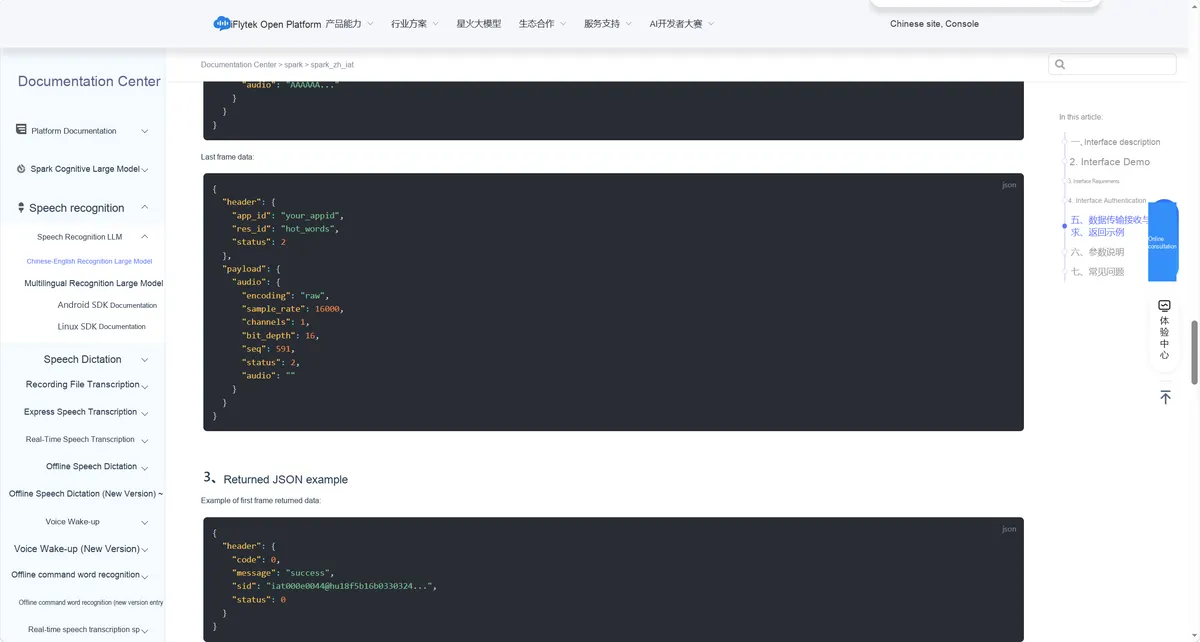
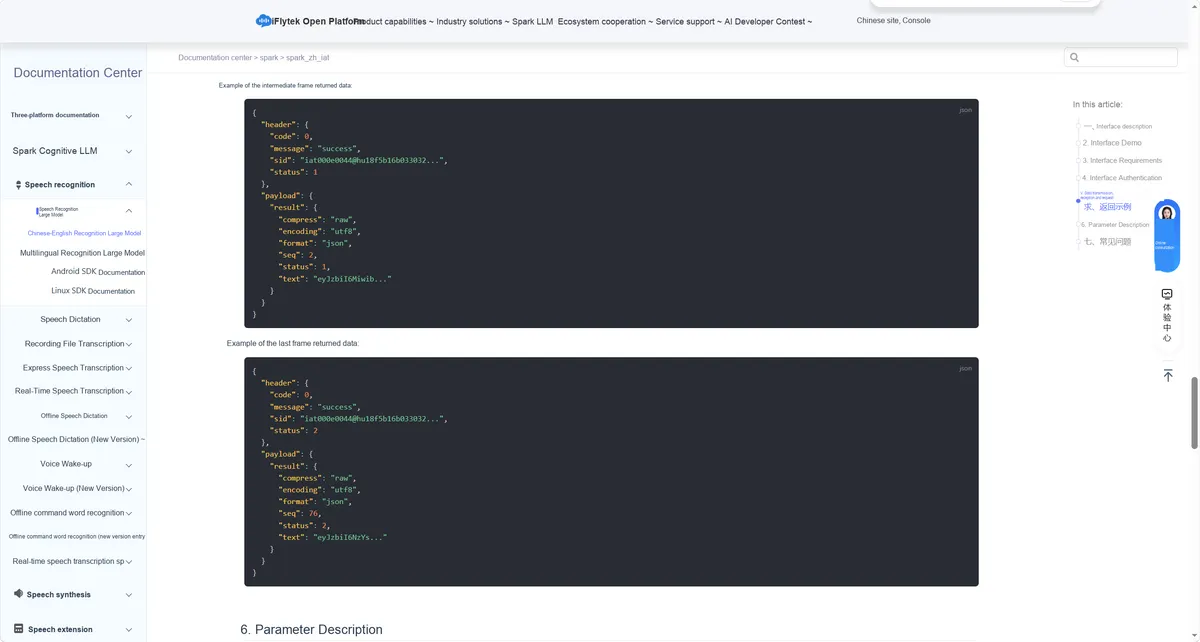
iFlytek Chinese-English recognition large model adopts WebSocket full-duplex communication. After a successful handshake, a long connection is established between the Client and the server, supporting two-way data transmission:
- Upload: The Client sends audio data in a streaming packetized manner, which is parsed and recognized by the server in real time
- Receive: After the server finishes identifying the segment, it actively pushes the recognition result to the Client via WebSocket
- Core Principles: Adapt to real-time voice scenarios, and avoid increased recognition time caused by excessively short packet transmission intervals or overly large packet sizes
Audio Transmission Specification Recommendations:
| Specification item | Requirement | Corresponding code / parameter |
|---|---|---|
| Send interval | 40ms / frame | Controls the pacing of audio frame sending, simulating real-time speech |
| Bytes per frame | 1280 bytes | Corresponds to frameSize=1280 in the Python demo, frameSize=1280 in the Java example |
| Compressed format note | If the audio is in a compressed format, 1280 bytes refers to the size of the raw audio data after decompression | - |
| Frame status flag | Streamed in 3 states: first frame (0), middle frame (1), last frame (2) | Corresponds to status=0/1/2 in the code |
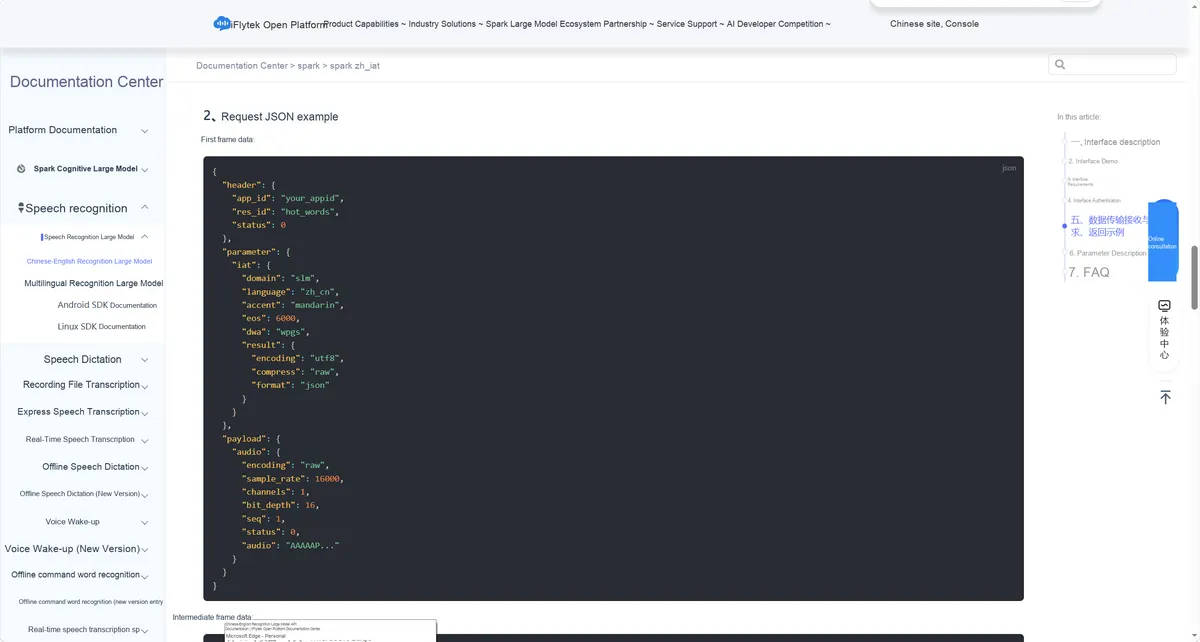
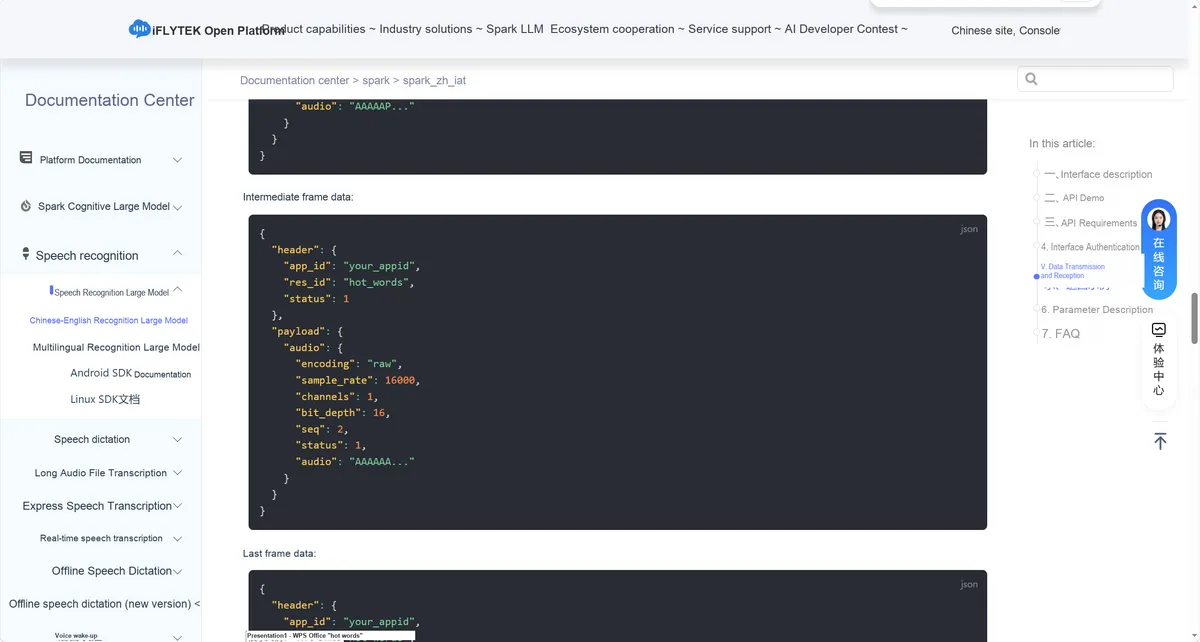
The following is a sample request JSON (frame-splitting logic):
First frame data (status= 0):
{
  "header": {
    "app_id": "your_appid",
    "res_id": "hot_words",
    "status": 0
  },
  "parameter": {
    "iat": {
      "domain": "slm",
      "language": "zh_cn",
      "accent": "mandarin",
      "dwa": "wpgs",
      "result": {
        "encoding": "utf8",
        "compress": "raw",
        "format": "json"
      }
    }
  },
  "payload": {
    "audio": {
      "encoding": "raw",
      "sample_rate": 16000,
      "channels": 1,
      "bit_depth": 16,
      "seq": 1,
      "status": 0,
      "audio": "AAAAAP..." // Base64-encoded audio data of the first frame
    }
  }
}
Intermediate frame data (status= 1):
{
  "header": {
    "app_id": "your_appid",
    "res_id": "hot_words",
    "status": 1
  },
  "parameter": {
    "iat": {...} // Same as the first frame parameters
  },
  "payload": {
    "audio": {
      "encoding": "raw",
      "sample_rate": 16000,
      "channels": 1,
      "bit_depth": 16,
      "seq": 2, // Frame sequence number increments
      "status": 1,
      "audio": "AAAAAA..." // Base64-encoded audio data of a middle frame
    }
  }
}
Last frame data:
{
  "header": {
    "app_id": "your_appid",
    "res_id": "hot_words",
    "status": 2
  },
  "parameter": {
    "iat": {...} // Same as the first frame parameters
  },
  "payload": {
    "audio": {
      "encoding": "raw",
      "sample_rate": 16000,
      "channels": 1,
      "bit_depth": 16,
      "seq": 531, // Sequence number of the last frame
      "status": 2,
      "audio": "" // The last frame may have no audio data
    }
  }
}
Description of Core Request Parameters:
| Parameter | Meaning | Constraint |
|---|---|---|
| header.status | Frame status | 0 = first frame, 1 = middle frame, 2 = last frame (indicates the audio sending stage) |
| payload.audio.seq | Frame sequence number | Increments from 1, indicating the order of audio frames |
| payload.audio.encoding | Audio encoding | Fixed as raw (corresponds to PCM format) |
| payload.audio.sample_rate | Sample rate | Supports 16000/8000 (must match the audio file) |
Return JSON example (streaming recognition result):
First frame returned (status= 0):
{
  "header": {
    "code": 0,
    "message": "success",
    "sid": "iat00e0044@hu18f5b16b033032...",
    "status": 0
  }
}
Intermediate frame return (status= 1):
{
  "header": {
    "code": 0,
    "message": "success",
    "sid": "iat00e0044@hu18f5b16b033032...",
    "status": 1
  },
  "payload": {
    "result": {
      "compress": "raw",
      "encoding": "utf8",
      "format": "json",
      "seq": 2, // Corresponding request frame sequence number
      "status": 1,
      "text": "cy12b1j6l9x1b..." // Base64-encoded recognized fragment text
    }
  }
}
Return of the last frame (status= 2):
{
  "header": {
    "code": 0,
    "message": "success",
    "sid": "iat00e0044@hu18f5b16b033032...",
    "status": 2
  },
  "payload": {
    "result": {
      "compress": "raw",
      "encoding": "utf8",
      "format": "json",
      "seq": 76, // Sequence number of the last frame
      "status": 2,
      "text": "cy12b1j6l9x1bN2y..." // Base64-encoded final recognized text
    }
  }
}
Simply put, it is as follows:
- Result Analysis: In the returned result
payload.result.textis Base64-encoded text, which needs to be decoded first before parsing the JSON to extract the final plain text - Status Association: The returned
header.statuscorresponds to thestatusof the request frame, indicating the current recognition phase. - Error Handling:
header.code= 0indicates success, while a non-zero value indicates an error (please refer to the official error codes for troubleshooting) - Streaming concatenation: the
textreturned by intermediate frames is the recognized segment, which needs to be concatenated in the order ofseq, and the last frame is the complete result
5.1.4.3 Request Parameters and Response Parameters Description
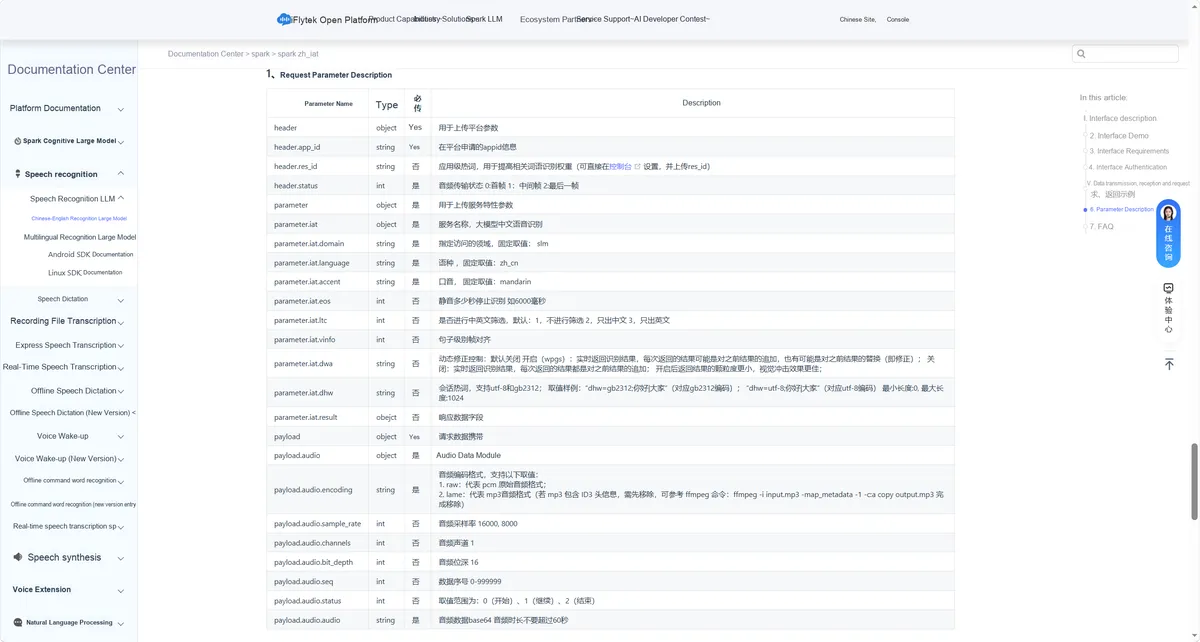
The top-level structure of the request parameters is as follows:
| Parameter name | Type | Required | Core description | Structured parsing |
|---|---|---|---|---|
| header | object | ✅ | Platform-level session parameters, used for identity and state verification | Core carrier of authentication and frame status |
| parameter | object | ✅ | Service feature parameters, used to configure recognition logic | Controls recognition domain, language, dynamic correction, and other behaviors |
| payload | object | ✅ | Business data carrier, carrying audio and extended attributes | Core of streaming audio data transmission |
Here, we will provide a layered explanation:
header layer (session control):
| Parameter | Type | Required | Value / rule | Teaching / AI adaptation notes |
|---|---|---|---|---|
| app_id | string | ✅ | Application ID applied for on the platform | Unique identity identifier, used together with the secret key |
| res_id | string | ❌ | Application-level hotword ID | Passed in after configuring hotwords in the console, to improve recognition of the specified words |
| status | int | ✅ | 0 (first frame) / 1 (middle frame) / 2 (last frame) | Core of streaming recognition: indicates the audio sending stage; must be passed in order |
parameter.iat Layer (Recognition Configuration):
| Parameter | Type | Required | Value / rule | Teaching / AI adaptation notes | |
|---|---|---|---|---|---|
| domain | string | ✅ | Fixed value: slm | Identifies the large-model Chinese speech recognition service | |
| language | string | ✅ | Fixed value: zh_cn | Specifies the recognition language as Chinese | |
| accent | string | ✅ | Fixed value: mandarin | Specifies the accent as Mandarin (dialect support must be configured on the platform) | |
| eos | int | ❌ | Millisecond value (e.g. 6000) | Silence timeout control; recognition ends automatically on timeout | |
| ltc | int | ❌ | 1 (no filtering) / 2 (Chinese only) / 3 (English only) | Language filter configuration, suited to mixed Chinese-English recognition scenarios | |
| vinfo | int | ❌ | 0/1 | Sentence-level frame alignment switch, used to precisely locate sentence boundaries | |
| dwa | string | ❌ | wpgs (on) / empty (off) | Dynamic correction: when on, results can be appended/replaced, with finer granularity | |
| dhw | string | ❌ | 编码 + 热词(如 `utf-8; 你好 | Everyone `) | Session-level hotwords, temporarily improve recognition of the specified words |
| result | object | ❌ | Nested object | Response data format configuration, adapted by default |
payload.audio layer (audio data):
| Parameter | Type | Required | Value / rule | Teaching / AI adaptation notes |
|---|---|---|---|---|
| encoding | string | ✅ | raw(PCM) / lame(MP3) | Format constraint: MP3 must have the ID3 header removed (can be handled with ffmpeg) |
| sample_rate | int | ❌ | 16000 / 8000 | The sample rate must match the audio file, otherwise recognition will be distorted |
| channels | int | ❌ | Fixed value: 1 | Mono only |
| bit_depth | int | ❌ | Fixed value: 16 | Only 16-bit depth is supported |
| seq | int | ❌ | 0-999999 | Audio frame sequence number; must increase consecutively to keep results in order |
| status | int | ❌ | 0 (start) / 1 (continue) / 2 (end) | Corresponds to header.status; indicates the audio stream lifecycle |
| audio | string | ✅ | Base64-encoded string | Data carrier: Base64 encoding of the audio data; a single audio segment must be ≤60 seconds |
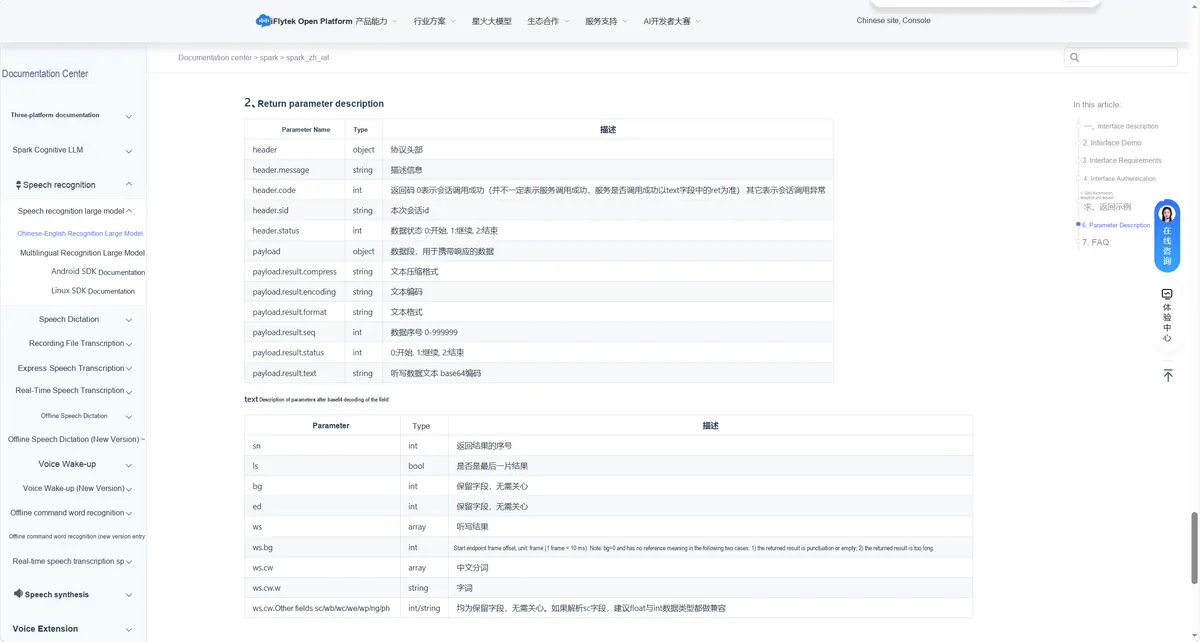
The top-level structure is as follows:
| Parameter name | Type | Core description | Structured parsing |
|---|---|---|---|
| header | object | Protocol header, containing session state and identity | Global call result check |
| payload | object | Business data section, carrying the recognition result | Core recognition content output |
header layer (return check):
| Parameter | Type | Description | Teaching / AI adaptation notes |
|---|---|---|---|
| message | string | Description | Auxiliary description; normally success |
| code | int | 0 means the session succeeded | Key: only indicates the session went through, not that recognition succeeded; check the text field |
| sid | string | ID of this session | Unique identifier, used for troubleshooting and log tracing |
| status | int | 0 (start) / 1 (continue) / 2 (end) | Corresponds to the request frame status; indicates how far recognition has progressed |
payload.result Layer (Recognition Result):
| Parameter | Type | Description | Teaching / AI adaptation notes |
|---|---|---|---|
| compress | string | Text compression format | Fixed as raw; no decompression needed |
| encoding | string | Text encoding | Fixed to UTF-8 to prevent garbled text |
| format | string | Text format | Fixed to JSON |
| seq | int | Data sequence number | Corresponds to request seq; verifies result integrity |
| status | int | 2000/1/2 | Same as request status; identifies the current result segment |
| text | string | Base64-encoded text | Core parsing point: Base64-decode first, then parse the inner JSON |
Description of parameters after text decoding (text field): payload.result.text is a JSON object after Base64 decoding, which contains structured recognition results as follows:
{
  "sn": 1,
  "ls": true,
  "bg": 0,
  "ed": 6,
  "ws": [{"cw": [{"w": "你好"}], "bg": 0}],
  "wb": 0,
  "wc": 0,
  "we": 0,
  "wp": 0,
  "ng": 0,
  "ph": 0
}| Parameter | Type | Description | Teaching / AI adaptation notes |
|---|---|---|---|
| sn | int | Result sequence number | Identifies the order of the current result block |
| ls | bool | Whether this is the last result segment | End flag: when true, recognition is complete |
| bg/ed | int | Reserved field | No processing needed; for internal alignment only |
| ws | array | Dictation result array | Core recognition content array; each element corresponds to one word segment / sentence |
| ws.cw.w | string | Recognized word | Final displayable text content |
| Other fields | - | Reserved field | When parsing, support both int and string types to avoid errors |
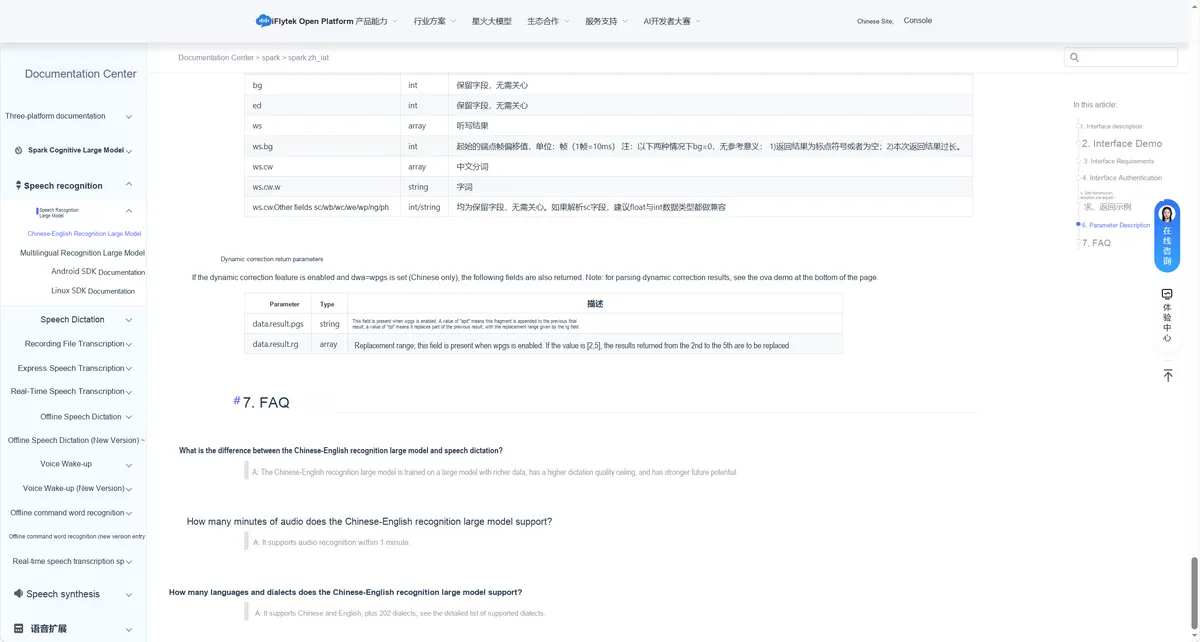
Returned only when dynamic correction (parameter.iat.dwa="wpgs") is enabled, which is used to optimize real-time recognition results:
| Parameter | Type | Description | Teaching / AI adaptation notes |
|---|---|---|---|
| data.result.pgs | string | apd (append) / rpl (replace) | Identifies result operation type: apd appends to previous results, rpl replaces the specified range |
| data.result.rg | array | Replacement range (e.g., [2,5]) | When pgs="rpl", specifies replacing the 2nd through 5th returned results |
5.2 Preparations Before the Experiment
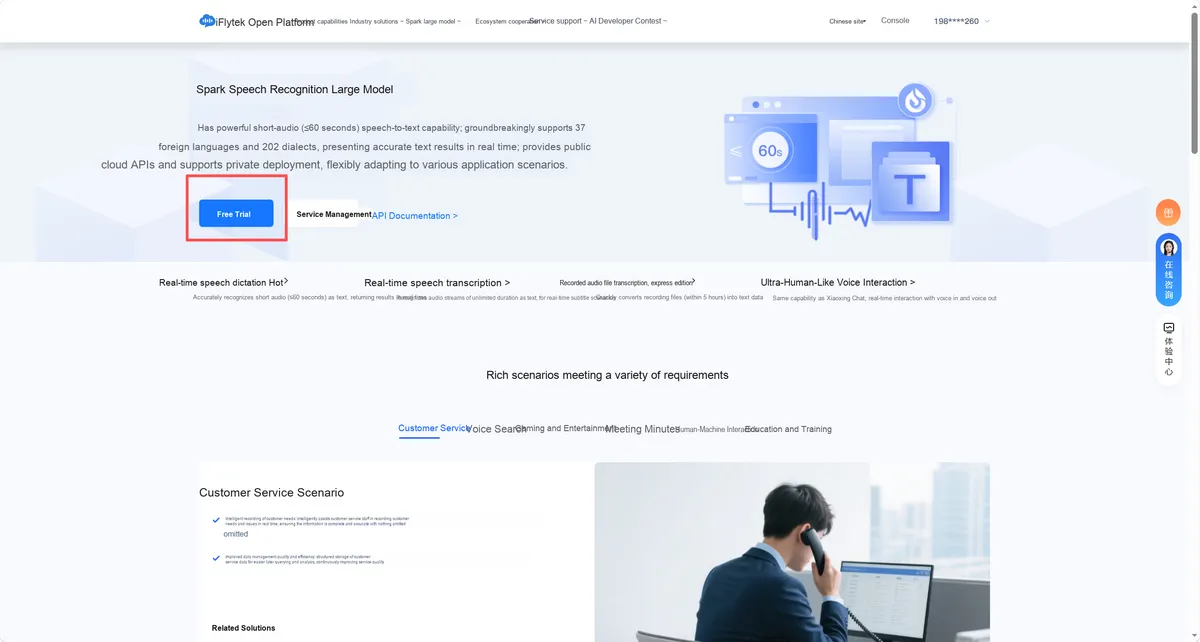
This is the product homepage of iFLYTEK Open Platform's "Spark Speech Recognition Large Model". The page demonstrates the model's real-time speech transcription capability supporting 37 foreign languages and 202 dialects, as well as applicable scenarios such as customer service, gaming and entertainment, and paid packages. The core operation is to click the "Free Trial" button to officially start the activation process of the ASR service, which is the starting point for the entire API configuration.
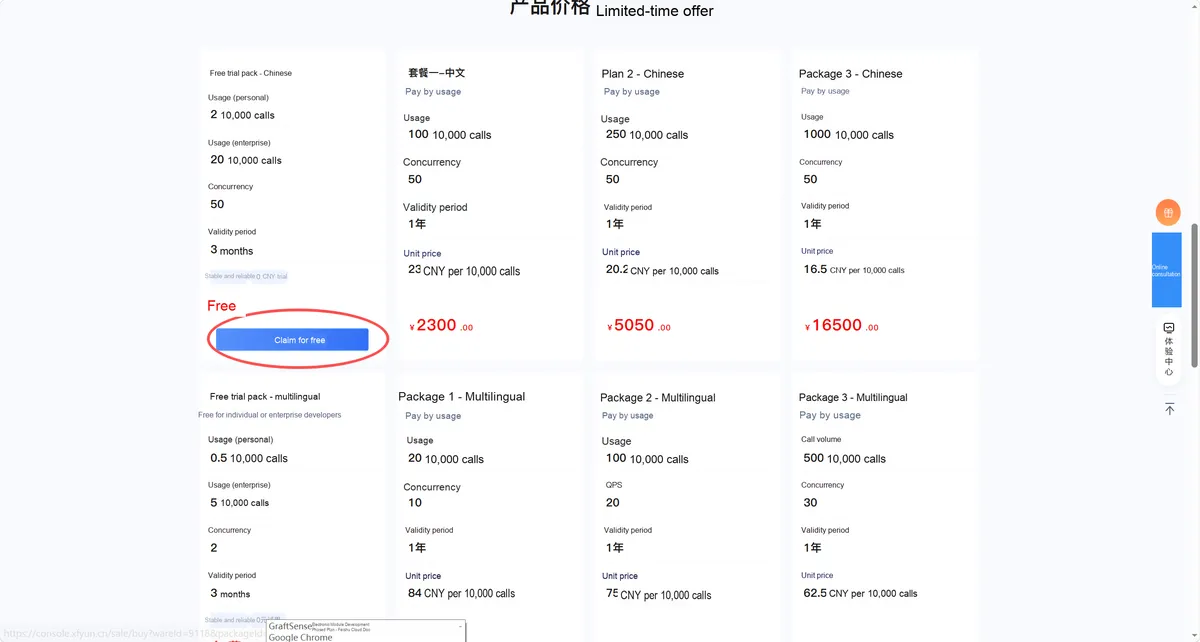
The upper part displays the list of speech recognition service packages. Click "Get for Free" to select the free trial package for Chinese speech recognition; the is the service purchase page. Click the "+" button to trigger the new application creation process, which binds a dedicated development application to the ASR service, serving as a critical prerequisite for activating the service and generating API credentials.
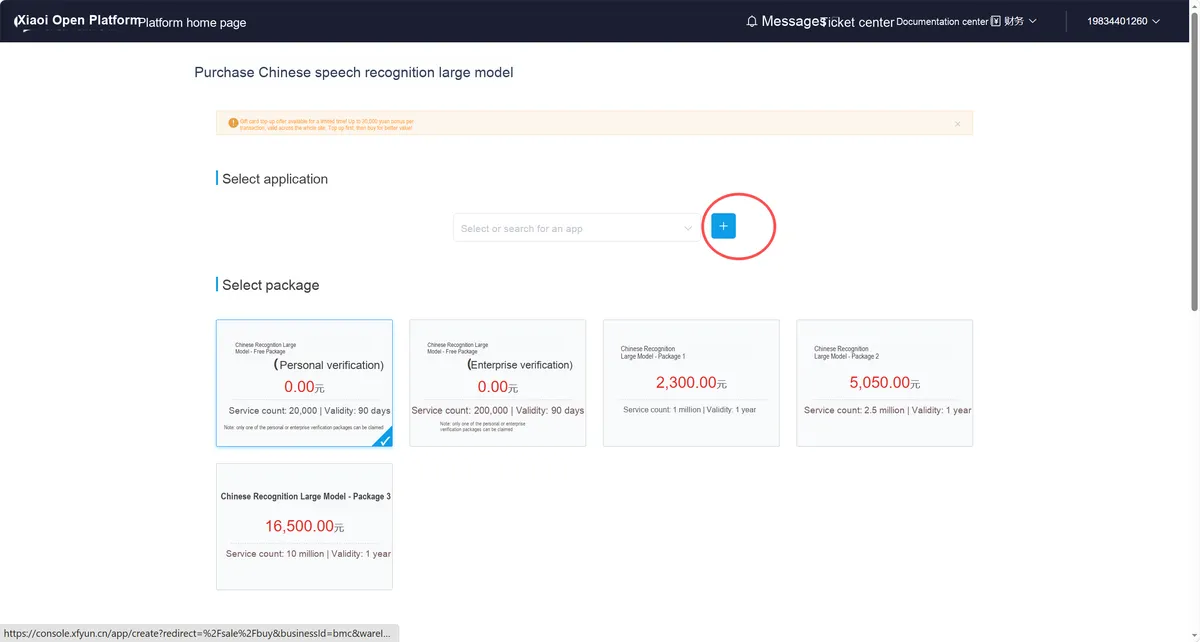
The upper part is the order confirmation page, where the payable amount for the free package is 0 yuan. Tick the service agreement and click "Confirm Order" to complete the free activation of the ASR service; the shows the Console entry. Click "Console" to enter the application management backend and obtain the API authentication information required for subsequent development, which is the final step of service activation.
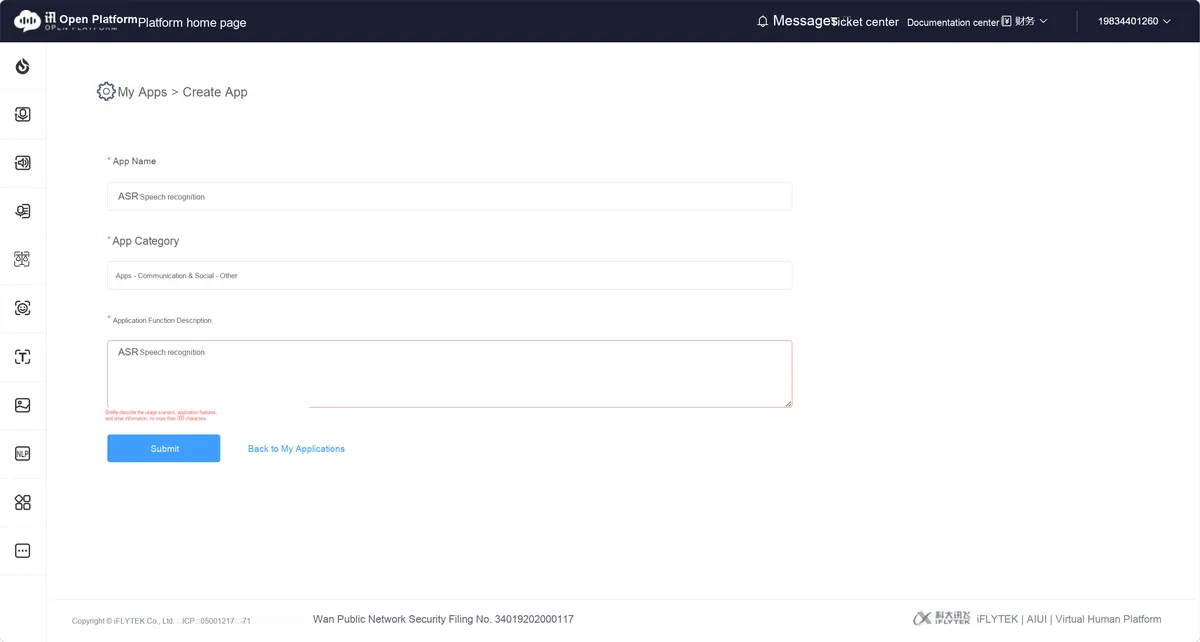
The upper part is the "My Apps" list, which displays the newly created "ASR Speech Recognition" app and its dedicated APPID; the is the detail page of the "Chinese Recognition LLM" service for this app, showing the remaining service quota, expiration time, as well as core development credentials required for WebSocket interface authentication such as APPID, APIKey, and APISecret. This information is exactly the authorization parameters that need to be configured in the code of Pico-side xfyun_asr.py to call the iFlytek ASR speech recognition service.
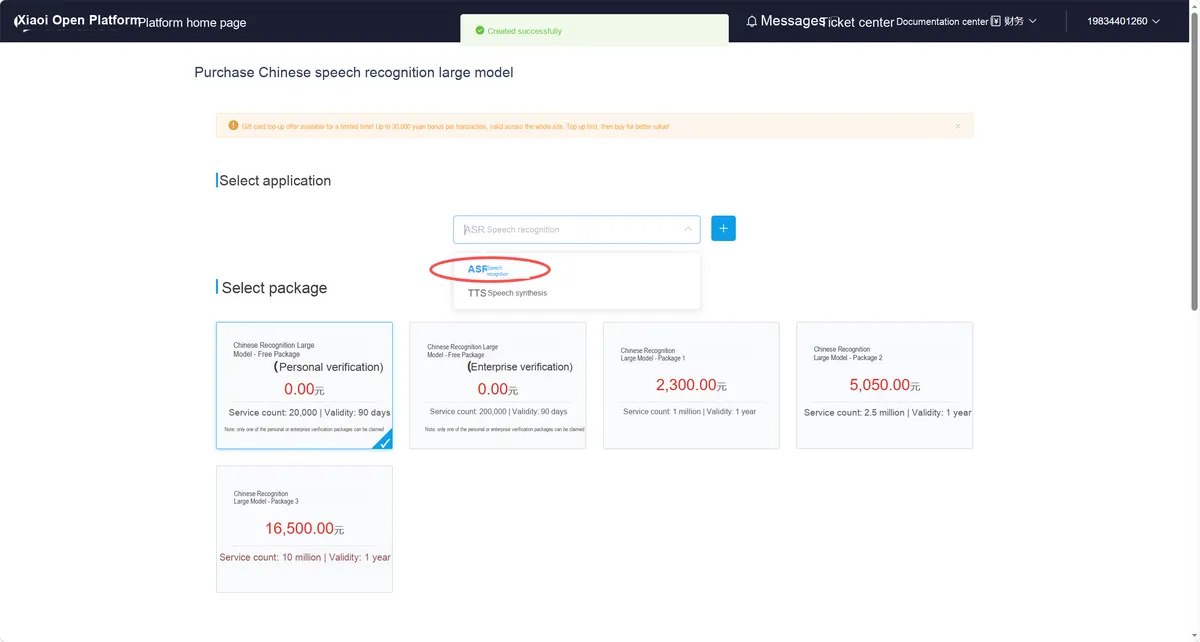
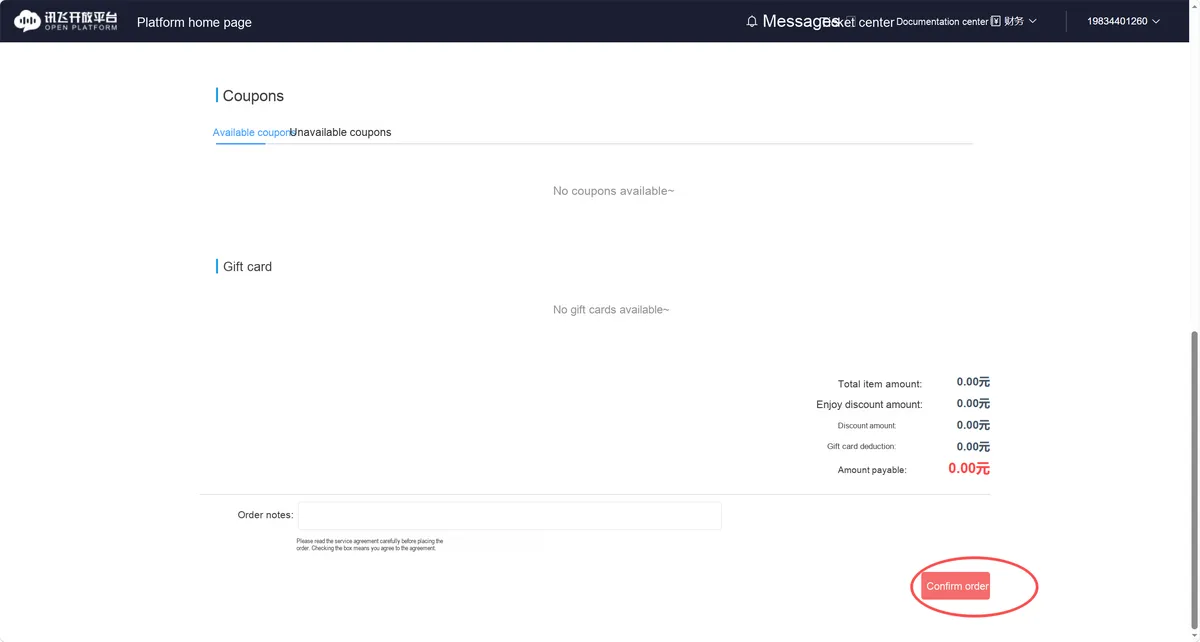
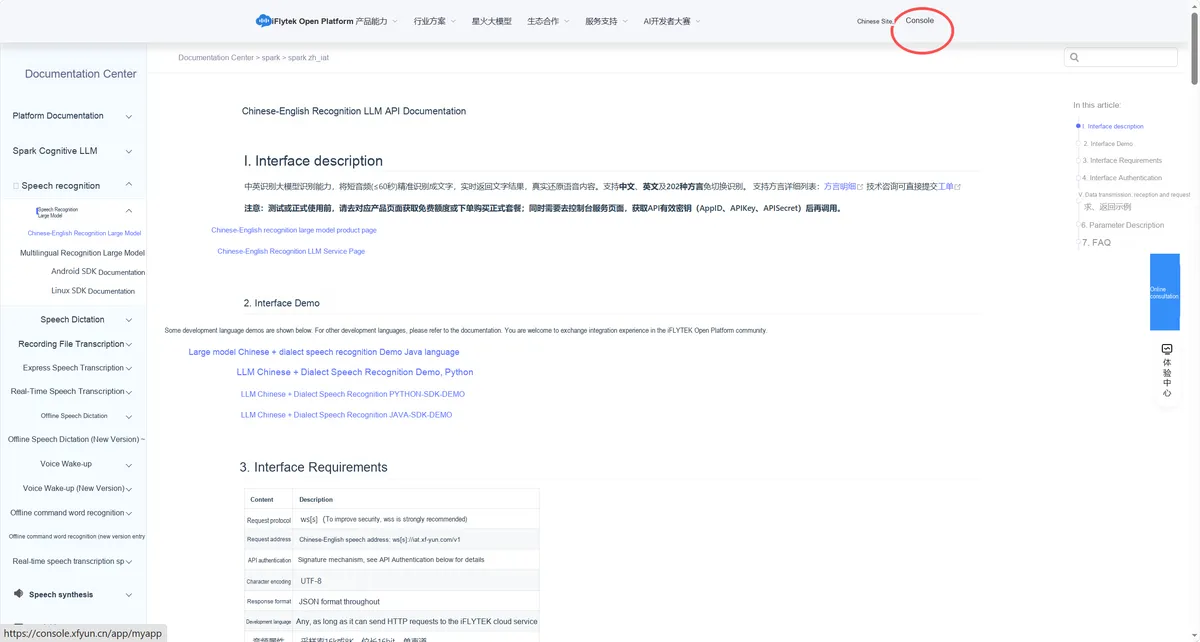
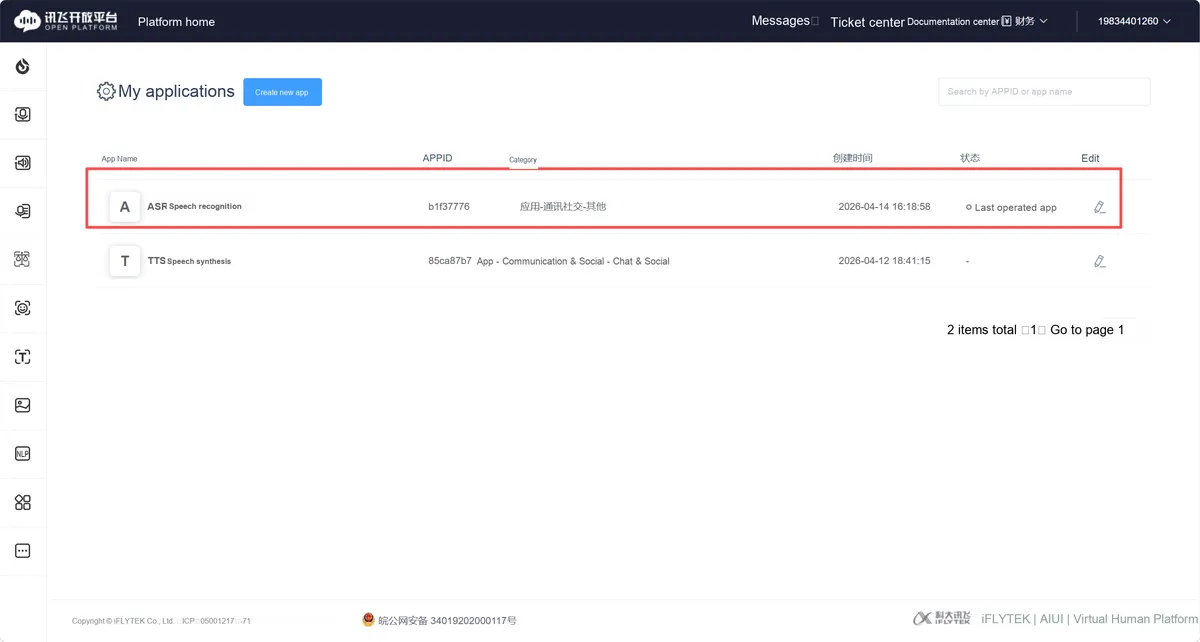
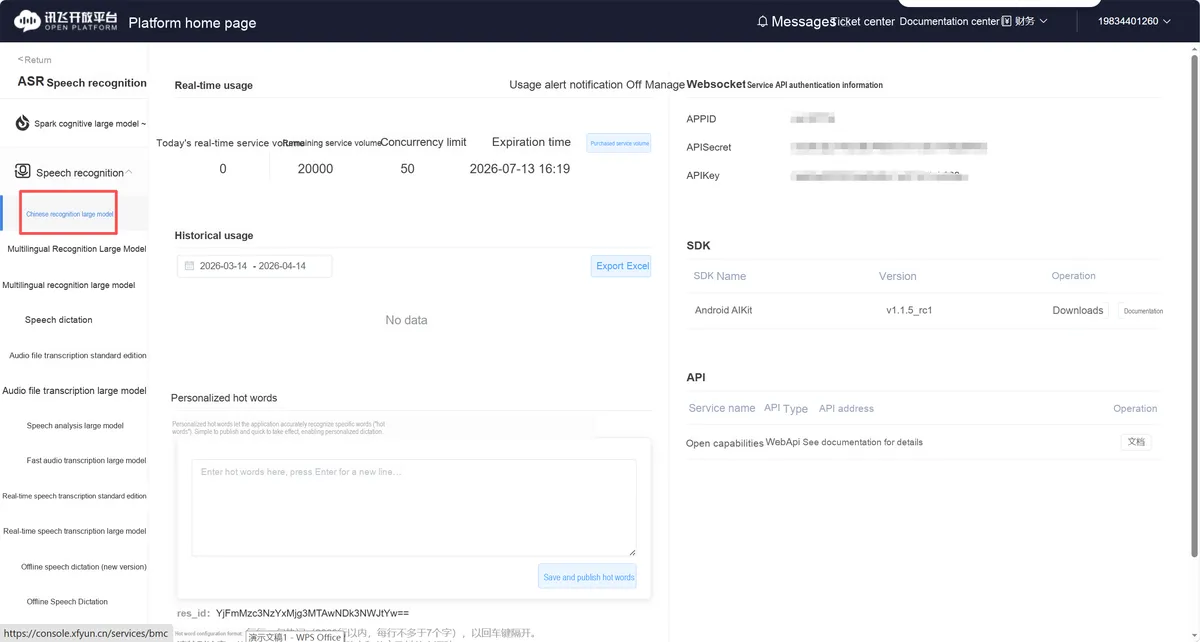
5.3 Experimental Case
Search upypi ( https://upypi.net/) for xfyun_asr:
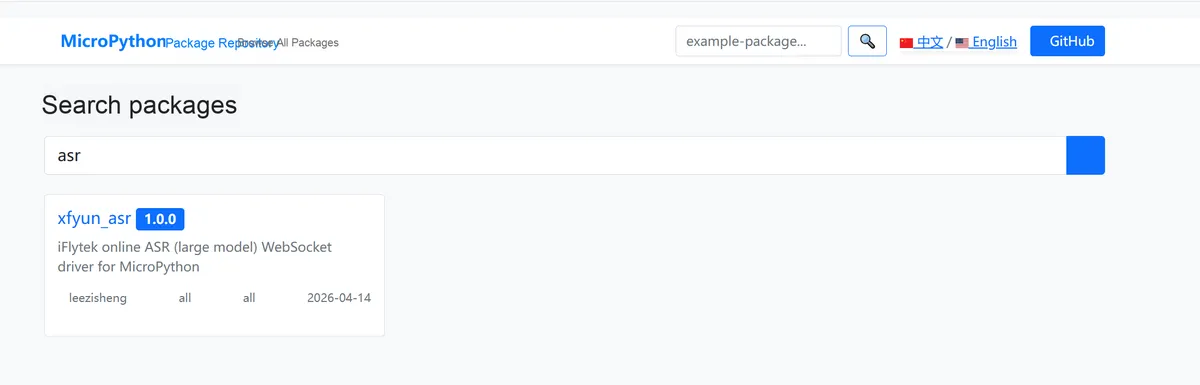
This is an iFlytek Chinese-English Automatic Speech Recognition (ASR) large model driver for MicroPython. It connects to the iFlytek Open Platform via WebSocket to recognize PCM audio files into text in real time, and has been verified on the Raspberry Pi Pico 2W.
Copy the installation command:
mpremote mip install https://upypi.net/pkgs/xfyun_asr/1.0.0Enter the following in the terminal to execute:

Then complete the configuration items related to WIFI and API in the code below, and flash it into the microcontroller:
# Python env   : MicroPython v1.23.0
# -*- coding: utf-8 -*-
# @Time    : 2026/04/14
# @Author  : leeqingsui
# @File    : main.py
# @Description : iFlytek TTS + ASR demo for MicroPython on Raspberry Pi Pico 2W

# ======================================== Import Modules =========================================

import network
import asyncio
import time
import ntptime
from xfyun_tts import XfyunTTS
from xfyun_asr import XfyunASR

# ======================================== Global Variables ============================================

WIFI_SSID     = "your_wifi_ssid"
WIFI_PASSWORD = "your_wifi_password"

# TTS credentials (the speech synthesis service must be enabled in the Xfyun console)
TTS_APPID      = "your_tts_appid"
TTS_API_KEY    = "your_tts_api_key"
TTS_API_SECRET = "your_tts_api_secret"

# ASR credentials (the Chinese-English recognition large model service must be enabled in the Xfyun console)
ASR_APPID      = "your_asr_appid"
ASR_API_KEY    = "your_asr_api_key"
ASR_API_SECRET = "your_asr_api_secret"

OUTPUT_PCM = "output.pcm"
OUTPUT_WAV = "output.wav"

# ======================================== Functions ============================================

def connect_wifi():
    """
    Connect to WiFi and return the network object.

    Returns:
        network.WLAN: the connected WLAN object; returns None if the connection fails.

    ==========================================

    Connect to WiFi and return the network object.

    Returns:
        network.WLAN: Connected WLAN object; None if connection fails.
    """
    wlan = network.WLAN(network.STA_IF)
    wlan.active(True)

    if not wlan.isconnected():
        print("Connecting to WiFi:", WIFI_SSID)
        wlan.connect(WIFI_SSID, WIFI_PASSWORD)

        timeout = 15
        while not wlan.isconnected() and timeout > 0:
            time.sleep(1)
            timeout -= 1
            print("Connecting...", timeout, "s remaining")

        if wlan.isconnected():
            ip_info = wlan.ifconfig()
            print("WiFi connected")
            print("IP:", ip_info[0])
            print("Gateway:", ip_info[2])
        else:
            print("WiFi connection failed")
            return None
    else:
        print("WiFi already connected")

    return wlan


def sync_ntp():
    """
    Synchronize the system time via NTP to provide an accurate timestamp for Xfyun API authentication signatures.
    Try multiple NTP servers in turn; if all fail, print a warning but do not interrupt the flow.

    ==========================================

    Sync system time via NTP for iFlytek API authentication signature.
    Tries multiple NTP servers in order; prints a warning if all fail.
    """
    servers = ("ntp.aliyun.com", "ntp.tencent.com", "pool.ntp.org")
    for host in servers:
        try:
            ntptime.host = host
            ntptime.settime()
            t = time.gmtime()
            print("NTP synced via {}: {}-{:02d}-{:02d} {:02d}:{:02d}:{:02d} UTC".format(
                host, t[0], t[1], t[2], t[3], t[4], t[5]))
            return
        except Exception as e:
            print("NTP failed ({}):".format(host), e)
    print("NTP sync unavailable; signature timestamp may be rejected.")


async def run_tts(text):
    """
    Call XfyunTTS to synthesize the given text in streaming mode and write the PCM data to output.pcm.

    Args:
        text (str): The text to synthesize.

    ==========================================

    Synthesize text via XfyunTTS and write raw PCM to output.pcm.

    Args:
        text (str): Text to synthesize.
    """
    print("Synthesizing:", text)
    total = await tts.synthesize(text, filepath=OUTPUT_PCM)

    if total:
        print("Saved", total, "bytes ->", OUTPUT_PCM)
    else:
        print("Synthesis failed: no audio data received.")


async def run_tts_wav(text):
    """
    Call XfyunTTS to synthesize the given text in streaming mode and write the audio with a WAV header to output.wav.

    Args:
        text (str): The text to synthesize.

    ==========================================

    Synthesize text via XfyunTTS and write WAV file to output.wav.

    Args:
        text (str): Text to synthesize.
    """
    print("Synthesizing (WAV):", text)
    total = await tts.synthesize(text, filepath=OUTPUT_WAV)

    if total:
        print("Saved", total, "bytes PCM +44 bytes header ->", OUTPUT_WAV)
    else:
        print("Synthesis failed: no audio data received.")


async def run_asr(filepath):
    """
    Call XfyunASR to recognize the given PCM file and print the recognition result.

    Args:
        filepath (str): Path of the PCM file to recognize.

    ==========================================

    Recognize a PCM file via XfyunASR and print the result.

    Args:
        filepath (str): Path to the PCM file to recognize.
    """
    print("Recognizing:", filepath)
    text = await asr.recognize(filepath)

    if text:
        print("ASR result:", text)
    else:
        print("Recognition failed: no text returned.")

# ======================================== Custom Classes ============================================

# ======================================== Initialization configuration ===========================================

time.sleep(3)
print("FreakStudio: iFlytek TTS + ASR Demo")

tts = XfyunTTS(
    app_id     = TTS_APPID,
    api_key    = TTS_API_KEY,
    api_secret = TTS_API_SECRET,
)

# The ASR sample rate must match the TTS output (TTS default auf=audio/L16;rate=8000 → 8000 Hz)
asr = XfyunASR(
    app_id      = ASR_APPID,
    api_key     = ASR_API_KEY,
    api_secret  = ASR_API_SECRET,
    sample_rate = 8000,
)

# ========================================  Main Program  ===========================================

if __name__ == "__main__":
    if not connect_wifi():
        print("Aborting: WiFi unavailable.")
    else:
        sync_ntp()

        # Demo 1: TTS synthesizes mixed Chinese-English text → output.pcm
        asyncio.run(run_tts("大家好一块吃饭吧hello"))

        # Demo 2: ASR recognizes output.pcm → print the text
        asyncio.run(run_asr(OUTPUT_PCM))

        # Demo 3: TTS synthesis → output.wav (can be played directly on a PC to verify)
        asyncio.run(run_tts_wav("Hi there, this is a WAV format test from Pico 2W."))
This is a piece of demo code based on the Raspberry Pi Pico 2W hardware and running in the MicroPython v1.23.0 environment for iFLYTEK voice interaction. It integrates iFLYTEK Text-to-Speech (TTS) and Automatic Speech Recognition (ASR) dual functions. It connects to the network via WiFi and synchronizes NTP time to complete API authentication, which can convert text into PCM/WAV format audio files and also perform text recognition on audio files. It fully implements a closed-loop voice interaction test of "text-to-speech and speech-to-text", and can be run only by configuring the authorization information of the iFLYTEK platform and WiFi information. It is a core example program for embedded devices to realize offline/online voice interaction.
Open the terminal and the display is as follows:
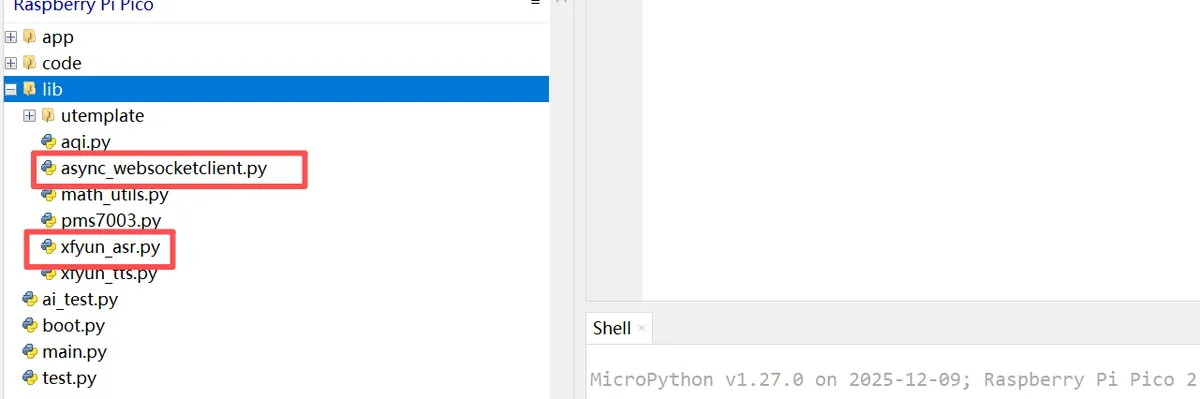
It can be seen that the driver library has been installed properly:
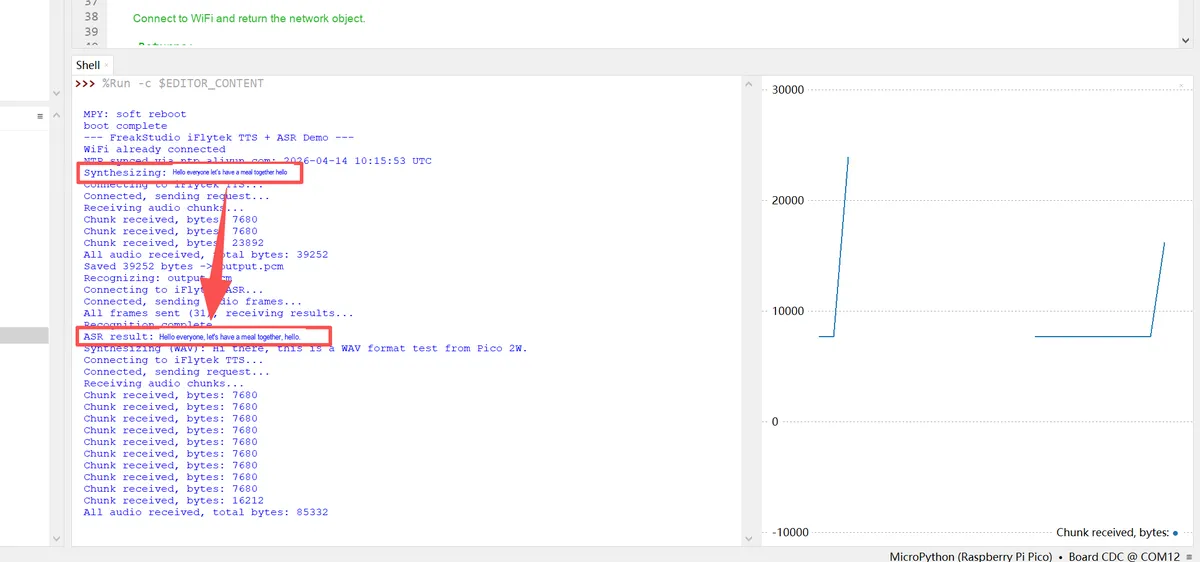
This is the main program main.py Shell log after running:
- TTS Speech Synthesis Section (the first red box):
- Input: Mixed Chinese-English text
Hi everyone, let's go eat together hello - Execution: via
XfyunTTSto call the iFlytek TTS API, with the WebSocket connection established successfully, audio sharding received in streaming mode, and finally generatedoutput.pcmraw PCM audio file (total size: 39252 bytes) - Verification: TTS synthesis functions properly, supports mixed Chinese-English text, and its streaming transmission adapts to the memory constraints of MicroPython — microcontrollers have limited memory and cannot load large audio files in a single batch.
- Input: Mixed Chinese-English text
- ASR Speech Recognition Step (the second red box):
- Input: the audio file generated by TTS just now
output.pcm - Execution: Pass
XfyunASRcalls the iFlytek ASR API, sends audio data in frames, and receives the recognition result - Output:
ASR result: Hello everyone, let's have a meal together, hello. - Verification:
- ✅ 100% restore the input text, free of typos and missing characters
- ✅ Accurate Chinese-English mixed recognition with automatic standard punctuation addition
- ✅ PCM audio with 8000Hz sampling rate is recognized normally (it fully matches the TTS output sampling rate, with no format issues)
- Input: the audio file generated by TTS just now
- Additional Verification:
- Follow-up log: TTS synthesizes a file in WAV format (
output.wav), which can be directly opened with a player on a computer to verify that the audio format is correct. - Network and time: The WiFi connection is normal, NTP time synchronization succeeds (accurate timestamp is required for iFlytek API authentication to ensure valid signature), and there is no authentication error in the entire process.
- Follow-up log: TTS synthesizes a file in WAV format (
The output PCM file can be played on the website https://pcm.qer.im/ :
output.pcm 38 KB
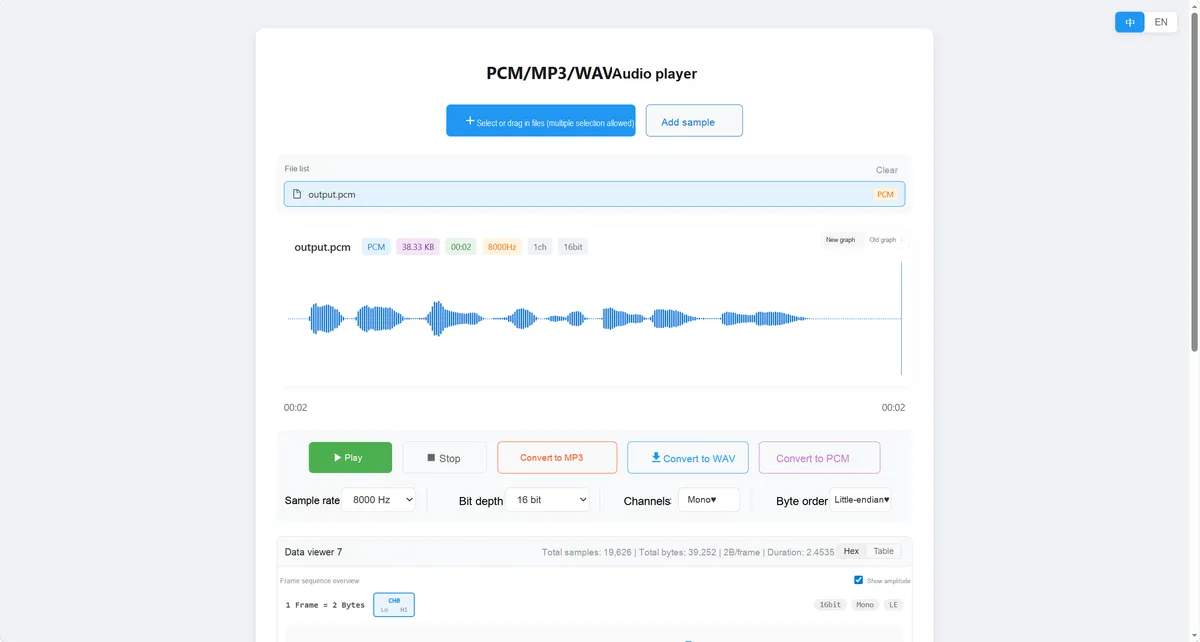
Verification succeeded.
References
- https://ruanyifeng.com/blog/2017/05/websocket.html
- https://www.cnblogs.com/yangykaifa/p/19305020
- https://blog.csdn.net/guoqi_666/article/details/137260613
- https://en.wikipedia.org/wiki/WebSocket
- https://github.com/danni/uwebsockets
- https://github.com/lkoepsel/microserver
- https://wellys.com/posts/rp2040_micropython_webserver2/
- https://www.cnblogs.com/azure-zero/p/14830175.html
- https://s.apifox.cn/apidoc/docs-site/3774108/websocket-3500587
- https://pcm.qer.im/
- https://www.xfyun.cn/doc/tts/online_tts/API.html#%E6%8E%A5%E5%8F%A3%E8%B0%83%E7%94%A8%E6%B5%81%E7%A8%8B
Version Record
Version Number | Revision Date | Modifier | Modify Content |
v1.0 | 2026-04-12 | Lee Eryong | Initialization version. |
v1.1 | 2026-04-14 | Lee Eryong | Added: 5. Implement ASR speech recognition by connecting to the Xunxinghuo speech recognition large model via WebSocket. |
v1.1.1 | 2026-04-14 | Lee Eryong | Modified Section 5: Implement ASR speech recognition by connecting to the Xunxinghuo speech recognition large model via a websocket connection. |