
Contents
- I. Background and Core Positioning
- 1.1 Development Background
- 1.2 Core Functions of µMail
- II. Core Implementation Principles
- 2.1 Underlying Dependencies
- 2.2 Introduction to Core Interaction Procedures and Core Methods of the SMTP Protocol
- III. Instructions for Use
- 3.1 Environment Preparation
- 3.2 Configuration Taking QQ Mail as an Example
- 3.3 Relevant Cases
- IV. API Reference
- 4.1 Core Class: umail.SMTP
- 4.2 Core Methodology
- 5. Precautions for Use
- Version Record
I. Background and Core Positioning
1.1 Development Background
MicroPython is a lightweight implementation of Python designed specifically for embedded devices (such as MCUs like ESP32/ESP8266 and PyBoard), and its operating environment is characterized by limited memory (in the order of kilobytes), simplified network libraries, and constrained performance:
- The standard Python
smtpliblibrary is bulky and has numerous dependencies, making it impossible to port directly to MicroPython; - Embedded devices often need to "report status/alarms"(such as sensor data, device faults), and email serves as a stable remote notification method;
- Traditional SMTP Client has not undergone memory optimization for MCU, and sending long content is likely to trigger a memory overflow.
1.2 Core Functions of µMail
µMail (MicroMail) is a lightweight SMTP Client tailored specifically for MicroPython, with the core objectives as follows:
- Adapted to MCU resource constraints, it only relies on
socketandsslbasic libraries with no additional dependencies; - Implement the core interaction of the SMTP protocol, and support email sending for mainstream email services (Gmail/QQ/163);
- Provides the capability of "chunked sending" to prevent emails with large content from occupying excessive memory;
- Supports SSL/TLS encryption to ensure the security of email transmission.
Simply put:µMail enables MCUs such as the ESP32/ESP8266 to send emails easily and securely, serving as a core tool for remote notifications on embedded devices.
Source Code Repository: https://github.com/shawwwn/uMail
II. Core Implementation Principles
2.1 Underlying Dependencies
µMail only relies on the built-in modules of MicroPython:
socket: Establish a TCP connection to communicate with the SMTP server;ssl: Provides SSL/TLS encryption (via thewrap_socketmethod);ubinascii: only used forBase64encoding during authentication (import on demand).
2.2 Introduction to Core Interaction Procedures and Core Methods of the SMTP Protocol
SMTP (Simple Mail Transfer Protocol) is the standard protocol for email transmission, and µMail is essentially a "minimalist implementation" of the SMTP protocol. Its core interaction process and core methods are as follows:
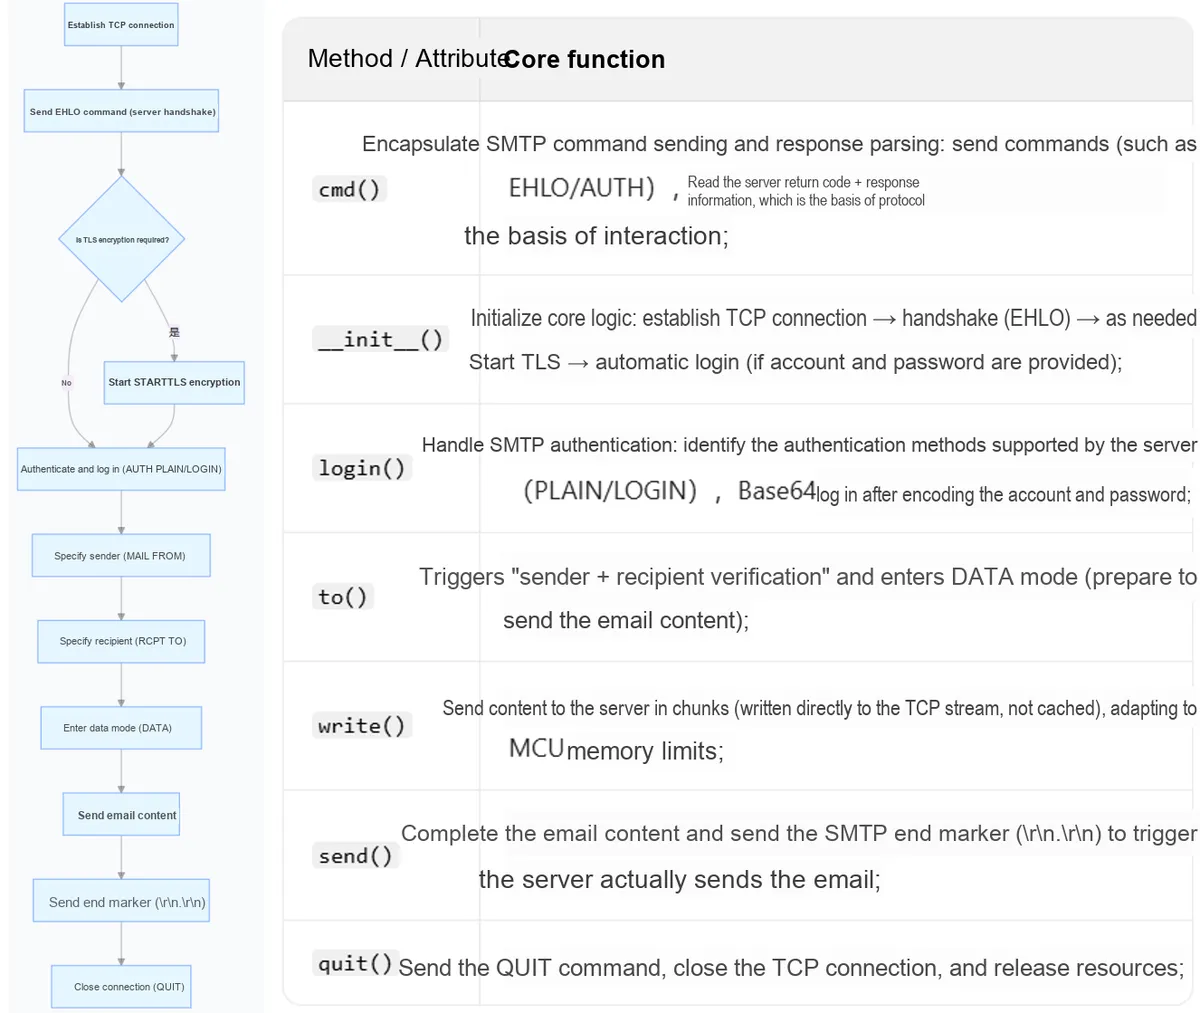
The core features can be summarized as follows:
- No content caching:
write ()sends content directly to the server instead of storing it in memory, preventing overflow caused by large emails; - Minimalist assertion validation: Use
assertto quickly validate protocol interaction results (e. g., connection success code 220, handshake success code 250) to reduce redundant logic; - On-demand encryption: STARTTLS (port 587) is preferred, while direct SSL (port 465) is also supported to adapt to different email configurations.
III. Instructions for Use
3.1 Environment Preparation
- Hardware: MCUs supporting MicroPython such as Pico W/ESP32/ESP8266 (network connection required);
- Software: Flash the MicroPython firmware (which needs to include the
socket/sslmodule); - Email Configuration: Enable the SMTP service and obtain the "authorization code"(this is not the login password, and this step is required for all mainstream email services).
| Email Provider | SMTP Server | Non-SSL Port | SSL Port | How to Get Authorization Code / App Password (Summary) |
|---|---|---|---|---|
| QQ Mail | smtp.qq.com | 587 | 465 | Settings → Account → Enable POP3/SMTP/IMAP → Generate SMTP/POP3 authorization code |
| 163 Mail | smtp.163.com | 587 | 465 | Settings → POP3/SMTP/IMAP or Security Settings → Enable SMTP service → Generate authorization code (or client authorization password) |
| Gmail (Google) | smtp.gmail.com | 587 | 465 | Enable 2-Step Verification → Go to App Passwords → Generate a 16-digit app password for "Mail" or a custom app |
Among these, it is extremely important to note that the authorization code and the login password are two distinct things:
| Item | QQ login password | Authorization code |
|---|---|---|
| Purpose | Log in to QQ / web mailbox | Log in to third-party clients |
| Scope of Use | Official services | POP3 / IMAP / SMTP, etc. |
| Security | High risk of exposure | Can be revoked individually |
| Can be managed separately | ❌ | ✅ |
An authorization code can be used to log in to the following QQ Mail services:
- POP3
- IMAP
- SMTP
- Exchange
- CardDAV (Address Book)
- CalDAV (Calendar)
👉 Essentially, an authorization code is a dedicated key for "third-party applications". It is recommended that one device / one program corresponds to one unique authorization code.
3.2 Configuration Taking QQ Mail as an Example
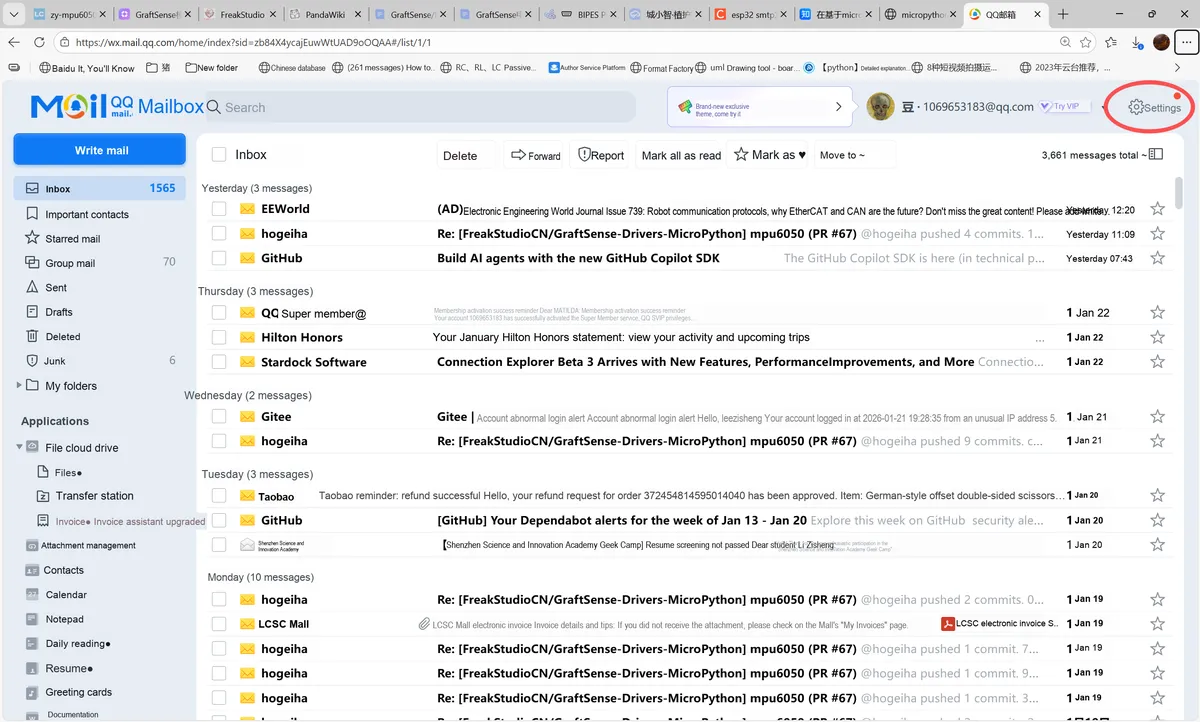
After clicking the "Settings" button in the top-right corner on the homepage of QQ Mail, we will enter the main settings page. Next, we need to locate and click the "Account and Security" option in the left menu bar to access the account security configuration interface.
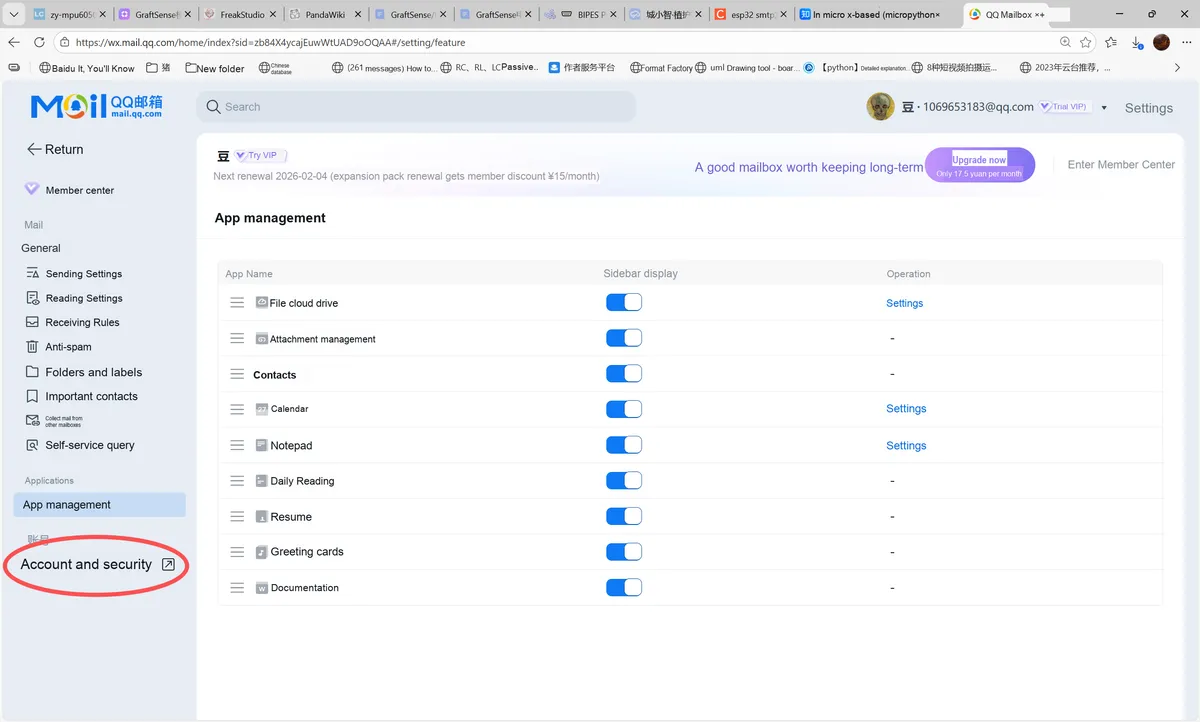
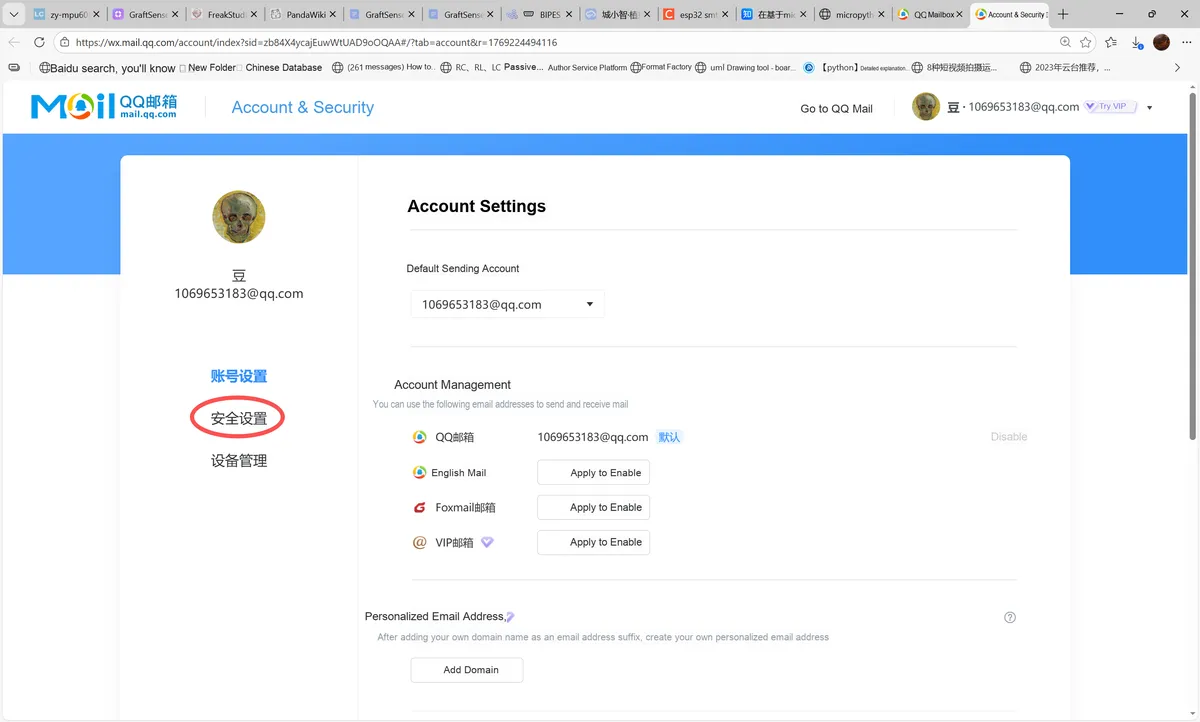
After entering the "Account & Security" page, locate the "Security Settings" option in the left navigation bar and click on it to access the core configuration page related to security.
In the security settings page, we locate the "POP3/IMAP/SMTP/Exchange/CardDAV Services" section, which is the key entry for configuring third-party Mail User Agents. Clicking "Configuration Method" allows you to learn the protocol details first.
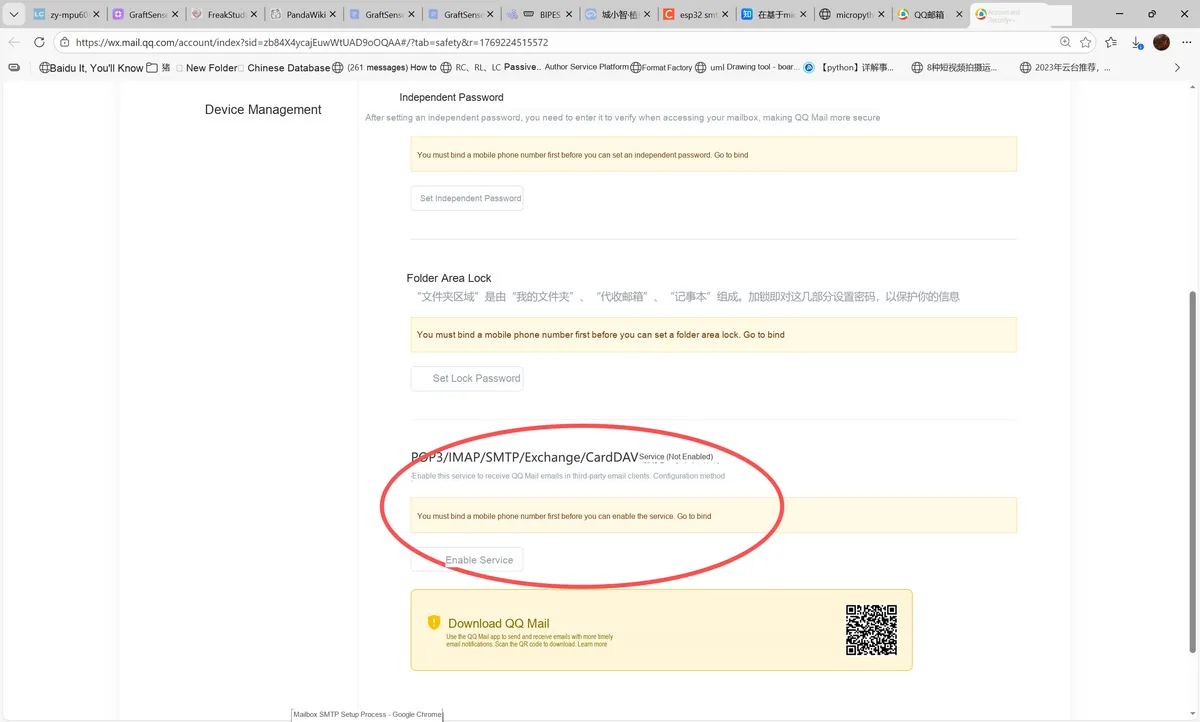
After clicking "Configuration Method", we are directed to the instruction page for POP3/IMAP/SMTP services, which elaborates on the differences between these protocols and the function of authorization codes. After familiarizing ourselves with this information, we return to the security settings page to proceed with the configuration.
https://wx.mail.qq.com/list/readtemplate?name=app_intro.html#/agreement/authorizationCode
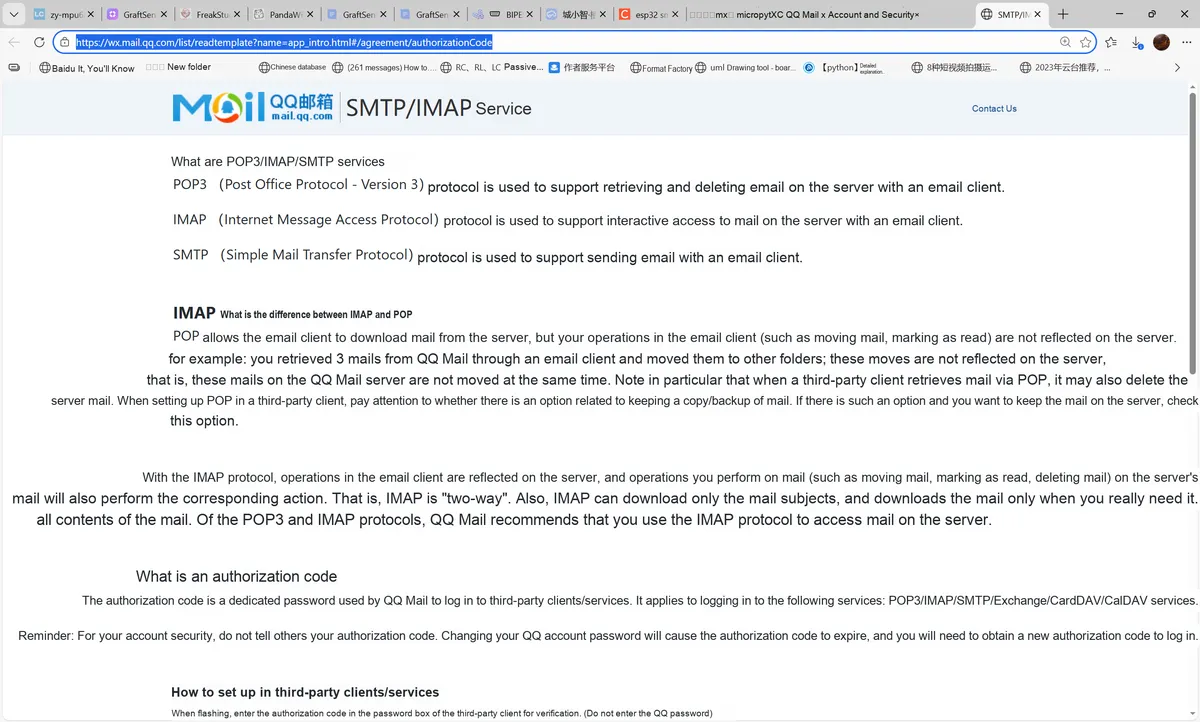
Simply put, the summary is as follows:
| Protocol | Full Name | Main Function | In One Sentence |
|---|---|---|---|
| POP3 | Post Office Protocol v3 | Receive email (download) | Moves mail to the local machine; the server is mostly left alone afterward |
| IMAP | Internet Message Access Protocol | Receive email + synchronized management | Local and server stay in "real-time sync" |
| SMTP | Simple Mail Transfer Protocol | Send email | Dedicated to "sending mail out" |
The uses of these different protocols can be briefly summarized as follows:
- POP3 / IMAP: Receive Emails
- SMTP: Send Emails
- When actually using an email client, it is always used in the combined mode of "receiving + sending"
The core differences between POP3 and IMAP are as follows:
| Comparison | POP3 | IMAP |
|---|---|---|
| Syncs with Server | ❌ No | ✅ Yes (two-way sync) |
| Default Mail Behavior | Downloaded locally | Kept on the server |
| Local Actions Affect Server | ❌ No effect | ✅ Synced |
| Multi-Device Sync Support | ❌ Very poor | ✅ Very good |
| Can Download Headers Only | ❌ No | ✅ Supported |
| Suitable Scenarios | Single device, legacy clients | Multiple devices, modern use |
| Officially Recommended by QQ Mail | ❌ Not recommended | ✅ Recommended |
When in use, the general login information that a third-party Client needs to fill in is as follows:
| Item | What to Enter |
|---|---|
| Username / Account | Full QQ Mail address (e.g., xxx@qq.com) |
| Email address | Full QQ Mail address |
| Password | Authorization code (not the QQ password) |
You can choose from the following two options for the configuration of a third-party Client for QQ Mail:
| Option | Function type | Protocol | Server address | Port | Encryption | Recommendation |
|---|---|---|---|---|---|---|
| Option 1 | Receive email | IMAP | imap.qq.com | 993 | SSL | ⭐⭐⭐⭐⭐ (Recommended) |
| Send email | SMTP | smtp.qq.com | 465 / 587 | SSL / STARTTLS | ⭐⭐⭐⭐⭐ | |
| Option 2 | Receive email | POP3 | pop.qq.com | 995 | SSL | ⭐ (Not recommended) |
| Send email | SMTP | smtp.qq.com | 465 / 587 | SSL / STARTTLS | ⭐⭐⭐ |
When using POP3, the following points should be noted:
| Notes | Description |
| Keep server copy | When using POP3, be sure to check "Keep a copy of messages on the server", otherwise messages may be deleted from the server |
| Multi-device sync | POP3 does not support multi-device status sync, which can easily cause lost or disordered email |
| Official recommendation | QQ Mail officially recommends using the IMAP + SMTP option first |
To sum up, IMAP is recommended for receiving emails, SMTP should be used uniformly for sending emails, and POP3 is not recommended unless there are specific special requirements.
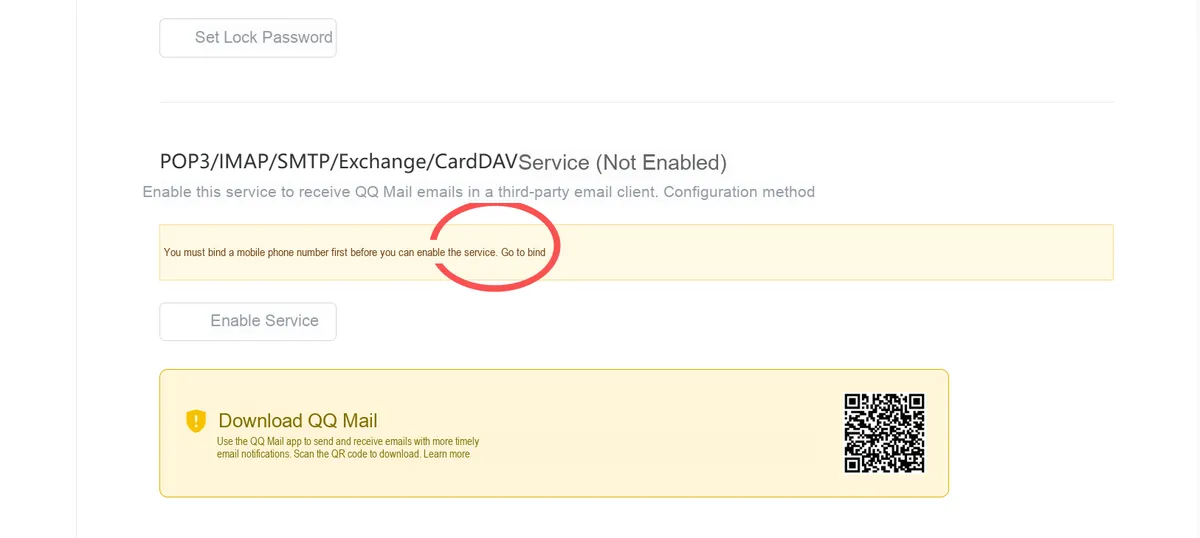
Return to the security settings page, where you will see that you need to bind your mobile phone number first to enable the service. After clicking "Go to Bind" to complete the mobile phone number binding, the "Enable Service" button will be activated, and then we click this "Enable Service" button.
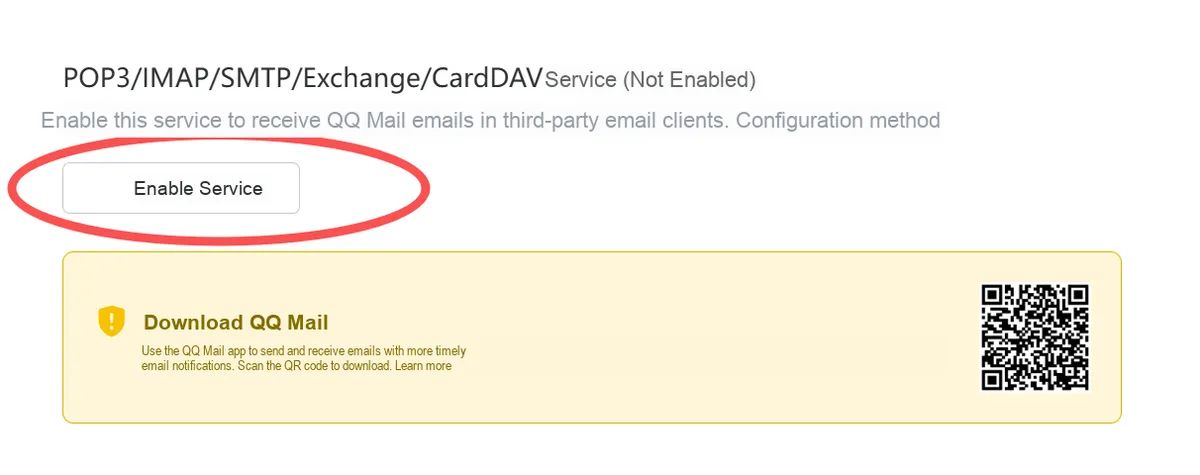
After tapping "Enable Service", the system will enter the SMS verification step. You can complete the verification by scanning a code or sending an SMS manually, then tap "I Have Sent" to submit the verification information.
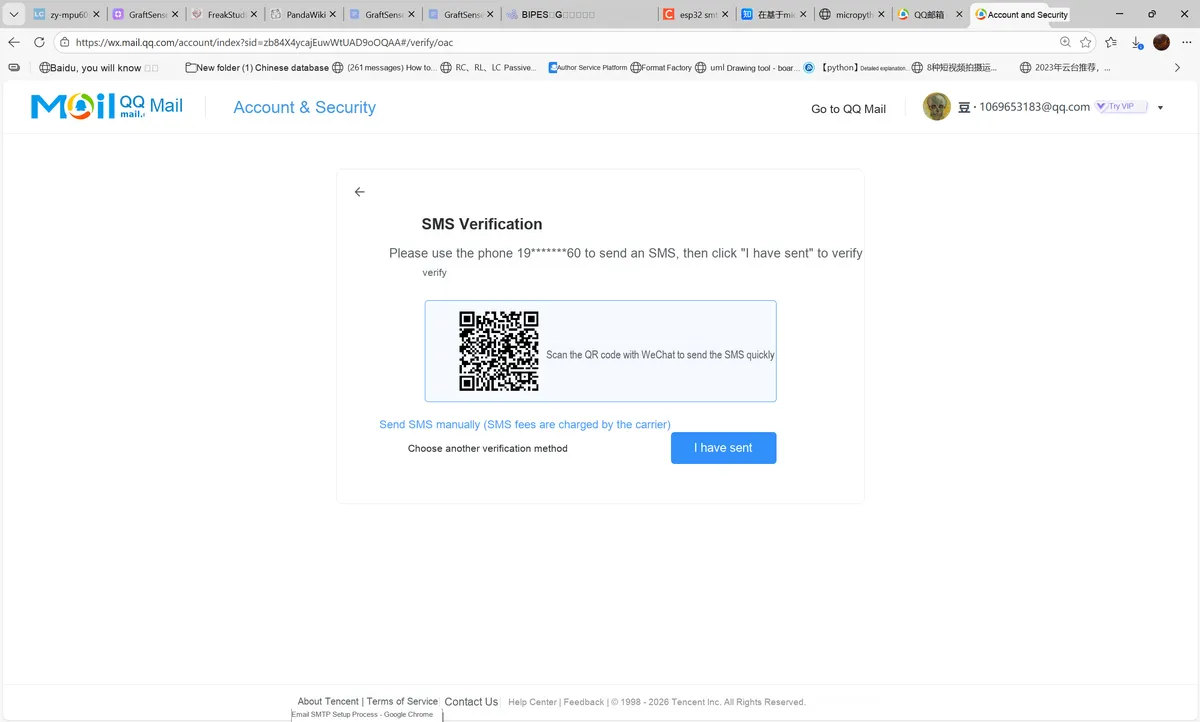
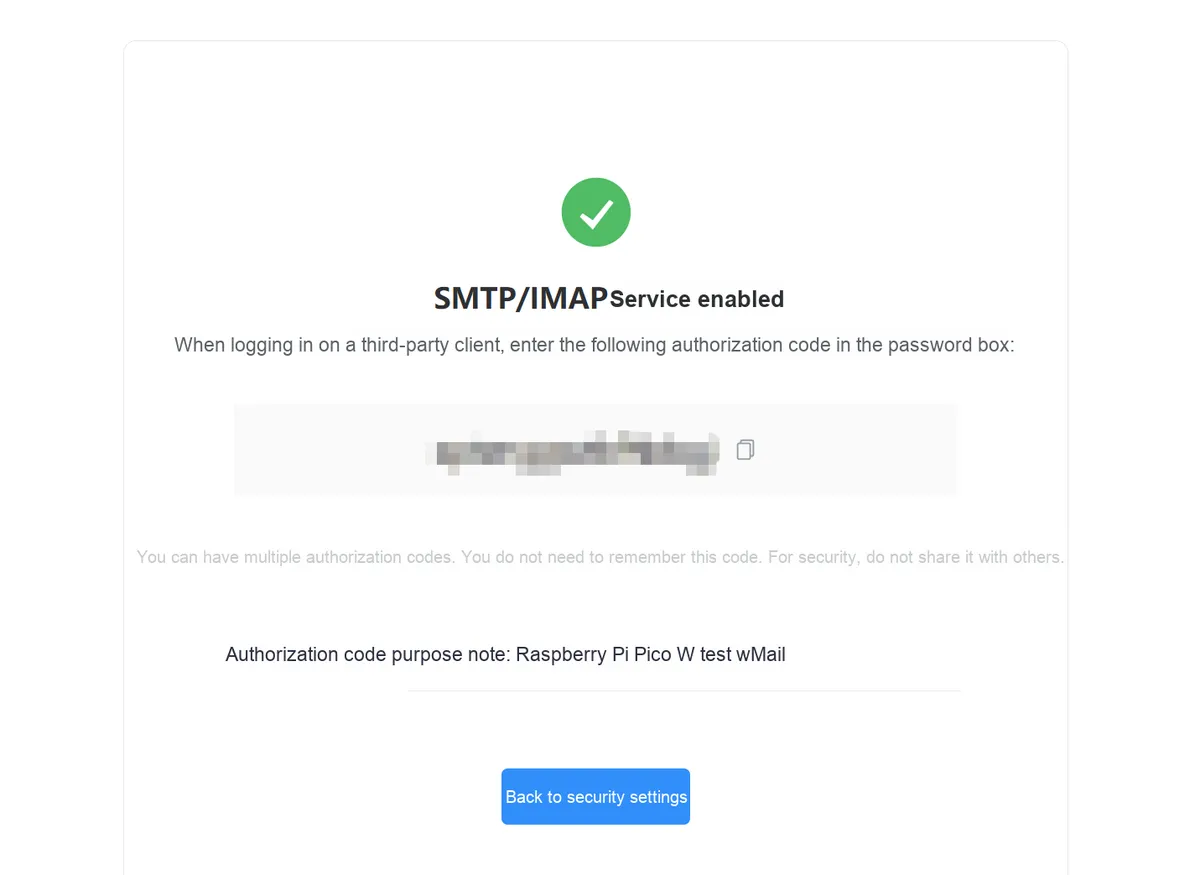
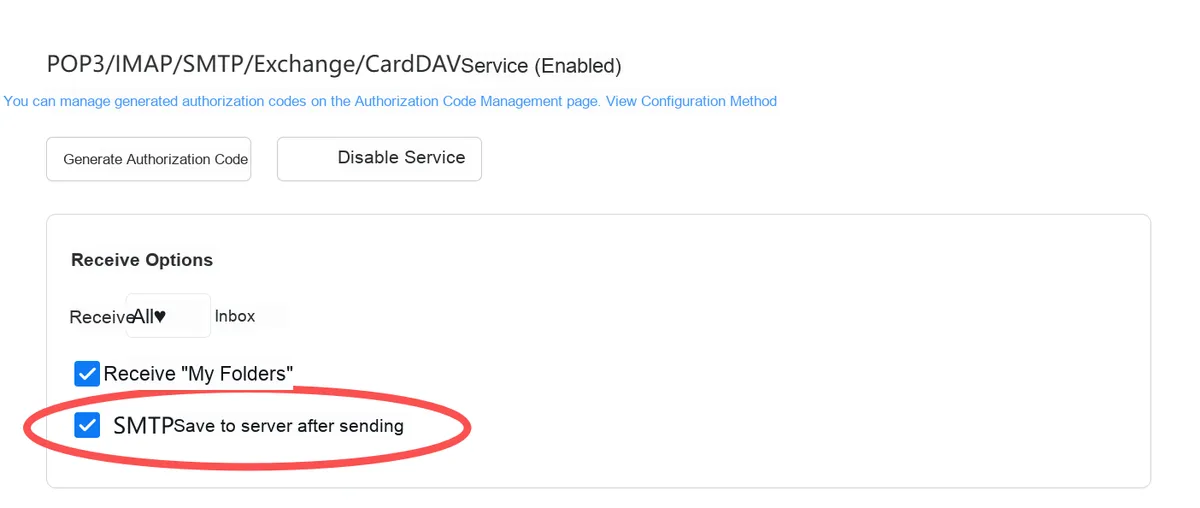
After returning to the security settings page, check the option "Save to server after SMTP sending" in the "Receiving Options" section, which ensures that emails sent via a third-party Client will also be retained as backups on the QQ Mail server.
3.3 Relevant Cases
3.3.1 WiFi Connection (Mandatory Preparatory Step)
The MCU must connect to WiFi first before accessing the SMTP server; the complete WiFi connection code is provided below:
import network
import time

# Your WiFi configuration (replace with the actual SSID and password)
WIFI_SSID = "Xiaomi_D0EC"
WIFI_PASSWORD = "12345678"

def connect_wifi():
    """Connect to WiFi, return whether the connection succeeded"""
    # Create a WLAN object (Pico 2W uses STA mode, i.e. client mode)
    wlan = network.WLAN(network.STA_IF)
    wlan.active(True)  # Activate WiFi

    # Avoid reconnecting
    if wlan.isconnected():
        print("已连接 WiFi,IP 地址:", wlan.ifconfig()[0])
        return True

    # Start connecting to WiFi
    print("正在连接 WiFi:", WIFI_SSID)
    wlan.connect(WIFI_SSID, WIFI_PASSWORD)

    # Wait for connection (up to 10 seconds)
    timeout = 10
    while not wlan.isconnected() and timeout > 0:
        print("等待连接中...剩余超时时间:", timeout, "秒")
        time.sleep(1)
        timeout -= 1

    # Check the connection result
    if wlan.isconnected():
        print("WiFi 连接成功!IP 地址:", wlan.ifconfig()[0])
        return True
    else:
        print("WiFi 连接失败,请检查 SSID/密码或网络环境")
        return False

# Run the WiFi connection (it must succeed before continuing to send the email)
if not connect_wifi():
    raise Exception("WiFi 连接失败,无法继续发送邮件")
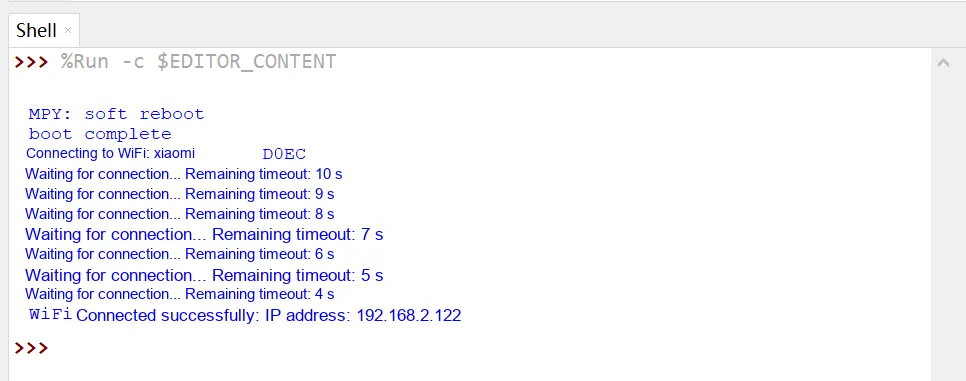
3.3.2 Basic Usage (WiFi + Email Sending)
First, we import the umail library:
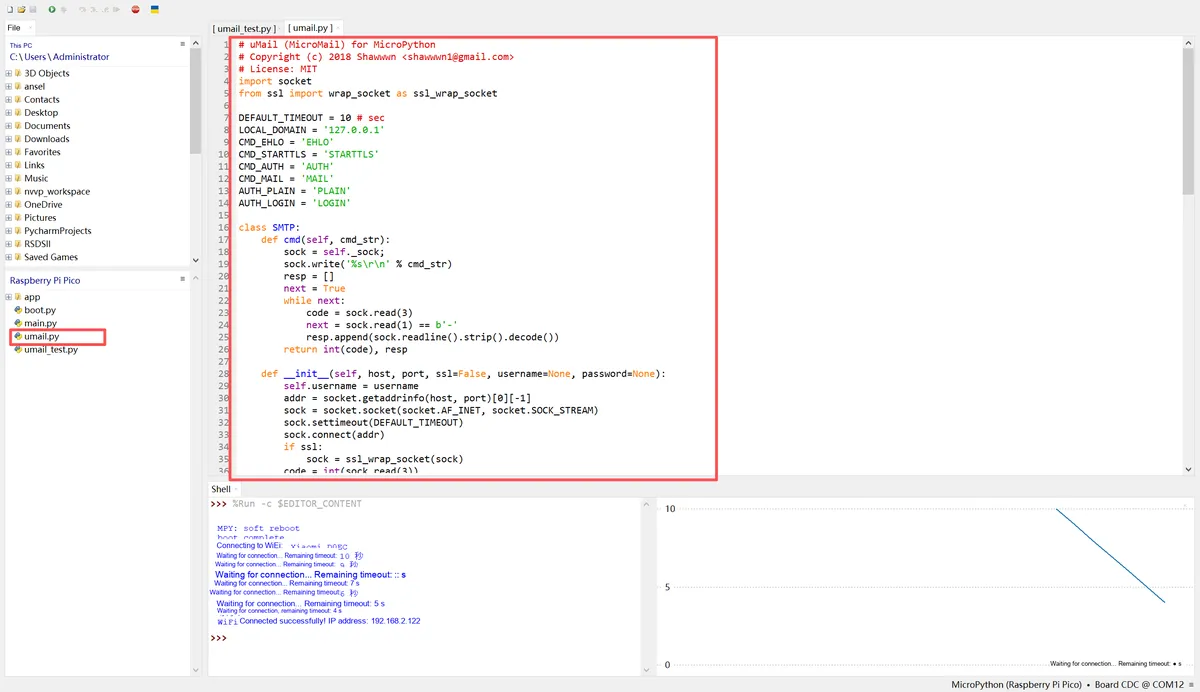
On the basis of a successful WiFi connection, here is the complete code for sending a short text email. Note that only by using port 465 for SSL and including the From/To/Subject/MIME-Version/Content-Type standard headers can the email be properly displayed and visible in QQ Mail:
import umail
import network
import time

WIFI_SSID = "Xiaomi_D0EC"
WIFI_PASSWORD = "12345678"

def connect_wifi():
    wlan = network.WLAN(network.STA_IF)
    wlan.active(True)
    if wlan.isconnected():
        print("已连接 WiFi:", wlan.ifconfig()[0])
        return True
    wlan.connect(WIFI_SSID, WIFI_PASSWORD)
    timeout = 10
    while not wlan.isconnected() and timeout > 0:
        time.sleep(1)
        timeout -= 1
    if wlan.isconnected():
        print("WiFi 连接成功:", wlan.ifconfig()[0])
        return True
    else:
        print("WiFi 连接失败")
        return False

if not connect_wifi():
    raise Exception("WiFi 连接失败")

# ========== Send email (using SSL port 465) ==========
FROM = "123456@qq.com"             # Your QQ mailbox (full address)
TO = "real_recipient@domain.com"   # Replace with the real recipient address
SUBJECT = "Pico 2W 告警通知"
BODY = "树莓派 Pico 2W 测试邮件:设备运行正常!"

try:
    smtp = umail.SMTP(
        host="smtp.qq.com",
        port=465,
        ssl=True,                 # Use SSL (465)
        username=FROM,
        password="abcdefghijklmn" # QQ mailbox authorization code (not the login password)
    )

    # Add standard headers; it is safer if From matches the login user
    msg = (
        "From: {}\r\n"
        "To: {}\r\n"
        "Subject: {}\r\n"
        "MIME-Version: 1.0\r\n"
        "Content-Type: text/plain; charset=UTF-8\r\n"
        "\r\n"
        "{}"
    ).format(FROM, TO, SUBJECT, BODY)

    smtp.to(TO)
    smtp.send(msg)
    smtp.quit()
    print("邮件发送成功(已通过 SMTP 提交)!")
except Exception as e:
    print("邮件发送失败:", e)
Wherein:
MIME-Version: 1.0: Indicates that the email complies with the MIME standard, and it is an essential header for modern emails;Content-Type: text/plain; charset= UTF-8: specifies that the email content is plain text with UTF-8 encoding, which resolves garbled Chinese characters;- There must be a blank line between the header and the body (
\r\n), which is a mandatory requirement of the SMTP protocol; Frommust be consistent with the login account; otherwise, it will be rejected by service providers such as QQ Mail.

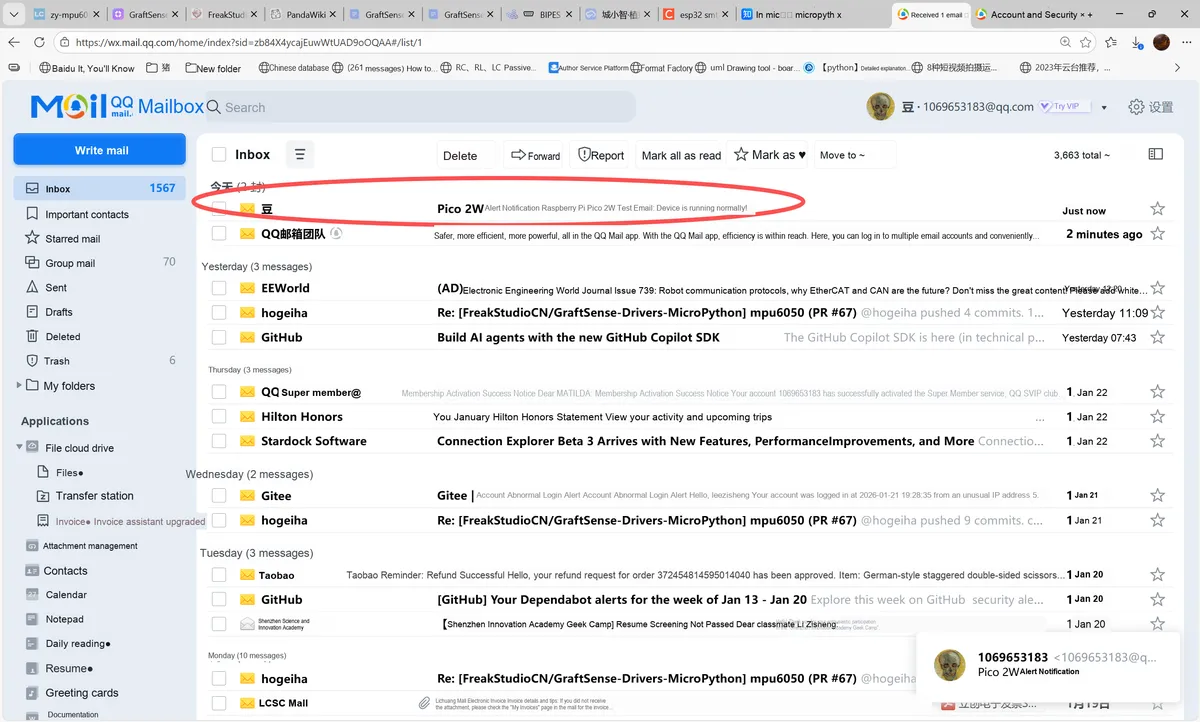
After completing the SMTP service configuration and the writing of the corresponding function code, click Run, and we can see that the email titled "Pico 2W Long Email Test (Chunked Sending)" has successfully appeared in the QQ mailbox inbox:
3.3.3 Advanced Usage: Sending Long Emails in Batches
The Pico 2W has limited memory, so long emails must be sent in chunks using write ():
import umail
import network
import time

# ====================== Step 1: Connect to WiFi ======================
WIFI_SSID = "Xiaomi_D0EC"
WIFI_PASSWORD = "12345678"

def connect_wifi():
    wlan = network.WLAN(network.STA_IF)
    wlan.active(True)
    if wlan.isconnected():
        print("已连接 WiFi:", wlan.ifconfig()[0])
        return True
    wlan.connect(WIFI_SSID, WIFI_PASSWORD)
    timeout = 10
    while not wlan.isconnected() and timeout > 0:
        time.sleep(1)
        timeout -= 1
    if wlan.isconnected():
        print("WiFi 连接成功:", wlan.ifconfig()[0])
        return True
    else:
        print("WiFi 连接失败")
        return False

if not connect_wifi():
    raise Exception("WiFi 连接失败")

# ====================== Step 2: Send email (SSL port 465) ======================
# Configure email information (replace with actual values)
FROM_EMAIL = "123456@qq.com"          # Your QQ mailbox (must match the login account)
TO_EMAIL = "real_recipient@domain.com"# Real recipient mailbox
EMAIL_SUBJECT = "Pico 2W 设备告警通知"
EMAIL_BODY = """树莓派 Pico 2W 测试邮件:
Device running status: normal
Current time: 2026-01-24
Sensor data: temperature 28℃ | humidity 60%
"""

# Build the email content with standard headers (key: specify UTF-8 encoding to avoid garbled Chinese text)
EMAIL_MSG = (
    "From: {from_email}\r\n"
    "To: {to_email}\r\n"
    "Subject: {subject}\r\n"
    "MIME-Version: 1.0\r\n"
    "Content-Type: text/plain; charset=UTF-8\r\n"
    "\r\n"  # A blank line is required between the headers and the body (SMTP protocol requirement)
    "{body}"
).format(
    from_email=FROM_EMAIL,
    to_email=TO_EMAIL,
    subject=EMAIL_SUBJECT,
    body=EMAIL_BODY
)

try:
    # Initialize the SMTP client (QQ Mail, port 465 SSL)
    smtp = umail.SMTP(
        host="smtp.qq.com",
        port=465,                # SSL-only port
        ssl=True,                # SSL must be enabled
        username=FROM_EMAIL,     # Login account = sender email
        password="abcdefghijklmn"# QQ Mail authorization code (not the login password)
    )

    # Specify the recipient (must match the To header of the email)
    smtp.to(TO_EMAIL)

    # Send the email content with standard headers
    smtp.send(EMAIL_MSG)

    # Close the connection (required)
    smtp.quit()

    print("邮件发送成功!已通过 SSL 465 端口提交")
except Exception as e:
    print("邮件发送失败:", str(e))
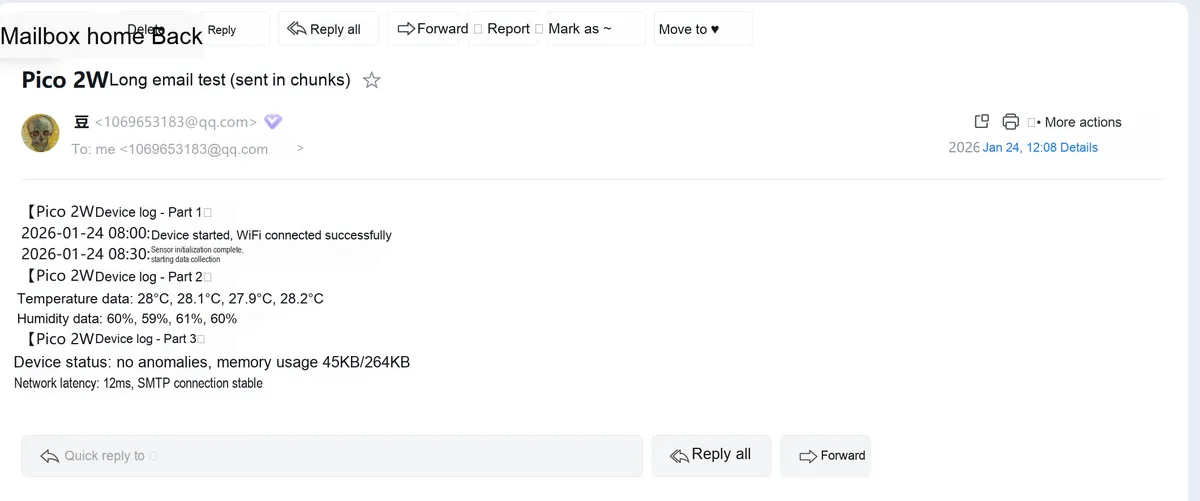
Click to view the details of this email, and you will see that the email fully contains log information such as device startup and Data Acquisition, which means that we have not only successfully completed the configuration of the QQ mailbox SMTP service, but also realized the function of chunking and sending long emails, and the entire email sending process can operate normally.
3.3.4 Advanced Usage: Custom MAIL FROM Address
Some professional email service providers (such as AWS SES and enterprise email) support the separation of the "sender address (MAIL FROM)" from the login account, which needs to be customized via the smtp.to () mail_from parameter (sender/domain verification needs to be completed in advance on the service provider's backend).
The following is a complete example adapted to port 465 SSL and containing standard email headers (taking AWS SES as an example):
import umail
import network
import time

# ====================== Step 1: Connect to WiFi ======================
WIFI_SSID = "Xiaomi_D0EC"
WIFI_PASSWORD = "12345678"

def connect_wifi():
    wlan = network.WLAN(network.STA_IF)
    wlan.active(True)
    if wlan.isconnected():
        print("已连接 WiFi:", wlan.ifconfig()[0])
        return True
    wlan.connect(WIFI_SSID, WIFI_PASSWORD)
    timeout = 10
    while not wlan.isconnected() and timeout > 0:
        time.sleep(1)
        timeout -= 1
    if wlan.isconnected():
        print("WiFi 连接成功:", wlan.ifconfig()[0])
        return True
    else:
        print("WiFi 连接失败")
        return False

if not connect_wifi():
    raise Exception("WiFi 连接失败")

# ====================== Step 2: Send email with custom MAIL FROM ======================
# Configuration (replace with actual values)
SMTP_USERNAME = "AKIAXXXXXXXXXXXXXX"  # AWS SES login account (not an email address)
SMTP_PASSWORD = "XXXXXXXXXXXXXXXXXXXXXXXXXXXXXXXXXXXXXXXX"  # AWS SES authorization code
SMTP_HOST = "email-smtp.us-west-2.amazonaws.com"  # AWS SES SMTP server
TO_EMAIL = "someones@gmail.com"  # Recipient email
CUSTOM_MAIL_FROM = "notification@my-domain.com"  # Custom sender address (must be verified in AWS)
EMAIL_SUBJECT = "自定义 MAIL FROM 测试(SSL 465)"
EMAIL_BODY = """这是通过 Pico 2W 发送的自定义发件人测试邮件:
- Login account: {smtp_user}
- Actual sender (MAIL FROM): {custom_from}
- Recipient: {to_email}
""".format(smtp_user=SMTP_USERNAME, custom_from=CUSTOM_MAIL_FROM, to_email=TO_EMAIL)

# Build the email content with standard headers
EMAIL_MSG = (
    "From: {custom_from}\r\n"  # Sender shown in the email (recommended to match MAIL FROM)
    "To: {to_email}\r\n"
    "Subject: {subject}\r\n"
    "MIME-Version: 1.0\r\n"
    "Content-Type: text/plain; charset=UTF-8\r\n"
    "\r\n"
    "{body}"
).format(
    custom_from=CUSTOM_MAIL_FROM,
    to_email=TO_EMAIL,
    subject=EMAIL_SUBJECT,
    body=EMAIL_BODY
)

try:
    # Initialize the SMTP client (AWS SES, port 465 SSL)
    smtp = umail.SMTP(
        host=SMTP_HOST,
        port=465,                # AWS SES supports port 465 SSL
        ssl=True,                # Force SSL on
        username=SMTP_USERNAME,  # AWS SES login account (different from the custom sender)
        password=SMTP_PASSWORD   # AWS SES authorization code
    )

    # Key: customize the MAIL FROM address via the mail_from parameter
    smtp.to(TO_EMAIL, mail_from=CUSTOM_MAIL_FROM)

    # Send the email with standard headers
    smtp.send(EMAIL_MSG)

    # Close the SSL connection
    smtp.quit()

    print(f"邮件发送成功!自定义 MAIL FROM:{CUSTOM_MAIL_FROM}")
except Exception as e:
    print(f"自定义 MAIL FROM 发送失败:{str(e)}")
Please note the following when using it:
- Prerequisites for customizing MAIL FROM:
- Only some service providers (e. g. AWS SES, SendGrid, self-built enterprise SMTP) support this feature, while free email services such as QQ and 163 do not allow the
mail_fromto be inconsistent with the login account; - You need to complete "Sender Domain / Email Verification" in the service provider backend in advance (for example, AWS SES requires verifying
my-domain.comdomain, otherwise the request will be rejected).
- Only some service providers (e. g. AWS SES, SendGrid, self-built enterprise SMTP) support this feature, while free email services such as QQ and 163 do not allow the
- Parameter Matching:
mail_fromofsmtp.to (): refers to the "sender"(MAIL FROM command) at the SMTP protocol layer, which is used for email routing;- The
From: in the email header is the "display sender" seen by the recipient. It is recommended to be consistent withmail_fromto avoid being judged as junk email.
IV. API Reference
4.1 Core Class: umail.SMTP
Initialization method:
umail.SMTP(host, port, ssl=False, username=None, password=None)| Parameter | Type | Description |
|---|---|---|
| host | str | SMTP server address (e.g., smtp.qq.com, smtp.gmail.com) |
| port | int | Server port (587 = non-SSL / STARTTLS; 465 = SSL) |
| ssl | bool | Whether to use SSL encryption directly: set to True if using 465, False if using 587 (and use STARTTLS) |
| username | str | Email account (usually the full email address; optional, if not passed at initialization, login() can be called later) |
| password | str | Email authorization code or app-specific password (optional, used together with username; do not use the main email login password) |
4.2 Core Methodology
| Method | Purpose |
|---|---|
| login(username, password) | Log in to the SMTP server manually (used when no account/password was passed at initialization). |
| to(addrs, mail_from=None) | Specify recipients: - addrs: string (single) or list (multiple); - mail_from: custom sender (default = login account, recommended not to change). |
| write(content) | Send content to the server in chunks (content is a string or binary), no return value (used for sending long message bodies or segmented upload). |
| send(content='') | Finish sending the email: - content: optional, short content can be passed directly as the complete email (including headers); for long content, call write() first to upload in chunks, and pass an empty string here; - Returns: (status code, response message). |
| quit() | Send the QUIT command and close the SSL-encrypted TCP connection (must be executed to end the session properly). |
5. Precautions for Use
- WiFi Connection Priority: Pico 2W must successfully connect to WiFi first before accessing the SMTP server. It is recommended to add the logic of "terminate the program if the connection fails" in the code;
- Authorization Code Instead of Login Password: All mainstream email services (QQ/163/Gmail) require logging in to SMTP with an "authorization code" rather than a regular login password. You need to enable SMTP in your email settings first and generate an authorization code;
- Port matches SSL parameters:
- Port 587:
ssl= False(dynamic encryption via STARTTLS); - Port 465:
ssl= True(direct SSL encryption);
- Port 587:
- quit () must be called: failure to close the connection will occupy server resources and may result in login restrictions imposed by the email service provider;
- Memory Limit: The Pico 2W only has 264KB of memory, and the content passed in a single
write ()call should not exceed 1KB; for excessively long content, you need to callwrite ()multiple times; - Exception Handling: The µMail source code makes extensive use of
assert, and it is recommended to usetry-exceptto catch exceptions when running on Pico 2W (to prevent program crashes); - Firmware Compatibility: Ensure that the MicroPython firmware of the MCU supports the
networkandsslmodules (the latest official firmware is recommended).
Version Record
Version Number | Revision Date | Modifier | Modify Content |
v1.0 | 2026-01-24 | Lee Eonyong | Initial release, based on the release date 2026-01-19 (MicroPython v1.24.0) |