
Contents
- Abstract
- 0. Introduction
- 1. Introduction
- 2. Description of MicroPython Third-Party Library Files and Folder Organization
- 2.1 What is a release library file
- 2.2 Library File Organization
- 2.3 Library File Description
- 3. Code Formatting Specifications and Static Checking
- 3.1 Use the black module to standardize your code
- 3.2 Static Code Checking Using the Flake8 Module
- 3.3 Automatic Execution Using Pre-commit Hooks
- 3.4 Usage of GitHub Accelerator
- 3.5 Introduction to the mpremote Tool and One-Click Download
- 4. Publicly released on the PyPi platform
- 4.1 PyPi Platform Registration
- 4.2 Create Distribution Package
- 5. Reference Links
Abstract
This article explains the description and organization of third-party library files, the selection of open source Licensing Agreement, the implementation of automatic code formatting specification and static checking through the black module, Flake8 module and pre-commit hook, the public release on Github/PyPi platforms, as well as the one-click installation of MicroPython third-party libraries via the mpremote tool.
0. Introduction
Recently, when I was using the serial servo library of Hiwonder Technology, I found that there are some issues with its supporting MicroPython SDK:
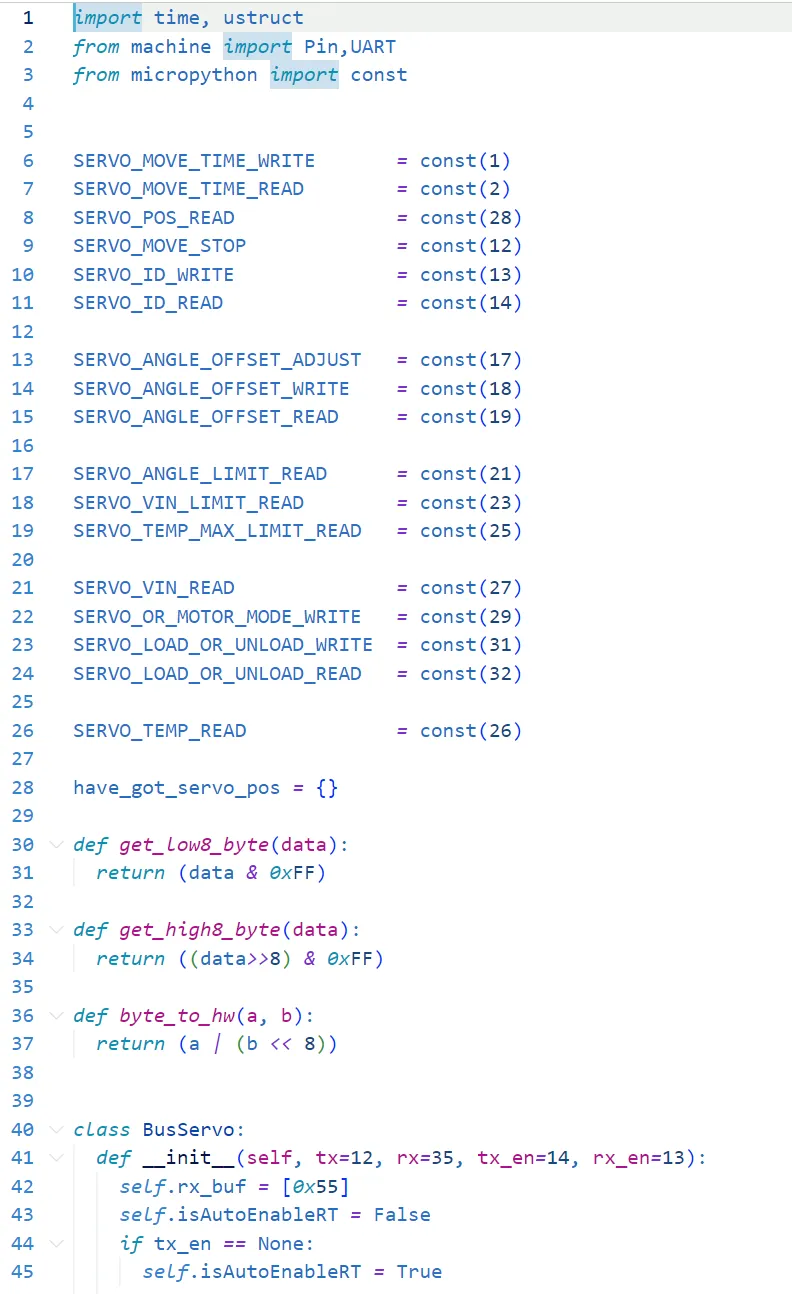
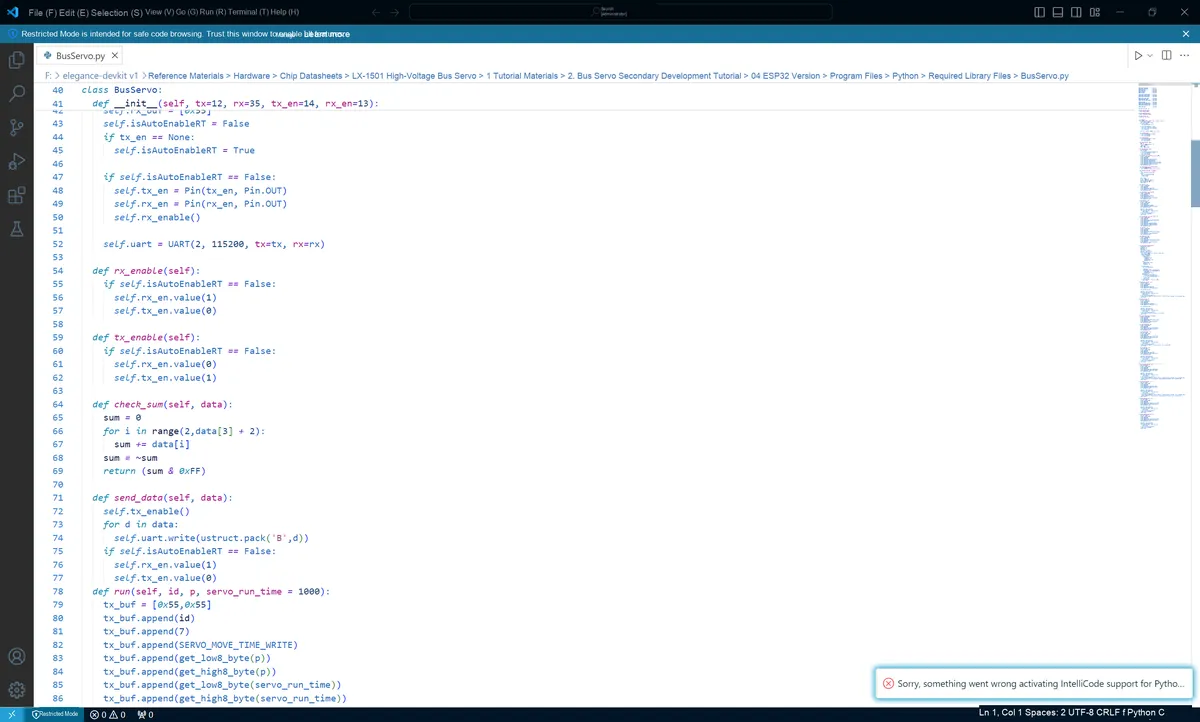
In practice, it fails to properly implement functional decoupling and make full use of Python's Object Oriented features.
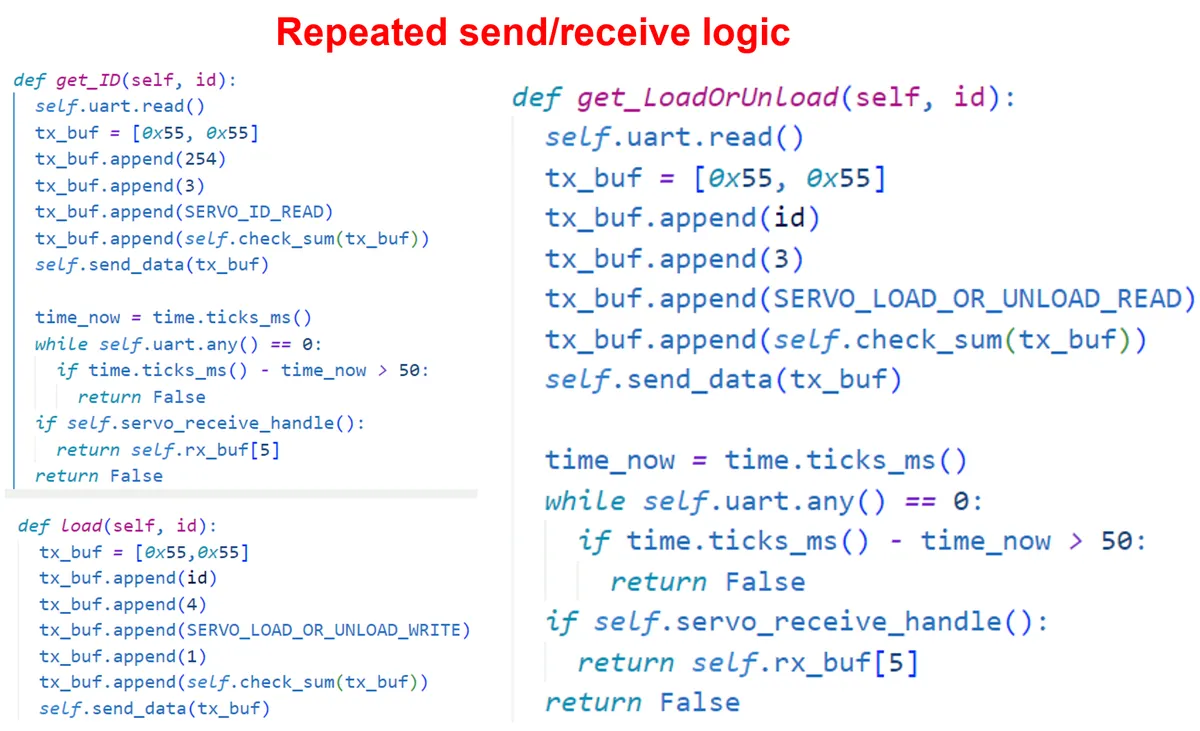
It can be seen that there are repeated sending and receiving logics among multiple methods:
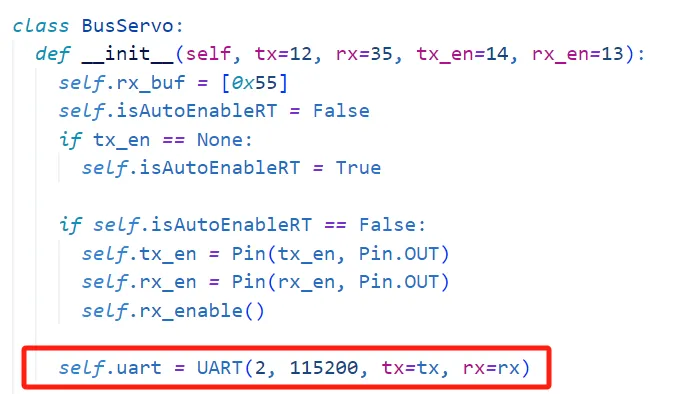
Meanwhile, parameters such as the UART baud rate (115200) and timeout period (50ms) are hardcoded in the code rather than being configurable.
Furthermore, the absence of API documentation and sample code hinders users from getting started quickly, and there is also a lack of necessary entry parameter verification mechanisms, such as checking whether the servo ID, angle range and speed range are valid.
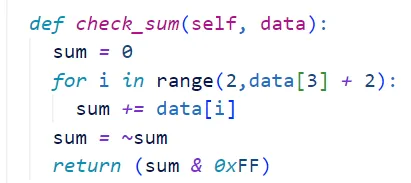
Therefore, I decided to write a MicroPython version of the Hiwonder serial servo library myself.
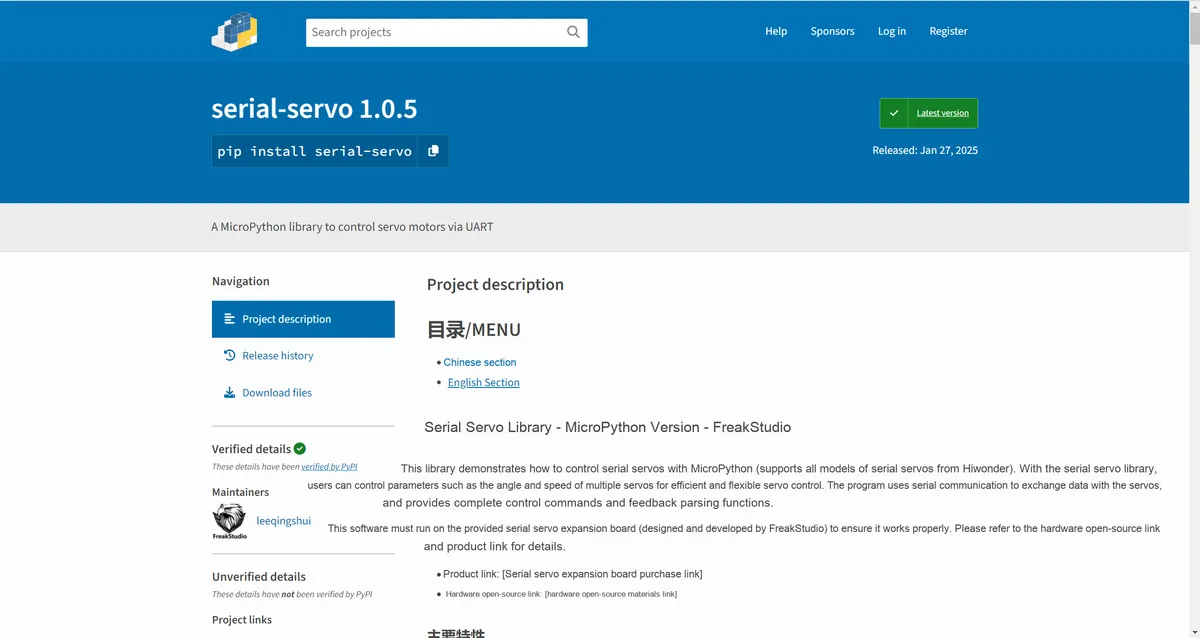
The main features include:
- Communicates with the servo motors via UART serial port, and supports multi-servo control.
- Supports multiple settings such as the angle, speed, and operation mode of the servo.
- Supports real-time reading of servo temperature, voltage, angle and other parameters.
- The checksum mechanism ensures the integrity of data transmission, Hiwonder serial port
- All 28 commands for the steering gear have been fully implemented and encapsulated into a class.
- A complete exception handling mechanism, with detailed checks on input parameters.
- Improved comments: all methods and classes are provided with type annotations.
The code repository is located at: https://github.com/leezisheng/freakstudio-micropython-libraries/tree/main/serial_servo
By configuring its project dependency files, one-click download can be achieved via the mpremote tool:
mpremote mip install github:leezisheng/freakstudio-micropython-libraries/serial_servoFor a detailed introduction, you can check out my blog:
https://www.cnblogs.com/FreakEmbedded/p/18742422
While publishing the library, I found that many online tutorials are outdated, most of them cannot work properly in the current version, and there are very few Chinese tutorials for releasing third-party libraries for MicroPython, which is exactly what prompted me to write this tutorial.
1. Introduction

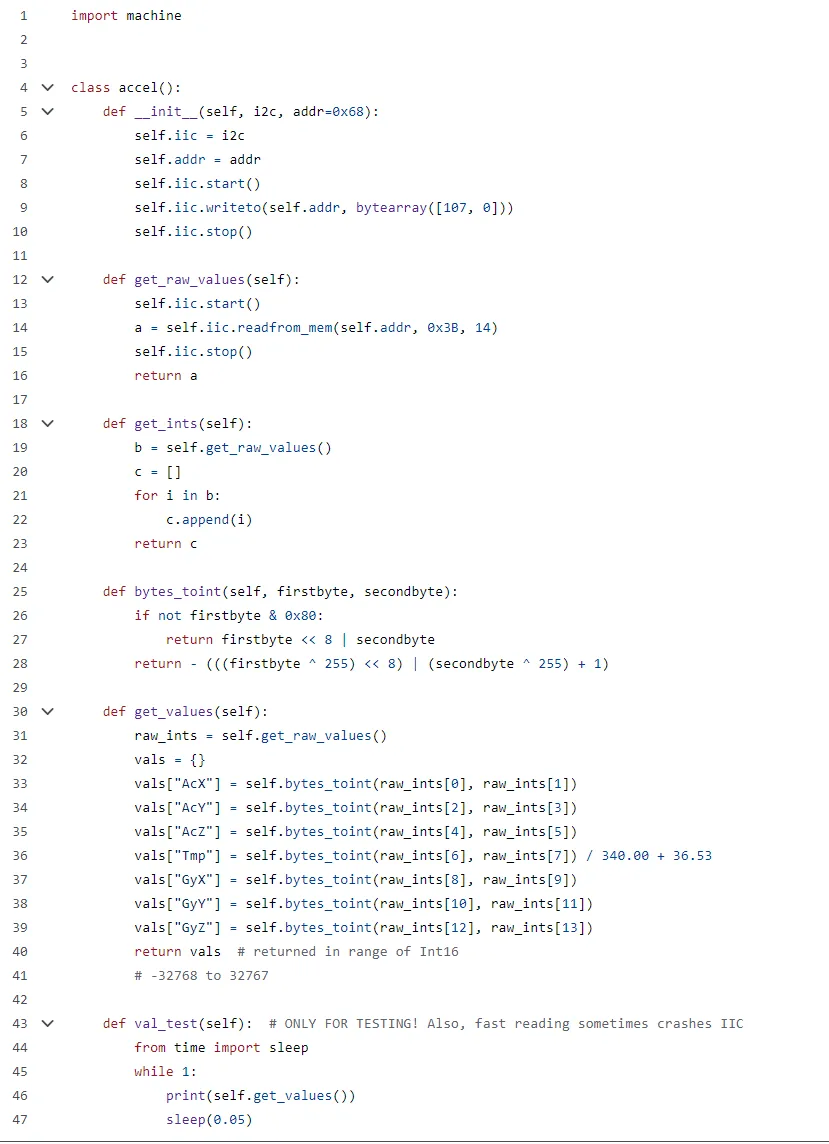
In the early stage of the development of the MicroPython ecosystem, when developers shared or used third-party libraries, they often needed to manually download multiple files and copy them to the project directory. This "copy-paste" method was not only cumbersome, but also easily caused problems such as version confusion and missing dependencies. At the same time, we can see that the comments in many code documents are not perfect, which makes it difficult to get started. Often, when looking at the API, one has no idea what type the entry parameters are, as shown below:
As the tools in the MicroPython community mature (such as mpremote, upip), releasing third-party libraries in compliance with standard procedures has now become an indispensable part of learning MicroPython development. By writing a standardized package.json project dependency file, a complete README.md file, and code that follows the PEP8 specification, we can make it easier for others to use the MicroPython library files we develop.
For example, we can use the mpremote tool to directly implement one-click download of the third-party modules we write and their dependent libraries:
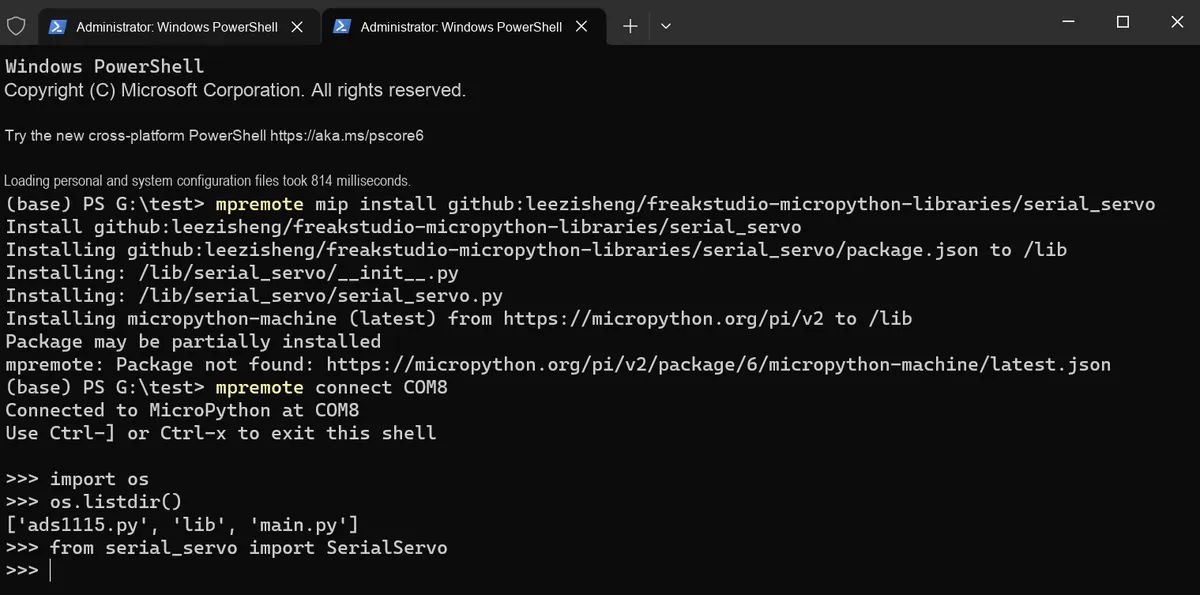
It can be seen that standardized library files eliminate the need for users to manually manage file paths, as both dependency resolution and updates can be automatically handled by the toolchain, significantly lowering the barrier to entry. Moreover, if there are updates to this library in our GitHub repository, you can still complete the installation of the library files directly with a single command.
This article will take the MicrPython serial servo library we developed as an example to explain how to standardize the release of third-party MicroPython library files.
The link to the relevant code is as follows:
https://github.com/leezisheng/freakstudio-micropython-libraries/tree/main/serial_servo
Since releasing MicroPython-lib is rather cumbersome, we have published the entire library file on PyPi:
https://pypi.org/project/serial-servo/
If you want to learn how to publish third-party Python libraries, this article is also perfectly suitable for you.
This article is intended for entry-level readers who have a certain foundation in Python, understand Python virtual environment configuration and Object Oriented programming syntax, have prior practical experience in MicroPython development, and possess basic version control awareness but are unfamiliar with open source release. The main contents of this article are as follows:
- Description of Files Required for Third-Party Libraries and Folder Organization
- Use the Pre-commit hook to automatically invoke the black and Flake8 modules for code formatting specification and static checking
- Registration and Public Release on the PyPi Platform
2. Description of MicroPython Third-Party Library Files and Folder Organization
2.1 What is a release library file
In MicroPython, publishing a library file refers to sharing the developed functional modules or tool libraries with other developers in a standardized manner. By publishing the library files we have written, others can quickly integrate and use these libraries without having to write the same functions from scratch. Publishing a library file usually includes function implementations, configuration files, sample code and documentation, which are organized according to certain specifications, so that other users can use these functional modules through a simple installation and import process.
For MicroPython, releasing a library file is not just an ordinary. py file; it should also include the project's metadata, documentation, examples, license and other components, so that other developers can quickly understand and use it. The following is the organization content of our serial servo library file:
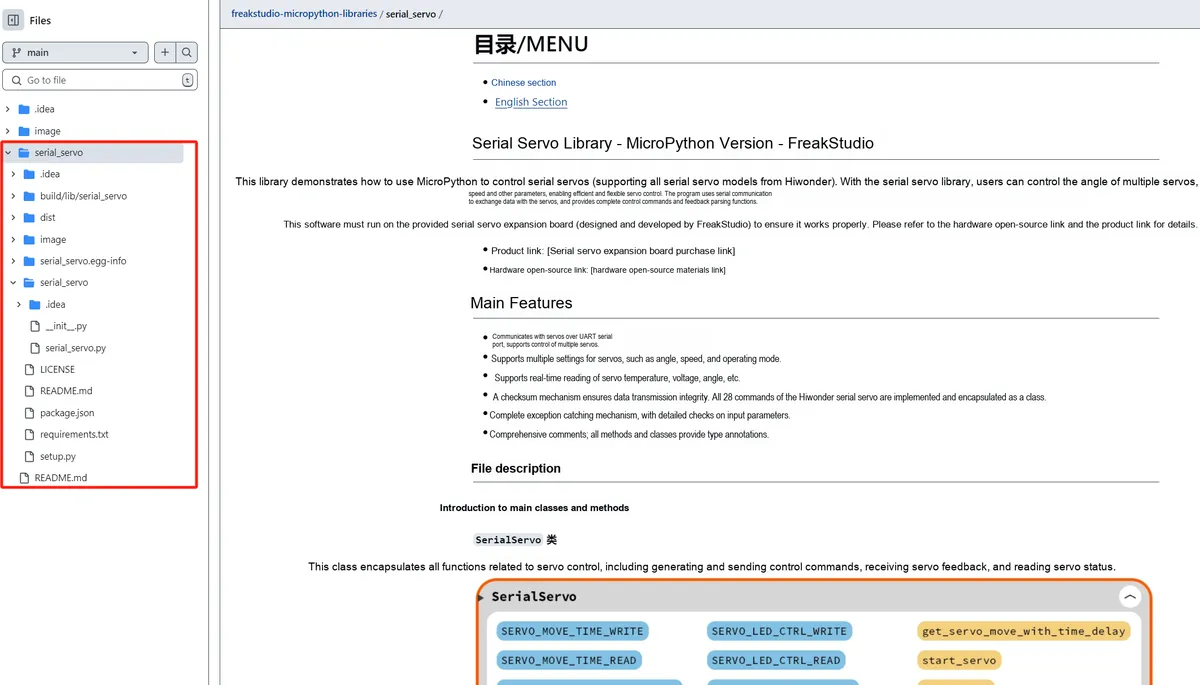
As can be seen, these include function implementation files (. py files), README.md files, open-source licenses, sample main programs, project dependency files, and so on.
As a side note here, publicly releasing a MicroPython library on GitHub does not mean formally "publishing" it to a package management platform (such as PyPI) in the official sense, though this process is commonly referred to as "publishing" or "public release", since you are making your library available for other developers to use, and you can leverage GitHub for version management, issue tracking and community collaboration.
The process of publishing a MicroPython library file includes:
- Encapsulate the functional modules and utility classes into a form that is easy to install and use.
- Ensure that the library has a well-organized structure and complete documentation so that other developers can understand and use it.
- Choose an appropriate license where applicable to allow others to modify and share the code.
Generally speaking, MicroPython/Python is released on the following platforms:
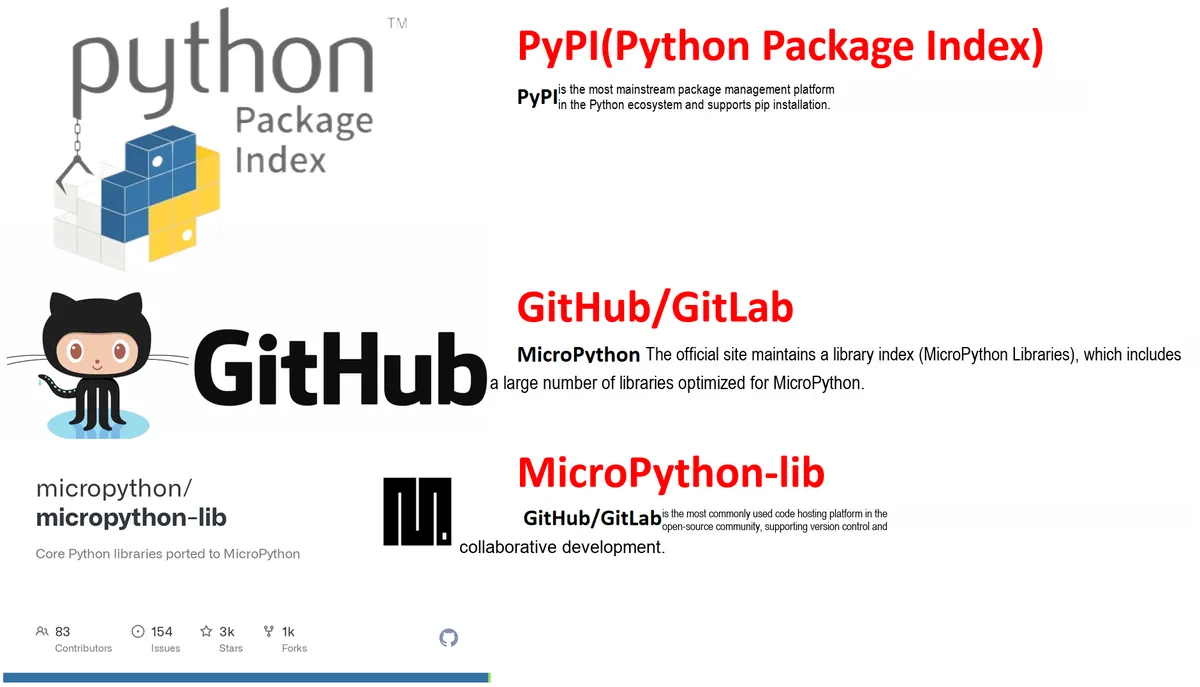
The specific differences are as follows:
PyPI | MicroPython-lib | GitHub/GitLab | |
Features |
|
|
|
Applicable Objects |
| MicroPython libraries |
|
How to install the library | Via | via | All supported |
Here, to accommodate the release of third-party libraries for both Python and MicroPython, we set PyPI as our distribution platform. However, please note that MicroPython libraries cannot be installed via the pip tool, and this serial servo library is also not usable on the Python platform for PCs.
Since the release process on the MicroPython-lib platform is rather cumbersome, for instance, requiring the inclusion of test files written with the unittest framework, we will not elaborate on this here. Students who are interested can independently explore the following content after finishing learning this article:
micropython-lib/CONTRIBUTING.md at 65a14116d503dd544cbba92284517c99e5e9a448 · micropython/micropytho
2.2 Library File Organization
The folder structure of a Python/MicroPython third-party library is as follows:
my_micropython_library/
│
├── my_module.py               # Main module or functional files of the library
├── __init__.py                # Optional, indicates this is a package
├── README.md                  # Project documentation, describing the library's purpose, installation, examples, etc.
├── LICENSE                    # Open-source license file, declaring the usage terms
├── requirements.txt           # Optional, lists other libraries depended on
├── examples/                  # Folder for example code
│   ├── example1.py
│   └── example2.py
└── library.properties         # Optional, library metadata file
These include:
- Function Implementation Files (
. pyfiles): These are the core files of the library, which contain the main functions of the library. Depending on the complexity of the library, there may be one or more such files. For example, there might be a module for interacting with hardware (such as controlling a sensor, a display, a motor, etc.). README.mdFile: This file describes the library's purpose, installation steps, usage examples and other related content, serving as the documentation entry point for the project.LICENSEFile: Used to declare the open-source license of a library, specifying how you want others to use, modify, and distribute the library. Common open-source licenses include MIT, GPL, Apache 2.0, and others.- Sample Code (
examplesfolder): Provides some simple sample code to help users quickly get started with this library. For instance, a small script can demonstrate how to initialize the library, call its methods, and handle exceptions, etc. __init__. pyfile (optional): If you organize multiple functional modules into a package structure, you can add an__init__. pyfile, which turns the directory into a Python package and allows modules in the library to be referenced viaimportstatements.- Project dependency files: In MicroPython, if you want a library to be downloadable with a single click via tools (such as
mpremote), you need to provide a metadata file in the format ofpackage.json,manifest.pyorrequirements.txt. This file contains information such as the library's name, version, and dependency relationships: Python packages use therequirements.txtfile, while MicroPython uses thepackage.jsonfile or themanifest.pyfile for description.
Here, you can check the organization of our library folder:
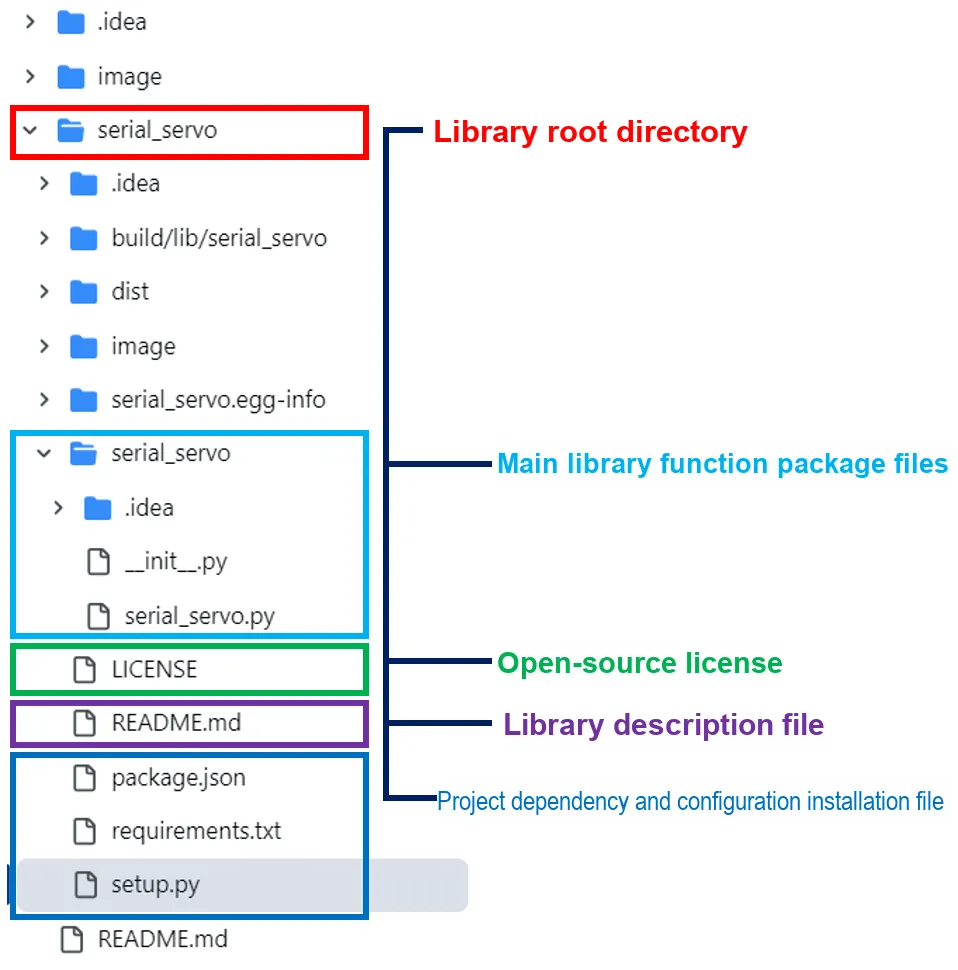
Among these, the serial_servo folder is the root directory of the library, and the serial_servo folder inside it contains the main function implementation of the library, including the __init__.py file and the serial_servo.py file:
__init__.pyfile: This file marks the directory as a Python package, enabling it to be referenced viaimport.serial_servo.py: The core code implementation file of the library, which usually contains the definitions of actual functions and classes.
In the project dependency files, we use two files:
package.jsonfile: This file is typically used to describe project dependencies and metadata, and is used in MicroPython.requirements.txtandsetup.pyfiles: List the third-party libraries that a Python project depends on, used in Python.
Here, if you only need to publish the MiroPython third-party library to your own GitHub repository, you only need the package.json file; if you need to publish a Python third-party library on the PyPI platform, then you need the requirements.txt and setup.py files; if you want to publish it to the MicroPython-lib platform, then you need to use manifest.py as the project dependency file.
2.3 Library File Description
2.3.1 Library Implementation Code
2.3.1.1 Core Code Implementation File
Here, we need to create a subfolder with the same name under the root directory folder of the library, and place the main function implementation code of the library into this subfolder. Taking our library file as an example, the serial_servo folder is the root directory folder of the library, and the serial_servo folder inside it contains the main function implementation of the library, including __init__.py file and serial_servo.py file:

Here, the serial_servo.py file serves as the core code implementation file of the library:
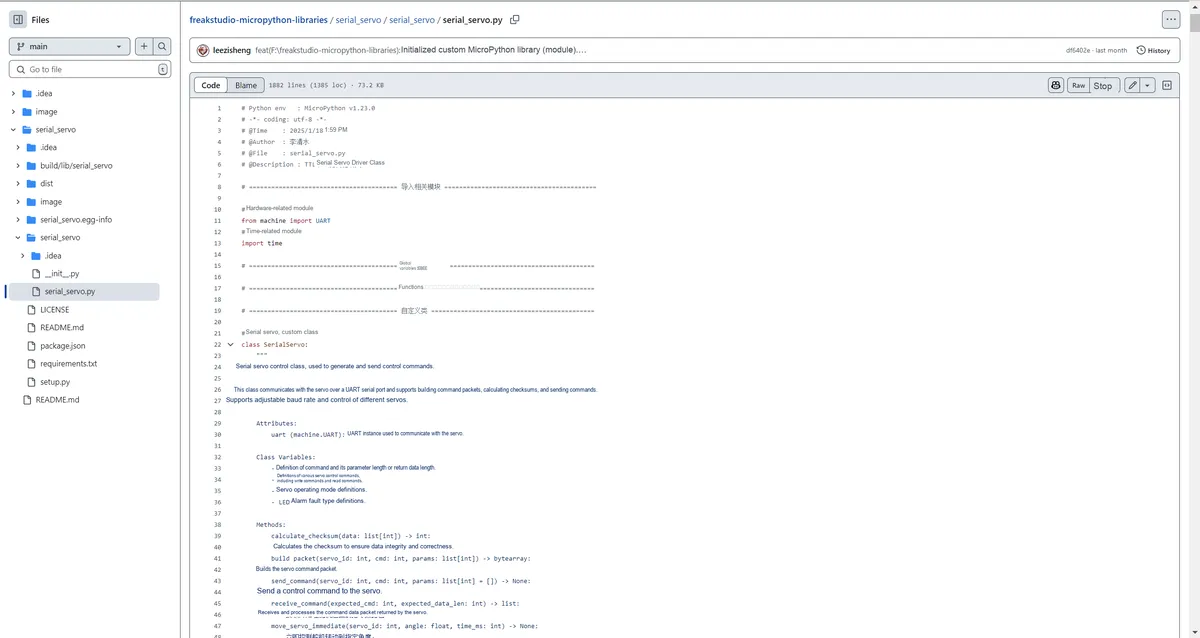
The third-party libraries we provide should organize relevant functions into a class for easier management and extension. A class can encapsulate internal states (such as hardware configurations, sensor data, etc.) to avoid the abuse of global variables. For knowledge related to Python Object Oriented programming, you can refer to our previous tutorial:
When encapsulating code into a class, the following points should be noted, including clear function naming, comments and docstrings, error handling, and type annotations.
We need to ensure that the naming of each method aligns with its function. For example, move_servo_immediate clearly indicates moving the servo immediately, and calculate_checksum clearly conveys the function of calculating the checksum. The sample code is as follows:
    def calculate_checksum(self, data: list[int]) -> int:
        """
        Calculate the checksum.

        The checksum is obtained by summing the data packet and inverting the result (low eight bits), ensuring data integrity and correctness.

        Args:
            data (list[int]): Data packet (excluding the checksum itself).

        Returns:
            int: The calculated checksum, with a value range of 0~255.

        ===================================================

        Calculate checksum to ensure data integrity and correctness.

        The checksum is obtained by summing the data packet and taking the one's complement (low eight bits of data).
        Args:
            data (list[int]): Data packet (excluding checksum itself).

        Returns:
            int: Calculated checksum, value range 0~255.

        """

        checksum = ~(sum(data) & 0xFF) & 0xFF

        return checksum
And you can see that above each function and method, we have added detailed docstrings to explain the purpose, input parameters and return value of each method.
Similarly, we also use type annotations in the code to specify types for variables, function parameters and return values, so as to help other developers easily understand the input and output types of a function:
    def build_packet(self, servo_id: int, cmd: int, params: list[int]) -> bytearray:
        return bytearray(packet)

    def send_command(self, servo_id: int, cmd: int, params: list[int] = []) -> None:
        self.uart.write(packet)

    def receive_command(self, expected_cmd: int, expected_data_len: int) -> list:
        return params
At the same time, it is necessary to pay attention to using appropriate error handling in methods, for example, in the build_packet method, check whether servo_id is within the valid range, and throw an exception if it does not meet the requirements:
    def build_packet(self, servo_id: int, cmd: int, params: list[int]) -> bytearray:
        """
        Build the servo command packet.

        Generates a complete data packet from the servo ID, command, and parameters, and appends the checksum.

        Args:
            servo_id (int): Servo ID, range 0~253, where 254 is the broadcast ID, meaning all servos.
            cmd (int): Command byte.
            params (list[int]): Parameter list.

        Returns:
            bytearray: The constructed servo control command packet.

        Raises:
            ValueError: Raised if the servo ID is not in the range 0~254.

        ===================================================

        Build servo control command packet, including checksum.

        Args:
            servo_id (int): Servo ID, range 0~253, where 254 is broadcast ID, indicating all servos.
            cmd (int): Command byte.
            params (list[int]): Parameter list (default empty).

        Returns:
            bytearray: Built servo control command packet, including checksum.

        Raises:
            ValueError: If the servo ID is not in the range 0~254, an exception will be raised.
        """
        # Check the input parameters
        # Check whether the servo ID is in the range 0~254
        if servo_id < 0 or servo_id > 254:
            raise ValueError("Servo ID must be in range 0~254.")

        # Packet length (command + parameters + checksum)
        length = 3 + len(params)
        # Build the packet: frame header + ID + data length + command + parameters + checksum
        packet = [0x55, 0x55, servo_id, length, cmd] + params
        # Calculate the checksum (from ID to the last parameter)
        checksum = self.calculate_checksum(packet[2:])
        # Append the checksum
        packet.append(checksum)

        return bytearray(packet)
For knowledge points about error handling and type annotations, you can refer to the following two linked documents:
In the docstring of a class, we should also explain the overall purpose, functionality and usage of the class:
# Custom class for serial bus servo
class SerialServo:
    """
    Serial bus servo control class, used to generate and send control commands.

    This class communicates with the servo over UART, and supports building control command packets, calculating checksums, and sending commands.
    Supports adjustable baud rates and control of different servos.

    Attributes:
        uart (machine.UART): UART instance used to communicate with the servo.

    Class Variables:
        - Definitions of command and parameter lengths or return data lengths.
        - Definitions of various servo control commands, including write commands and read commands.
        - Definitions of servo working modes.
        - Definitions of LED alarm fault types.

    Methods:
        calculate_checksum(data: list[int]) -> int:
            Calculate the checksum to ensure data integrity and correctness.
        build_packet(servo_id: int, cmd: int, params: list[int]) -> bytearray:
            Build the servo command packet.
        send_command(servo_id: int, cmd: int, params: list[int] = []) -> None:
            Send a control command to the servo.
        receive_command(expected_cmd: int, expected_data_len: int) -> list:
            Receive and process the command data packet returned by the servo.
        move_servo_immediate(servo_id: int, angle: float, time_ms: int) -> None:
            Immediately control the servo to rotate to the specified angle.
        get_servo_move_immediate(servo_id: int) -> tuple:
            Get the preset angle and time of the servo.
2.3.1.2 __init__.py Identifier File
__init__. py is a special Python file that marks a directory as a Python package. If there are multiple files in your module, you can place an file in the same directory as the module files to mark that folder as a package, so that all Python files under this directory are regarded as part of the package and can be imported and used via the file in the same directory as the module files to mark that folder as a package, so that all Python files under this directory are regarded as part of the package and can be imported and used via the import statement.
For example, if a package contains multiple modules (such as module1.py, module2.py), the __init__. py file can import these modules via import statements, allowing users to access the modules within the package directly using the package name:
from mypackage import module1Additionally, if you want to expose certain interfaces or attributes at the package level, you can define them in the __init__. py file:
# mypackage/__init__.py
from .module1 import MyClass
In this way, users can directly access MyClass via `from mypackage import MyClass` to access the module1.py module's MyClass class.
In the __init.py__ file of the serial servo class we provide:
# Import the SerialServo class and expose it to package users
from .serial_servo import SerialServo

# Use __all__ to ensure only the SerialServo class is exposed
__all__ = ["SerialServo"]
# Define the version number
__version__ = "1.0.0"
We provide at the package level the SerialServo class, along with a simple definition of the version number.
For the basic knowledge of modules and packages in Python, you can refer to the following document:
2.3.2 README File
In any open-source library, README.md is a vitally important file: it not only provides a basic introduction to the project, but also helps other developers quickly understand how to use, contribute to, and install the library. It can be said that README.md serves as the "gateway" to the project.
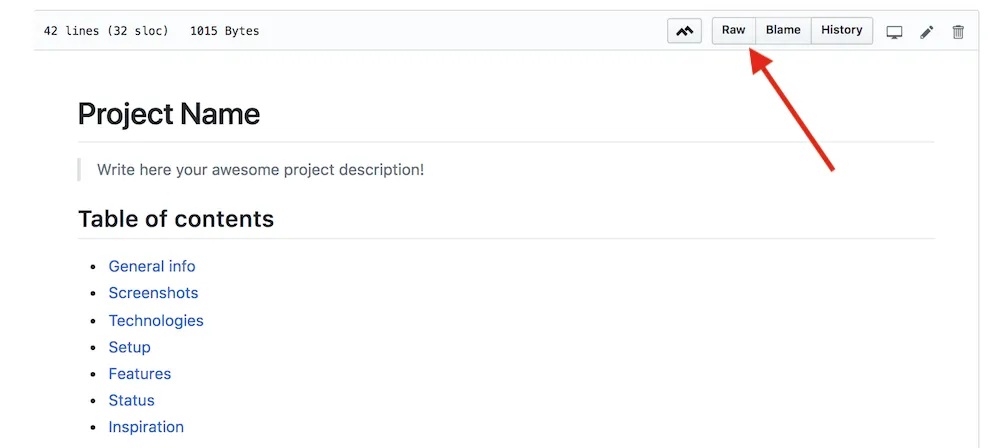
README.md is a text file, usually written in Markdown format, and contains the following content:
Project name: Briefly state the name of the project.
Project introduction: Describe the purpose, features, or usage scenarios of the project, and provide some background information to help users understand what the project is for.
Installation guide: Provide the steps to install and configure the project, including system requirements, dependencies, and installation commands.
Usage instructions: Provide the basic steps for using the project, example code for the command line or API interface, example configuration files, etc.
Features: List the main functions and features of the project so users understand what it can do.
Contribution guide: If the project is open source, provide instructions on how to contribute code and submit bug reports or feedback.
License: State the type of license the project uses (such as MIT, GPL, etc.).
Development and testing: Explain how to develop locally, test the project, and submit changes.
Documentation links: If the project has more detailed documentation or links to external resources, provide them.
Example code: Provide basic usage examples or code snippets of the project to help users get started quickly.
Contact information: How users can contact the developer or team if they have questions or suggestions.
Acknowledgments: Thank the contributors who helped the project and the other open-source projects it depends on.
The following contents are included in our README file:
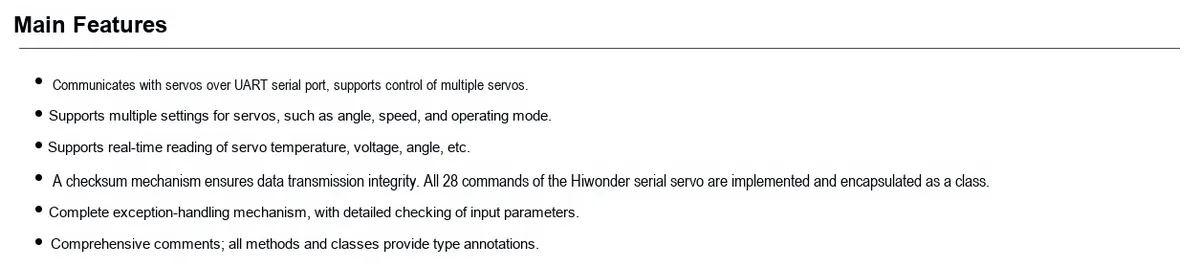
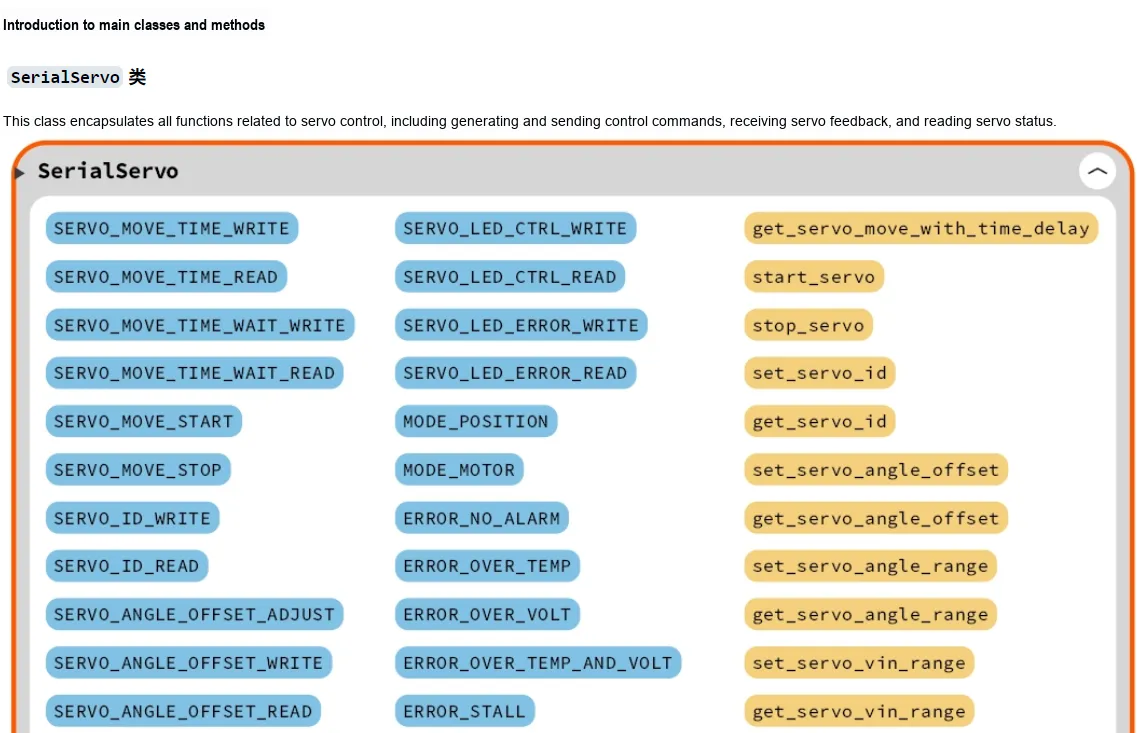
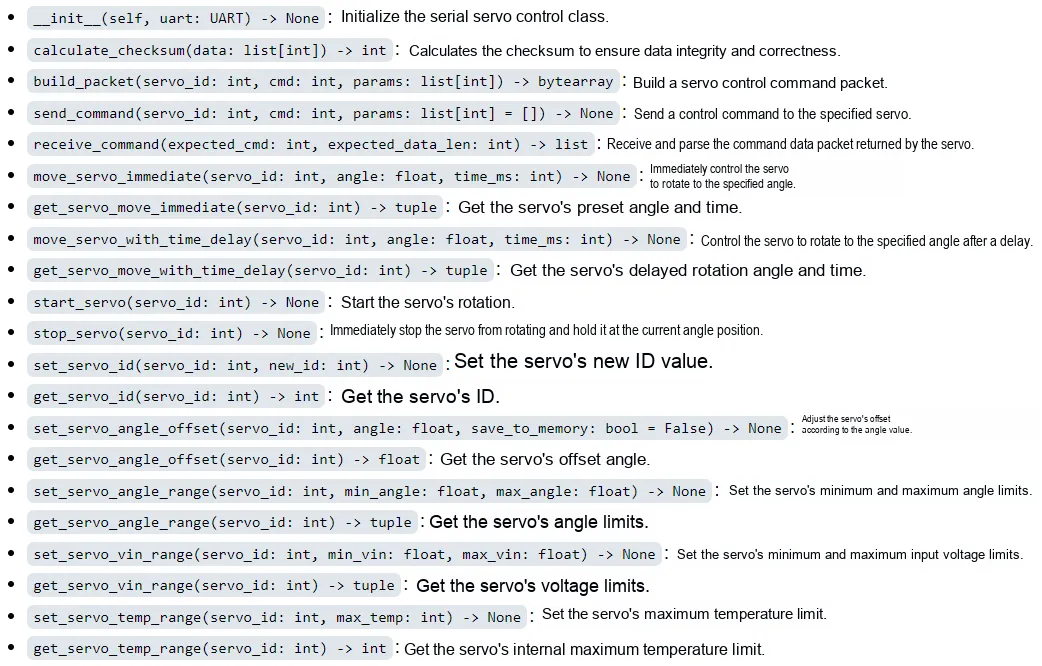
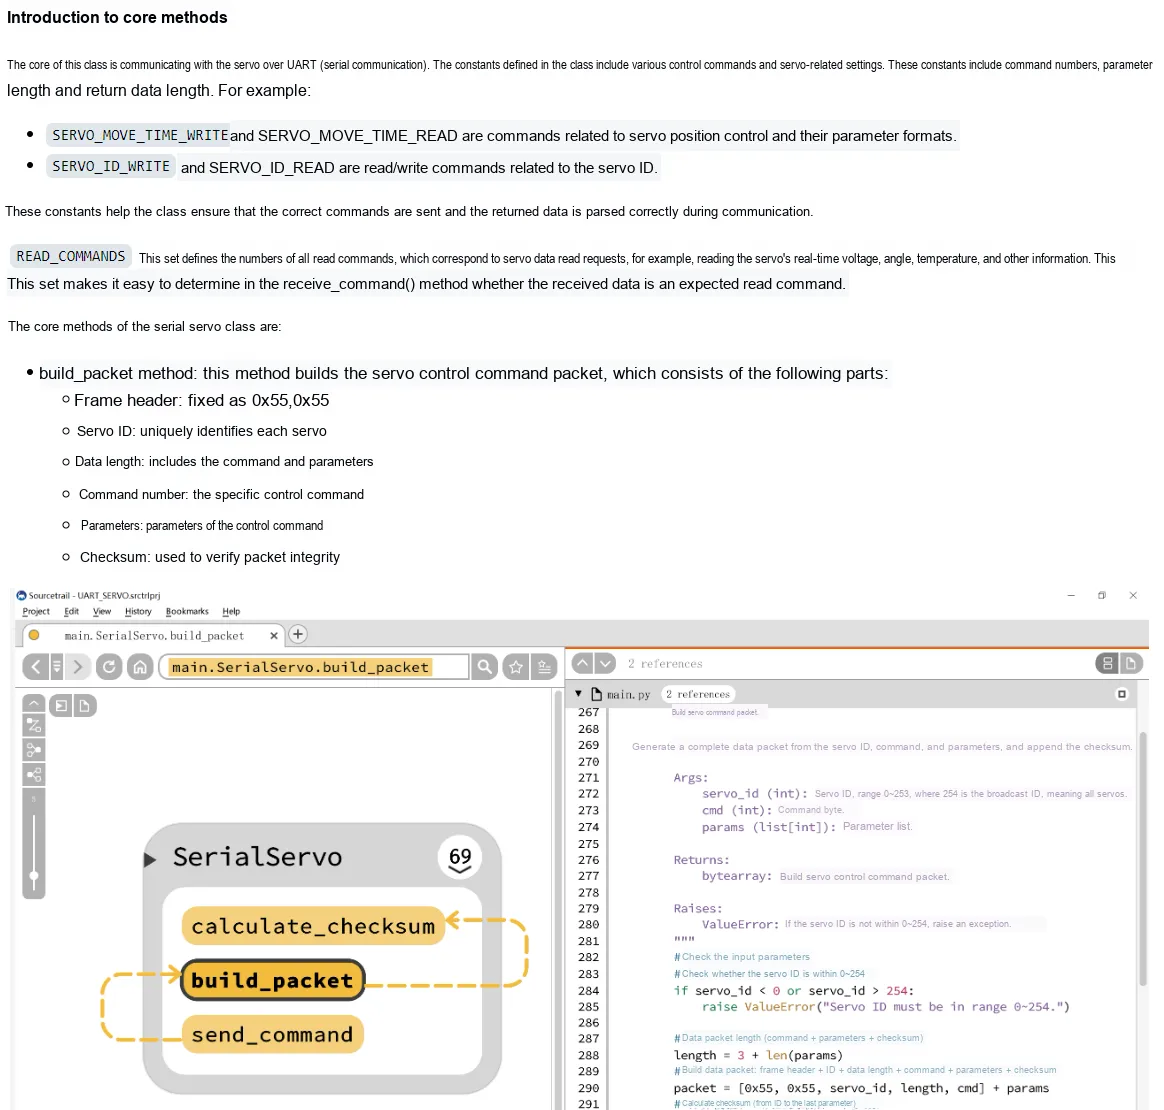
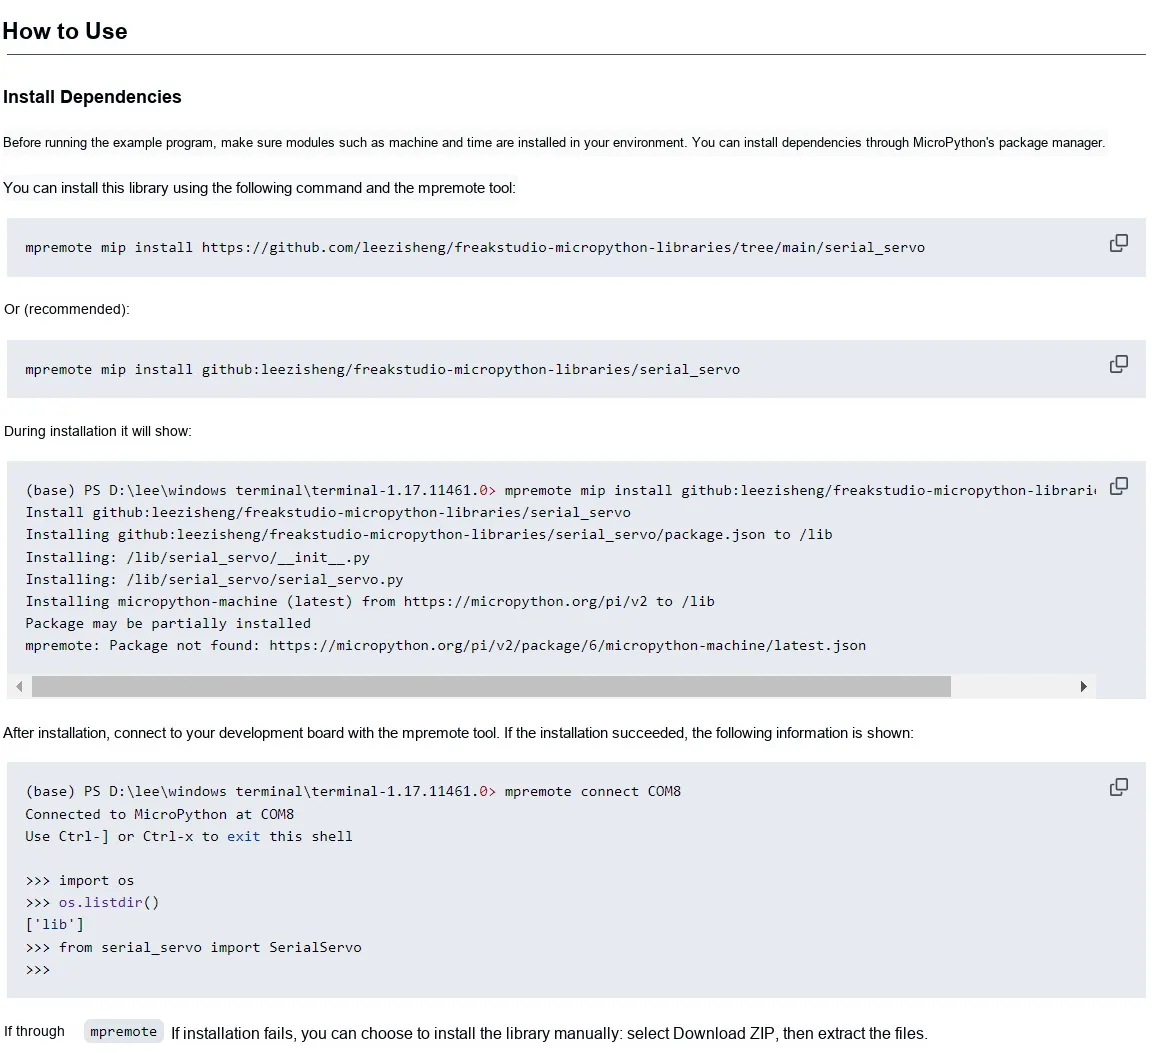
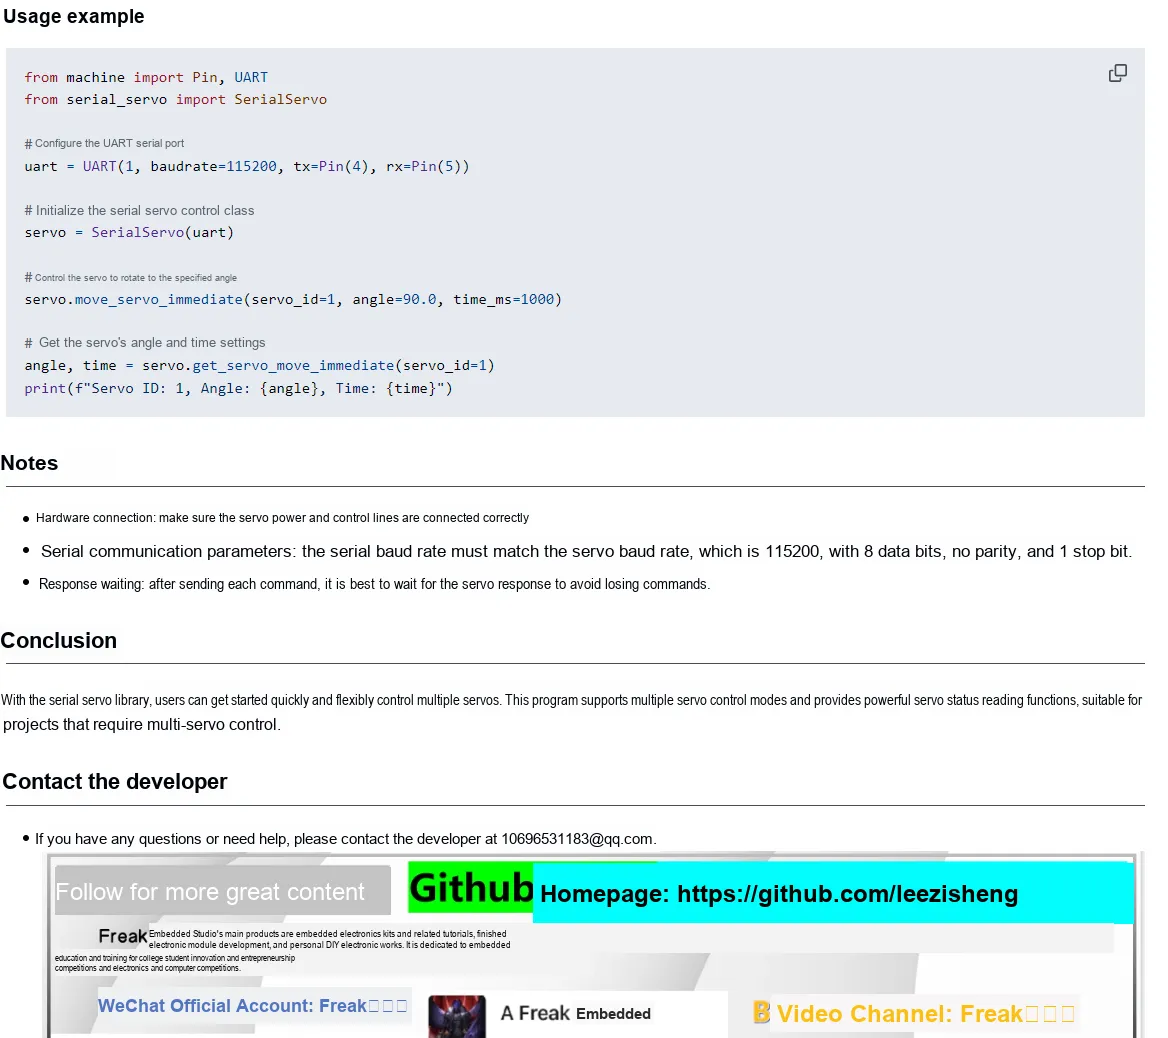
For details, please refer to:
freakstudio-micropython-libraries/serial_servo/README.md at main · leezisheng/freakstudio-micropytho
We are accustomed to using the MD plugin in PyCharm to write README.md files. Before writing an MD file, you need to learn some basic Markdown syntax, and we recommend the following tutorial:
A Hands-On Guide to Markdown [From Beginner to Expert, This One Article Is Enough] - CSDN Blog
2.3.3 Open Source License
A license is similar to a legal agreement and is of great importance to any open-source project, as it clearly stipulates the permissions and restrictions regarding the use, modification, distribution and other aspects of a software project:
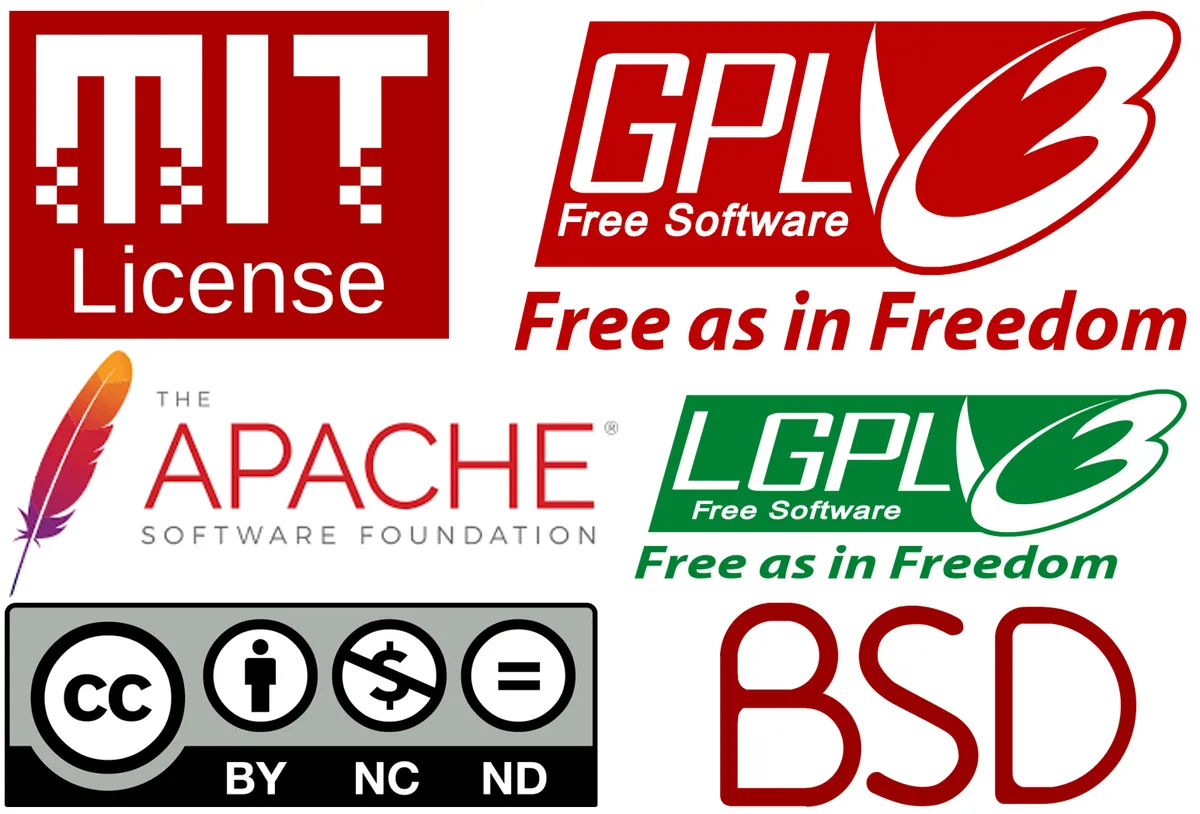
- Clear Usage Rights: A license clarifies for users how they may legally use a third-party library, including whether monetization is permitted, whether the source code may be modified, and whether the modified version must be disclosed, among other terms.
- Protecting Developers' Rights and Interests: Through licenses, developers can specify their control rights over their code. They may choose open-source licenses (such as MIT, GPL, etc.) to authorize others to use, modify, and distribute their code, while also setting certain restrictions to prevent the code from being improperly used or abused.
- Avoid Legal Disputes: Without a clear license statement, other developers may encounter copyright and intellectual property disputes when using your code. Explicit license terms can help mitigate these issues and prevent legal disputes arising from improper use.
- Monetization support: For some companies or teams, choosing an appropriate license is of great importance. If a project adopts an open-source license that permits monetization (such as MIT or Apache 2.0), companies can legally integrate such code into their products. Conversely, if the project uses a license that requires source code disclosure (such as GPL), it may affect its monetization path.
There are various types of licenses, each with different priorities depending on the freedom of use, whether commercial use is permitted, requirements for modification and redistribution, privacy protection, and legal liability. For example, some licenses (such as the AGPL) focus on protecting user privacy, especially in web applications, and require that modified code must also be made public to prevent developers from using the software to collect user data and keep it private.
The following is a widely circulated classification diagram for license selection (shared by a top contributor on Zhihu):
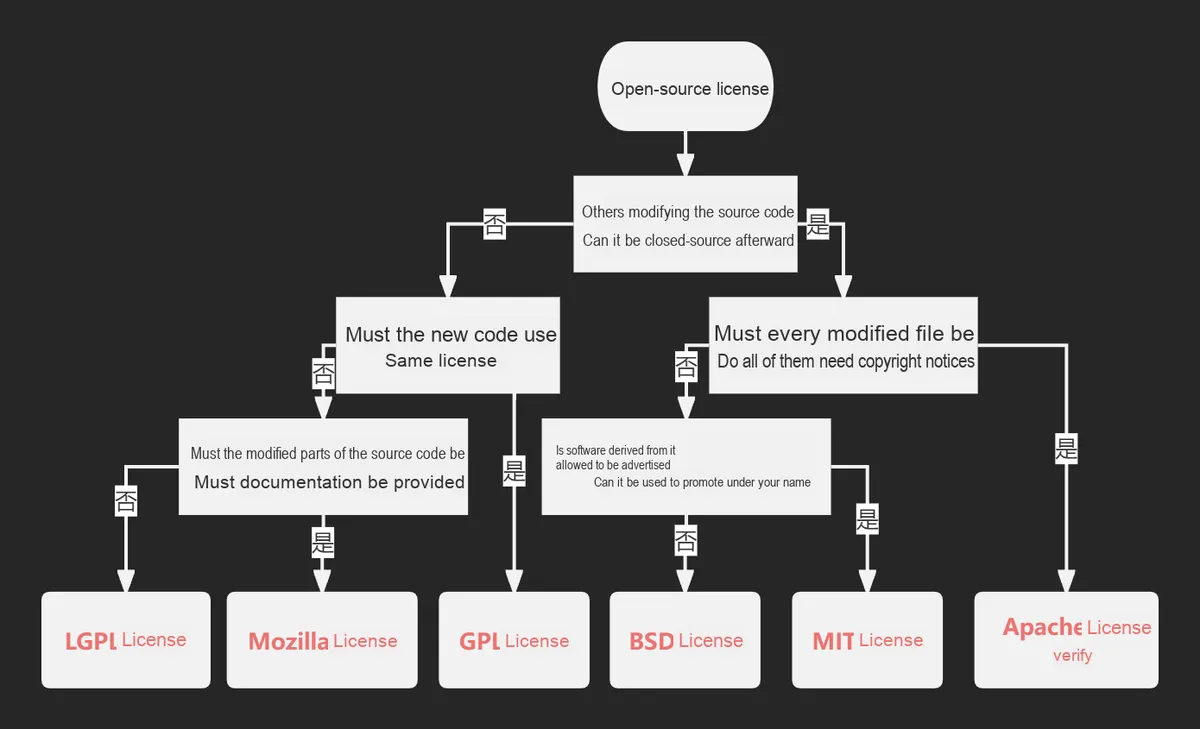
The following are three commonly used licenses:
- MIT License (Massachusetts Institute of Technology License): The MIT License is a highly permissive license that grants users the right to freely use, copy, modify, and distribute the software. The only requirement is that all copies of the software must include the original copyright notice and license statement. It is commonly adopted for open-source projects that do not impose restrictions on source code modifications or modified derivative code.
- GPL License (GNU General Public License): GPL is an open-source license released by the Free Software Foundation (FSF), which requires that code under the GPL license must remain open-source, and all derivative works must also adopt the GPL license. Its most critical requirement is that if you modify or distribute such code, you must disclose the source code, and any software that uses this code must also remain open-source.
- CC BY-NC License (Creative Commons Attribution-NonCommercial License): This is a license issued by Creative Commons that allows users to copy, distribute, display and adapt the work, provided that it is not used for commercial purposes. In addition, anyone who uses the work must give attribution to the author.
Here, we use the Creative Commons Attribution-NonCommercial 4.0 International (CC BY-NC 4.0) Licensing Agreement, which is specified in the README.md file. You can check our LICENSE for details:

Creative Commons Attribution-NonCommercial 4.0 International License

Copyright 2025 Lee Qingshui / Freak

This work is licensed under the Creative Commons Attribution-NonCommercial 4.0 International License.
You may not use the material for commercial purposes.
You must give appropriate credit, provide a link to the license, and indicate if changes were made.
You may do so in any reasonable manner, but not in any way that suggests the licensor endorses you or your use.

To view a copy of this license, visit:
https://creativecommons.org/licenses/by-nc/4.0/
2.3.4 Project Dependencies and Installation Configuration Files
2.3.4.1 Python
In pure Python, we use the requirements.txt file and the setup.py file to specify the dependencies and their versions for the released library, the project's metadata, as well as how to install and distribute the project:
requirements.txt is a common configuration file that lists all Python packages a project depends on along with their version requirements:
setuptools~=70.0.0
machine
time
The above is our requirements.txt, where you can see that each line lists a dependency with its specified version.
setup.py is a traditional installation configuration file for Python projects, which is essential when we publish packages to the Python Package Index (PyPI), as it provides project information (such as name, version, author, etc.) as well as dependencies and installation methods.
from setuptools import setup, find_packages

# Read the README file content
with open("README.md", "r", encoding="utf-8") as fh:
    long_description = fh.read()

setup(
    name="serial_servo",
    version="1.0.5",
    description="A MicroPython library to control servo motors via UART",
    author="leeqingshui",
    author_email="1069653183@qq.com",
    url="https://github.com/leezisheng/freakstudio-micropython-libraries",
    packages=find_packages(where="serial_servo"),
    long_description=long_description,
    long_description_content_type="text/markdown",
    install_requires=[
        # Use only MicroPython built-in modules
    ],
    classifiers=[
        "Programming Language :: Python :: 3",     # Supports Python 3
        "Programming Language :: Python :: 3.8",   # Supports Python 3.8
        "License :: Other/Proprietary License",    # Uses the CC BY-NC 4.0 license
        "Operating System :: OS Independent",      # OS independent
    ],
    # Python version requirement (adapted for MicroPython, the Python version supported by v1.23.0)
    python_requires='>=3.12',
    # If there are MicroPython-related dependencies, they can be added here
    extras_require={
        # MicroPython dependencies
        'micropython': ['machine', 'time'],
    },
)
In the setup.py file, setup is a function that comes from the setuptools library. Its parameter is a dictionary containing various metadata and configuration items of the project, namely the basic information of the project, the required minimum Python version and specific dependencies. The common parameters are as follows:
name: The name of the project, for example"serial_servo".version: The version number of the project, e. g."1.0.5".description: A brief description of the project, usually a single sentence outlining the project's functionality.authorandauthor_email: the author's name and contact information.url: The URL of the project's homepage, usually an address on GitHub or other hosting platforms.long_descriptionBy reading theREADME.mdfile, ensure that the basic project information is correctly displayed on the PyPI platform. Note that the image references in theREADME.mdfile must use links from GitHub; if referenced via relative paths, they will not be displayed correctly on the PyPI platform.packages= find_packages (where="serial_servo"): This parameter will find and include Python packages located in theserial_servodirectory.install_requires: You can list external dependencies (such asrequests,numpy, etc.) here,extras_require: If your project has special environment or additional feature dependencies (such as MicroPython), you can define them inextras_require.python_requires='>= 3.12': Settingpython_requiresensures that the Python version requirement is met when users perform installation.classifiers: Used to help PyPI and other tools classify your project. Note that theOperating Systementry here is actually incorrect for the serial servo driver; it should be specifically marked as an application in MicroPython.
2.3.4.2 MicroPython
For MicroPython, we use package.json or manifest.py files to specify the dependencies and their versions of the published library, the project's metadata, as well as how to install and distribute the project.
Here, regarding package.json file writing, we can refer to the relevant MicroPython documentation:
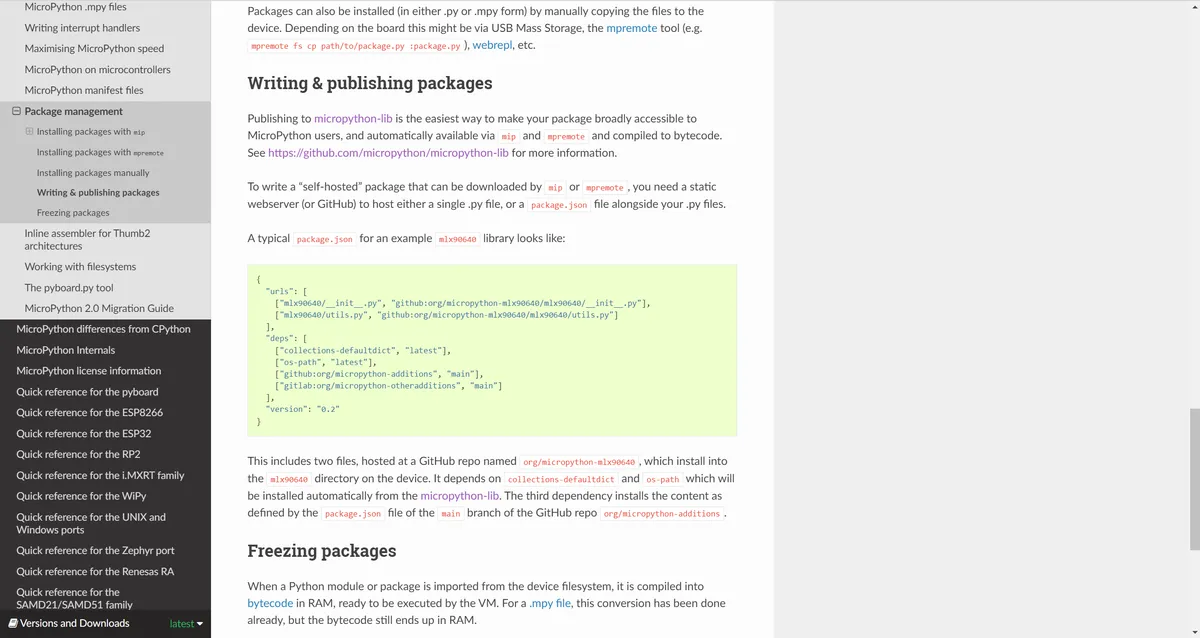
package.json file is a JSON-formatted configuration file, which is mainly used to define and manage information such as library dependencies, versions and installation sources in MicroPython projects. It describes how to upload and install library files to devices, and MicroPython uses this file to handle library installation and dependency management.
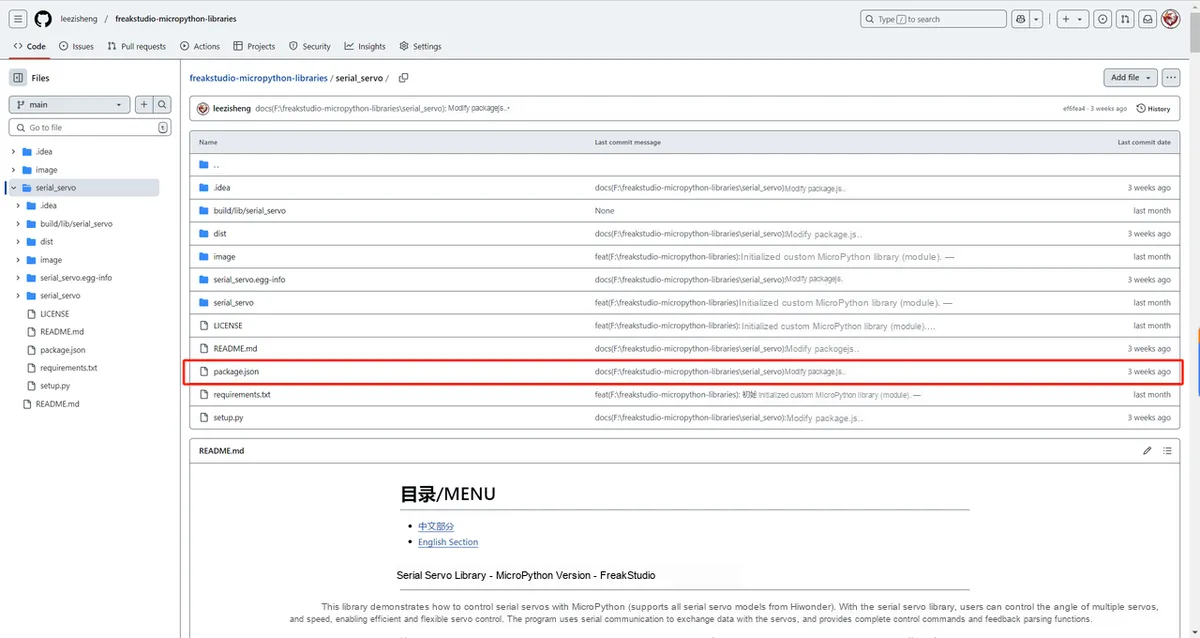
Below is the package.json file for our serial servo driver library:
{
  "name": "serial_servo",
  "version": "1.0.5",
  "description": "A MicroPython library to control servo motors via UART",
  "author": "leeqingshui",
  "author_email": "1069653183@qq.com",
  "url": "https://github.com/leezisheng/freakstudio-micropython-libraries",
  "urls": [
    ["serial_servo/__init__.py", "github:leezisheng/freakstudio-micropython-libraries/serial_servo/serial_servo/__init__.py"],
    ["serial_servo/serial_servo.py", "github:leezisheng/freakstudio-micropython-libraries/serial_servo/serial_servo/serial_servo.py"]
  ],
  "deps": [
    ["micropython-machine", "latest"],
    ["micropython-time", "latest"]
  ],
  "version": "1.0.5",
  "long_description": "A MicroPython library to control servo motors via UART",
  "long_description_content_type": "text/markdown",
  "classifiers": [
    "Programming Language :: Python :: 3",
    "Programming Language :: Python :: 3.8",
    "License :: Other/Proprietary License",
    "Operating System :: OS Independent"
  ],
  "python_requires": ">=3.12",
  "extras_require": {
    "micropython": ["machine", "time"]
  }
}
The basic information thereof is as follows:
- name:
serial_servo, the name of the library, used to identify this library. - version:
1.0.5, the version number of this library, indicating that this is version 1.0.5. - description: Provide a brief description of the library's functionality.
- author:
leeqingshui, the name of the library's author. - author_email:
1069653183@qq.com, the author's email address. - URL:
https://github.com/leezisheng/freakstudio-micropython-libraries— the GitHub repository URL of the library, where users can access information such as source code, issues and documentation.
The other three main parameters are as follows:
- In the
urls, we have listed the files of this library and their specific locations on GitHub. Each element in theurlsarray contains a pair of file path and its corresponding remote repository location. depsarray lists all dependencies of this library along with their version requirements.versionThe file version is listed in the version information.
With a properly written package.json file, we can use the mip and mpremote tools to download third-party libraries published on Github to the corresponding folder on the MCU with a single command, while package.json is suitable for simple static configuration.
You may also come across some MicroPython library files elsewhere that use manifest.py as the project dependency description, such as the MQTT library we frequently use:
micropython-lib/micropython/umqtt.robust/manifest.py at master · micropython/micropython-lib
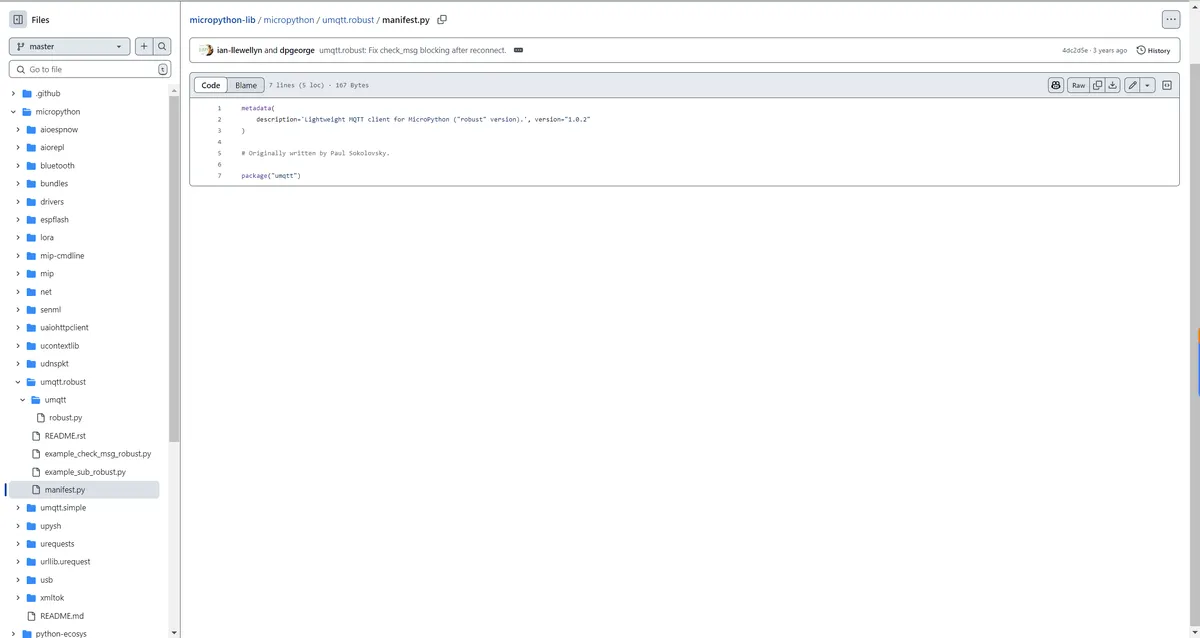
Different from package.json files, manifest.py is a Python script. Similar in function to package.json files, it describes the library's metadata, dependencies, and how to integrate the library into MicroPython firmware. It is typically used for libraries published to micropython-lib, and is mainly implemented via the built-in metadata function:
def metadata():
    return {
        "name": "mlx90640",
        "version": "0.2",
        "description": "Library for controlling the mlx90640 sensor",
        "dependencies": [
            ("collections-defaultdict", "latest"),
            ("os-path", "latest")
        ]
    }
The meanings of each field are as follows:
name: The name of the project.version: The version of the project.description: A brief description of the project.dependencies: Dependencies of the project, listing the dependencies and corresponding versions of the library.
manifest.py files are suitable for more complex configurations and dynamic logic; for example, different dependencies can be selected according to the platform:
def metadata():
    dependencies = {
        "collections-defaultdict": "latest",
        "os-path": "latest"
    }

    # Add platform-specific dependencies as needed
    import sys
    if sys.platform == "esp32":
        dependencies["esp32-specific-lib"] = "latest"
    elif sys.platform == "rp2":
        dependencies["rp2-specific-lib"] = "latest"

    return {
        "description": "A library with platform-specific dependencies.",
        "version": "0.1",
        "dependencies": dependencies
    }
In this scenario, manifest.py can dynamically adjust dependencies based on the running platform, whereas package.json cannot implement such dynamic logic. Meanwhile, manifest.py can dynamically generate a file list, and even selectively include or exclude certain files according to conditions:
def metadata():
    files = [
        ("mylibrary/__init__.py", "github:org/mylibrary/mylibrary/__init__.py"),
        ("mylibrary/core.py", "github:org/mylibrary/mylibrary/core.py")
    ]

    # Add extra files according to the configuration
    import os
    if os.getenv("USE_ADVANCED_FEATURES") == "1":
        files.append(("mylibrary/advanced.py", "github:org/mylibrary/mylibrary/advanced.py"))

    return {
        "description": "A library with optional advanced features.",
        "version": "0.1",
        "files": files
    }
It can also include features such as debug logs and error handling mechanisms.
import logging

logging.basicConfig(level=logging.DEBUG)

def metadata():
    logging.debug("Generating metadata for the library")
    return {
        "name": "library-with-debug",
        "version": "1.0",
        "description": "Library with dynamic configuration",
        "dependencies": [("os-path", "latest")]
    }
For content related to the JSON format, you can refer to our previous tutorial:
2.3.5 Sample Files
Here, we have not set up sample files, and the usage examples are specified in the README.md file:
from machine import Pin, UART
from serial_servo import SerialServo

# Configure the UART serial port
uart = UART(1, baudrate=115200, tx=Pin(4), rx=Pin(5))

# Initialize the serial servo control class
servo = SerialServo(uart)

# Control the servo to rotate to the specified angle
servo.move_servo_immediate(servo_id=1, angle=90.0, time_ms=1000)

# Get the servo's angle and time settings
angle, time = servo.get_servo_move_immediate(servo_id=1)
print(f"Servo ID: 1, Angle: {angle}, Time: {time}")
2.3.6 Other Documents
Here, we don't have any other files, only the images referenced in the README.md file, which we have placed in the image folder:
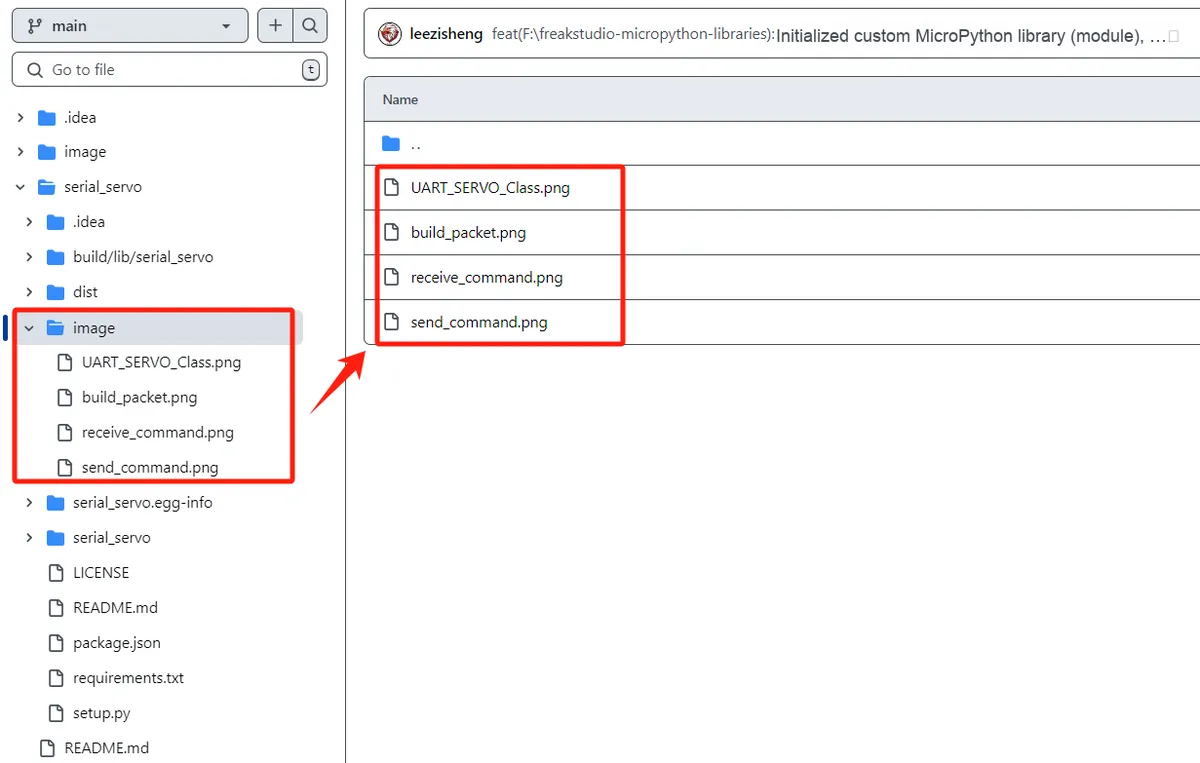
Actually, we can create a separate extra folder to store reference files and images.
3. Code Formatting Specifications and Static Checking
When releasing third-party MicroPython modules, code formatting specifications and static checking are extremely critical steps. We expect that every one of our library files follows consistent indentation, line width, and coding style, rather than being in a messy state.
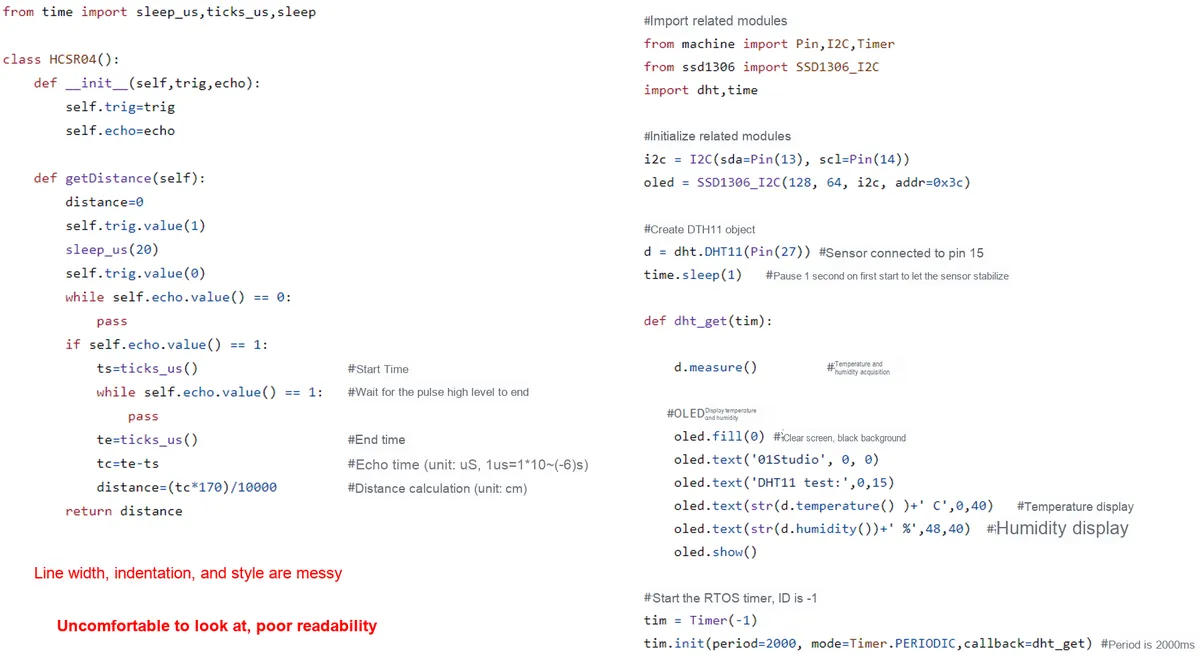
When writing code, we usually follow the PEP8 code specification, which is the official coding style guide for Python and defines the formatting specifications for Python code:
- Indentation: Use 4 spaces for indentation and avoid using tabs.
- Line Width: The number of characters per line shall not exceed 79.
- Use of spaces: Operators (such as
=,+, etc.) should be surrounded by spaces; do not use spaces between commas and parameters. - Function and class naming: functions use lowercase letters with words separated by underscores (e. g.
my_function); class names use CamelCase notation (e. g.MyClass). - Docstring: Functions and classes should have docstrings to describe their functionality and usage.

The goal of PEP 8 is to enhance the readability and maintainability of code through a consistent coding style. Adhering to these conventions makes Python code more Pythonic.
For more information about the PEP8 style guide, please refer to the article in the following link:
3.1 Use the black module to standardize your code

black is an automated Python code formatter that automatically formats code in accordance with the PEP 8 specification to make it comply with unified style requirements. The advantage of using black is that it can automatically correct code formatting without the need for manual adjustments.
Its formatting style is similar to that shown in the following code:
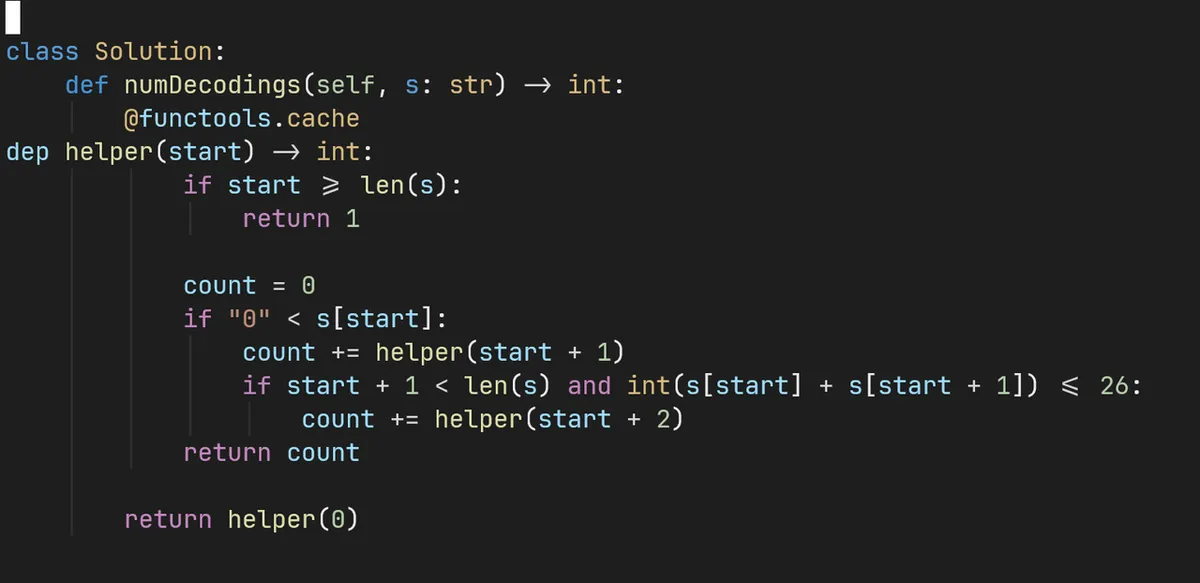
Here, first in the code directory where we need to perform formatting, open the terminal, activate the virtual environment, and start by installing black:
pip install black
After the installation is complete, you can use the following command to format the code:
black <path-to-your-python-files>Here, we format the file serial_servo.py in the directory:

Check the before-and-after changes in Github Desktop:
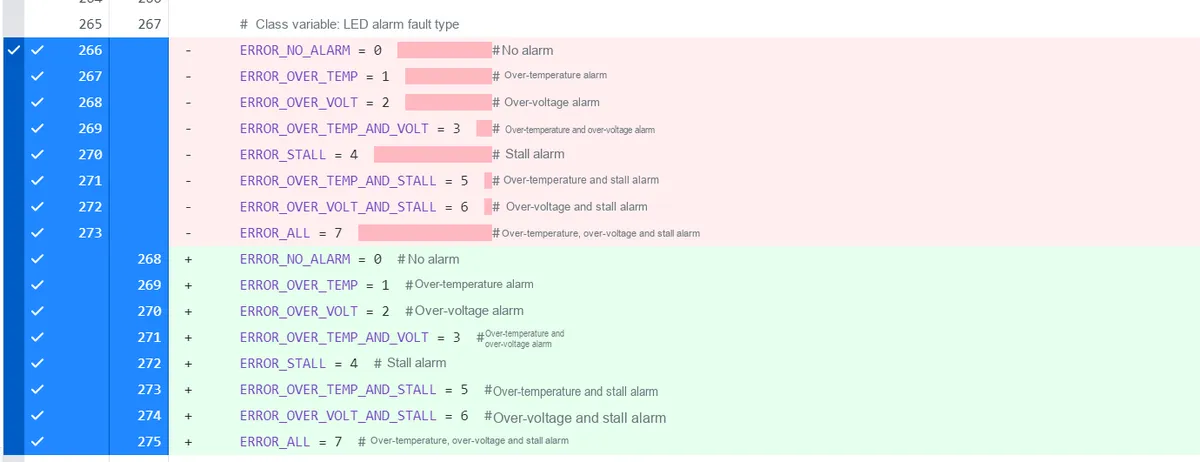
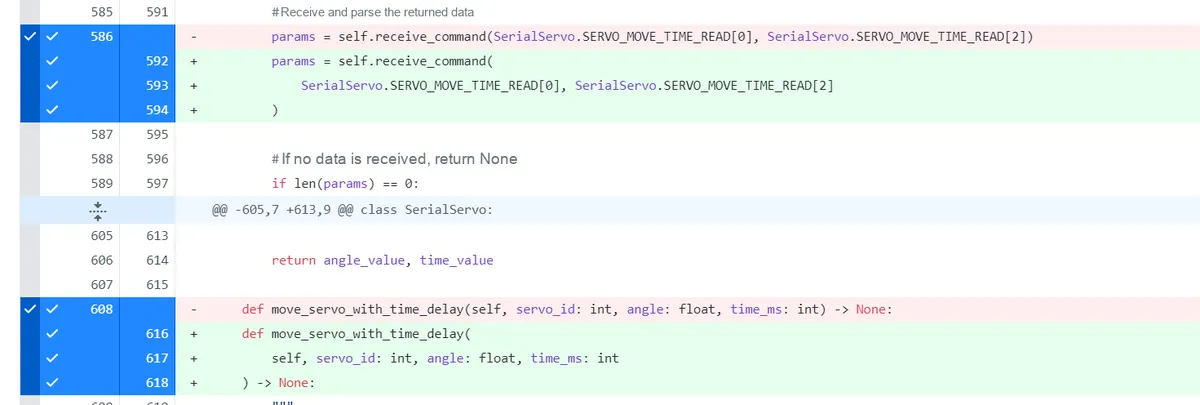
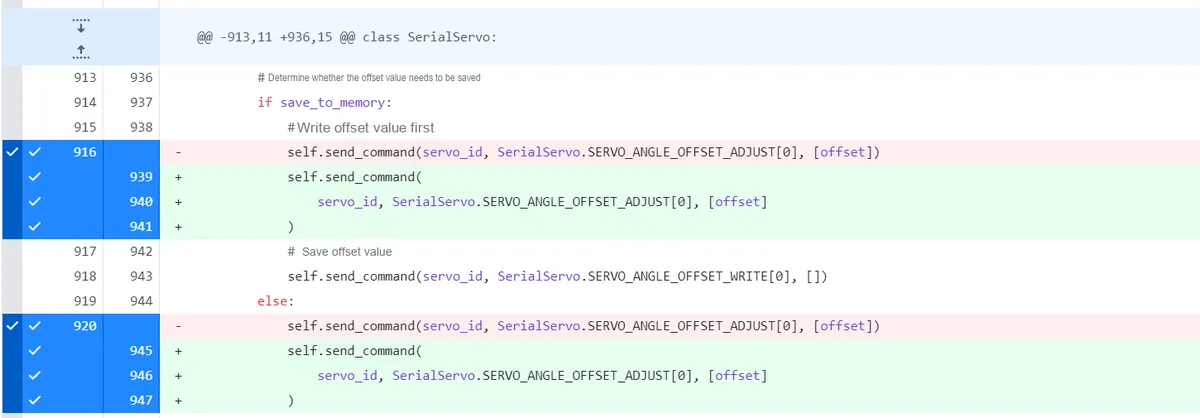

It can be seen that the relevant comments, indentation and code line lengths have all been adjusted, and the typesetting has been completed.
3.2 Static Code Checking Using the Flake8 Module
Flake8 is a static code analysis tool for Python. It analyzes code to check compliance with PEP 8 specifications and other style guide standards. Its main functions are to help developers maintain consistent code style, catch common errors, and improve code quality.

Flake8 mainly has the following functions:
- Check the code for syntax errors.
- Check whether the code style complies with the PEP 8 specification.
- Check the complexity of the code and issue warnings based on the given threshold.
- You can customize rules via the configuration file to ignore certain errors or warnings.
pip install flake8After installation, you can use flake8 in the command line to check Python files:
flake8 <your_python_file>.py
Output the following information:
(MicroPython_Learn) PS G:\test> flake8 .\serial_servo.py
.\serial_servo.py:8:80: E501 line too long (91 > 79 characters)
.\serial_servo.py:16:80: E501 line too long (92 > 79 characters)
.\serial_servo.py:18:80: E501 line too long (92 > 79 characters)
.\serial_servo.py:20:80: E501 line too long (92 > 79 characters)
.\serial_servo.py:49:80: E501 line too long (80 > 79 characters)
.\serial_servo.py:53:80: E501 line too long (86 > 79 characters)
.\serial_servo.py:65:80: E501 line too long (98 > 79 characters)
.\serial_servo.py:69:80: E501 line too long (89 > 79 characters)
.\serial_servo.py:73:80: E501 line too long (83 > 79 characters)
.\serial_servo.py:107:80: E501 line too long (84 > 79 characters)
.\serial_servo.py:109:80: E501 line too long (119 > 79 characters)
.\serial_servo.py:118:80: E501 line too long (91 > 79 characters)
.\serial_servo.py:131:80: E501 line too long (80 > 79 characters)
.\serial_servo.py:135:80: E501 line too long (86 > 79 characters)
.\serial_servo.py:147:80: E501 line too long (98 > 79 characters)
.\serial_servo.py:151:80: E501 line too long (89 > 79 characters)
.\serial_servo.py:155:80: E501 line too long (83 > 79 characters)
.\serial_servo.py:307:80: E501 line too long (81 > 79 characters)
.\serial_servo.py:328:80: E501 line too long (117 > 79 characters)
.\serial_servo.py:341:80: E501 line too long (84 > 79 characters)
.\serial_servo.py:363:80: E501 line too long (100 > 79 characters)
.\serial_servo.py:371:80: E501 line too long (95 > 79 characters)
.\serial_servo.py:389:80: E501 line too long (84 > 79 characters)
.\serial_servo.py:413:80: E501 line too long (95 > 79 characters)
.\serial_servo.py:419:80: E501 line too long (81 > 79 characters)
.\serial_servo.py:440:80: E501 line too long (132 > 79 characters)
.\serial_servo.py:448:80: E501 line too long (116 > 79 characters)
.\serial_servo.py:451:80: E501 line too long (97 > 79 characters)
.\serial_servo.py:495:80: E501 line too long (86 > 79 characters)
.\serial_servo.py:515:80: E501 line too long (91 > 79 characters)
.\serial_servo.py:516:80: E501 line too long (133 > 79 characters)
.\serial_servo.py:519:80: E501 line too long (103 > 79 characters)
.\serial_servo.py:571:80: E501 line too long (127 > 79 characters)
.\serial_servo.py:578:80: E501 line too long (142 > 79 characters)
.\serial_servo.py:582:80: E501 line too long (108 > 79 characters)
.\serial_servo.py:593:80: E501 line too long (84 > 79 characters)
.\serial_servo.py:637:80: E501 line too long (108 > 79 characters)
.\serial_servo.py:642:80: E501 line too long (115 > 79 characters)
.\serial_servo.py:643:80: E501 line too long (135 > 79 characters)
.\serial_servo.py:646:80: E501 line too long (108 > 79 characters)
.\serial_servo.py:696:80: E501 line too long (92 > 79 characters)
.\serial_servo.py:698:80: E501 line too long (119 > 79 characters)
.\serial_servo.py:705:80: E501 line too long (142 > 79 characters)
.\serial_servo.py:709:80: E501 line too long (108 > 79 characters)
.\serial_servo.py:715:80: E501 line too long (100 > 79 characters)
.\serial_servo.py:719:80: E501 line too long (81 > 79 characters)
.\serial_servo.py:767:80: E501 line too long (129 > 79 characters)
.\serial_servo.py:768:80: E501 line too long (92 > 79 characters)
.\serial_servo.py:774:80: E501 line too long (97 > 79 characters)
.\serial_servo.py:795:80: E501 line too long (141 > 79 characters)
.\serial_servo.py:801:80: E501 line too long (97 > 79 characters)
.\serial_servo.py:822:80: E501 line too long (111 > 79 characters)
.\serial_servo.py:829:80: E501 line too long (112 > 79 characters)
.\serial_servo.py:858:80: E501 line too long (118 > 79 characters)
.\serial_servo.py:867:80: E501 line too long (97 > 79 characters)
.\serial_servo.py:912:80: E501 line too long (113 > 79 characters)
.\serial_servo.py:914:80: E501 line too long (106 > 79 characters)
.\serial_servo.py:919:80: E501 line too long (96 > 79 characters)
.\serial_servo.py:920:80: E501 line too long (120 > 79 characters)
.\serial_servo.py:923:80: E501 line too long (102 > 79 characters)
.\serial_servo.py:943:80: E501 line too long (84 > 79 characters)
.\serial_servo.py:970:80: E501 line too long (124 > 79 characters)
.\serial_servo.py:971:80: E501 line too long (132 > 79 characters)
.\serial_servo.py:977:80: E501 line too long (84 > 79 characters)
.\serial_servo.py:981:80: E501 line too long (109 > 79 characters)
.\serial_servo.py:1032:80: E501 line too long (94 > 79 characters)
.\serial_servo.py:1040:80: E501 line too long (119 > 79 characters)
.\serial_servo.py:1093:80: E501 line too long (123 > 79 characters)
.\serial_servo.py:1100:80: E501 line too long (111 > 79 characters)
.\serial_servo.py:1104:80: E501 line too long (120 > 79 characters)
.\serial_servo.py:1115:80: E501 line too long (88 > 79 characters)
.\serial_servo.py:1159:80: E501 line too long (102 > 79 characters)
.\serial_servo.py:1163:80: E501 line too long (95 > 79 characters)
.\serial_servo.py:1164:80: E501 line too long (95 > 79 characters)
.\serial_servo.py:1167:80: E501 line too long (125 > 79 characters)
.\serial_servo.py:1171:80: E501 line too long (82 > 79 characters)
.\serial_servo.py:1218:80: E501 line too long (123 > 79 characters)
.\serial_servo.py:1225:80: E501 line too long (94 > 79 characters)
.\serial_servo.py:1229:80: E501 line too long (125 > 79 characters)
.\serial_servo.py:1241:80: E501 line too long (84 > 79 characters)
.\serial_servo.py:1283:80: E501 line too long (82 > 79 characters)
.\serial_servo.py:1287:80: E501 line too long (97 > 79 characters)
.\serial_servo.py:1290:80: E501 line too long (119 > 79 characters)
.\serial_servo.py:1294:80: E501 line too long (87 > 79 characters)
.\serial_servo.py:1298:80: E501 line too long (87 > 79 characters)
.\serial_servo.py:1322:80: E501 line too long (142 > 79 characters)
.\serial_servo.py:1329:80: E501 line too long (122 > 79 characters)
.\serial_servo.py:1333:80: E501 line too long (119 > 79 characters)
.\serial_servo.py:1338:80: E501 line too long (81 > 79 characters)
.\serial_servo.py:1382:80: E501 line too long (131 > 79 characters)
.\serial_servo.py:1388:80: E501 line too long (80 > 79 characters)
.\serial_servo.py:1392:80: E501 line too long (112 > 79 characters)
.\serial_servo.py:1439:80: E501 line too long (123 > 79 characters)
.\serial_servo.py:1445:80: E501 line too long (99 > 79 characters)
.\serial_servo.py:1449:80: E501 line too long (109 > 79 characters)
.\serial_servo.py:1499:80: E501 line too long (124 > 79 characters)
.\serial_servo.py:1500:80: E501 line too long (103 > 79 characters)
.\serial_servo.py:1506:80: E501 line too long (95 > 79 characters)
.\serial_servo.py:1510:80: E501 line too long (103 > 79 characters)
.\serial_servo.py:1546:80: E501 line too long (85 > 79 characters)
.\serial_servo.py:1567:80: E501 line too long (96 > 79 characters)
.\serial_servo.py:1568:80: E501 line too long (127 > 79 characters)
.\serial_servo.py:1571:80: E501 line too long (124 > 79 characters)
.\serial_servo.py:1578:80: E501 line too long (92 > 79 characters)
.\serial_servo.py:1627:80: E501 line too long (127 > 79 characters)
.\serial_servo.py:1634:80: E501 line too long (127 > 79 characters)
.\serial_servo.py:1637:80: E501 line too long (119 > 79 characters)
.\serial_servo.py:1642:80: E501 line too long (80 > 79 characters)
.\serial_servo.py:1688:80: E501 line too long (125 > 79 characters)
.\serial_servo.py:1723:80: E501 line too long (123 > 79 characters)
.\serial_servo.py:1724:80: E501 line too long (88 > 79 characters)
.\serial_servo.py:1730:80: E501 line too long (131 > 79 characters)
.\serial_servo.py:1735:80: E501 line too long (81 > 79 characters)
.\serial_servo.py:1775:80: E501 line too long (117 > 79 characters)
.\serial_servo.py:1786:80: E501 line too long (85 > 79 characters)
.\serial_servo.py:1809:80: E501 line too long (102 > 79 characters)
.\serial_servo.py:1810:80: E501 line too long (83 > 79 characters)
.\serial_servo.py:1816:80: E501 line too long (99 > 79 characters)
.\serial_servo.py:1820:80: E501 line too long (108 > 79 characters)
.\serial_servo.py:1831:80: E501 line too long (82 > 79 characters)
.\serial_servo.py:1861:80: E501 line too long (100 > 79 characters)
.\serial_servo.py:1862:80: E501 line too long (97 > 79 characters)
.\serial_servo.py:1866:80: E501 line too long (112 > 79 characters)
.\serial_servo.py:1869:80: E501 line too long (89 > 79 characters)
.\serial_servo.py:1911:80: E501 line too long (111 > 79 characters)
.\serial_servo.py:1912:80: E501 line too long (108 > 79 characters)
.\serial_servo.py:1913:80: E501 line too long (85 > 79 characters)
.\serial_servo.py:1919:80: E501 line too long (101 > 79 characters)
.\serial_servo.py:1923:80: E501 line too long (110 > 79 characters)
.\serial_servo.py:1934:80: E501 line too long (84 > 79 characters)
.\serial_servo.py:1962:80: E501 line too long (91 > 79 characters)
.\serial_servo.py:1964:80: E501 line too long (92 > 79 characters)
Here, we will first explain the common Flake8 error codes, which consist of a combination of letters and numbers. For example:
EError (Error Type):E101: Inconsistent use of spaces and tabs for indentation.E302: Expected 2 blank lines, found 1.
WWarning (Style Issue):W291: Trailing whitespace at the end of the line.
FError (Static Analysis):F401: Imported unused module.
The above prompt code line is too long:
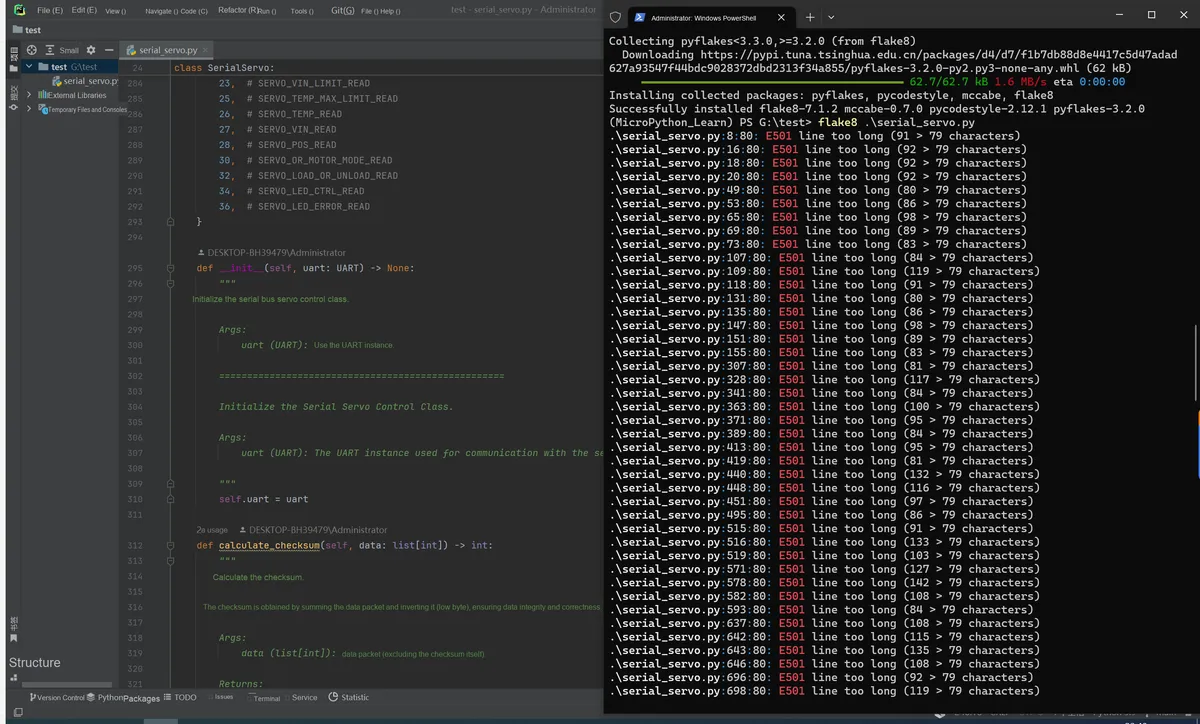
Actually, we can modify the maximum allowed line count limit, Flake8 supports managing and customizing rules via configuration files. You can create a. flake8 file or configure settings in the setup.cfg file.
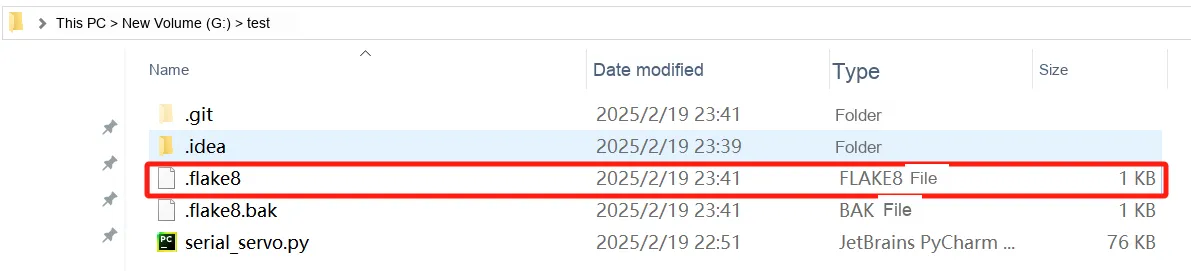
[flake8]
max-line-length = 150
exclude = .git, __pycache__, build, dist
ignore = E203, W503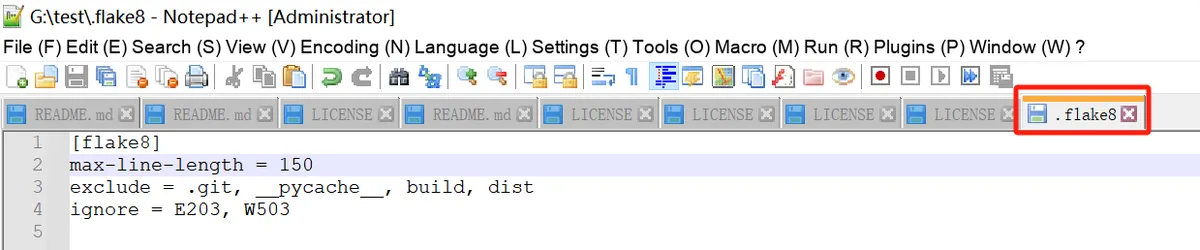
Here, we set the line length limit to 150 characters (the default is 79), and exclude checking the. git, pycache, build and dist directories, while ignoring the E203 and W503 errors.

Run it again, and there are no errors.
3.3 Automatic Execution Using Pre-commit Hooks
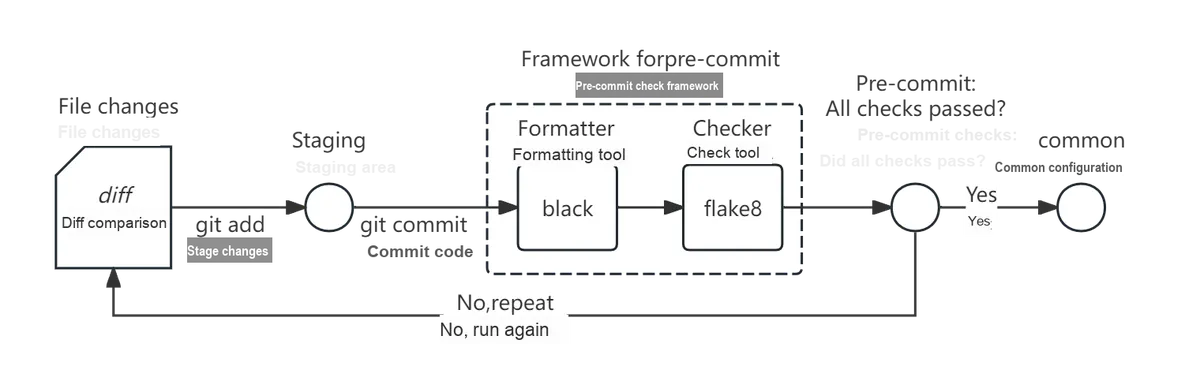
As you can see, when using the black and flake8 tools, we have to manually enter commands every time, which is not only tedious but also error-prone. In fact, we can use the Git hook mechanism to automatically run the black and flake8 tools every time we commit code.

Git hooks are a mechanism provided by Git that allow you to automatically run custom scripts or programs before or after executing Git operations such as committing, pushing, merging, etc. Through Git hooks, developers can insert custom operations at specific timings for automated processing, thereby improving development efficiency and ensuring code quality and consistency.The name of hooks in Git derives from their function and working mechanism. In computer science, a "hook" generally refers to a mechanism that allows code to be "hooked" into a system or process when a specific event occurs.Git hooks are essentially a set of scripts (usually shell scripts). When you perform specific Git operations such as commit, push and merge, Git will automatically trigger the corresponding hook, making the specified script run automatically before or after these operations. It is just like hooking onto an event, so that the hook can execute certain actions once the event occurs.
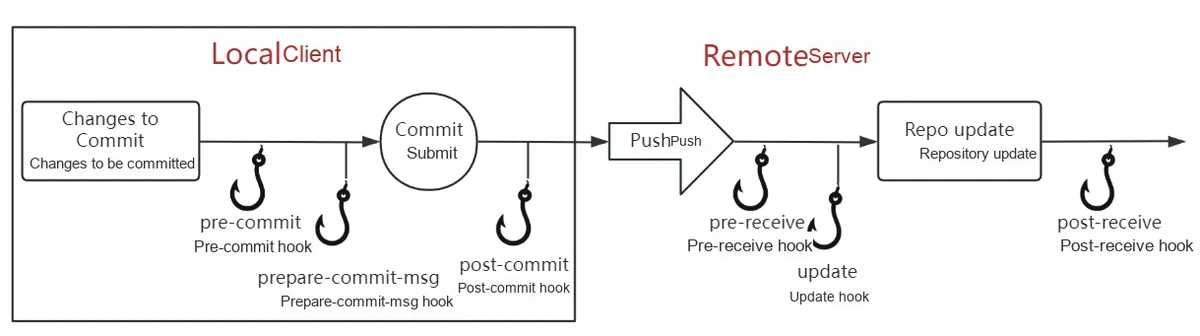
Git hooks can be divided into the following two categories:
- Client hook: Related to users' local Git operations (such as commit, merge, etc.).
- Server-side hook: Related to operations of the Git server (such as push, receive, etc.).
Additionally, the naming of Git hooks follows certain rules, which are usually based on the name or behavior of a Git operation, with a specific suffix or prefix added afterward to indicate the timing when the hook is executed. Below are some common naming rules for Git hooks:
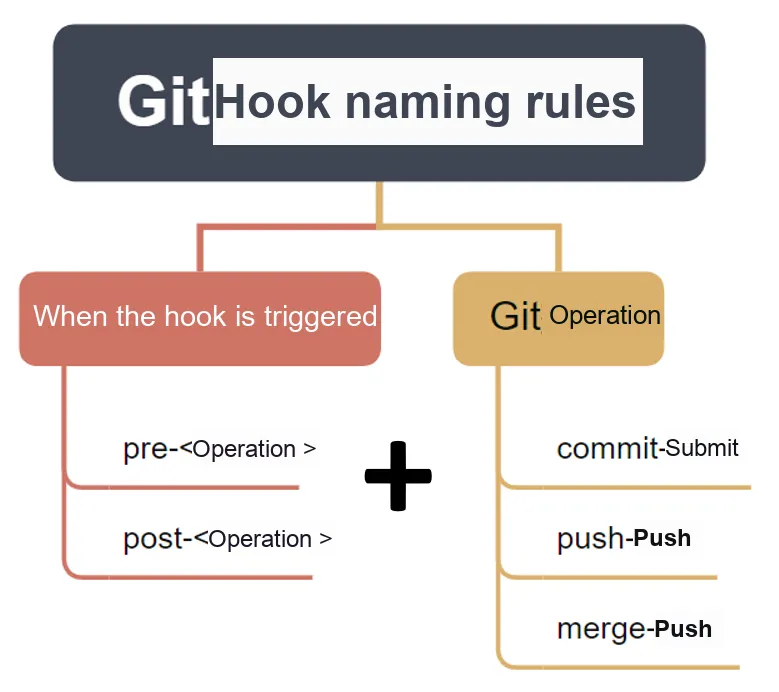
Here, we use the pre-commit Client Git hook, which runs before the git commit command is executed. We can leverage pre-commit to automatically invoke tools like black and flake8 prior to Git commit operations (e. g., git commit).
First, we use the pip tool to install the pre-commit module:
pip install pre-commit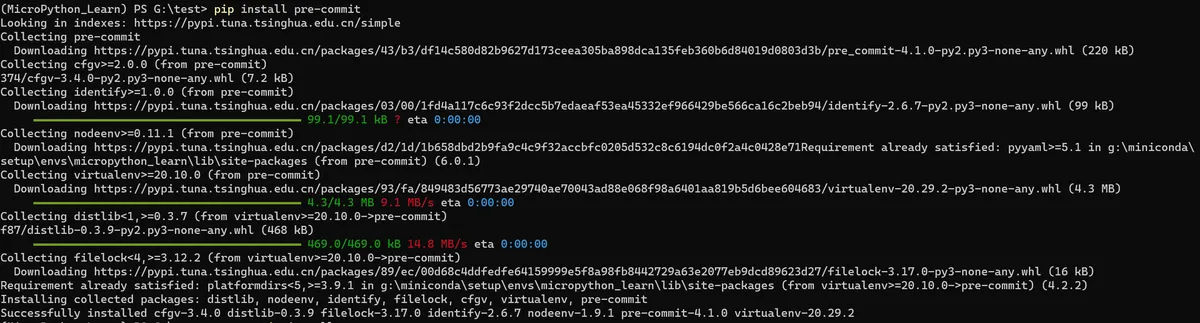
Then create a configuration file named. pre-commit-config.yaml in the root directory of the project, which contains the hooks you want to execute during Git commits.
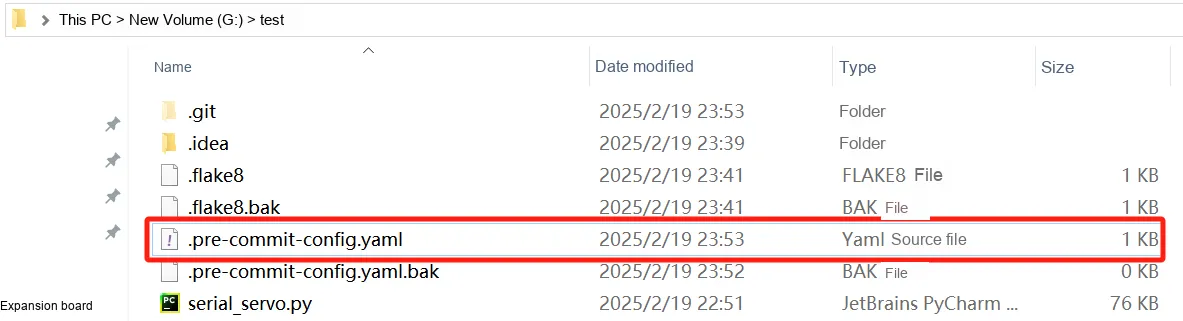
Here, the content of the configuration file we set is as follows:
repos:
  - repo: git@github.com:psf/black.git
    rev: 24.3.0
    hooks:
      - id: black
        args: [--line-length=150]

  - repo: git@github.com:pycqa/flake8.git
    rev: 7.0.0
    hooks:
      - id: flake8
args: ["--ignore=E203,E501,W503", "--max-line-length=150"]This. pre-commit-config.yaml configuration defines two Git hooks: one for running the black formatter with a maximum line length of 150 characters; the other for running the flake8 linting tool, which ignores the E203, E501, and W503 errors and sets a maximum line length of 150 characters.
In fact, pre-commit also provides some other commonly used hook libraries, including mypy (a type checking tool for detecting type errors), isort (for automatically sorting import statements), pytest (for running tests) and trailing-whitespace (for removing extra spaces at the end of lines). All these tools can be selected according to project requirements and configured in the. pre-commit-config.yaml file.
First, we use the following command to automatically update. pre-commit-config.yaml file to automatically update. pre-commit-config.yaml the hook repositories defined in the file to the latest version. :
pre-commit autoupdateThen run the following command to install the. pre-commit-config.yaml hooks specified in the configuration:
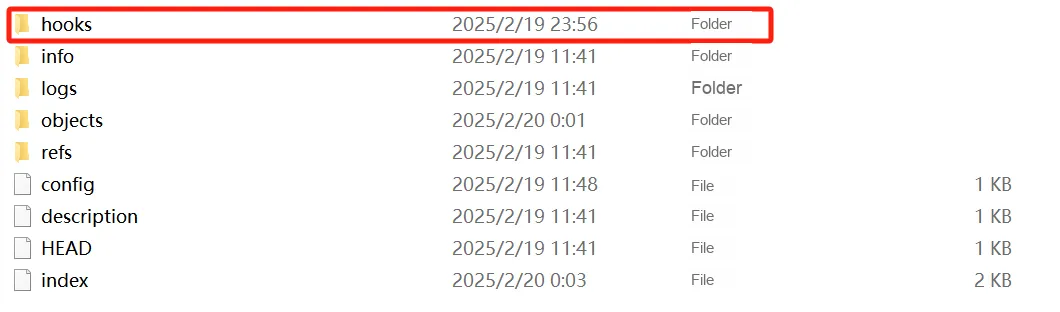
pre-commit install
This command will create a. git/hooks/pre-commit file to associate the hook script with the Git repository. Every subsequent execution of git commit will trigger this hook in Git.
When we make the next commit, we will first run black and flake8 to detect any non-compliant code issues, and these tools can automatically format the code for you. After you make the corresponding modifications and resubmit the commit, the submission will go through smoothly.
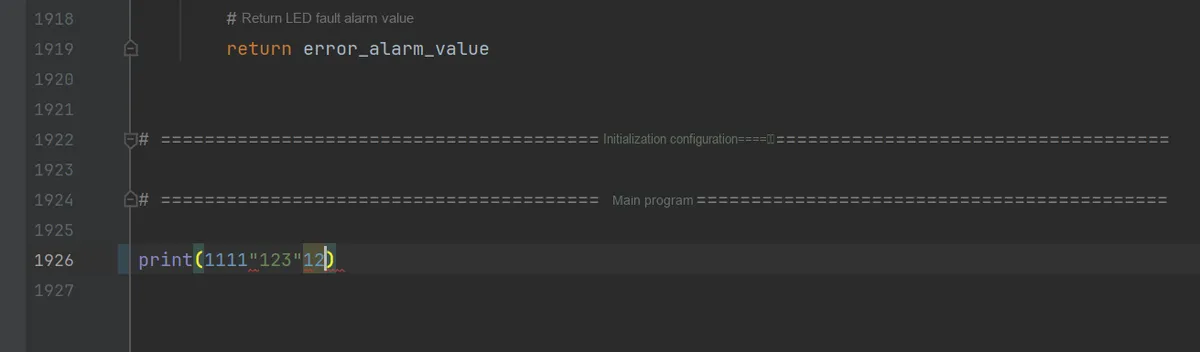
Let's introduce some errors into the source code:
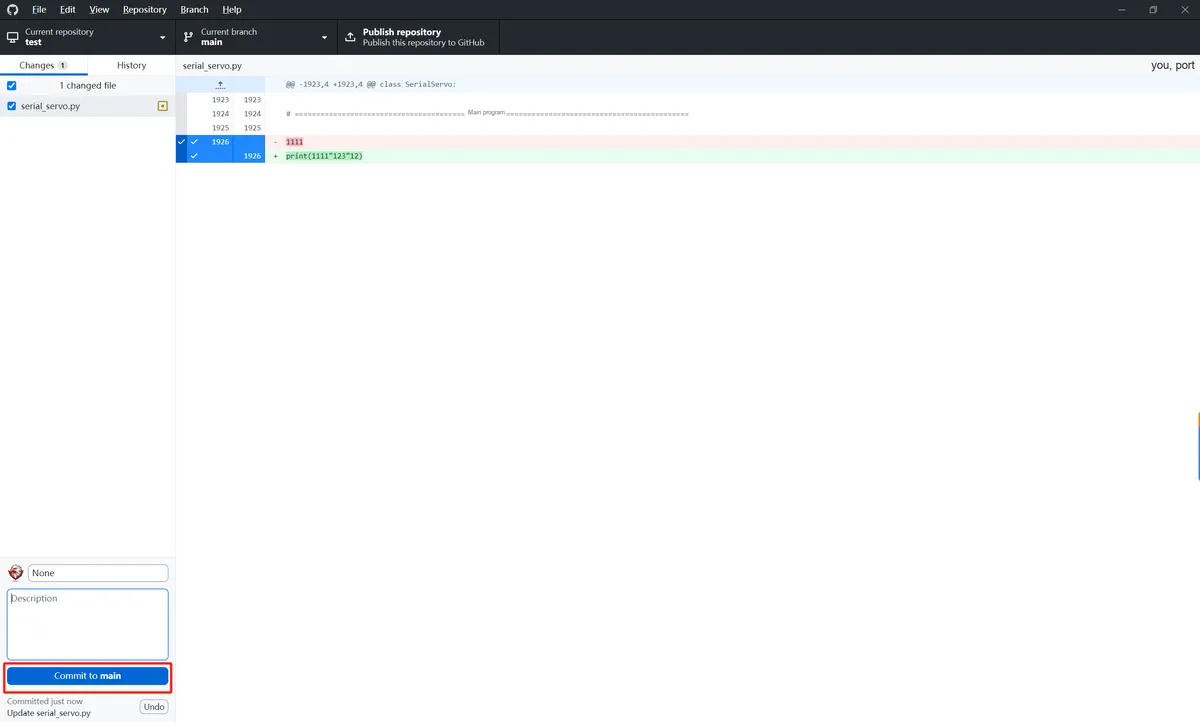
Click commit to submit:
It can be seen that the error has been identified:
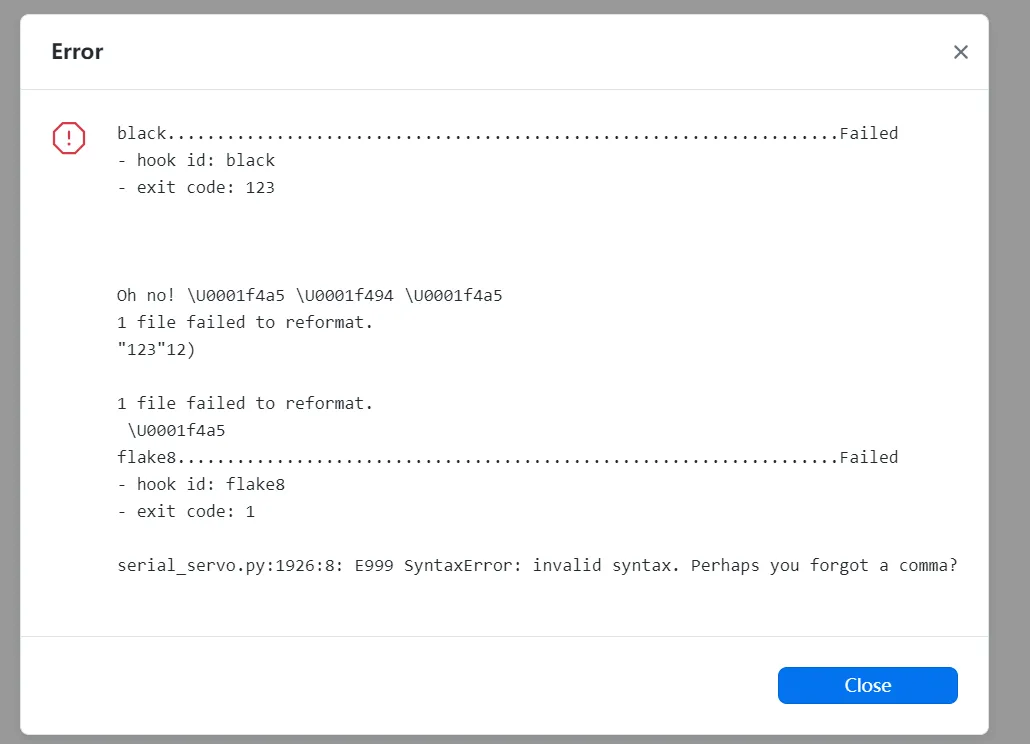
As you can see, every time you run git commit, the pre-commit hook will be triggered automatically to perform operations such as code checking and formatting before the commit. If the hook detects issues in the code (for example, non-standard code formatting or static check errors), it will block the commit and report the corresponding error message. After deleting the problematic lines of code, run commit again:
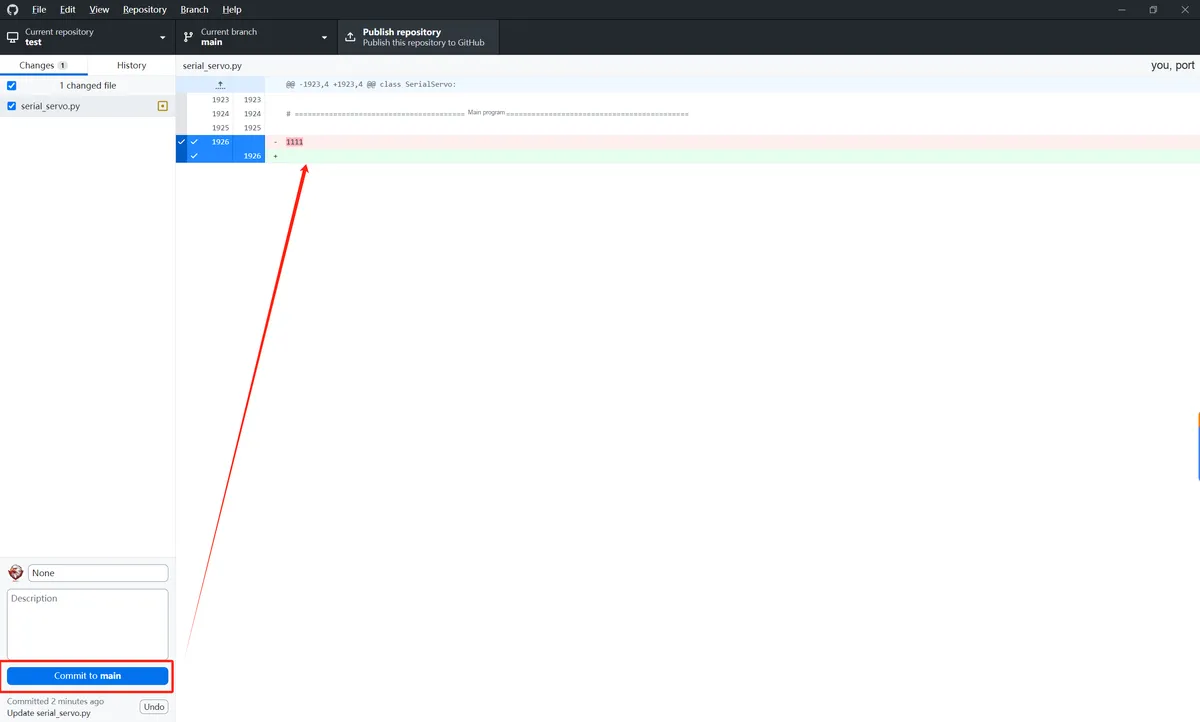
You can see that the commit was successful.
We can also choose to manually run the hook without committing, using the following command:
pre-commit run --all-filesWe can conduct a simple test:

3.4 Usage of GitHub Accelerator
Note that in the. pre-commit-config.yaml configuration file, if you specify the repo as an online repository address on GitHub, you may encounter access delays or failures when pulling or updating the repository related to Git hooks, which will cause an error in the commit operation:
(MicroPython_Learn) PS G:\test> pre-commit run --all-files
[INFO] Initializing environment for git@github.com:psf/black.git.
origin', '--tags')
stdout: (none)
stderr:
    banner exchange: Connection to 20.205.243.166 port 22: Software caused connection abort
    fatal: Could not read from remote repository.

    Please make sure you have the correct access rights
    and the repository exists.
Check the log at C:\Users\Administrator\.cache\pre-commit\pre-commit.log
To avoid this situation, you can consider enabling GitHub Accelerator, or using some proxy services to speed up access to GitHub, so as to ensure the normal operation of. pre-commit hook.
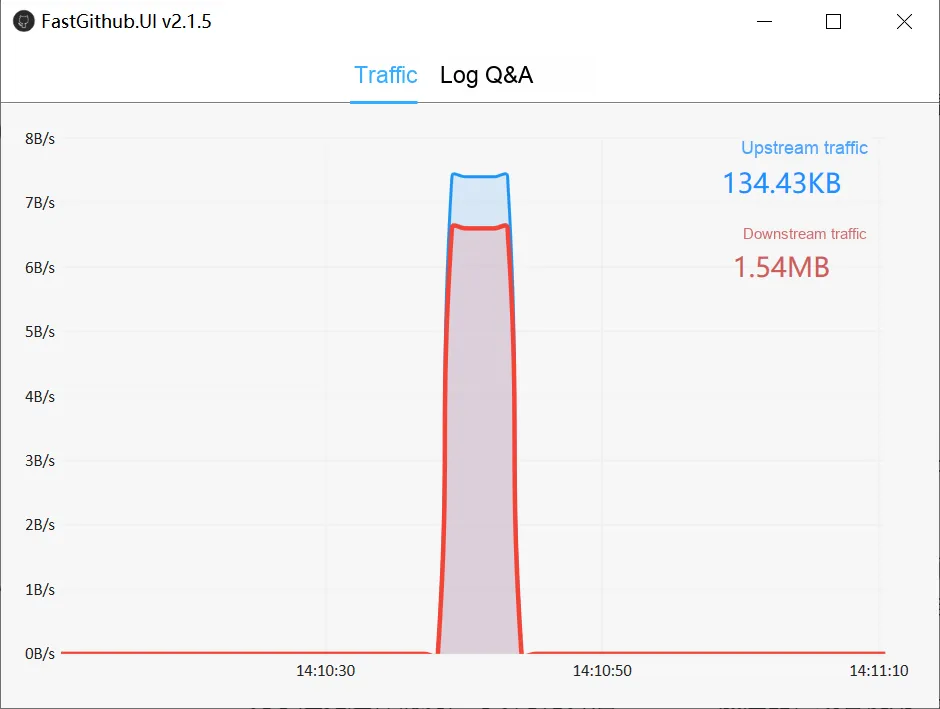
Here, we use FastGithub.UI for acceleration:

It can be seen that the uplink traffic and downlink traffic are significantly accelerated during the commit operation:
3.5 Introduction to the mpremote Tool and One-Click Download
Actually, if you only want to release the third-party library to your own GitHub repository, after completing the functional testing of the code module, and conducting code format specification check and static check, you can directly use the mpremote tool to realize one-click download of the code. mpremote is a command-line tool officially provided by MicroPython, which supports functions such as file upload and download, script execution, and device management. For details, please refer to the following document:
MicroPython remote control: mpremote 
Here, we will only explain the process of downloading library files using the mpremote tool. Taking our library as an example, the address is:
https://github.com/leezisheng/freakstudio-micropython-libraries/tree/main/serial_servo
You can use the following command to implement one-click download of library files via the mpremote tool and the mip tool:
mpremote mip install github:leezisheng/freakstudio-micropython-libraries/serial_servoDuring the installation process, the following will be displayed:
(base) PS D:\lee\windows terminal\terminal-1.17.11461.0> mpremote mip install github:leezisheng/freakstudio-micropython-libraries/serial_servo
Install github:leezisheng/freakstudio-micropython-libraries/serial_servo
Installing github:leezisheng/freakstudio-micropython-libraries/serial_servo/package.json to /lib
Installing: /lib/serial_servo/__init__.py
Installing: /lib/serial_servo/serial_servo.py
Installing micropython-machine (latest) from https://micropython.org/pi/v2 to /lib
Package may be partially installed
mpremote: Package not found: https://micropython.org/pi/v2/package/6/micropython-machine/latest.json
After the installation is complete, connect your development board via the mpremote tool. If the installation is successful, the following information will be displayed:
(base) PS D:\lee\windows terminal\terminal-1.17.11461.0> mpremote connect COM8
Connected to MicroPython at COM8
Use Ctrl-] or Ctrl-x to exit this shell

>>> import os
>>> os.listdir()
['lib']
>>> from serial_servo import SerialServo
>>>
4. Publicly released on the PyPi platform
4.1 PyPi Platform Registration
Here, no further elaboration is needed; simply refer to the tutorial in the link below to register:
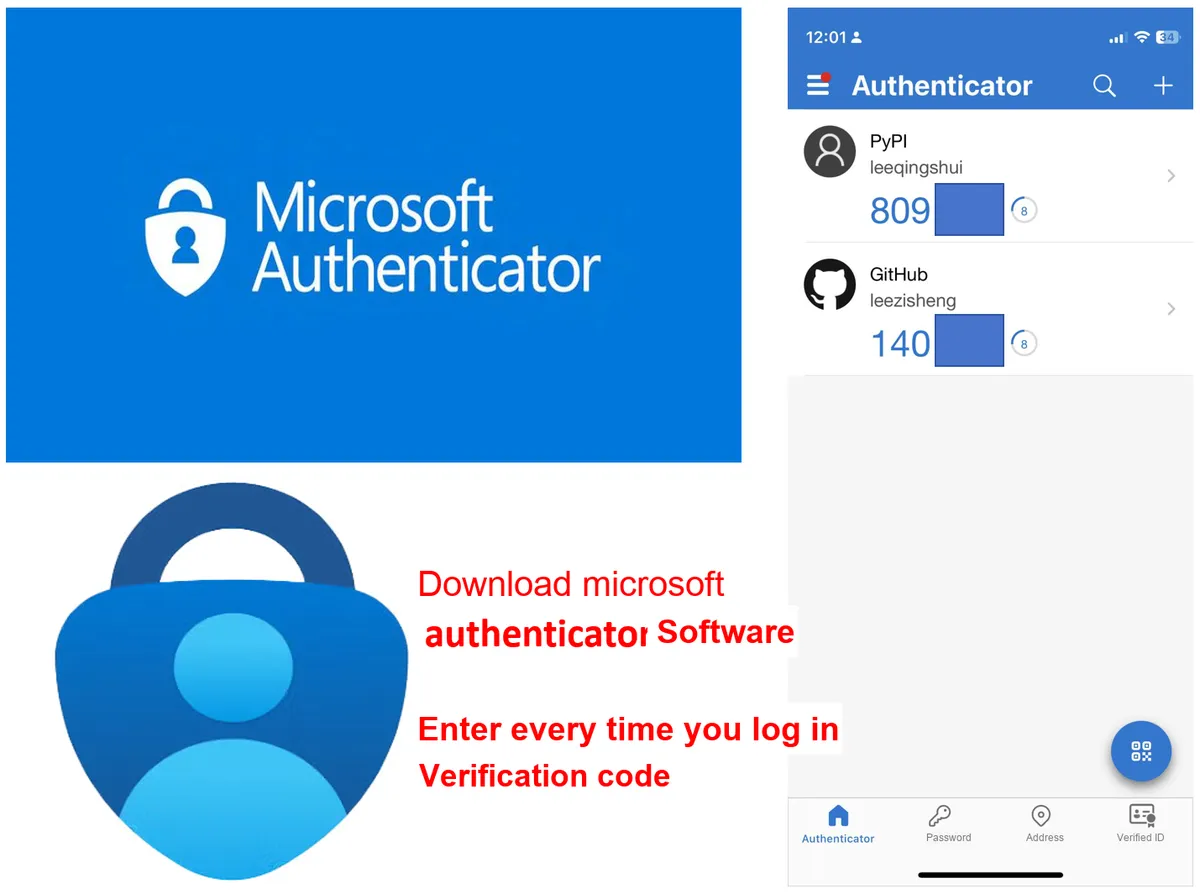
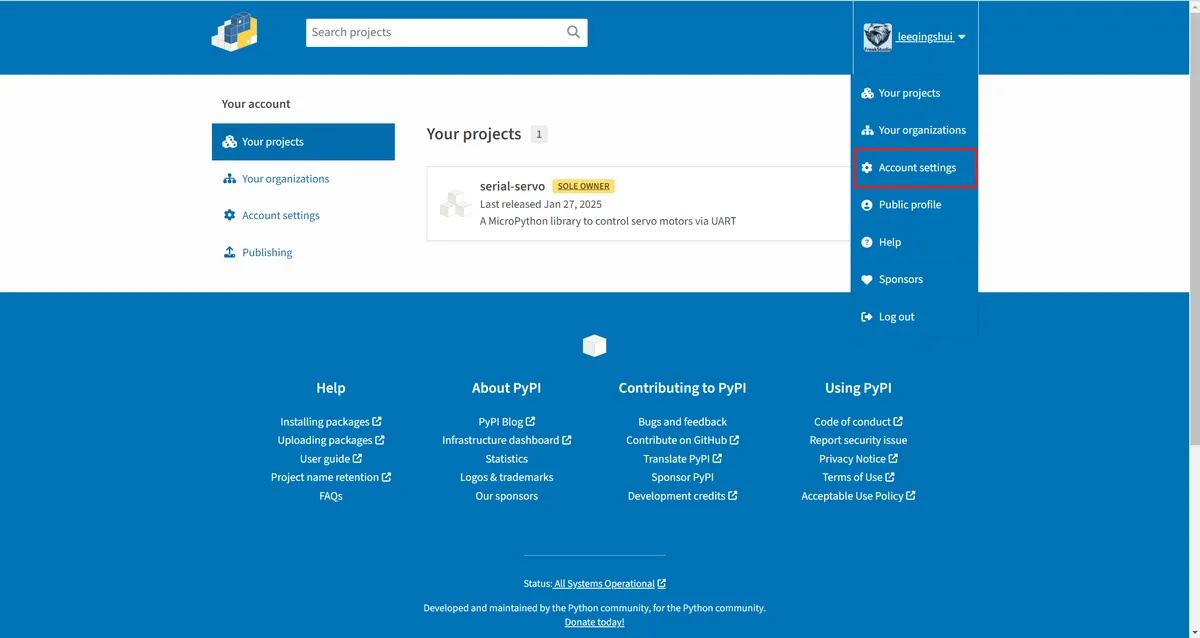
It should be noted that the PyPi platform requires all users to enable Two-Factor Authentication (2FA) to enhance account security. After completing registration, we need to select Add two-factor authentication on the account settings page, then use an authenticator app to scan the QR code and save the backup codes.
We need to download a Microsoft Authenticator app on our mobile phone in advance for 2FA verification login:
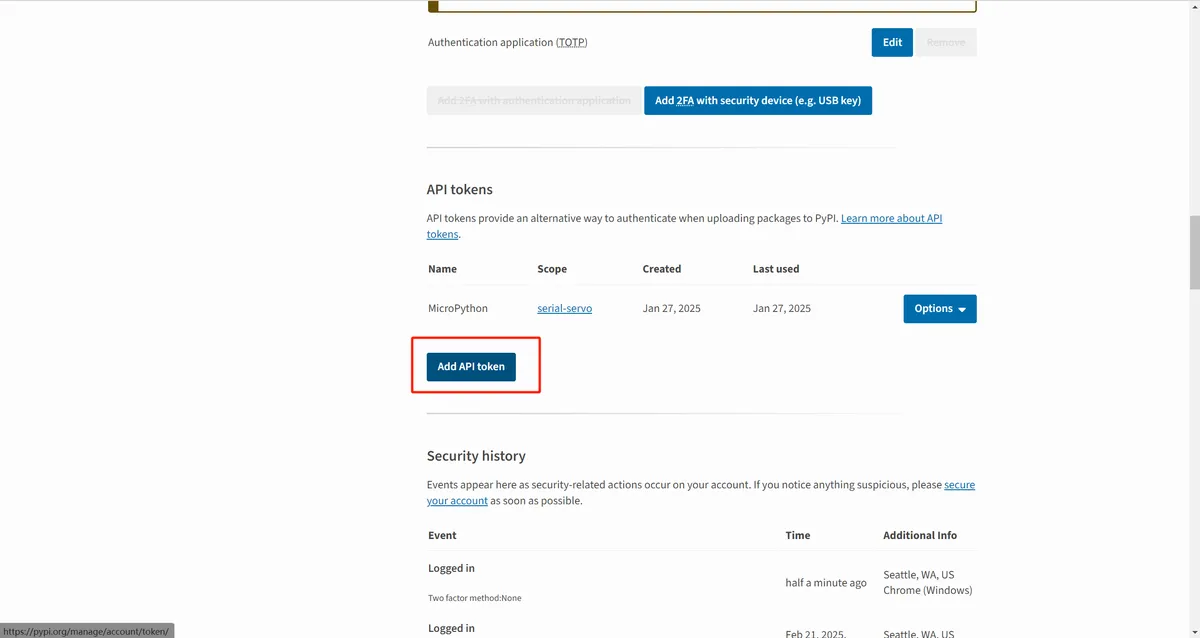
After completing registration and enabling 2FA, navigate to the API token section under the 2FA settings in your account, then create a new API token:
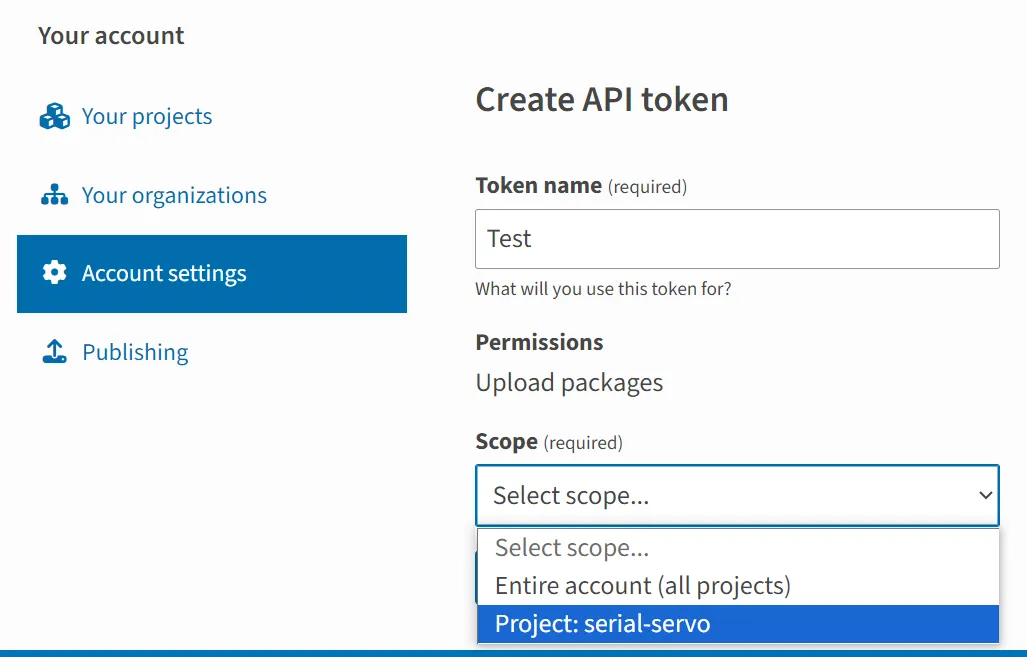
Enter the token name and application scope. If you have never uploaded a third-party library to the PyPi platform before, select Entire account:
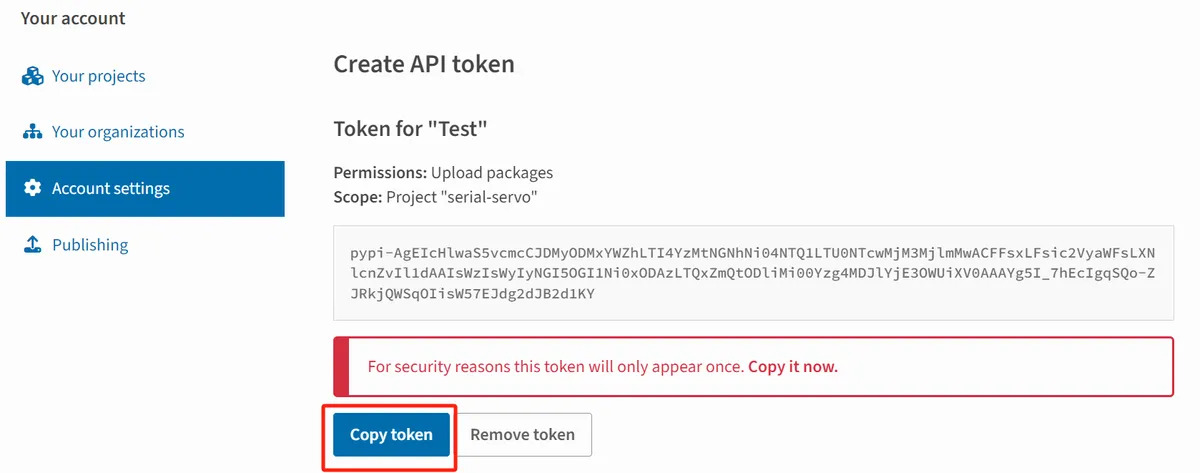
Copy this token and save it properly, as we will need to use it every time we release a library later:
4.2 Create Distribution Package
Here, we use setuptools and twine to create distribution packages. When packaging with setuptools, the generated distribution packages are. tar.gz and. whl files, which you can find in the dist folder. The distribution packages we created are Compressed Packet files and whl files:

twine is a tool for securely uploading Python packages to the Python Package Index (PyPI). It uses HTTPS and encrypted transmission. We can install pip to install twine:
pip install twine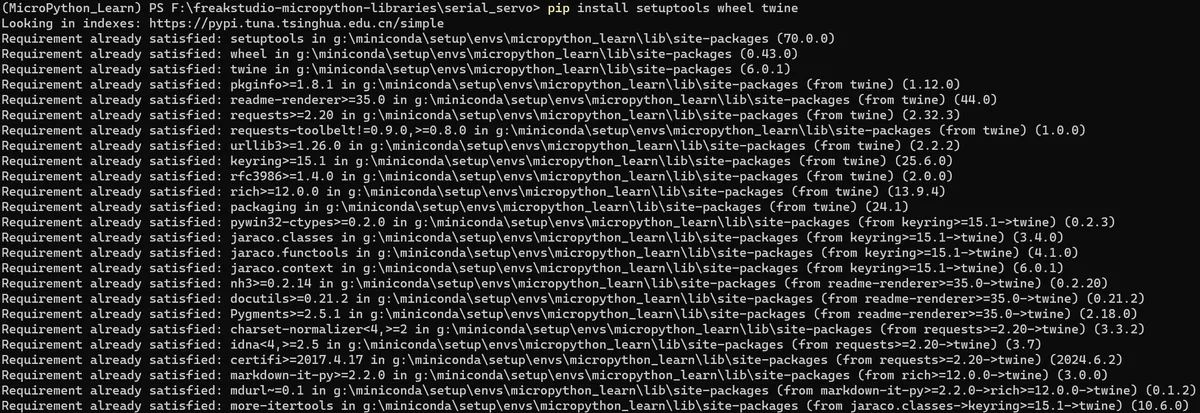
Next, we use setuptools to create distribution packages in. tar.gz and. whl formats. Note that you need to open a terminal in the root directory of the library to be released:
python setup.py sdist bdist_wheelOutput is as follows:
(MicroPython_Learn) PS F:\freakstudio-micropython-libraries\serial_servo> python setup.py sdist bdist_wheel
running sdist
running egg_info
writing serial_servo.egg-info\PKG-INFO
writing dependency_links to serial_servo.egg-info\dependency_links.txt
writing requirements to serial_servo.egg-info\requires.txt
writing top-level names to serial_servo.egg-info\top_level.txt
reading manifest file 'serial_servo.egg-info\SOURCES.txt'
adding license file 'LICENSE'
writing manifest file 'serial_servo.egg-info\SOURCES.txt'
running check
creating serial_servo-1.0.5
creating serial_servo-1.0.5\serial_servo
creating serial_servo-1.0.5\serial_servo.egg-info
copying files to serial_servo-1.0.5...
copying LICENSE -> serial_servo-1.0.5
copying README.md -> serial_servo-1.0.5
copying setup.py -> serial_servo-1.0.5
copying serial_servo\__init__.py -> serial_servo-1.0.5\serial_servo
copying serial_servo\serial_servo.py -> serial_servo-1.0.5\serial_servo
copying serial_servo.egg-info\PKG-INFO -> serial_servo-1.0.5\serial_servo.egg-info
copying serial_servo.egg-info\SOURCES.txt -> serial_servo-1.0.5\serial_servo.egg-info
copying serial_servo.egg-info\dependency_links.txt -> serial_servo-1.0.5\serial_servo.egg-info
copying serial_servo.egg-info\requires.txt -> serial_servo-1.0.5\serial_servo.egg-info
copying serial_servo.egg-info\top_level.txt -> serial_servo-1.0.5\serial_servo.egg-info
copying serial_servo.egg-info\SOURCES.txt -> serial_servo-1.0.5\serial_servo.egg-info
Writing serial_servo-1.0.5\setup.cfg
Creating tar archive
removing 'serial_servo-1.0.5' (and everything under it)
running bdist_wheel
running build
G:\miniconda\setup\envs\MicroPython_Learn\Lib\site-packages\setuptools\_distutils\cmd.py:66: SetuptoolsDeprecationWarning: setup.py install is deprecated.
!!

        ********************************************************************************
        Please avoid running ``setup.py`` directly.
        Instead, use pypa/build, pypa/installer or other
        standards-based tools.

        See https://blog.ganssle.io/articles/2021/10/setup-py-deprecated.html for details.
        ********************************************************************************

!!
  self.initialize_options()
installing to build\bdist.win-amd64\wheel
running install
running install_egg_info
Copying serial_servo.egg-info to build\bdist.win-amd64\wheel\.\serial_servo-1.0.5-py3.12.egg-info
running install_scripts
creating build\bdist.win-amd64\wheel\serial_servo-1.0.5.dist-info\WHEEL
creating 'dist\serial_servo-1.0.5-py3-none-any.whl' and adding 'build\bdist.win-amd64\wheel' to it
As you can see, under the dist folder, there have been created. tar.gz and. whl files:

Next, use the following command to upload all packages in the dist/ folder:
twine upload dist/*Enter the newly created API token:

You can see that the file is being uploaded:

Since the third-party package for this version has already been released previously, the system shows that it cannot be published here. Under normal circumstances, a URL for the third-party library will be generated, and you can access the corresponding third-party library interface by opening this URL, as shown in the example below:
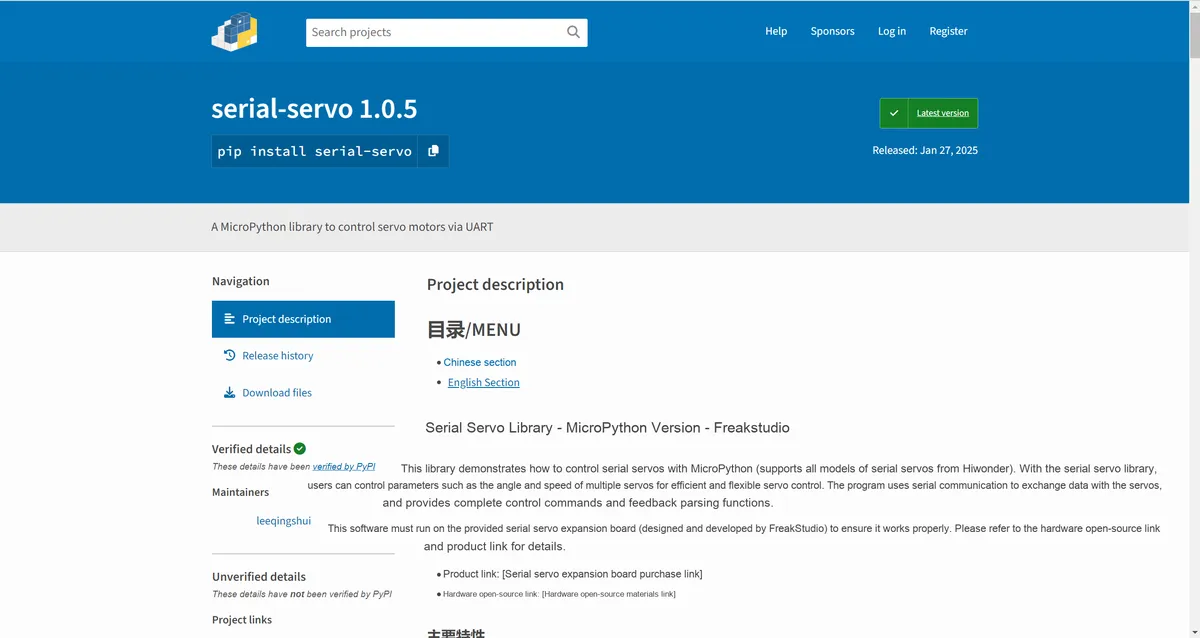
We can also choose to download the source file directly:
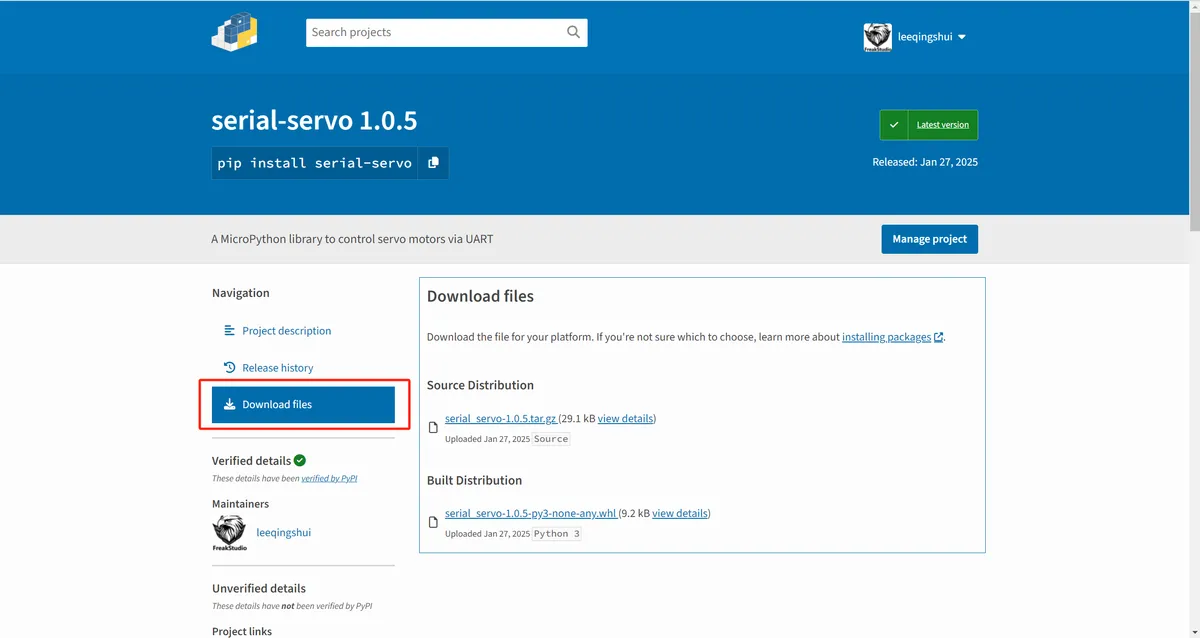
Here, it should be noted that if you want to release a new version of this third-party library, you need to manually delete dist/ the old version packages in the folder.
After the upload is complete, we can install it via the pip tool (note that this library cannot run on a PC and is for demonstration only):
pip install serial-servoDisplayed as follows:

Open the installation location, and you will see:
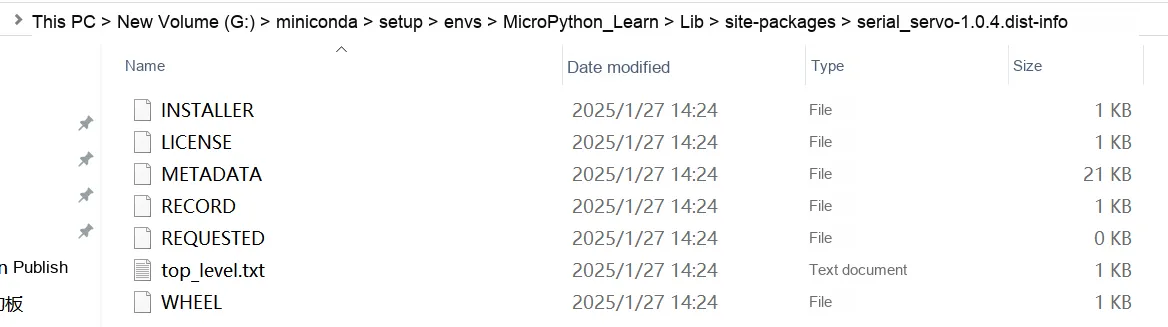
5. Reference Links
https://docs.micropython.org/en/latest/reference/packages.html#writing-publishing-packages
https://github.com/leezisheng/freakstudio-micropython-libraries/tree/main/serial_servo
https://github.com/micropython/micropython-lib/blob/master/.pre-commit-config.yaml
https://github.com/micropython/micropython-lib/blob/65a14116d503dd544cbba92284517c99e5e9a448/CONTRIBUTING.md
https://blog.csdn.net/wuShiJingZuo/article/details/135765628
https://www.ctyun.cn/developer/article/616592047181893
https://zhuanlan.zhihu.com/p/336238526
https://zhuanlan.zhihu.com/p/65820736
https://www.jianshu.com/p/eba337fe0828
https://www.runoob.com/w3cnote/open-source-license.html
https://zhuanlan.zhihu.com/p/682004873