
4.7 Layer Management
The layers in LVGL essentially govern the rendering hierarchy of UI elements (i. e., "which item appears on top of another"), and there are two core hierarchical systems:
- First, the default hierarchy of ordinary objects based on the "creation order";
- Second, there are special system layers (top/sys/bottom) that are globally visible.
To be precise:
- Hierarchy Rules: Objects are stacked by default in the order they are created, and the hierarchy can be adjusted manually to achieve overlay effects such as pop-up windows and floating windows.
- Special layers: The top/sys layers are used to display global pop-ups and status bars; the bottom layers are for background elements to ensure clear layer priority.
4.7.1 Creation Order: Default Hierarchy Rules
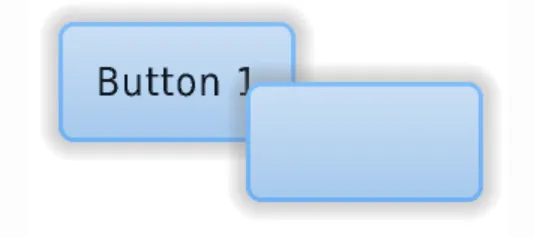
LVGL follows the default "later-created objects on top" principle: a newly created object (along with its child objects) will be drawn above older objects (and their child objects), and may cover the display area of the older ones.
# Initialize

import display_driver
import lvgl as lv

# Create a button with a label

lv.init()
scr = lv.screen_active()

# Create the first button (created first, lower in z-order)
btn1 = lv.button(scr)
# Position (x=60, y=40)
btn1.set_pos(60, 40)
label1 = lv.label(btn1)
label1.set_text("Button 1")

# Create the second button (created later, higher in z-order, covers the overlapping area of btn1)
btn2 = lv.button(scr)
# Position (x=60, y=60)
btn2.set_pos(60, 60)
label2 = lv.label(btn2)
label2.set_text("Button 2")

lv.screen_load(scr)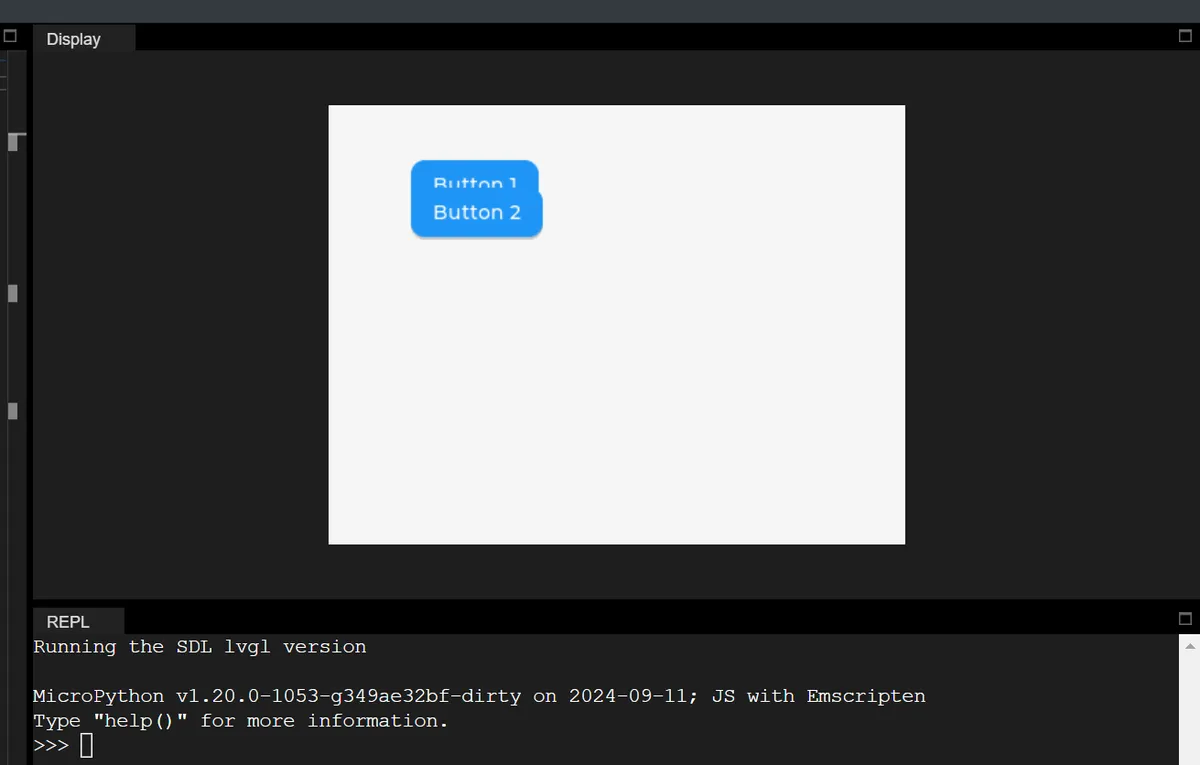
4.7.2 Modify Hierarchy: Actively Adjust the Display Order of Objects
When the default creation order fails to meet requirements (for example, moving a bottom-layer button to the top layer), LVGL provides 4 explicit methods to modify the layer order, and you can directly call the corresponding object methods in MicroPython:
4.7.2.1 Pin to Top / Pin to Bottom (Most Commonly Used)
| Method (mpy) | Purpose |
|---|---|
| obj.move_foreground() | Move the object (and its children) to the top layer of the parent container |
| obj.move_background() | Move the object (and its children) to the bottom layer of the parent container |
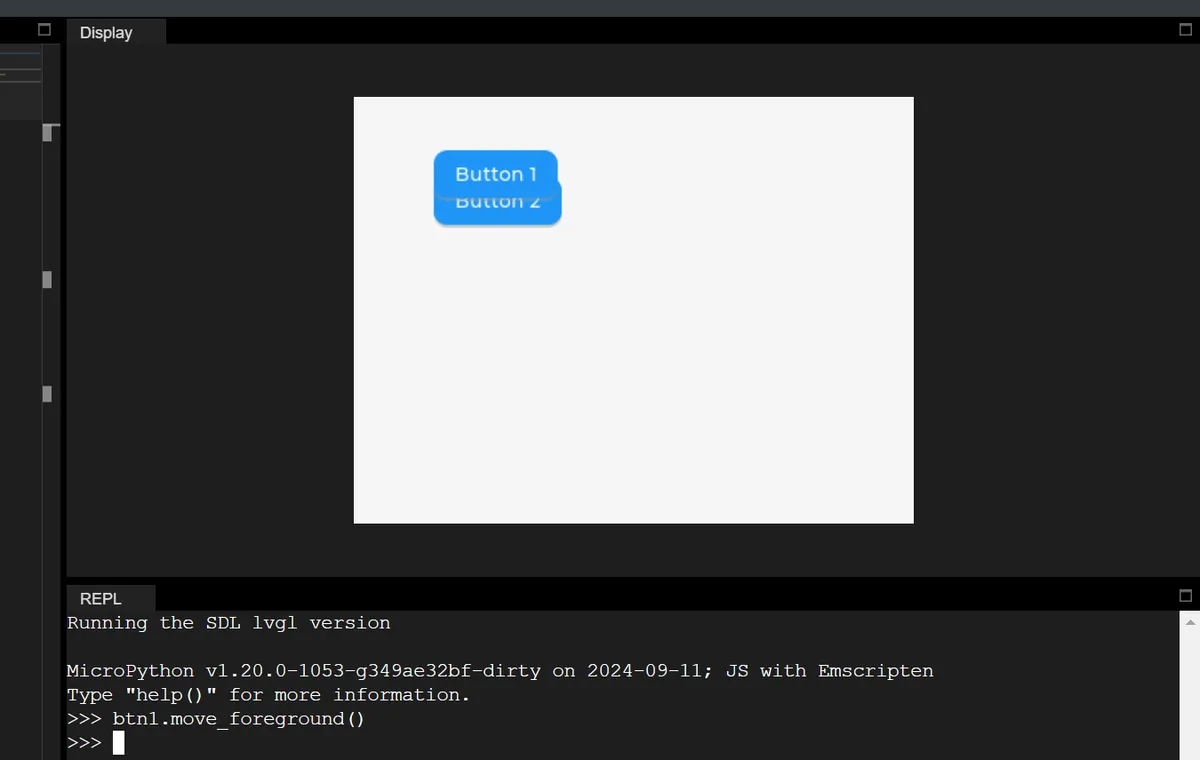
mpy example: Move the previously created btn1 to the top layer (to cover btn2)
# Move btn1 to the topmost layer of the parent container (scr)
btn1.move_foreground()
4.7.2.2 Move to the specified index position
Each child object of a parent container has an "index value", and the index determines the hierarchy:
- Index
0: the bottom layer of the parent container; - Index
Number of child objects + 1: the upper layer of the parent container; - Negative indices: count backwards from the top level (e. g.,
-1= top level,-2= the level immediately below the top level).
mpy core method:
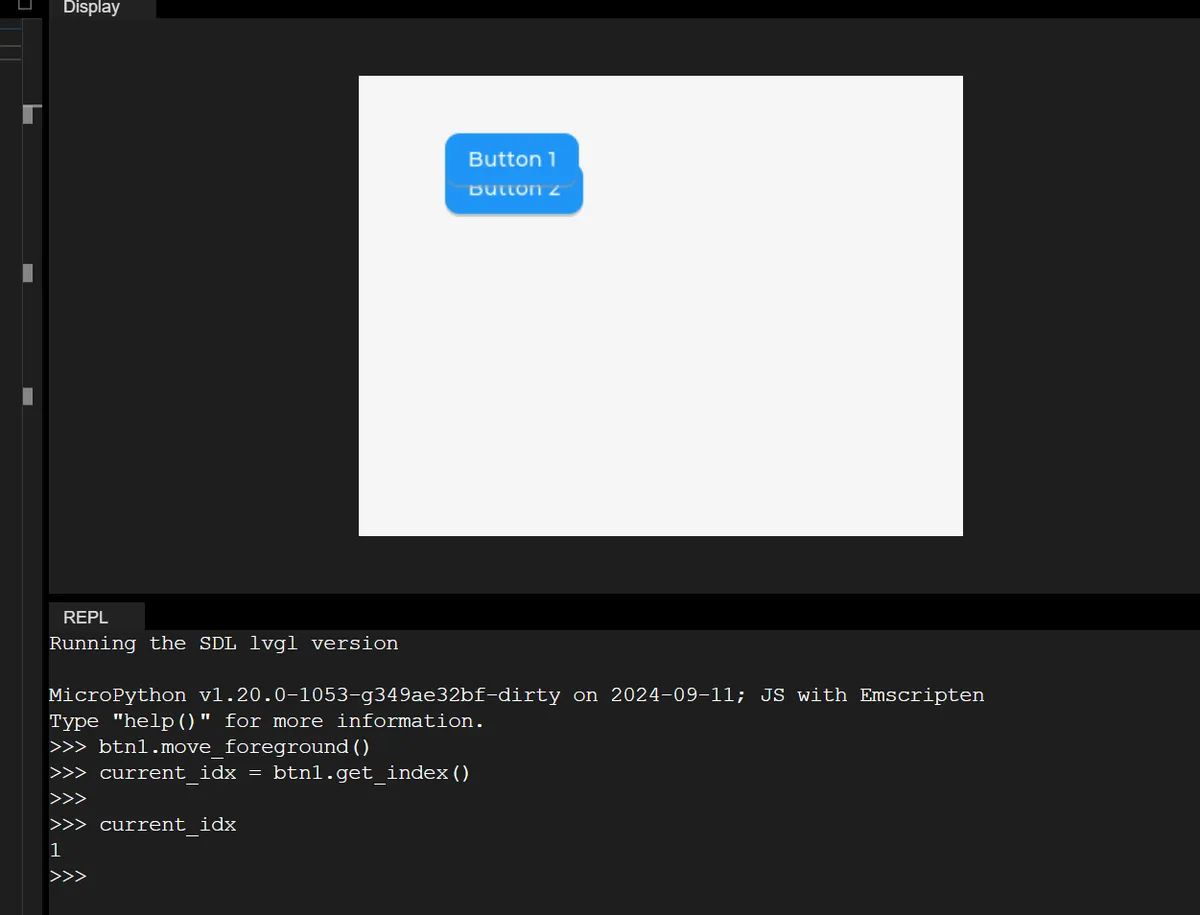
# 1. Get the object's current index
current_idx = obj.get_index()

# 2. Move to the specified index (e.g., move up 1 level)
obj.move_to_index(current_idx + 1)

# 3. Move directly to the bottom layer (index 0)
obj.move_to_index(0)
mpy example:
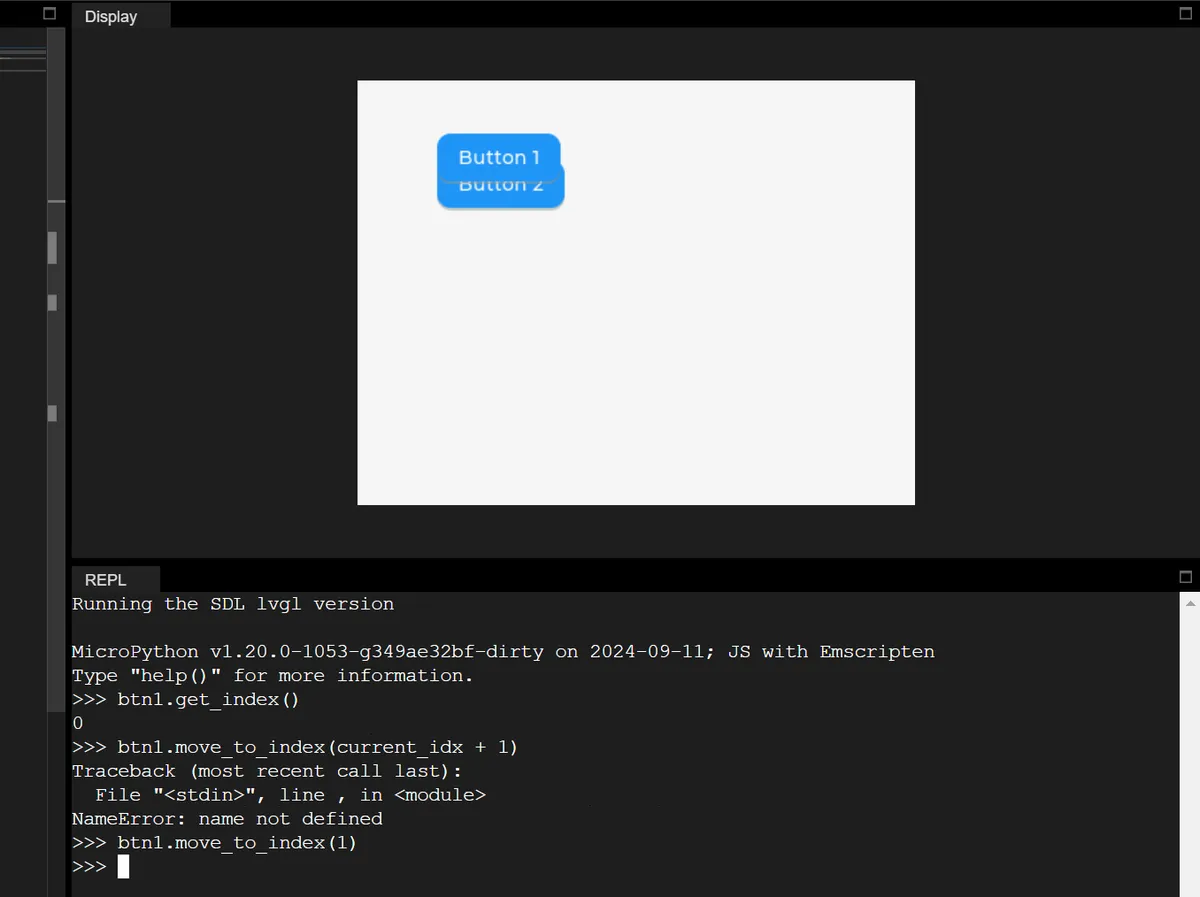
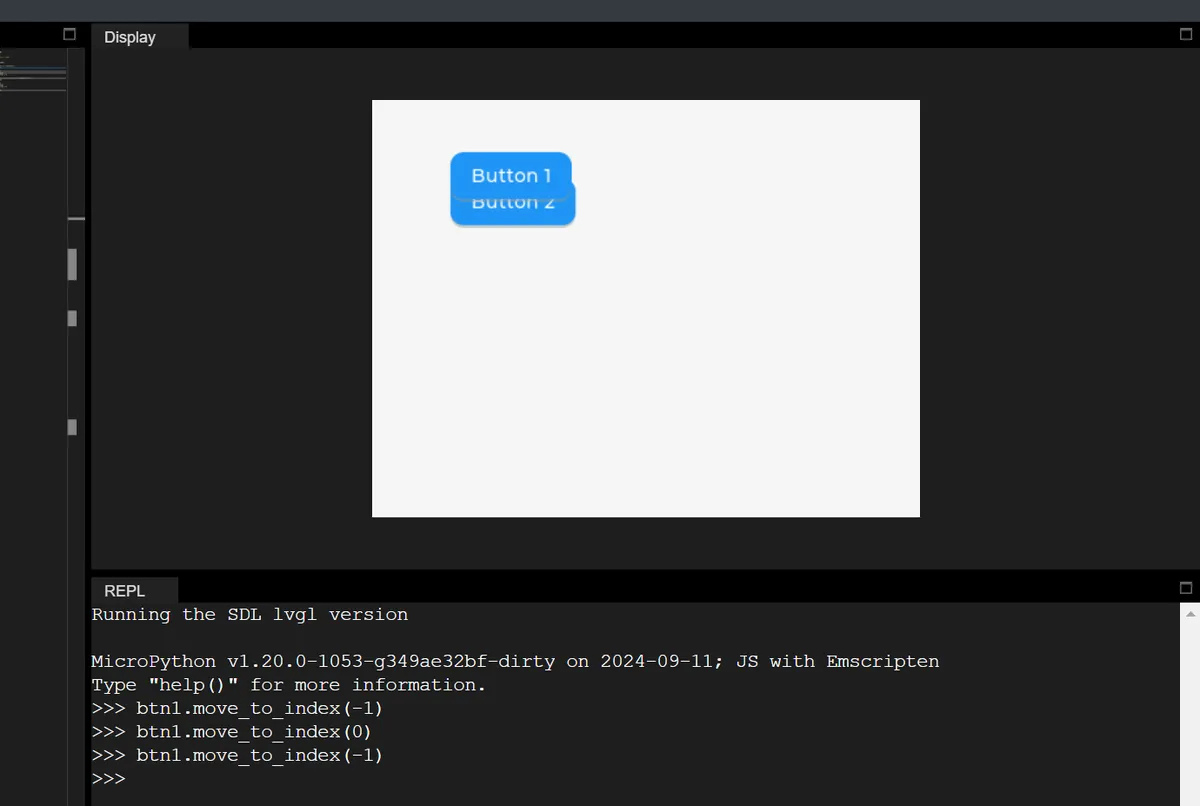
4.7.2.3 Impact of changing the parent object's hierarchy
When modifying the parent container of an object via obj.set_parent (new_parent), the object will automatically become the topmost child object of the new parent container.
# Change btn1's parent to btn2; btn1 becomes the topmost child of btn2
btn1.set_parent(btn2)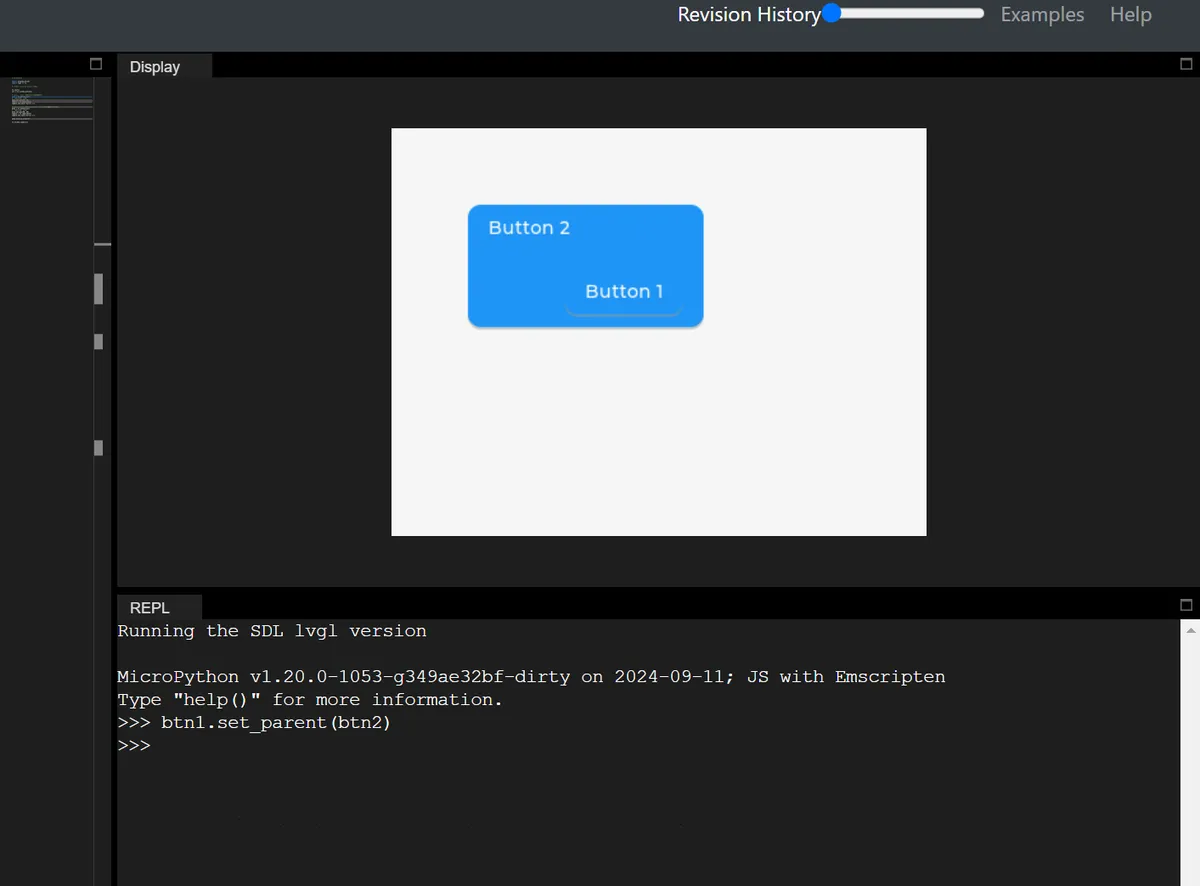
4.7.3 Top Layer and System Layer (Top & Sys Layers)
LVGL provides two globally visible special layers (shared by all screens but not across different displays) for each physical display, which reside at a higher z-order than all objects on regular screens:
layer_top(top layer): located at the topmost level of the currently active screen (lv.screen_active ());layer_sys(system layer): Located at the very top oflayer_top, it is the highest level of the entire display.
Many beginners are confused about LVGL's layer_top / layer_sys / layer_bottom, and the core reason is that they fail to understand the essential difference between "ordinary screen objects" and "global special layers":
- Ordinary objects (such as buttons and pop-ups) belong to a specific screen and will disappear when you switch screens;
- A special layer is a "display-level global layer": no matter which screen you switch to, the content on this layer remains consistently visible, and its hierarchy is permanently fixed above / below all regular screens.
显示器最终显示效果 = 最顶层往下叠加
├─ layer_sys(系统层,最顶层)→ 比如鼠标光标,永远在所有内容上面
├─ layer_top(顶级图层)→ 比如全局弹窗、悬浮窗,覆盖所有屏幕
├─ 当前活跃的普通屏幕(屏幕A/屏幕B)→ 普通按钮/标签都在这一层
└─ layer_bottom(底层图层)→ 比如全局背景图,在所有屏幕下面
4.7.3.1 layer_top (top-level layer): Globally visible "floating window / modal popup"
It is similar to the "floating window" or "system pop-up window" on a mobile phone: no matter which APP (corresponding to a regular screen in LVGL) you switch to, the floating window remains displayed; after enabling the "modal" mode, the underlying content cannot be clicked (for example, a mobile phone pop-up window blocks the operation of the APP).
In the following code, two regular screens that can be switched between each other are created, and a globally visible modal popup is generated on layer_top. This popup is similar to the "system-level popup" on mobile phones: it will not disappear when switching between screens, and will block the interaction of the underlying screen. The buttons on the underlying screen can only be used normally after the popup is closed.
# Initialize

import display_driver
import lvgl as lv

lv.init()

# ===================== Step 1: Create two normal screens (for switching test) =====================
# Screen A: add a button; clicking it switches to screen B
scr_a = lv.obj()  # Create normal screen A
btn_a = lv.button(scr_a)
btn_a.set_size(180, 60)
btn_a.set_pos(50, 50)
label_a = lv.label(btn_a)
label_a.set_text("Screen A: Switch to B")

# Screen B: add a button; clicking it switches to screen A
scr_b = lv.obj()  # Create normal screen B
btn_b = lv.button(scr_b)
btn_b.set_size(180, 60)
btn_b.set_pos(50, 150)
label_b = lv.label(btn_b)
label_b.set_text("Screen B: Switch to A")

# Bind the screen switching event
def switch_to_b(e):
    lv.screen_load(scr_b)
btn_a.add_event_cb(switch_to_b, lv.EVENT.CLICKED, None)

def switch_to_a(e):
    lv.screen_load(scr_a)
btn_b.add_event_cb(switch_to_a, lv.EVENT.CLICKED, None)

# ===================== Step 2: Create a global modal popup with layer_top =====================
# 1. Get the display's top layer (global layer, shared by all screens)
top_layer = lv.layer_top()

# 2. Add a "click absorb" flag to top_layer → implements modal behavior (buttons below cannot be clicked)
# Principle: when the user clicks the screen, the click event is received by top_layer, and widgets on the underlying screen do not get the click event
top_layer.add_flag(lv.obj.FLAG.CLICKABLE)

# 3. Create the popup on top_layer (globally visible, stays regardless of which screen is shown)
popup = lv.obj(top_layer)  # The parent object is top_layer, not a normal screen!
popup.set_size(300, 200)   # Popup size
popup.center()             # Popup centered
# Set popup style: white background, gray border, rounded corners
popup.set_style_bg_color(lv.color_hex(0xFFFFFF), 0)    # White background
popup.set_style_border_color(lv.color_hex(0xCCCCCC), 0)# Gray border
popup.set_style_border_width(2, 0)                     # Border width 2px
popup.set_style_radius(10, 0)                          # Corner radius 10px

# 4. Add text + close button to the popup
popup_label = lv.label(popup)
popup_label.set_text("Global Modal Popup\n→ Persists across screen switches\n→ Blocks clicks on underlying elements")
popup_label.center()

# Add close button: clicking it removes the modal and closes the popup
close_btn = lv.button(popup)
close_btn.set_size(120, 30)
close_btn.align(lv.ALIGN.BOTTOM_MID, 0, -10)  # Popup bottom center
close_label = lv.label(close_btn)
close_label.set_text("Close Popup")

# Event to close the popup: remove click absorption + delete the popup
def close_popup(e):
    top_layer.remove_flag(lv.obj.FLAG.CLICKABLE)  # Cancel click absorption
    popup.delete()  # Delete the popup
close_btn.add_event_cb(close_popup, lv.EVENT.CLICKED, None)

# ===================== Step 3: Load the initial screen and run the test =====================
lv.screen_load(scr_a)  # Load screen A first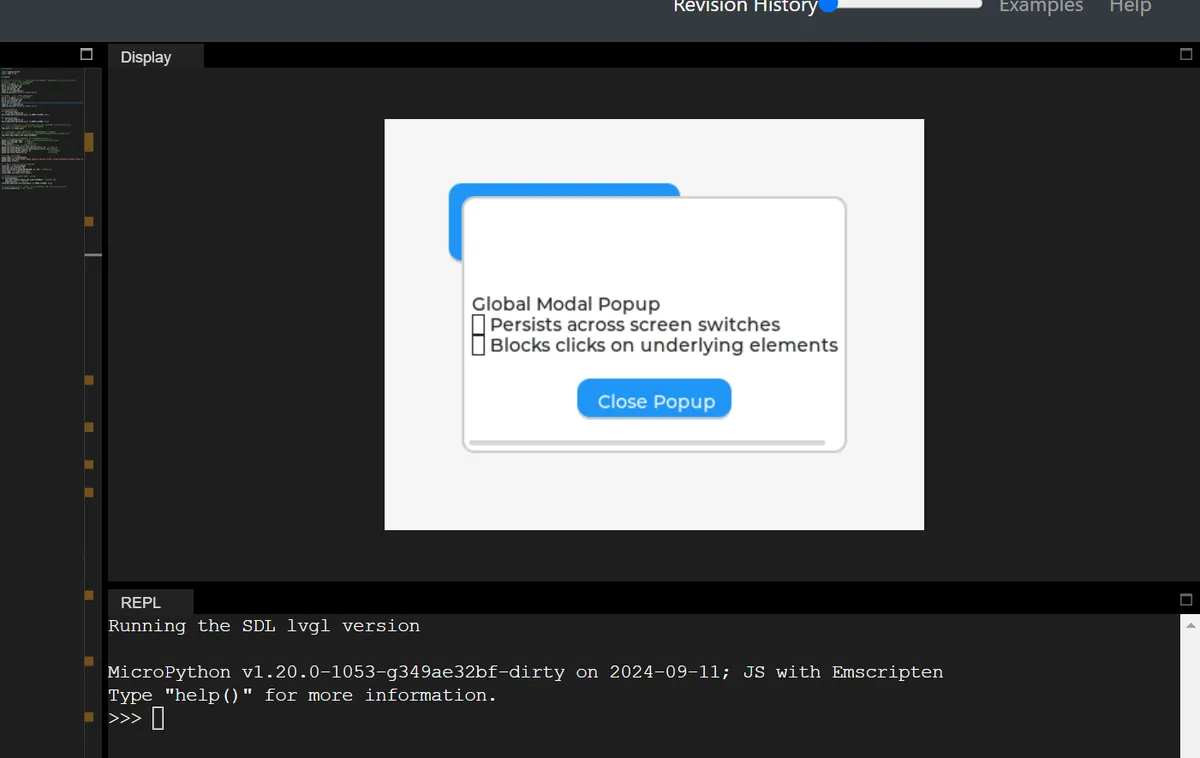
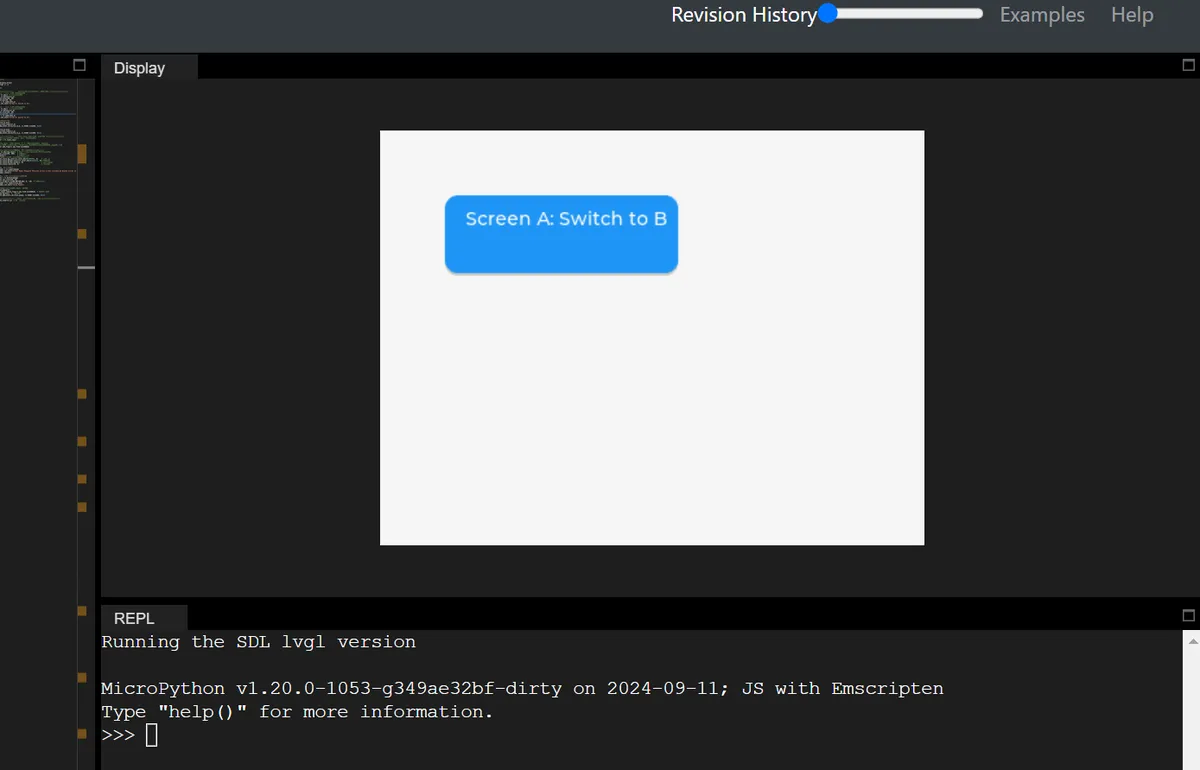
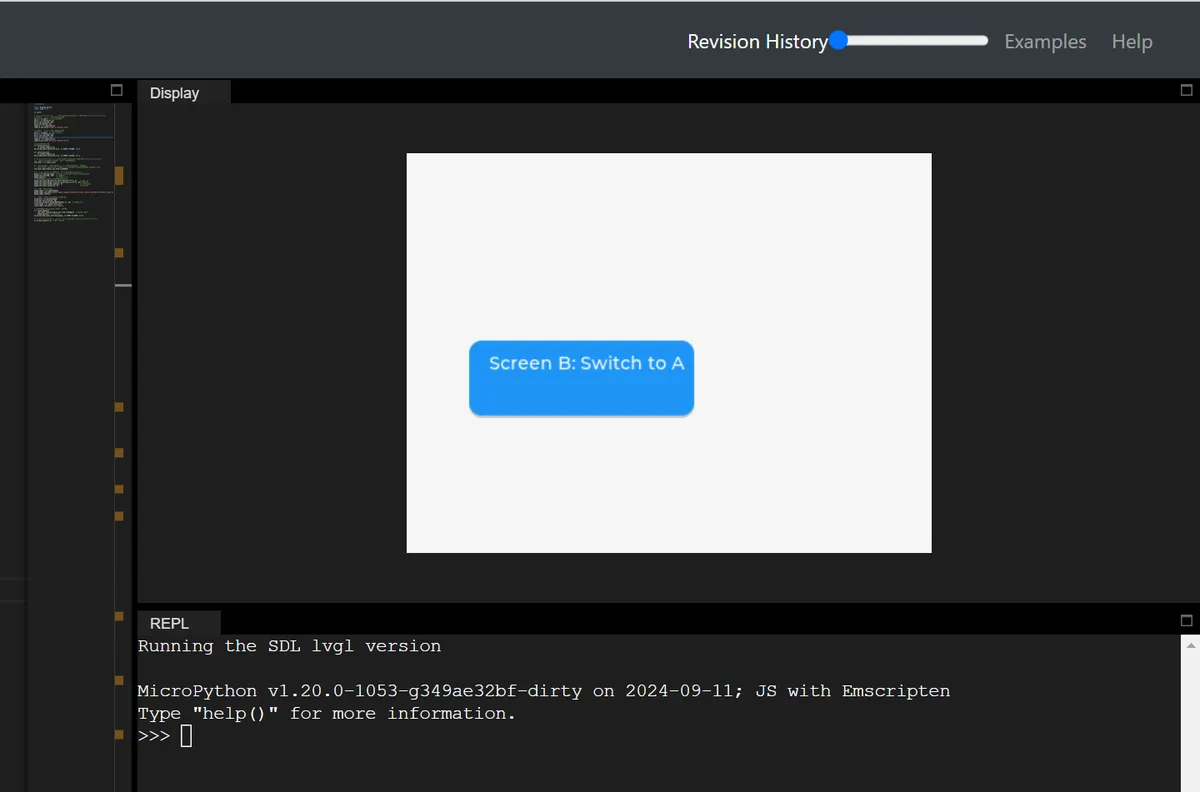
It can be seen that:
- Startup sequence: Screen A is displayed, but is overlaid by a pop-up from
layer_top; clicking the "Switch to B" button on Screen A yields no response (modal blocking); - Test operation: Even if you switch to Screen B via other methods (such as modifying the code), the pop-up window will still be displayed on top of Screen B, and the "Switch to A" button on Screen B will also be unclickable;
- Close the pop-up: Click the "Close Popup" button on the pop-up, and the pop-up will disappear.
layer_topwill no longer absorb click events. At this point, the toggle buttons for Screen A/B can be clicked normally, and the screens can be switched between each other. - Core Verification:
layer_toppop-up is "global", switching between regular screens will not affect it, and it can block all underlying interactions — this is exactly the core logic of the "system-level modal pop-up / floating window" on mobile phones.
4.7.3.2 layer_sys (system layer): The topmost "system-level element"
LVGL internally uses this layer to place elements that "must always be on top"(such as the mouse cursor), even when layer_top has popups, layer_sys content will still cover those popups.
The demo code is as follows:
# Initialize

import display_driver
import lvgl as lv
import time

lv.init()

# ===================== Step 1: Create two normal screens (for switching test) =====================
# Screen A: add a button; clicking it switches to screen B
scr_a = lv.obj()  # Create normal screen A
btn_a = lv.button(scr_a)
btn_a.set_size(180, 60)
btn_a.set_pos(50, 50)
label_a = lv.label(btn_a)
label_a.set_text("Screen A: Switch to B")

# Screen B: add a button; clicking it switches to screen A
scr_b = lv.obj()  # Create normal screen B
btn_b = lv.button(scr_b)
btn_b.set_size(180, 60)
btn_b.set_pos(50, 150)
label_b = lv.label(btn_b)
label_b.set_text("Screen B: Switch to A")

# Bind the screen switching event
def switch_to_b(e):
    lv.screen_load(scr_b)
btn_a.add_event_cb(switch_to_b, lv.EVENT.CLICKED, None)

def switch_to_a(e):
    lv.screen_load(scr_a)
btn_b.add_event_cb(switch_to_a, lv.EVENT.CLICKED, None)

# ===================== Step 2: Create a global modal popup with layer_top =====================
# 1. Get the display's top layer (global layer, shared by all screens)
top_layer = lv.layer_top()

# 2. Add a "click absorb" flag to top_layer → implements modal behavior (buttons below cannot be clicked)
# Principle: when the user clicks the screen, the click event is received by top_layer, and widgets on the underlying screen do not get the click event
top_layer.add_flag(lv.obj.FLAG.CLICKABLE)

# 3. Create the popup on top_layer (globally visible, stays regardless of which screen is shown)
popup = lv.obj(top_layer)  # The parent object is top_layer, not a normal screen!
popup.set_size(300, 200)   # Popup size
popup.center()             # Popup centered
# Set popup style: white background, gray border, rounded corners
popup.set_style_bg_color(lv.color_hex(0xFFFFFF), 0)    # White background
popup.set_style_border_color(lv.color_hex(0xCCCCCC), 0)# Gray border
popup.set_style_border_width(2, 0)                     # Border width 2px
popup.set_style_radius(10, 0)                          # Corner radius 10px

# 4. Add text + close button to the popup
popup_label = lv.label(popup)
popup_label.set_text("Global Modal Popup\n→ Persists across screen switches\n→ Blocks clicks on underlying elements")
popup_label.center()

# Add close button: clicking it removes the modal and closes the popup
close_btn = lv.button(popup)
close_btn.set_size(120, 30)
close_btn.align(lv.ALIGN.BOTTOM_MID, 0, -10)  # Popup bottom center
close_label = lv.label(close_btn)
close_label.set_text("Close Popup")

# Event to close the popup: remove click absorption + delete the popup
def close_popup(e):
    top_layer.remove_flag(lv.obj.FLAG.CLICKABLE)  # Cancel click absorption
    popup.delete()  # Delete the popup
close_btn.add_event_cb(close_popup, lv.EVENT.CLICKED, None)

# ===================== Step 3: Load the initial screen and run the test =====================
lv.screen_load(scr_a)  # Load screen A first

# Get the system layer (topmost layer)
sys_layer = lv.layer_sys()

# 2. Create a small circle (simulates a mouse cursor)
cursor = lv.obj(sys_layer)
cursor.set_size(20, 20)       # Cursor size 20x20
cursor.set_style_bg_color(lv.color_hex(0xFF0000), 0)  # Red background
cursor.set_style_radius(10, 0)                        # Circle (radius = size/2)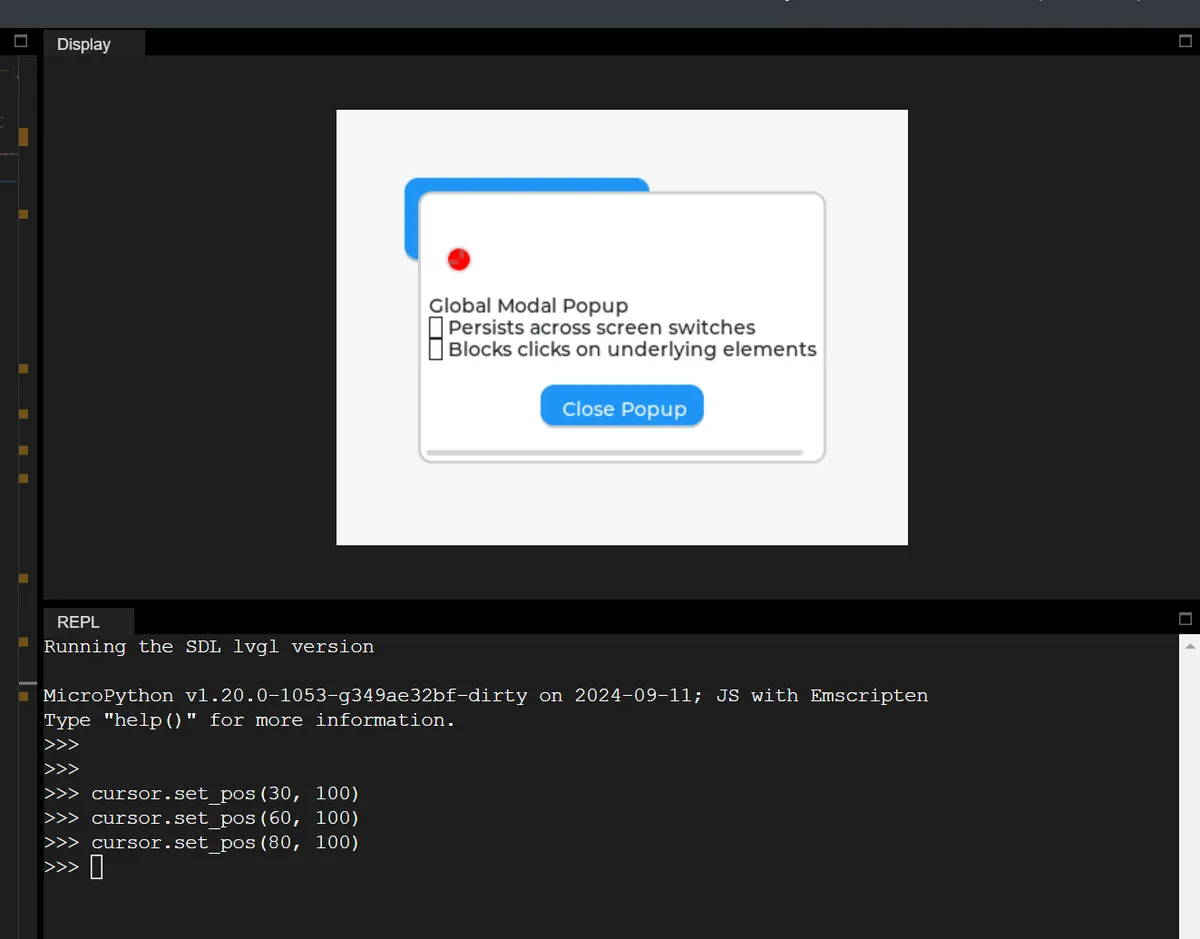
After running it, you can see the following:
As we run the command to adjust the ball position in the REPL, the red circular cursor will pass through the pop-up window of layer_top and always stay on the top layer (the cursor remains visible even when blocked by the pop-up).
The summary is as follows:
layer_sysis the "ultimate top layer", which cannot be covered by any content;- Developers generally do not use
layer_systo avoid interfering with the internal cursor/system elements of LVGL; - Each display has its own
layer_sys, which is not shared between different displays.
4.7.4 layer_bottom (bottom layer): Global background image
Set the "background for all screen shares", such as the global background image of the APP, so that the background remains unchanged no matter which page (screen) you switch to (provided that the screen background is semi-transparent).
In the following code, we set:
- layer_bottom serves as the dark blue global background;
- Screen A features a light gray semi-transparent background;
- Screen B has a background of a different color.
# Initialize

import display_driver
import lvgl as lv
import time

lv.init()

# ===================== Step 1: Create the global background for layer_bottom =====================
# Get the bottom layer
bottom_layer = lv.layer_bottom()

# Global background: dark blue (#1A237E), fully opaque (to highlight the global background)
bg_rect = lv.obj(bottom_layer)
bg_rect.set_size(lv.pct(80), lv.pct(80))  # Fill the entire screen
bg_rect.set_style_bg_color(lv.color_hex(0x1A237E), 0)  # Dark blue (high contrast)
bg_rect.set_style_bg_opa(255, 0)  # Background opaque

# ===================== Step 2: Create two normal screens (semi-transparent background) =====================
# Screen A: semi-transparent background (so the light cyan of the bottom layer shows through)
scr_a = lv.obj()
scr_a.set_style_bg_opa(64, 0)  # Opacity 64 (25%), more transparent
scr_a.set_style_bg_color(lv.color_hex(0xF5F5F5), 0)  # Light gray
btn_a = lv.button(scr_a)
btn_a.set_pos(50, 50)
btn_a.set_size(180, 60)
label_a = lv.label(btn_a)
label_a.set_text("Screen A: Switch to B")

# Screen B: semi-transparent background as well
scr_b = lv.obj()
scr_b.set_style_bg_opa(64, 0)
scr_b.set_style_bg_color(lv.color_hex(0xF5F5F5), 0)
btn_b = lv.button(scr_b)
btn_b.set_pos(50, 150)
btn_b.set_size(180, 60)
label_b = lv.label(btn_b)
label_b.set_text("Screen B: Switch to A")

# Bind the switch event
def switch_to_b(e):
    lv.screen_load(scr_b)
btn_a.add_event_cb(switch_to_b, lv.EVENT.CLICKED, None)

def switch_to_a(e):
    lv.screen_load(scr_a)
btn_b.add_event_cb(switch_to_a, lv.EVENT.CLICKED, None)

# ===================== Step 3: Test the result =====================
lv.screen_load(scr_a)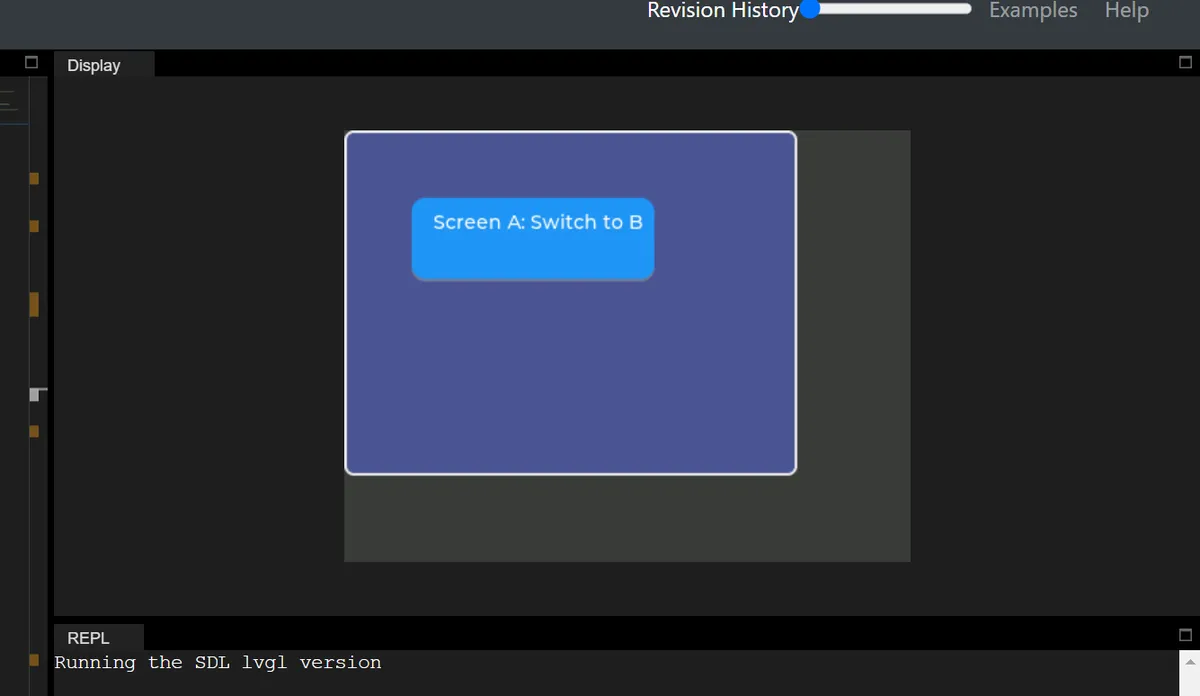
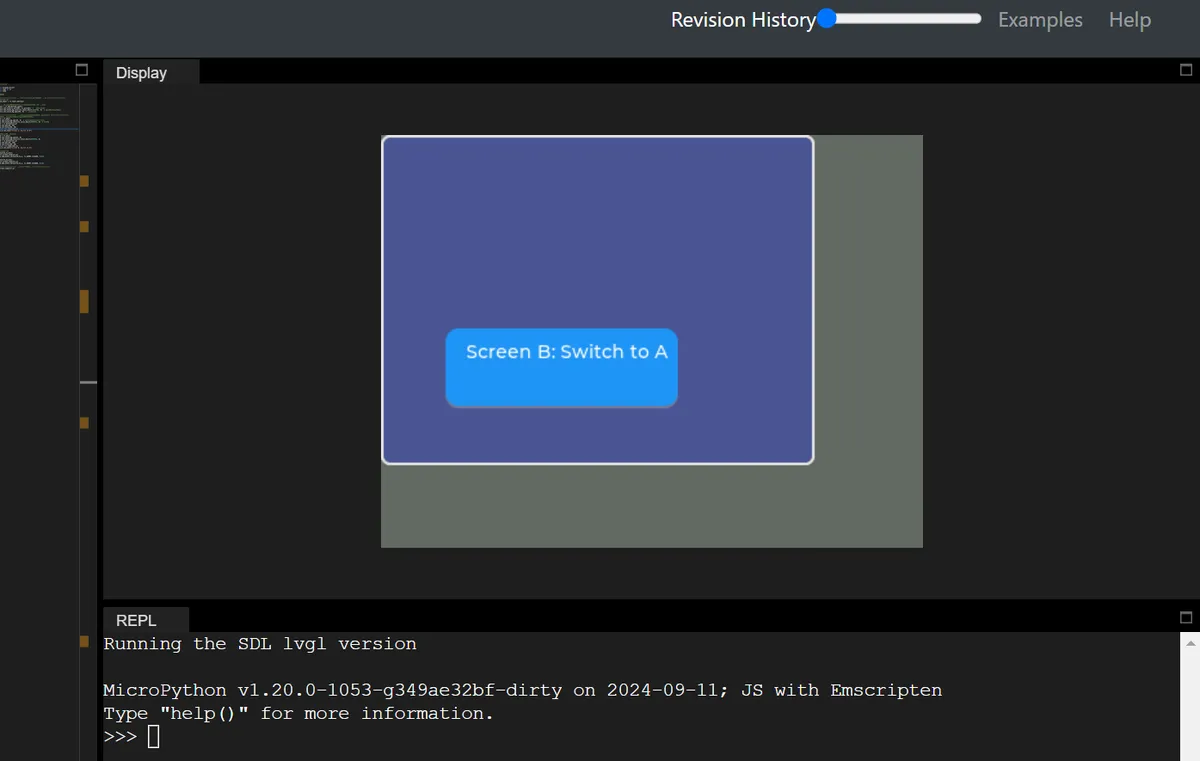
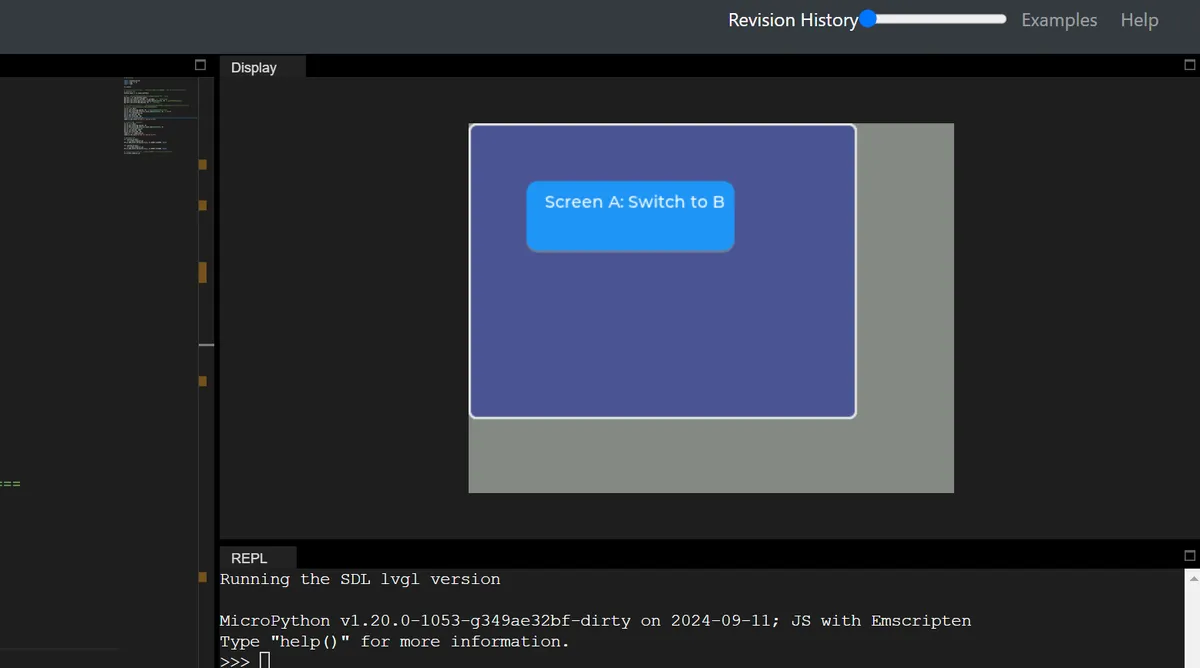
It can be seen that when switching between screen A and screen B, the dark blue global background remains unchanged all the time, while the light gray screen background changes accordingly with the switching.
Version Record
Version Number | Modifier | Time | Content |
v1.0 | Li Zisheng | 2026/03/24 | Initialize the document. |