
Contents
- I. Core Definition of the Event Callback Mechanism
- II. Event Binding
- 2.1 Methods of Event Binding
- 2.2 Multi-button Click Example
- III. Classification of High-Frequency Event Codes
- 3.1 Input Device Interaction Events
- 3.2 Control Lifecycle Events
- 3.3 Core Parameters of Event Callback
- 3.4 Control Lifecycle Event Examples
- 3.5 Event Bubbling
- Version Record
I. Core Definition of the Event Callback Mechanism
- Essence: LVGL's notification mechanism for "notable events" — for example, when a user clicks a button, swipes a container, or a widget's size changes, the system will actively notify you so that you can execute custom logic.
- Core Features:
- Event binding: Associate a "callback function" with a control and specify the behavior to be monitored (e. g., only monitor clicks).
- Event propagation: Events from child controls can be automatically passed to parent controls (referred to as "event bubbling"), which facilitates unified processing.
- Event Context: Through the
eventobject, you can obtain information such as "event type, triggering control, and custom data".
II. Event Binding
2.1 Methods of Event Binding
obj.add_event_cb(callback, event_code, user_data)callback: A custom function you write that is automatically invoked when an event occurs, with the parameter being theeventobject.event_code: the type of event to listen for (e. g.lv.EVENT.CLICKED).user_data: Custom data (e. g., button ID, configuration dictionary), which can be read viaevent.get_user_data ()in the callback.
The key features are as follows:
- A single control can be bound to multiple events (e. g. listening for both "tap" and "long press" at the same time), and the execution order follows the binding sequence.
- The same callback function can be bound to multiple controls, and
user_datais used to distinguish the logic of different controls.
2.2 Multi-button Click Example
import display_driver
import lvgl as lv
lv.init()

# Get the screen
scr = lv.screen_active()
scr.set_style_bg_color(lv.color_hex(0x000000), 0)

# ======================
# [Core] One callback function shared by all buttons
# ======================
def common_callback(e):
    # 1. Get the event type
    code = e.get_code()
    if code != lv.EVENT.CLICKED:
        return

    # 2. ✅ Core: get the [widget that was actually clicked] (to tell the buttons apart)
    target = e.get_target_obj()
    type(target)
    print(target)

    # 3. Determine which button it is
    if target == btn1:
        print("按钮1 → 打开LED")
    elif target == btn2:
        print("按钮2 → 播放音乐")
    elif target == btn3:
        print("按钮3 → 返回主页")

# ======================
# Create 3 buttons, bind the same callback, pass different user_data
# ======================

# Button 1
btn1 = lv.button(scr)
btn1.set_size(120, 40)
btn1.set_pos(100, 80)
lv.label(btn1).set_text("BTN_1")
# Bind the callback, pass identifier BTN_1
btn1.add_event_cb(common_callback, lv.EVENT.CLICKED, None)

# Button 2
btn2 = lv.button(scr)
btn2.set_size(120, 40)
btn2.set_pos(100, 140)
lv.label(btn2).set_text("BTN_2")
# Bind the same callback, pass identifier BTN_2
btn2.add_event_cb(common_callback, lv.EVENT.CLICKED, None)

# Button 3
btn3 = lv.button(scr)
btn3.set_size(120, 40)
btn3.set_pos(100, 200)
lv.label(btn3).set_text("BTN_3")
# Bind the same callback, pass identifier BTN_3
btn3.add_event_cb(common_callback, lv.EVENT.CLICKED, None)

# Load the screen
lv.screen_load(scr)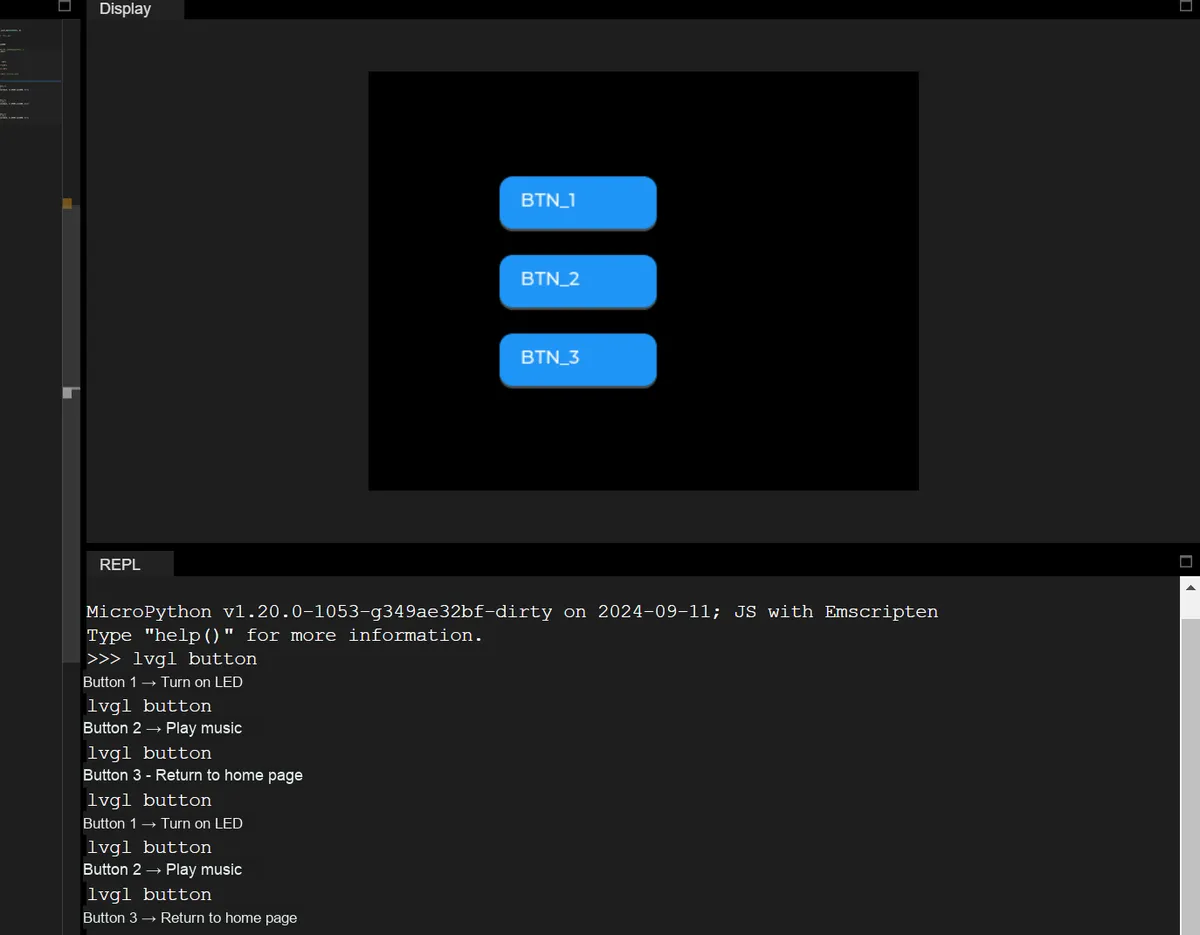
III. Classification of High-Frequency Event Codes
3.1 Input Device Interaction Events
| Event enums (MPY) | Meaning | Trigger Scenarios |
|---|---|---|
| lv.EVENT.CLICKED | Click | The widget is released after being pressed, and no scrolling occurred (most commonly used) |
| lv.EVENT.PRESSED | Press | The instant a finger / mouse presses the widget |
| lv.EVENT.RELEASED | Release | The finger / mouse lifts off the widget (triggers even if it slid off the widget) |
| lv.EVENT.LONG_PRESSED | Long press | The widget is held down longer than the set duration (no scrolling) |
| lv.EVENT.SCROLL_BEGIN | Scroll start | The instant the container starts being scrolled |
| lv.EVENT.SCROLL_END | Scrolling ends | The instant the container stops scrolling completely |
3.2 Control Lifecycle Events
| Event enums (MPY) | Meaning | Trigger Scenarios |
|---|---|---|
| lv.EVENT.CREATE | Widget created | When the widget has just finished being created |
| lv.EVENT.DELETE | Widget deleted | When the widget is deleted |
| lv.EVENT.SIZE_CHANGED | Size changed | When the width / height of the widget changes |
3.3 Core Parameters of Event Callback
The only parameter of the callback function e (event object) is the "core hub" for event processing. The common methods of event_t are as follows:
| Method name | Core function | In One Sentence |
|---|---|---|
| e.get_code() | Get the event type | Know whether it is a click / long press / scroll |
| e.get_target_obj() | Get the widget that triggered the event | Tell which button was clicked |
| e.get_current_target_obj() | Get the widget currently handling the event | Used for event bubbling |
| e.stop_bubbling() | Stop the event from propagating upward | After the child widget handles it, the parent widget does not respond |
| e.stop_processing() | Stop event processing | Intercept the event so no subsequent logic runs |
3.4 Control Lifecycle Event Examples
In the following code, we use one target button plus two control buttons to visually demonstrate the three core lifecycle events: creation, size change, and deletion. The code is extremely concise, and you can understand the triggering timing just by checking the print output after running it.
import display_driver
import lvgl as lv
lv.init()

# Initialize screen
scr = lv.screen_active()
scr.set_style_bg_color(lv.color_hex(0x000000), 0)

# ======================
# [Core] Lifecycle callback function
# Handle the CREATE / SIZE_CHANGED / DELETE events in one place
# ======================
def lifecycle_callback(e):
    # 1. Get the event type and the widget that triggered it
    event_code = e.get_code()
    target_obj = e.get_target_obj()

    # 2. Print the corresponding message by event type
    if event_code == lv.EVENT.CREATE:
        print("🆕 【事件触发】控件创建完成(控件刚被实例化并添加到界面)")
    elif event_code == lv.EVENT.SIZE_CHANGED:
        print("📏 【事件触发】控件尺寸发生变化(宽/高被修改)")
    elif event_code == lv.EVENT.DELETE:
        print("🗑️ 【事件触发】控件被删除(控件从界面销毁)")

# ======================
# 1. Create the "target button" (the core widget for demonstrating the lifecycle)
# ======================
btn_target = lv.button(scr)
btn_target.set_size(120, 40)   # Initial size
btn_target.set_pos(100, 80)    # Position
lv.label(btn_target).set_text("BUTTON")

# Bind the three lifecycle events
btn_target.add_event_cb(lifecycle_callback, lv.EVENT.CREATE, None)
btn_target.add_event_cb(lifecycle_callback, lv.EVENT.SIZE_CHANGED, None)
btn_target.add_event_cb(lifecycle_callback, lv.EVENT.DELETE, None)

# ======================
# 2. Control button 1: change the target button size (triggers SIZE_CHANGED)
# ======================
def change_size(e):
    # Change the target button's width and height → automatically triggers the SIZE_CHANGED event
    btn_target.set_size(150, 60)

btn_change_size = lv.button(scr)
btn_change_size.set_size(240, 40)
btn_change_size.set_pos(60, 160)
lv.label(btn_change_size).set_text("Change BUTTON size and pos")
btn_change_size.add_event_cb(change_size, lv.EVENT.CLICKED, None)

# ======================
# 3. Control button 2: delete the target button (triggers DELETE)
# ======================
def delete_target(e):
    # Delete the target button → automatically triggers the DELETE event
    btn_target.delete()

btn_delete = lv.button(scr)
btn_delete.set_size(120, 40)
btn_delete.set_pos(100, 240)
lv.label(btn_delete).set_text("delete")
btn_delete.add_event_cb(delete_target, lv.EVENT.CLICKED, None)

# Load the screen
lv.screen_load(scr)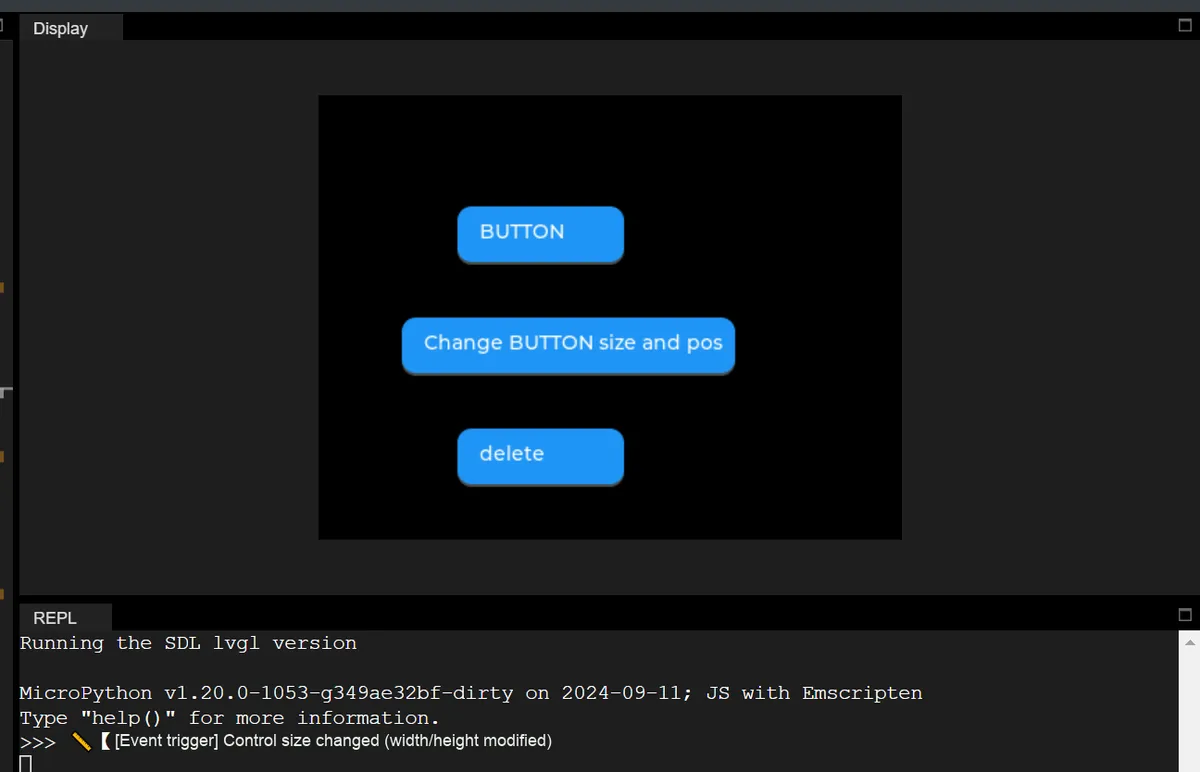
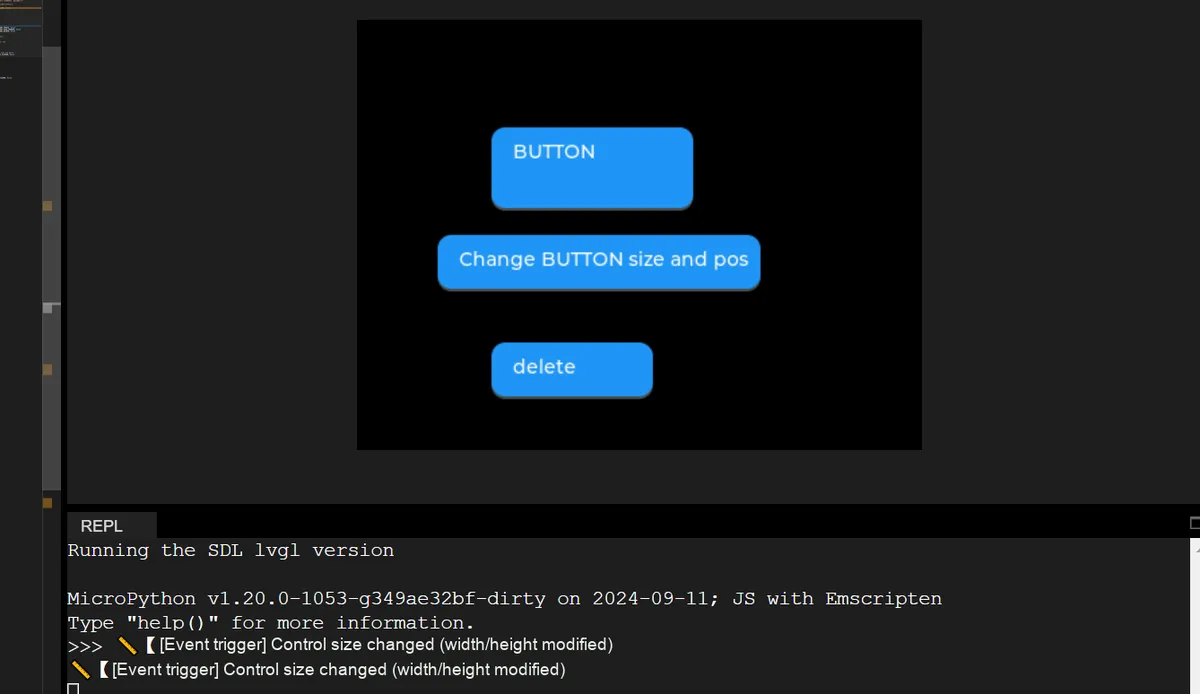
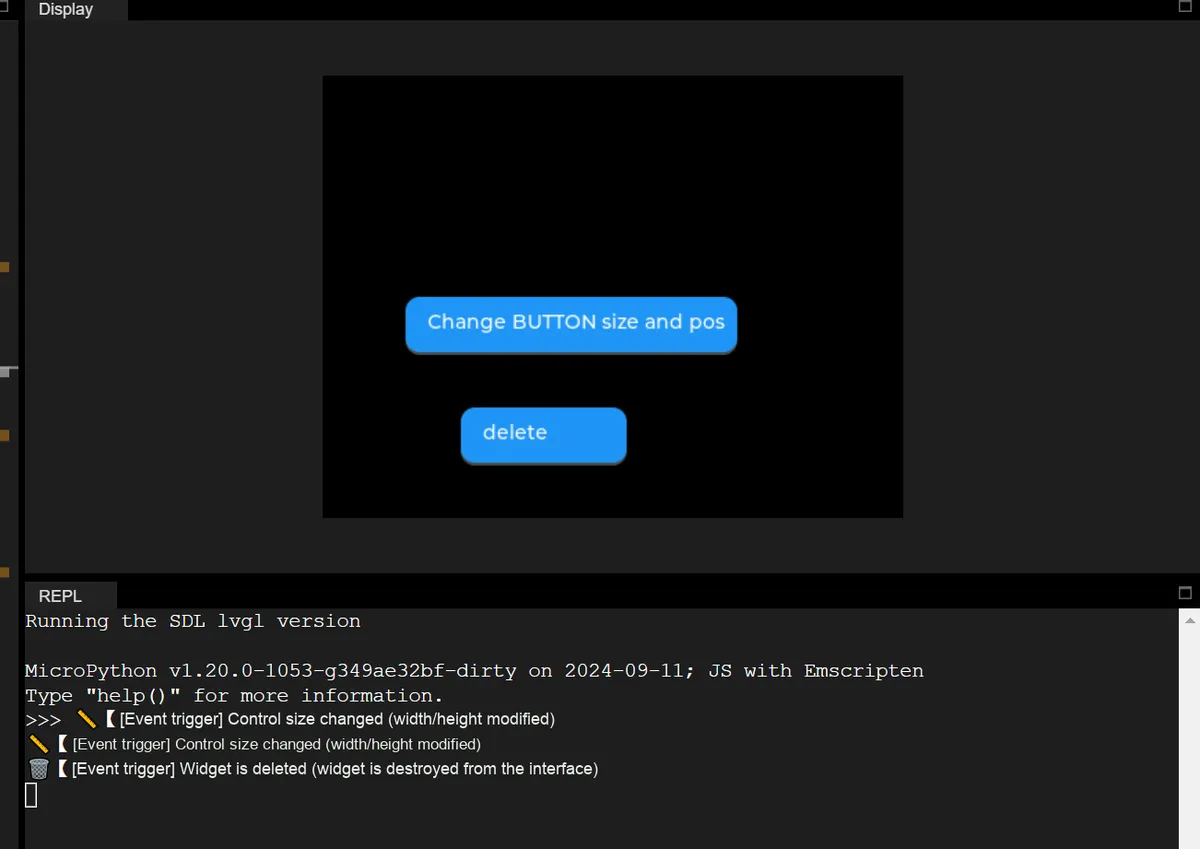
The output after running is as follows:
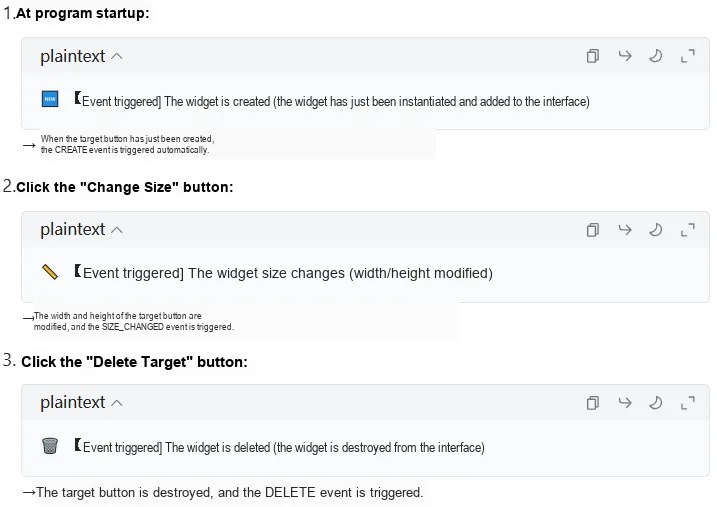
| Event | Trigger timing | Use case |
|---|---|---|
| CREATE | When the widget has just been created and added to the screen | Initialize widget data (e.g., set a default value for a text box, load an image) |
| SIZE_CHANGED | When the width / height of the widget is modified | Adaptive layout (e.g., re-flow the text inside after the widget grows larger) |
| DELETE | When the widget is destroyed / removed from the screen | Clean up resources (e.g., free image memory, cancel scheduled tasks) |
3.5 Event Bubbling
3.5.1 Basic Concepts
When a child control triggers an event (e. g., a button click), if the "bubbling flag" of the child control is enabled, the event will be automatically passed to the parent container; if the parent container also has bubbling enabled, the event will continue to be passed upward to the grandparent container, until it encounters a control or the screen that does not have bubbling enabled.
Enable BUBBLE:
# 1. Enable [normal event] bubbling (click, press, etc.; most commonly used)
obj.add_flag(lv.obj.FLAG.EVENT_BUBBLE)

# 2. Enable [gesture event] bubbling (swipe, long-press gestures, etc.)
obj.add_flag(lv.obj.FLAG.GESTURE_BUBBLE)
There is no need to bind events to each child control individually; the parent container only needs to bind one callback to handle events from all child controls (for example, if there are 10 buttons in the container, you only need to bind a click callback to the container).
3.5.2 Event Bubbling Example
In the following code, we create a parent container with 4 child buttons, enable event bubbling, and let the parent container handle click events uniformly, so that you can intuitively observe the bubbling effect:
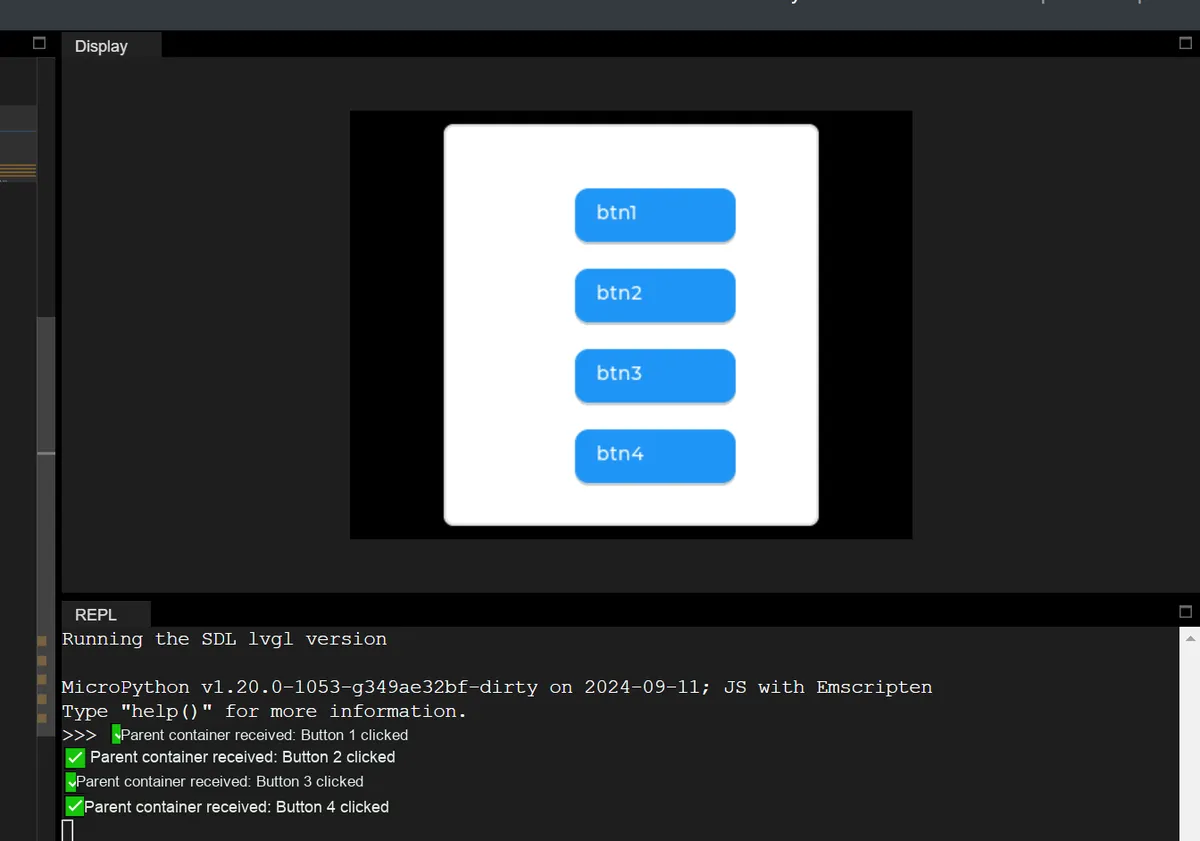
Click any of the sub-buttons, and the Console will print:
✅ 父容器收到:按钮1 被点击
✅ 父容器收到:按钮2 被点击
✅ 父容器收到:按钮3 被点击
✅ 父容器收到:按钮4 被点击
In the code above, we:
- 4 buttons, only 1 callback function written → extremely concise code
- Child buttons must be added with
EVENT_BUBBLEso that events can be passed to the parent container. - Two key methods:
e.get_target_obj ()→ which (sub-button) was clickede.get_current_target_obj ()→ Who is handling (parent container)
This is the most commonly used solution for batch widget processing in LVGL.
Version Record
Version Number | Modifier | Time | Content |
v1.0 | Li Zisheng | 2026/03/24 | Initialize the document. |