
4.5 Layout System
Layout is a core mechanism in LVGL that automatically arranges widgets. It can replace manually calling set_pos () to calculate coordinates, making the interface more structured and easier to maintain, which is especially suitable for GUI development with limited screen sizes in embedded scenarios.
- Core Objective: To enable controls such as buttons and text to be automatically arranged according to set rules, eliminating the need for tedious position calculation.
- Typical scenarios: horizontal menus, vertical lists, numeric keypads, function matrices, etc.
The core concepts include the following. First, the layout container:
- Layout carrier: Create an empty container via
lv.obj (scr), and all controls that require automatic arrangement must be mounted inside this container. - The container itself is also a control: you can use
set_size (width, height)to limit the layout area, andset_pos (X, Y)to adjust the position of the container on the screen. - Parent-child hierarchy: The container acts as the "parent control", while buttons/labels are "child controls"; the layout rules only apply to the direct child controls of the container.
Layout types include:
| Layout Type | Applicable scenarios | Core characteristics |
|---|---|---|
| Flex layout | Linear arrangement (one row / one column), such as horizontal menus and vertical settings lists | Child widgets are automatically arranged along a single direction (horizontal / vertical), with spacing handled automatically |
| Grid layout | Two-dimensional table arrangement, such as number keypads and 3×3 function matrices | Divides the container into cells of multiple rows and columns; child widgets can be precisely assigned to specified cells |
The basic process of layout is as follows:
- Create Container:
lv.obj (scr)—— Generates an empty container for holding the layout - Enable Layout :
set_layout (layout_type)—— Select Flex or Grid mode - Configuration Rules: Set parameters such as direction, spacing, grid rows and columns, etc.
- Add Control: Add child controls such as buttons and labels to the container — the controls will be automatically arranged according to the rules
- Load Display:
lv.screen_load (scr)—— Renders the layout to the screen
4.5.1 Row/Column Arrangement (Flex Layout)
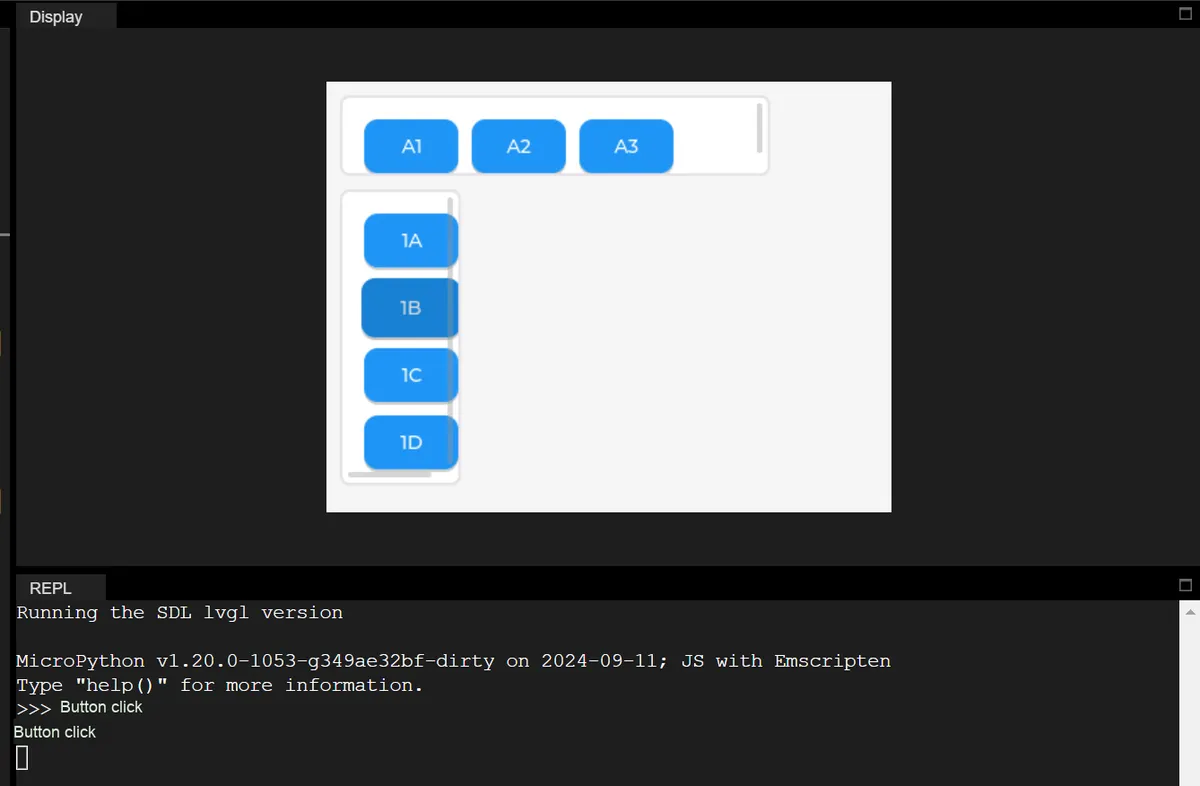
The following code is a standard example of LVGL MicroPython flex layout, which implements horizontal row arrangement and vertical column arrangement of buttons:
import display_driver
import lvgl as lv

# Initialize LVGL
lv.init()
scr = lv.screen_active()

# Generic button callback function
def btn_cb(e):
    print("按钮点击")

# Minimal button creation
def make_btn(parent, text):
    btn = lv.button(parent)
    btn.set_size(70, 40)
    btn.add_event_cb(btn_cb, lv.EVENT.PRESSED, None)
    label = lv.label(btn)
    label.set_text(text)
    label.center()
    return btn

# ============== 1. Horizontal row layout (one horizontal row) ==============
row = lv.obj(scr)
row.set_size(320, 60)
row.set_pos(10, 10)
row.set_layout(lv.LAYOUT.FLEX)                # Correct: flex layout
row.set_style_flex_flow(lv.FLEX_FLOW.ROW, 0)  # Correct: horizontal row
row.set_style_pad_column(10, 0)               # Horizontal spacing between buttons

# Automatically arrange 3 buttons horizontally
make_btn(row, "A1")
make_btn(row, "A2")
make_btn(row, "A3")

# ============== 2. Vertical column layout (one vertical column) ==============
col = lv.obj(scr)
col.set_size(90, 220)
col.set_pos(10, 80)
col.set_layout(lv.LAYOUT.FLEX)                  # Correct: flex layout
col.set_style_flex_flow(lv.FLEX_FLOW.COLUMN, 0) # Correct: vertical column
col.set_style_pad_row(10, 0)                   # Vertical spacing between buttons

# Automatically arrange 4 buttons vertically
make_btn(col, "1A")
make_btn(col, "1B")
make_btn(col, "1C")
make_btn(col, "1D")

lv.screen_load(scr)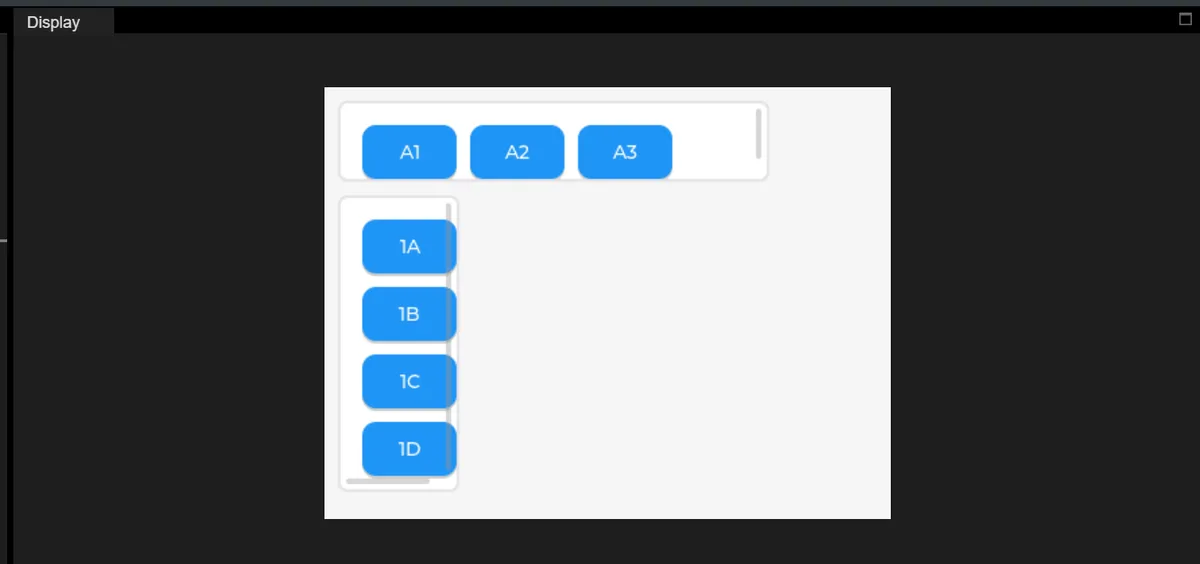
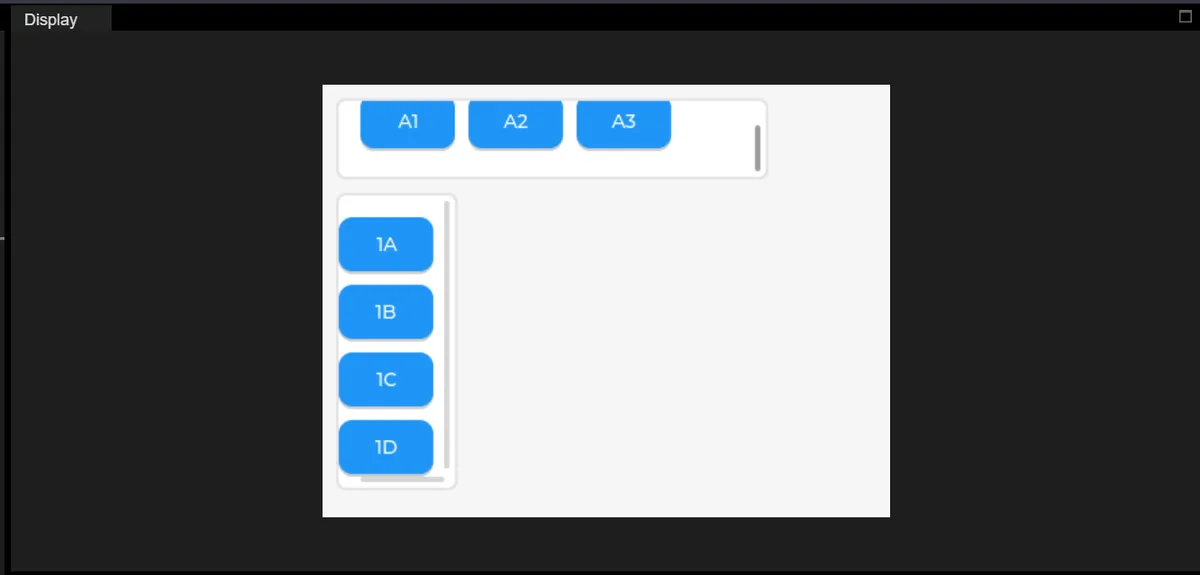
In the code above, we performed the following operations on the layout container:
lv.obj (scr): Creates a blank container to hold buttons and implement automatic layoutset_size (width, height): Set the size of the container to define the display area of the layoutset_pos (X coordinate, Y coordinate): Set the position of the container on the screen (with the top-left corner as the coordinate origin)
Among these, the core attribute settings of Flex layout include:
set_layout (lv.LAYOUT.FLEX): Enables flex layout, which allows child widgets to be arranged automatically and serves as the core toggle for layout functionalitylv.LAYOUT.FLEX: an enumerated value, indicating that the layout type is flex layout
The layout direction attributes include:
set_style_flex_flow (direction, 0): Set the arrangement direction of the flex layoutlv.FLEX_FLOW.ROW: Horizontal arrangement (left to right)lv.FLEX_FLOW.COLUMN: Vertical and longitudinal arrangement (top to bottom)
Spacing control attributes include:
set_style_pad_column (pixels, 0): Sets the column spacing between buttons when arranged horizontally.set_style_pad_row (pixels, 0): Sets the row spacing between buttons when they are arranged vertically.
Core Fundamentals of Flex Layout
Layout Direction (Flow)
Controlling the arrangement direction of child controls is the core switch of Flex layout:
lv.FLEX_FLOW.ROW: Horizontal arrangement (left to right)lv.FLEX_FLOW.COLUMN: Vertical and longitudinal arrangement (top to bottom)
Spacing Control
Avoid overcrowded controls and optimize the aesthetic appeal of the interface:
- When arranged horizontally:
set_style_pad_column (pixels, 0)—— Set the horizontal spacing between child controls - When arranged vertically:
set_style_pad_row (pixels, 0)—— used to set the vertical spacing between child controls
Alignment Logic
Child controls automatically fill along the layout direction, and their position within the container can be adjusted via alignment properties (such as lv.FLEX_ALIGN.CENTER).
4.5.2 Two-Dimensional Grid Layout (Grid Layout)
The code below implements a 2D grid layout, and creates a regular button grid with 2 rows and 3 columns based on the officially revised API:
import display_driver
import lvgl as lv

# Initialize LVGL
lv.init()
scr = lv.screen_active()

# Click callback
def btn_cb(e):
    print("按钮点击")

# Create button
def make_btn(parent, text):
    btn = lv.button(parent)
    btn.set_size(70, 40)
    btn.add_event_cb(btn_cb, lv.EVENT.PRESSED, None)
    label = lv.label(btn)
    label.set_text(text)
    label.center()
    return btn

# ==================== 2D grid layout (2 rows, 3 columns) ====================
grid = lv.obj(scr)
grid.set_size(280, 150)
grid.set_pos(20, 20)
grid.set_layout(lv.LAYOUT.GRID)

# Define 3 columns + 2 rows
col_dsc = [80, 80, 80, lv.GRID_TEMPLATE_LAST]
row_dsc = [50, 50, lv.GRID_TEMPLATE_LAST]

# Correct API
grid.set_grid_dsc_array(col_dsc, row_dsc)

# Spacing
grid.set_style_pad_row(10, 0)
grid.set_style_pad_column(10, 0)

# Loop to create buttons + set grid positions strictly following your API
for i in range(6):
    col = i % 3   # Columns: 0,1,2
    row = i // 3  # Rows: 0,0,0,1,1,1

    btn = make_btn(grid, str(i+1))

    # ✅ Strictly matches the 6 parameters you provided!!!
    btn.set_grid_cell(
        lv.GRID_ALIGN.CENTER,  # 1. column_align: column alignment
        col,                   # 2. col_pos: column position
        1,                     # 3. col_span: spans 1 column
        lv.GRID_ALIGN.CENTER,  # 4. row_align: row alignment (must be passed in your API!)
        row,                   # 5. row_pos: row position
        1                      # 6. row_span: spans 1 row
    )

lv.screen_load(scr)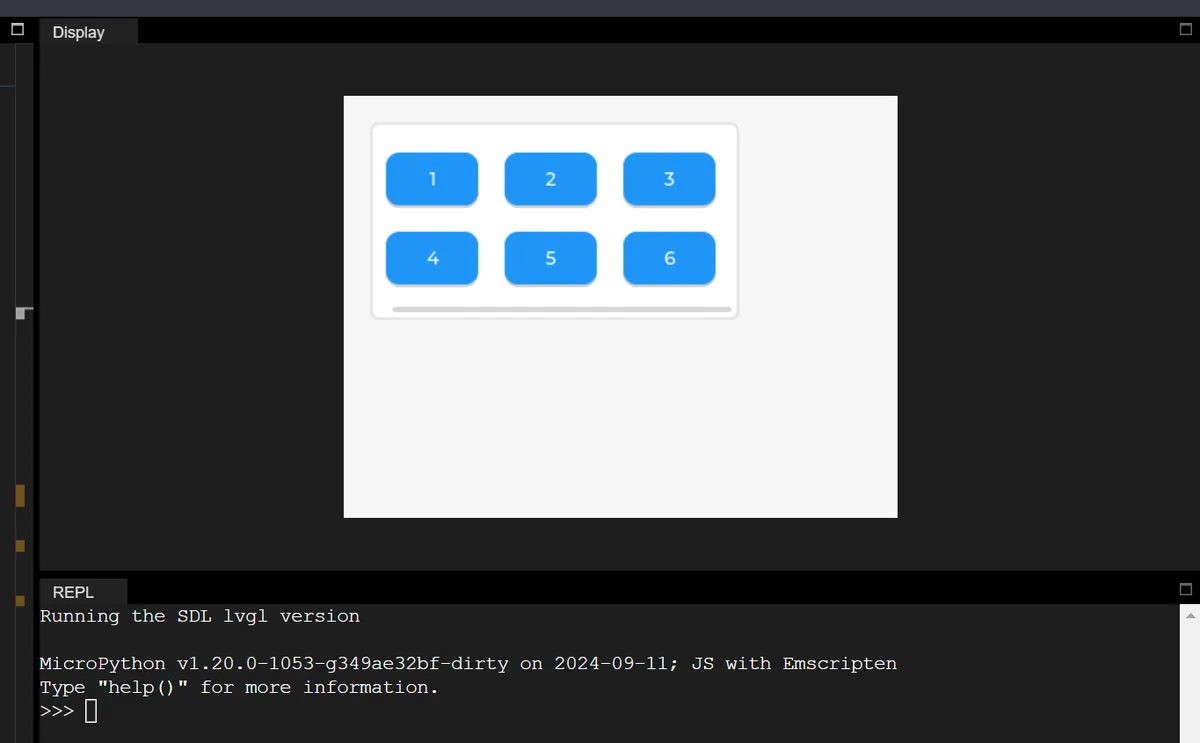
In the code above, after initializing the LVGL graphics library and the screen container, we encapsulated a general button creation function with click response. By enabling the GRID grid layout, defining row and column size descriptors, and setting the spacing, we then generated buttons in a loop and strictly followed the 6-parameter specification of set_grid_cell to specify the grid alignment, position and span of each button. Finally, we loaded the screen to implement a neatly arranged grid interface, which fully demonstrates the core usage of LVGL grid layout.
The core APIs and their properties are defined as follows:
- Grid Container Creation
lv.obj (scr)creates a blank container (the carrier of the layout);set_layout (lv.LAYOUT.GRID)enables the grid layout (core: divides the container into independent cells with multiple rows and columns to realize 2D structured arrangement). - Grid structure definition:
col_dsc/row_dscis a grid description array used to define the column widths and line-height of the grid; in the example, it defines 3 columns (80px per column) and 2 rows (50px per row);lv.GRID_TEMPLATE_LASTis a fixed syntax of LVGL that marks the end of the array. - Grid Frame Binding
set_grid_dsc_array ()This is a core grid API that applies the defined row and column dimensions to the container to complete the construction of the grid cell frame. - Network Spacing Settings:
set_style_pad_row/set_style_pad_columnare used to set the row spacing and column spacing of cells respectively to avoid overcrowded buttons, which is a basic optimization for GUI layout. - Precise Control Positioning:
set_grid_cell ()assigns cells to child controls, with its 6 parameters strictly following the LVGL grid rules: center alignment in column, index of the target column, occupying 1 column, center alignment in row, index of the target row, occupying 1 row, ensuring each button is fixed within the corresponding grid.
Core Fundamentals of Grid Layout
Grid Descriptor (col_dsc / row_dsc)
Defining the column width and line-height of the grid forms the "skeleton" of Grid layout:
- Format:
[col_width_1, col_width_2,. .., lv.GRID_TEMPLATE_LAST],lv.GRID_TEMPLATE_LASTis a fixed end marker. - Example:
col_dsc = [80,80,80, lv.GRID_TEMPLATE_LAST]→ Defines 3 columns, each with a width of 80px
Grid Frame Binding
set_grid_dsc_array (col_dsc, row_dsc)—— Apply the defined row and column dimensions to the container to complete the construction of the cell framework.
Precise Control Positioning (set_grid_cell)
Assign specific cells to child controls, with the 6 parameters strictly corresponding to the LVGL grid rules:
column_align: column alignment (e. g.lv.GRID_ALIGN.CENTERfor center alignment)col_pos: The index of the column where the element is located (starting from 0)col_span: the number of columns occupied (usually 1)row_align: Row alignment moderow_pos: the index of the row where the element is located (starting from 0)row_span: Number of occupied rows (usually 1)
Version Record
Version Number | Modifier | Time | Content |
v1.0 | Li Zisheng | 2026/03/24 | Initialize the document. |