
Contents
Young makers, today let's unlock a "magic screen that can conjure up rainbows" 🌈!
It is composed of tiny WS2812 RGB LED beads, each of which can independently emit red, green and blue light. When combined together, they can display rainbows, smileys, text and even animations, just like a small electronic canvas, making it extremely suitable for creative interactive projects ✨!
1. Module Introduction
Ordinary LEDs can only emit one color, while the WS2812 matrix module is a smart full-color LED matrix: a micro driver chip is embedded in each LED bead, and with only one data line, the development board can independently control the color and brightness of each individual LED bead, enabling the entire matrix to display rich patterns and dynamic effects.
Compared with ordinary LED modules, it has the following characteristics:
- 🎨 Full-color display: Each LED bead can be adjusted to 16 million colors, enabling effects such as rainbows and gradients;
- ✨ Independent control: Each individual LED bead can be switched on/off and color-adjusted independently, supporting complex patterns and animations;
- 🔌 Simple wiring: All LED beads can be controlled with only one data cable, which won't take up too many pins;
- 🧩 Versatile gameplay: Suitable for projects such as ambient lights, pattern displays, and interactive electronic canvases.
In graphical programming, these blocks are commonly used for WS2812 matrices:
Init NeoPixelBlock: Initialize the matrix, and configure the pin and the number of LEDs;Control NeoPixelBlock: Set the color of the specified LED bead;Write NeoPixelBlock: Sends color data to the matrix to turn on the LEDs;count withloop block: control each LED individually to implement animations such as flowing-light effects;delayblock: Controls the speed of animation changes.
In practical projects, it is often used for the following purposes:
- Full-color ambient lighting (e. g. rainbow gradient background)
- Pattern display (e. g., displaying smiley faces, hearts)
- Interactive toys (e. g., those that trigger animations of different colors when touched)
- Mini Electronic Canvas (Scrolling Text Display)
Quick Science: What is a WS2812 LED bead?
WS2812 is a type of "RGB LED with built-in driver". Each LED bead contains a tiny chip that can store the color commands sent by the development board. Using only a single data line, the development board can transmit color data to each LED bead in sequence, allowing each of them to display a distinct color — this is the secret behind the matrix's ability to show complex patterns!
2. Wiring Instructions
To make the matrix "light up", the first step is still —— connect the wires correctly!
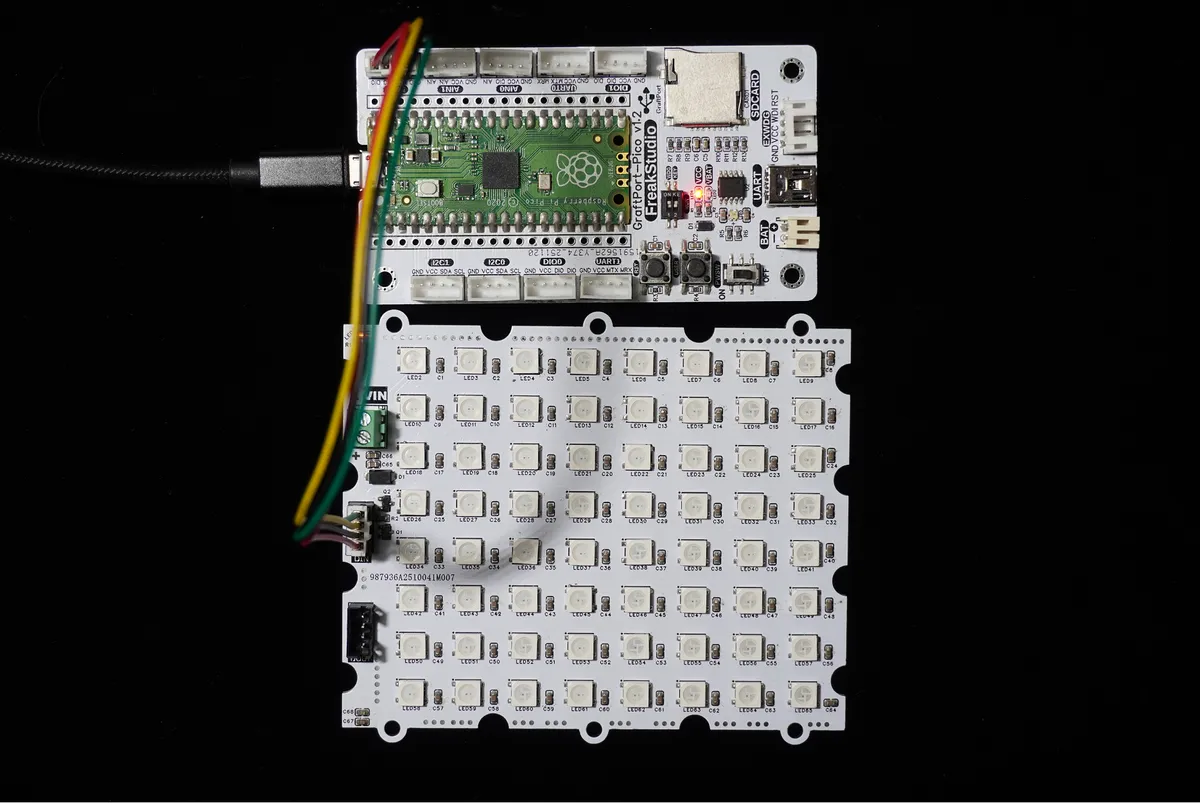
We connect the WS2812 matrix module to the digital interface DIO0 of the development board, and the corresponding relationship is as follows:
Development Board Pins | Module Pins | Description |
Pin 6 |
| Communication signal output interface on MCU |
Pin 7 |
| - |
📌 Note
- The module communicates via a single-bus interface, and the DIN pin must be connected correctly; otherwise, the LED beads will be unable to receive color data.
- The number of LED beads on the matrix (e. g., 64) must match the setting in the initialization block, otherwise the display will malfunction.
3. Example: Chasing LED light effect (turning on red LEDs one by one)
Experiment Objective: Make the 64 LED beads in the matrix light up in red sequentially from the 0th to the 63rd one, meanwhile print the serial number of the currently lit bead on the terminal to create the dynamic effect of a "running light".
Everyday Thought: The string lights used during festivals produce a similar chasing light effect, so let's use a WS2812 matrix to create an even cooler "full-color chasing LED light"!
The graphical program is as follows:
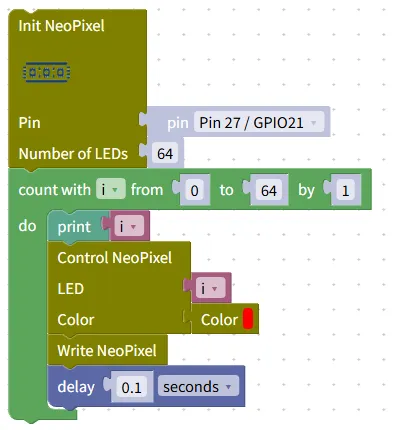
Building Block Assembly Steps:
- Initialize the matrix
- Drag in
Init NeoPixelblock; - Set the
PintoPin 27 / GPIO21, and set theNumber of LEDsto64(consistent with the number of matrix LED beads).
- Drag in
- Cycle-controlled lamp beads
- Drag in the
count with i from 0 to 64 by 1block; - Let the variable
irange from 0 to 63, corresponding to the serial number of each lamp bead one by one.
- Drag in the
- Print the serial number of the LED bead
- Add the
print iblock inside the loop to display the number of the currently lit LED in the terminal.
- Add the
- Set the LED bead color
- Drag in the
Control NeoPixelblock; - Set
LEDtoi(the serial number of the lamp bead in the current loop), and setColorto red;
- Drag in the
- Refresh Display
- Add the
Write NeoPixelblock to send color data to the matrix and turn on the LEDs;
- Add the
- Control animation speed
- Drag in the
delayblock and set it to0.1seconds → to make the chaser LED movement smoother.
- Drag in the
Experimental Effect:
5307984e87b74b21128d522d35748c02.mp4 641 KB
- After the program runs, the LEDs in the matrix will light up in red one by one starting from the top-left corner;
- The terminal will synchronously print the serial numbers of the lamp beads (0,1, 2…63);
- The entire process resembles a red stream flowing through the matrix, with the dynamic effect clearly visible.
Graphical blocks will be automatically converted into MicroPython code, and the running results will be displayed:
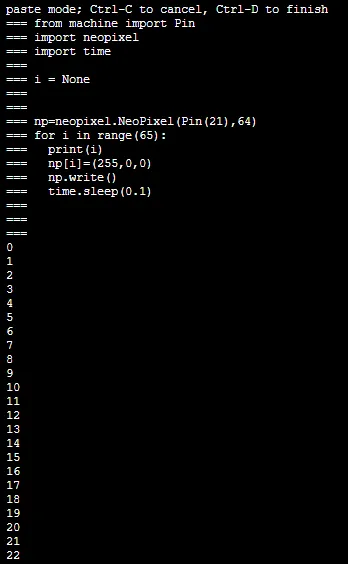
Directly importable building blocks:
LED Board.xml 3 KB
Tips
- If the LED bead does not light up:
- Check whether the pins are selected correctly and the wiring is secure;
- Confirm that the number of initialized LED beads is consistent with the actual number of the matrix (e. g., 64 beads);
- Check whether the module power supply is normal to avoid the lamp beads not lighting up due to insufficient voltage.
- What should I do if there is a color display error?
- Check
Control NeoPixelfor the color settings; the RGB value ranges from 0 to 255. - Ensure that the
Write NeoPixelblock is executed after setting the color, otherwise the color will not refresh.
- Check
- Advanced Gameplay:
- Change the color to green or blue, and check the chaser light effect;
- Implement a "rainbow gradient flowing water light" with nested loops to make the color of each lamp bead change sequentially;
- Combined with sensors, such as a touch key trigger, it can display a smiling face pattern on the matrix.
✨ Interactive Mini Quiz
- Think about it: Why does the WS2812 matrix only need one data line to control all the LED beads? How many lines would be required if a regular LED matrix is used?
- Try it: Change the
delaytime from 0.1 second to 0.5 second, and see whether the speed of the flowing LED lights will become slower or faster? Then change it to 0.05 second to experience different animation rhythms.
Summary
- The WS2812 matrix module is an intelligent full-color LED display module, with each LED bead capable of independent color control;
- It communicates via a single bus, features simple wiring, and supports complex patterns and animations;
- The basic usage is to realize a flowing-light effect through "loop + single LED control", while the advanced usages include displaying patterns, rainbow gradient, etc. ;
- It is an excellent module for learning full-color LED control and creative display, which can make your project full of visual impact.