
Contents
Young makers, today let's unlock a magical module that can "make your development board talk" 🎵!
When you directly connect a speaker to a development board in daily use, the sound is as faint as a mosquito's buzz. The LM386-based power amplifier speaker module can amplify the weak audio signal from the development board, enabling the speaker to produce clear and loud sound, making it perfectly suitable for making a "mini speaker" or an "electronic keyboard" ✨!
1. Module Introduction
Why is the sound very low when the development board is directly connected to a speaker? Because the current of the audio signal output by the development board is too weak to drive the speaker. The LM386 power amplification module is a "sound amplifier", which can amplify small signals by dozens of times to make the speaker produce loud enough sound, and also supports simulating sound effects of different tones through PWM.
It is a audio power amplification module whose core component is the LM386 low-power audio amplifier chip:
- Input the PWM analog audio signal of the development board;
- The chip amplifies the signal power internally;
- Drive the speaker to produce clear and loud sound.
Compared with direct connection to a speaker, it has the following features:
- 🎵 High volume: the amplification factor can reach 20~200 times, delivering clear and loud sound;
- 🎛️ Adjustable Pitch: Different pitches are simulated via PWM frequency, enabling it to play simple melodies;
- 🔌 Simple wiring: can be driven with just one control pin;
- 🧩 Versatile gameplay: Suitable for projects such as electronic keyboards, alarm sound effects, voice prompts, etc.
In graphical programming, these blocks are commonly used for power amplifying speakers:
PWM #6Building Blocks: Configure audio frequency (pitch) and duty cycle (volume);delayblock: controls the playback duration of each tone;- Sequential execution block: Combine PWM signals of different frequencies to play simple melodies.
In practical projects, it is often used for the following purposes:
- Electronic keyboard (different keys correspond to different PWM frequencies)
- Alarm indicator (plays alarm sound when an abnormality is detected)
- Interactive toy (touch to trigger different tones)
Popular Science: How Does PWM Simulate Sound?
Sound is generated by the vibration of objects, and vibrations of different frequencies correspond to different pitches. A PWM signal can simulate this kind of vibration: the higher the frequency, the higher the pitch; the lower the frequency, the lower the pitch. After the LM386 amplifies the PWM signal, it drives the speaker to vibrate, thus producing the sound we hear!
2. Wiring Instructions
To make the speaker "produce sound", the first step is still —— connect the module correctly!
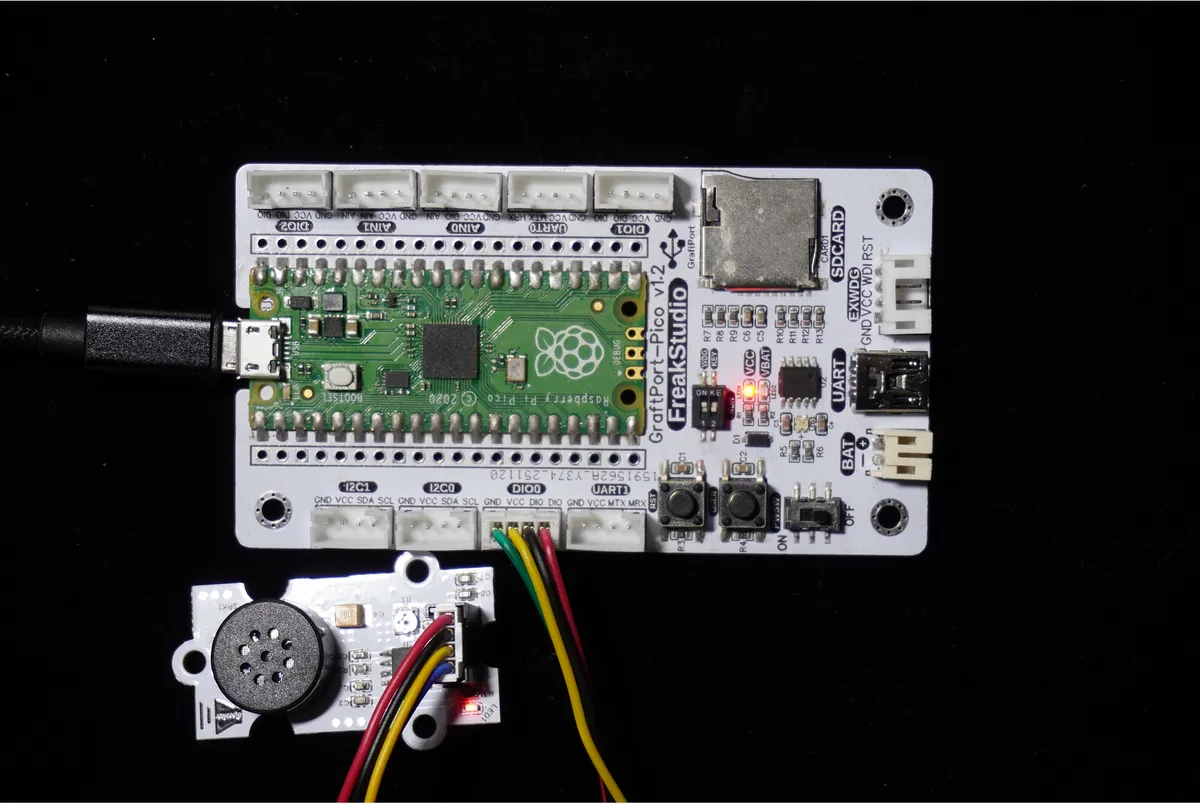
We will connect the LM386-based power amplifier speaker module to the digital interface DIO0 of the development board, and the corresponding relationship is as follows:
Development Board Pins | Module Pins | Description |
Pin 6 |
| PWM output pins on the MCU |
Pin 7 |
| - |
📌 Note
- The development board outputs PWM signals of different frequencies, which are amplified by the LM386 to drive the speaker to emit sounds of corresponding pitches.
- When the PWM duty cycle is set to 32768 (the midpoint of the range 0 to 65535), the volume is moderate; when the duty cycle is 0, sound generation stops.
3. Example: Play prompt tones of different pitches
Objective of the experiment: By varying the PWM frequency, make the speaker play the tones of 800Hz and 400Hz in sequence, and finally stop sounding, so as to intuitively perceive the correspondence between "frequency → tone".
Little Life Insight: The notification tone of a mobile phone and the ding-dong sound of a doorbell are both realized by audio signals of different frequencies. Now let's make a "small loudspeaker that can produce different sounds"!
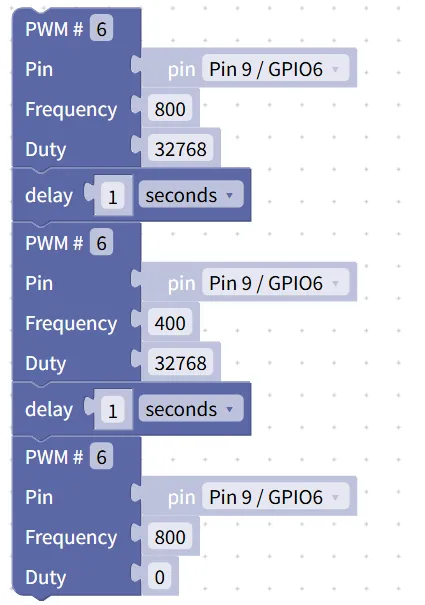
The graphical program is as follows:
Building Block Assembly Steps:
- Play 800Hz tone
- Drag in
PWM #6block; - Selected Pin:
Pin 9 / GPIO6; - Set the
Frequencyto800(corresponding to a higher pitch); - Set
Dutyto32768(medium volume); - Add a
delayblock and set it to1second → to make this tone play for 1 second.
- Drag in
- Play a 400 Hz tone
- Drag in another
PWM #6block; - Pin Hold
Pin 9 / GPIO6; - Set
Frequencyto400(corresponding to a lower pitch); Dutyremains32768;- Add the
delayblock and set it to1second → play for 1 second.
- Drag in another
- stop making sounds
- Finally, drag in
PWM #6block; - Pin Hold
Pin 9 / GPIO6; - Set the
Frequencyto800; - Set the
Dutyto0→ stop outputting audio signals.
- Finally, drag in
Experimental Effect:
- After the program runs, the speaker first emits a high-pitched "beep" sound (800Hz) lasting for 1 second;
- Then a lower "click" sound (400 Hz) lasting for 1 second is emitted;
- Finally, the sound stops completely, and the change in pitch throughout the process is clearly discernible.
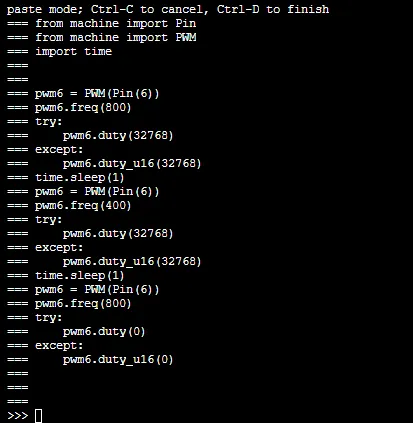
Graphical blocks will be automatically converted into MicroPython code, and the running result will be displayed:
Directly importable building blocks:
Amplifier Speaker Module.xml 3 KB
Tips
- If the sound is too low or there is no sound:
- Check if the correct pin is selected (
Pin 9 / GPIO6) and whether the wiring is secure; - Confirm that the module is powered normally and the speaker is securely plugged in;
- You can try increasing the duty cycle (e. g., 40000) to raise the volume.
- Check if the correct pin is selected (
- What should I do if there is noise?
- Ensure that the PWM frequency falls within the audible range of the human ear (20Hz to 20000Hz), and avoid excessively high or low frequencies;
- The module is kept away from interference sources such as power supplies and motors to reduce electromagnetic interference.
- Advanced Gameplay:
- Pair it with a touch key module, where different keys correspond to different frequencies, to make a "mini electronic keyboard";
- Use loop blocks to play a sequence of PWMs with different frequencies to form a simple melody (such as *Twinkle Twinkle Little Star*).
✨ Interactive Quick Question
- Think about it: Why is the volume moderate when the duty cycle of PWM is set to 32768? How will the volume change if the duty cycle is adjusted to 65535?
- Try it out: Change the frequency to 1000Hz and 200Hz, listen to how the pitch changes? Can you piece together a simple rhythm using different frequencies?
Summary
- The power amplifier speaker module based on LM386 is an audio amplification output module that can amplify the weak signal from the development board to drive the speaker;
- It simulates different pitches via PWM frequency and controls the volume through the duty cycle, making it suitable for projects such as electronic keyboards and sound effect reminders;
- The basic usage is to play simple sound effects via "PWM with different frequencies + delay", while the advanced usage is to combine frequencies to play melodies;
- It is the key module that enables the development board to "produce sound", which can make your project more interactive.