
Contents
Young makers, today let's unlock an "interactive vibrating gadget" 📳!
The vibration when your phone receives a message, the haptic feedback from a game controller, and the alert vibration from a smart band — all of these are powered by tiny vibration motors. Today, we’re going to get to know the module that can make your development board “vibrate” — the MOSFET-based vibration motor module ✨, which delivers clear haptic vibration feedback for your development board and adds a tangible, tactile dimension to your projects!
1. Module Introduction
Want to make your development board vibrate just like a mobile phone? This module is your perfect go-to tool!
It is an execution-type output module: its core is a MOS transistor (which can be understood as an "electronic switch"). The development board only needs to output a low-current control signal, and the MOS transistor can drive the vibration motor to rotate, generating a noticeable vibration effect. Since the current required by the motor is larger than what the pins of the development board can supply, the MOS transistor acts like a "bridge" — it uses a small signal to control a large current, which not only protects the development board but also enables the motor to vibrate stably.
Compared with ordinary direct-drive motors, it has the following characteristics:
- 📳 Noticeable vibration: The motor delivers moderate vibration intensity that can be clearly felt;
- 🔌 Safe and Reliable: The MOSFET isolates the current between the development board and the motor, preventing the development board from being burned out by high current;
- 🎮 Simple control: Vibration can be controlled simply via an "on/off" signal, as easy as controlling an LED.
In graphical programming, these blocks are commonly used for vibration motors:
set output pinBlock: Control motor start/stop;printBlock: Output prompt information of the vibration status;delayblock: controls the duration of the vibration.
In practical projects, it is often used for the following purposes:
- Interactive reminder device (e. g., vibration triggered by touch button)
- Haptic feedback toys (e. g., those that vibrate to alert when collided with)
- Alarm prompt (e. g., vibration alarm when flame is detected)
Popular Science: What is a MOSFET?
A MOSFET acts like an "electronic switch": the pins of the development board only need to output a very small current (such as a high level) to turn the MOSFET "on", allowing a large current to flow to the motor and drive it to rotate; when a low level is output, the MOSFET turns "off" and the motor stops running. This not only ensures the safety of the development board but also enables the motor to work properly.
2. Wiring Instructions
To get the motor "vibrating", the first step remains the same —— connect the module correctly!
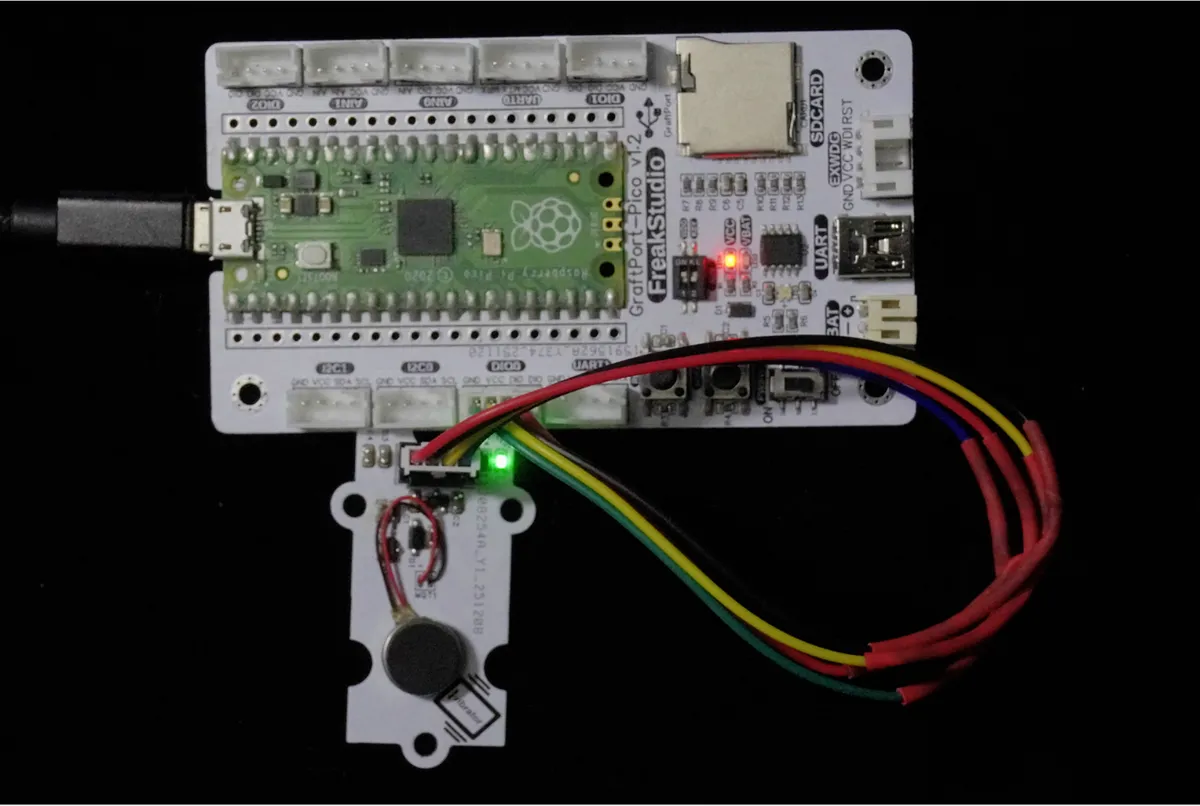
We connect the MOSFET-based vibration motor module to the digital interface DIO0 of the development board, and the corresponding relationship is as follows:
Development Board Pins | Module Pins | Description |
Pin 6 |
| Motor control signal input pin |
Pin 7 |
| - |
📌 Note
- When the pin of the development board outputs a high level (true), the MOSFET turns on and the motor starts to vibrate;
- When outputting a low level (false), the MOSFET is turned off and the motor stops vibrating.
3. Example: Control the motor to vibrate for 5 seconds
Experiment Objective: To achieve the effect of "automatically stop after vibrating for 5 seconds": start the motor and print "Start vibrating", stop the motor and print "Stop vibrating" after 5 seconds, so as to intuitively understand the control logic of the motor.
Life-related Tip: When your phone receives a WeChat message, it vibrates for a few seconds and then stops — that’s a similar control logic. Now let’s make a "vibration reminder" ourselves!
The graphical program is as follows:
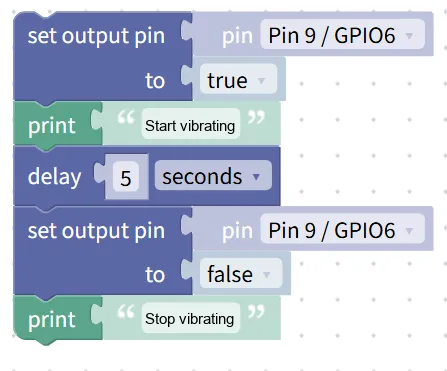
Building Block Assembly Steps:
- Starter Motor
- Drag in the
set output pinblock; - Selected Pin:
Pin 9 / GPIO6; - Set to
true→ the motor starts vibrating;
- Drag in the
- Print vibration prompt
- Add
print "Start vibrating"block to display the status in the terminal;
- Add
- Set vibration duration
- Drag in the
delayblock and set it to5seconds → make the motor vibrate continuously for 5 seconds;
- Drag in the
- Stop the motor
- Drag in another
set output pinblock; - Pin Selection
Pin 9 / GPIO6; - Set to
false→ the motor stops vibrating;
- Drag in another
- Print stop prompt
- Add
print "Stop vibrating"block to indicate that the vibration has ended.
- Add
Experimental Effect:
- After the program runs, the motor starts vibrating immediately, and the terminal prints "Vibration started";
- After 5 seconds, the motor automatically stops vibrating, and the terminal prints "Vibration stopped";
- The entire process requires no manual intervention and is fully controlled by the program.
Graphical blocks will be automatically converted into MicroPython code, and the running result will be output:
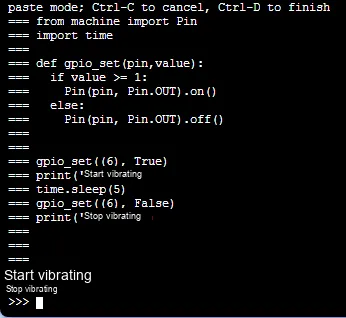
Directly importable building blocks:
Vibration.xml 2 KB
Tips
- If the motor does not vibrate:
- Check if the correct pin is selected (
Pin 9 / GPIO6) and whether the wiring is secure; - Confirm that the power supply of the module is normal and the motor is properly installed in place;
- Check if the correct pin is selected (
- The vibration intensity is adjustable:
- Some modules are equipped with potentiometers, which can be turned to adjust the vibration intensity of the motor;
- Advanced Gameplay:
- When paired with a touch key module, it achieves the interactive effect of "vibrating as soon as touched and stopping immediately when released".
- When paired with a light sensor, it can realize the function of "vibration reminder when the ambient light is dim".
✨ Interactive Mini Quiz
- Think about it: Why do we need to use MOSFETs to drive a motor instead of directly connecting it to the pins of the development board?
- Try it out: Change the delay time from 5 seconds to 2 seconds and see how the vibration duration changes; then change it to 10 seconds to experience different vibration feedback.
Summary
- The MOSFET-based vibration motor module is an actuator-type output module that drives the motor via a MOSFET to generate vibration;
- Its core principle is to use a small current to control a large current, which not only protects the development board but also enables the motor to operate stably.
- The basic usage is simple control following the sequence of "start → delay → stop", while the advanced usage enables interactive vibration in coordination with sensors;
- It is an interesting module that adds "haptic feedback" to projects, making it ideal for interactive toys and reminder devices.