
Contents
Young makers, today let's unlock an "ultra-bright high-power LED bulb"💡!
We've played with the compact Piranha LED before, and today this high-power single-LED module based on the OC7140 delivers even higher brightness — it can illuminate your desk just like a small table lamp. What's more, its brightness can be precisely adjusted via PWM, making it a perfect pick for building a "dimmable mini table lamp" ✨!
1. Module Introduction
Regular LEDs don’t have sufficient brightness. What if you want to make a small desk lamp that can light up your desktop? This high-power LED module is exactly the solution you need!
It is a high-power lighting output module that is centrally equipped with the OC7140 driver chip: since the current required by high-power LEDs is far greater than what a development board pin can supply, the OC7140 acts as a "current manager" that can stably power the LEDs, protecting the development board while enabling the LEDs to operate safely at high brightness. It also supports PWM dimming, which allows the LED to transition continuously from dim to bright for fine-grained brightness adjustment.
Compared with conventional low-power LEDs, it boasts the following features:
- 💡 Ultra-high brightness: a single LED bead can reach a brightness of several lumens, capable of illuminating a small area;
- 🎛️ PWM dimming supported: Capable of precise brightness adjustment with continuous transition from dim glow to full brightness;
- 🔌 Safety and Stability: Equipped with OC7140 chip for current limiting protection to prevent LEDs from being burned out by excessive current;
- 🧩 Good heat dissipation: Equipped with a built-in heat sink, it will not overheat even when lit for a long time.
In graphical programming, these blocks are commonly used for high-power LEDs:
count withloop block: Generates continuously varying values for brightness adjustment;PWM #6Building Blocks: Configure the pin, frequency, and duty cycle (brightness) of the LED;printblock: output the value of the current brightness;delayblock: Controls the speed of brightness change.
In practical projects, it is often used for the following purposes:
- Dimmable Desk Lamp (Brightness Adjusted via PWM)
- Ambient Light (with sensor for automatic color change / dimming)
- Outdoor Lighting Prototype (High Brightness, Long Battery Life)
Quick Science: What is PWM Dimming?
PWM stands for "Pulse Width Modulation". Simply put, it makes the LED rapidly cycle between "on → off → on → off", and adjusts the brightness by modifying the "proportion of on-time"(duty cycle). For example, at a 10% duty cycle, the LED is off for most of the time and appears very dim; at a 100% duty cycle, the LED stays on continuously and reaches maximum brightness. Since the switching speed is extremely fast (e. g., 1000 times per second), the human eye cannot detect the flickering at all, and only perceives a change in brightness.
2. Wiring Instructions
To get high-power LEDs to "light up", the very first step remains —— connect the module correctly!
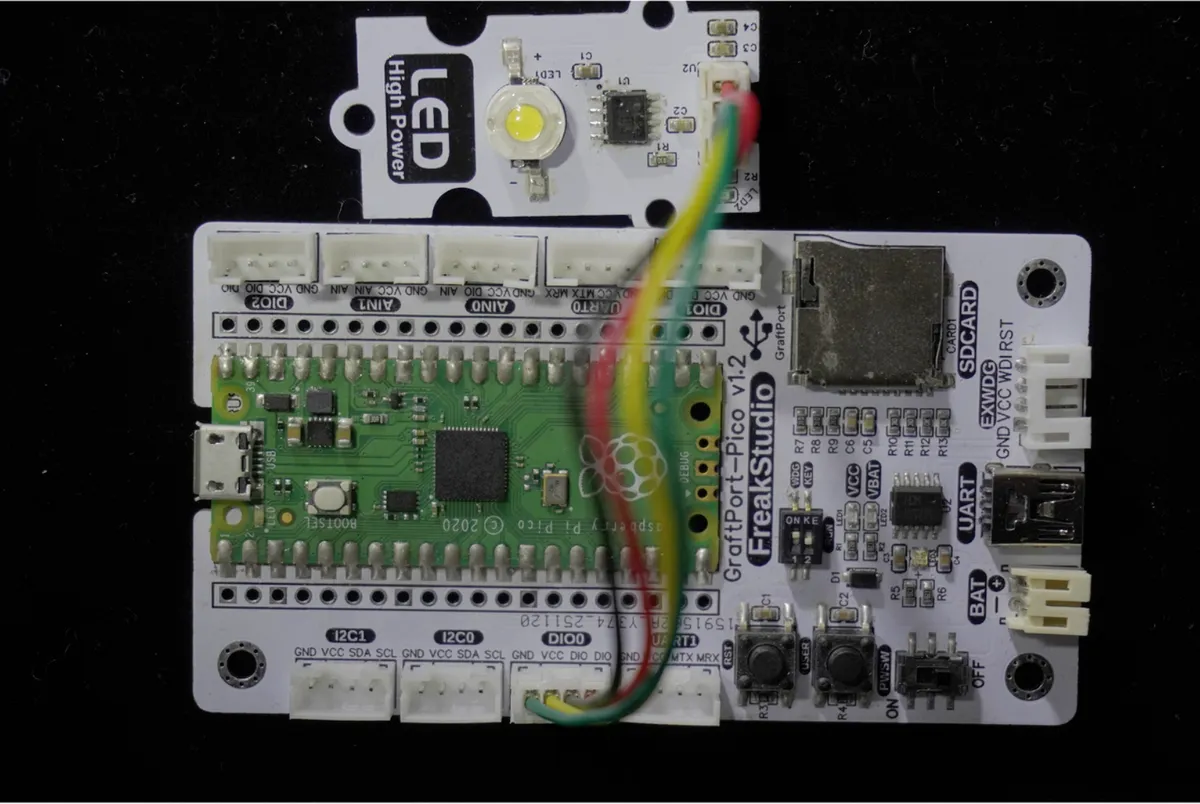
We will connect the high-power single-LED module based on OC7140 to the digital interface DIO0 of the development board, and the corresponding relationship is as follows:
Development Board Pins | Module Pins | Description |
Pin 6 |
| PWM output / level output pins on the MCU |
Pin 7 |
| - |
📌 Note
- When the development board outputs a PWM signal, the OC7140 adjusts the current of the LED according to the duty cycle to achieve brightness variation;
- The larger the duty cycle (the higher the value), the brighter the LED; when the duty cycle is 0, the LED turns off.
3. Example: Adjusting LED Brightness via PWM (Gradual Transition from Dim to Bright)
Experiment Objective: Make the LED gradually fade slowly from off to full brightness, and meanwhile print the duty cycle value of the current brightness on the terminal to intuitively experience the effect of PWM dimming.
Everyday Insight: The dimmable table lamp at home can adjust its brightness via a , which relies on PWM for Technology Implementation. Now let's make an "auto-dimming mini table lamp" ourselves!
The graphical program is as follows:
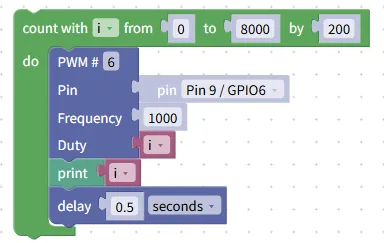
Building Block Assembly Steps:
- Generate brightness gradient values
- Drag the
count with i from 0 to 8000 by 200block in; - Let the variable
istart from 0, increment by 200 each time until it reaches 8000, to simulate the brightness change from 0 to the maximum.
- Drag the
- Configure PWM output
- Drag the
PWM #6block into the loop; - Selected Pin:
Pin 9 / GPIO6; - Set
Frequencyto1000(1000 switches per second, no flicker perceived by the human eye); - Set
Dutytoi(use variable i to control the duty cycle so as to achieve brightness variation).
- Drag the
- Print the brightness value
- Add the
print iblock to display the current duty cycle value in the terminal.
- Add the
- control the rate of change
- Drag in the
delayblock and set it to0.5seconds → this makes the brightness change smoother and easier to observe.
- Drag in the
Experimental Effect:
- After the program runs, the LED will start from being completely off, getting a little brighter every 0.5 seconds until it reaches the maximum brightness;
- The terminal will synchronously print the duty cycle value for each time (0,200,400…8000);
- The brightness changes continuously and smoothly throughout the entire process, with no flickering sensation.
Graphical blocks will be automatically converted into MicroPython code, and the running result will be displayed:
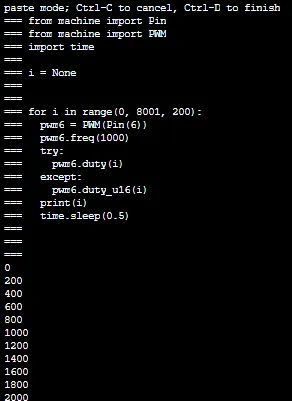
Directly importable building blocks:
High-power LED.xml 3 KB
Tips
- If the LED does not light up:
- Check if the correct pin is selected (
Pin 9 / GPIO6) and whether the wiring is secure; - Confirm that the module power supply is normal and the heat sink is properly installed (to avoid overheat protection);
- Check if the correct pin is selected (
- What should I do if the brightness is insufficient?
- You can increase the maximum value of
count withfrom 8000 to a larger number (e. g., 10000) to increase the duty cycle;
- You can increase the maximum value of
- Advanced Gameplay:
- Pair it with a sliding rheostat module, use the resistance value of the rheostat to control the PWM duty cycle, and implement a "manual dimming table lamp";
- Add conditional judgment to automatically brighten the LED when the ambient light is dim, making it an "auto-sensing desk lamp".
✨ Interactive Quick Question
- Think about it: Why use PWM dimming instead of directly adjusting the voltage of the LED?
- Try this: change the
count withparameter fromby 200toby 400, and see whether the brightness changes faster or slower?
Summary
- The high-power single-chip LED module based on OC7140 is a high-power lighting output module that relies on the OC7140 chip to stably drive the LED;
- It supports PWM dimming, which enables continuous brightness transition from dim to bright, making it ideal for projects such as dimmable desk lamps and ambient lighting fixtures.
- The basic usage is to realize automatic gradient through "loop + PWM", while the advanced usage is to realize intelligent dimming in combination with sensors;
- It is an excellent module for learning PWM technology and experiencing high-power lighting.