
Young makers, in the last session we installed a "brightness-sensing eye" for the development board, and in this session we're upgrading our gear — we're installing a flame sensor module that can "detect fire". It acts like a "fire early warning officer" for the development board, capable of accurately detecting flames or strong light; the moment it spots an anomaly, it immediately triggers an alarm (such as printing a prompt or activating the buzzer), making it a total "game-changer" for building safety early warning projects~
1. Module Introduction
The core mission of a flame sensor is to "detect flames/strong light", and its working principle is extremely straightforward — just remember these two key points: ✅ Working essence: The photosensitive component inside the sensor is highly sensitive to the infrared light emitted by flames —
- Flame approaching / strong light irradiation → low module output voltage (digital pin at low level);
- No flame / weak light → high module output voltage (digital pin is at high level). ✅ Two reading modes:
- Numerical reading: only judges "whether there is a flame or not"(simple and fast, suitable for alarm purposes);
- ADC analog reading: capable of measuring "how close the flame is / how strong the light is"(the larger the value, the farther the flame / the weaker the light).
To make the flame sensor work properly, it mainly relies on the cooperation of the following categories of blocks:
- Set pin mode block: Set the pin connected to the sensor to "input mode" before you can read the voltage level;
- Read Number / ADC Input Block: The number reading function determines "whether there is a flame", while the ADC reading function measures "flame intensity";
- Conditional judgment block: For example, "If flame is detected, trigger the buzzer alarm";
- Output control blocks: Link LEDs and buzzers to turn "detection results" into "early warning actions".
Quick Science: Why Are They Sensitive to Flames?
Flames emit infrared light of a specific wavelength, and the photosensitive element of the flame sensor only "recognizes" this type of light, making it difficult for ordinary lights (such as incandescent lamps) to trigger it, resulting in a very low false alarm rate~
2. Wiring Instructions
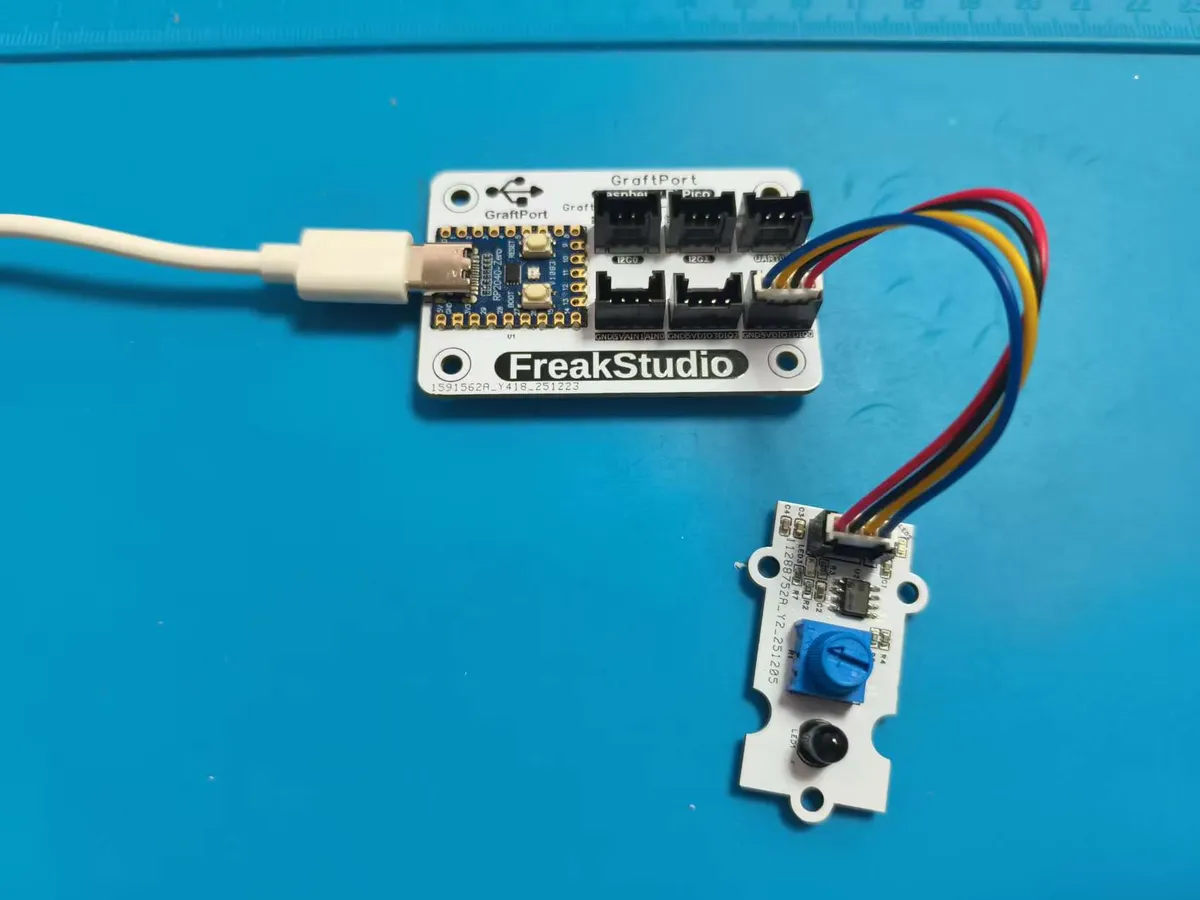
If you want the sensor to keep a close eye on the flame, you must connect the wires correctly first! We connect the flame sensor module to the DIO0 interface of the development board, and please keep the specific pin correspondence in mind:
Development Board Pins | Module Pins | Description |
Pin 8 |
| Analog Output of Flame Sensor |
Pin 7 |
| Digital output of the flame sensor analog signal after passing through the comparator |
3. Flame Alarm
Experimental Objective: Make the development board continuously detect flames. Once a flame (or strong light) is detected, immediately print the prompt "Flame sensor triggered" on the terminal, and it can also avoid repeated alarms caused by signal jitter~
Core Principle: Level Characteristics of the DIN Pin of the Flame Sensor:
- Flame not detected: DIN pin outputs high level;
- Flame detected: the DIN pin outputs a low level; by using
not(inversion) to judge the level, you can accurately identify the "flame detected" state, just like the button detection logic we learned before~
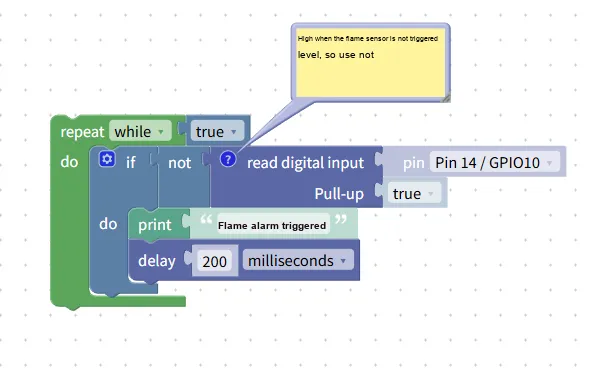
Building Block Assembly Steps (Step-by-Step Guide for You):
- Infinite Loop: Select the
repeat while trueblock → continuously monitor the flame status; - Flame Detection and Judgment:
- Select
if not read digital inputblock,pinselectPin 14/GPIO10,Pull-upset totrue→ detect sensor level;notis used to identify the state of "flame detected (low level)".
- Select
- Trigger Prompt:
- Add inside the loop
print "Flame sensor triggered"Blocks → When flame is detected, print a prompt on the terminal; - Add
a delay of 200 millisecondsblock → to prevent duplicate printing caused by signal jitter.
- Add inside the loop
After running the program:
- Under normal circumstances, there will be no output on the terminal;
- Bring the flame of a lighter close to the sensor (or shine strong light directly on it), and the terminal will immediately print "Flame sensor triggered";
- Remove the flame, the system will prompt to stop printing, and there will be no repeated alarms even if the signal jitters slightly~
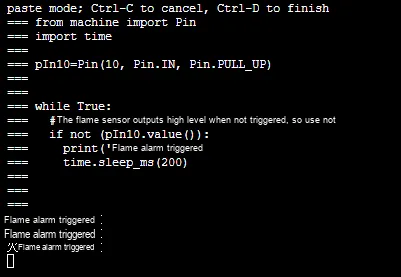
XML files can be directly imported into the building blocks:
Flame sensor.xml 2 KB
Tips
- Want to upgrade to an "audio-visual alarm"? Just replace the
printblock with a "buzzer beeps + LED flashes" block — when a flame is detected, it will both beep and light up, making the warning far more noticeable; - What to do if false triggering occurs? Move the sensor away from strong light sources (such as flashlights, table lamps), or adjust the sensor's sensitivity (if available);
- Want to test flame intensity? Replace "read digital input" with "read ADC input (AIN pin)", and the terminal will print a specific value — the smaller the value, the closer the flame is~
✨ Interactive Mini Quiz
- Think about it: if you remove
not, the program will become "keep printing when no flame is detected, and stop printing when a flame is detected". Why? (Answer: No flame means a high level 1,flame_pin.value ()is True, so print will be executed; a flame means a low level 0, so the condition is not satisfied~) - Try this: shine your phone's flashlight at the sensor, and it can also trigger the prompt, which shows that it is also sensitive to strong light — this is normal~