
Contents
1. Module Introduction
In actual machines and equipment, how do you know that "it has reached the end of its service life"? For example:
- Draw the electric curtain all the way to the left;
- Push the drawer all the way in;
- The lifting platform rises to its highest point.
The answer is —— limit switch.
A limit switch module is a position detection input module that immediately changes its output level when an object actuates the switch contacts, signaling to the development board:"I've been triggered / I've reached the limit position!"
It has the following distinct features:
- 🔘 It can only be triggered when it is "touched", which is very intuitive;
- 🔘 Output: digital signal (present / absent);
- 🔘 It features a simple structure, stable and reliable performance, and is extremely widely used in practical engineering scenarios.
In graphical programming, limit switches are mainly used with these blocks:
- Set pin mode (input) block;
- Read Digital Input Block;
- Conditional (if-then) block;
- Delay block (optional): Used to prevent accidental or repeated triggering.
In the project, it is often used to:
- Detect whether the movement has reached the end point
- Prevent equipment from being "damaged in a collision"
- as a safety stop signal
2. Wiring Instructions
To make the development board "sense" your fingers, the first step is still —— connect the wires correctly!
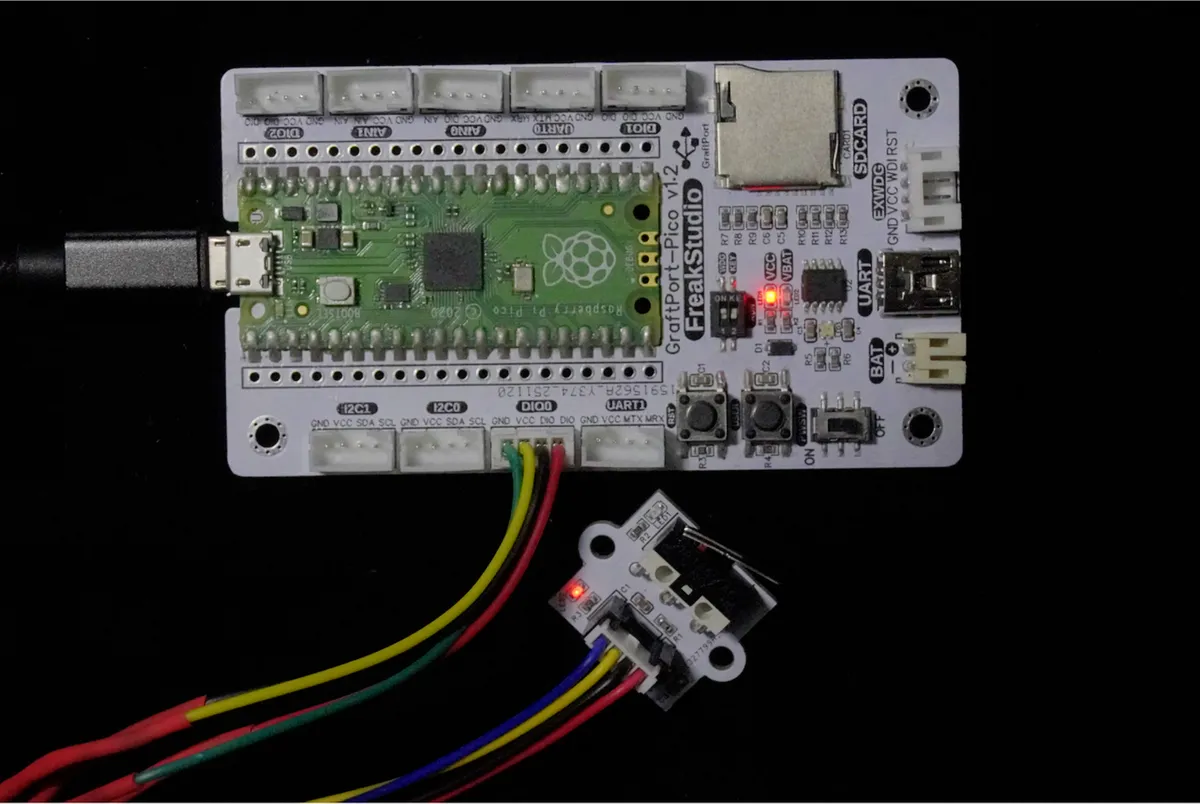
We connect the TTP223 touch key module to the DIO0 interface of the development board, and the corresponding relationship is as follows:
Development Board Pins | Module Pins | Description |
Pin 6 |
| MCU upper limit switch signal input interface |
Pin 7 |
| - |
📌 Working Status Description (pull-up mode is used by default):
- Not triggered (not pressed): the pin is at high level;
- Triggered (pushed by an object): the pin becomes low level.
As long as the development board reads this level change, it can determine the current state of the limit switch.
3. Example: Check whether the limit switch is triggered
Experiment Objective: Implement the most basic limit detection function: when the limit switch is pressed, a prompt message will be printed on the terminal, and the printing will stop after the switch is released.
Everyday Thought: When you close a door at home and it clicks into place, that sound actually stems from a principle similar to limit detection.
The graphical program is as follows:
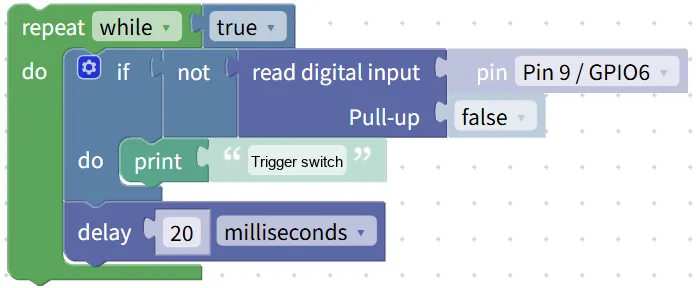
Building Block Assembly Steps:
- Infinite Loop Detection
- Use the
repeat while trueblock to keep the program running continuously;
- Use the
- Read limit switch status
- Use the
read digital inputblock; - Pin Selection
Pin 12 / GPIO9; - Set Pull-up to
true;
- Use the
- Determine whether to trigger
- Use
if not read digital inputfor judgment; - When a low level is read, it indicates that the limit switch has been pressed;
- Use
- Trigger Feedback
- When the condition is true, add the
print "Limit trigger detected"block.
- When the condition is true, add the
Experimental Effect:
- When the limit switch is not triggered, there is no output at the terminal;
- Press the limit switch by hand, and the terminal will print the prompt immediately;
- After being released, the prompt stops outputting.
Graphical blocks will be automatically converted into MicroPython code for execution on the development board:
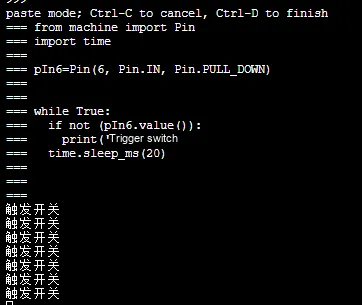
XML file (can be directly imported into building blocks):
Limit.xml 2 KB
Tips
- If the limit switch does not respond:
- Check whether the pin is selected as GPIO9 / Pin12;
- Whether to enable Pull-up;
- A limit switch is a mechanical structure:
- Requires when triggered: press firmly and properly;
- If repeated triggering is detected:
- A delay of 200~500 ms can be added;
- Or use the logic of "trigger only once".
✨ Interactive Mini Quiz
- Think about it:
If you remove thenot, what will happen? And why? - Give it a try:
Reverse the logic of the LED (trigger on/off) and experience the difference.
Summary
- A limit switch is a position detection input module used to determine whether a "limit position" has been reached.
- It outputs digital signals (high/low), which are ideal for beginners to learn conditional judgment;
- Commonly used in scenarios such as safety protection and motion end point detection;
- Proper use of variables and delays can make limit switch detection more stable and reliable.