
Contents
Young makers, today let's unlock a versatile module that can adjust its own values 🎛️!
The dimming on the desk lamp at home, the volume button on the speaker, and the joystick on the game console all conceal devices that enable "continuous adjustment". Today, we are going to get to know the most fundamental "value adjustment magic weapon" — the sliding rheostat module ✨, which can let the development board know: 👉 how far the has been turned right now, and whether the value is large or small!
1. Module Introduction
When we want the value of the development board to "change continuously from 0 to the maximum", the sliding rheostat is the best introductory tool.
It is an analog input module: there is a sliding resistor sheet inside the module. When you turn the or push the slider, the resistance connected to the circuit will change accordingly, and the output voltage will also change continuously from 0 to the maximum value. The development board can detect the adjustment amplitude by reading the analog value corresponding to this voltage (usually an integer between 0 and 65535)!
Compared with switching modules, it has the following characteristics:
- 🎛️ Continuously adjustable: It does not have only two states of "on/off", but can take any value between 0 and the maximum;
- 🔍 Intuitive and easy to understand: turning the adjusts the value, with the value change visible directly, making it ideal for beginner learning;
- 🧩 Versatile gameplay: It can be used to adjust LED brightness, control motor speed, and build volume adjustment prototypes.
In graphical programming, these blocks are commonly used for slide rheostats:
- Read analog input block: Get the current value of the rheostat;
- Loop Block: Continuously detect value changes;
- Print Block: Outputs a value to the terminal;
- Delay block: Controls the detection frequency.
In practical projects, it is often used for the following purposes:
- Manual adjustment devices (e. g., dimmable desk lamps, variable-speed fans)
- Analog signal input tool (e. g. simulating temperature and humidity changes)
- Adjustment for interactive items (such as sensitivity adjustment in games)
Popular Science: What is an analog quantity?
An analog quantity refers to a "continuously varying value". For example, the temperature changes gradually from 20°C to 30°C instead of jumping abruptly. What a sliding rheostat outputs is an analog quantity, whose value changes continuously as the turns, which is completely different from the "0 or 1" of a switch-type module.
2. Wiring Instructions
For the development board to "understand" your adjustments, the first step remains the same — connect the module correctly!
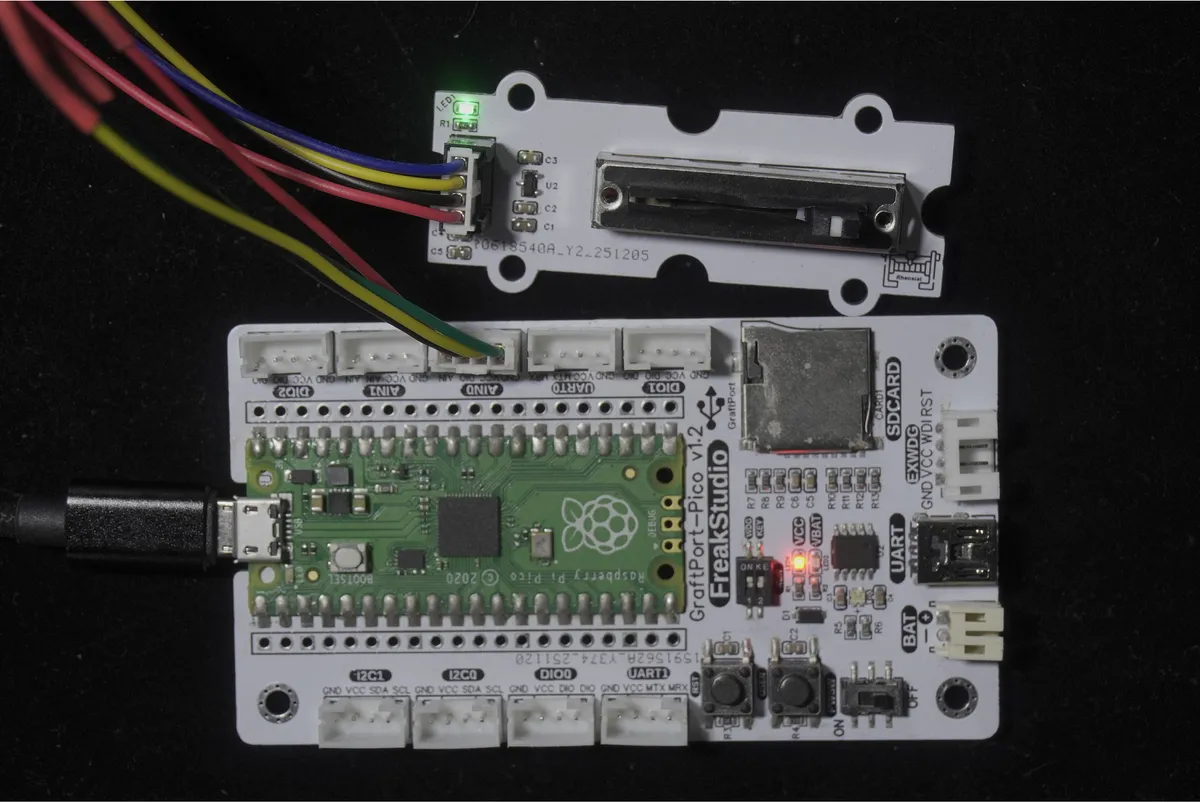
We connect the sliding rheostat module to the analog interface AIN0 of the development board, and the corresponding relationship is as follows:
Development Board Pins | Module Pins | Description |
Pin 26 |
| The input interface of the sliding rheostat voltage signal on the MCU |
Pin 19 |
| - |
📌 Note
- When turning the clockwise, the output analog value will increase;
- Turn the counterclockwise, and the value will decrease;
- The development board can detect the amplitude of your adjustment by reading this analog value!
3. Example: Read the value of the sliding rheostat and print it
Experiment Objective: Detect the value change of the sliding rheostat in real time, print the value to the terminal, and intuitively perceive the corresponding relationship between "turning the → value change".
Little Thought Experiment: When you turn the volume on a speaker, the volume gets louder or softer — that works thanks to a variable resistor (rheostat) that adjusts the voltage in a similar way. Now let's build our own "Value Adjustment Detector"!
The graphical program is as follows:
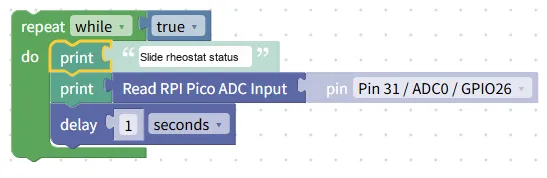
Building Block Assembly Steps:
- infinite loop
- Use the
repeat while trueblock to make the program continuously detect the value;
- Use the
- Print prompt information
- Add the
print "Rheostat Status"block to make it easier to distinguish the results of each detection;
- Add the
- Read analog values
- Use the
Read RPI Pico ADC Inputblock; - Select the pins connected to the rheostat:
Pin 31 / ADC0 / GPIO26;
- Use the
- Add Delay
- Drag in the
delayblock and set it to1second → this controls the printing frequency and prevents the terminal from being flooded with messages.
- Drag in the
Experimental Effect:
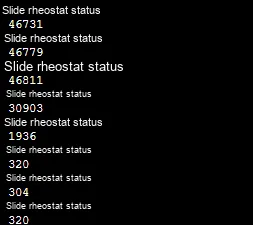
- After the program runs, the terminal will print the "status of the sliding rheostat" and the corresponding value once per second;
- Turn the clockwise, and the value will gradually increase from 0 (e. g., 46731,46779);
- Turn the counterclockwise, and the value will gradually decrease from the maximum (e. g., 3090,1596,30);
- When it stops rotating, the value will stabilize at the current position.
Graphical blocks will be automatically converted into MicroPython code, and the running results will be output:
Directly importable building blocks:
Sliding rheostat module.xml 2 KB
Tips
- If the value remains unchanged:
- Check if the correct pins are selected (
Pin 31 / ADC0 / GPIO26) and if the wiring is secure; - Try turning the to confirm that the slider of the module can slide smoothly;
- The value range is 0 to 65535:
- This is the standard range for the analog input of the development board, which is a normal phenomenon;
- Advanced Gameplay:
- Pair it with the PWM building block, adjust the LED brightness via the rheostat value to make a "dimmable table lamp";
- Control the tone of the buzzer with numerical values to make an "electronic organ".
✨ Interactive Mini Quiz
- Think about it: Why does a sliding rheostat output an analog quantity, whereas the vibration sensor we used earlier outputs a digital quantity?
- Try this: Turn the to the middle position and check if the value is roughly around 32768 (the midpoint of the range 0 to 65535).
Summary
- A sliding rheostat is a analog input module that outputs a continuously varying voltage by adjusting its resistance;
- Its value ranges from 0 to 65535, and turning the can intuitively adjust the value;
- The basic usage is to "read + print" the value, while the advanced usage is to adjust the status of the peripheral (such as brightness and speed);
- It is an essential introductory module for learning analog input and understanding the concept of "continuous change".