
Contents
- 1. Module Introduction
- 2. Usage of Basic Building Blocks
- 2.1 Initialization Block (Init BH1750 Sensor: I2C. .., SDA. .., SCL. ..)
- 2.2 Ambient Light Intensity Reading Block (Read Ambient Light Level)
- 3. Wiring Instructions
- 4. Address Selection
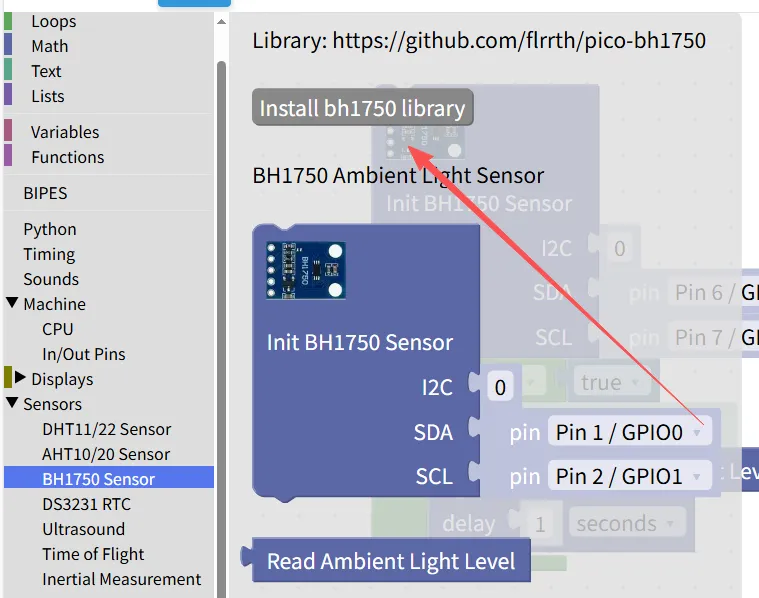
- 5. Download bh1750 library function
- 6. Example: Read light brightness and control LED
Young makers, today let's unlock the "Light Sensing Prodigy" — the light intensity sensor module based on the BH1750 chip ✨!
Unlike simple light sensors that only distinguish between light and dark, it can accurately measure the specific brightness value of ambient light, just like installing a "professional light meter" on the development board, which is extremely practical whether you are making an automatic desk lamp or a light alarm.
1. Module Introduction
The human eye can perceive brightness and darkness, but what about machines? The BH1750 light intensity sensor module can achieve exactly that.
It is a digital light intensity sensor whose core chip is BH1750:
- It can convert the ambient light intensity into a digital signal, with the unit being Lux
- It can be directly read by the development board without analog voltage conversion.
- It can detect changes in the environment from dark to bright, making it ideal for light sensing projects.
Compared with ordinary analog photoresistors, it has the following characteristics:
- 🌞 Digital Output: Directly obtain numerical values for easy calculation and judgment
- 🌞 High precision: capable of distinguishing more subtle brightness variations
- 🌞 Fast response: capable of reflecting ambient light changes in real time
In graphical programming, the following blocks are mainly used for the BH1750 module:
- I2C Initialization Block: Activates the I2C communication function of the development board, enabling "message exchange" between the module and the development board;
- BH1750 initialization block: configure the measurement mode (high / low resolution) of the sensor;
- BH1750 data reading block: Obtain the brightness value (in lux, lx) of the current environment;
- Conditional block: Performs different operations based on the brightness value (e. g., turns on the LED when the ambient light is dim);
- Loop block: Continuously monitors changes in ambient light.
In practical projects, it is often used for the following purposes:
- Auto Brightness Adjustment
- Ambient Light Detection
- Mini Experiment on Intelligent Lighting System
Popular Science Tidbit
What is the I2C Communication Protocol?
It can be understood as a "whisper protocol" between the development board and the sensors — with just two wires (the SDA data pin and the SCL clock pin), it enables communication between multiple sensors and the development board without the need for separate wiring for each sensor, which is both simple and efficient; many high-precision digital sensors adopt this method~
What is lux?
Lux is the unit of illuminance, and a higher value indicates brighter light. The BH1750 can convert the amount of light that is invisible to us into a digital value, enabling the development board to "see light".
2. Usage of Basic Building Blocks
2.1 Initialization Block (Init BH1750 Sensor: I2C. .., SDA. .., SCL. ..)
This building block serves as the "power-on key" for the BH1750 light intensity sensor; without it, all subsequent operations to read light intensity data will be completely futile!
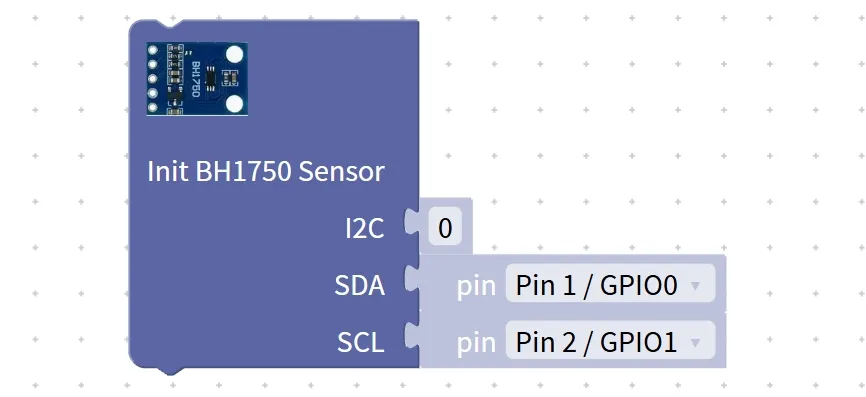
First, let’s clarify: why do we need initialization? The BH1750 is a light intensity sensor based on I2C communication, and it requires establishing a dedicated communication link with the I2C bus of the development board and the specified pins — different development boards come with multiple I2C buses (such as I2C0 and I2C1), and the SDA/SCL pins can also be connected to different GPIO pins.
The function of this building block is to convey three key pieces of information to the development board: "Which I2C bus am I using? ", "Which pin is the SDA connected to? ", and "Which pin is the SCL connected to", so as to enable the successful "handshake" between the development board and the BH1750.
Chinese meaning: Initialize the BH1750 light intensity sensor, select the I2C bus (I2C) to be used, and specify the connected SDA pin (SDA) and SCL pin (SCL).
When the program runs to this block, the development board will send an I2C initialization command to establish a communication connection with the BH1750. After the handshake succeeds, the sensor enters the "standby state" and is ready to collect ambient light intensity data at any time; if you directly use the subsequent reading block without initialization, the program will report an error and cannot read any data at all — just like trying to enter your house without entering the password, the door won't open at all.
Tips
- Do not connect the pins incorrectly! The SDA and SCL pins selected during initialization must be consistent with the pins actually wired. For example, if SDA is actually connected to Pin6 and SCL to Pin7, you cannot select Pin8 and Pin9 in the blocks, otherwise the sensor will "play dead" and not respond;
- Don’t make the wrong choice of I2C bus! Most development boards come with two buses, I2C0 and I2C1, and selecting the wrong one will result in communication failure; beginners are recommended to prioritize I2C0.
- Initialization only needs to be performed once! Just place this block at the very beginning of the program; do not repeatedly initialize it inside a loop, otherwise it will waste the development board's resources and may even cause communication disorders.
✨ Interactive Quiz: Let's Ponder
If you skip the initialization block and directly use the "Ambient Light Intensity Read" block, what will happen? (Answer: The program will fail to recognize the BH1750 sensor, and will read invalid data (such as 0) or report an error directly!)
2.2 Ambient Light Intensity Reading Block (Read Ambient Light Level)
After the sensor completes initialization, it's time to use this block to "fetch the package" — that is, read out the light intensity data collected by the BH1750 for use in the program!

First, figure out: How do reading blocks get data?
BH1750 is a "continuous measurement" sensor that automatically and real-timely collects ambient light intensity signals after initialization, converts the analog signals into digital signals and temporarily stores them in its internal buffer. This programming block acts like a "courier" for the development board, specifically fetching the "light intensity parcel" from the sensor's buffer, and reads the latest light intensity value collected by the sensor, with the unit being lux (a standard unit for measuring light intensity).
Chinese Meaning: Read the ambient light level value collected by the BH1750 sensor.
When the program runs to this block, it will retrieve the light intensity data from the BH1750 buffer and return a specific number (e. g., 50,200,1000): the smaller the value, the darker the environment (e. g., at night); the larger the value, the brighter the environment (e. g., under sunlight).
This value can be directly used for printing, displaying on the screen, or performing conditional judgments (for example, "turn on the LED if the light intensity is less than 100 lux").
Tips
- Do NOT reverse the order! If you read the light intensity before initializing the sensor, you will get invalid data (e. g., 0);
- Numerical range reference! The BH1750 can measure light intensity ranging from 0 to 65535 lux; the typical indoor light intensity in daily life is around 50~500 lux, while that under direct sunlight is approximately 10000~100000 lux;
- Avoid direct exposure to strong light! Do not point the sensor directly at strong light sources such as desk lamps or the sun, otherwise the reading will instantly go off the charts and the sensor may also be easily damaged.
✨ Interactive Pop Quiz: First to Answer Wins
Cover the photosensitive surface of the BH1750 sensor tightly with your hand. Will the read light intensity value increase or decrease? (Answer: Decrease! Because the hand blocks the light, and the light intensity collected by the sensor drops significantly~)
3. Wiring Instructions
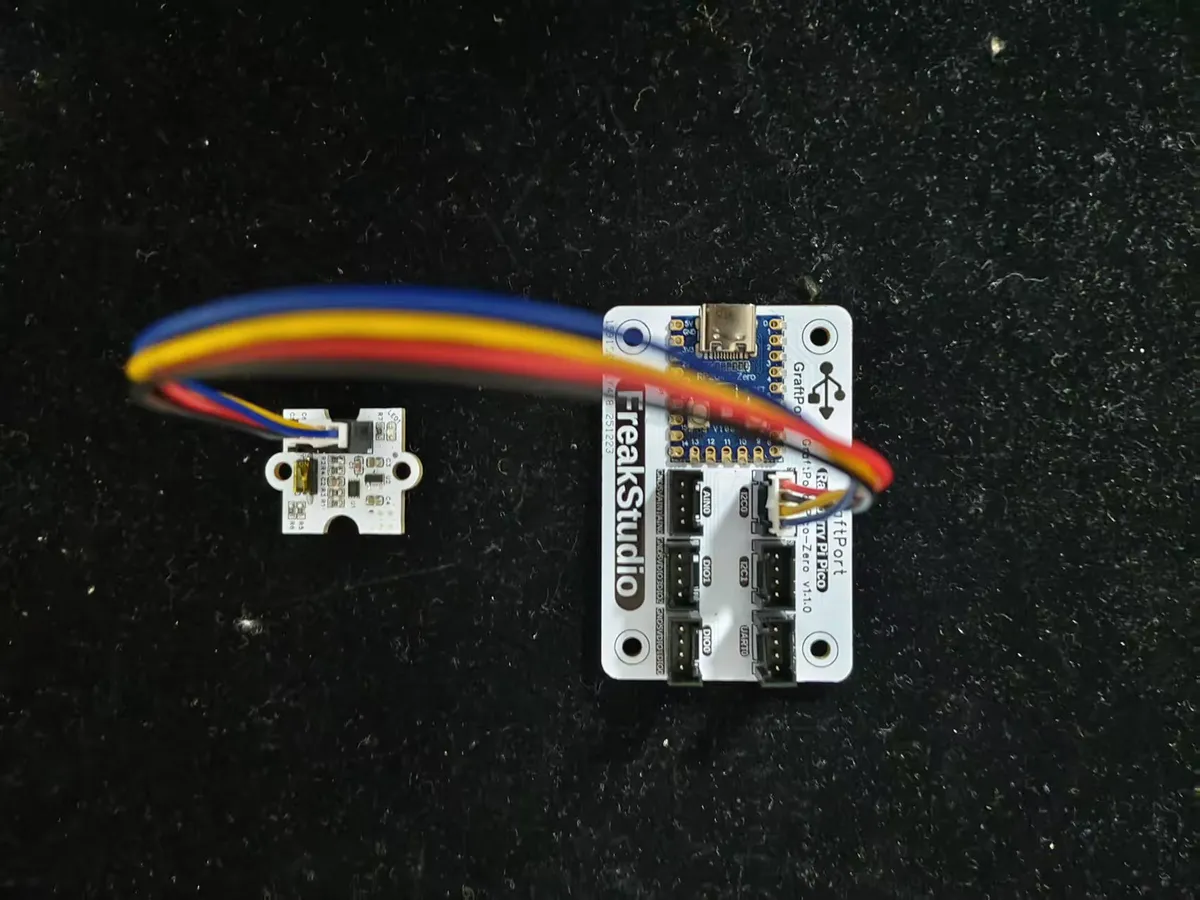
The BH1750 module communicates via I2C. We will connect the BH1750-based light intensity sensor module to the I2C0 interface of the development board, and the corresponding relationship is as follows:
Development Board Pins | Module Pins | Description |
Pin 4 |
| I2C data transmission line, corresponding to |
Pin 5 |
| I2C clock signal line, corresponding to |
4. Address Selection
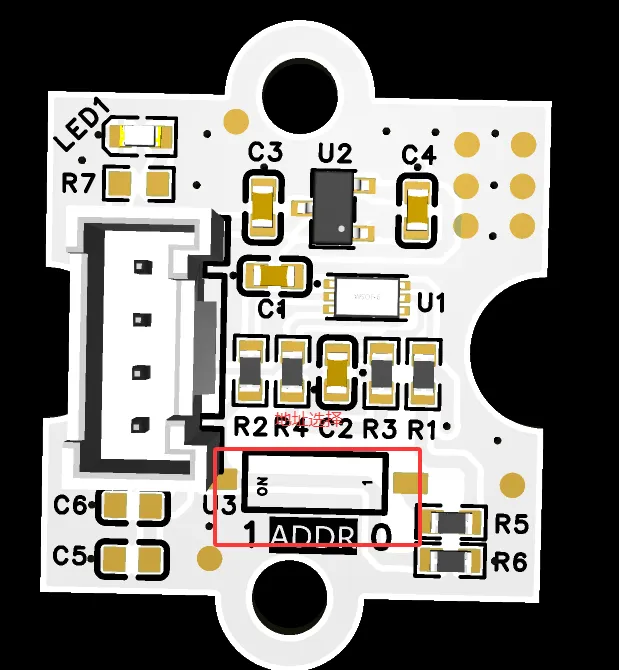
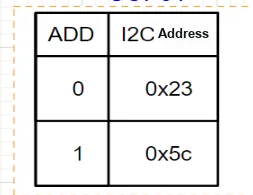
Here, we need to set the address bits in advance via the DIP switch, and different positions correspond to different addresses:
5. Download bh1750 library function
Before using graphical building blocks, you need to import the driver library for BH1750 first:
6. Example: Read light brightness and control LED
Experimental Objective: To implement a closed loop of "light sensing + device control": the BH1750 accurately reads the ambient brightness; when the brightness is lower than 100 lx (dim environment), the piranha LED is automatically turned on; when the brightness is higher than 100 lx (bright environment), the LED is automatically turned off, simulating the core function of an automatic desk lamp.
Everyday Life Insight: The reason why our phone screens can automatically brighten or dim based on ambient light is that they are equipped with light sensors similar to the BH1750. Now, let's use the BH1750 to build a prototype of a "smart desk lamp"!
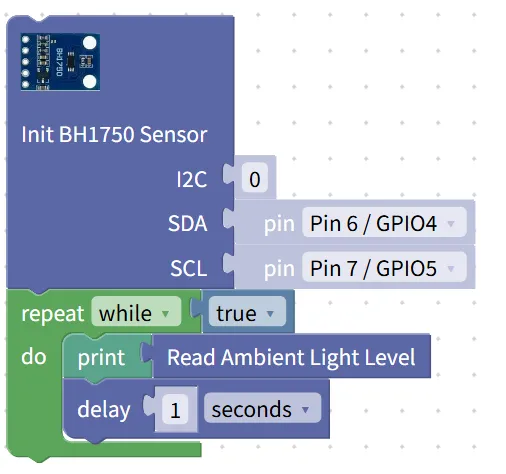
The graphical program is as follows:
Building Block Assembly Steps:
- Initialize the sensor
- Drag in
Init BH1750 Sensorblock; - Set
I2Cto0(corresponding to the I2C0 interface); SDAselectsPin 6 / GPIO4,SCLselectsPin 7 / GPIO5, which matches the wiring.
- Drag in
- Infinite Loop Monitoring
- Drag in the
repeat while trueblock to keep the program running continuously.
- Drag in the
- Read and print the brightness value
- Drag the
printblock into the loop, select theRead Ambient Light Levelblock as its content to directly output the current brightness value;
- Drag the
- Add Delay
- Drag a
delayblock at the end of the loop, and set it to1second → this controls the printing frequency and prevents the terminal from scrolling too fast.
- Drag a
Experimental Effect:
- Cover the sensor with your hand (brightness < 100 lx), and the LED will light up immediately;
- Remove your hand to let the sensor be exposed to natural light (brightness > 100lx), and the LED will turn off automatically;
- The terminal can synchronously display the brightness value, allowing users to clearly observe the LED state switching corresponding to light changes.
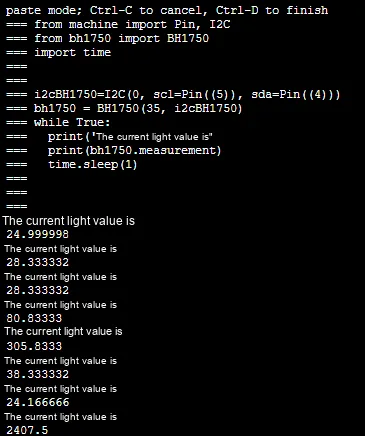
The graphical building blocks will be automatically converted into MicroPython code adapted for the BH1750, which core consists of I2C initialization, sensor configuration and brightness reading logic:
Directly importable building blocks:
Light intensity.xml 2 KB
Tips
- If the brightness value cannot be read:
- Check whether the SDA and SCL pins are connected correctly (pins 4 and 5 of the development board) and whether the wiring is secure;
- Confirm that the power supply of the module is normal and there is no conflict in the I2C address (to avoid multiple I2C devices using the same address);
- Adjustment method for inaccurate readings:
- Switch to the "high resolution" mode, and take the reading after standing still for 3 seconds to reduce errors;
- Avoid direct strong light exposure to or obstruction of the sensor, and keep the detection direction facing the ambient light;
- Pro Tips:
- The brightness threshold for conditional judgment (e. g., 80lx, 120lx) can be modified to adapt to the lighting requirements of different scenarios.
✨ Interactive Quick Question
- Think about it: Why does the BH1750 require initializing I2C communication, while the previous touch buttons and line-tracking modules do not?
- Try: Change the measurement mode to "low resolution", compare the reading speed and accuracy with those in the high-resolution mode, and see what the differences are?
Summary
- The light intensity sensor based on BH1750 is a digital high-precision sensor that transmits accurate brightness values (in lux, lx) via I2C communication as its core working principle;
- It boasts the advantages of high precision, simple wiring and wide measuring range, making it more suitable for refined light control projects than simple optical sensors.
- The basic usage is to read the brightness value and link with peripheral devices, while the advanced usage is to display the brightness in conjunction with an OLED and set multi-level light alarms;