
Contents
- 1. Module Introduction
- 1.1 Working Principle: The "Signal Conversion Logic" That Beginners Can Understand
- 1.2 Pin Description: There are 4 pins in total, and only 3 of them are used by the core
- 1.3 Summary
- 2. Usage of Basic Building Blocks
- 2.1 Initialization Block (Start DHT Sensor: type. .., pin. ..)
- 2.2 Enable the sensor data measurement block (Measure DHT11/22 Sensor)
- 2.3 Temperature Reading Block (Read DHT11/22 Temperature)
- 2.4 Humidity Reading Block (Read DHT11/22 Humidity)
- 3. Wiring Instructions
- 4. Example: Temperature and Humidity Detection and Printing
Young makers, we've already equipped the development board with its "eyes" and "nose", and now it's time to add a "sensory organ" that can "perceive temperature, humidity, cold and warmth" — the DHT series temperature and humidity sensors (DHT11/DHT22)!
To enable a sensor to accurately measure temperature and humidity, you first need to master its 4 core building blocks — these are the "fundamental skills" for reading temperature and humidity data, and not a single step can be wrong~
1. Module Introduction
The DHT series temperature and humidity sensors (DHT11/DHT22) are the core modules that endow development boards with the capability to "perceive the temperature and humidity of the surrounding environment", just like installing "skin receptors" that can accurately capture temperature and humidity for development boards — they can convert the intangible physical quantities of ambient temperature and humidity into digital signals recognizable by development boards, allowing programs to easily acquire and utilize ambient temperature and humidity data.
1.1 Working Principle: The "Signal Conversion Logic" That Beginners Can Understand
Don’t be intimidated by the complexity! The working process of a DHT sensor is just like a three-step "little magic trick":
- Signal Acquisition: The humidity-sensitive and temperature-measuring elements inside the sensor perceive changes in ambient temperature and humidity, and generate corresponding analog electrical signals (voltage/current changes);
- Signal Conversion: The built-in chip converts analog electrical signals into digital signals (combinations of 0s and 1s) that the development board can recognize;
- Transmission signal: The digital signal is transmitted to the development board via the 1-Wire bus (DIO pin), and the specific temperature and humidity values can be calculated after the development board parses the signal.
1.2 Pin Description: There are 4 pins in total, and only 3 of them are used by the core
DHT sensors typically have 4 pins (some packages omit the vacant pin, leaving only 3). We only need to remember the functions of the core pins to better understand the principle of our wiring:
Pin Name | Function Description |
|---|---|
VCC | Power supply pin (connect to 3.3V/5V; most development boards are compatible with both voltages) |
DIO | 1-Wire communication pin (the core pin for data transmission) |
GND | Ground pin (must be connected, otherwise the sensor will not work) |
NC | NC (No connection, no wiring required) |
Brief summary: As long as you connect the three wires of "power supply (VCC), ground (GND), and data (DIO)" correctly to the sensor, it will work properly!
1.3 Summary
- DHT11/DHT22 are 1-wire temperature and humidity sensors, whose core advantages include simple wiring and low cost, making them suitable for beginners to get started;
- The DHT11 is suitable for simple measurements, while the DHT22 offers higher accuracy and a wider measurement range; you should choose the appropriate one based on your specific use case.
- The core pins of the sensor are VCC (power supply), GND (ground), DIO (data), and the NC pin does not need to be connected to any wire.
2. Usage of Basic Building Blocks
2.1 Initialization Block (Start DHT Sensor: type. .., pin. ..)
This block serves as the "power-on key" for the DHT sensor; without it, all subsequent operations will be completely futile!
First, figure this out: Why do we need initialization?
DHT sensors come in two models, DHT11 and DHT22, which differ in both their Communication Protocol and measurement accuracy — the DHT11 has lower accuracy while the DHT22 has higher accuracy. Meanwhile, the sensor can be connected to different GPIO pins. The function of this block is to inform the development board of two key pieces of information:"which type of DHT sensor I am using" and "which pin the sensor is connected to", so as to establish a dedicated communication connection between the development board and the sensor.
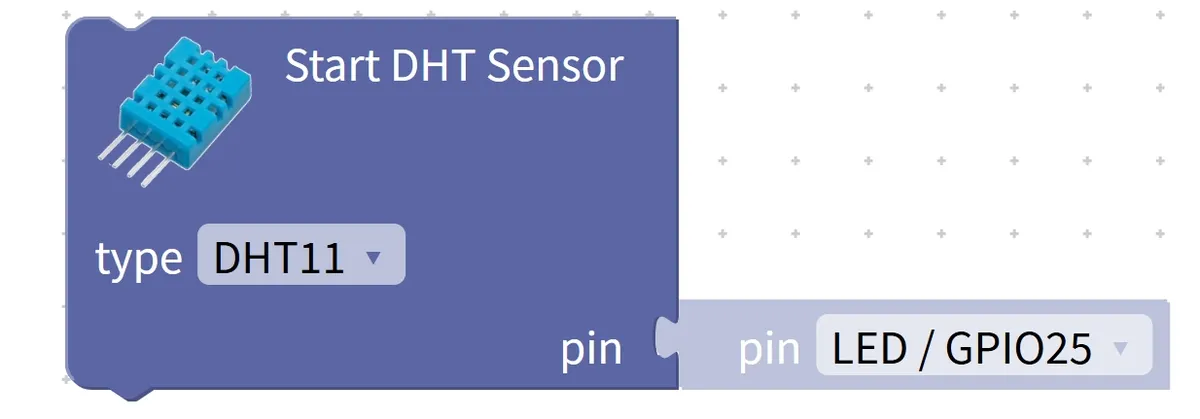
Chinese meaning: Start the DHT temperature and humidity sensor and select the sensor type (type) DHT11/DHT22, then specify the connected pin (pin).. ..
When the program runs to this block, the development board will send an initialization instruction to perform a "handshake" with the sensor. After a successful handshake, the sensor enters a "standby state" and is ready to measure data at any time. If you directly use the subsequent reading block without initialization, the program will report an error and fail to read any data at all — just like trying to enter your house without entering the password, the door simply won't open!
Tips
- Make sure to select the correct model! If you select the DHT11 instead of the DHT22 sensor, the read data will be severely inaccurate;
- Initialization only needs to be performed once! Just place this block at the very beginning of the program; there is no need to repeatedly initialize it inside a loop, otherwise it will waste resources.
- Do not connect the pins incorrectly! The pins selected during initialization must be consistent with the actually connected pins; otherwise, the sensor will "feign death" and fail to respond to commands.
✨ Interactive Quick Question
Think about it: What will happen if you skip the initialization block and directly use the "read temperature" block? (Answer: The program cannot recognize the sensor, and you will get invalid data or an error report!)
2.2 Enable the sensor data measurement block (Measure DHT11/22 Sensor)
After initialization is complete, the sensor will not actively measure data, and you need to use this block to send it a "measurement command" — which is equivalent to telling the sensor: "Hey, go measure the temperature and humidity now!"
First, let’s figure out: What is the function of measurement blocks?
DHT sensors operate in an on-demand measurement mode, meaning they will not perform any measurement unless triggered by an instruction. The function of this block is to trigger the sensor to execute a complete measurement cycle:
- The sensor collects temperature and humidity signals from the environment;
- Convert analog signals into digital signals;
- Temporarily store the data in the internal buffer and wait for the development board to read it.

This block must be used after the "Initialize Block (Start DHT Sensor)". If the sensor is not initialized first, the system will not know the sensor type and pin position, and thus cannot perform measurement.
Chinese meaning: measurement (Measure) DHT11 or DHT22 temperature and humidity sensor (DHT11/22 Sensor).
When the program runs to this block, the sensor immediately starts measurement, which takes about 20~100 milliseconds (the time varies by model). After the measurement is completed, the data will be stored in the buffer, but the specific value is not visible to the program at this point — just like when you finish taking your temperature with a thermometer without checking the reading, you have to use the "read block" to get the result.
Key Notes
- Must be used after initializing the blocks! If not initialized, the development board will not know the model and pins of the sensor, and cannot send measurement commands at all;
- Measurement takes time! Do not connect a read block immediately after a measurement block; it is recommended to add an optional 50-millisecond delay to ensure the data measurement is completed.
✨ Interactive Quick Question
Try it out: If you read the data directly without adding a delay after measuring the building blocks, will it affect the result? (Answer: You might end up reading incomplete data, or even the old data from the last time!)
2.3 Temperature Reading Block (Read DHT11/22 Temperature)
After the sensor stores the temperature and humidity data in the cache, it's time to use this block to "pick up the parcel" — that is, read out the temperature data for the program to use!
First, figure out: How do reading blocks get data?
This building block acts like a "courier" for the development board, specifically fetching the "temperature package" from the sensor's buffer. It reads the temperature value from the sensor 's most recent measurement, with the unit being ℃(degrees Celsius).

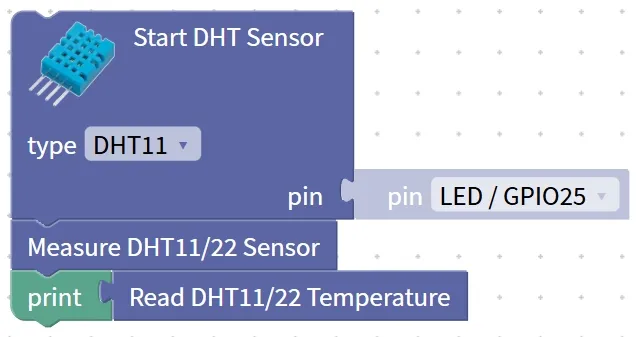
Chinese meaning: Read (Read) the temperature (Temperature) value of the DHT11 / DHT22 sensor.
When the program runs to this block, it will retrieve the temperature data from the sensor buffer and return a specific number (e. g., 25, 30.5), which can be directly used for printing, displaying, or conditional judgment.
Specific example: The program first performs initialization, then starts the DHT sensor for measurement, and subsequently reads the current temperature and displays it.
Tips
- Do not reverse the order! If you read the temperature first and then start the measurement, the data you read will be invalid (e. g., 0);
- They differ in accuracy! The temperature readings of the DHT11 are integers (e. g., 26°C), while the DHT22 can output decimal values (e. g., 26.3°C) — this is determined by their respective models.
✨ Interactive Quick Question
Quick Quiz: Which one has higher temperature measurement accuracy, DHT11 or DHT22? (Answer: DHT22! It features an accuracy of ±0.5℃, which is far more precise than DHT11's ±2℃~)
2.4 Humidity Reading Block (Read DHT11/22 Humidity)
This block is a "close sibling" to the temperature reading block, and its task is to retrieve humidity data from the sensor cache, with the unit being % RH (Relative Humidity).
First, let’s figure out: What’s the use of humidity data?
Relative humidity tells us how dry or humid an environment is — for example, a humidity level above 70% RH indicates a very humid environment prone to mold growth, while a level below 30% RH signals a very dry environment where static electricity is likely to occur.

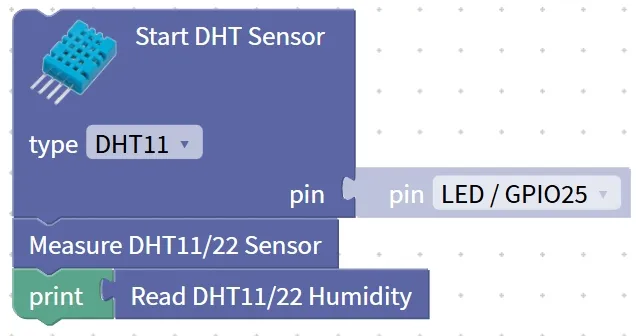
During the running of the program, when the humidity reading block is executed, the system will read the already measured humidity data from the sensor and return the humidity value to the program.
Chinese meaning: Read (Read) the humidity (Humidity) value of the DHT11 / DHT22 sensor.
Specific example: The program first performs initialization, then starts the DHT sensor for measurement, and subsequently reads the current humidity and displays it.
Tips
- One measurement, two readings! There is no need to take one measurement for temperature and another for humidity — you can get both temperature and humidity data in a single measurement, simply take two separate readings, which saves time;
- Humidity Range! The humidity measurement range of the DHT sensor is 0~100% RH, which can cover the vast majority of daily environments.
✨ Interactive Quick Question
Think about it: How do temperature and humidity usually change in an air-conditioned room? (Answer: The temperature drops, and the humidity also decreases, which is why air-conditioned rooms feel dry~)
3. Wiring Instructions
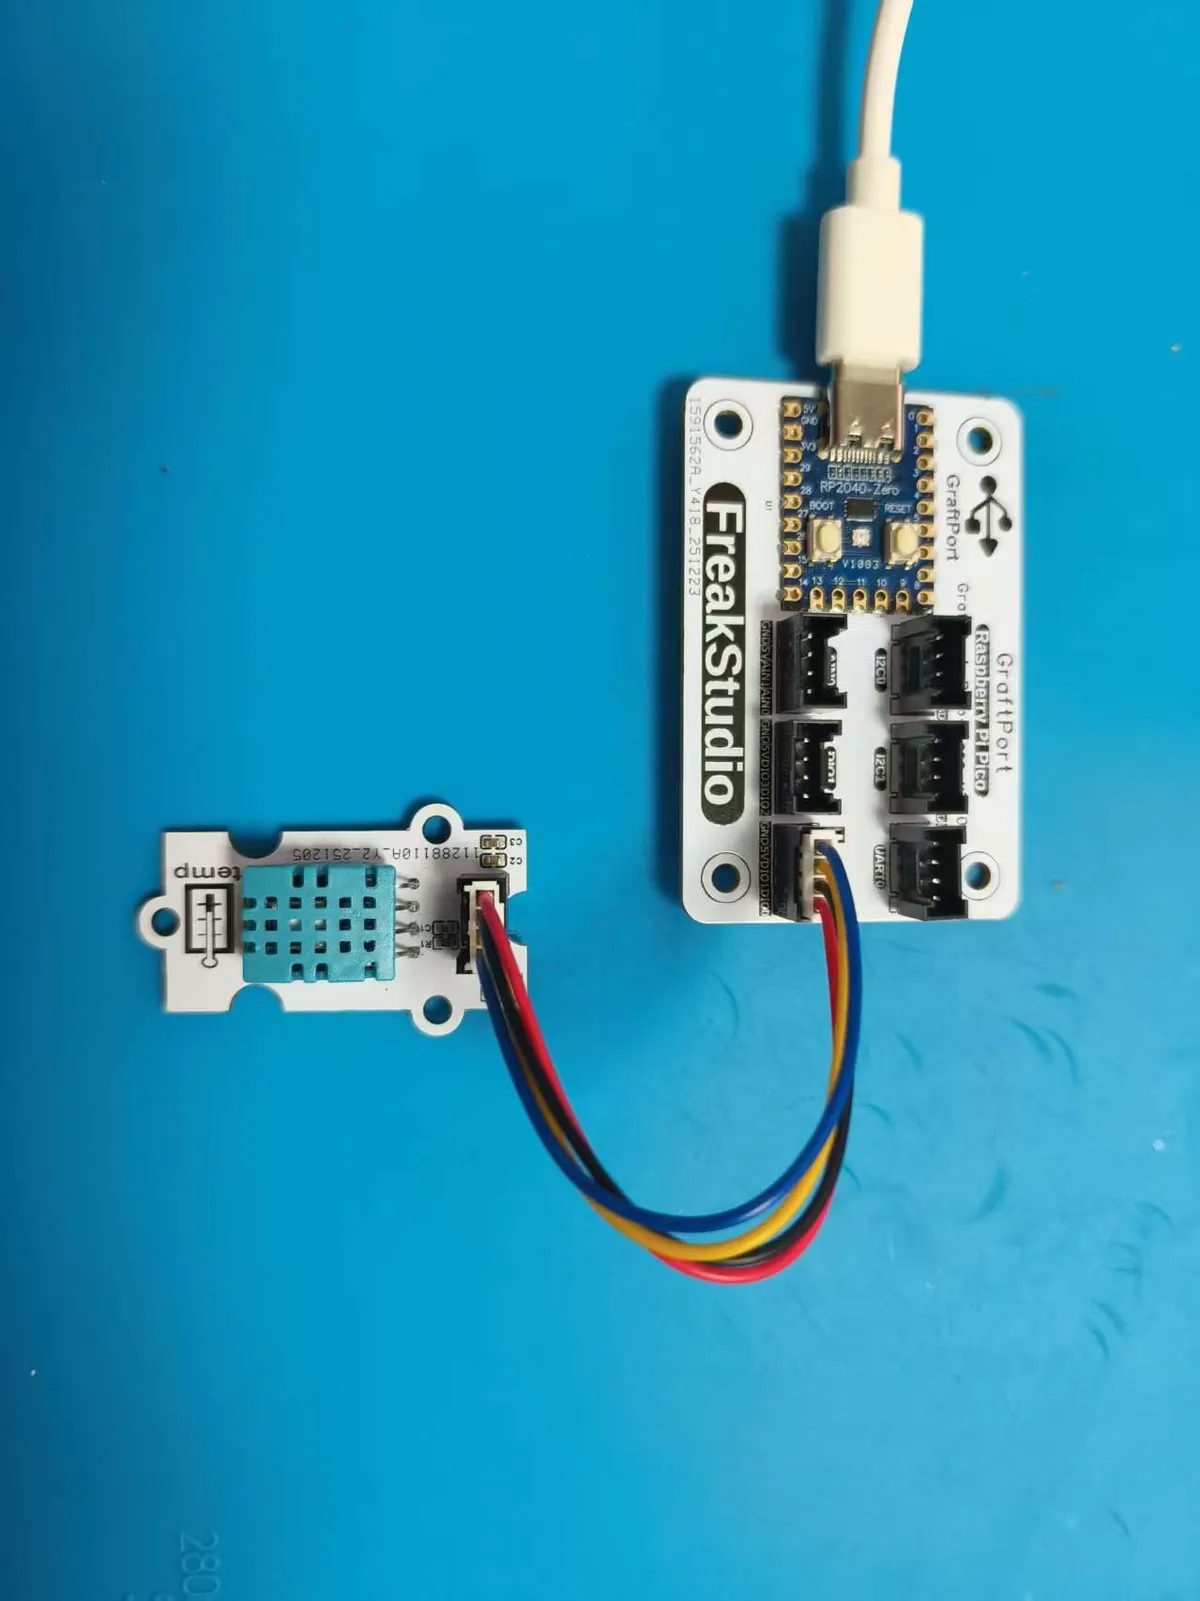
For the DHT sensor and the development board to "communicate properly", wiring is the foundation — the DHT sensor uses single-bus communication (data can be transmitted with just one data line), making wiring extremely simple. We will connect it to the DIO0 interface of the development board, so make sure to memorize the specific pin correspondence:
Development Board Pins | Module Pins | Description |
Pin 7 |
| 1-Wire communication pin |
Pin 8 |
| - |
4. Example: Temperature and Humidity Detection and Printing
Experiment Objective: Continuously detect ambient temperature and humidity with the DHT11 sensor, and print the temperature (℃) and humidity (% RH) on the terminal every 2 seconds. The data shall be accurate without errors, and even beginners can achieve success at the first attempt~
First, get to know the "idiosyncrasy" of the DHT11 sensor: The DHT11 is not a sensor that responds to every call immediately, and there is a hard requirement: there must be an interval of at least 2 seconds between two data readings! If you read it frequently (for example, once per second), the sensor will return "garbled code" and invalid data (such as a temperature of 99°C and a humidity of 0%), which is determined by its Communication Protocol, so you must follow this rule~
Building Block Assembly Steps (Step-by-Step Guide for You):
- Initialize the sensor:
- Select
Start DHT Sensorblock, settypetoDHT11, and setpintoPin 10/GPIO7→ to establish communication between the development board and the DHT11;
- Select
- Cycle Detection :
- Select
repeat while trueBlock → Continuously detect temperature and humidity;
- Select
- Read data:
- Add
Measure DHT11/22 Sensorblock → trigger the sensor to collect temperature and humidity data;
- Add
- Display Results:
- sequentially add
print “T:”,Read DHT11/22 Temperatureblock → display the temperature label and value; - Add
print “H:”,Read DHT11/22 Humidityblock → display the humidity label and value;
- sequentially add
- Latency:
- Add
delay 2 secondsblock → to meet the requirement of "reading at 2-second intervals" for the DHT11 sensor.
- Add
After running the program:
- The terminal refreshes data every 2 seconds, and the display format is as follows:
- Cover the sensor with your hand (to raise its temperature and humidity), and the reading will gradually increase;
- When you move the sensor to the air outlet of an air conditioner (for cooling and dehumidification), the reading will gradually decrease.
- There will be no garbled characters or error values throughout the process, with stable and accurate data~
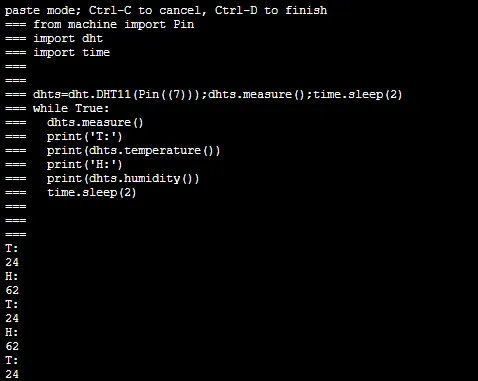
xml files, which can be directly imported into the blocks:
dht11.xml 4 KB
A Beginner’s Guide to Avoiding Common Pitfalls
- Failed to read data?
- Check whether the DIO pin is correctly connected to GPIO7, and verify if the pin parameter of the initialization block matches the requirement;
- Confirm that the sensor is DHT11 (do not select DHT22);
- Check whether the wiring is loose, especially the GND pin (if the GND is not connected properly, data will definitely not be read).
- Is the value jump too large?
- Do not place the sensor at the air outlet of an air conditioner or desk lamp; keep it away from heat sources and moisture sources.
- You can add the logic of "reading multiple times and taking the average value"(for example, reading 3 times and taking the median value) in the code to make the data smoother.
- Forgot to add a 2-second delay?
- The program will frequently report errors, or display invalid values such as "T: 0℃, H: 0%" and "T: 99℃, H: 99%", which must be added!
✨ Interactive Quick Question
- Think about it: What will happen if the delay is changed to 1 second? (Answer: The sensor will return incorrect data, the terminal will frequently print 0℃/99℃, and even report errors!)
- Try it: Add a unit to the print block (e. g., "T: 25℃") to make the terminal display more intuitive. Can you modify the block to achieve this by yourself?