
Contents
- 1. Pure number building blocks
- 2. Operation blocks (supporting operators such as +, −, ×, ÷, etc.)
- 3. Math function blocks (square root, absolute, -, ln, log10, etc.)
- 4. Trigonometric function blocks (sin, cos, tan, etc.)
- 5. Mathematical constant blocks (π, e, √2, √0.5, ∞, etc.)
- 6. Number property judgment blocks (even, odd, prime, whole, positive, etc.)
- 7. Rounding blocks (round, round up, round down)
- 8. List Statistical Operation Blocks (sum/min/max/average/median/modes…of list)
- 9. Remainder Block (remainder of)
- 10. Numerical Constraint Block (constrain [num] low [num] high [num])
- 11. Random Integer Block (random integer from [number] to [number])
- 12. Random Decimal Block (random fraction)
- 13. Integer Conversion Block (to int)
Young makers, earlier we learned to use loop blocks to make programs "perform repeated tasks" and control blocks to make programs "respond flexibly". But what should we do when a program has the need to "do some calculations"? For example, "calculate the difference between two temperature values", "judge whether the distance is greater than 50 centimeters", or "count the total number of times a loop is executed" — at such times, we need to equip the program with a "computing brain", which is exactly the math blocks we are going to learn today!
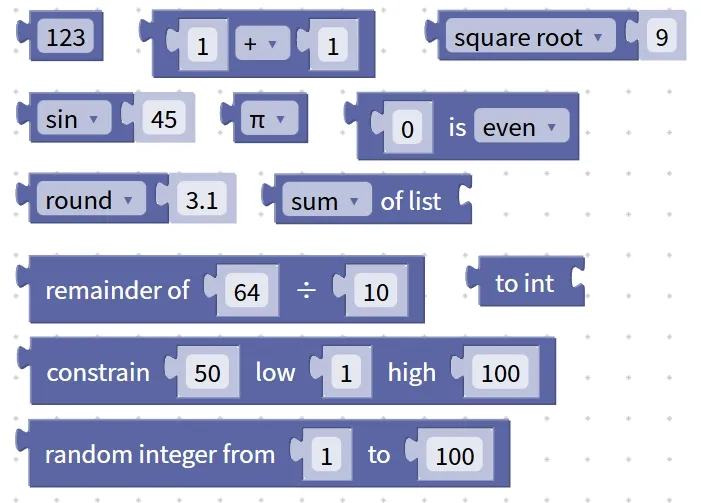
Math blocks are like the "portable calculator" of a program, dedicated to handling all kinds of calculation operations within the program, such as basic arithmetic like addition, subtraction, multiplication and division, as well as logical calculations like comparing the size of two numbers and judging whether they are equal. Without math blocks, a program can only execute fixed instructions; with them, a program can calculate results and make judgments on its own according to different data, truly gaining the ability to "think and calculate"~
In fact, scenarios requiring "computational thinking" are everywhere in daily life: calculating the total price when shopping, counting how many skips you've made while rope skipping, judging whether the measured temperature exceeds the target value. .. The math blocks in programming are designed to translate these real-life computational needs into operations that programs can understand. It is not only a "computation whiz" for programs, but also the foundation for subsequent complex judgments, precise control and data processing. Mastering it well will enable us to create smarter programs!
Sneak peek: When combined with the logic blocks and loop blocks we learned earlier, math blocks can unlock a huge number of practical functions! For example, "loop 10 times, increment the value by 1 each time and display the total sum", "calculate the distance, then determine whether to trigger an exit from the loop" — we’ll gradually walk through these combined use cases later~
✨ Pre-class Warm-up Activity
- Quick Quiz: What is the block that can provide "computing power" for a program? (Answer: Math block!)
- Think about it: What other things in your daily life "require calculation"? If you were to implement them with a program, would you need to use math blocks? (Hint: For example, calculating your homework score or your running time both require the help of math blocks~)
1. Pure number building blocks
Among all math blocks, pure number blocks are the most fundamental and straightforward type! Just like the number keys on a calculator, they don't perform any calculations on their own, but provide fixed values that serve as the "raw material" for all mathematical operations and conditional judgments — without them, subsequent addition, subtraction, multiplication, division, and size comparisons would be impossible to carry out.
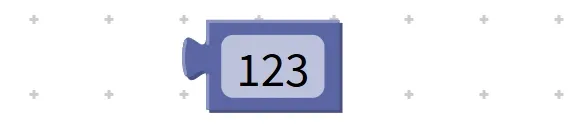
Chinese meaning: It refers to a fixed and unchanging value (such as 1,5, 20, 30.5, etc.), which can be directly used as basic data for calculation, judgment or variable assignment.
First, understand the core features of pure numeric building blocks, and you can remember them at a glance:
- Constant value: Once it is placed in a program, the number it represents is fixed. For example, if you input "5", it will always remain 5 during the program's operation unless you manually change it to another number;
- Not used alone: It cannot trigger any action on its own and must be used in combination with other blocks — for example, it can be connected with operation blocks to perform calculations, with comparison blocks to make judgments, or to assign values to variables.
Let's look at a few real-life examples to quickly understand its role as a "basic raw material":
Real-life Example 1: When you tell your mom "buy 3 apples", the number "3" here is a fixed value, which is equivalent to a pure numeric block in a program and serves as the basic data for the "buy apples" operation;
Real-life Example 2: When a teacher says "a test score above 60 counts as passing", the number "60" here is also a fixed value that serves as the criterion for judging whether one passes, just like using a pure number block paired with a comparison block to make a judgment.
Let's look at the practical examples in programming, and understand how to use them in combination with our hardware devices:
Practical Example 1: Performing Basic Calculations with Operation Building Blocks
- Requirement: Calculate "5+ 3" and display the result;
- Step 1: Find the pure number building blocks "5" and "3";
- Step 2: Find the "addition" operation block, and put "5" and "3" into the two value boxes of the addition block respectively;
- Step 3: Match the combined "5+ 3" block with the "display" block;
- Logical explanation: The pure number blocks provide two basic data, "5" and "3", the addition block is responsible for the calculation, and the final result displayed is "8" — without the pure number blocks, the addition operation would be "cooking a meal without any ingredients".
Practical Example 2: Performing Conditional Judgments with Comparison Blocks
- Requirement: Judge whether "the temperature is higher than 30 degrees Celsius", and if yes, turn on the red light;
- Step 1: Find the pure numeric block labeled "30";
- Step 2: Find the "greater than" comparison block, and place the "temperature sensor value" and "30" into the comparison boxes respectively;
- Step 3: Put the comparison block into the condition area of the "if. .. then. .." logic block, followed by the action of "turn on the red light";
- Logic explanation: The pure number block "30" serves as the judgment standard. The program will compare the temperature detected by the sensor with it to determine whether to turn on the light.
Practical Example 3: Assign Values to Variables
- Requirement: Set the initial value of the "volume" variable to "5";
- Step 1: Locate the variable block "Set volume to …";
- Step 2: Put the pure numeric block "5" into the variable assignment box;
- Logic description: The pure number block provides a fixed initial value, which gives the variable a clear initial state, so that the program can directly use this value to control the buzzer volume in subsequent operations.
Quick reminder: Although pure number blocks are simple, they play a vital role! Just like the "bricks" for building a house, they form the foundation of all math-related functions. All the complex calculations and judgments we will learn later rely on the fixed values they provide~
✨ Exclusive Mini Interaction: Pure Numerical Block Grand Challenge
- Quick Response Quiz 1: What is the core function of pure numerical blocks? (Answer: To provide fixed, unchanging base values!)
- Quick Response Quiz 2: Can pure number building blocks be used alone? (Answer: No, they must be paired with other building blocks!)
- Think about it: We want to make the LED light up for 2 seconds. Do we need to use a pure number block? If yes, what is its function? (Hint: Yes, we do! The pure number block "2" provides the lighting duration, and it is used together with the "turn on light" block~)
- Scenario judgment: If a pure number block "10", a "subtraction" block and another pure number block "4" are placed in the program, what will be the final result? (Answer: 6! 10-4= 6~)
2. Operation blocks (supporting operators such as +, −, ×, ÷, etc.)
In the previous section, we learned about pure number blocks, which are like the "basic raw materials" for mathematical calculations and provide fixed, unchanging values. However, raw materials alone are not enough—we also need "processing tools" to work out the results. Today's operation blocks, which act as the "portable calculation core" of a program, are specifically responsible for performing operations such as addition, subtraction, multiplication, and division on numerical values, processing the input values into new results, and endowing the program with genuine "dynamic computing capability"!
Just as when using a calculator, you first press the number keys (corresponding to pure number blocks) and then press the addition, subtraction, multiplication, or division keys (corresponding to operation blocks) to get the calculation result, operation blocks are the key to connecting "basic values" and "final results". They can handle various values such as pure numbers, sensor data, and variable values, and the operation results can be directly used for assignment, comparison, or display, making them extremely practical!
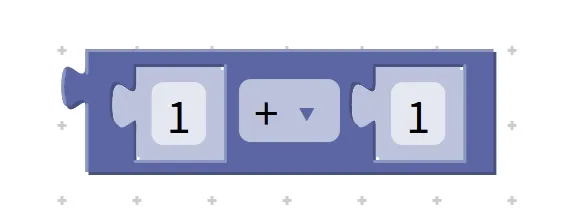
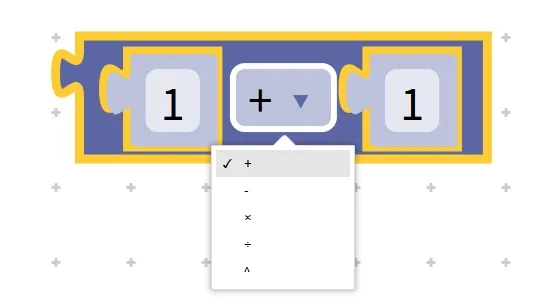
Chinese meaning: Perform mathematical operations (addition +, subtraction −, multiplication ×, division ÷) on numerical value A and numerical value B, and output the operation result.
First, understand the core features and components of operation blocks, and you can easily master how to use them:
- Core Features: Dynamically generated results: The calculation result is not fixed, but entirely determined by the two input values and the selected operator. For example, if you input "5" and "3", selecting "+" will give you 8, while selecting "×" will give you 15; whenever the input values change, the program will automatically recalculate the result during runtime.
- Components: It consists of "two numerical input boxes" and "one operator selection area". The numerical input boxes serve as the "raw material inlet", which can hold pure number blocks, sensor data blocks such as temperature and distance, variable blocks, etc. ; the operator selection area acts as the "processing mode", where common mathematical operations such as addition, subtraction, multiplication and division can be selected.
First, let’s look at a few real-life examples to quickly understand the "computational processing" function of operation blocks:
- Real-life Example 1: If you buy 2 notebooks priced at 5 yuan each, the total price is calculated as "2×5= 10". Here, "2" and "5" are input values (corresponding to pure number blocks), "×" is the operator (corresponding to the processing mode of operation blocks), and "10" is the operation result, which perfectly matches the working logic of operation blocks;
- Real-life Example 2: If you jump rope 35 times in the first round and 42 times in the second round, you calculate the total number of jumps as "35+ 42= 77". Here, "35" and "42" are the input values, "+" is the operator, and "77" is the result — this is just like how operation blocks complete an addition operation.
- Real-life Example 3: When distributing 12 candies equally among 3 children, calculating how many candies each child gets requires the operation "12÷3= 4". Here, "12" and "3" are input values, "÷" is the operator, and "4" is the result, which corresponds to the division function of the operation building blocks.
Then let's look at the practical examples in programming, which are combined with our hardware devices and can be put to direct use right after you finish learning:
- Practical Example 1: Basic Operation — Calculate the Sum of Two Pure Numeric Values and Display the Result

- Requirement: Calculate the result of "5+ 3" and display it on the display screen;
- Step 1: Find the blocks for addition operation in the block area;
- Step 2: Place the pure number blocks "5" and "3" into the two value input boxes of the addition block respectively;
- Step 3: Place the combined "5+ 3" operation block into the content area of the "display" block;
- Operating logic: When the program runs, the calculation block automatically computes "5+ 3= 8", passes the result "8" to the display block, and finally "8" will be clearly shown on the display screen. If you replace "5" with "6", the program will automatically calculate "6+ 3= 9" without modifying any other blocks, which is extremely flexible.
- Practical Example 2: Processing Sensor Data — Calculating Temperature Difference and Triggering Alerts
- Requirement: Read the current ambient temperature, and calculate the difference between it and the target temperature of 25 degrees Celsius; if the difference is greater than 5 degrees Celsius, turn on the yellow light to indicate that the temperature deviation is too large;
- Step 1: Find the subtraction block, place the "temperature sensor data" block (current temperature) in the first input box, and place the pure number block "25"(target temperature) in the second input box;
- Step 2: Find the "greater than" comparison block, place the combined subtraction operation block (temperature difference) in the first input box, and place the pure number block "5" in the second input box;
- Step 3: Place the comparison block into the condition section of the "if-then" logic block, and connect an action block of "turn on the yellow light for 1 second" after the condition section;
- Operating logic: The program first automatically calculates the difference between "current temperature - 25", then determines whether the difference is greater than 5. For example, if the current temperature is 32°C, 32-25= 7>5, and the yellow light turns on; if the current temperature is 28°C, 28-25= 3≤5, and the yellow light stays off, thus realizing intelligent judgment of temperature deviation.
Pro Tip: Quick Reminders for Using Operation Blocks – Must-Know to Avoid Pitfalls!
- Choose the right operator: pick from the following based on your needs
+,−,×,÷; for example, use "×" for calculating total price and "−" for calculating difference, so don't pick the wrong one; - Avoid division by zero: when performing a division operation, you cannot enter "0" in the second value input box (for example, "5÷0"); just like it is impossible to "distribute 5 apples to 0 people" in real life, this will cause a program error;
- Numeric types should match: try to perform operations with values of the same type, for example, all integers (1,2, 3) or all decimals (1.5, 2.3), to avoid unexpected results.
✨ Exclusive Mini Interaction: Operation Building Block Challenge
- Quick Response 1: What are the blocks that can perform mathematical operations such as addition, subtraction, multiplication and division called? (Answer: Operation Blocks!)
- Quick Response Quiz 2: Are the results of operation blocks fixed? (Answer: No! They are dynamically generated based on the input values and operators~)
- Think: To achieve the function of "calculating the result of 8 minus 4 and displaying it", which blocks do we need? (Hint: subtraction operation block, pure number blocks "8" and "4", display block, etc.)
- Scenario Judgment: If you build a program that "uses multiplication operation blocks to calculate 3×4 and then display the result", what number will be displayed in the end? (Answer: 12! 3×4= 12~)
- Hands-on Association: Try to describe a real-life scenario where you use operation blocks, such as "calculating the total price of 3 bottles of drinks at 2 yuan per bottle", then explain what the corresponding input values, operators, and operation result are respectively~
Core Quick Summary: Operation blocks are the "portable computing core" of a program, whose core function is to perform operations such as addition, subtraction, multiplication and division on values to dynamically generate new results. Consisting of two value input boxes and an operator selection area, they need to be used with values like pure numbers, sensor data and variables, and their output can be directly applied to assignment, comparison or display. When paired with logic blocks and loop blocks, they can also realize more complex intelligent computing functions, serving as the core support for the "computing power" of the program~
3. Math function blocks (square root, absolute, -, ln, log10, etc.)
In the previous section, we learned about basic operation blocks, which can handle simple calculations such as addition, subtraction, multiplication and division. However, when it comes to more complex calculation requirements, such as "calculating the square root of a number", "finding the absolute value of a negative number" and "computing the power of a certain number", the basic operation blocks are no longer sufficient! At this point, we need to bring out the mathematical function blocks, this "advanced calculation toolkit" — it contains various practical mathematical functions that can help programs complete more professional calculations and further upgrade the "computing power" of programs!
A math function block works just like the "special calculation formulas" we see in math textbooks, such as the square root symbol √, the absolute value notation |a|, the exponent form aⁿ, and so on. Instead of piecing together complex calculation steps on our own, we only need to select the corresponding function, input the value to be calculated, and get the result directly. It is especially suitable for scenarios that require advanced calculations, such as scientific computing and data processing.
Chinese meaning: Performs a specified mathematical function operation (such as square root √, absolute value abs, negation −, common logarithm log10, power operation pow, exponentiation exp, etc.) on one or two input values, and outputs the corresponding operation result.
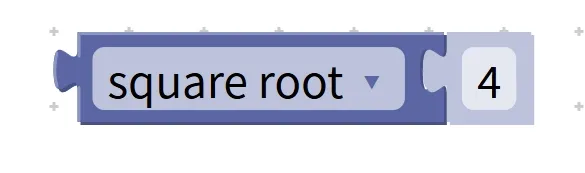
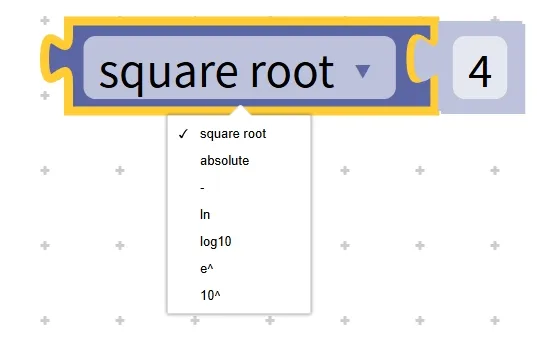
First, understand the core features and components of the mathematical function blocks, and you can easily master how to use them:
- Core Features: Focus on "special calculations" — addressing advanced requirements that basic operations cannot handle, such as processing negative numbers, calculating powers, finding logarithms, etc. ; different functions have different calculation rules and varying requirements for input values (for example, the square root function cannot take negative numbers as input);
- Components: Consists of a "function selection area" and a "value input box". The function selection area acts as a "tool switch" for selecting the required mathematical function; the value input box serves as the "calculation material entry", where most functions only require 1 input value, while a few functions (such as exponentiation) require 2 input values (e. g., base and exponent), and the input values can be pure numbers, sensor data or variable values.
First, let's get to know several common mathematical functions and understand what they do:
- Square root function (square root): It calculates the square root of a non-negative number, for example, √16= 4, √25= 5; only 0 or positive numbers can be input, and negative numbers cannot be input (for example, √-9 is invalid);
- Absolute value function (absolute): It calculates the absolute value of a number (the result is always a non-negative number regardless of whether the original number is positive or negative), for example, abs (-3)= 3, abs (5)= 5, abs (-2.5)= 2.5; it is often used to process negative data to make values easier to analyze;
- Negation function (-): Adds a negative sign to the input value; for example, inputting 5 yields -5, and inputting -3 yields 3.
- Common logarithm function (log10): Calculates the common logarithm (logarithm with base 10) of a positive number. For example, log10 (100) = 2 (since 10² = 100), log10 (1000) = 3; only positive numbers are allowed as input;
- Power function (pow): Calculates the power of a number (requires two input values: base and exponent), for example pow (10,4)= 10⁴= 10000, pow (2,3)= 2³= 8;
- Exponential function (exp): Calculates the power of the natural constant e (approximately equal to 2.718), for example, exp (1)= e¹≈2.718, exp (2)= e²≈7.389;
Here are a few real-life examples to quickly understand the role of mathematical functions:
Real-life Example 1: The area of a square is 16 square centimeters, find its side length. The side length is the square root of the area; using the square root function √16= 4, we can calculate that the side length is 4 centimeters;
Real-life Example 2: Xiaoming's home is 50 meters east of the school (recorded as + 50 meters), and Xiaohong's home is 30 meters west of the school (recorded as -30 meters). Find the difference in the distances of the two homes from the school (direction is not considered). Use the absolute value function, abs (50) and abs (-30), to get that the distances of the two homes from the school are 50 meters and 30 meters respectively, then the difference can be calculated by subtraction;
Real-life Example 3: The side length of a square floor tile is 2 decimeters, find the square of its area (for example, when paving a floor, it is necessary to calculate the power of the total square footage). Using the power operation function pow (2², 2)= pow (4,2)= 16, the result can be obtained directly.
Then let's look at the practical examples in programming, which are combined with hardware devices and can be put to direct use right after you finish learning:
Practical Example 1: Exponentiation Operation — Calculate 10 to the power of 4 and display the result
- Requirement: Calculate 10 to the power of 4 (10⁴) and display the result on the display screen;
- Step 1: Find the power operation function (pow) block from the block area;
- Step 2: Place the pure number blocks "10"(base) and "4"(exponent) into the two value input boxes of the exponentiation block respectively;
- Step 3: Place the combined exponentiation block into the content area of the "show" block;
- Operation logic: When the program runs, the exponentiation function automatically calculates 10⁴ = 10000, and passes the result "10000" to the display block, which finally shows "10000" on the display screen.

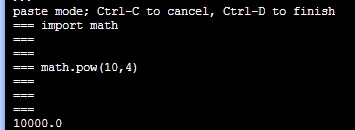
Practical Example 2: Absolute Value Function — Processing Temperature Differences (Ignoring Positive or Negative Signs)
- Requirement: Read the current ambient temperature, calculate the difference between it and the target temperature of 25 degrees Celsius (the difference can be positive or negative), take the absolute value of the difference, and turn on the yellow light for indication if the absolute value is greater than 5 degrees Celsius;
- Step 1: Find the subtraction block, place the "temperature sensor data" block in the first input box, and place the pure number block "25" in the second input box to obtain the temperature difference;
- Step 2: Find the absolute value function (abs) block, and put the result of the subtraction operation block into the value input box of the absolute value function;
- Step 3: Find the "greater than" comparison block, place the combined absolute value function block in the first input box, and place the pure number block "5" in the second input box;
- Step 4: Put the comparison block into the condition area of the "if. .. then. .." logic block, followed by the action block of "turn on the yellow light for 1 second";
- Operating logic: The program first calculates the difference between the current temperature and 25 degrees Celsius (for example, if the current temperature is 20°C, the difference is -5; if the current temperature is 32°C, the difference is 7), then takes the absolute value (abs (-5)= 5, abs (7)= 7), and finally determines whether the absolute value is greater than 5. If the current temperature is 20°C, abs (-5)= 5, so the indicator light does not turn on; if the current temperature is 32°C, abs (7)= 7>5, so the indicator light turns on; if the current temperature is 19°C, abs (-6)= 6>5, so the indicator light turns on, thus realizing temperature deviation judgment that ignores positive and negative signs.
Practical Example 3: Square Root Function — Calculate and Display the Side Length of a Square
- Requirement: Given the area of a square (stored in the variable "area" with an initial value of 25), calculate its side length and display the result;
- Step 1: Find the variable block "set area to 25" and place it at the very beginning of the program (to initialize the variable);
- Step 2: Find the square root function block, and place the "area" variable block into the value input field;
- Step 3: Put the square root function block into the content area of the "show" block;
- Operation logic: When the program runs, it first sets the "area" to 25, the square root function automatically calculates √25 = 5, and the display shows "5". If the "area" is changed to 16, the program will automatically calculate √16 = 4, flexibly adapting to different values.
Pro Tip: Quick Reminders for Using Math Function Blocks — Must-Know to Avoid Pitfalls!
- Choose the right function type: Select the corresponding function according to your needs, for example, use pow for exponentiation and abs for absolute value calculation, and do not choose the wrong function;
- Note the input requirements: Some functions have restrictions on input values. For example, negative numbers cannot be entered for square root or log10, otherwise the program will report an error;
- Differentiate the number of inputs: Most functions only require 1 input value (e. g. abs, √), while a few require 2 (e. g. pow), so pay attention to the number of input fields of the block;
- Result Interpretation: The outputs of some functions are approximate values (e. g., exp, log10). For instance, exp (1) ≈ 2.718, which is a normal mathematical calculation result.
✨ Exclusive Mini Interaction: Math Function Block Challenge
- Quiz 1: If you want to calculate 10 to the power of 4, which mathematical function should you use? (Answer: The power function pow!)
- Quick Response Quiz 2: What is the function of the absolute value function? (Answer: It calculates the absolute value of a number; regardless of whether the number is positive or negative, the result is always a non-negative number~)
- Think: If we want to calculate and display the result of √36, which blocks do we need? (Hint: square root function block, pure number block "36", display block~)
- Scenario Judgment: If you build a program that "uses the absolute value function to process -8 and then displays the result", what number will be displayed in the end? (Answer: 8! abs (-8)= 8~)
- Hands-on Association: Try to describe a real-life scenario that uses a mathematical function, such as "finding the square root of the area of a square with a side length of 3 decimeters", then explain what the corresponding function, input value and operation result are respectively~
Core Quick Summary: Math function blocks are the "advanced computing toolkit" for programs, whose core function is to handle advanced mathematical calculations that basic operations cannot solve. It consists of a function selection area and a value input box; common functions include square root, absolute value, exponentiation, etc. , and different functions have different input requirements and calculation rules. When used with pure numbers, variables, sensor data and other inputs, it can realize functions such as scientific calculation and data processing, making the "computing power" of the program more comprehensive~
4. Trigonometric function blocks (sin, cos, tan, etc.)
Besides the mathematical functions we learned earlier, there are also calculation tools specifically for handling "angles" in programs — trigonometric function blocks! Just like the "angle assistant" in our math studies, they can perform trigonometric function calculations such as sine (sin), cosine (cos), and tangent (tan), and are dedicated to solving problems related to angles and ratios. Whether it is analyzing the motion trajectory of an object or modeling periodically changing phenomena, such as the swing of a pendulum or the gradient of lighting, they are indispensable, making the "advanced computing power" of programs more suitable for mathematical and physical scenarios~
The core of the trigonometric function blocks lies in "interpreting the relationship between angles and side lengths". For example, in a right triangle, sine is the ratio of the opposite side to the hypotenuse, cosine is the ratio of the adjacent side to the hypotenuse, and tangent is the ratio of the opposite side to the adjacent side. In programming, we don't need to derive these relationships manually; we just select the corresponding trigonometric function, input the angle value, and get the result directly, which is extremely convenient!
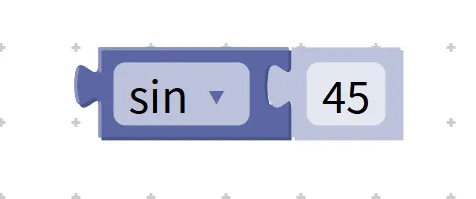
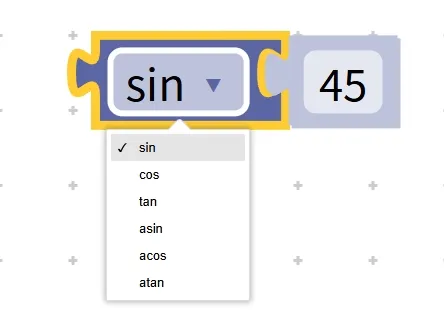
Chinese meaning: Perform specified trigonometric function calculations (such as sine sin, cosine cos, tangent tan, etc.) on the input value, and output the corresponding operation result.
First understand the core features and components of the trigonometric function blocks, and you can easily master how to use them:
- Core Features: Focus on "angle calculation" — all calculations are centered around angles, and different trigonometric functions correspond to different angle-ratio relationships; the input angle value is usually in "radians" or "degrees"(depending on the specific settings of the programming software, most of which will be marked), and the calculation result is a decimal (e. g., sin30°= 0.5);
- Components: It consists of a "trigonometric function selection area" and an "angle input box". The trigonometric function selection area allows you to select sin, cos, tan, etc. ; the angle input box serves as the "raw material entry", where you can input pure numbers (angle values), variables, or angle data detected by sensors (such as the tilt angle detected by a gyroscope).
First, let's get to know the three most commonly used trigonometric functions and understand their basic functions (take a right triangle as an example for a simple explanation):
- Sine function (sin): In a right triangle, it equals "the length of the opposite side divided by the length of the hypotenuse"; for example, sin30°= 0.5 and sin90°= 1; it is often used to calculate angle problems related to "height", such as the height change of a tilted object;
- Cosine function (cos): In a right triangle, it is equal to "length of the adjacent side ÷ length of the hypotenuse"; for example, cos0°= 1, cos60°= 0.5; it is often used to calculate angle problems related to "horizontal distance", such as the horizontal displacement of a moving object;
- Tangent function (tan): In a right triangle, it is equal to "the length of the opposite side divided by the length of the adjacent side"; for example, tan45° = 1, tan30° ≈ 0.577; it is often used to calculate problems related to "slope" and "inclination angle", such as the steepness of a ramp.
Here are a few real-life examples to quickly understand the function of trigonometric functions:
- Real-life Example 1: The hypotenuse of a slope is 10 meters long and the inclination angle is 30°, find the height of the slope. Use the sine function sin30° = height ÷ 10, then height = 10 × sin30° = 10 × 0.5 = 5 meters, and thus the height can be calculated as 5 meters;
- Real-life Example 2: The pendulum has a length of 50 centimeters. When the angle between the pendulum bob and the vertical direction is 60°, calculate the horizontal distance the pendulum swings. Use the cosine function cos60° = horizontal distance ÷ 50, so the horizontal distance = 50 × cos60° = 50 × 0.5 = 25 centimeters;
- Real-life Example 3: A ladder leans against a wall, with the base of the ladder 3 meters away from the wall and the top of the ladder at a height of 3 meters above the ground. Find the angle between the ladder and the ground. Using the tangent function tanθ = height ÷ base distance = 3 ÷ 3 = 1, so θ = 45°, meaning the ladder forms a 45° angle with the ground.
Then let's look at the practical examples in programming, which are combined with hardware devices and can be put to direct use right after you finish learning:
Practical Example 1: Sine function — Calculate the sine value of 30° and display the result
- Requirement: Calculate the sine value of 30°(sin30°) and display the result on the display screen;
- Step 1: Find the sine function (sin) block from the block area;
- Step 2: Confirm the angle unit of the programming software (if it is "degrees"), and place the pure number block "30" in the angle input box;
- Step 3: Place the assembled sine function block into the content area of the "Show" block;
- Operation logic: When the program runs, the sine function automatically calculates sin30° = 0.5, passes the result "0.5" to the display block, and finally "0.5" is displayed on the screen. If "30" is changed to "90", the program will automatically calculate sin90° = 1.
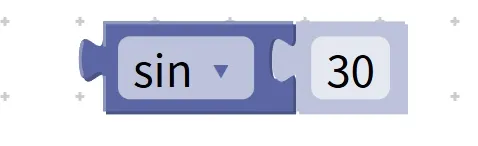
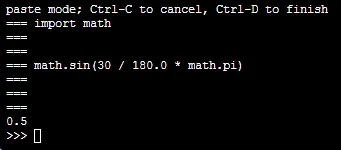
Practical Example 2: Combined with Sensor — Control LED Brightness Based on Tilt Angle (Application of Sine function)
- Requirement: Use a gyroscope sensor to detect the tilt angle of the device (range: 0°-90°), calculate the brightness value corresponding to the angle via the sine function (sin0°= 0, minimum brightness; sin90°= 1, maximum brightness), and control the brightness of the LED lamp to change with the tilt angle;
- Step 1: Find the gyroscope sensor block and obtain the "tilt angle" data;
- Step 2: Find the sine function (sin) block, and put the "tilt angle" block into the angle input box;
- Step 3: Find the "Set LED Brightness" block (the brightness value ranges from 0 to 1), and put the output of the sine function block into the brightness input field;
- Operating logic: The program reads the tilt angle in real time, calculates the corresponding sine value and uses it as the brightness value. When the device is placed horizontally (at an angle of 0°), sin0° = 0, and the LED turns off; when the device is placed vertically (at an angle of 90°), sin90° = 1, and the LED reaches maximum brightness; when the tilt angle is between 0° and 90°, the brightness gradually increases as the angle grows, achieving a smooth brightness transition effect.
Pro Tip: A Quick Reminder on Using Trigonometric Function Blocks — Must-Know to Avoid Pitfalls!
- Note the unit of angle: Most programming software supports two units for trigonometric functions, namely "radian" and "degree". Be sure to confirm the settings (for example, the results of sin 30° and sin (π/6) in radians are both 0.5); if the unit is wrong, the result will be completely incorrect.
- Special values of the tangent function: tan90° is invalid (the denominator is 0), so 90° or the corresponding radian value cannot be input, otherwise the program will report an error;
- Result range: The results of sin and cos always lie between -1 and 1, while the result of tan has no fixed range and varies with the angle.
- Usage with other operations: In practical scenarios, it is often used in combination with multiplication and division blocks. For example, the height of the opposite side can be obtained by multiplying the sin angle by the length of the hypotenuse.
✨ Exclusive Mini Interaction: Trigonometric Function Block Challenge
- Quiz 1: If you want to calculate the sine value of 30°, which trigonometric function should you use? (Answer: The sine function sin!)
- Quick Response Quiz 2: What is the range of results for the sin and cos functions? (Answer: Between -1 and 1~)
- Think about it: If we want to calculate and display the cosine value of 60°, which blocks do we need to use? (Hint: cosine function block, number block "60", display block, and remember to confirm the angle unit~)
- Scenario Judgment: If you build a program that "uses the sine function to calculate the sine value of 90° and then displays the result", what number will be displayed in the end? (Answer: 1! sin90°= 1~)
- Hands-on Association: Try to describe a real-life scenario that uses trigonometric functions, such as "finding the height of a slope with an inclination angle of 45°", then explain what the corresponding function, input value and calculation result are respectively~
Core Quick Summary: The trigonometric function block is a "magic tool for angle calculation" in programs. Its core function is to complete angle-related calculations such as sine, cosine and tangent, providing support for scenarios including angle analysis and motion trajectory modeling. It consists of a trigonometric function selection area and an angle input box, with the input value being an angle (or radian), and the result can be directly used for control, comparison or display. Paired with sensors and logic blocks, it can realize intelligent control functions that are closer to physical scenarios, making the "computing power" of the program more professional~
5. Mathematical constant blocks (π, e, √2, √0.5, ∞, etc.)
Earlier, we learned about mathematical functions and trigonometric functions that require input values to perform calculations. In fact, there is another type of "ready-made precise value" in programs — the mathematical constant block! It is just like the "standard reference value" in mathematics. For example, the pi π used when solving circle-related problems and the Euler's number e used when calculating exponent problems do not require us to manually input approximate values; we can use them directly, which makes calculations more accurate and convenient, and they are a "great helper" for scientific computing and formula modeling~
The values in the math constant blocks are fixed values defined by scientists, such as π≈3.1415926535 and e≈2.7182818284. These values do not change as the program runs, and are as stable as pure number blocks, yet more precise than the approximate values we enter manually, making them especially suitable for computing scenarios that require high precision.
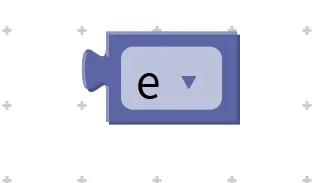
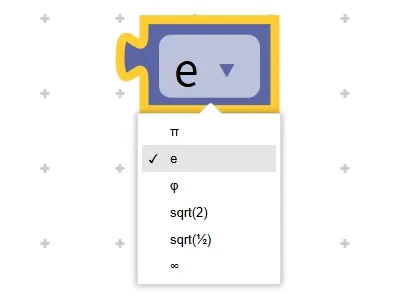
Chinese meaning: It refers to a predefined fixed mathematical constant value (such as the pi π, the Euler's number e, the square root constants √2 and √0.5, the infinity ∞, etc.), which can be directly used for calculation, comparison or variable assignment.
First, understand the core features and components of the math constant blocks, and you can easily master how to use them:
- Core Features: Predefined and fixed values — the values of all constants are set in advance and will not change during program execution; for example, π is always approximately 3.1415926535, and e is always approximately 2.7182818284; Ultra-high precision — far more accurate than approximate values we manually enter such as "3.14" and "2.72", which can guarantee the accuracy of calculation results;
- Component: It is usually a "constant name selection area" or directly a block with a constant identifier (such as a standalone π block or e block). You don't need to enter any numerical value — just select the corresponding constant name, and it can be directly used as a numerical value to participate in calculations.
First, let's get to know several common mathematical constants and understand their functions:
- Pi (π): The ratio of the circumference of a circle to its diameter, approximately equal to 3.1415926535; it is specifically used for calculating the circumference and area of a circle, for instance, circumference = 2 × π × radius, area = π × radius²;
- Natural Constant (e): the base of the Natural Logarithm, approximately equal to 2.7182818284; it is commonly used in calculations related to exponential growth and decay, such as modeling scenarios like bacterial reproduction and radioactive element decay;
- Square Root Constants (√2, √0.5): √2 ≈ 1.4142, √0.5 ≈ 0.7071; commonly used in geometric calculations, for example, the diagonal length of a square = side length × √2;
- Infinity (∞): A value that denotes boundlessness; it is commonly used in comparison scenarios, such as determining whether a given value approaches infinity or serving as a limiting condition.
Here are a few real-life examples to quickly understand the role of mathematical constants:
Real-life Example 1: Calculate the circumference of a circular badge with a diameter of 4 centimeters. The formula for circumference is π × diameter, and using the constant π allows for an accurate calculation: circumference ≈ 3.1415926535 × 4 ≈ 12.566 centimeters;
Practical Example 2: The side length of a square is 5 cm, find the length of its diagonal. Diagonal length = side length × √2; calculated with the constant √2, the result ≈ 5 × 1.4142 ≈ 7.071 cm;
Real-life Example 3: Simulate bacterial reproduction: the number of bacteria grows exponentially over time, and the growth formula involves the natural constant e, which enables accurate modeling of the reproduction process when used as a constant.
Then let's look at the practical examples in programming, which are combined with hardware devices and can be put to direct use right after you finish learning:
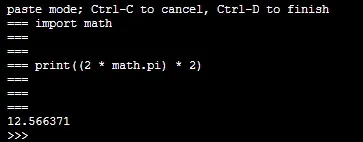
Practical Example 1: Use the π constant to calculate the circumference of a circle with a radius of 2 and display the result
- Requirement: Calculate the circumference of a circle with a radius of 2 (circumference formula = 2 × π × radius), and display the result on the screen;
- Step 1: Find the multiplication operation blocks from the block area (you need two of them, since we are multiplying three values: 2, π, 2);
- Step 2: Put the pure number block "2" and the mathematical constant block "π" into the two input boxes of the first multiplication block respectively;
- Step 3: Put the output of the first multiplication block and the pure number block "2"(radius) into the two input boxes of the second multiplication block respectively;
- Step 4: Place the assembled multiplication operation block into the content area of the "display" block;
Operation logic: When the program runs, it automatically calculates 2×π×2≈2×3.1415926535×2≈12.566371, passes the result to the display block, and finally displays "12.566371" on the screen, which is accurate and eliminates the need to manually input the approximate value of π.

Practical Example 2: Using the π constant + sensor — Calculate the circumference based on the diameter of a circular object and provide a prompt
- Requirement: Use a distance sensor to detect the diameter of a circular object (assuming the distance measured by the sensor equals the diameter), calculate the circumference using the constant π; if the circumference is greater than 15, turn on the green light and display the prompt "Large circle";
- Step 1: Locate the distance sensor block and obtain the "detected distance" data (i. e., the diameter of the circular object);
- Step 2: Find the multiplication operation block, and place the mathematical constant block "π" and the distance sensor block into its two input boxes respectively;
- Step 3: Locate the "greater than" comparison block, place the assembled multiplication operation block (the perimeter result) in the first input box, and place the pure number block "15" in the second input box;
- Step 4: Put the comparison block into the condition area of the "if. .. then. .." logic block, followed by the action block of "turn on the green light for 1 second + display 'the circle is larger'".
Operating logic: The program reads the diameter detected by the sensor in real time and calculates the circumference as π × diameter. For example, when the detected diameter is 5, the circumference ≈ 15.707 > 15, and the green light turns on; when the detected diameter is 4, the circumference ≈ 12.566 < 15, and the green light stays off, thus realizing intelligent judgment.
Practical Example 3: Calculate and Display the Diagonal Length of a Square Using the Constant √2
- Requirement: Given the side length of a square (stored in the variable "side_length" with an initial value of 3), calculate and display the length of its diagonal using the constant √2;
- Step 1: Use a variable block to set "side length = 3" and place it at the very beginning of the program (initialize the variable);
- Step 2: Find the multiplication operation block, and place the "side length" variable block and the mathematical constant block "√2" into the two input boxes respectively;
- Step 3: Place the assembled multiplication operation block into the content area of the "display" block;
Operating logic: When the program runs, it first sets the "side length" to 3, then calculates 3×√2≈3×1.4142≈4.2426, and the display screen shows the result "4.2426". If the "side length" is changed to 5, the program automatically calculates 5×√2≈7.071, which is flexible and accurate.
Pro Tip: Quick Reminder on Using Math Constant Blocks – Must-Know to Avoid Pitfalls!
- Choose the right constant type: Select the corresponding constant based on your calculation needs, for example, use π for circle-related calculations, e for exponential growth calculations, and √2 for square diagonal calculations; make sure not to pick the wrong one.
- Note the usage of infinity: Infinity (∞) cannot directly participate in operations such as multiplication and division (for example, π×∞ is invalid), and is usually only used in comparison scenarios, such as judging whether a value is greater than a certain fixed value and approaching infinity;
- Use with operation blocks: Constant blocks cannot be used alone; they must be paired with operation blocks, function blocks, etc. For example, they can be used with multiplication blocks to calculate perimeter, or with exponential function blocks to model growth processes;
- Understanding Approximate Display: The value of a constant is highly precise (for example, pi has many decimal places), but the display screen may only show the first few digits, which is normal and will not affect the accuracy of calculations.
✨ Exclusive Mini Interaction: Math Constant Block Challenge
- Quick Response 1: Which mathematical constant is required when calculating the circumference of a circle? (Answer: Pi π!)
- Quick Response Quiz 2: Will the value of the math constant block change as the program runs? (Answer: No! It is a predefined fixed value~)
- Think about it: We want to calculate the area of a circle with a radius of 3 (Area = π × radius²). Which blocks do we need to use? (Hint: the constant π block, the multiplication operation block, the number block "3", the display block, etc.)
- Scenario Judgment: If you build a program that "multiplies the constant π by the pure number 5 and then displays the result", what approximate value will it eventually show? (Answer: 15.707963! π≈3.1415926535×5≈15.707963~)
- Hands-on Association: Try to describe a real-life scenario that uses a mathematical constant, for example, "calculating the circumference of a round cake with a diameter of 6 centimeters", then explain what the corresponding constant, calculation process and approximate result are respectively~
Core Summary: Mathematical constant blocks act as the "standard precise value library" of a program, whose core function is to provide predefined fixed mathematical constants (such as π, e, √2, etc.) to support precise calculation and formula modeling. They eliminate the need for manual value input, feature high precision and fixed values, and need to be used together with operation blocks, function blocks and other components. Mastering them will make our programs more accurate and efficient when dealing with scenarios such as geometric calculation and scientific modeling~
6. Number property judgment blocks (even, odd, prime, whole, positive, etc.)
Previously, the math building blocks we learned are all designed to "compute numerical values", such as performing addition, subtraction, multiplication and division, calculating trigonometric functions, and making precise computations with constants. However, if we want to figure out the "traits" of a number, for example, "Is this number an even number? ", "Is it a prime number? ", or "Is it a positive number? ", those computing building blocks will be of no help to us at all!At this point, we need to bring in the "numerical attribute detector" — the numeric attribute judgment block. It is specifically designed to determine whether a value has a specific mathematical property, outputting a result of either "True" or "False", and serves as a core helper for making logical judgments based on numerical characteristics in programs.
The numeric attribute checker block works like a "trait checkup" for numbers: for example, running a "prime number checkup" on the number 7 returns "qualified (true)", while running an "odd number checkup" on the number 8 returns "unqualified (false)". It has only two possible output results: either "true"(the number matches the attribute) or "false"(the number does not match the attribute). It is especially suitable to pair with conditional blocks like "if. .. then. .." to let the program perform different operations based on the traits of a number.
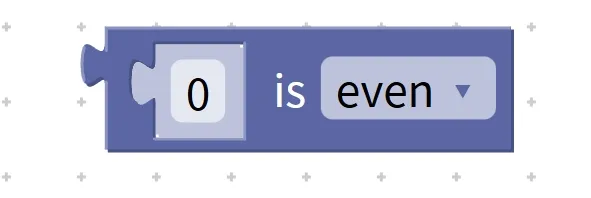
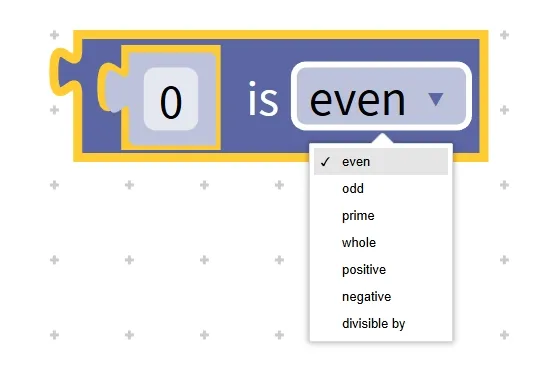
Chinese meaning: Determine whether the input value has the specified mathematical properties (such as even number even, odd number odd, prime number prime, integer whole, positive number positive, negative number negative, divisible number divisible by, etc.), and output the judgment result "True (True)" or "False (False)".
First, understand the core features and components of the number attribute judgment block, and you can easily master how to use it:
- Core Features: Outputs a "TRUE/FALSE" result — it does not generate a new value, and only makes a "yes/no" judgment; the result is a logical value, which is specifically used in conditional judgment scenarios;
- Components: It consists of an "attribute selection area" and a "value input box". The attribute selection area acts as a "physical examination item switch", where you can select the numeric attributes to be judged (such as even, odd, etc.); the value input box serves as a "physical examination object entry", where you can input values to be judged such as pure numbers, variables, and sensor data.
First, let's get familiar with several common number properties and understand what they mean:
- Even number: An integer that is divisible by 2, such as 2,4, 6,8; to judge whether a number is an even number, check if there is no remainder when the value is divided by 2, and "true" will be returned if there is no remainder.
- Odd number: An integer that is not divisible by 2, such as 1,3, 5,7; to judge whether a number is odd, check if there is a remainder when it is divided by 2, and a remainder means the result is "true".
- Prime number (prime): A natural number greater than 1 that has no positive divisors other than 1 and itself, such as 2,3, 5,7; to judge whether a number is a prime, check if it has exactly two distinct positive divisors, and the result will be "true" if it does;
- Integer (whole): A number with no fractional part, including positive integers, zero, and negative integers, such as -3,0, 5,10; when judging, check whether the value has no decimal places, and if so, the result is "true";
- Positive number (positive): A value greater than 0, such as 1, 2.5, 6.8; when judging, check whether the value is greater than 0, and the result will be "true" if it is;
- Negative number: A number less than 0, such as -1, -2.5, -6.8; when judging, check whether the value is less than 0, and if so, the result is "true";
- Divisible by: A number is divisible by another number if it can be divided by the latter without leaving a remainder; for example, 6 is divisible by 2, and 9 is divisible by 3. This operation requires inputting two values (a dividend and a divisor) to determine whether the dividend is divisible by the divisor, and returns "True" if the result is affirmative.
Let's look at a few real-life examples to quickly understand the function of numerical attribute judgment:
Real-life Example 1: A teacher is distributing candies to the students, splitting the total number of candies into 2 groups and wondering if they can be divided equally. This requires checking whether the number of candies is an "even number" — if it is even, an equal split is possible (true); if not, it is not possible (false);
Real-life Example 2: Product prices in supermarkets include positive numbers (e. g., 10 yuan) and negative numbers (e. g., a discount of -2 yuan). To distinguish between "discount amount" and "regular selling price", you need to determine whether the price is a "negative number" — if it is a negative number, it is a discount (True); if it is a positive number, it is the regular selling price (False);
Real-life Example 3: When distributing 12 apples to 3 children, if you want to know whether each child can get the same number of apples, you need to determine whether 12 is "divisible by 3" — if it is divisible (true), equal distribution is possible; if not (false), it is not possible.
Then let's look at the practical examples in programming, which are combined with hardware devices and can be put to direct use right after you finish learning:
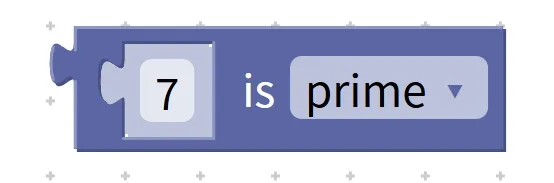
Practical Example 1: Prime Number Judgment — Determine whether the number 7 is a prime number and display the result
- Requirement: Determine whether the pure number 7 is a prime number, and display the judgment result (True/False) on the display screen;
- Step 1: Locate the block for number attribute judgment in the block area, and select "prime" in the attribute selection area;
- Step 2: Place the pure number block "7" into the value input box;
- Step 3: Place the assembled number attribute judgment block into the content area of the "show" block;
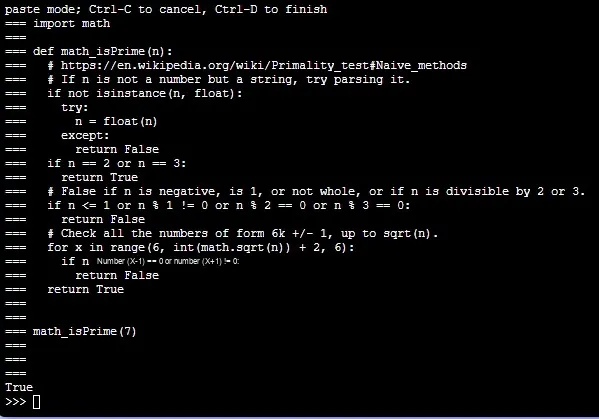
Operation logic: When the program runs, the number attribute judgment block will detect the attribute of 7 — 7 is greater than 1 and has only two factors, 1 and 7, which conforms to the attribute of a prime number, so it outputs "True", and the display screen finally shows "True". If "7" is changed to "8", since 8 has four factors: 1,2, 4 and 8, which does not conform to the attribute of a prime number, it will display "False".
Practical Example 2: Even Number Judgment + Conditional Control — Turn on the green light when the detected value is an even number
- Requirement: Define a variable named "number" with an initial value of 6; determine whether this number is an even number, if yes, turn on the green light for 1 second, otherwise keep it off;
- Step 1: Use a variable block to set "number = 6" and place it at the very beginning of the program (initialize the variable);
- Step 2: Locate the block for number attribute judgment, select the "even" attribute, and place the "number" variable into the input box;
- Step 3: Locate the "if. .. then. .." conditional block, and place the numeric attribute judgment block into the condition area;
- Step 4: Place the action block "Turn on the green light for 1 second" in the execution area of the "if. .. then. .." block;
Operation logic: The program first sets the "number" to 6, then judges whether 6 is an even number — since 6 is divisible by 2, the result is "true", so the action of "turning on the green light for 1 second" is executed; if the "number" is changed to "7", the judgment result is "false", and the green light will not turn on.
Practical Example 3: Divisibility Judgment + Sensor – Controlling the Buzzer Based on Detected Values
- Requirement: Use a distance sensor to detect the distance to an object (the value is an integer), and determine whether the distance is divisible by 5; if yes, trigger the buzzer to sound for 1 second, and display the prompt "The distance is a multiple of 5";
- Step 1: Locate the distance sensor block and obtain the "detected distance" data;
- Step 2: Find the block for judging numeric properties, select the "divisible by" property, put the distance sensor data in the first input box, and place the pure number block "5" in the second input box;
- Step 3: Place the judgment block into the condition area of the "if. .. then. .." conditional block;
- Step 4: Place the action blocks of "buzzer sounds for 1 second" and "display 'the distance is a multiple of 5'" in the execution area;
Operation logic: The program reads the distance detected by the sensor in real time. If the detected distance is 10, which is divisible by 5, the judgment result is "True", the buzzer will beep and a prompt will be displayed; if the detected distance is 12, which is not divisible by 5, the result is "False", and the buzzer will not beep.
Pro Tip: Quick Reminder for Using Number Attribute Detection Blocks — Must-Know to Avoid Pitfalls!
- Choose the correct attribute type: Select the corresponding attribute based on your judgment needs. For example, choose "even" when judging "whether a number is divisible by 2", and choose "positive" when judging "whether a number is greater than 0. Be careful not to pick the wrong attribute.
- Note the special values of prime numbers: 1 is not a prime number, and 2 is the smallest prime number as well as the only even prime number; these two special cases should be taken into account when judging prime numbers.
- Input order for divisible numbers: Pay attention to the input order of the "divisible by" attribute — the first entry is the dividend, and the second is the divisor. For example, for the statement "10 is divisible by 5", you should enter 10 in the first input box and 5 in the second;
- Use with conditional blocks: It returns a logical value of "true/false" as the judgment result, which is meaningless when used alone. It must be used together with conditional judgment blocks such as "if. .. then. .." and "if. .. then. .. else. .." to realize the branch control of the program.
✨ Exclusive Mini Activity: Number Attribute Judging Block Challenge
- Quick Response 1: To determine whether a number is "an integer not divisible by 2", which attribute should be selected? (Answer: odd number!)
- Quick Response Quiz 2: How many types of output results does the number attribute judgment block have? What are they respectively? (Answer: Two! True and False~)
- Think about it: If we want to determine whether the number 9 is divisible by 3, which blocks do we need? (Hint: number attribute judgment block, pure number blocks "9" and "3", display block, etc.)
- Scenario Judgment: If you create a program that "determines whether the number -5 is a positive number and then displays the result", will it ultimately display "True" or "False"? (Answer: False! -5 is a negative number, not a positive number~)
- Hands-on Association: Try to describe a real-life scenario that uses number attributes for judgment, such as "judging whether an exam score is a positive number", then explain what the corresponding attribute, input value and judgment result are respectively~
Core Quick Summary: The number attribute judgment block acts as the "number trait detector" for a program. Its core function is to determine whether a numerical value has a specific mathematical attribute and output a "true/false" logical result. It consists of an attribute selection area and a numerical input box, with common attributes including even number, odd number, prime number, positive number, etc. When used in combination with conditional judgment blocks, sensors and variables, it enables the program to perform different operations based on the traits of numbers, realizing more flexible logical control. It is a key integration point of the program's "logical capability" and "computational capability"~
7. Rounding blocks (round, round up, round down)
Earlier, we learned the blocks for judging number properties, which can help us distinguish the "characteristics" of numbers. However, in programming, we often encounter values with decimals, such as the distance of 3.6 centimeters detected by a sensor or the calculated area of 5.28 square decimeters. These decimals sometimes make display and statistics cumbersome. That's when the rounding block, this "little helper for value regularization", comes in handy! It can convert decimals into integers according to the rules we specify, making values more intuitive and standardized, and it is especially suitable for scenarios that require integer results, such as value display and data statistics~
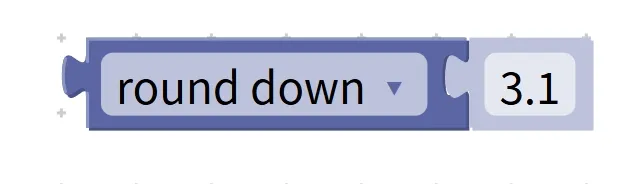
The rounding block works just like the "rounding to whole number" operation we use when solving math problems: for example, it rounds 3.6 to 4, rounds 2.1 down to 2, and rounds 1.3 up to 2. It eliminates the need for manual calculation — simply select the corresponding rounding method, input a value with decimals, and you will get an integer result directly, making the numerical output of the program better aligned with our needs.
Chinese meaning: Process the input value according to the specified rounding rules, which include round half up (round), round up (round up) and round down (round down), and output an integer result.
First, understand the core features and components of the integer block, and you can easily master how to use it:
- Core Features: Convert decimals to integers — the input can be a value with a decimal part (or an integer, in which case the result remains unchanged after rounding), and the output is guaranteed to be an integer; the result is jointly determined by the input value and the rounding method, and different rounding methods follow different rules;
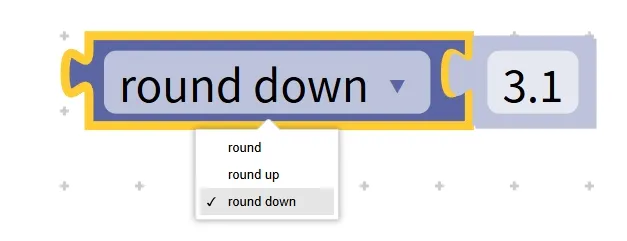
- Components: Consists of a "rounding mode selection area" and a "value input box". The rounding mode selection area acts as a "standardization rule switch", with options including round (round half up), round up (ceiling rounding), and round down (floor rounding); the value input box serves as the "entry for values to be standardized", where pure numbers, variables, sensor data, and other values with or without decimal places can be entered.
First, get familiar with the three core rounding methods and understand their rules (it’s easier to grasp with examples):
- Rounding to the nearest integer (round): Check the first digit of the fractional part; if it is greater than or equal to 5, add 1 to the integer part; if it is less than 5, discard the fractional part. For example: 3.6 → 4 (6 ≥ 5, add 1), 2.3 → 2 (3 < 5, discard), 5.5 → 6(5 ≥ 5, add 1);
- Round up: No matter what the fractional part is, add 1 to the integer part to get the smallest integer that is larger than the original value. For example, 1.1 rounds up to 2, 3.001 rounds up to 4, and 5.9 rounds up to 6;
- Round down: Regardless of the value of the fractional part, directly discard the fractional part and take the largest integer that is smaller than the original value. For example, 2.9 rounds down to 2, 4.999 rounds down to 4, and 6.1 rounds down to 6.
Here are a few real-life examples to quickly help you understand the function of the rounding block:
Real-life Example 1: You spend 3.6 yuan on stationery, and the total needs to be rounded to the nearest whole number at checkout, so 3.6 yuan ≈ 4 yuan (in practice, checkout may be calculated to the cent, but this rule is commonly used for rounding);
Real-life Example 2: We need to pack apples into boxes, and each box can hold 5 apples. If there are 11 apples in total, how many boxes are required? 11÷5= 2.2, and in this case we need to round up to 3 boxes (2 boxes are not enough, so one extra box is a must);
Real-life Example 3: Calculate the "number of complete groups" corresponding to the number of students in a class. Each group has 4 people, and there are 9 students in total. 9÷4= 2.25, and the result rounded down is 2 complete groups (the remaining 1 person is not enough to form a group, so it is discarded).
Then let's look at the practical examples in programming, which are combined with hardware devices and can be put to direct use right after you finish learning:
Practical Example 1: Rounding to the Nearest Integer: Round 3.6 to the nearest integer and display the result
- Requirement: Round the pure number 3.6 to the nearest integer, and display the result on the display screen;
- Step 1: Find the rounding block in the block area, and select "round" in the rounding mode selection area;
- Step 2: Place the pure number block "3.6" into the value input box;
- Step 3: Put the combined rounding block into the content area of the "show" block;
Operation logic: When the program runs, the rounding block processes 3.6 according to the rounding-off rule — the first digit of the fractional part is 6, which is greater than or equal to 5, so we add 1 to the integer part: 3 + 1 = 4, output the integer 4, and the display finally shows "4". If "3.6" is changed to "2.3", then the output will be 2.
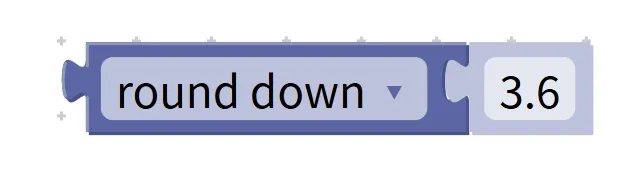
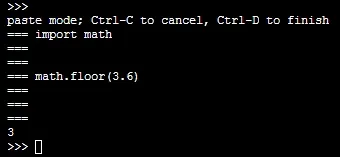
Practical Example 2: Floor Function + Sensor – Count and Display the Number of Complete Groups
- Requirement: Use an infrared sensor to detect the current number of people (assuming the detected value is 9.8, which is approximated as 9 people), with 4 people per group, calculate the number of complete groups (round down) and display it;
- Step 1: Locate the infrared sensor block and obtain the "detected number of people" data (assumed to be 9.8);
- Step 2: Find the division operation block, put the sensor data and the plain number "4" into the two input boxes respectively, and you will get 9.8÷4= 2.45;
- Step 3: Find the rounding block, select "round down", and put the result of the division operation into the input box;
- Step 4: Place the rounding block into the content area of the "show" block;
Operation logic: The program first calculates 9.8÷4= 2.45, then rounds down to discard the fractional part to get 2, and the display shows "2", which means 2 complete groups.
Practical Example 3: Rounding Up + Conditional Control — Determine the Required Number of Boxes Based on the Number of Apples and Provide a Prompt
- Requirement: Set the initial value of the variable "number of apples" to 11, with 5 apples packed in each box, and calculate the required number of boxes using the ceiling function; if the number of boxes > 2, turn on the red light to prompt "need to prepare more boxes";
- Step 1: Use a variable block to set "number of apples = 11" and place it at the very beginning of the program;
- Step 2: Locate the division operation block, place the "number of apples" variable and the plain number "5" into the input boxes, and you will get 11÷5= 2.2;
- Step 3: Find the rounding block, select "round up", and put the division result into the input box;
- Step 4: Find the "greater than" comparison block, and put the rounding result and the pure number "2" into the input boxes;
- Step 5: Place the comparison block into the condition area of the "if. .. then. .." condition block, and put "turn on the red light for 1 second + display 'need to prepare more boxes'" into the execution area;
Operation logic: The program first calculates 11÷5= 2.2, rounds it up to 3. Since 3>2, the judgment result is true, the red light turns on and a prompt is displayed. If the number of apples is 9,9÷5= 1.8, which is rounded up to 2. Since 2 is not greater than 2, the red light remains off.
Pro Tip: Quick Reminder on Using the Rounding Block – Must-Read to Avoid Pitfalls!
- Choose the right rounding method: select the rule according to the scenario requirements. For example, use round half up for "rounded statistics", use ceiling for "container loading and resource allocation", and use floor for "complete quantity statistics. Don't choose the wrong one;
- Note the result of integer input: if the input is an integer (e. g., 5,7), no matter which rounding method is used, the result will be the same as the original integer (5→5,7→7);
- Use with operation building blocks: Rounding blocks are often used in combination with division operations (e. g., in distribution problems and proportion calculations); first perform the division to get a decimal, then apply rounding to obtain an integer result.
- Distinguish the "upward/downward" directions: rounding up always makes the number "larger", while rounding down always makes it "smaller". For example, the rounded-up value of 2.1 is 3, and the rounded-down value is 2 — don’t mix up the directions.
✨ Exclusive Mini Activity: Rounding Block Challenge
- Quick Quiz 1: What is the result of rounding 2.25 down to the nearest whole number? (Answer: 2!)
- Quick Response Quiz 2: Which rounding method "always rounds up to the next integer regardless of the value of the fractional part"? (Answer: Round up!)
- Think about it: We want to calculate how many boxes are needed to pack 15 apples, with 6 apples in each box. Which rounding method should we use? (Hint: 15÷6 = 2.5, rounding up gives 3 boxes, so choose round up~)
- Scenario Judgment: If you create a program that "rounds 5.5 to the nearest integer and then displays the result", what number will be displayed in the end? (Answer: 6! The fractional part of 5.5 is 5, so we carry over 1, and 5+ 1= 6~)
- Hands-on Association: Try to describe a real-life scenario that involves using rounding blocks, such as "calculating the number of complete bookshelves needed for 13 books (with 5 books per shelf)", then explain the corresponding rounding method, calculation process and result respectively~
Core Quick Summary: The rounding block is a "value regularization helper" for programs. Its core function is to convert decimals into integers according to specified rules (rounding, rounding up, rounding down) to make values more intuitive and standardized. It consists of a rounding method selection area and a value input box. Different rounding methods correspond to different rules, so it is necessary to select according to the actual scenario. When used with sensors, variables and logic blocks, it can realize practical functions such as data statistics and resource allocation, and is an important tool for programs to process decimal values~
8. List Statistical Operation Blocks (sum/min/max/average/median/modes…of list)
Previously, the math building blocks we learned all perform calculations or judgments on a single value. But if we have a set of data, such as the test scores of 5 students in a class [6,8, 10,9, 7], or the distance data detected multiple times by a sensor [5.2, 4.8, 5.1, 4.9], and we want to quickly calculate the sum, average, and maximum value of these data, calculating them one by one would be far too tedious!At this point, the list statistical operation block, this "little expert in data statistics", comes in handy — it can process all the values in a list at once and directly output the statistical results, making it particularly suitable for scenarios that require extracting data features such as Data Analysis and statistical processing~
The list statistical operation block works just like how we do class grade statistics: a teacher compiles all students' scores into a "score list", and instead of calculating each one individually, they can directly use a statistical tool to work out the total score, average score and highest score with extremely high efficiency. Its core lies in "batch data processing" — simply select the corresponding statistical method, then choose the list to be processed, and it will automatically complete the calculation and output the statistical results we need.
Chinese meaning: Perform a specified statistical operation on a set of values in the list (such as summation sum, minimum value min, maximum value max, average value average, median median, mode modes, Standard Deviation standard deviation, or randomly pick an element random item of list), and output the corresponding statistical result.
First, understand the core features and components of the list statistical operation blocks, and you can easily master how to use them:
- Core Features: Batch processing of Tabular Data — the input must be a "list"(a set of ordered values), which can read all elements in the list at one time for calculation; output a single statistical result — output a corresponding value (such as sum, average) or an element in the list (random number extraction) according to the selected statistical method;
- Components: Consists of a "statistics method selection area" and a "list input box". The statistics method selection area acts as the "statistics function switch", with selectable options including sum (sum of values), min (minimum value), max (maximum value), etc. ; the list input box serves as the "data source entry", where a pre-created numerical list needs to be placed (you can manually enter values to create a list, or place a list variable that stores data).
First, let's get familiar with several common statistical methods and understand their functions (you can refer to the example [6,8, 10,9, 7] for better comprehension):
- Summation (sum): Calculate the sum of all values in a list. For example, the sum of [6,8, 10,9, 7] = 6 + 8 + 10 + 9 + 7 = 40;
- Minimum value (min): Find the smallest number in the list. For example, the minimum value of [6,8, 10,9, 7] is 6;
- Maximum value (max): Find the largest number in a list; for example, the maximum value of [6,8, 10,9, 7] is 10.
- Average: Calculate the arithmetic mean of all values in the list (sum divided by the number of elements). For example, the average of [6,8, 10,9, 7] = 40 ÷ 5 = 8;
- Median: The value located at the middle position after sorting all numbers in the list in ascending order. When the count of elements is odd, take the middle one; when even, take the average of the two middle values. For example, the median of [6,7,8,9,10] is 8.
- Mode (modes): The value that appears most frequently in a list; for example, the mode of [5,6,6,7,8] is 6.
- Randomly pick an element (random item of list): randomly select a value from the list as the result. For example, from [6,8,10,9,7], elements such as 8 or 10 may be randomly picked.
Here are a few real-life examples to quickly help you understand the function of list statistical operations:
Real-life Example 1: Given the math scores of 5 students in a class: [85,92,78,90,88], use sum to calculate the total score, average to get the mean score, max to find the highest score, and min to obtain the lowest score.
Real-life Example 2: Record the temperature data over a week: [22℃, 24℃, 23℃, 25℃, 21℃, 23℃, 24℃], and we can find that the most frequent temperatures (the mode) are 23℃ and 24℃;
Real-life Example 3: When running a raffle, organize the winning numbers into the list [101,102,103,104], then use the random number selection function to pick the lucky number.
Then let's look at the practical examples in programming, which are combined with hardware devices and can be put to direct use right after you finish learning:
Practical Example 1: Average Statistics — Calculate the average of all numbers in the list and display the result
- Requirement: Calculate the average of all numbers in the list [1,23,2] and display the result on the screen;
- Step 1: Find the "Create List" block in the block area, and enter the values 1,23, and 2 into the list;
- Step 2: Locate the list statistical operation block, and select "Average (average)" in the statistical method selection area;
- Step 3: Place the created value list into the list input box;
- Step 4: Put the assembled list statistical operation block into the content area of the "display" block;
Operation logic: When the program runs, it first calculates the sum of the list as 1+ 23+ 2= 26, then divides the sum by the number of elements, which is 3 (26÷3= 8.666667), outputs the average value 8.666667, and the display finally shows "8.666667".
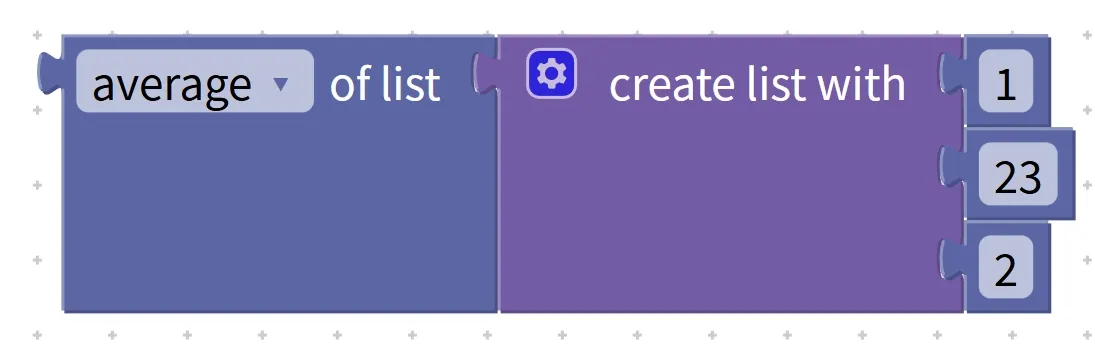
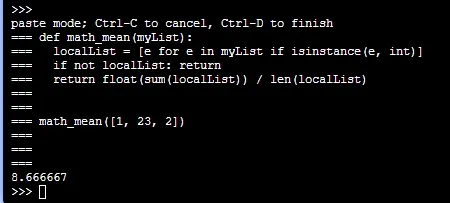
Practical Example 2: Maximum Value Statistics + Sensor — Count the maximum value of multiple detection distances and give a prompt
- Requirement: Use a distance sensor to detect the distance of an object 5 times, and store the data in the list [4.2, 4.5, 4.3, 4.6, 4.4]; calculate the maximum value, and if the maximum value > 4.5, turn on the yellow light to prompt "Distance exceeds limit";
- Step 1: Create a list block and enter the distance data from the 5 tests;
- Step 2: Locate the list statistical operation block, select "Maximum (max)", and place the created list into the input box;
- Step 3: Find the "greater than" comparison block, and put the statistical result and the pure number "4.5" into the input boxes;
- Step 4: Put the comparison block into the condition area of the "if. .. then. .." condition block, and place "turn on the yellow light for 1 second + display 'distance out of limit'" in the execution area;
Operation logic: The program finds the maximum value 4.6 from the list. Since 4.6 > 4.5, the judgment result is true, the yellow light turns on and a prompt is displayed.
Pro Tip: Quick Reminder for Using List Statistics Operation Blocks — Must-Know to Avoid Pitfalls!
- The input must be a list: you cannot directly enter a single value; instead, you must first create a list containing multiple values, otherwise the program will throw an error.
- Choose the right statistical method: Select the corresponding function based on your needs, e. g., use sum to calculate the total score and min to find the minimum value; do not select the wrong statistical method.
- Note the empty list issue: the list must not contain no values (i. e., be an empty list), otherwise the calculation cannot be performed and the program will throw an error;
- Randomness of random number fetching: "
random item of list" may produce different results each time it runs, which is a normal random effect.
✨ Exclusive Mini Challenge: List Statistical Operation Block Challenge
- Quick Response 1: If you want to calculate the sum of the list [3,5,7,9], which statistical method should you choose? (Answer: Sum!)
- Quick Response Quiz 2: What is the mode of the list [2,4,6,4,8]? (Answer: 4!)
- Think about it: If we want to calculate and display the median of the list [15,18,20,17,16], which blocks do we need to use? (Hint: create list block, list statistical operation block (select
median), display block~)
Core Quick Summary: The List Statistical Operation Block is the "data statistics expert" of the program, whose core function is to process the values in a list in batches and output statistical results such as sum, average, and maximum value. It consists of a statistical method selection area and a list input box, and needs to be used together with a list. Mastering it allows us to quickly extract data features and efficiently complete Data Analysis tasks~
9. Remainder Block (remainder of)
Earlier, we learned about division operations and the "divisible number" judgment in number attribute checks. In fact, there is another block specifically for calculating "remainders" — the modulo block! It can calculate the remainder left after dividing two integers. For example, 17 ÷ 5 = 3 with a remainder of 2, and the modulo block will directly output 2. Although this "remainder" is just a "byproduct" of division, it has a wide range of uses, such as judging whether a number is divisible, counting in loops, and triggering events at intervals. It is an important supplement to integer operations in programs~
The modulo block works just like the "leftover part" when we divide things up: for example, if you distribute 17 oranges among 5 children, each gets 3, and there are 2 left in the end — those 2 are the "remainder". You don’t need to calculate the division first and then find the remainder; just input two integers, and you’ll quickly get the remainder result. It’s especially convenient for scenarios that require "remaining quantity" or "divisibility check".

Chinese meaning: Calculate the remainder after dividing two integers (remainder of), and output the remainder result; it is often used to determine whether a number is divisible by another number (if the remainder is 0, it is divisible) or to perform remainder-related operations.
First, understand the core features and components of the remainder block, and you can easily master how to use it:
- Core Features: Only calculate the remainder — when two integers are input and a division operation is performed, the quotient will not be output, only the remainder; the range of the remainder result: 0 ≤ remainder < divisor(for example, if the divisor is 5, the remainder can only be 0,1, 2,3, 4);
- Components: It consists of "two numeric input boxes" and a "remainder identifier". The two input boxes are for entering the "dividend" and the "divisor" respectively (note the order); the remainder identifier is labeled "remainder of" to clearly indicate that the function of the block is to calculate the remainder.
Here are a few real-life examples to quickly understand the function of the modulo block:
Real-life Example 1: Determine whether 12 apples can be evenly distributed among 3 children — 12 ÷ 3 = 4 with a remainder of 0, and a remainder of 0 means equal distribution is possible; 13 ÷ 3 = 4 with a remainder of 1, and a remainder of 1 means equal distribution is not possible;
Practical Example 2: Mark every 5 numbers (5,10,15.. .): take the remainder of the current number divided by 5, and the number to be marked is the one with a remainder of 0;
Real-life Example 3: Calculating time intervals — for instance, there are 3 sets of 5 minutes in 17 minutes, with a remainder of 2 minutes; here, the number 2 is the remainder of 17 divided by 5.
Then let's look at the practical examples in programming, which are combined with hardware devices and can be put to direct use right after you finish learning:
Practical Example 1: Basic Modulo Operation — Calculate the remainder of 17 divided by 5 and display the result
- Requirement: Calculate the remainder of 17 divided by 5, and display the result on the display screen;
- Step 1: Find the remainder of block from the block area;
- Step 2: Place the pure number blocks "17"(dividend) and "5"(divisor) into the two value input boxes of the modulo block respectively;
- Step 3: Place the combined modulo block into the content area of the "show" block;
Operation logic: When the program runs, the modulo block calculates 17 ÷ 5 = 3 with a remainder of 2, only outputs the remainder 2, and the display finally shows "2". If "17" is changed to "15", 15 ÷ 5 = 3 with a remainder of 0, and it will display "0".

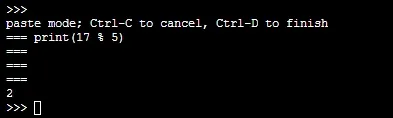
Practical Example 2: Remainder Judgment + Loop — Trigger the buzzer to sound every 5 loop iterations
- Requirement: Set a loop to run 10 times, and increment the counter by 1 in each loop; when the remainder of the counter divided by 5 is 0 (i. e., the 5th and 10th loops), trigger the buzzer to sound for 1 second.
- Step 1: Create a variable named "count" and set its initial value to 0;
- Step 2: Find the block for loops with a fixed number of times, and set the loop count to "10";
- Step 3: Inside the loop, first place the variable block "set count to count + 1"(the count increments by 1 with each loop iteration);
- Step 4: Locate the modulo block, and place the "count" variable and the plain number "5" into the input boxes;
- Step 5: Find the "equal to" comparison block, and put the remainder result and the plain number "0" into the input boxes;
- Step 6: Put the comparison block into the condition area of the "if. .. then. .." condition block, and place the "buzzer beeps for 1 second" block in the execution area;
Operating logic: After 1 cycle, the count is 1,1 divided by 5 leaves a remainder of 1 which is not equal to 0, so no beep; after 5 cycles, the count is 5,5 divided by 5 leaves a remainder of 0 which equals 0, so it beeps; after 10 cycles, the count is 10,10 divided by 5 leaves a remainder of 0 which equals 0, so it beeps, thus achieving the effect of triggering once every 5 cycles.
Pro Tip: Quick Reminder on Using the Modulo Block – Must-Know to Avoid Pitfalls!
- Note the input order: the first input box is the dividend, and the second one is the divisor; do not reverse the order (for example, the remainders of 17÷5 and 5÷17 are different: 17÷5 leaves a remainder of 2, while 5÷17 leaves a remainder of 5);
- The divisor cannot be zero: Just like in division operations, the divisor must not be 0 (for example, 10÷0), otherwise it will cause a program error;
- Judging divisibility by using the remainder: when the result of the remainder operation is 0, it means that the dividend can be evenly divided by the divisor, which is one of the most common use scenarios of the remainder block;
- The input must be an integer: the modulo block is usually used for integer operations. If a decimal is input, some programming software will report an error or automatically round it off before calculation, so it is recommended to input an integer as much as possible.
✨ Exclusive Mini Interaction: Modulo Block Challenge
- Quick Response Quiz 1: Calculate the remainder when 20 is divided by 3, what is the result? (Answer: 2! 20 ÷ 3 = 6 with a remainder of 2~)
- Quick Response 2: How to use the modulo block to determine whether a number is an even number? (Answer: Calculate the remainder of this number divided by 2; if the remainder is 0, then it is an even number~)
- Think about it: We want to determine whether 18 is divisible by 6. If we use the modulo block, what are the dividend and divisor we need to input respectively? What result indicates that the number is divisible? (Hint: The dividend is 18, the divisor is 6, and a result of 0 means it is divisible~)
Core Summary: The modulo block is a "remainder calculation tool" for programs, whose core function is to compute the remainder after dividing two integers. It consists of two number input boxes; note the order of the dividend and the divisor, and the divisor cannot be 0. A remainder of 0 can be used to judge exact division, and when paired with loop and condition blocks, it can also implement functions such as interval triggering, making it an important tool for integer operations and logic control~
10. Numerical Constraint Block (constrain [num] low [num] high [num])
When programming, we often encounter the issue of "values falling outside the expected range" — for example, a sensor might suddenly return an anomalous reading of 150 when measuring distance (while the normal range is 1-100), or a variable might accidentally turn negative and cause the program to crash. This is where the "value constraint block", our "value safety guard", comes into play! It firmly restricts a value within the upper and lower bounds we set: if the value exceeds the upper limit, it is capped at the upper limit; if it falls below the lower limit, it is floored at the lower limit. This ensures the value always stays safe and compliant, making it particularly suitable for use cases such as sensor data calibration and variable range control.
A numerical constraint block is just like setting a "safe driving range" for a toy car: for example, you can specify that the toy car can only travel within an area of 1 to 10 meters — if it goes beyond 10 meters, it will stop at the 10-meter mark, and if it goes below 1 meter, it will stop at the 1-meter mark, so it will never wander off. Its core function is to "define boundaries": as long as you input the value to be constrained and the set upper and lower limits, it can automatically output a compliant result.

Chinese meaning: Restrict the input value within the specified minimum (low) and maximum (high); if the value is less than the lower limit, return the lower limit; if it is greater than the upper limit, return the upper limit; otherwise, return the original value.
First, understand the core features and components of the numerical constraint blocks, and you can easily master how to use them:
- Core Features: Enforced numerical compliance: the output result is always within the set [low, high] range with no outliers; it does not alter the inherent property of the value (integers remain integers, decimals remain decimals);
- Components: Consists of a "to-be-constrained value input box", a "lower limit input box (low)", and an "upper limit input box (high)". The three input boxes are respectively used to hold the value to be constrained (e. g., sensor data, variables), the minimum boundary value, and the maximum boundary value.
Here are a few real-life examples to quickly help you understand the function of numerical constraints:
Real-life Example 1: Constrain test scores within the range of 0 to 100: a score of 105 will be counted as 100, a score of -5 will be counted as 0, and a normal score of 85 will be counted as 85.
Example in daily life 2: Constrain the air conditioner temperature within the range of 16-30°C — if you set it to 10°C, it will automatically adjust to 16°C; if you set it to 35°C, it will automatically adjust to 30°C; if you set it to 25°C, it will remain unchanged;
Real-life Example 3: Constrain the value displayed on the weighing scale to the range of 0-200kg — if the value exceeds 200kg, display 200kg; if it is lower than 0kg (abnormal), display 0kg.
Then let's look at the practical examples in programming, which are combined with hardware devices and can be put to direct use right after you finish learning:
Practical Example 1: Basic Constraint — Restrict 150 to the range of 1 to 100 and display the result

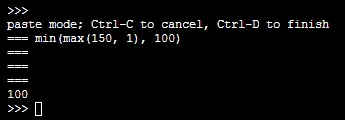
- Requirement: Constrain the pure number 150 within the range of 1 to 100, and display the constrained result on the display screen;
- Step 1: Find the numerical constraint block (constrain [number] low [number] high [number]) from the block area;
- Step 2: Place the pure number block "150" in the "value to be constrained input box", "1" in the "low input box", and "100" in the "high input box";
- Step 3: Place the combined numerical constraint block into the content area of the "display" block;
Operating logic: The program determines that 150 > 100 (the upper limit), so it outputs the upper limit value 100, and the display finally shows "100". If "150" is changed to "0", since 0 < 1(the lower limit), the display will show "1"; if it is changed to "50", since 1 < 50 < 100, the display will show "50".
Practical Example 2: Sensor Data Constraints — Calibrating Distance Sensor Data
- Requirement: Use a distance sensor to detect the distance of an object (abnormal values such as 0.5 or 120 may occur), constrain the data to the range of 1 to 100, and use the constrained data to control the brightness of the LED (1 corresponds to the dimmest level, and 100 corresponds to the brightest level);
- Step 1: Locate the distance sensor block and obtain the "detected distance" data;
- Step 2: Locate the numerical constraint block, input the sensor data into the value input box to be constrained, and set low= 1 and high= 100;
- Step 3: Locate the "map" block (which maps the range 1-100 to the brightness range of 0-1), and place the constraint result, 1,100,0, and 1 into the input fields respectively;
- Step 4: Put the mapping result into the input box of the "Set LED Brightness" block;
Operating logic: If the sensor detects a value of 0.5, it will be constrained to 1 and mapped to a brightness level of 0 (dimmest); if it detects 120, the value will be constrained to 100 and mapped to a brightness level of 1 (brightest); if it detects 50, the value will be constrained to 50 and mapped to a brightness level of 0.5 (medium brightness), so as to prevent abnormal values from causing disorder in brightness control.
Pro Tip: Quick Reminder for Using Value Constraint Blocks — Must-Know to Avoid Pitfalls!
- Note the order of the upper and lower limits: enter the minimum value in the "low" input box and the maximum value in the "high" input box, and do not reverse them (for example, setting low= 100 and high= 1 will cause the constraint to become invalid);
- Adaptation of numeric types: The numeric types of the upper and lower limits should be consistent with the numeric value to be constrained as much as possible (integer for integer, decimal for decimal). For example, to constrain 3.7, use low= 1.0 and high= 10.0;
- Use in combination with mapping: If the range of the constrained value does not match the subsequent function (e. g., brightness 0-1), you can use a mapping block to convert the range and improve practicality;
- For exception protection: It is usually placed after sensor data reading and variable assignment to filter out abnormal values in advance and prevent program crashes.
✨ Exclusive Mini Interaction: Numerical Constraint Block Challenge
- Quick Response Quiz 1: What is the result of constraining the value -3 within the range of 0 to 5? (Answer: 0!)
- Quick Response Quiz 2: What is the core function of the numerical constraint block? (Answer: To limit a numerical value to a specified range and ensure it complies with requirements~)
- Think about it: We want to constrain the air conditioner temperature (the variable "temperature") between 16 and 30°C. Which blocks do we need to use? (Hint: a value constraint block, the "temperature" variable block, and the plain numbers 16 and 30~)
Core Quick Summary: The numerical constraint block acts as the "numerical security guard" of a program, whose core function is to restrict a value within a specified upper and lower bound and filter out outliers. Consisting of three input fields: the value to be constrained, the lower limit, and the upper limit, it is widely applied in sensor data calibration and variable range control. Mastering this block will make your program's numerical processing more stable and reliable~
11. Random Integer Block (random integer from [number] to [number])
Want to add "randomness" to your program? For example, randomly picking numbers for a lottery draw, spawning enemies randomly in a game, or generating random data for testing — this is exactly when you need the "random lucky star" that is the random integer block! It can generate a random integer between the start and end values you set; each run may yield a different result, but it will always fall within the specified range, making your program more flexible and fun~
The random integer block works just like the "prize wheel" we play: the wheel is marked with numbers from 1 to 10, and each spin will randomly land on one of the numbers. The result is uncertain, but it will definitely be an integer between 1 and 10. Its core function is to "generate a random integer" — as long as you set the range properly, it will automatically produce a random result without any manual intervention from us.

Chinese meaning: generate a random integer (random integer) between the specified start value. ..(from) and end value. ..(to), which can be used for random events or test data generation.
First, understand the core features and components of the random integer block, and you can easily master how to use it:
- Core Features: Randomness of results — the integer generated each time the program runs or the block is triggered may vary; Determinacy of range — the result will always be between from and to, and will never go beyond this range;
- Components: It consists of a "start value input box (from)" and an "end value input box (to)". The two input boxes are used to enter the minimum and maximum values of the random range respectively (for example, if from= 1 and to= 10, a random integer between 1 and 10 will be generated).
Here are a few real-life examples to quickly understand the use of random integers:
Real-life Example 1: Selecting a lottery number – randomly pick one number from 1 to 100 as the winning number;
Example in daily life 2: Random in-game items: Generate a random number from 1 to 5, where 1 corresponds to gold coins, 2 to health points, 3 to weapons, and so on;
Example in Daily Life 3: Random Q&A: Generate a random number from 1 to 30, which corresponds to the student number of one of the 30 students in the class, and the selected student will answer the question.
Then let's look at the practical examples in programming, which are combined with hardware devices and can be put to direct use right after you finish learning:
Practical Example 1: Basic Random — Generate a random integer between 1 and 10 and display the result
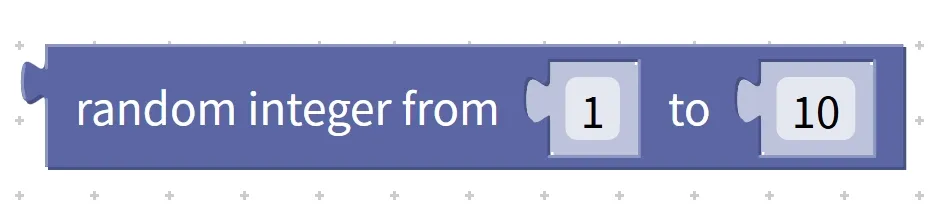
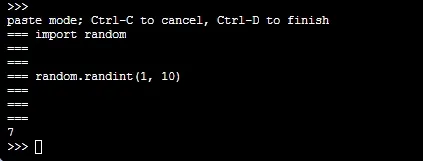
- Requirement: Generate a random integer between 1 and 10, and display the result on the display screen;
- Step 1: Find the random integer block (random integer from [number] to [number]) in the block area;
- Step 2: Place the pure number block "1" in the "from input box" and "10" in the "to input box";
- Step 3: Place the combined random integer block into the content area of the "show" block;
Operation logic: The program randomly selects an integer within the range of 1 to 10. The first run may display "7", the second run may display "3", and the third run may display "10". Each result is uncertain, but all fall between 1 and 10.
Practical Example 2: Random Event Trigger — Randomly Lighting Up LEDs of Different Colors
- Requirement: Generate a random integer between 1 and 3, where 1 turns on the red light, 2 turns on the green light, and 3 turns on the blue light, to achieve a random lighting effect;
- Step 1: Locate the random integer block, set from= 1, to= 3;
- Step 2: Locate the "If. .. then. .. else if. .. then. .. else. .." multi-condition block;
- Step 3: In the first condition area, set "Random Result = 1", and in the execution area, set "Turn on the red light for 1 second";
- Step 4: In the second condition area, set "random result = 2", and in the execution area, set "turn on the green light for 1 second";
- Step 5: Otherwise, place "Turn on the blue light for 1 second" in the area;
Operation logic: Each time the program runs, it randomly generates an integer between 1 and 3, which corresponds to lighting up a light of a different color. For example, if the generated number is 2, the green light turns on; if the generated number is 3, the blue light turns on, thus realizing a random lighting effect.
Pro Tip: Quick Reminder for Using the Random Integer Block — Must-Know to Avoid Pitfalls!
- Note on range inclusiveness: The generated random integer includes both the start value and the end value. For example, if from= 2 and to= 5, any of 2,3, 4, or 5 may be generated;
- Start value ≤ end value: It must be ensured that the value entered in the from field is less than or equal to the value entered in the to field (for example, a setting of from= 5 and to= 3 will result in generation failure);
- Conditional Block Matching: Random results usually need to be paired with multi-condition blocks to enable the triggering of different random events;
- For test data: Generates random integers within a specified range, which can be used as test data to verify the running effect of the program under different values.
✨ Exclusive Mini Interaction: Random Integer Block Challenge
- Quick Quiz 1: When generating a random integer from 5 to 15, what is the maximum possible number that can appear? (Answer: 15!)
- Quick Response Quiz 2: Will the result of the random integer block be the same every time it runs? (Answer: No! It has randomness~)
- Think about it: We want to make a program that "randomly selects a snack", where numbers 1 to 4 correspond to 4 different snacks. Which blocks do we need to use? (Hint: random integer block (from= 1 to= 4), multi-condition block, show block~)
Core Quick Summary: The random integer block is the "random lucky star" of programs, whose core function is to generate a random integer within a specified range. It consists of two input fields: a start value and an end value; the output is random but falls within a fixed range. When paired with conditional blocks, it can enable functions such as random event triggering and game design, making programs more flexible and engaging~
12. Random Decimal Block (random fraction)
The previous random integer block can generate integers, but if we need "continuous random values", such as randomly controlling light brightness (a ratio between 0 and 1) or simulating probability events (e. g., triggering with a 30% probability), random integers will not suffice! At this point, the random decimal block, this "random ratio generator", comes in handy — it is specially designed to generate random decimals between 0 and 1 (inclusive of 0, exclusive of 1), with continuous and random values, making it perfectly suitable for scenarios like ratio control and probability simulation~
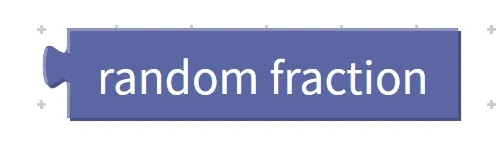
The random decimal block works just like the "probability spinner" we use: the spinner is marked with a scale from 0 to 1, and the pointer lands on a random position. If it points to 0.3, that corresponds to a 30% probability; if it points to 0.8, that corresponds to an 80% probability. Its core function is to "generate a continuous random proportion" — there is no need to set a range (it is fixed at 0 to 1), and you can generate a qualifying random decimal simply by calling it directly.
Chinese meaning: Generate a random decimal between 0 and 1 (random fraction), which can be used for probability control or random behavior simulation.
First, understand the core features and components of the random decimal block, and you can easily master how to use it:
- Core Features: Fixed range: the result always falls within 0 ≤ decimal < 1, eliminating the need for manual range setting; Numerical continuity: the output is a decimal that can take any value between 0 and 1(e. g., 0.123, 0.554695, etc.);
- Component: It has no input box and is a "parameterless block". You can directly drag it out from the block area to use without setting additional values.
Here are a few real-life examples to quickly help you understand the function of random decimals:
- Real-life Example 1: Random Light Brightness — Generate a random decimal between 0 and 1 to control the brightness of the LED light (0 = dimmest, 1 = brightest);
- Real-life Example 2: Probability Event Simulation — Generate a random decimal between 0 and 1; if the value is less than 0.3 (30% probability), the lottery draw is triggered successfully, otherwise (if the value is greater than or equal to 0.3), it fails;
- Example in Real Life 3: Random Speed Control: Generate a random decimal between 0 and 1, map it to a speed in the range of 0 to 10 km/h, and control the random traveling speed of a toy car.
Then let's look at the practical examples in programming, which are combined with hardware devices and can be put to direct use right after you finish learning:
Practical Example 1: Basic Random — Generate a random decimal between 0 and 1 and display the result
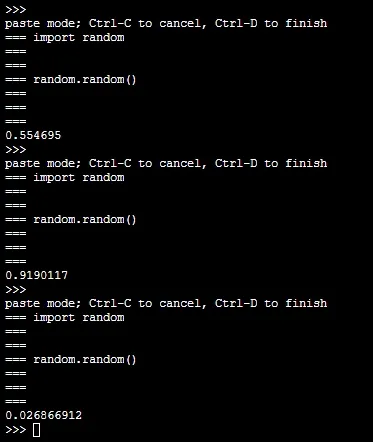
- Requirement: Generate a random decimal number between 0 and 1, and display the result on the screen;
- Step 1: Find the random fraction block in the block area;
- Step 2: Directly place the random decimal block into the content area of the "show" block;
Operation logic: The program automatically generates random decimals satisfying 0 ≤ x < 1. The first run may display "0.554695", the second run may display "0.123456", and the third run may display "0.999999". Each result is different, but all fall within the range of 0 to 1.
Practical Example 2: Probabilistic Event Simulation – Trigger the buzzer with a 30% probability
- Requirement: Generate a random decimal between 0 and 1. If the decimal is less than 0.3 (30% probability), trigger the buzzer to sound for 1 second and display the prompt "Lottery draw successful"; otherwise, do not activate the buzzer and display the prompt "Thank you for participating".
- Step 1: Locate the random decimal block;
- Step 2: Find the "less than" comparison block, place the random decimal block in the first input box, and put the pure number "0.3" in the second input box;
- Step 3: Put the comparison block into the condition area of the "if. .. then. .. else. .." conditional block;
- Step 4: In the "if" execution area, set "buzzer sounds for 1 second + display 'Lottery Successful'"; in the "else" execution area, set "display 'Thank You for Participating'";
Operating logic: Each time the program runs, it randomly generates a decimal between 0 and 1. If the generated value is 0.25 < 0.3, the buzzer will sound and "Success" will be displayed; if the generated value is 0.4 > 0.3, "Thanks for participating" will be displayed, thus realizing a lottery effect with a 30% winning probability.
Pro Tip: Quick Reminder for Using the Random Decimal Block — Must-Know to Avoid Pitfalls!
- Keep the range restriction in mind: the result includes 0 but excludes 1, and 1 will never be generated. For example, to achieve a 50% probability, use "<0.5" instead of "≤0.5";
- Direct use without parameters: The block has no input box, and can be used directly after being dragged out, with no need to set additional ranges or values;
- Mapping Extension Range: If you need random values beyond the range of 0-1 (e. g., 0-100), you can use the mapping block to map the 0-1 range to 0-100;
- Accurate probability calculation: When simulating probabilities, the number of decimal places does not affect the probability (for example, 0.3 and 0.30 produce the same effect), so you can set it as needed.
✨ Exclusive Mini Interaction: Random Decimal Block Challenge
- Quick Response Quiz 1: What is the range of values generated by the random decimal block? (Answer: 0 ≤ decimal < 1, inclusive of 0 but exclusive of 1!)
- Quick Response Quiz 2: If you want to trigger an event with a 20% probability, which comparison condition should you use? (Answer: Random decimal < 0.2!)
- Think about it: We want to randomly control the fan speed (0-500 RPM). If we use the random decimal block, what other blocks do we need to pair it with? (Hint: Random decimal block + mapping block (map 0-1 to 0-500) + set fan speed block~)
Core Quick Summary: The random decimal block acts as the "random proportion generator" in a program, whose core function is to generate continuous random decimals between 0 and 1. It requires no input parameters, is easy to use, and has a fixed value range. When paired with comparison blocks, it enables probability event simulation; when paired with mapping blocks, it can expand the value range. It is a key tool for programs to implement continuous random control~
13. Integer Conversion Block (to int)
When programming, we often encounter the issue of "needing an integer but getting a decimal" — for example, a sensor returns 3.7 when measuring distance, or a calculation yields 2.999, while some blocks (such as those for loop counts or motor speed control) only accept integer inputs. This is where the "convert to integer" block, our decimal-to-integer converter, comes into play! It converts a decimal value into an integer type, typically by directly truncating the fractional part (rounding towards zero), helping us resolve the problem of incompatible numeric types.
The "convert to integer" block works just like the "truncator" we use: for example, it strips off the decimal part "0.7" from 3.7 to turn it into 3, and removes the decimal part "0.999" from 5.999 to make it 5. Its core function is to discard the fractional part and keep only the integer part — it simply truncates the number directly no matter how large the decimal part is, rather than rounding it!

Chinese meaning: converts the input value to the integer type (to int), removing the fractional part for integer operations or assignment.
First, understand the core features and components of the "convert to integer" block, and you can easily master how to use it:
- Core Features: Truncation towards zero instead of rounding — regardless of whether the fractional part is 0.1 or 0.9, it is directly discarded, e. g., 3.7 → 3, 5.9 → 5, -2.3 → -2; Integer input remains unchanged — if the input is an integer (such as 7,10), it will remain the original integer after conversion;
- Component: It consists of a "to-be-converted value input box", which can hold values that need to be converted such as pure decimals, sensor data with decimals, and variables.
Here are a few real-life examples to quickly help you understand the function of converting to an integer:
- Real-life Example 1: Counting the quantity of items: If you bought 3.7 jin of apples, when counting them by the unit of "individual", you discard the decimal part and count them as 3 pieces (the actual payment is based on weight, but the quantity needs to be an integer);
- Real-life Example 2: Calculating the number of trips – a car has traveled 2.99 times (simulated data), which is rounded down to 2 after converting to an integer, as the number of trips must be an integer;
- Practical Example 3: Controlling motor speed — the sensor returns a reading of 50.8 rpm, but the motor only accepts integer values, so the value is rounded to an integer and the motor is controlled at 50 rpm.
Then let's look at the practical examples in programming, which are combined with hardware devices and can be put to direct use right after you finish learning:
Practical Example 1: Basic Conversion — Convert 3.7 to an integer and display the result
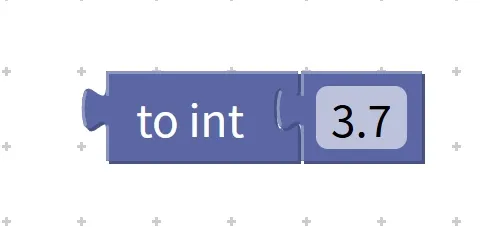
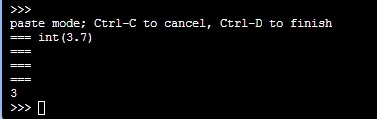
- Requirement: Convert the pure number 3.7 into an integer, and display the converted result on the display screen;
- Step 1: Find the "to int" block in the Blocks area;
- Step 2: Place the pure numeric block "3.7" in the "Value to Convert Input Box";
- Step 3: Put the combined "convert to integer" block into the content area of the "show" block;
Operation logic: The program directly truncates the fractional part "0.7" of 3.7, outputs the integer 3, and the display finally shows "3". If "3.7" is changed to "5.999", it displays "5"; if changed to "-4.2", it displays "-4"; if changed to "7", it displays "7".
Practical Example 2: Sensor Data Conversion — Controlling Motor Speed
- Requirement: Use a rotational speed sensor to detect the simulated rotational speed (obtaining data with decimals such as 45.6 rpm, 52.9 rpm, etc.), convert the data into an integer, and then control the motor to operate at the integer rotational speed after conversion;
- Step 1: Locate the speed sensor block and obtain the "detected speed" data;
- Step 2: Locate the "Convert to Integer" block, and place the sensor data into the input field for the value to be converted;
- Step 3: Locate the "Set Motor Speed" block (which only accepts integers), and place the converted integer result into its input box;
Operating logic: If the sensor detects 45.6, the integer conversion result is 45, and the motor runs at 45 rpm; if it detects 52.9, the integer conversion result is 52, and the motor runs at 52 rpm, so as to avoid motor control errors caused by decimal rotational speeds.
Pro Tip: Quick Reminder for Using the "Convert to Integer" Block – Must-Know to Avoid Pitfalls!
- Distinguish between "truncation" and "rounding": when converting to an integer, the decimal part is directly removed instead of being rounded (for example, 3.9 is not equal to 4, but 3), do not confuse it with the rounding function of the rounding block;
- Negative number conversion rule: When converting a negative number to an integer, it is also truncated towards zero. For example, -2.8 becomes -2 instead of -3;
- For type compatibility: when subsequent blocks (such as loop count and motor control) can only receive integers, you must use the convert to integer block for conversion, otherwise the program will report an error;
- Avoid precision loss: If you need to preserve decimal precision (e. g., for amount calculation), do not use the "convert to integer" block; instead, use the rounding function of the "round" block.
✨ Exclusive Mini Interaction: Integer Block Rotation Challenge
- Quick Response Quiz 1: What is the result of converting the value 5.999 to an integer? (Answer: 5! Just truncate the decimal part directly~)
- Quick Response 2: What is the core difference between the "convert to integer" block and the "round to integer" block? (Answer: The "convert to integer" block truncates the decimal part, while the "round to integer" block rounds up or discards the decimal part based on its value~)
- Think about it: We want to convert the 28.7°C temperature detected by the sensor into an integer for integer display. Which blocks do we need to use? (Hint: integer conversion block, temperature sensor block, display block~)
Core Quick Summary: The "Convert to Integer" block acts as the "decimal-to-integer converter" for programs. Its core function is to convert a numerical value into an integer type by truncating the decimal part (not rounding). It consists of an input field for the value to be converted, and is mainly used to solve the problem of incompatible data types. Mastering this block will help our programs run stably in scenarios that require integer inputs~