
Contents
1. Introduction
In the previous explanation, we learned about the principle of the serial port Communication Protocol. Now let's move on to the code practice part to see how we can implement serial port communication through code.
In actual operation, there are two ways for us to implement serial communication: hardware serial communication and software-simulated serial communication.
Serial communication essentially transmits data through changes in electrical levels. For a hardware serial port, there is a dedicated hardware module inside. Developers only need to simply instruct the hardware serial port to "send this data" or "receive data", and the hardware module will automatically generate the corresponding electrical level signals. Just like the ones we used before Serial.begin () and Serial.print () and other statements, all use the relevant functions of hardware serial communication.
As for the software-simulated serial port, it completely relies on GPIO pins to simulate every signal level change in serial communication, including the high and low transitions of signals such as baud rate, data bits, start bits, and stop bits, among others.
2. Hardware Serial Communication —— HardwareSerial Library
Previously, we have learned the basic usage of the serial port, and the most commonly used functions include Serial.begin (), Serial.print (), Serial.println () and Serial.read (), etc.
When we learned about library files earlier, we mentioned that the dot operator is used to access the members of an object (including properties and methods). Apparently, Serial is clearly an object, while begin (), print (), println (), read () and so on are member functions of the class to which this object belongs.
This is indeed the case. Serial belongs to the HradwraeSerial class, which actually comes from the HradwraeSerial hardware serial port library. It is also the core library of Arduino, so we don't need to #include <HradwraeSerial> to reference the contents inside.
There's another question I wonder if you've noticed: since Serial is an object, why can we use it without instantiating it?
Actually, this is because the HradwraeSerial library file has already completed the object creation process, so we can just use it directly.
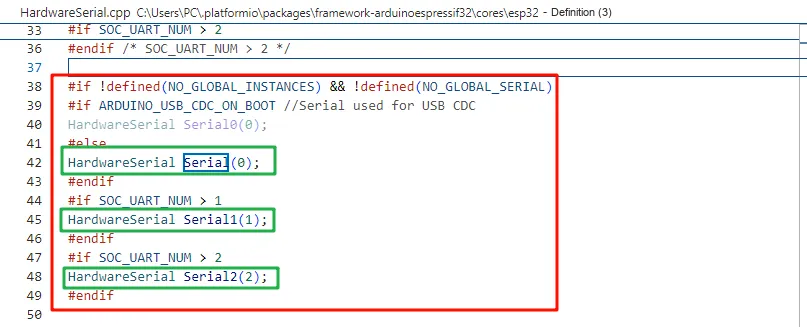
The ESP32 has three UART ports (UART0, UART1, UART2), and each port is equipped with corresponding TX and RX pins.
In the class library functions, three objects for hardware serial ports have already been created:
UART0 -> Serial
UART1 -> Serial1
UART2 -> Serial2
Obviously, when we use Serial in daily scenarios, we are actually using the UART0 serial port.
2.1 Member Functions of the HardwareSerial Library
1.begin ()- Initialize the serial port
Function: Used to initialize the serial port and configure the baud rate, data format and pins.
Syntax:
Serial.begin(baudrate);
Serial.begin(baudrate, config);
Serial.begin(baudrate, config, rxPin, txPin);
Serial.begin(baudrate, config, rxPin, txPin, invert);
Parameters:
baudrate: baud rate (unsigned long), e. g. 9600, 115200.
config (optional): data format, default is SERIAL_8N1, which stands for 8 data bits, no parity, 1 stop bit. Available values include:
SERIAL_8N1(default): 8 data bits, no parity, 1 stop bit.SERIAL_8E1: 8 data bits, even parity, 1 stop bit.SERIAL_8O1: 8 data bits, odd parity, 1 stop bit.
rxPin, txPin (ESP32-specific, optional): Specify the receive (RX) and transmit (TX) pins, which default to the hardware default pins.
invert (ESP32-specific, optional): whether to invert the logic level. true means inverted, false (default) means normal level.
Return value: None.
2.end ()- Close the serial port
Function: Used to close the serial port and release the hardware resources occupied by the serial port.
Syntax:
Serial.end();Parameters: None.
Return value: None.
Example:
Serial.begin(115200);  // Initialize serial
// ... perform serial communication
Serial.end();  // Close the serial port and release resources
3. available ()- Get the number of bytes available for reading
Function: Returns the number of bytes available for reading in the serial port buffer.
Syntax:
int availableBytes = Serial.available();Parameters: None.
Return value: Returns the number of bytes available for reading in the serial port buffer (of type int). A return value of 0 indicates that there is currently no data available to read.
Example:
if (Serial.available() > 0) {char c = Serial.read();  // read one byte
    Serial.print("Received: ");
    Serial.println(c);
}
4. read ()- Read one byte
Function: Reads one byte of data from the serial port buffer.
Syntax:
int data = Serial.read();Parameters: None.
Return value: Returns the read byte data (int type, ranging from 0 to 255). If there is no data available for reading, it returns -1.
Example:
if (Serial.available()) {
    int receivedByte = Serial.read();
    Serial.print("Received Byte: ");
    Serial.println(receivedByte);
}
5. readBytes (buffer, length)- Read multiple bytes
Function: Reads byte data of a specified length from the serial port buffer and stores it into the buffer.
Syntax:
int bytesRead = Serial.readBytes(buffer, length);Parameters:
buffer: A character array (char[]) used to store read data.length: The number of bytes to be read (of typesize_t).
Return value: Returns the number of bytes successfully read (of type int).
Example:
char data[10];  // Define the buffer
int bytesReceived = Serial.readBytes(data, 10);
Serial.print("Received bytes: ");
Serial.println(bytesReceived);
6.write (data)- Send data
Function: Sends data to the serial port, which can be a single byte, a string, or a byte array.
Syntax:
Serial.write(data);
Serial.write(buffer, length);
Parameters:
data: A single byte (of typeuint8_t) or a string (of typechar*) to be sent.buffer: The data array to be sent (uint8_t[]).length: the number of bytes to be sent (of typesize_t).
Return value: Returns the number of bytes successfully written (of type size_t).
Example:
Serial.write(65);  // Send the character 'A' (ASCII value 65)
char message[] = "Hello";
Serial.write(message, sizeof(message));  // Send the string "Hello"
7. print (data)- Send data in a human-readable format
Function: Send data in ASCII code format, if desired.
Syntax:
Serial.print(value);
Serial.print(value, format);
Parameters:
value: The numeric value or string to be sent.format(optional): specifies the base (BIN,OCT,DEC,HEX) or the number of decimal places for a floating-point number.
Return value: Returns the number of bytes successfully written (of type size_t).
Example:
Serial.print("Temperature: ");
Serial.print(25.6, 1);  // Send "Temperature: 25.6"
Serial.print(255, HEX);  // Send "FF"
8.println (data)- Send data in a human-readable format and append a newline
Function: Similar to print (), but it automatically appends the newline character \r\n after the data.
Syntax:
Serial.println(value);
Serial.println(value, format);
Parameters:
value: The numeric value or string to be sent.format(optional): specifies the base (BIN,OCT,DEC,HEX) or the number of decimal places for a floating-point number.BIN(Binary)OCT(octal)DEC(decimal, default value)HEX(hexadecimal)
Return value: Returns the number of bytes successfully written (of type size_t).
Example:
Serial.println("Hello, World!");  // Send "Hello, World!" followed by a newline
Serial.println(100, DEC);  // Send "100" followed by a newline
9. write ()- Send data
Function: Used to send data to the serial port; the data can be a single byte, a string, or a byte array.
Syntax:
Serial.write(data);
Serial.write(buffer, length);
Parameters:
data: A single byte (of typeuint8_t) or a string (of typechar*) to be sent.buffer: The data array to be sent (uint8_t[]).length: the number of bytes to be sent (of typesize_t).
Return value: Returns the number of bytes successfully written (of type size_t).
Example:
Serial.write(65);  // Send the character 'A' (ASCII value 65)
char message[] = "Hello";
Serial.write(message, sizeof(message));  // Send the string "Hello"
10.flush ()- Wait for data transmission to complete
Function: Ensure that all data has been sent completely before proceeding to the next step.
Syntax:
Serial.flush();Parameters: None.
Return value: None.
Example:
Serial.print("Sending data...");
Serial.flush();  // Make sure the data has been completely sent
Serial.println(" Done.");
11. setTimeout (time)- Set the timeout duration
Function: Sets readBytes () and other blocking functions' timeout duration, in milliseconds.
Syntax:
Serial.setTimeout(time);
Parameters:
time: Timeout duration (unsigned long), default value is 1000ms (1 second).
Return value: None.
Example:
Serial.setTimeout(500);  // Set the read timeout to 500 milliseconds
char buffer[5];
Serial.readBytes(buffer, 5);  // Read 5 bytes, waiting at most 500 milliseconds
12. peek ()- View the data of the next byte
Function: View the next byte to be read without removing it from the buffer.
Syntax:
int nextByte = Serial.peek();Parameters: None.
Return value: Returns the data of the next byte (0~255). If there is no data available to read, it returns -1.
Example:
if (Serial.available()) {int nextByte = Serial.peek();  // Look at the next byte of data
    Serial.print("Next Byte: ");
    Serial.println(nextByte);
}
13. find ()- Find a substring
Function: Check whether a specified string exists in the serial port input data.
Syntax:
bool found = Serial.find(str);Parameters: str: The string to be found (of type char*).
Return value: If the specified string is found, this method returns true; otherwise, it returns false.
Example:
if (Serial.find("OK")) {
    Serial.println("Found the string 'OK'!");
}
14. findUntil ()- Find a string until the specified character
Function: Check whether a specified string exists in the serial port input data until the specified termination character is encountered.
Syntax:
bool found = Serial.findUntil(str, terminator);Parameters:
str: The string to be found (of typechar*).terminator: a terminating character (of typechar) that specifies that the search process shall stop when this character is encountered.
Return value: If the specified string is found, or the search stops when a terminating character is encountered, returns true; otherwise, returns false.
Example:
if (Serial.findUntil("OK", "\n")) {
    Serial.println("Found the string 'OK' or reached newline.");
}
15. listen ()- Set the serial port as the active serial port
Function: Set the serial port as the currently active serial port, and only the active serial port can receive data.
Grammar:
Serial.listen();Parameters: None.
Return value: None.
16. availableForWrite ()- Check if the serial port is writable
Function: Checks whether data can be written to the serial port, and returns the remaining writable space in the serial port buffer.
Grammar:
int availableSpace = Serial.availableForWrite();Parameters: None.
Return value: Returns the remaining writable space in the serial port buffer (of type int).
Example:
if (Serial.availableForWrite() > 0) {
    Serial.write("Data to send");
}
17. baudRate ()- Get the current baud rate
Function: Get the baud rate of the current serial port.
Grammar:
unsigned long currentBaudRate = Serial.baudRate();Parameters: None.
Return value: Returns the currently configured baud rate (of type unsigned long).
Example:
unsigned long baud = Serial.baudRate();  // Get the current baud rate
Serial.print("Current Baud Rate: ");
Serial.println(baud);
18. configure ()- Configure the serial port
Function: Configure parameters such as the baud rate, data bits, stop bits, and parity bits of the serial port.
Grammar:
Serial.configure(baudRate, config);Parameter:
baudRate: The set baud rate.config: Data format, commonly used options includeSERIAL_8N1,SERIAL_8E1, etc.
Return value: None.
Example:
Serial.configure(115200, SERIAL_8N1); // Set the baud rate to 115200, data format 8N119. setRxBufferSize ()- Set the size of the receive buffer
Function: Set the size of the receive buffer, which affects the amount of data that can be received.
Syntax:
Serial.setRxBufferSize(size);Parameter: size: size of the receive buffer (in bytes, of type int).
Return value: None.
Example:
Serial.setRxBufferSize(128); // Set the receive buffer size to 128 bytes20. setTxBufferSize ()- Set the size of the transmit buffer
Function: Set the size of the send buffer, which affects the buffer size when sending data.
Syntax:
Serial.setTxBufferSize(size);Parameter: size: size of the send buffer (in bytes, of type int).
Return value: None.
Example:
Serial.setTxBufferSize(256); // Set the transmit buffer size to 256 bytes21. setFlowControl ()- Set flow control mode
Function: Configure serial port flow control, which is usually used to ensure reliable data transmission and prevent serial port buffer overflow.
Syntax:
Serial.setFlowControl(flowControl);Parameter: flowControl: flow control mode, which is usually SERIAL_FLOWCONTROL_NONE, SERIAL_FLOWCONTROL_RTSCTS, etc.
Return value: None.
Example:
Serial.setFlowControl(SERIAL_FLOWCONTROL_NONE); // No flow control22. setParity ()- Set the parity bit
Function: Set the parity check mode used for data transmission via the serial port.
Syntax:
Serial.setParity(parity);Parameter: Check Mode parity, common values include:
SERIAL_PARITY_NONE(No Parity)SERIAL_PARITY_EVEN(Even Parity)SERIAL_PARITY_ODD(Odd Parity)
Return value: None.
Example:
Serial.setParity(SERIAL_PARITY_NONE); // Set to no parity23. isDataAvailable ()- Check if data is available
Function: Check whether there is data available for reading from the serial port.
Syntax:
bool isData = Serial.isDataAvailable();Parameters: None.
Return value: returns true if the data is available, otherwise returns false.
Example:
if (Serial.isDataAvailable()) {char receivedChar = Serial.read();
    Serial.print("Data Received: ");
    Serial.println(receivedChar);
}
2.2 Output: print () vs. write ()
In the HardwareSerial class, there are two output functions: print () and write (). Both can output data, but the difference lies in their output forms.
print () is primarily used for outputting human-readable text: it converts data into strings and sends the characters one by one;write () sends raw byte data directly without any format conversion, making it suitable for transmitting binary data.
You can use the following sample program to compare the differences between the two:
int num = 123;
int byteData = 65;

Serial.print("Using print(): ");
Serial.print(num);   // Send "123" (characters '1', '2', '3')
Serial.print("\n");

Serial.print("Using write(): ");
Serial.write(num);  // Send ASCII code 123 (corresponding to the character `{`)
Serial.print("\n");

delay(1000);

Serial.print("Using print(): ");
Serial.print(byteData);   // Send "65" (characters '6', '5')
Serial.print("\n");

Serial.print("Using write(): ");
Serial.write(byteData);  // Send ASCII code 65 (corresponding to the character 'A')
Serial.print("\n");

delay(1000);
Serial.print () and Serial.write () behave differently when processing num and byteData, resulting in the following output:
Serial.print ()converts data into a string and then sends it character by character. For example, when the number65is passed in, it will be converted to the string"65", and then sent via the serial port one character at a time ('6'and'5').Serial.write ()sends data directly as bytes. If you pass the number65, it will directly send the byte0x41, which corresponds to the ASCII code of the character'A'.
Using print(): 123
Using write(): {
Using print(): 65
Using write(): A
| ||
1 | Incoming number | 65 |
2 | Convert to string | "65" |
3 | Send character by character | [ '6' ] [ '5' ] |
4 | Serial port display | 65 |
| ||
1 | Incoming number | 65 |
2 | Send bytes directly | 0x41 (i. e., the ASCII code for the character 'A') |
3 | Serial port display | 'A' |
💡 By default, the serial monitor parses the received bytes according to the ASCII table and displays the corresponding characters.
2.4 Input: Differences between read () and peek ()
read () and peek () are both used to read data from the serial port buffer, but their core difference lies in whether the data will be removed:
read ()reads the next byte from the serial port buffer and removes it from the buffer. If the buffer is empty, it returns-1.peek ()reads the next byte in the buffer, but does not remove it, leaving the data still in the buffer.
Sample Code: Comparison between read () and peek ()
void setup() {
  Serial.begin(9600);
  while (!Serial) {}  // Wait for the serial connection
}

void loop() {
  if (Serial.available()) {  // Check whether there is data to read
    Serial.print("Using peek(): ");
    Serial.println(Serial.peek());  // Read without removing the data

    Serial.print("Using read(): ");
    Serial.println(Serial.read());  // Read and remove the data

    Serial.print("Using read() again: ");
    Serial.println(Serial.read());  // Read the next data
  }
}
Analysis of Operation Results
Assume that "ABC" is sent via the serial port "ABC":
Using peek(): 65  // ASCII code of 'A'
Using read(): 65  // 'A' is read and removed
Using read() again: 66  // 'B' is read
Let's analyze the process step by step:
Serial.peek ()reads'A', but the data remains in the buffer.Serial.read ()reads'A'and removes it.- Call
Serial.read ()again, and the value read is'B'.
function | Function | Read |
Serial.read() | Read and remove | [ 'B', 'C' ] |
Serial.peek() | Read without removal | [ 'A', 'B', 'C' ] |
If you want to inspect the data without affecting subsequent processing, use peek (); if you want to actually retrieve and process the data, use read ()!
2.5 Serial Port Buffer
When explaining read () and peek (), we have mentioned the serial port buffer on multiple occasions, which is a crucial concept in the data transmission process.
So, what exactly is a serial port buffer?
As the name suggests, a buffer is a temporary storage area for data between the sender and the receiver. It is essentially a temporary storage space allocated on the RAM of the ESP32, functioning as a data buffer.
It is used to temporarily store data in transit, ensuring that the data stream between the sender and the receiver will not be lost due to speed mismatch.
Some of you may wonder, "Haven't we already set the baud rate? Why do we still need to consider this speed issue? " Actually, the baud rate only specifies the transmission speed of data over the serial port, but the processing speed of the receiving end is also affected by factors such as code execution and system resource usage. For example, if the receiver is busy with other tasks or has complex program logic, it may delay reading the data. Without a buffer, the data might be overwritten by new data before the receiver has a chance to process it, resulting in data loss.
When transmitting data, the buffer stores the data incoming from the sender until the receiver is ready to read it. Once the receiver starts receiving, it can read the data from the buffer for processing, and vice versa.
Let’s take a look at the working mechanism of the serial port buffer, shall we?
First, let’s talk about its reading principle and sequence: it follows the First-In-First-Out (FIFO) mechanism. Just like queuing, the data that enters the buffer first will be processed first, while the data that enters later has to wait until all the preceding data has been processed before it can be handled.
The UART buffer of ESP32 consists of a receive buffer (RX Buffer) and a transmit buffer (TX Buffer), and their operating mechanisms are as follows:
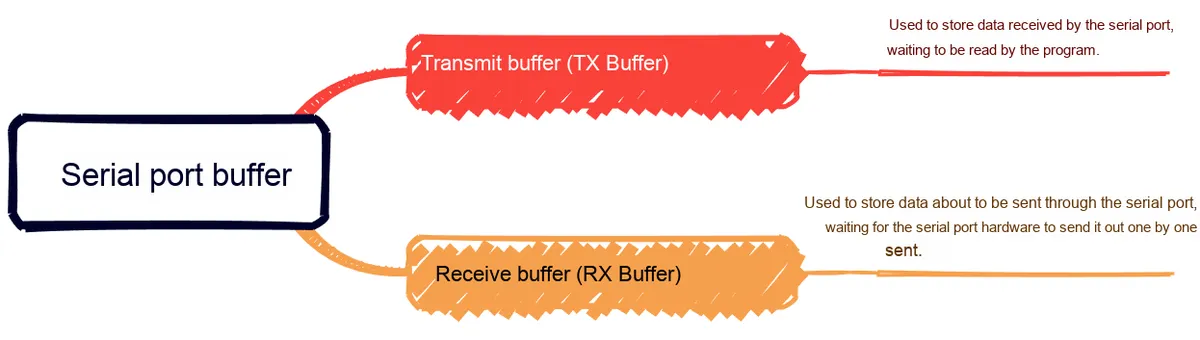
Receive Buffer (RX Buffer)
When an external device (such as a computer) sends data to a microcontroller:
- The data received by the serial port hardware is sequentially stored in the RX buffer and queued for reading.
- The program calls
Serial.read ()to read data sequentially, and each time a byte is read, that byte is removed from the buffer.
Transmit Buffer (TX Buffer)
When the program calls Serial.print ("HELLO") to send data:
'H','E','L','L','O'are stored in the TX buffer in sequence.- The serial port hardware transmits data one by one in sequence.
Type | Function | function of influence |
RX buffer | Store received but unread data | Serial.available(), Serial.read(), Serial.peek() |
TX buffer | Store the data to be sent and wait for serial port transmission | Serial.print(), Serial.write() |
Limitations of the Serial Port Buffer
However, as the volume of data being transmitted gradually increases, partial data loss may occur.
It should be noted that the size of the RX/TX buffer is limited (typically 64 bytes).
Then what will happen if the buffer is already full but new data keeps pouring in continuously?
- When the RX buffer is full, new data will be directly discarded.
- When the TX buffer is full, no data loss will occur, but
Serial.print ()will be blocked until there is free space available for writing.
To prevent the buffer from becoming full, we can do the following:
- Timely Reading: Read
Serial.read ()data in a timely manner to prevent RX buffer overflow. - Control the transmission frequency: Avoid calling
loop ()to execute consecutiveSerial.print ()to output excessive content; appropriately adddelay ()or usemillis ()to control the transmission rate, so as to prevent data accumulation in the TX buffer.
Review of Functions Related to Serial Port Buffer
Let's review several important functions related to the serial port buffer:
Serial.available()
Function: Returns the number of bytes in the RX buffer (i. e., the amount of data available for reading).
Example:
if (Serial.available() > 0) {
int data = Serial.read();  // read one byte
}
Application Scenario: Avoid Serial.read () from reading an empty buffer and prevent returning -1.
Serial.flush()
Function: Wait for the TX buffer to finish sending all data (the RX buffer will not be cleared!).
Example:
Serial.print("Sending data...");
Serial.flush();  // Wait until all data has been sent
Serial.print("Done");
Application Scenario: Ensure that all serial port data has been completely sent before performing other operations.
Example: Observing Buffer Behavior
The following code simulates the working mode of the RX buffer:
void setup() {
  Serial.begin(9600);
  while (!Serial) {}  // Wait for the serial connection
}

void loop() {
  if (Serial.available() > 0) {
    Serial.print("RX Buffer Size: ");
    Serial.println(Serial.available());  // Display the amount of remaining data

    Serial.print("Reading: ");
    Serial.println(Serial.read());  // read one byte
  }
}
The code runs as follows:
- The computer sends
"ABC"via the serial port. Serial.available ()returns 3 (there are 3 unread bytes).Serial.read ()reads'A', leaving only'B'and'C'in the buffer.- Each time
Serial.read ()is called, the data in the RX buffer decreases.
2.6 Serial Port Event serialEvent ()
serialEvent () Its function is: this event will be triggered when there is data in the serial port buffer.
3. Software Simulation of Serial Communication —— SoftwareSerial Library
In some cases, we may not have enough hardware serial ports (for example, the hardware serial ports are already occupied), or the pins of the hardware serial ports are not suitable. In such cases, we can use software serial port to simulate an additional serial port for communication.
The SoftwareSerial library enables emulating additional serial pins via code using other digital pins for communication. As it is not part of the Arduino core libraries, we need to include the SoftwareSerial.h library file before using it.
3.1 Limitations of Software-based Emulated Serial Communication
Since a software serial port is simulated and generated by a program and does not rely on a serial port controller at the hardware level, it is less stable to use than a hardware serial port. Moreover, just like a hardware serial port, the higher the baud rate, the more unstable it becomes.
3.2 SoftwareSerial Library Member Functions
As we have learned earlier, the software serial port is implemented by a program on the GPIO simulating the timing of serial communication.
For this very reason, SoftwareSerial is deliberately designed to be highly similar to the hardware serial port in terms of usage, which reduces the learning curve and allows developers to quickly "add an extra serial port" when needed.
Therefore, in most cases, the basic usage of a software serial port is almost identical to that of the hardware serial port you are already familiar with, for example, begin (), read (), write (), available (), print (), println (), end () and other such functions, which are used in largely the same way. What really requires our extra attention are some limitations and control functions unique to software serial ports.
1. SoftwareSerial () - Creates a software serial port object (constructor function)
Function: Creates a SoftwareSerial object and specifies the receive pin and transmit pin to be used for communication.
Syntax:
SoftwareSerial mySerial(rxPin, txPin);Parameter:
rxPin: Receive pin.txPin: Transmit pin.
Return value: None.
Example:
SoftwareSerial mySerial(10, 11);
void setup() {
    mySerial.begin(9600);
}
2. listen () - Listen on the specified software serial port
Function:
- Enable the software listening status
- SoftwareSerial can only listen to one serial port at a time, so if there are multiple SoftwareSerial instances, you need to use
listen ()to switch between them - Ensure that the current object is active and capable of receiving data.
Syntax:
mySerial.listen();Parameter: None
Return value: If the listener is successfully switched, this method returns true; otherwise, it returns false.
Example:
SoftwareSerial serial1(10, 11);
SoftwareSerial serial2(8, 9);

void setup() {
    serial1.begin(9600);
    serial2.begin(9600);
    serial1.listen(); // Listen to serial1
}

void loop() {if (serial1.available()) {char c = serial1.read();
        Serial.print("Serial1 Received: ");
        Serial.println(c);
    }
// Switch to listening to serial2
    serial2.listen();if (serial2.available()) {char c = serial2.read();
        Serial.print("Serial2 Received: ");
        Serial.println(c);
    }
}
3. isListening () - Checks whether the current object is listening
Function:
- Used to determine whether the current SoftwareSerial object is in the listening state, that is, whether it is receiving data.
- This method can be used to verify
listen ()whether it has successfully switched to the current serial port.
Syntax:
bool status = mySerial.isListening();Parameter: None
Return value: If the current object is listening, returns true; otherwise, returns false.
Example:
if (mySerial.isListening()) {
    Serial.println("SoftwareSerial is active.");
} else {
    Serial.println("SoftwareSerial is not active.");
}
4. overflow () - Check if a buffer overflow has occurred
Function:
- The receive buffer of SoftwareSerial is limited (typically 64 bytes); if data arrives too fast to be read in time, the buffer may overflow, resulting in data loss.
overflow ()method is used to check whether this situation has occurred.
Syntax:
bool hasOverflowed = mySerial.overflow();Parameters: None
Return value: If a buffer overflow occurs, returns true; otherwise, returns false.
Example:
if (mySerial.overflow()) {
    Serial.println("Buffer Overflow Detected!");
}
3.3 Example: ESP32 uses SoftwareSerial for software serial communication
ESP32 has multiple hardware serial ports by default (Serial, Serial1, Serial2), but if additional serial ports are required, the SoftwareSerial library can be used to simulate serial communication.
However, the ESP32 does not support the SoftwareSerial library; you can use the alternative libraries AltSoftSerial or ESPSoftwareSerial instead.
#include <ESPSoftwareSerial.h>

// Define the software serial pins
#define RX_PIN 16
#define TX_PIN 17

ESPSoftwareSerial mySerial(RX_PIN, TX_PIN); // Create the software serial object

void setup() {
    Serial.begin(115200);  // Hardware serial, used for debugging
    mySerial.begin(9600);  // Software serial baud rate
    Serial.println("Software Serial Ready!");
}

void loop() {
    // Send data
    mySerial.println("Hello from Software Serial!");

    // Check whether there is data to read
    if (mySerial.available()) {
        String receivedData = mySerial.readString();  // Read the serial data
        Serial.print("Received: ");
        Serial.println(receivedData);  // Print to the hardware serial
    }

    delay(1000);  // Send once per second
}
If you connect TX to RX (for a loopback test), you will see the following output in the Serial Monitor:
Software Serial Ready!
Received: Hello from Software Serial!
Received: Hello from Software Serial!
...
4. Summary of This Chapter
In this chapter, we move from theory to practice, and formally complete the transition of serial communication from "understanding the principle" to "being able to actually write code to use it". Through the explanation of serial communication practice, you not only learn how to call the relevant functions, but more importantly, understand how serial communication operates and manages data inside the program.
Initially, we distinguished between two implementation approaches as a whole: hardware serial communication and software-simulated serial communication. Hardware serial relies on the UART controller inside the chip, and developers only need to interact with it via Serial.begin (), Serial.read (), Serial.write () and other functions; the underlying details such as specific electrical timing, start bits, and stop bits are all automatically handled by the hardware. In contrast, software serial implements communication entirely by the program simulating GPIO level changes, which has higher timing requirements and is more susceptible to the impact of program execution efficiency.This comparison helps us clarify a fundamental principle: where conditions permit, hardware serial ports should be prioritized.
Subsequently, we took the HardwareSerial library as the main thread to systematically sort out the common member functions of the serial port. Starting from the begin () serial port initialization, through data transmission and reception, to configuration options such as buffer, timeout and flow control, everyone gradually realized that: Serial is not a set of scattered functions, but an already instantiated object.The most commonly used Serial, Serial1, Serial2 essentially correspond to different UART ports of the ESP32, which explains why we can directly use the serial port without manually creating an object.
In the output section, we focused on comparing the differences between print () and write (). As clearly demonstrated by the examples, print () converts data into a human-readable string and sends it character by character, making it more suitable for debugging and human-computer interaction; whereas write () directly sends raw byte data without format conversion, making it more suitable for inter-device communication and binary data transmission. Understanding this point can help you avoid the common issue in real projects where "the data looks incorrect, yet the program throws no error".
In the input section, we further distinguish between the usage scenarios of read () and peek (). read () removes the data from the buffer while reading it, whereas peek () only views the data without taking it away. This difference is particularly important in scenarios such as Communication Protocol parsing and data prediction, and it also leads to a core concept of this chapter — serial port buffer.
Through the explanation of the RX buffer and TX buffer, we have understood that serial communication does not perform "immediate transmission and reception", but relies on a buffer area of limited size to coordinate the speed difference between the transmitting end and the receiving end. Precisely because the buffer size is limited, if the program does not read data in time or transmits too frequently, problems such as data loss or program blocking may occur. This part of the content helps everyone build an understanding of the "overall operation process" of serial communication, rather than just staying at the function level.
In the latter half of this chapter, we additionally introduce the usage ideas and limitations of software serial, and explain why alternative solutions such as ESPSoftwareSerial are required in combination with the actual situation of ESP32. Through the sample program, you can intuitively understand the basic usage of software serial, and also realize that it is more suitable to serve as a supplementary solution rather than a complete replacement for hardware serial.
Generally speaking, the focus of this chapter is not on how many functions you memorize, but on establishing such an understanding: serial communication is a communication mechanism jointly composed of hardware, class libraries, buffers and program logic. When you understand how data enters the buffer, how it is read, and how it is sent out, serial port will become one of your most reliable and commonly used tools for subsequent tasks, whether it is sensor Data Acquisition, module communication, or multi-device linkage.