
Contents
1. Introduction: Did the key really get "pressed just once"?
When we press a button in daily life, it just feels like a crisp "snap" — press down, then release, the whole process is neat and straightforward. But in reality, what you think of as "a single press" may be recognized by the microcontroller as several consecutive presses. Why does this happen?
This is a common yet easily overlooked issue that we will delve into today: key jitter (Button Bounce). It not only affects the stable operation of our programs but also impacts user experience.
In the following content, we will take a detailed look at what key jitter is, how it occurs, and how to address it — that is key debouncing.
2. Key Jitter
2.1 Phenomenon
Key jitter refers to the phenomenon that when a key is pressed or released at the very moment, the level of the input pin will fluctuate rapidly for multiple times instead of a single stable transition. For example, when you press a key, the level should theoretically change from high to low, but in reality it may follow this sequence: HIGH → LOW → HIGH → LOW →. .. → LOW.
To gain a more intuitive understanding of the key bouncing phenomenon, we can use a simple program to conduct practical observation:
09-1 Button Bounce - Wokwi ESP32, STM32, Arduino Simulator
#define BUTTON_PIN 25

void setup() {
  Serial.begin(115200);
  pinMode(BUTTON_PIN, INPUT_PULLUP);
}

int lastState = HIGH;
int pressCount = 0;  // press count
int releaseCount = 0; // release count

void loop() {
  int value = digitalRead(BUTTON_PIN);

  if (lastState != value) {
    lastState = value;

    if (value == HIGH) {
      releaseCount++;  // increment the count on release
      Serial.print("released ");
      Serial.print(releaseCount);  // output the number of releases
      Serial.println(" times");
    }

    if (value == LOW) {
      pressCount++;  // increment the count on press
      Serial.print("pressed ");
      Serial.print(pressCount);  // output the number of presses
      Serial.println(" times");
    }
  }
}
The program will output the number of times you press and release the keys via the serial port. Theoretically, one pressed and one released should be output for each press-release cycle. However, you will find that one key press may result in multiple outputs of pressed and released.
2.2 Causes
This is due to the elasticity of the mechanical structure and contact bounce; the metal contact spring inside the key usually has a certain degree of elasticity, so when pressed, they do not make full contact or separate completely immediately. The tiny vibration during this contact process leads to unstable key signals, and the circuit may rapidly toggle back and forth between high and low levels multiple times, which is when "key jitter" occurs.
Mechanical Elasticity: The metal dome inside the key has elasticity, and it will produce slight "bounce" when pressed or released;
Contact bounce Metal contacts may intermittently make and break contact briefly during the closing or opening process, resulting in chattering.
2.3 What problems does jitter cause?
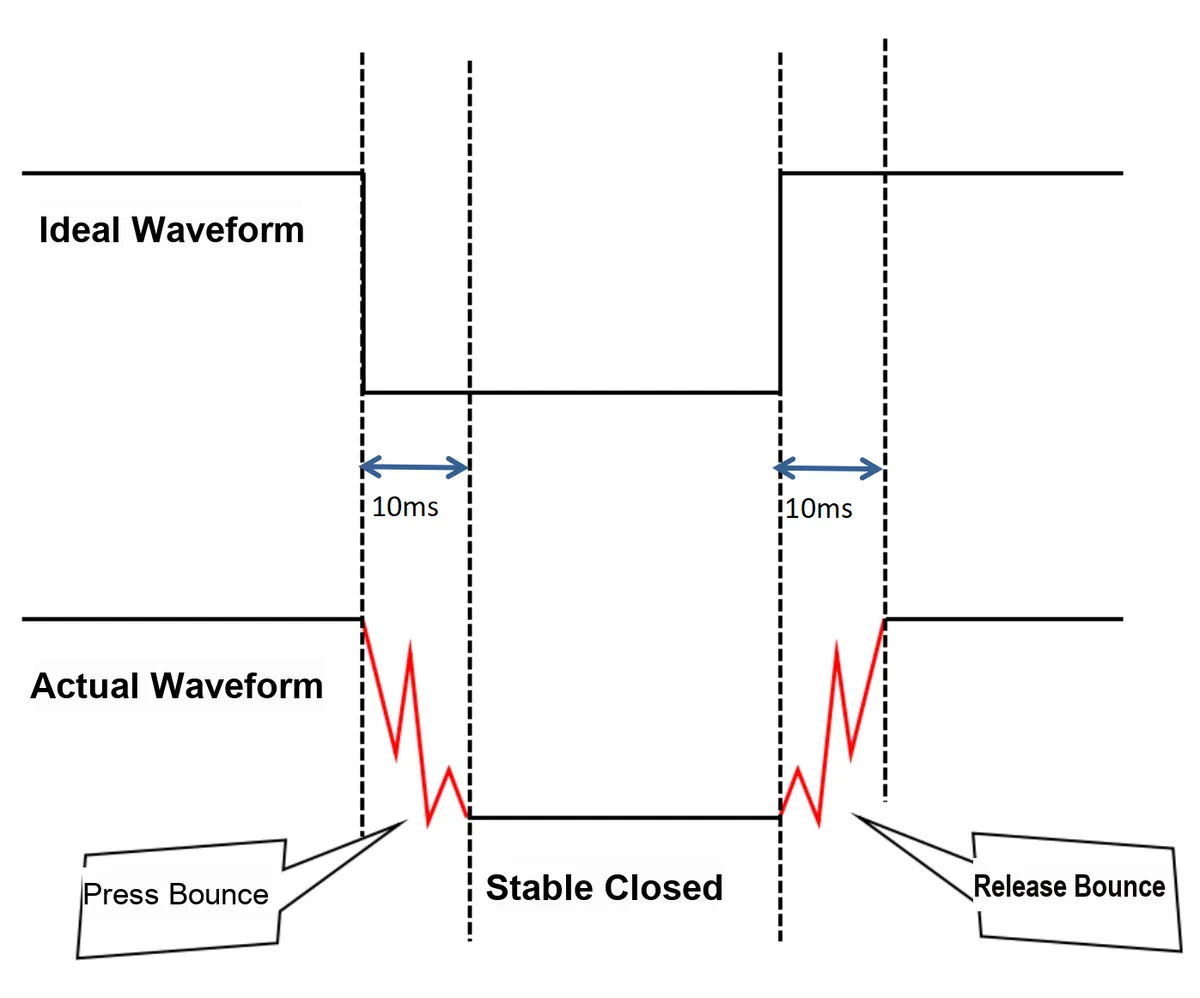
Key bounce typically lasts 5 to 10 milliseconds. By contrast, the processing speed of a microcontroller is measured in microseconds — meaning the microcontroller’s response speed is far faster than the duration of key bounce. Within these 5 to 10 milliseconds, while imperceptible to humans, for a microcontroller with microsecond-level response speed, it has already "observed" numerous level transitions, which may trigger a series of misjudgments.
Suppose we write a piece of code to count the number of key presses: we may actually press the key only once, but the pin level may be misjudged as "several presses". If no processing is performed, the program will treat one press as multiple inputs, leading to false triggering.
A single physical action is perceived by the program as multiple separate actions — that is exactly the hazard of jitter.
3. Key Debouncing
Then we need to think about how to avoid such misjudgments. Since key jitter exists, we should implement debouncing: find a way to filter out these jitter signals so that the ESP32 only records the stable state changes of the key.
In practical applications, jitter elimination methods are divided into hardware jitter elimination and software jitter elimination.
3.1 Hardware Debouncing
Hardware debouncing mainly "filters" the jitter signals generated by keys through circuit components to make the input level more stable. Common hardware debouncing methods include:
- RC filter circuit: A resistor (R) is connected in series between the key and the input pin of the microcontroller, and a capacitor (C) is connected in parallel to the ground to form a low-pass filter. The capacitor can smooth the fast level changes caused by the key and reduce jitter.
- Principle: A resistor is connected in series between the key and the input terminal, and then a capacitor is connected in parallel to form a low-pass filter.
- Function: The delay characteristic of capacitor charging and discharging can filter out the high-frequency components of key jitter, retaining only stable low-frequency signals.
- Features: simple, low-cost and commonly used;
- An appropriate RC time constant should be selected, as an excessively large one will result in a slow response.
- Schmitt Trigger: A Schmitt trigger chip with hysteresis characteristics is used to shape the input signal, so that the level change of the input signal is cleaner and multiple triggers caused by jitter are avoided.
- Principle : Use the hysteresis characteristics of the input end of the Schmitt trigger to shape the input signal.
- Function: Even if the input signal has small jitter, the output will maintain a stable high/low level.
- Features:
- Fast response;
- It is often used in combination with RC circuits (RC filtering → Schmitt trigger shaping) for better performance.
- Dedicated hardware debounce chip
- Example: such as MC14490 6-channel switch debounce IC.
- Principle: The chip integrates an RC filter and Schmitt trigger logic internally, which is specifically designed for debouncing key/switch signals.
- Features:
- Easy to use and highly reliable;
- It features relatively high cost and is generally used in complex or large-scale key input systems.
The advantages of hardware debouncing are fast response and stable debouncing effect, while the disadvantages are the need for additional hardware cost and increased circuit complexity. It is suitable for projects that have high requirements for key response time and reliability.
3.2 Software Debouncing
Software debouncing refers to using program logic to "wait" for the jitter to end, so as to determine whether a key is actually pressed or released.
3.2.1 Delay Method (Blocking Type)
The simplest and most straightforward method is the delay method. Its detection principle is that once a change in the key state is detected, pause for a short period of time (e. g., 10~20ms) first, and then confirm whether the state is stable after the jitter ends.
if (digitalRead(buttonPin) == HIGH) {
  delay(20);  // delay 20ms, wait for the bounce to end
  if (digitalRead(buttonPin) == HIGH) {
    // confirm the button is really pressed
    // perform the corresponding action
  }
}
09-1 Button Bounce - Wokwi ESP32, STM32, Arduino Simulator
#define BUTTON_PIN 25

void setup() {
  Serial.begin(115200);
  pinMode(BUTTON_PIN, INPUT_PULLUP);
}

int lastState = HIGH;
int pressCount = 0;  // press count
int releaseCount = 0; // release count

void loop() {
  int value = digitalRead(BUTTON_PIN);
  delay(20);
  if (lastState != value) {
    lastState = value;

    if (value == HIGH) {
      releaseCount++;  // increment the count on release
      Serial.print("released ");
      Serial.print(releaseCount);  // output the number of releases
      Serial.println(" times");
    }

    if (value == LOW) {
      pressCount++;  // increment the count on press
      Serial.print("pressed ");
      Serial.print(pressCount);  // output the number of presses
      Serial.println(" times");
    }

  }
}#define BUTTON_PIN 25
void setup() {
Serial.begin(115200);
pinMode(BUTTON_PIN, INPUT_PULLUP);
}
int lastState = HIGH;
int pressCount = 0; // press count
int releaseCount = 0; // release count
void loop() {
int value = digitalRead(BUTTON_PIN);
if (lastState != value) {
lastState = value;
delay(20);
if (value == HIGH) {
releaseCount++; // increment the count on release
Serial.print("released ");
Serial.print(releaseCount); // output the number of releases
Serial.println(" times");
}
if (value == LOW) {
pressCount++; // increment the count on press
Serial.print("pressed ");
Serial.print(pressCount); // output the number of presses
Serial.println(" times");
}
}
}This method is simple and intuitive, and is suitable for small projects with simple logic and low requirements for real-time performance. However, its drawbacks are also obvious —— delay () is blocking, which means that during this period, the program cannot process other tasks, which easily causes the system to be "laggy".
3.2.2 Timing Method (Non-blocking Type)
During the duration specified by "delay", the entire program pauses. However, if the program has other critical tasks to perform concurrently, such as display updates, sensor data acquisition, and WIFI communication, we need an anti-shake method that does not block other operations.
Another way to think about it is this:
- When a change in the key state is detected, record the current time;
- Wait for a set debounce time (e. g., 20ms) before checking again;
- If the status remains unchanged, confirm that the key press is valid.
This method does not use delay (); instead, it uses millis () to obtain the current time, and implements debounce processing through a combination of state judgment and time judgment.
The sample code is as follows:
const int buttonPin = 25;
int buttonState = HIGH;        // current button state
int lastButtonState = HIGH;    // previous state
unsigned long lastDebounceTime = 0; // time of the last change
const unsigned long debounceDelay = 20;  // debounce delay time

void setup() {
  pinMode(buttonPin, INPUT_PULLUP);
  Serial.begin(115200);
}

void loop() {
  int reading = digitalRead(buttonPin);

  // if different from the last state, it may have been pressed or released
  if (reading != lastButtonState) {
    lastDebounceTime = millis();  // record the current time
  }
  // If the state holds for debounceDelay milliseconds, it is considered valid
  if ((millis() - lastDebounceTime) > debounceDelay) {
    if (reading != buttonState) {
      buttonState = reading;

      if (buttonState == LOW) {
        Serial.println("按键按下");
      }
    }
  }
  lastButtonState = reading;
}
Although this method involves slightly more complex code, its advantages are as follows:
- will not block the execution of loop () and will not interfere with other tasks;
- It is more suitable for projects with strong real-time requirements or those that require concurrent multitasking;
- It features stronger scalability and is suitable for embedding structured system logic.
4. Summary of This Chapter
In this chapter, we delved into a common yet easily overlooked issue— key jitter.
We have understood how it occurs and what misjudgment issues it may cause, learned the most basic delay debouncing method to ensure program stability and reliability in the simplest way, and also got familiar with a more flexible timed debouncing approach — this method does not require the program to pause and wait, but can judge the key status while running other codes, making it more suitable for application scenarios that have certain requirements for response speed.