
Contents
1. Introduction
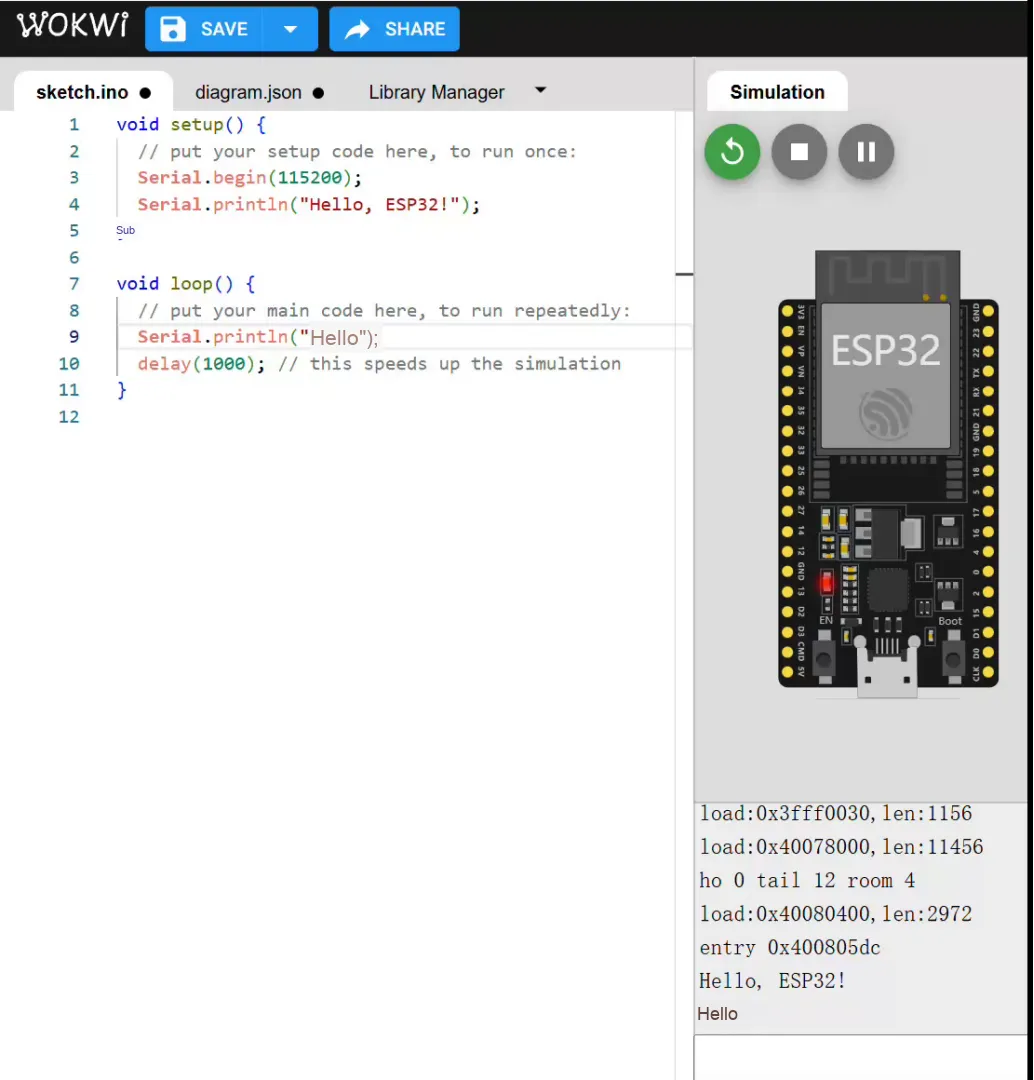
In the previous experiments, you might have noticed an interesting phenomenon: every time we run a program, we always write Serial.begin (115200);in the code, and we also frequently use Serial.print () to output certain information. After that, lines of "prompts" from the ESP32 will appear on your computer screen in the Serial Monitor.
It's like the ESP32 is "talking" to us. So here comes the question: what on earth Serial is? And how does the ESP32 communicate with the computer through it?
2. Why is Serial required
Do not be misled by the settings in the simulation experiments. In actual scenarios, the ESP32 operates independently of a computer.
During the development process, we often wonder: Is the program running? Which step has it reached? What is the value of the variable? Has the key been pressed?
For example: suppose we conduct an experiment of "controlling an LED with a button". Theoretically, the LED should light up when the button is pressed, and turn off when the button is released. However, during the experiment, we find that no matter how we press the button, the LED does not respond at all. Where could the problem be in this case?
Could it be that the key is not connected properly? Could it be that the program doesn't detect the key at all? Or maybe the LED is already lit, but the circuit is wired incorrectly?
If we can't see any information and just have to guess based on intuition, the troubleshooting process will be extremely painful.
With the Serial port, we can add some output statements in the program, for example:
- When a key press is detected, print "Button Pressed".
- Print the current value when the variable state changes.
- When the program runs to a specific line, print a prompt message.
In this way, we can clearly see what exactly is happening inside the ESP32 on the serial monitor of the computer, so as to quickly locate the problem.
Since the ESP32 has no screen and cannot display such information directly, we need a method to transmit the internal status information of the ESP32 to an external device at this point. In this case, Serial UART communication comes in handy.
3. What is Serial?
Serial Port, whose full name is serial communication interface, is a kind of communication interface used for data transmission.
We can regard it as a "data pipeline" between two devices, through which information is sent and received.
Serial communication enables the ESP32 to send its internal operating information to a computer, which can be viewed in the computer's serial monitor. Naturally, the computer can also send data to the ESP32 via the serial port, realizing bidirectional transmission.
4. Software Implementation
So, how can we use the Serial function to make the ESP32 send the program running status or data to the computer via the serial port?
This involves the use of several key functions: the serial port initialization Serial.begin (), the data output functions Serial.print () and Serial.println (), and the data receiving functions Serial.available () and Serial.read ().
4.1 Serial Port Initialization: Serial.begin ()
For the ESP32 to communicate with a computer, the first step is to agree on a "communication speed", otherwise the two sides will be talking at cross-purposes.
4.1.1 Basic Functions
Get the ESP32 and the computer (or peripheral) to agree on "how to communicate" — the baud rate, data format, which set of pins to use, and so on.
4.1.2 Function Prototype
// 1. Most common (default data format 8N1)
Serial.begin(baud);
// Initialize the serial port, baud rate 115200, data format defaults to SERIAL_8N1
Serial.begin(115200);


// 2. Specify the data format
Serial.begin(baud, config);
// Baud rate 9600, format: 7 data bits, even parity, 1 stop bit
Serial.begin(9600, SERIAL_7E1);


// 3. Specify the pins (for Serial1 / Serial2 or when you want to change pins)
Serial1.begin(baud, config, rxPin, txPin);
// Use Serial2, baud rate 115200, format 8N1
// Specify RX = GPIO16, TX = GPIO17
Serial2.begin(115200, SERIAL_8N1, 16, 17);


// 4. Advanced: add an extra "invert level" parameter (rare, used for special modules)
Serial2.begin(baud, config, rxPin, txPin, invert);
// Use Serial2, baud rate 9600, format 8N1
// RX=16, TX=17, with level inversion enabled
Serial2.begin(9600, SERIAL_8N1, 16, 17, true);
First, the input parameters:
baud: Baud rate (available options: 115200,9600)
config: Data format (default SERIAL_8N1)
rxPin, txPin: Specify the RX and TX pin numbers
invert: level inversion (true/false)
1. baud (baud rate)
- Definition: The number of bits transmitted per second.
- Common values:
115200(preferred for debugging),9600(default for many sensors/modules); other common values include:57600,38400,19200,4800,2400, etc. - Tip: Inconsistent baud rates will result in "garbled characters". The baud rate of the serial monitor must match the setting in the code (no manual setting is required in Wowki simulation, as it will automatically keep consistent).
2. config (data format)
- Consists of data bits + parity bit + stop bits, the most common configuration being
SERIAL_8N1:- Data bits: 5/6/7/8 (8 is the most commonly used)
- Parity Check:
N(None),E(Even),O(Odd) - Stop bit: 1 or 2
- Example:
SERIAL_8N1(default, covers almost all debugging scenarios)SERIAL_8E1(8 data bits, even parity, 1 stop bit)SERIAL_7O2(7 data bits, odd parity, 2 stop bits)
- When should this be modified? When interfacing with certain modules or instruments that specify a format (e. g., 7E1), you will need to adjust accordingly.
3. rxPin / txPin (Pin Selection)
- For
Serial1/Serial2or when you want to map the hardware serial port to other pins: // For example, map Serial2 to custom pinsSerial2.begin (115200, SERIAL_8N1, RX_PIN, TX_PIN);- Note:
Serial(USB-CDC or UART0) generally does not require manual pin configuration; whereasSerial1/2are commonly used to connect modules such as GPS, Bluetooth pass-through devices, and displays, so flexible pin selection is critical. - The available serial ports/pins vary slightly depending on the board model, so do not select pins that are occupied or cannot be routed.
4. invert (level inversion, rarely used)
true/false, which is used in scenarios where the logic level is inverted (a relatively niche use case).- Most students won't need to use this, just be aware that this switch exists.
Next comes the return value of this function: None (void)
→ This function is to "open a communication channel" and returns no result.
4.1.3 Example
Serial.begin(115200);   // Initialize the serial port, baud rate 115200 (commonly used for debugging)
Serial.begin(9600);     // Initialize the serial port, baud rate 9600 (default for common modules)
Serial.begin (115200);This is just like two people agreeing before making a phone call: we will use Mandarin, and set a specific speaking speed. The 115200 here corresponds to the concept of speaking speed — it refers to the number of bits transmitted per second.
At the start of the program, we call Serial.begin (115200);to initialize serial communication. After initialization, the ESP32 can communicate properly with the computer.
4.2 Output Data: Serial.print () and Serial.println ()
4.2.1 Basic Functions
Once the ESP32 has opened the "communication channel" via Serial.begin (), you can then send information to the computer via Serial.print () and Serial.println ().
Serial.print (): Prints content without appending a newline.Serial.println (): Automatically adds a newline after printing.
It's just like when chatting: one is "typing continuously in a single line", while the other is "hitting the enter key after every single sentence".
4.2.2 Function Prototype
Serial.print(value);             // print in the default format
Serial.print(value, format);     // print in the specified format

Serial.println(value);           // print and add a newline
Serial.println(value, format);   // print in the specified format and add a newline
First, let's look at the input parameters of these two functions:
value: The content to be output (string, number, variable, etc.)format: Output format (integer base / floating-point decimal places)
1. value (content to be output)
- It can be a string ("Hello"), a character ('A'), an integer, a floating-point number, or even a variable.
- Example:
Serial.print("Hello");
Serial.print(123);
Serial.print(3.14);
2.format (base or number of decimal places)
- For integers:
DEC(decimal, default)HEX(hexadecimal)BIN(Binary)OCT(octal)- For example:
Serial.println (255, DEC); // Outputs 255Serial.println (255, HEX); // Outputs FFSerial.println (255, BIN); // Outputs 11111111Serial.println (255, OCT); // Outputs 377
- For floating-point numbers:
- The second parameter indicates the number of decimal places.
- For example:
float pi = 3.14159;Serial.println (pi, 2); // Outputs 3.14Serial.println (pi, 4); // Outputs 3.1416
Return value: Returns the number of bytes written (of type int)
For example:
size_t n = Serial.print("Hi");
Serial.println(n); // outputs 2, because two characters were printed
This can be used during debugging to confirm "how many bytes have been successfully sent out".
4.2.4 Example 1
void loop()
{
  Serial.print("Hello, ");
  Serial.print("World!");  // print continuously
  delay(1000);  // delay 1 second
  Serial.println("Hello, World!");  // print and add a newline
  delay(1000);  // delay 1 second
}
4.2.4 Example 2
void setup() {
  Serial.begin(115200);
}

void loop() {
  Serial.print("Hello, ");
  Serial.print("World!");        // no newline
  delay(1000);

  Serial.println("Hello, World!"); // newline
  delay(1000);

  int number = 42;
  Serial.print("Decimal: ");
  Serial.println(number, DEC);  // decimal
  Serial.print("Hex: ");
  Serial.println(number, HEX);  // hexadecimal
  Serial.print("Binary: ");
  Serial.println(number, BIN);  // binary
  delay(2000);
}
4.3 Receiving Data: Serial.available () and Serial.read ()
Not only can the ESP32 "speak" to the computer, but it can also "listen" to the input from the computer (such as the characters you type in the serial monitor).
Serial.available (): Check if there is any incoming data.Serial.read (): Reads incoming data (one byte at a time).
Just like when you're chatting:
- First, check: "Has the other party sent any data? " →
Serial.available () - If yes, listen word by word to what he is saying →
Serial.read ()
A serial port is a ByteFlow: when a computer sends "abc" at a time, the ESP32 will sequentially receive 'a', 'b', 'c' instead of a "lump of string".
4.3.1 Serial.available () function
function prototype
int Serial.available(void);Function
- Check how many bytes are available for reading in the serial port buffer.
- It is used to determine whether data has arrived so as to prevent directly reading an empty buffer.
Input Parameters
- None
Output Parameters (Return Values)
- Returns the number of bytes available for reading in the buffer (of
inttype)- If there is data in the buffer, the return value > 0 indicates the specific number of bytes
- If the buffer is empty, the return value = 0
Common Usage
if (Serial.available() > 0) {
  // indicates data has arrived and can be read safely
  char c = Serial.read();
  Serial.print("收到字符:");
  Serial.println(c);
}
4.3.2 Serial.read () function
function prototype
int Serial.read(void);
Function
- Reads one byte from the serial port buffer.
- Used in conjunction with
Serial.available ()to avoid reading from an empty buffer.
Input Parameters
- None
Output Parameters (Return Values)
- Returns the read byte (0~255,
inttype) - If the buffer is empty, return
-1
Common Usage
if (Serial.available() > 0)
{
    char received = Serial.read();  // read one byte
    Serial.print("Received: ");
    Serial.println(received);  // print the received character
}
4.3.3 Example: Byte-by-byte Echo
void setup() {
  Serial.begin(115200);
}
void loop()
{
  if (Serial.available() > 0)
  {
    char received = Serial.read();  // read one byte
    Serial.print("Received: ");
    Serial.println(received);  // print the received character
  }
}
Why is there an extra line printing out "Received: " here?
— This is because line breaks and carriage returns are not ignored.
void setup() {
  Serial.begin(115200);
}

void loop() {
  if (Serial.available() > 0) {
    char received = (char)Serial.read();
    if (received != '\n' && received != '\r') { // ignore newline and carriage return
      Serial.print("Received: ");
      Serial.println(received);
    }
  }
}
After excluding line breaks and carriage returns, it will function normally.
5. Chapter Summary: What Should Beginners Remember Now?
You don't need to grasp all the details of serial communication at once — we'll cover them in depth in later lessons. For now, just remember three things:
- UART is a communication method that enables the ESP32 to "communicate" with a computer.
Serial.begin ()is equivalent to "starting to speak",Serial.print ()corresponds to "the content being spoken".- The serial monitor allows us to view the messages sent by the ESP32, which helps us debug and understand the program more effectively.
6. Related Links
Serial Port Demo: https://wokwi.com/projects/419150248395251713