Contents
Abstract:
This paper will build upon the previous content to implement a simulated sensor system software, which consists of three threads: the sensor thread generates data and sends it to the host process via the serial port; the host process receives commands through the serial port, performs data filtering and processing, and then sends the processing results to the plotting thread; the plotting thread is responsible for receiving the data and drawing and updating the data curve.
Original Link:
Previous Recommendations:
You who are learning embedded systems still don't know Object Oriented? ?!
More exciting content can be found here:
Speed Up Your Python: A Quick Guide to Python Parallel Computing
A Complete Guide to Debugging Principles of CM3 Microcontrollers
The "Secret Martial Arts Manual" for Computer Science Competitions
Avnet ZUBoard 1CG Development Board — A New Choice for Deep learning
Deploy SenseCraft Model to Grove Vision AI V2 Image Processing Module
Document and Code Access:
You can download the document via the following link:
https://github.com/leezisheng/Doc
This document mainly introduces how to use Python for Object Oriented programming, and requires readers to have a basic understanding of Python syntax and microcontroller development. Compared with other blogs or books that explain Python Object Oriented programming, this document is more detailed and focuses on embedded host computer applications, taking the common serial port data transmission and reception, data processing, dynamic graph drawing and other functions between the host computer and the slave computer as application examples. Meanwhile, it uses the Sourcetrail code software to visualize the code for reading, so as to facilitate readers' understanding.
The link to obtain the relevant sample code is as follows:
https://github.com/leezisheng/Python-OOP-Demo
Body Text
Next, we will use what we have learned previously to accomplish the following tasks:
- The analog sensor thread generates data and transmits it to the analog host process via the serial port protocol;
- The simulated host process sends instructions to the sensor thread via the serial port to acquire data, performs data filtering and processing, and then transmits the data to the plotting thread;
- The drawing thread completes the drawing and updating operations of the data curve.
It should be noted that some of the association designs between classes that we previously mentioned to illustrate the skills of Object Oriented programming are not the best practices in practical applications. In addition, in the original program code, we used a large number of print statements for output to enhance the readers' intuitive perception. However, such an approach will not only reduce the overall execution efficiency when the program runs in parallel, but also easily cause confusion about the running order of multi-threads or multi-processes when observing the terminal output, making it difficult to understand.Therefore, it is necessary for us to optimize and adjust this part of the code to improve the performance and readability of the program.
In the following code, we define a MasterProcess host multi-process class, which inherits from the Process class and is used to create and manage host multi-processes. As can be seen, the MasterProcess host multi-process class directly implements serial port reading and writing in the __ReadMasterSerial and __WriteMasterSerial methods, which is different from the original code where the MasterClass class inherits from the SerialClass class.
The sample code is as follows:
class MasterProcess(Process):
    '''
        Host multiprocess class
    '''
    # Class variables:
    #   START_CMD       - start command      -0
    #   STOP_CMD        - stop command      -1
    #   SENDID_CMD      - send ID command    -2
    #   SENDVALUE_CMD   - send data command   -3
    START_CMD, STOP_CMD, SENDID_CMD, SENDVALUE_CMD = (0, 1, 2, 3)

    def __init__(self,
                 lock,
                 Queue,
                 simplequeue,
                 port:str = "COM17",
                 baudrate:int = 115200,
                 bytesize:int = serial.EIGHTBITS,
                 parity  :str = serial.PARITY_NONE,
                 stopbits:int = serial.STOPBITS_ONE):
        '''
        MasterProcess initialization function
        :param lock: mutex lock
        :param Queue: queue
        :param port: port number
        :param baudrate: baud rate
        :param bytesize: data bits
        :param parity: parity bit
        :param stopbits: stop bits
        '''
        self.lock               = lock
        self.Queue              = Queue
        self.simplequeue        = simplequeue
        self.dev                = serial.Serial()
        self.dev.port           = port
        self.dev.baudrate       = baudrate
        self.dev.bytesize       = bytesize
        self.dev.parity         = parity
        self.dev.stopbits       = stopbits
        # Set the read timeout
        self.dev.timeout        = 0.3
        # Set the write timeout
        self.dev.write_timeout  = 0.3
        # Data cache
        self.datalist           = []
        # Filter length
        self.filterlength       = 3
        # Data processing class instance
        self.dataprocessobj     = DateProcessClass(self.datalist,self.filterlength)
        # Process initialization method
        Process.__init__(self)
    def StartMasterSerial(self):
        '''
        Open the host serial port
        :return: None
        '''
        self.dev.open()
    def StopMasterSerial(self):
        '''
        Stop the host serial port
        :return: None
        '''
        self.dev.close()
    def __ReadMasterSerial(self):
        '''
        Read the host serial port, private method
        :return data[int] : the data read
        '''
        # Read by line
        data = self.dev.readline()
        # If bytes are received, process them
        if data != b'':
            # The received data is binary
            # Decode the binary data into a unicode string using utf-8
            # Convert the string to int
            data = int(data.decode('utf-8', 'replace'))
        # Otherwise, set data to -1
        else:
            data = -1
        return data
    def __WriteMasterSerial(self,write_data):
        '''
        Write to the host serial port, private method
        :param write_data: the data to write
        :return:
        '''
        # Write in non-blocking mode
        self.dev.write(write_data.encode())
        # Output a newline character
        # The input parameter of write must be in bytes format
        # String data needs to be encoded into binary data with the encode() function before it can be sent successfully
        # \r\n means carriage return and line feed
        self.dev.write('\r\n'.encode())
    def RecvSensorID(self):
        '''
        Read the sensor ID
        :return sensorid[int] : the sensor ID number read
        '''
        sensorid = self.__ReadMasterSerial()
        return sensorid
    def RecvSensorValue(self):
        '''
        Read the sensor data value
        :return data[int] : the sensor data read
        '''
        data = self.__ReadMasterSerial()
        return data
    def SendSensorCMD(self,cmd):
        '''
        Host sends a command
        :param cmd : class variable in MasterProcess
        :return: None
        '''
        self.__WriteMasterSerial(str(cmd))
Meanwhile, we have defined a run method in it, which will be invoked after the multi-processes are started. In this method, we first open the serial port, then send the command to obtain the ID and receive the ID number of the sensor. After that, we enter an infinite loop: the maximum and minimum values are calculated and printed once every 9 loops. Then we send the command to acquire data, receive the sensor data, put the data into a queue and a list, perform filtering processing on the data, and place the filtered data into another queue. Finally, we print the received sensor data and put the current process to sleep for 0.5 seconds.
The sample code is as follows:
    def run(self):
        '''
        Method that runs after the multiprocess starts
        :return: None
        '''
        # Run count variable
        count = 0
        # File save index count variable
        index = 0
        # Open the serial port
        self.StartMasterSerial()
        self.lock.acquire()
        print(" Master Process Started ")
        self.lock.release()

        # Send the get-ID command
        self.SendSensorCMD(self.SENDID_CMD)
        # Get the sensor ID number
        id = self.RecvSensorID()

        self.lock.acquire()
        print(" Recv Sensor ID : ", id)
        self.lock.release()

        while True:
            if count == 9:
                maxvalue = self.dataprocessobj.DateCalMax()
                minvalue = self.dataprocessobj.DateCalMin()
                self.lock.acquire()
                print("----------------------------------")
                print("Max Value: ", maxvalue)
                print("Min Value: ", minvalue)
                print("----------------------------------")
                self.lock.release()
                count = 0
            else:
                count = count + 1

            # Send the get-data command
            self.SendSensorCMD(self.SENDVALUE_CMD)

            self.lock.acquire()
            print("Master Send SENDVALUE_CMD")
            self.lock.release()

            # Receive the sensor data value
            data = self.RecvSensorValue()
            self.Queue.put(data)

            self.datalist.append(data)
            filterdata,filterdatalist = self.dataprocessobj.DateFilter()
            self.simplequeue.put(filterdata)

            self.lock.acquire()
            print("  Recv Sensor Data : ",data)
            self.lock.release()

            time.sleep(0.5)
At the same time, it should be noted that there is a composition relationship between the MasterProcess host process class and the DateProcessClass data processing class, which can be implemented with the following statement:
        # Data cache
        self.datalist           = []
        # Filter length
        self.filterlength       = 3
        # Data processing class instance
        self.dataprocessobj     = DateProcessClass(self.datalist,self.filterlength)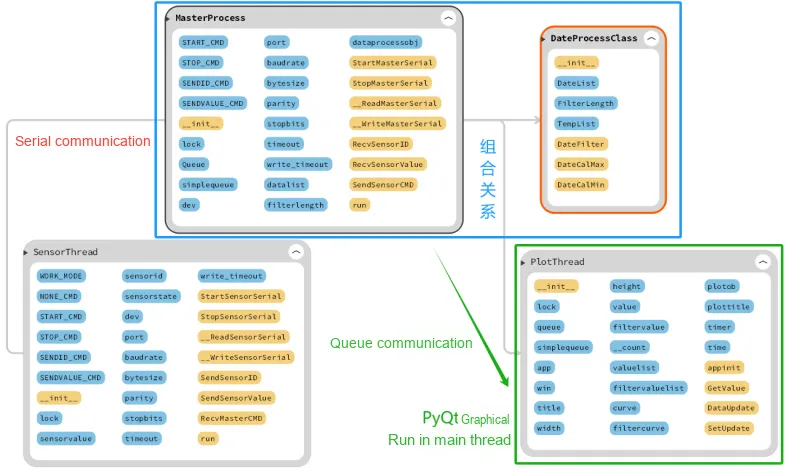
Meanwhile, we have rewritten the DateProcessClass data processing class. To facilitate understanding of the program running status, we have removed the exception classes, logs and print output statements, and also made the calculated average value return in the DateFilter method.
class DateProcessClass():
    def __init__(self, DateList: List[int], FilterLength: int):
        self.DateList = DateList
        self.FilterLength = FilterLength
        self.TempList = [0] * (self.FilterLength)

    def DateFilter(self) -> List:
        # Iterate over DateList
        for index, value in enumerate(self.DateList):
            # Treat each value as a new sensor value being passed in
            NowValue = value
            # Variable representing the sum of the list
            sum = 0
            for i in range(self.FilterLength - 1):
                # Implement the list shift operation
                self.TempList[i] = self.TempList[i + 1]
                # Implement the list sum
                sum += self.TempList[i]
            self.TempList[self.FilterLength - 1] = NowValue
            sum += self.TempList[self.FilterLength - 1]
            # Compute the average
            average = sum / self.FilterLength
            # Replace the original value with the computed average
            self.DateList[index] = average
        # After the computation, reset the elements in TempList to zero
        self.TempList = [0] * (self.FilterLength)
        return average,self.DateList

    def DateCalMax(self) -> int:
        max_value = max(self.DateList)
        return int(max_value)

    def DateCalMin(self) -> int:
        min_value = min(self.DateList)
        return int(min_value)
Meanwhile, we have rewritten the plotting class, which encapsulates methods including initialization, data update, and scheduled update. In the initialization method, the program instantiates a Qt application object, a multi-panel graph window object, and two plotting curve objects. The data update method is designed to receive sensor data, add it to the cache list, and then convert the data into graphical representation. The scheduled update method is responsible for updating the curves at regular intervals.
Here we mainly rewrite the GetValue method and the DataUpdate method. Meanwhile, it can be seen that related attributes of the filtered data have been added to the initialization method and the plotting curve, which are used to check the filtering effect.
The sample code is as follows:
class PlotThread:
    def __init__(self,lock,queue,simplequeue,wintitle:str="Basic plotting examples",plottitle:str="Updating plot",width:int=1000,height:int=600):
        '''
        Used to initialize the PlotThread class
        :param wintitle:  window title
        :param plottitle: plot layer title
        :param width:     window width
        :param height:    window height
        '''
        self.lock               = lock
        self.queue              = queue
        self.simplequeue        = simplequeue
        # Qt application instance object
        self.app                = None
        # Window object
        self.win                = None
        # Set the window title
        self.title              = wintitle
        # Set the window size
        self.width              = width
        self.height             = height
        # Sensor data
        self.value              = 0
        # Store the filtered data
        self.filtervalue        = 0
        # Counter variable
        self.__count            = 0
        # Sensor data cache list
        self.valuelist          = []
        # Sensor filtered data cache list
        self.filtervaluelist    = []
        # Plot curve
        self.curve              = None
        # Plot curve of the filtered data
        self.filtercurve        = None
        # Plot layer object
        self.plotob             = None
        # Plot layer title
        self.plottitle          = plottitle
        # Timer object
        self.timer              = QtCore.QTimer()
        # Timer interval
        self.time               = 0
        # Qt application and window initialization
        self.appinit()

        self.lock.acquire()
        print(" PlotClass Object Init Complete ")
        self.lock.release()

    def appinit(self):
        '''
        Used to initialize the qt application, add the window, curve and plot layer
        :return: None
        '''
        # Create a Qt application and return its instance object
        self.app = pg.mkQApp("Plotting Example")
        # Create a multi-panel graphic
        # show: (bool) If True, show the widget immediately after it is created.
        # title: (str or None) If specified, sets the window title for this widget.
        self.win = pg.GraphicsLayoutWidget(show=True, title=self.title)
        # Set the window size
        self.win.resize(self.width, self.height)
        # Make global window settings; setConfigOptions configures multiple parameters at once
        # antialias enables anti-aliasing, useNumba accelerates the image
        pg.setConfigOptions(antialias=True, useNumba=True)

        # Add a plot layer
        self.plotob = self.win.addPlot(title=self.plottitle)
        # Add a curve
        # Raw data - yellow curve
        self.curve = self.plotob.plot(pen='y')
        # Filtered data - red curve
        self.filtercurve  = self.plotob.plot(pen='r')

    def GetValue(self,value,filtervalue):
        '''
        Used to receive sensor data and add it to the cache list
        :param value: sensor data
        :param filtervalue: sensor filtered data
        :return: None
        '''
        self.value          = value
        self.valuelist.append(self.value)
        self.filtervalue    = filtervalue
        self.filtervaluelist.append(self.filtervalue)

    def DataUpdate(self):
        '''
        Used to update the curve at timed intervals; here a sine curve is simulated
        :return: None
        '''
        self.value = self.queue.get()
        self.filtervalue = self.simplequeue.get()
        self.GetValue(self.value,self.filtervalue)
        # Convert the data into a graph
        self.curve.setData(self.valuelist)
        self.filtercurve.setData(self.filtervaluelist)

    def SetUpdate(self,time:int = 100):
        '''
        Set the timed update task
        :param time: timer interval
        :return: None
        '''
        # When the timer ends, trigger the DataUpdate method
        self.timer.timeout.connect(self.DataUpdate)
        # Start the timer
        self.timer.start(time)
        # Timer interval
        self.time = time
        # Enter the main event loop and wait
        pg.exec()
The GetValue method is used to receive sensor data and add it to the cache list. The DataUpdate method runs periodically, which uses a queue to receive the data generated and transmitted in the MasterProcess process, and updates the plotted curve via the setData method with the updated data. As can be seen, both the plotting and updating of data are performed in the main thread. This is because when plotting with PyQtGraph, if plotting operations are performed outside the main thread, problems such as ineffective plotting or program crashes may occur.
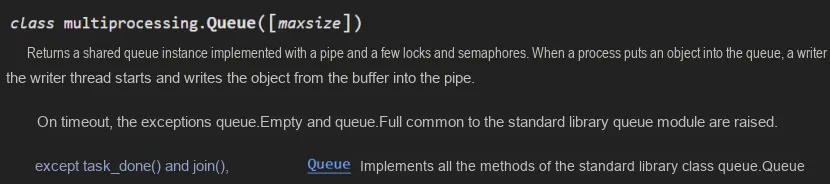
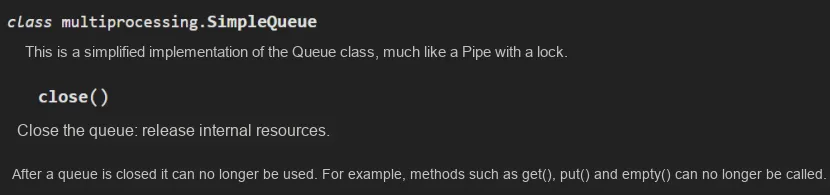
Create the mutex, message queue, and process instance in the main thread, then create the sensor thread and plotting thread instances, and finally start the process and threads. The sample code is as follows:
if __name__ == "__main__":
    # Create the mutex lock
    lock    = Lock()
    # Create the message queue
    queue   = Queue(5)
    # Create the message queue
    simplequeue = SimpleQueue()

    # Create the process instance
    m_process = MasterProcess(lock,queue,simplequeue,port = "COM17")
    # Create the thread instance
    s_thread  = SensorThread(lock,port="COM11", id=0, state=SensorThread.WORK_MODE["RESPOND_MODE"])
    # Create the plotting class instance
    p_thread  = PlotThread(lock,queue,simplequeue)

    # Start the process
    m_process.start()
    # Start the thread; the start method runs it concurrently
    s_thread.start()
    # Start the timed task of p_thread
    p_thread.SetUpdate(600)
Next, we run the program:
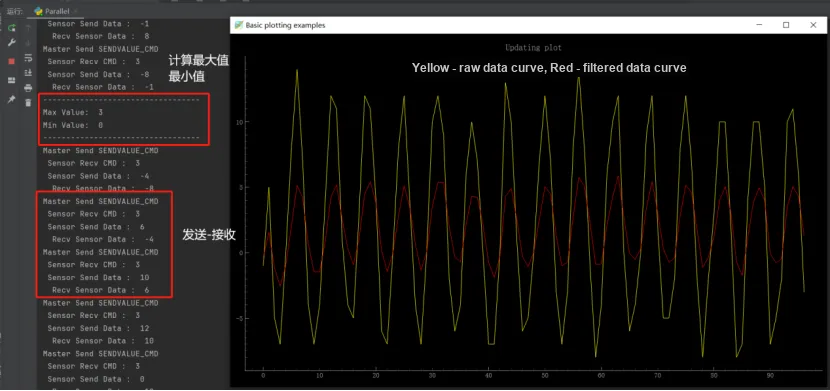
It can be seen that the entire program can run in parallel. For Python programs running in parallel, we can use tools such as Profile/CProfile for analysis and debugging, or use visualization tools such as viztracer/SnakeViz to generate flame graphs of thread/process execution. These tools can complete operations such as recording the entry/exit of a function, function parameters/return values, the values of arbitrary variables, and the execution order of threads/processes.