
Contents
- Introduction
- 1. Module Introduction
- 2. Introduction to Main Chips
- 2.1 Chip Overview
- 2.2 Pin Definitions
- 2.3 Functional Block Diagram
- 2.4 Performance Parameters
- 2.5 Reference Circuit
- 2.6 Chip Configuration
- 2.7 Communication Interfaces and Related Protocols
- 2.8 Register Definition
- III. Circuit Engineering
- 3.1 Circuit Source Project
- 3.2 Module Usage Instructions
- 3.3 Application Experiment
- 4. Driver
- 5. BOM & Recommended Alternatives
- 6. Change History
- VII. Related Materials
Introduction
In scenarios such as data centers, power cabinets, underground utility tunnels, and smart homes, water leakage detection is a crucial defense line for ensuring equipment safety and building structure. However, traditional conductivity-based water immersion sensors have always been unable to overcome the pain points of "easy corrosion, high error rate, and high maintenance cost" - metal electrodes are prone to oxidation and corrosion when exposed to a humid environment for a long time, the conductivity differences of different water qualities can lead to unstable detection, and they can only detect between two points, resulting in blind spots for leak points.
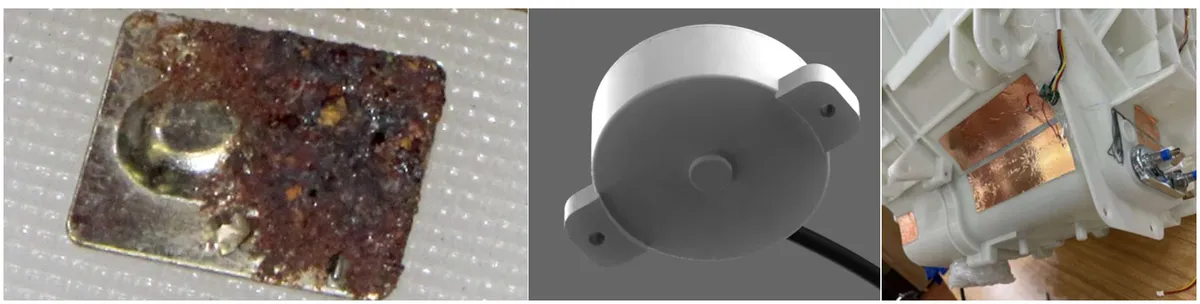
Traditional conductive water immersion sensors rely on direct contact between electrodes and water, and have many insurmountable drawbacks:
- Prone to corrosion and short lifespan: Metal electrodes are highly susceptible to oxidation and corrosion when in long-term contact with water and humid air, leading to detection malfunctions and requiring frequent replacement and maintenance;
- High Error Rate, Significantly Affected by Water Quality: Water quality, scale, salt, etc. can change the conductivity of water, leading to unstable detection results, and moisture condensation can also easily trigger false alarms;
- Multiple detection blind spots and no positioning capability: Only supports on-off state detection between two points, unable to cover large areas, and unable to locate water leakage points, resulting in low efficiency in troubleshooting;
- Multiple installation restrictions: Installation of electrodes requires damaging the waterproof structure of the device, making it unsuitable for sealed containers or decorated scenarios.
The capacitive water immersion module is precisely a new generation of detection solution designed to address these pain points.

Scenarios such as underground utility tunnels and tunnels are susceptible to the influence of surface water or groundwater, with hidden water leakage hazards that pose significant risks. WS11 can be deployed at key locations in utility tunnels and tunnels to monitor water level changes in real-time, issue immediate alerts when anomalies occur, and initiate the drainage system or take corresponding measures; the module supports cascading expansion, enabling multi-point water leakage detection and location, helping management personnel respond quickly, reducing losses, and enhancing the operational safety of infrastructure.
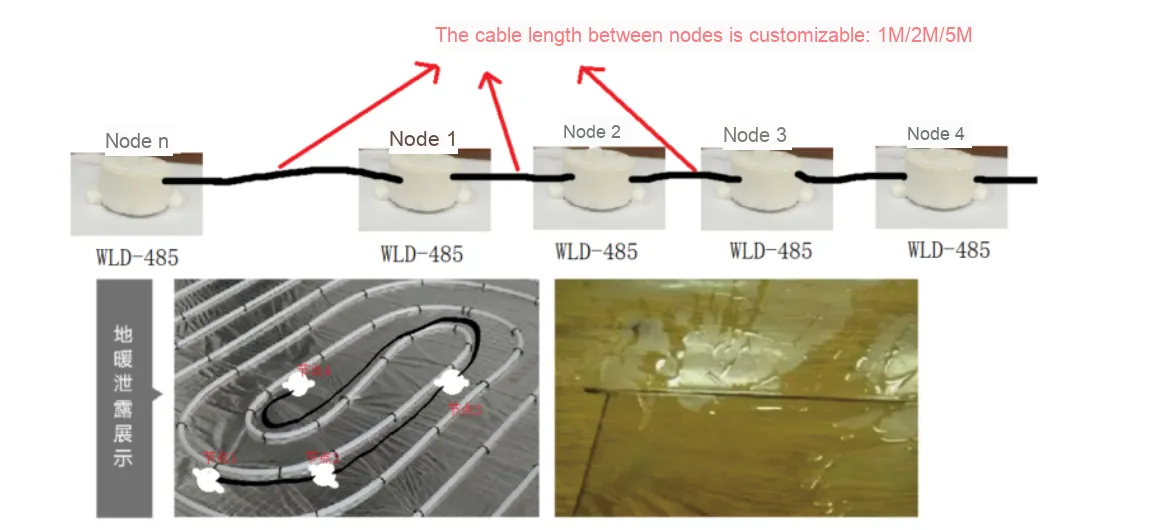
In data centers, communication rooms, and power cabinets, WS11 can be installed at the bottom of equipment or inside cabinets to monitor water immersion in real time. Once a water leak occurs, the module can quickly detect and output a signal, triggering an alarm or interlocking power outage to prevent equipment short circuits and fire risks caused by water damage; the non-contact design eliminates the need for frequent maintenance and can operate stably for a long time in a humid data center environment, providing all-weather safety protection for critical equipment.

In smart homes, WS11 can be installed in locations prone to water leakage, such as kitchens, bathrooms, and water pipe connections, to monitor leakage in real time and promptly notify users; in buildings, it can monitor issues such as pipe bursts and air conditioning condensate water leakage, reducing damage to the building structure caused by water damage and lowering maintenance costs. The non-contact installation method does not affect the aesthetic appeal of the decoration, and the low-power design also meets the long battery life requirements of smart home devices.
1. Module Introduction
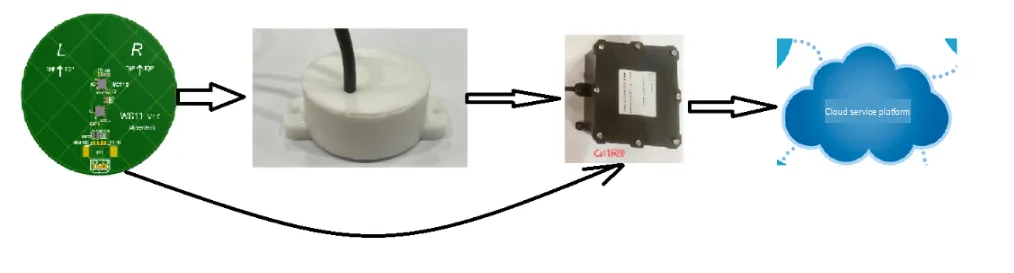
WS61 (Water Sensor-MCP61) is a capacitive, non-contact intelligent water immersion sensor that uses the new generation of capacitive sensing microprocessor SOC chip launched by Minyuan Sensing, integrates a dual-channel capacitive analog front-end sensing circuit (AFE CAP), and is equipped with a high-precision temperature chip. It outputs capacitance information through the UART interface for algorithm analysis, effectively filtering out interference such as vibration and condensation, achieving accurate differentiation between the presence/absence of water and different states, and can simultaneously provide ambient temperature information.
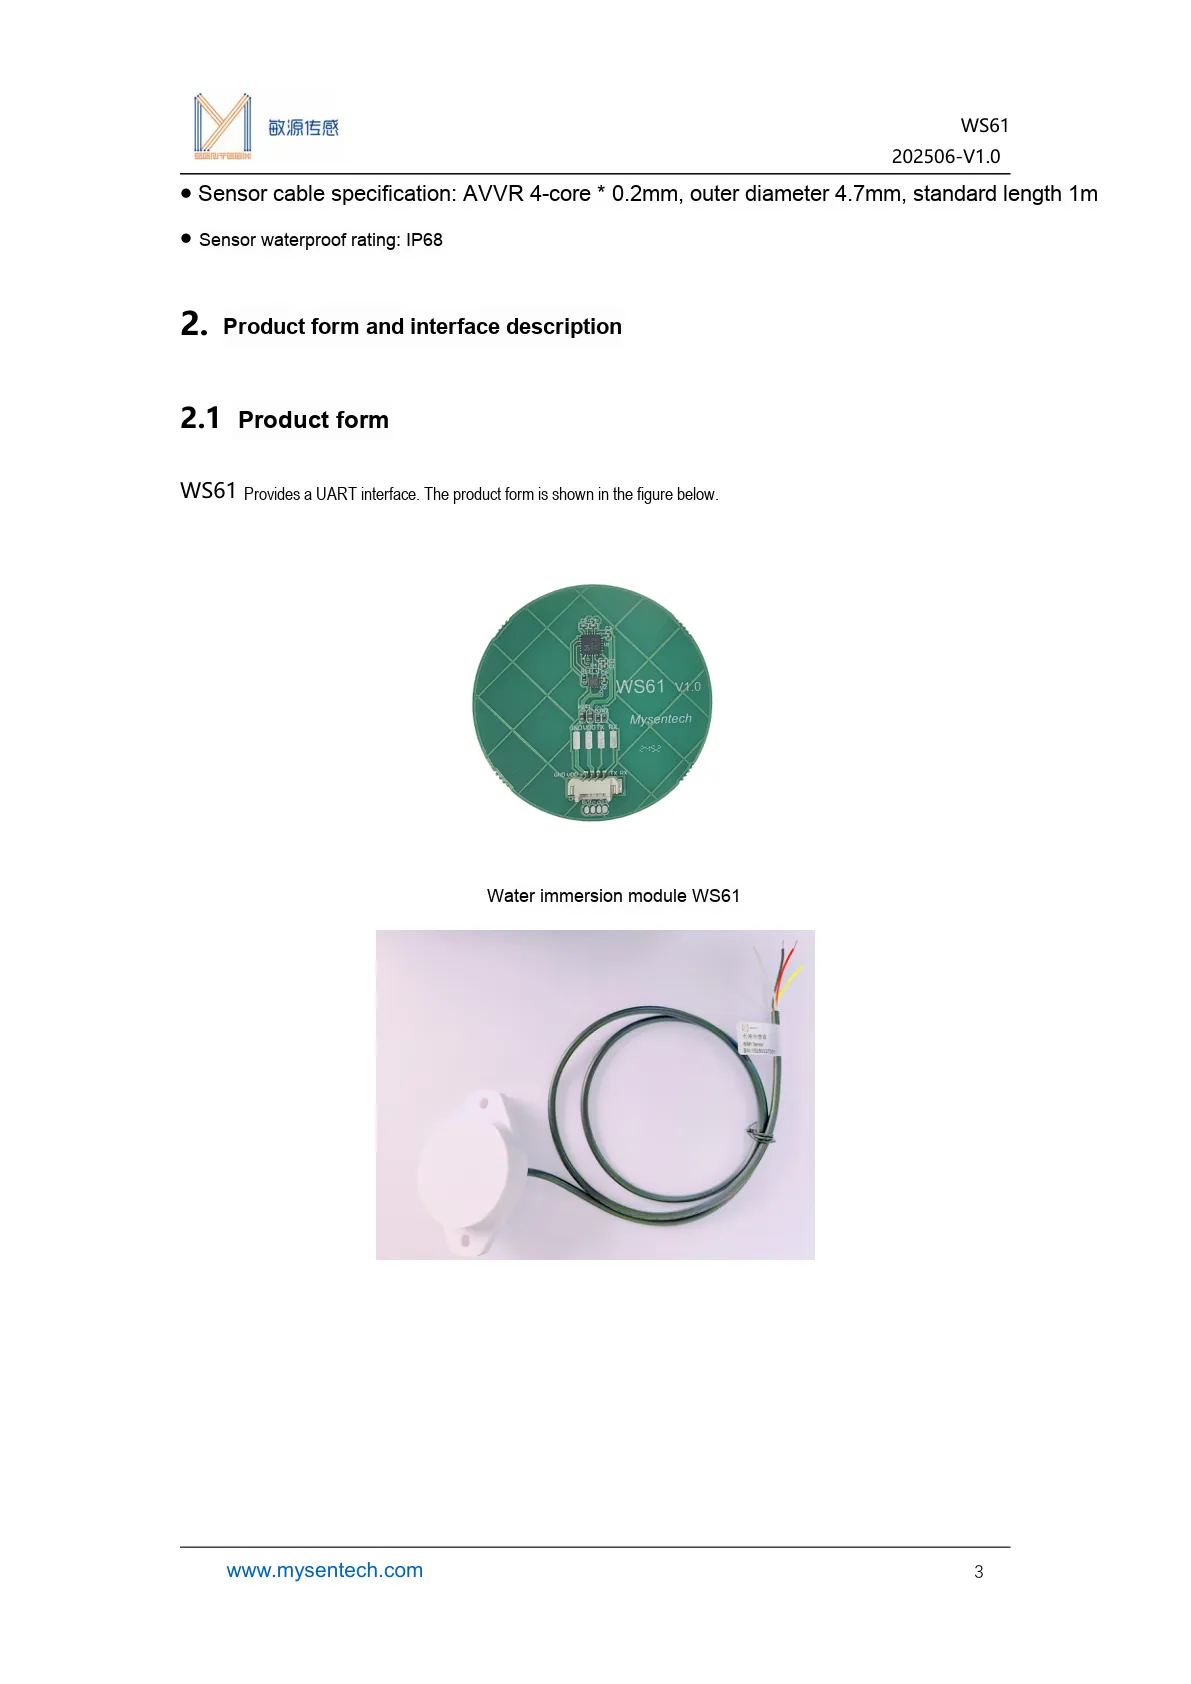
Product Form, cable specifications, and basic appearance information of the WS61 Water Immersion Sensor.
- WS61 is a capacitive, non-contact sensing intelligent water immersion sensor;
- Compared with traditional conductivity-based solutions, it features a wide detection range, high reliability, and minimal influence from water quality;
- Supports continuous digital quantity analysis and cascaded positioning, suitable for water leakage monitoring and water accumulation detection scenarios;
- By default, it provides a
UARTinterface, and the sensor protection rating can reachIP68.
2. Introduction to Main Chips
2.1 Chip Overview
WS61 is based on the principle of capacitive non-contact measurement, determines the water immersion state by detecting changes in dielectric constant, and can simultaneously output capacitance value, temperature, and alarm status.
2.2 Pin Definitions
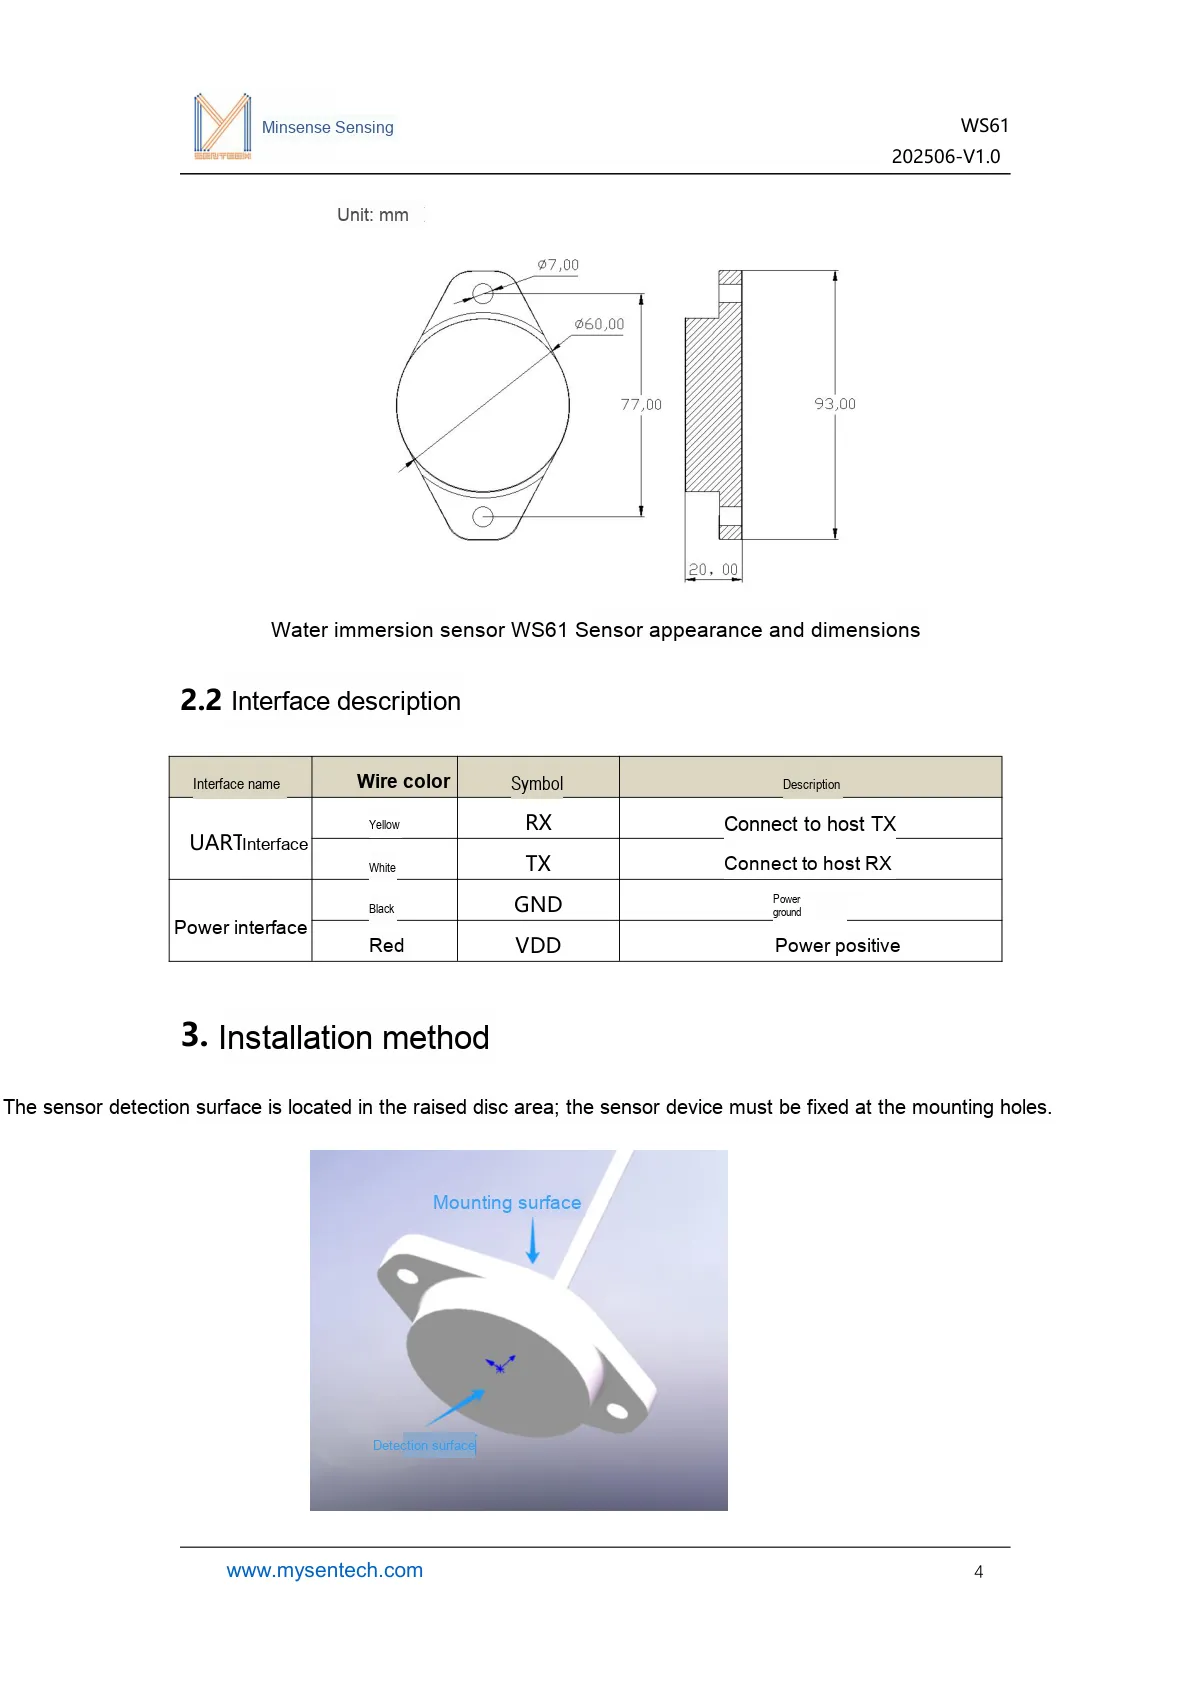
This diagram shows the external dimensions and interface definitions of WS61, facilitating installation and wiring.
2.3 Functional Block Diagram
None.
2.4 Performance Parameters
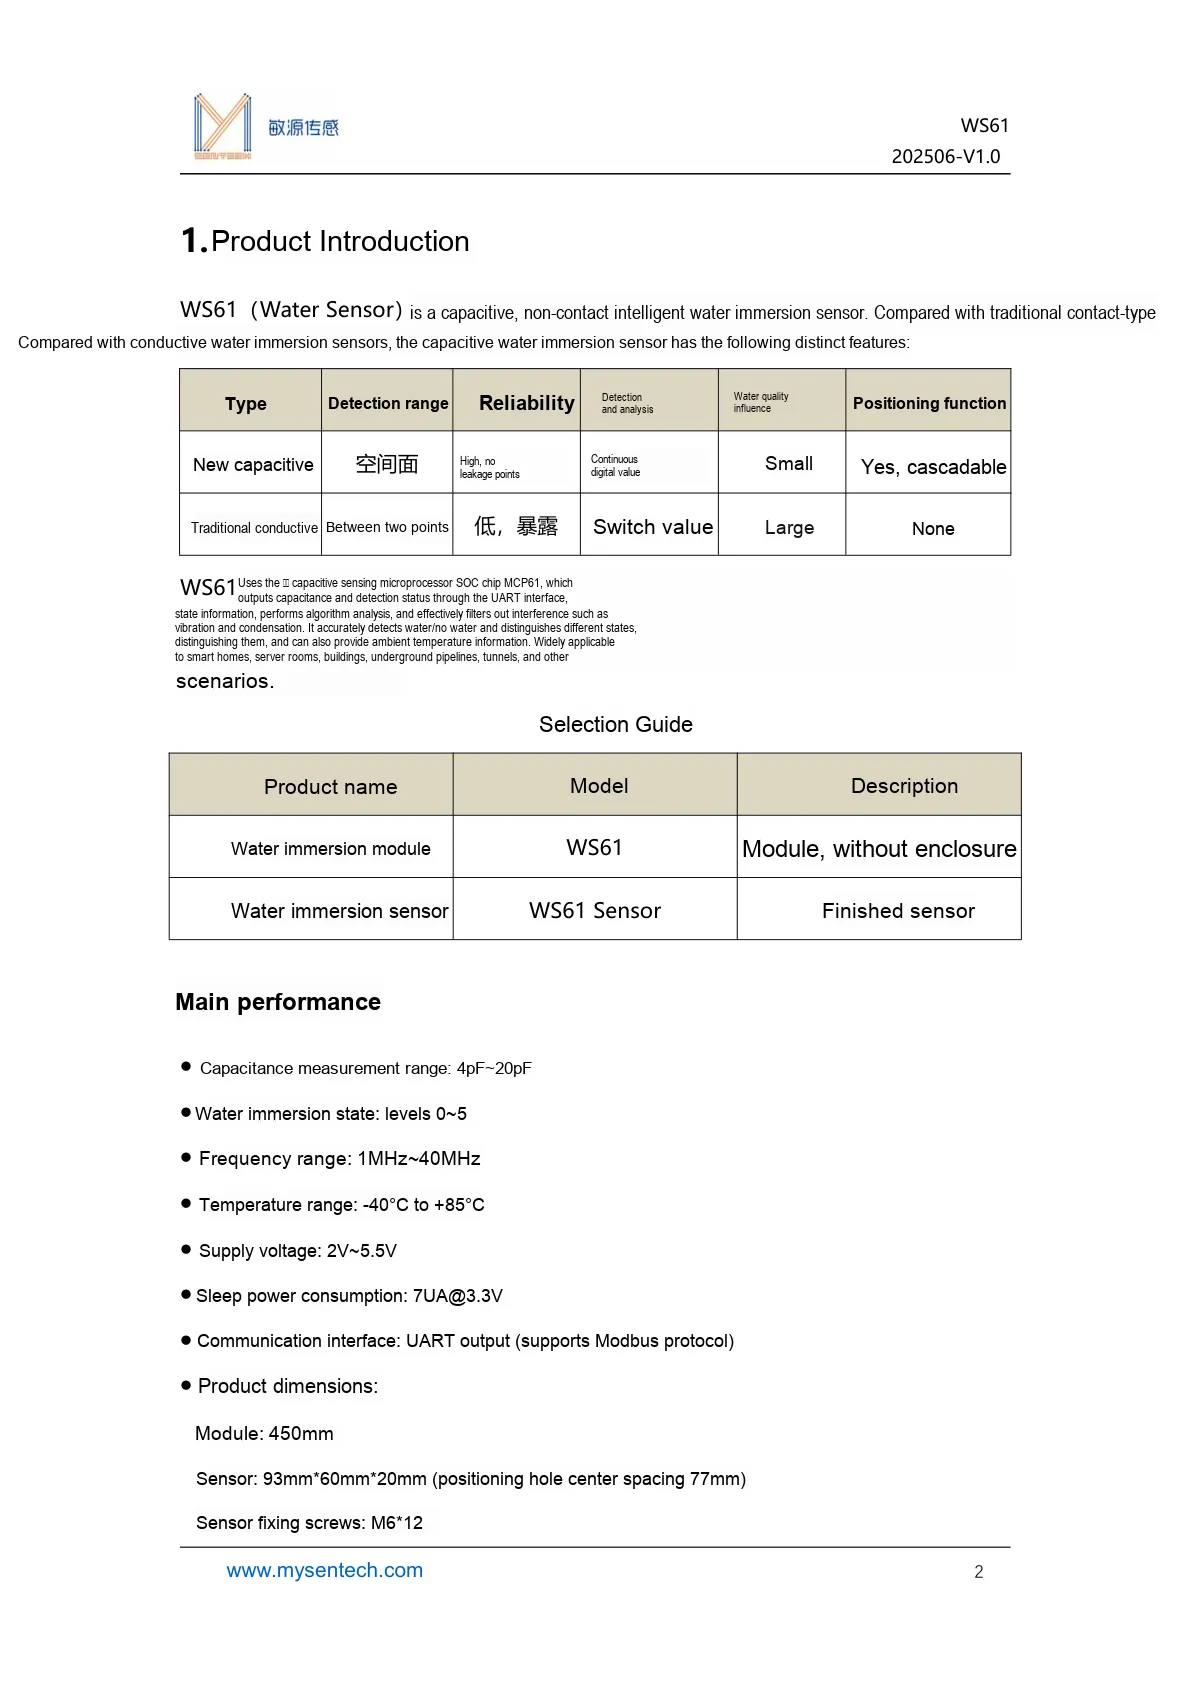
This diagram illustrates the performance parameters of WS61
2.5 Reference Circuit
None.
2.6 Chip Configuration
None.
2.7 Communication Interfaces and Related Protocols
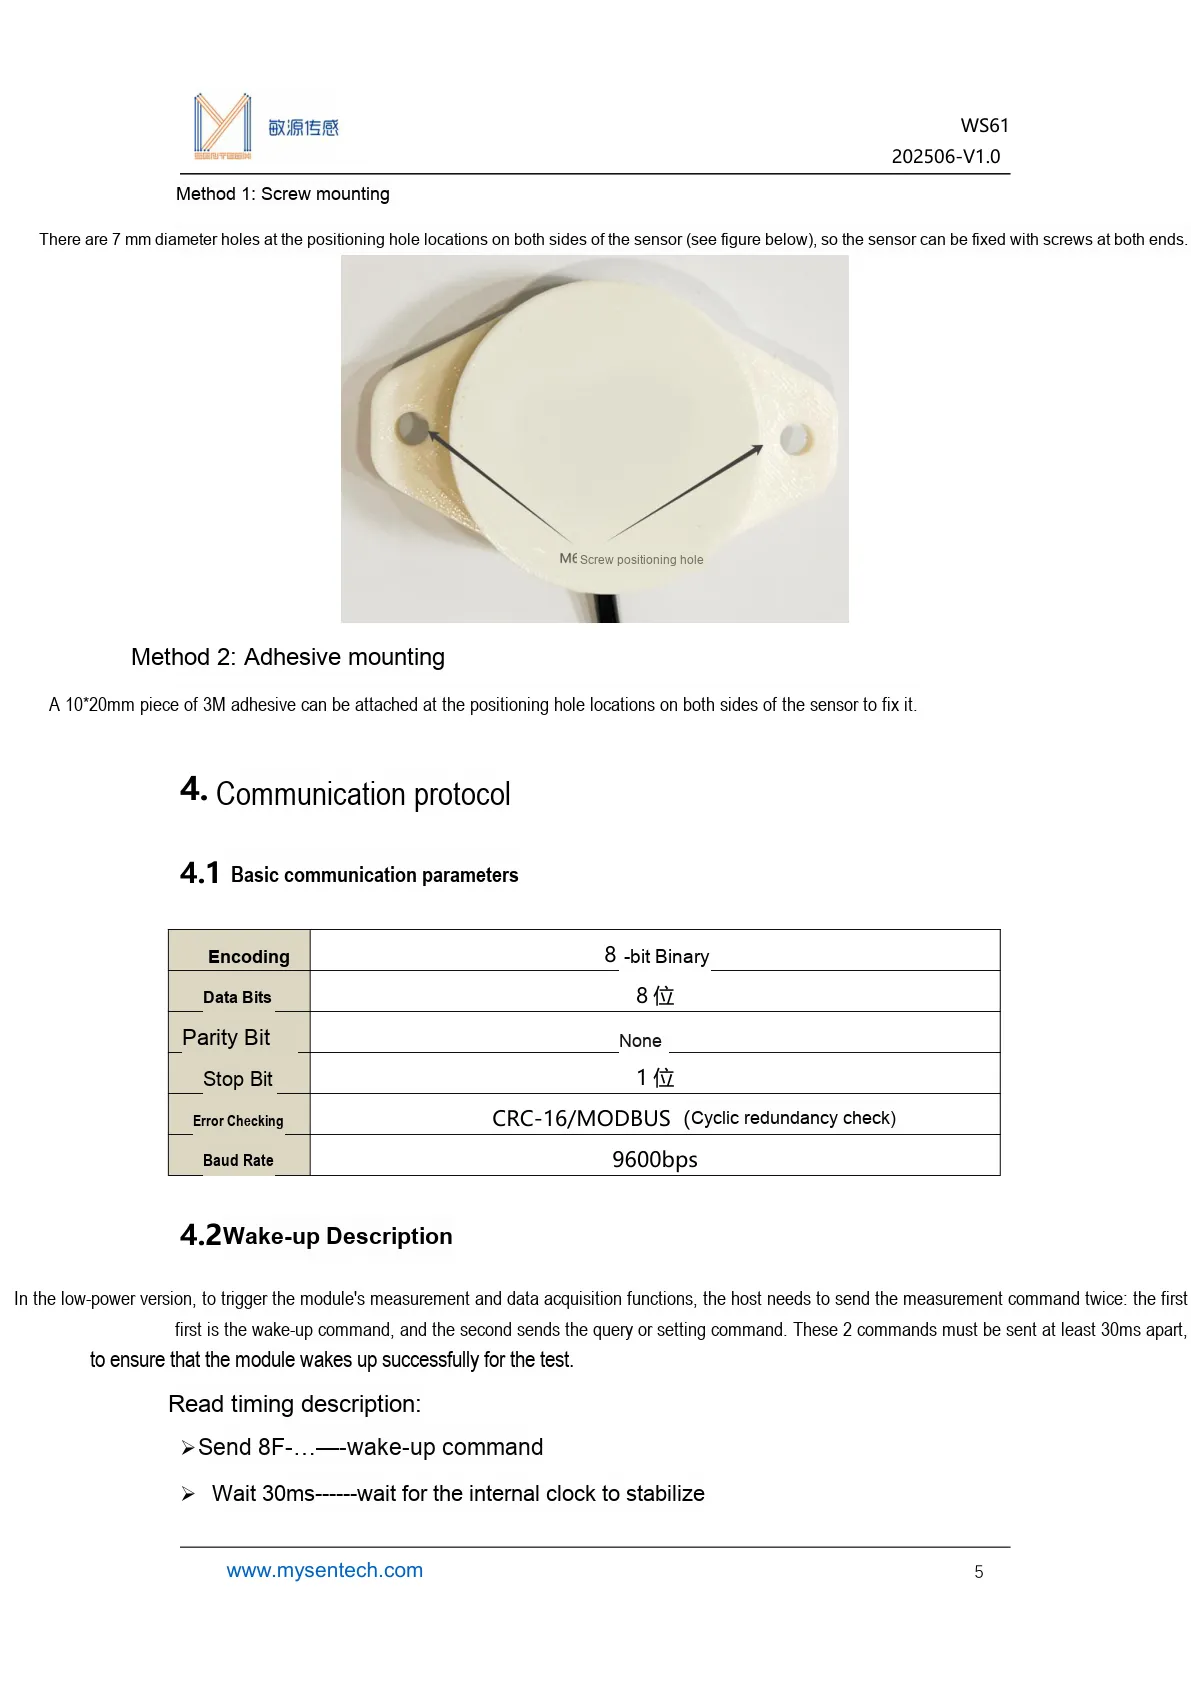
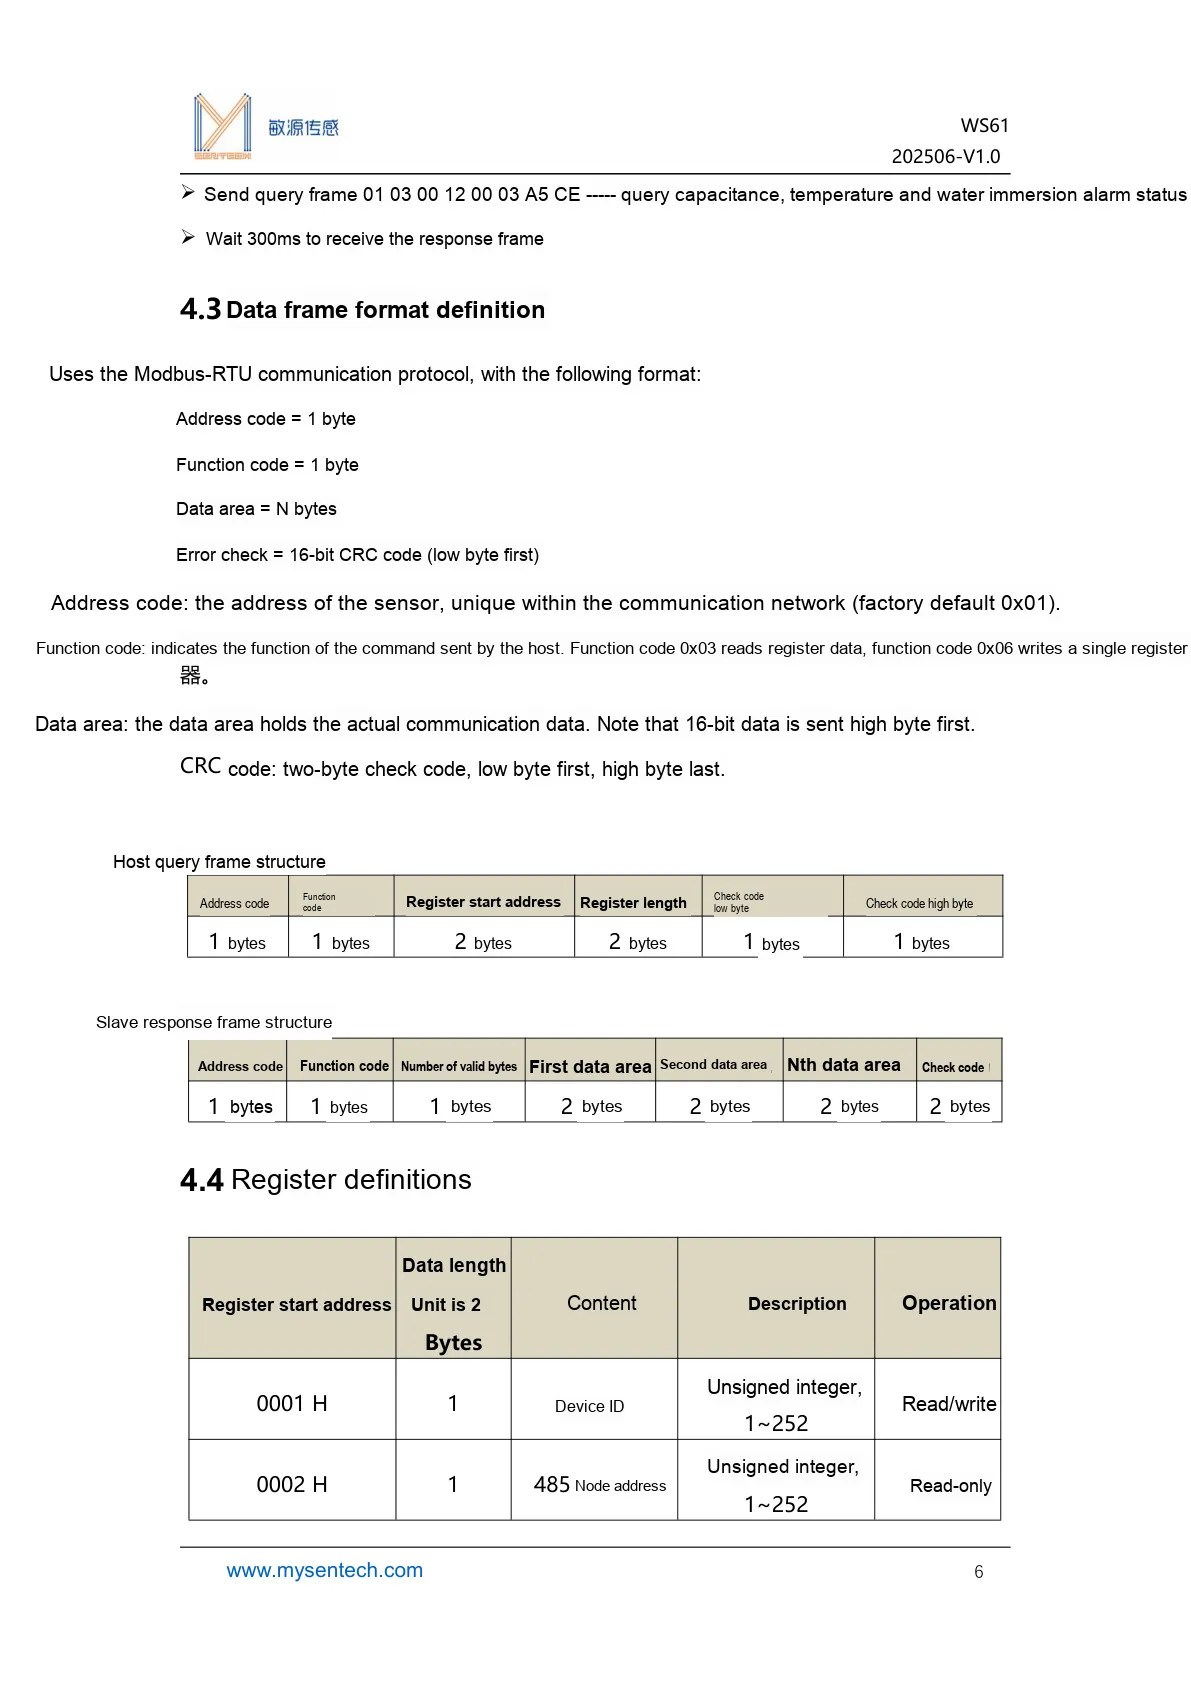
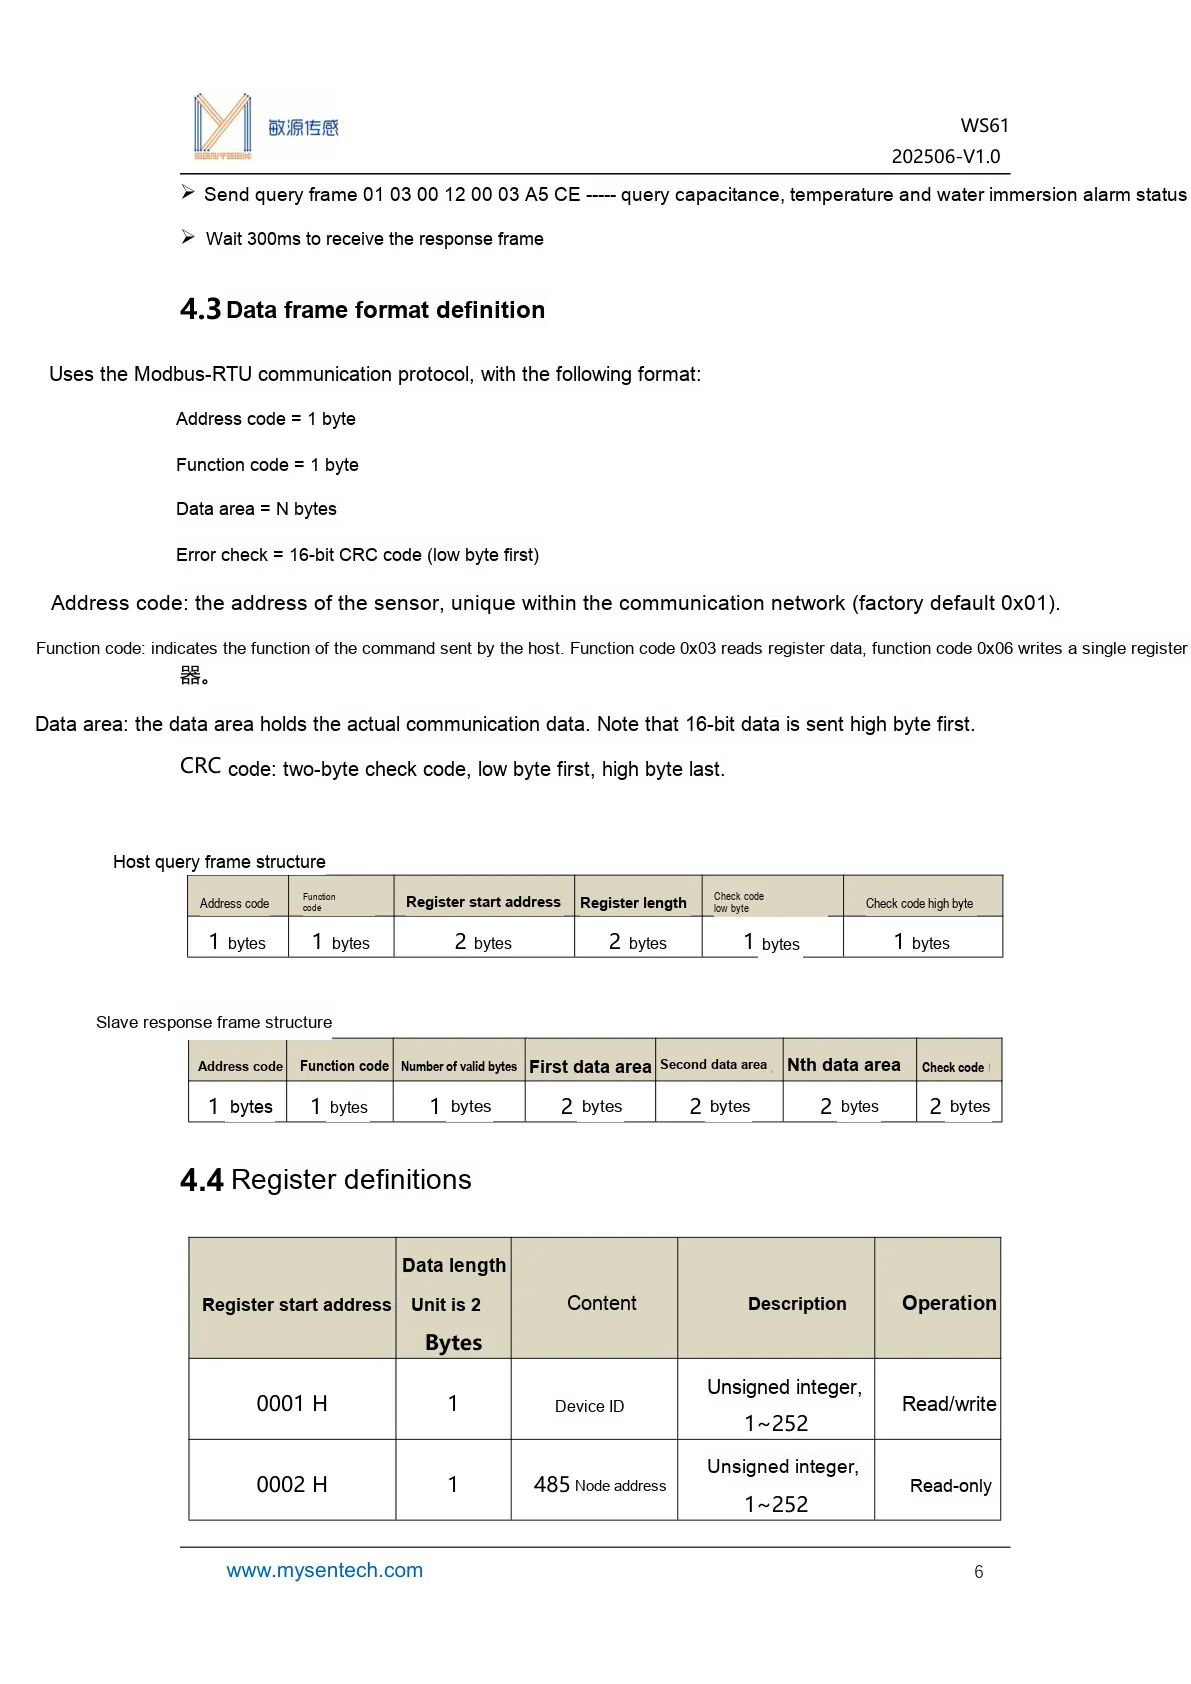
This figure illustrates the Modbus-RTU data frame format and the first half of the register definitions for WS61.
2.8 Register Definition
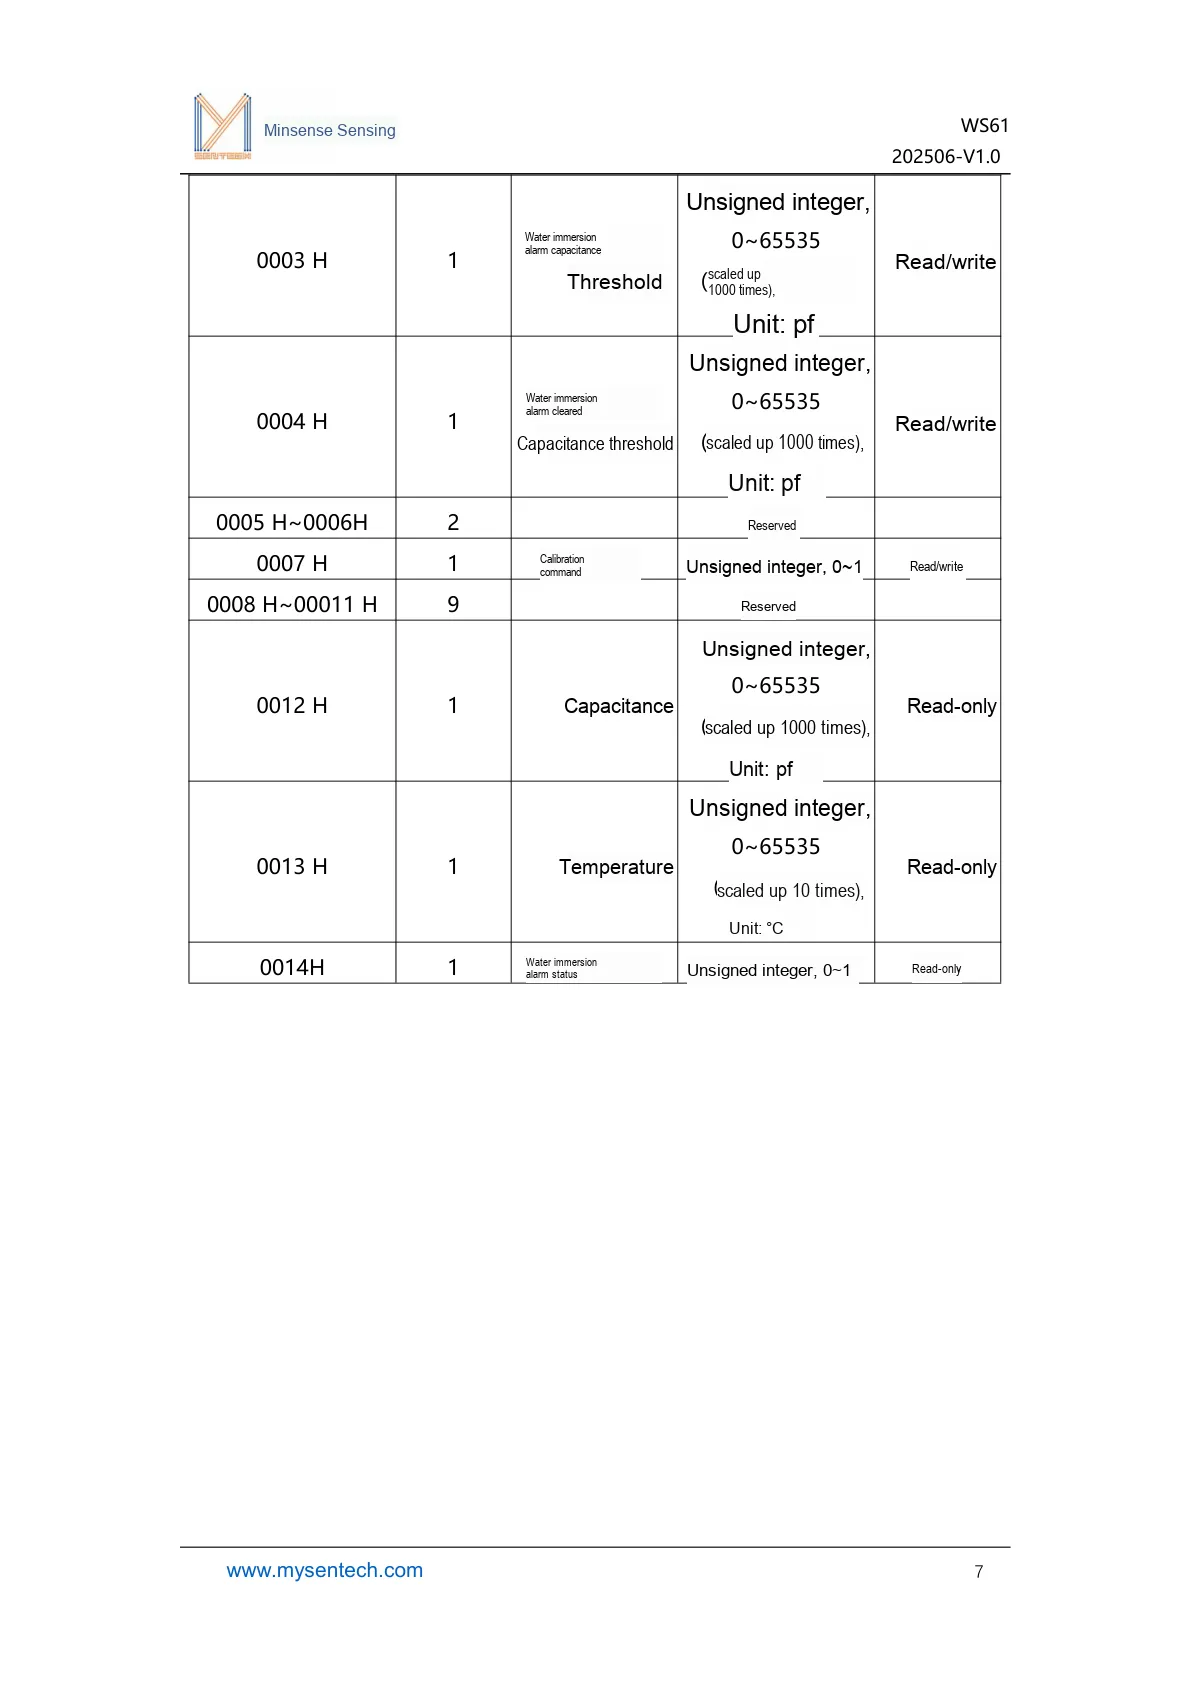
This figure lists the registers related to the alarm threshold of WS61 and the meanings of the data.
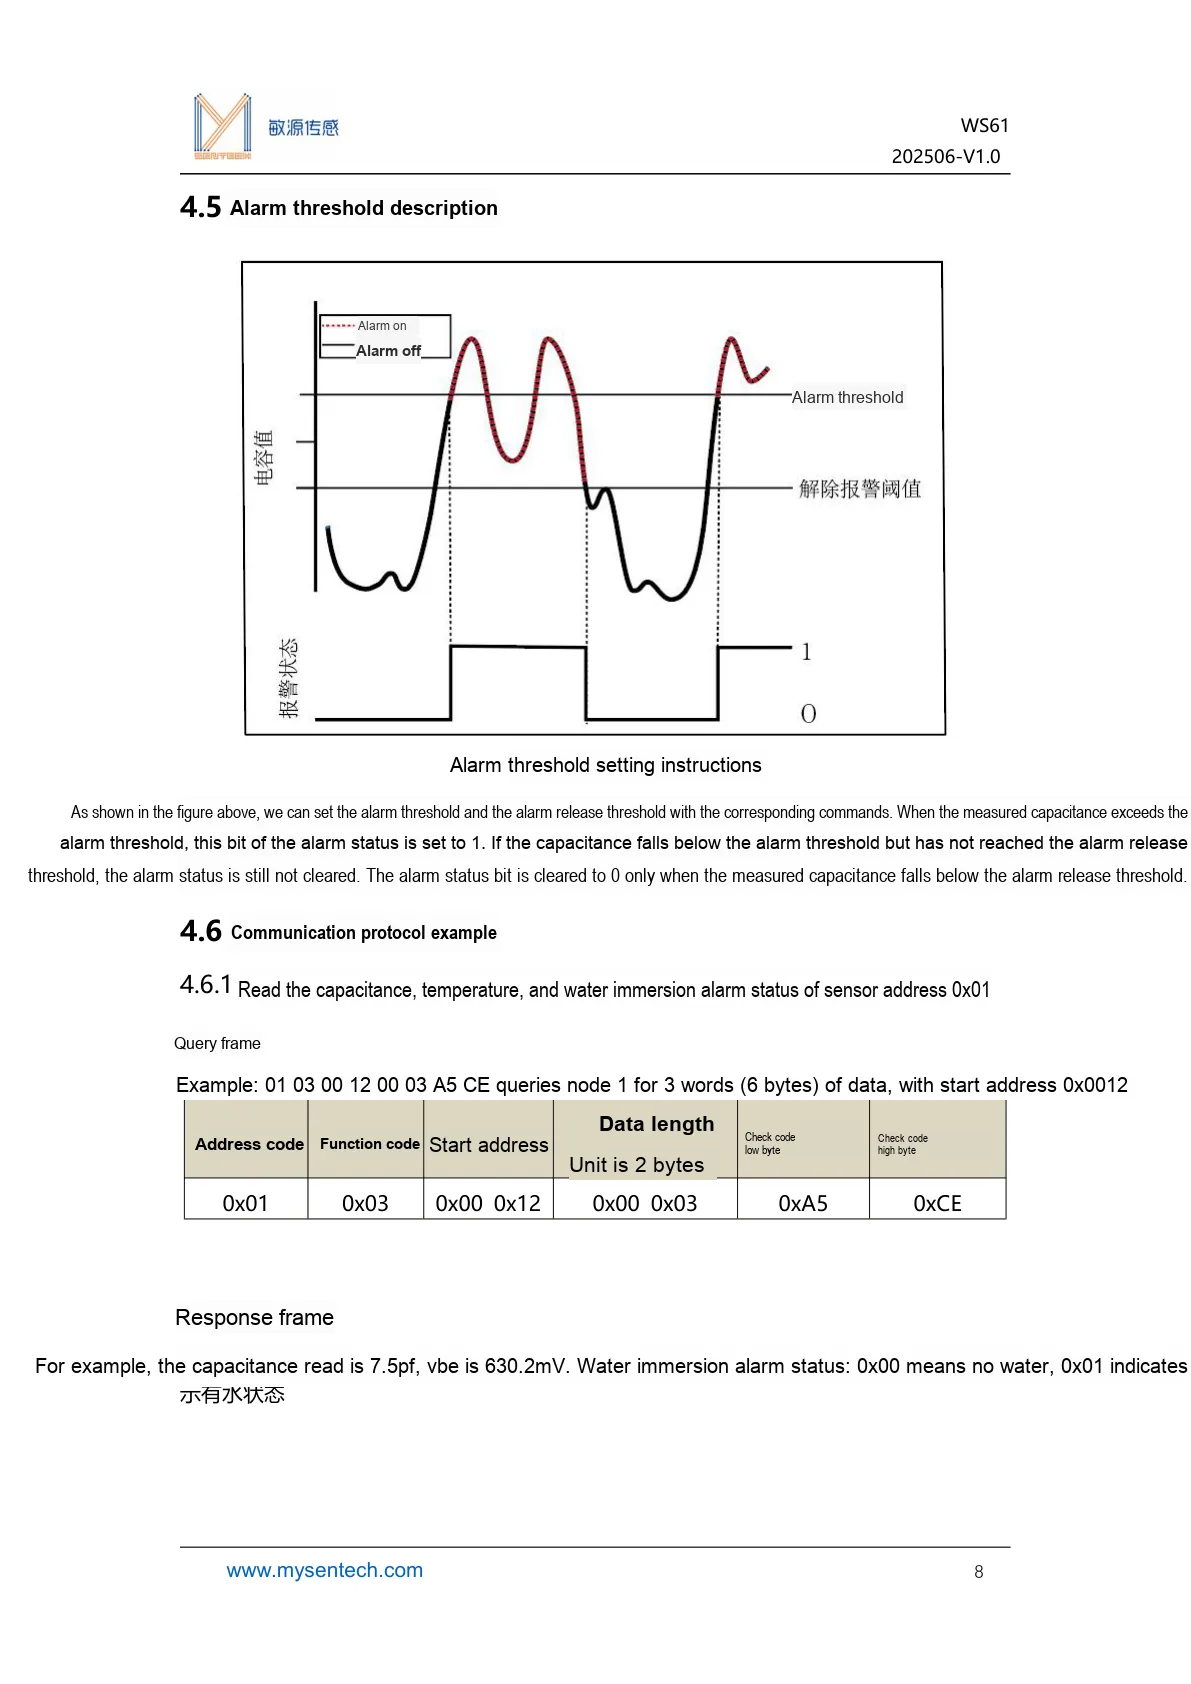
This diagram shows the description of the alarm threshold and communication examples, which can be used to set and debug the water immersion alarm logic.
III. Circuit Engineering
3.1 Circuit Source Project
To obtain the circuit source project, please check the link below:
https://mysentech.com/productinfo/3228659.html
3.2 Module Usage Instructions
3.2.1 Module Test Environment Setup and Precautions
Here, before testing, equip the module with a waterproof housing (or seal the wiring terminals with waterproof glue), and a water leakage scenario can be simulated through a transparent plastic container. After powering on and confirming the stability of serial port data, test with clean water through plastic plates of different thicknesses, and observe whether the water immersion level changes synchronously with the contact/separation of water.
Key Precautions: The module itself has no waterproof design, so a waterproof enclosure/sealed interface must be installed, and direct contact of the bare board with water is strictly prohibited; the power supply voltage must not exceed 5.5V; during installation, it must be closely attached to the measured plane and kept away from metal objects to avoid affecting the accuracy of capacitance detection.
3.2.2 Usage of Modbus Poll
Modbus Poll is a general-purpose Modbus master station debugging tool that is compatible with all capacitive sensors in this series that support the Modbus-RTU protocol. It can quickly achieve serial communication debugging between sensors and computers, real-time data reading, and log export, and is a general-purpose upper computer tool for verifying sensor functions and collecting test data. The software supports Modbus RTU/ASCII/TCP/IP protocols, is compatible with various register types and data formats, and its operation process is universal for all sensors in the series.
Before use, you need to complete the software installation and activation first. You can download the installation package through official channels. When opening it for the first time, you can try it for 30 days, or you can enter the registration code to activate it permanently. After connecting the sensor to the computer via hardware, open the software and click "Connection" - "Connect". In the pop-up window, configure the serial port parameters (Port Number, Baud Rate, Data Bits / Parity Bits / Stop Bits; sensors in this series default to 9600 Baud, 8N1 format, with the specific details subject to the corresponding model specification). After confirmation, you can establish a communication connection.
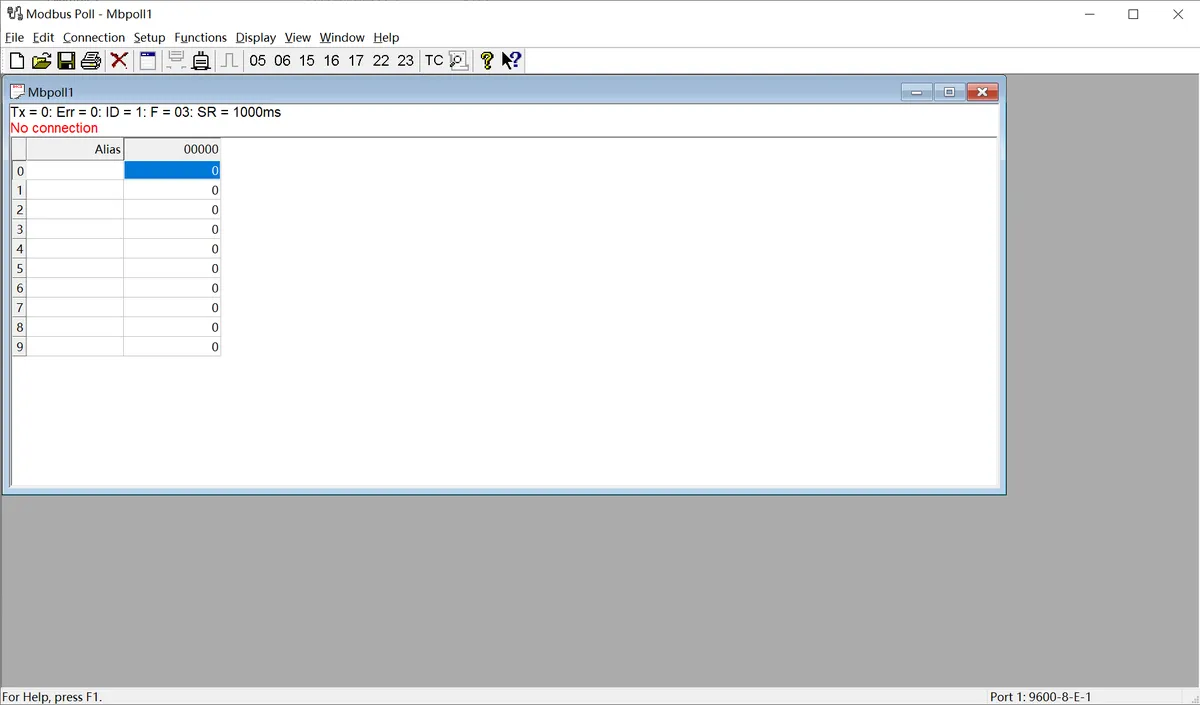
The following is a description of the general operating procedure:
- Serial Connection Configuration: After connecting the sensor to the computer via a USB-to-serial module, open the Modbus Poll software, click on the menu bar "Connection" - "Connect", select the COM Port Number corresponding to the sensor in the pop-up window, and configure the serial port parameters that match the sensor (Baud Rate, Data Bits, Parity, Stop Bits; sensors in this series default to 9600 Baud, 8N1 format). After confirmation, the communication connection can be established.
- Import Sensor Configuration File: The software supports importing the corresponding
.mbppre-configured files for each sensor model. The register address, data format, and alias definition have been pre-set in the file, eliminating the need for manual register configuration. Simply open the corresponding sensor's.mbpfile in the software, and all parameters will be automatically loaded. After a successful connection, the real-time detection data of the sensor (such as dust/rain/frost thickness values, status flags, etc.) will be directly displayed. - Data Logging (Optional): If you need to save test data, you can configure logging rules through the "Setup" - "Excel Log" function, which supports logging data at fixed intervals or every time data is updated, and allows you to set an upper limit on the number of records, facilitating subsequent analysis and verification of sensor data.
The above are the general basic operations of the host computer. For the pre-configured files, specific register definitions, and special configuration details of the .mbp of different sensor models, please refer to the content in "VII. Related Materials".
3.3 Application Experiment
Here, we use the GraftPort-RP2040 development board for testing, and the water immersion module WS61 uses the UART interface to communicate with the main controller.
Here, we first use the HY2.0-4P connection cable to connect the module through the XH2.54-4P to HY2.0-4P interface module to the GraftPort-RP2040 development board's UART0 interface:
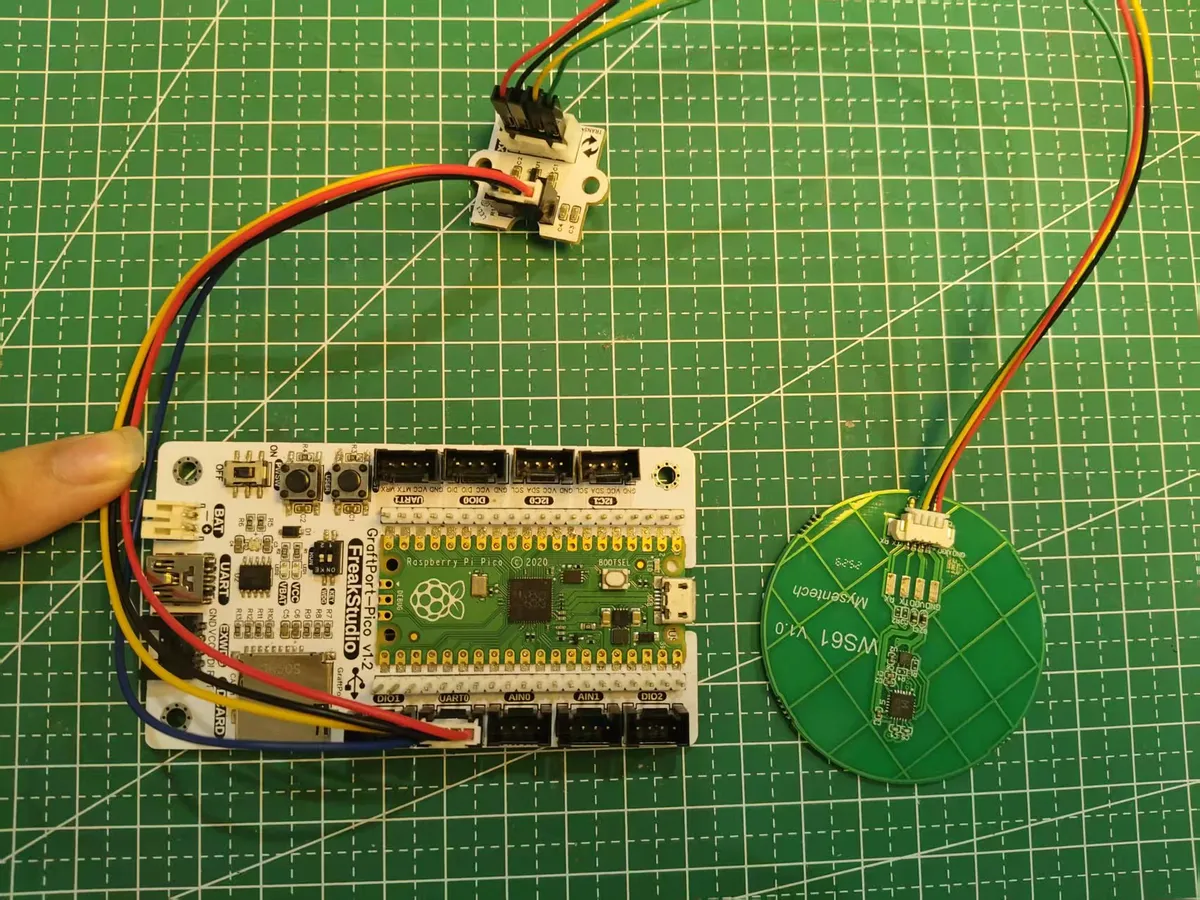
This diagram shows the UART wiring method between the WS61 module and GraftPort-RP2040 development board.
Module connections are shown in the following table:
Development Board Pins | Module Pin | Description |
Pin 16 |
|
|
Pin 17 |
|
|
Here, we need to search for relevant driver packages on uPyPI: https://upypi.net/zh/
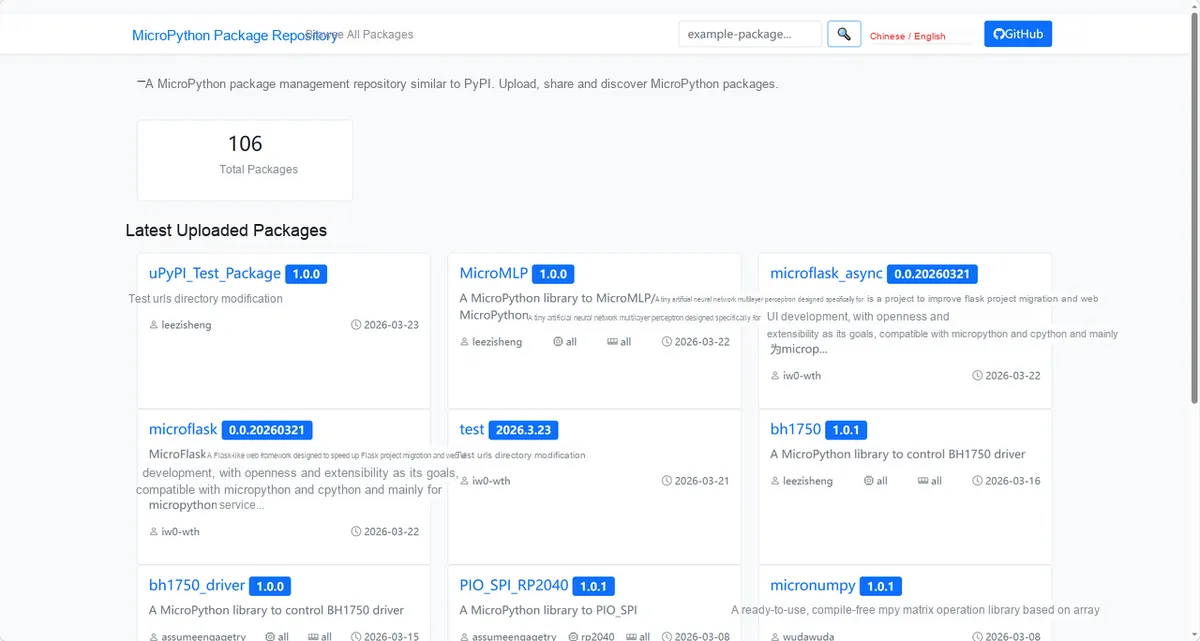
This figure demonstrates the process of searching for the WS61 driver package in uPyPI.
Input ws61_driver for search, and the display is as follows:
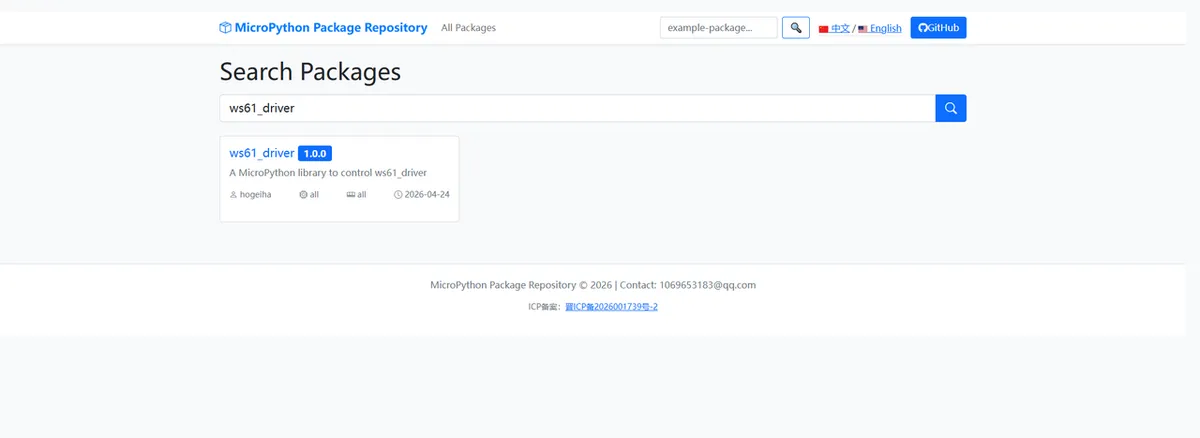
This figure shows the ws61_driver search results, used to confirm the corresponding driver package.
Click to copy the local installation command:
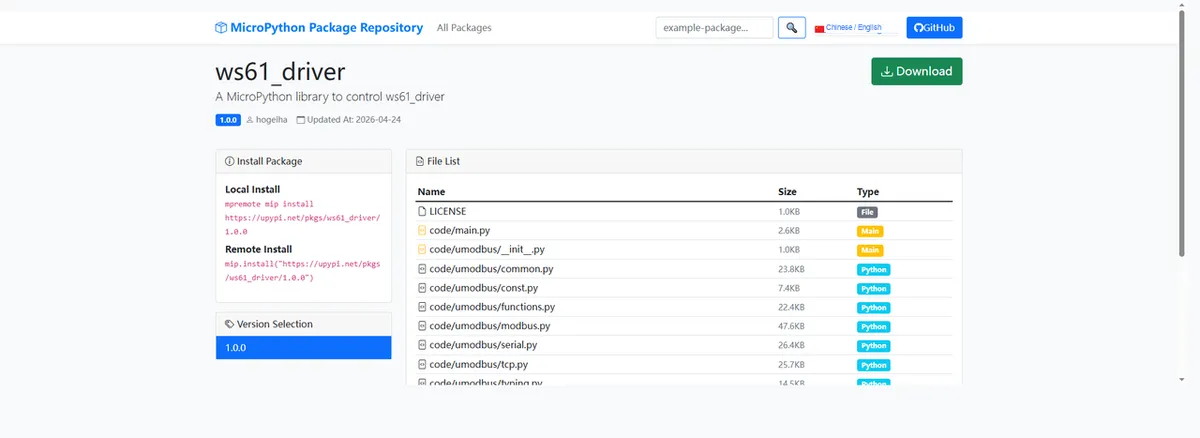
This figure shows the interface for copying the WS61 driver installation command, facilitating the completion of environment preparation.
Import module driver library code via mip tool, the following are the usage instructions for mpremote tool:
mpremote mip install https://upypi.net/pkgs/ws61_driver/1.0.0After importing the water immersion module WS61-MicroPython driver code , copy the following main.py code into our project:
# Python env   : MicroPython v1.23.0
# -*- coding: utf-8 -*-
# @Time    : 2026/4/3 2:30 PM
# @Author  : FreakStudio
# @File    : main.py
# @Description : WS61 water immersion sensor data acquisition main program

# ======================================== Import Modules =========================================

import time
from wd61 import WS61Water

# ======================================== Global Variables ============================================

# ======================================== Functions ============================================

# ======================================== Custom Classes ============================================

# ======================================== Initialization configuration ===========================================

# Wait for hardware to stabilize
time.sleep(3)
# Output initialization message (English only)
print("FreakStudio: WS61 Water Sensor Initialization")

# Create sensor object, configure slave address, UART number, TX and RX pins
sensor = WS61Water(slave_addr=1, uart_id=0, tx_pin=16, rx_pin=17)
# Write alarm capacitance threshold (unit: pF)
sensor.write_alarm_threshold(7.5)
# Write alarm release threshold (unit: pF)
sensor.write_release_threshold(7)

# ========================================  Main Program  ============================================

# Main loop: print all readable parameters
while True:
    # Read device ID
    dev_id = sensor.read_device_id()
    # Read 485 node address
    node_addr = sensor.read_485_node_address()
    # Read alarm capacitance threshold
    alarm_th = sensor.read_alarm_threshold()
    # Read alarm release threshold
    release_th = sensor.read_release_threshold()
    # Read real-time capacitance value
    cap = sensor.read_capacitance()
    # Read ambient temperature
    temp = sensor.read_temperature()
    # Read water immersion status (1: water alarm, 0: no water)
    status = sensor.read_water_status()

    # Print all parameters in formatted form (English-only output)
    print("=" * 60)
    print(f"Device ID: {dev_id if dev_id is not None else 'Read failed'}")
    print(f"485 Node Address: {node_addr if node_addr is not None else 'Read failed'}")
    print(f"Alarm threshold: {alarm_th} pF" if alarm_th is not None else "Alarm threshold: Read failed")
    print(f"Release threshold: {release_th} pF" if release_th is not None else "Release threshold: Read failed")
    print(f"Capacitance: {cap} pF" if cap is not None else "Capacitance: Read failed")
    print(f"Temperature: {temp} C" if temp is not None else "Temperature: Read failed")
    print(f"Water status: {'Water alarm' if status == 1 else 'No water'}" if status is not None else "Water status: Read failed")
    print("=" * 60)

    # Delay 1 second
    time.sleep(1)
Burn the code, open the terminal, and the output is as follows:
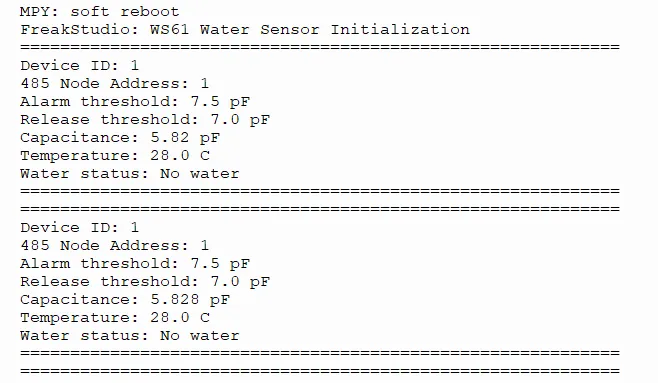
This figure shows the first half of the output of the WS61 example program, including information such as device address and threshold.
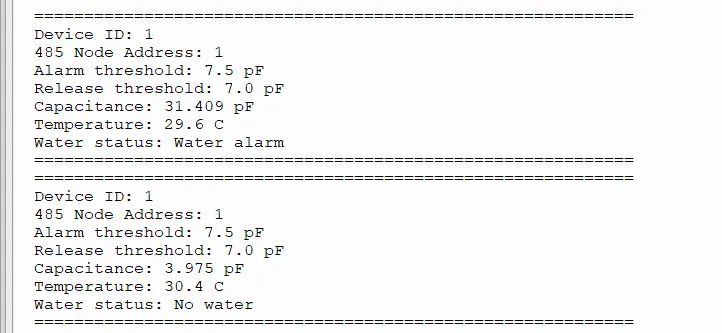
This figure shows the second half of the output of the WS61 example program, including information on capacitance, temperature, and water immersion status.
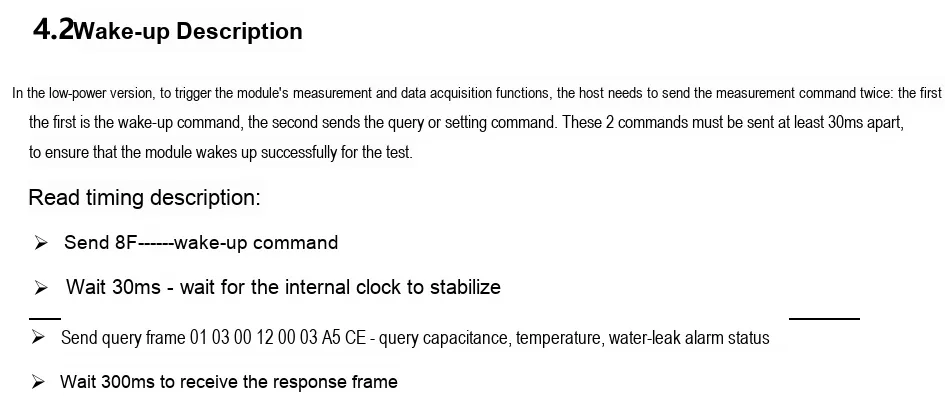
Here, it should be noted that our driver library code has already encapsulated the two read operations, so developers do not need to perform two reads.
4. Driver
ws61_driver.zip 44 KB
5. BOM & Recommended Alternatives
None.
6. Change History
Document Version | Modification Date | Modifier | Modified Content |
v1.0 | 2026-04-24 | Hou Junhan | Initialize Document |
v1.1 | 2026-05-20 | Li Zisheng | Add Introduction, 3.2.2 Usage of Modbus Poll |
VII. Related Materials
WS61 Water Immersion Sensor Product Introduction-Minyuan 202506-2.pdf 1.2 MB
WS11.mbp 3 KB