
Contents
- 1. Basic Concepts of the REPL Interactive Interpreter
- 1.1 Workflow of REPL
- 1.2 Keyboard Shortcuts for REPL
- 2. Connect the computer to the Raspberry Pi Pico
- 2.1 Connect via USB
- 2.2 Connect via Serial Port
- 3. Related Applications of REPL
- 3.1 Quickly Master the Methods Related to REPL
- 3.2 Terminal Print Output
- 3.3 Driving an LED
- References
- Version Record
1. Basic Concepts of the REPL Interactive Interpreter
After we finish flashing the firmware to our Raspberry Pi Pico, if we use a remote terminal to connect the computer to the Raspberry Pi Pico via serial port, USB or other methods at this point, we will find that some information is output in the terminal:
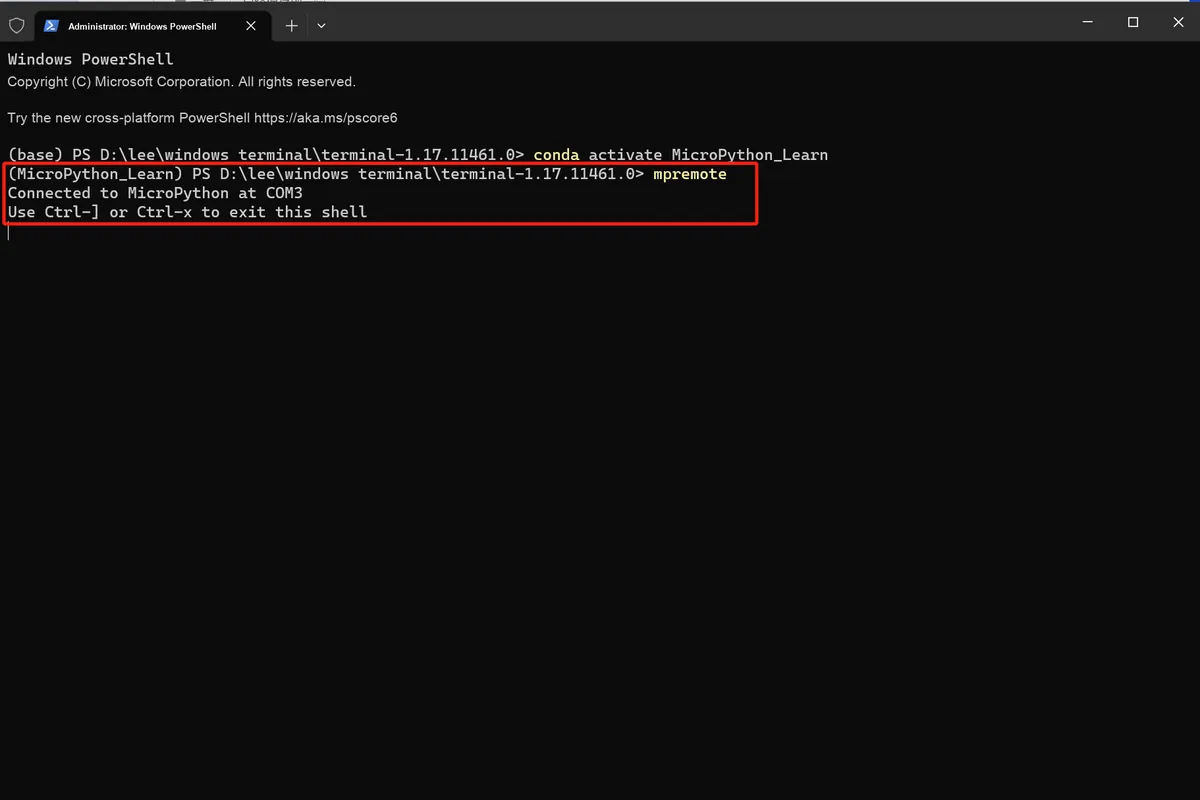
This is because after the firmware of the Raspberry Pi Pico is burned, the built-in MicroPython will run in the REPL interactive interpreter mode, which is similar to the terminal of Windows system or the shell of Unix/Linux. We can enter commands in the terminal and receive responses from the system.
Interactivity means that you can get immediate feedback on code execution. In an editor like PyCharm, after you finish writing a piece of code, you have to run it to see how it works; if you make a small modification, you have to run it again to check the result. In an interactive interpreter, by contrast, it’s like a program that’s always running — you can make changes at any time and get feedback right away.
As shown in the figure, by entering the following commands, we can turn on the onboard LED of the Raspberry Pi Pico, turn off the onboard LED, and output messages in the terminal:
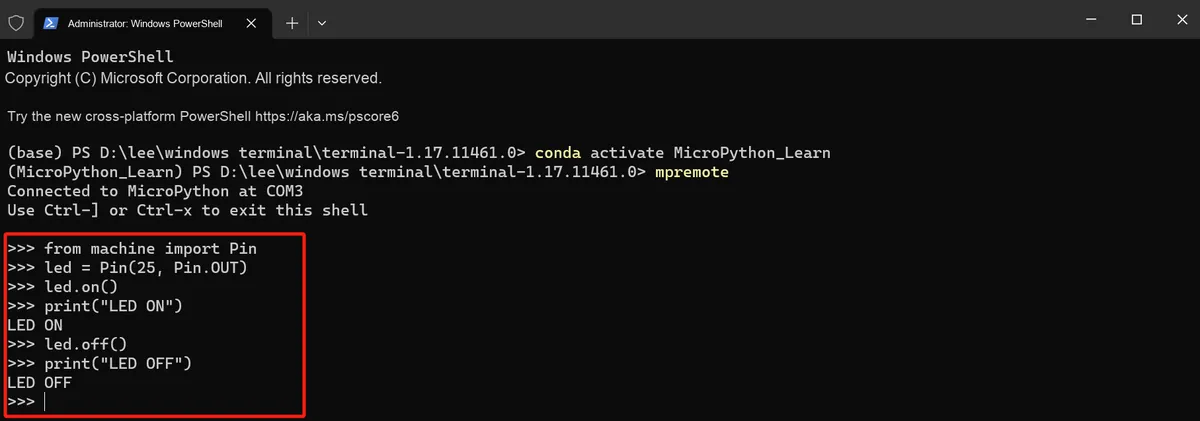
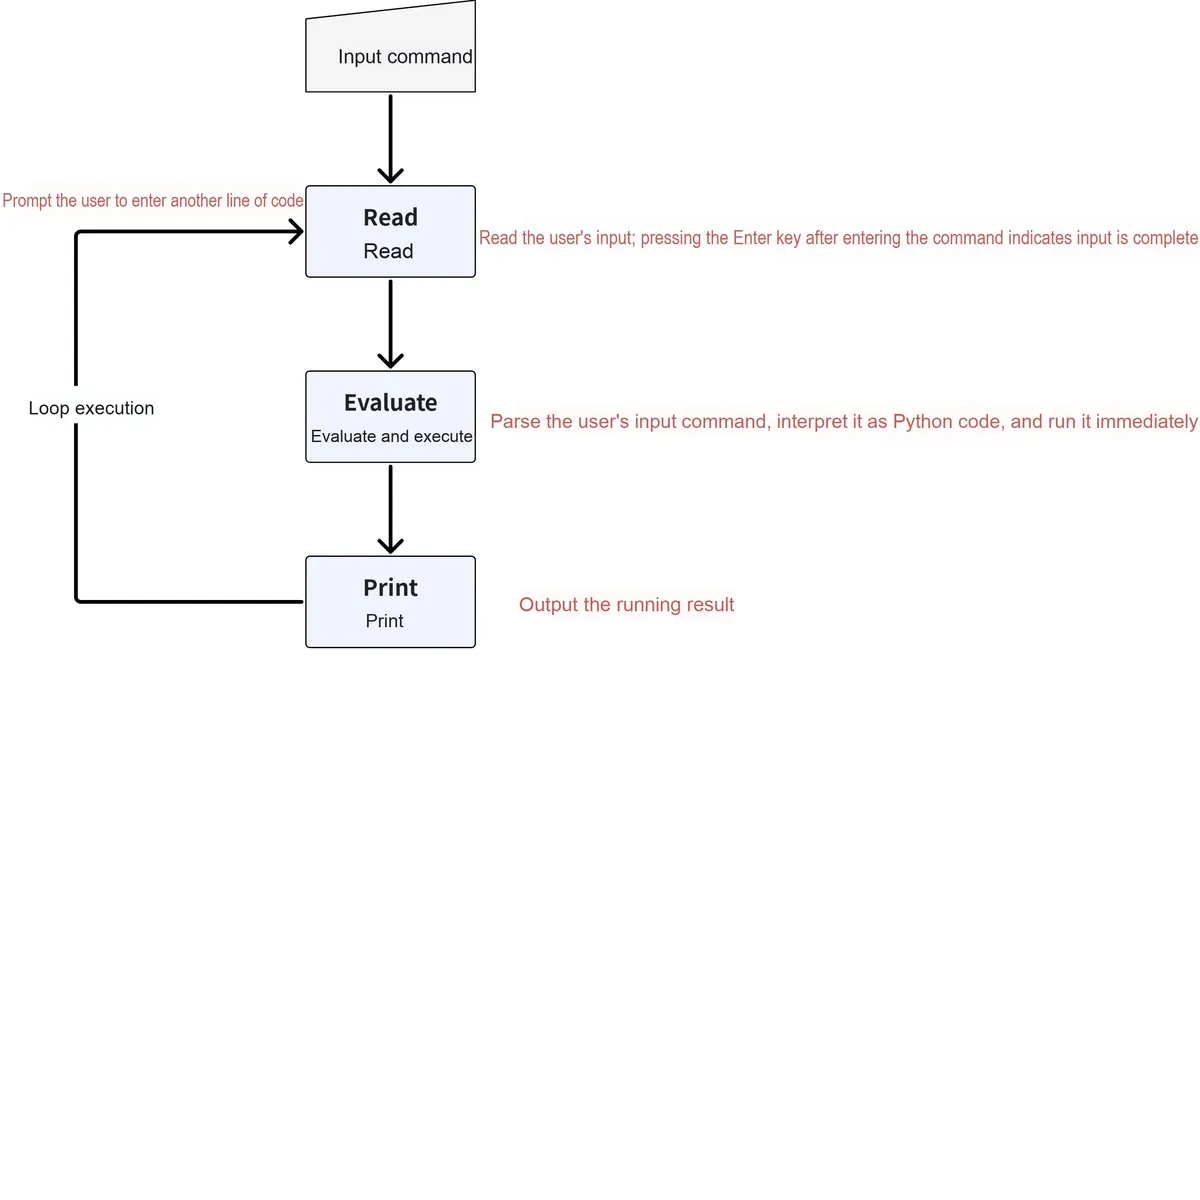
REPL is the abbreviation for Read-Evaluate-Print Loop. Many programming languages come with a REPL, which acts like a miniature Shell that facilitates interaction between the interpreter (core) and commands. It allows users to conveniently input various commands to be executed by MicroPython's internal interpreter and observe the running status, thus playing a very significant role in program debugging.
Through MicroPython 's REPL interactive environment, we can accomplish the following tasks:
- Access and control the
IOpins and peripherals of the Raspberry Pi Pico - View help information and disk files
- Output debug information
- Test Code
However, it should be noted that once the code in the REPL has been executed, it cannot be rolled back or undone. Moreover, when you close the REPL environment, all variables, functions, etc. defined in the REPL will be lost, and a brand new session will be started the next time you launch the REPL.
1.1 Workflow of REPL
The workflow of REPL is illustrated in the following figure:
1.2 Keyboard Shortcuts for REPL
shortcut key | Features |
Ctrl-C | Stop the running program or terminate the current command line, and return to the REPL |
Ctrl-D | Implement a soft reset when the command line is empty. |
Ctrl-B | When the command line is empty, the system prompts are displayed: version number, and REPL operation instructions |
Ctrl-E | When the command line is empty, enter paste mode. You can press Ctrl-C to exit paste mode, and Ctrl+ D to complete pasting. |
Tab | command auto-completion |
Up and down keys | Recall previously entered commands. MicroPython can save the last 6 entered commands. |
Left and right arrow keys | Move and edit commands in the current command line |
Except for Ctrl-C, all other shortcut keys only take effect when the command line is empty (i. e., no characters have been entered yet).
2. Connect the computer to the Raspberry Pi Pico
2.1 Connect via USB
We can use multiple remote control terminals to connect and communicate with the Raspberry Pi Pico via USB cables, and common remote control terminals include MobaXterm, Putty, mpremote, Xshell, etc.
2.1.1 Connect using the mpremote tool (recommended)
The mpremote command-line tool provides a set of integrated utility functions that enable remote interaction and automation with MicroPython devices via serial connection. We can install mpremote via pip in the command line after downloading and installing Python to use it:
pip install mpremoteThe simplest way to use this tool is to call it without any parameters, which can be done by directly entering the following command in the command line:
mpremote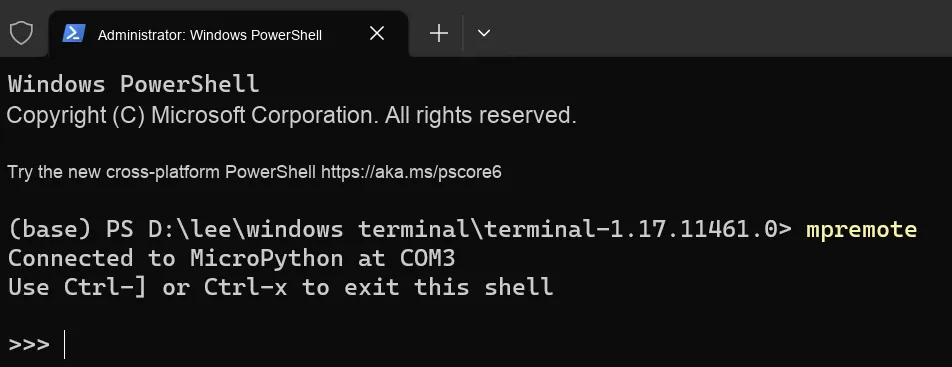
This command automatically detects and connects to the first available serial port device and provides an interactive REPL. Serial ports are opened in exclusive mode, so when you run a second (or third, etc.) instance, mpremote will connect to subsequent serial devices if any are available.
For more information on how to use mpremote, please refer to the link:
MicroPython Remote Control: mpremote
https://listenai.github.io/MicroPythonDocCN/reference/mpremote.html
2.1.2 Connect Using the PuTTY Tool
PuTTY is a remote login tool that serves as a Telnet, SSH and RLOGIN Client for Windows and Unix platforms. It supports cross-platform usage and can run on systems including Windows, Linux and macOS; it is a lightweight program that can be run as a standalone executable without installation; it supports multiple protocols including SSH, Telnet, Rlogin and serial port, and can be used for remote login and management of remote servers, network devices and routers.
For the download and installation of the Putty software, you can refer to the following link:
[Tool] Tutorial on Downloading, Installing, Using PuTTY and Common Settings
https://blog.csdn.net/crr411422/article/details/131135853
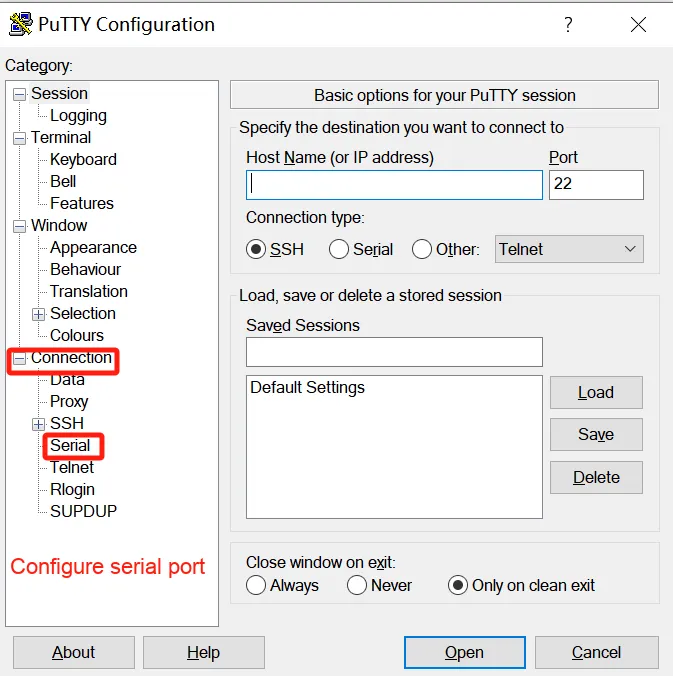
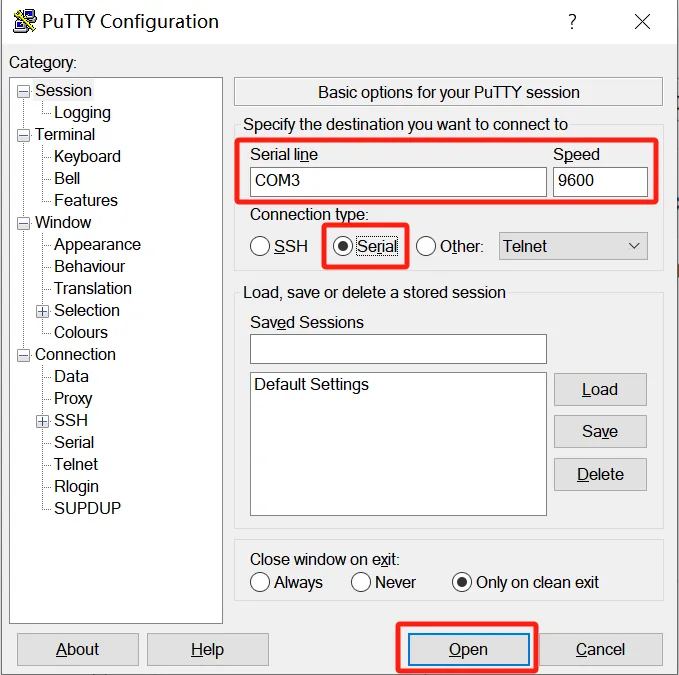
When connecting to a port using PuTTY, we need to make the following settings:
- First, open Connection-Serial to configure the parameters for serial port connection:
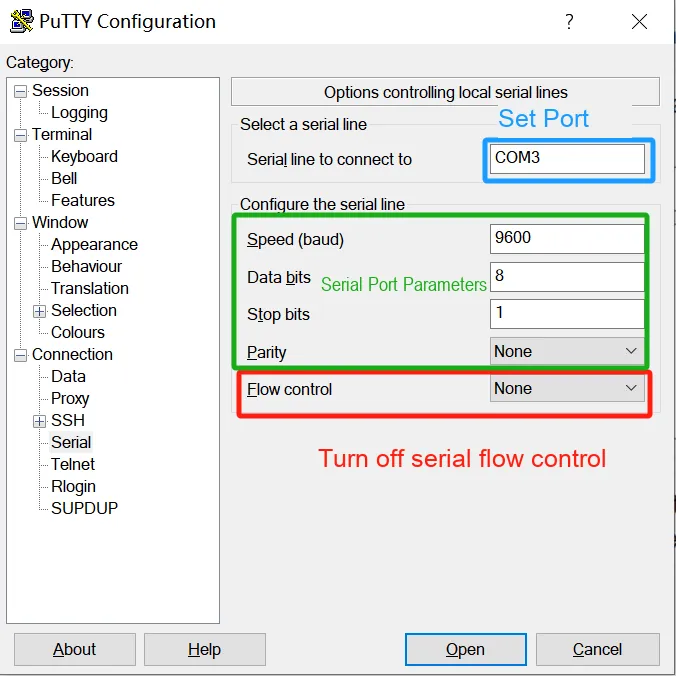
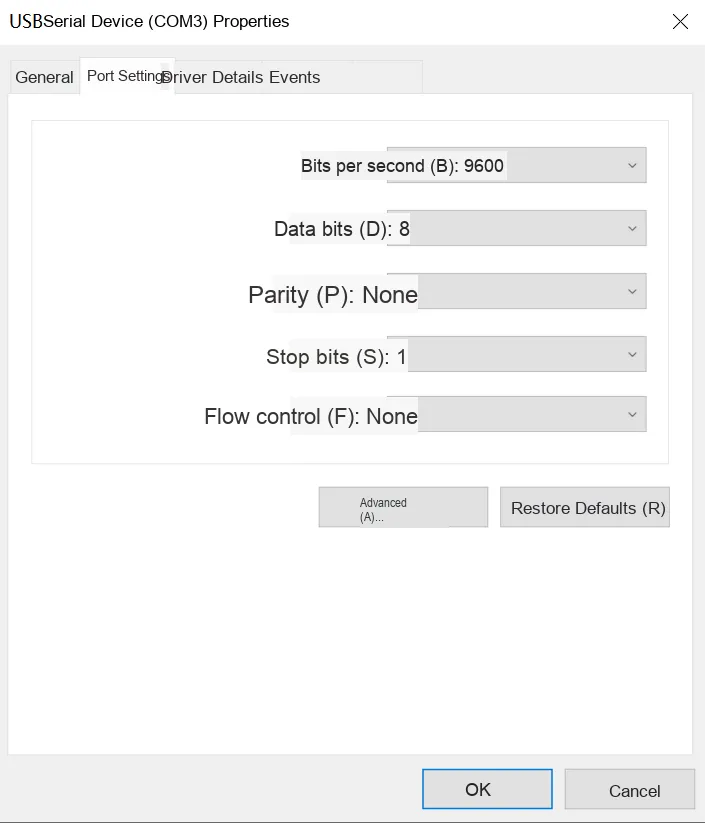
- Set the Port Number according to the Port Number displayed in the device manager. For parameters such as the baud rate, stop bits, data bits, and parity bits of the serial port connection, you can select them based on the attribute values of the port. Finally, disable the serial port flow control:
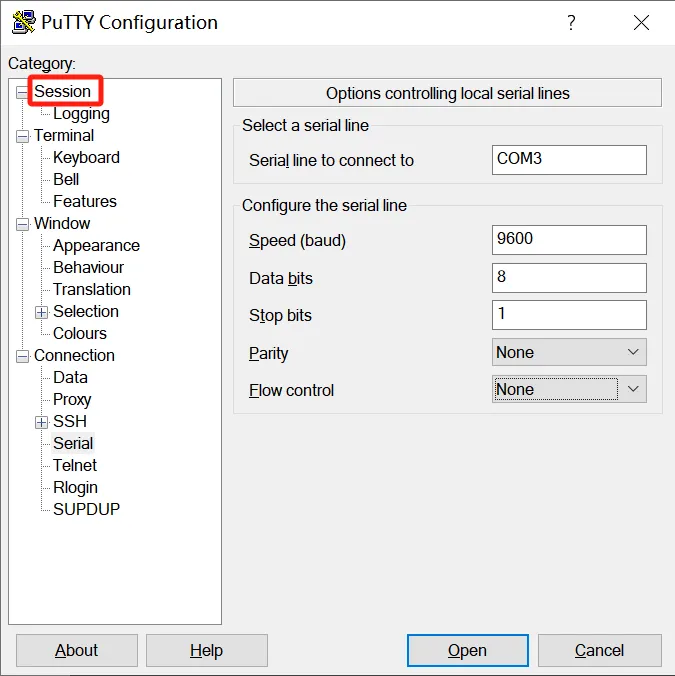
- Return to the Session window, select serial port serial in Connection type, and click Open
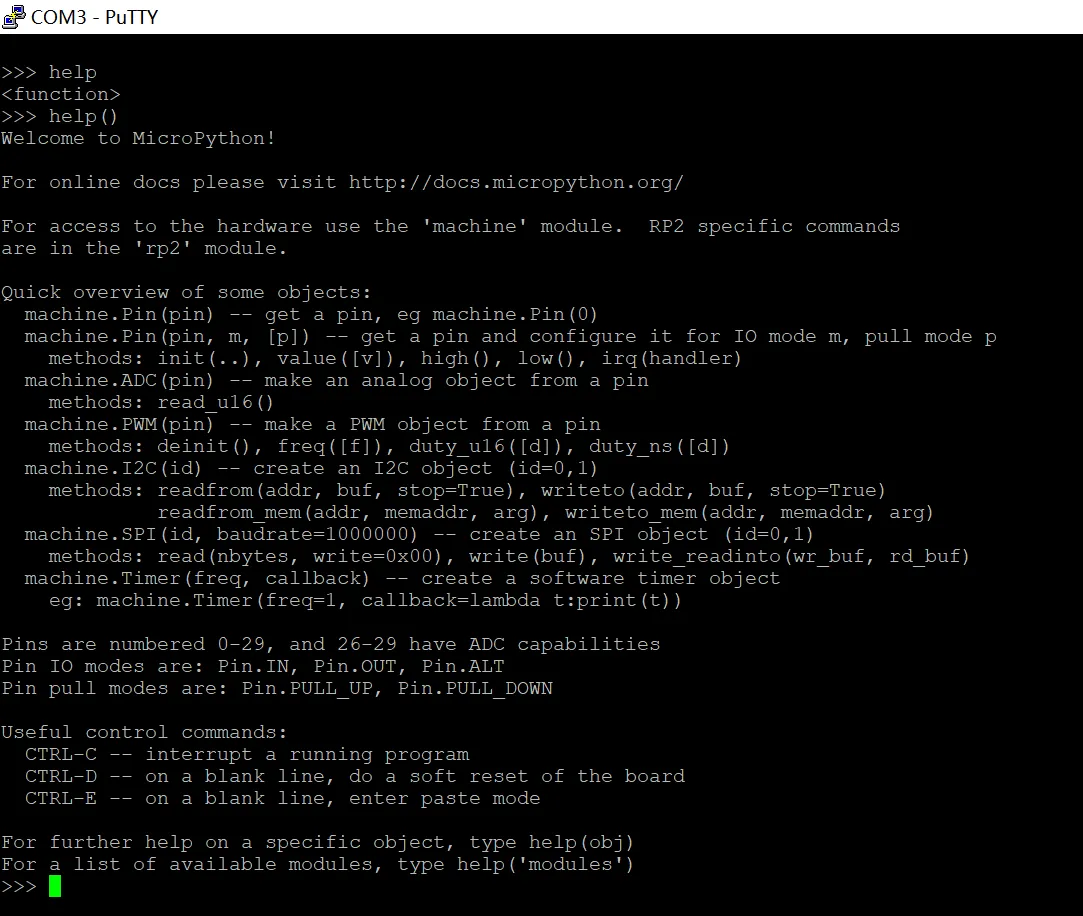
- When the following window appears, just press the Enter key. Here, enter the help () command for testing:
2.1.3 Connect Using the MobaXterm Tool
MobaXterm, also known as MobaXVT, is an enhanced terminal, X server and Unix command set (GNU/Cygwin) toolbox. It features the following characteristics:
- Supports various connection protocols including SSH, X11, RDP, VNC, FTP and MOSH
- Supports Unix commands (bash, ls, cat, sed, grep, awk, rsync, …)
- Supports SFTP file transfer after connecting to an SSH terminal
- A wide variety of feature-rich plugins (git/dig/aria2, etc.)
- runs Windows or other software
You can refer to the following link for the download and installation of MobaXterm:
MobaXterm (Terminal Tool): Download, Installation and Usage Tutorial
https://blog.csdn.net/qq_44074697/article/details/118544904
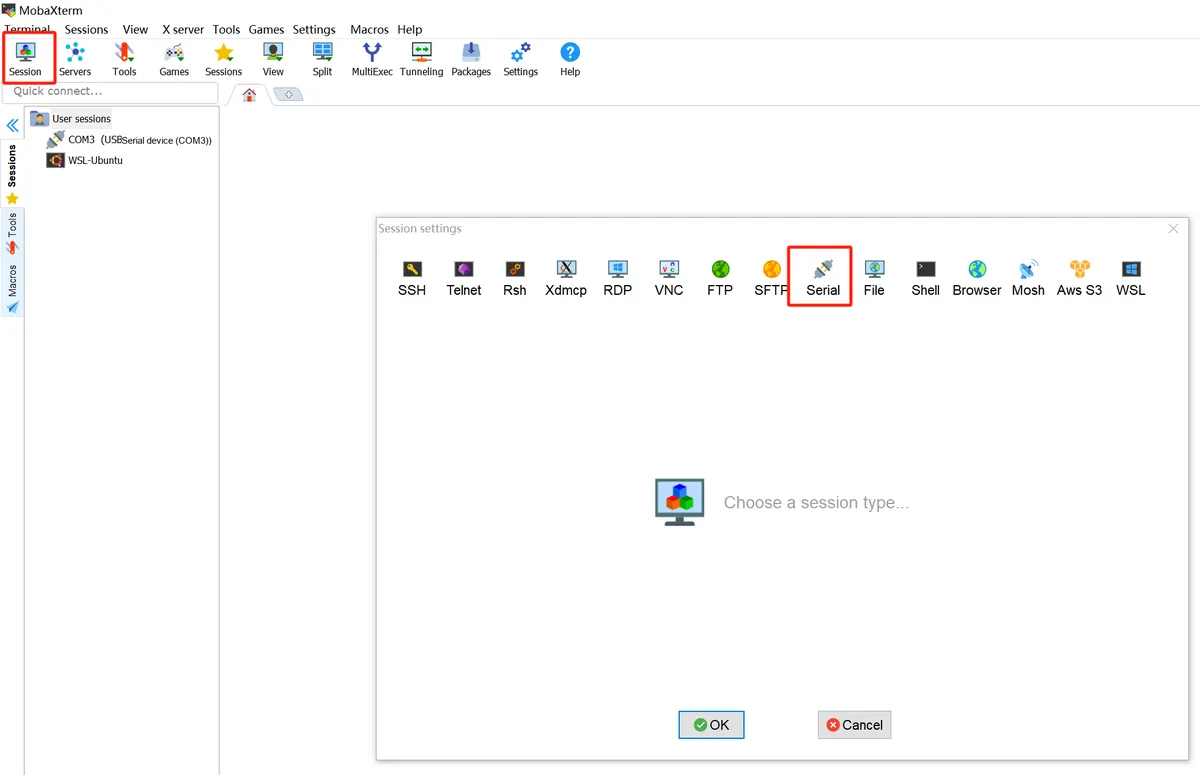
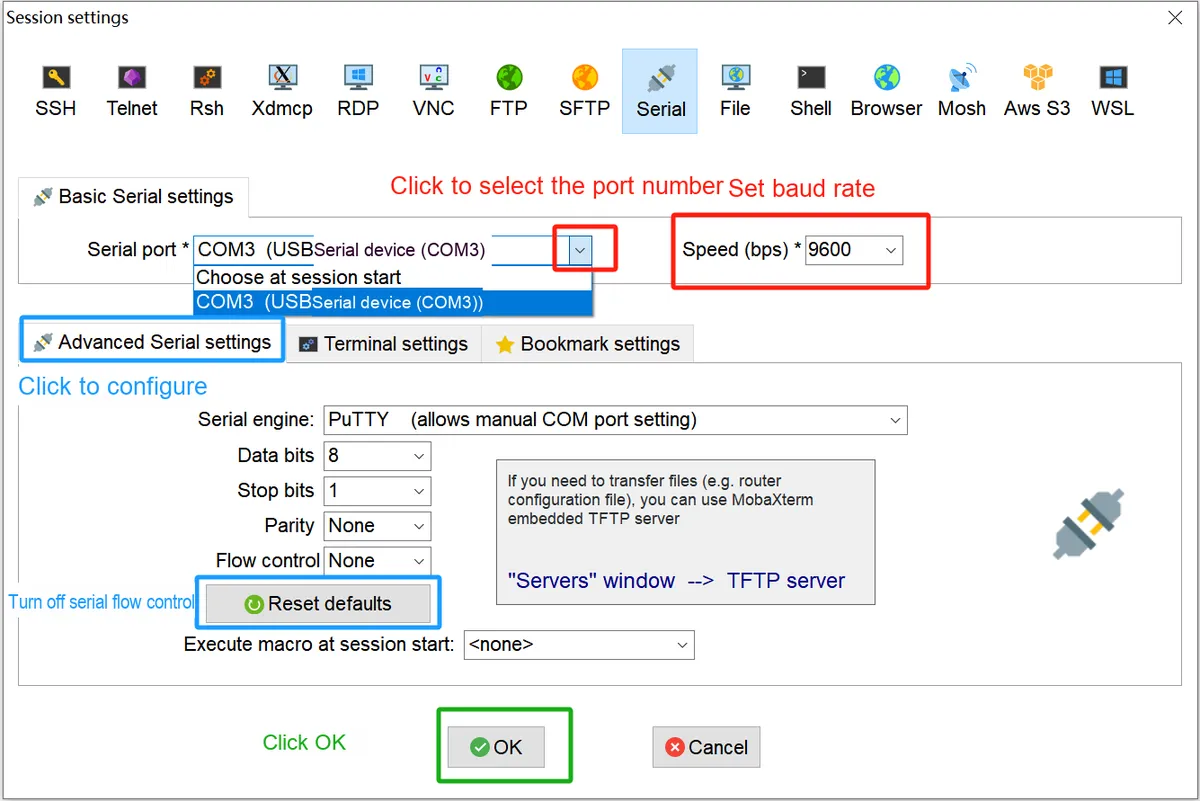
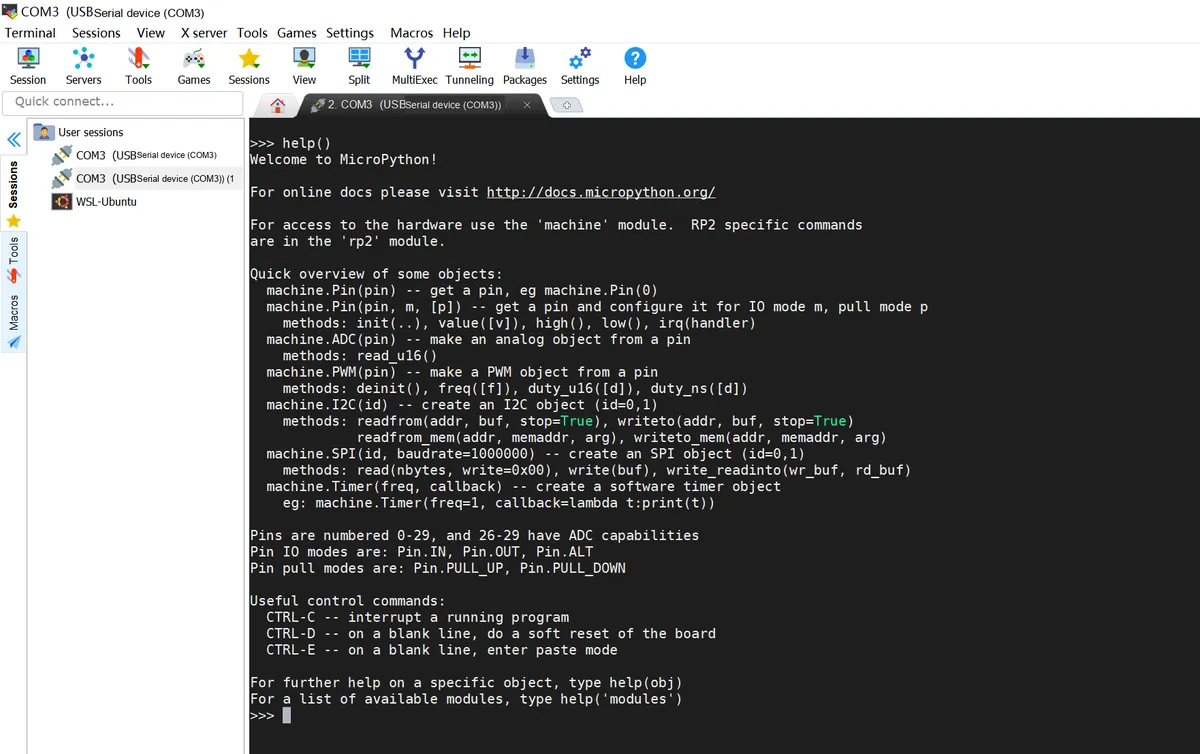
Open MobaXterm, click "Session" in the upper left corner, select "Serial" in the pop-up interface, select the Port Number (COM3, the Port Number displayed in the previous Device Manager), baud rate (Speed 9600), and flow control (Flow Control: none) as shown in the following figure, and finally click "OK".
2.2 Connect via Serial Port
By default, RP2040 MicroPython port does not expose UART port REPL.
However, you can modify the values of the following macros in the source code file: micropython/ports/rp2/mpconfigport.h to connect to the Raspberry Pi Pico via the serial port:
#define MICROPY_HW_ENABLE_UART_REPL (1) // useful if there is no USB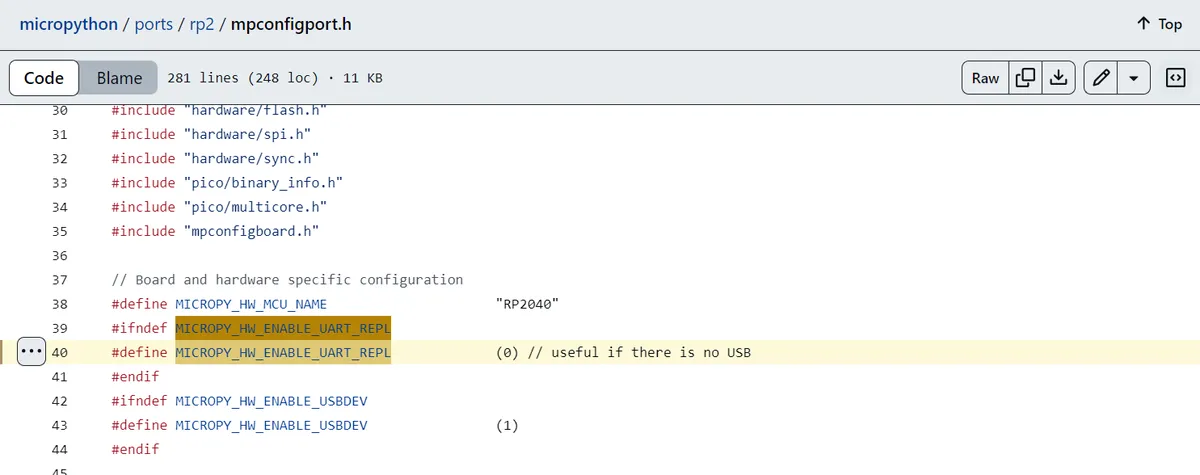
Then recompile the source code and flash the generated firmware to the Raspberry Pi Pico. After that, the Raspberry Pi Pico can be connected to the computer via the serial port.
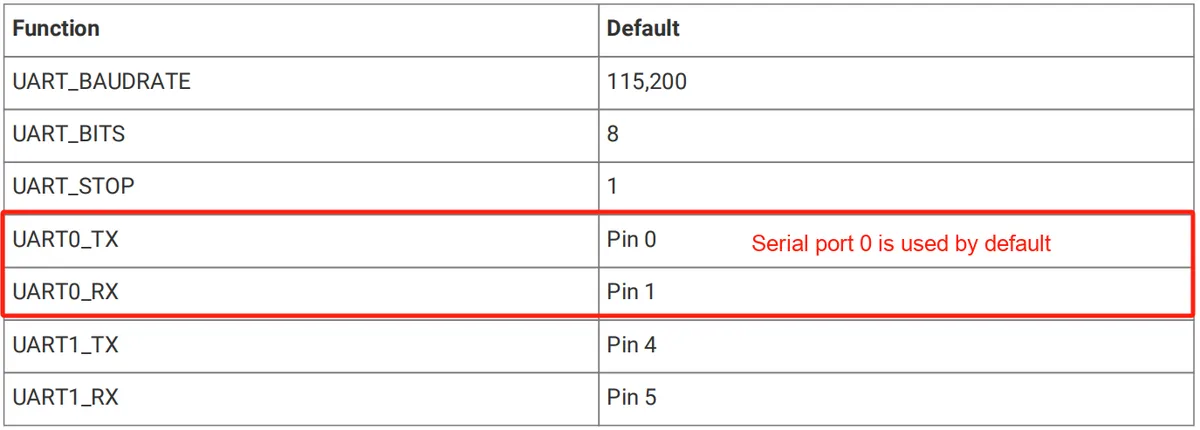
By default, UART 0 is used to connect to the computer, and the specific parameters are as follows:
3. Related Applications of REPL
3.1 Quickly Master the Methods Related to REPL
3.1.1 Help Interface
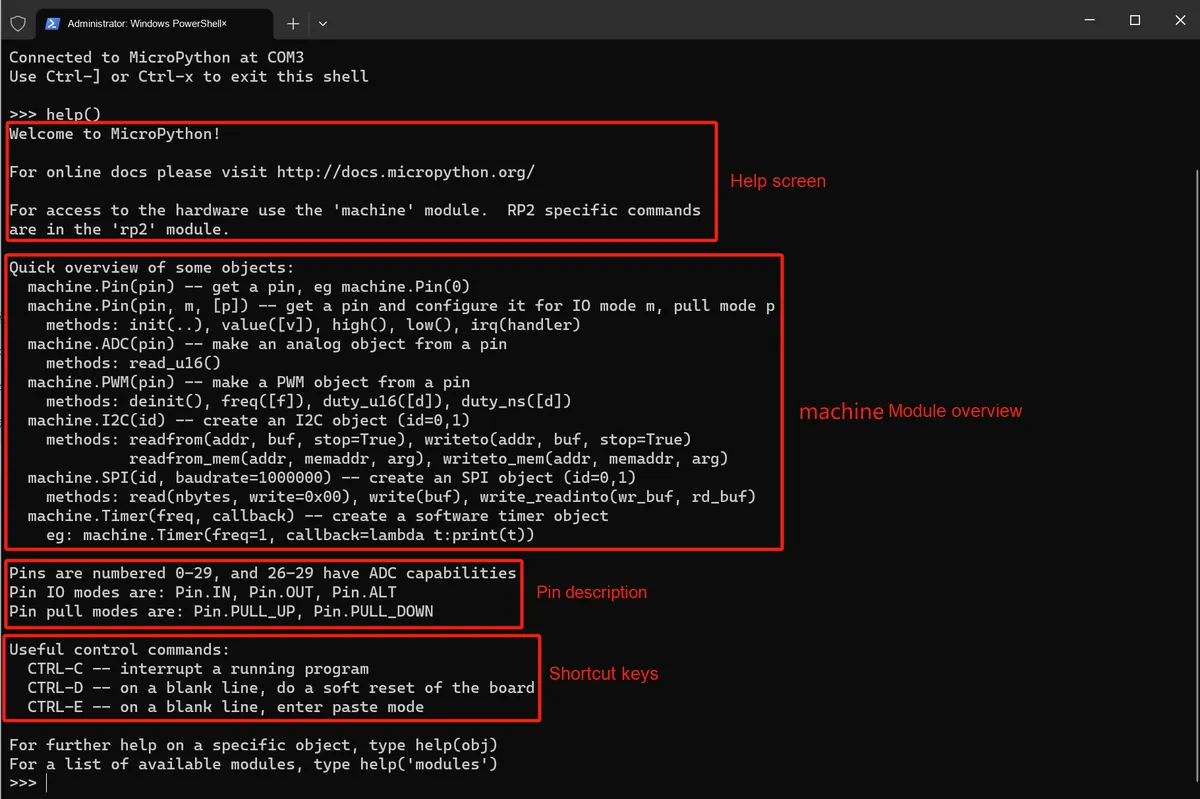
Using the help () function, you can bring up the basic help interface, which contains information including Quick Start, Pin Definitions, Shortcut Keys, etc.
You can view more detailed help by using help (module_name/function_name), for example, to view the detailed help of the machine module:
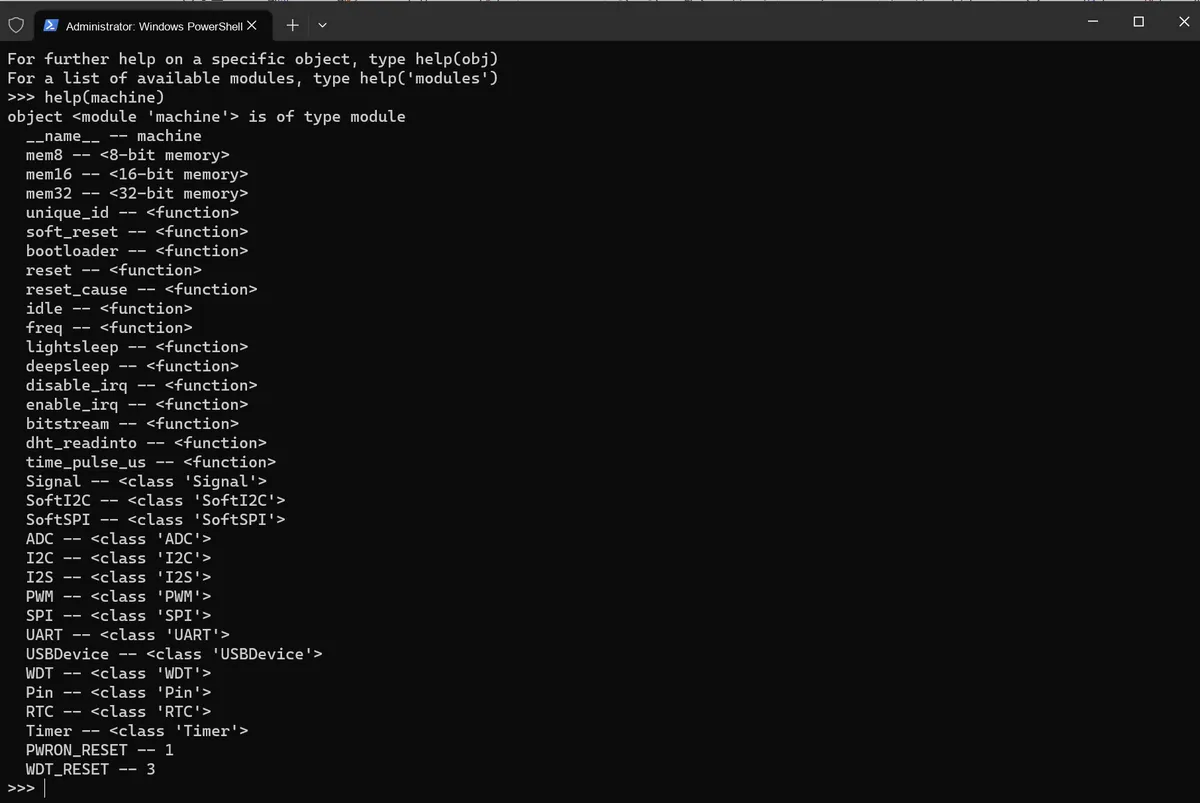
You can also use the help () function to view the help information of the internal modules of machine:
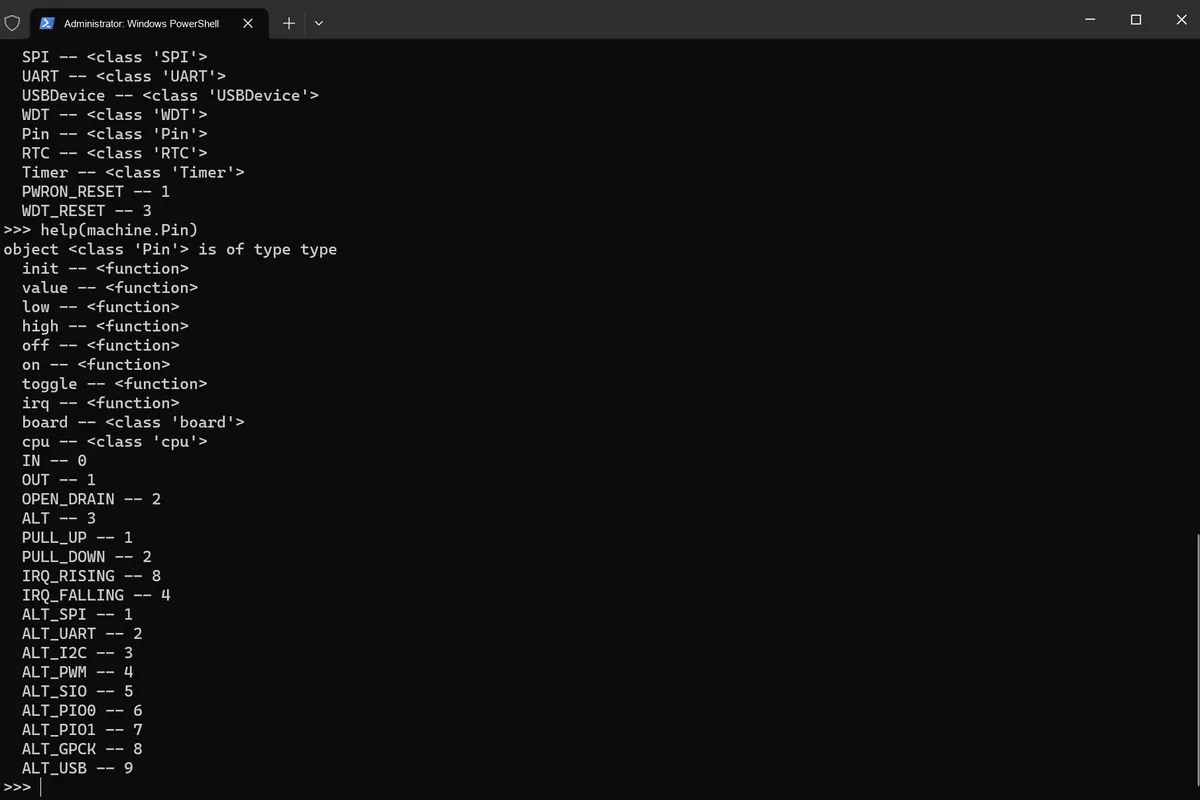
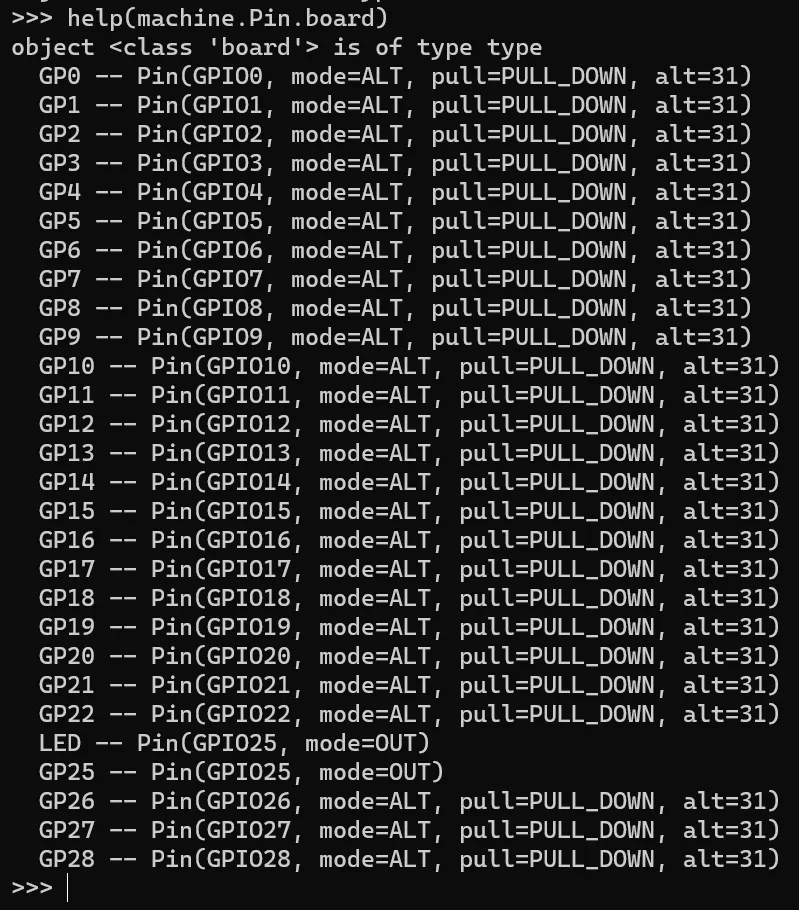
By using the help function, we can check the methods and attributes that most modules have.
3.1.2 View the properties and methods contained in the module
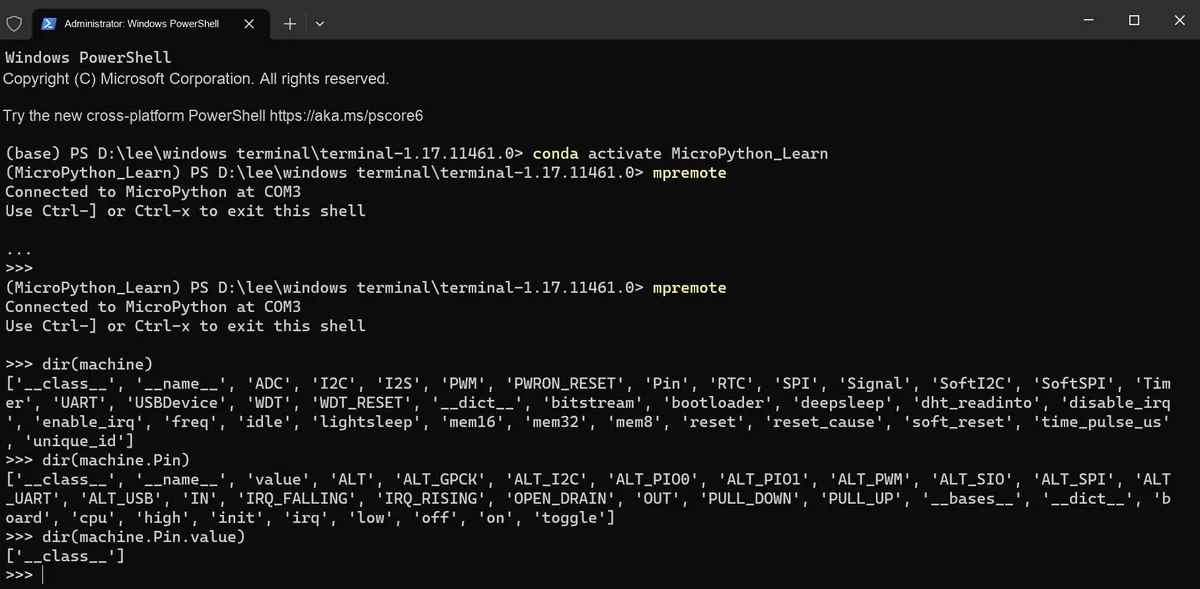
Use dir () function to check what variables and functions are inside a module:
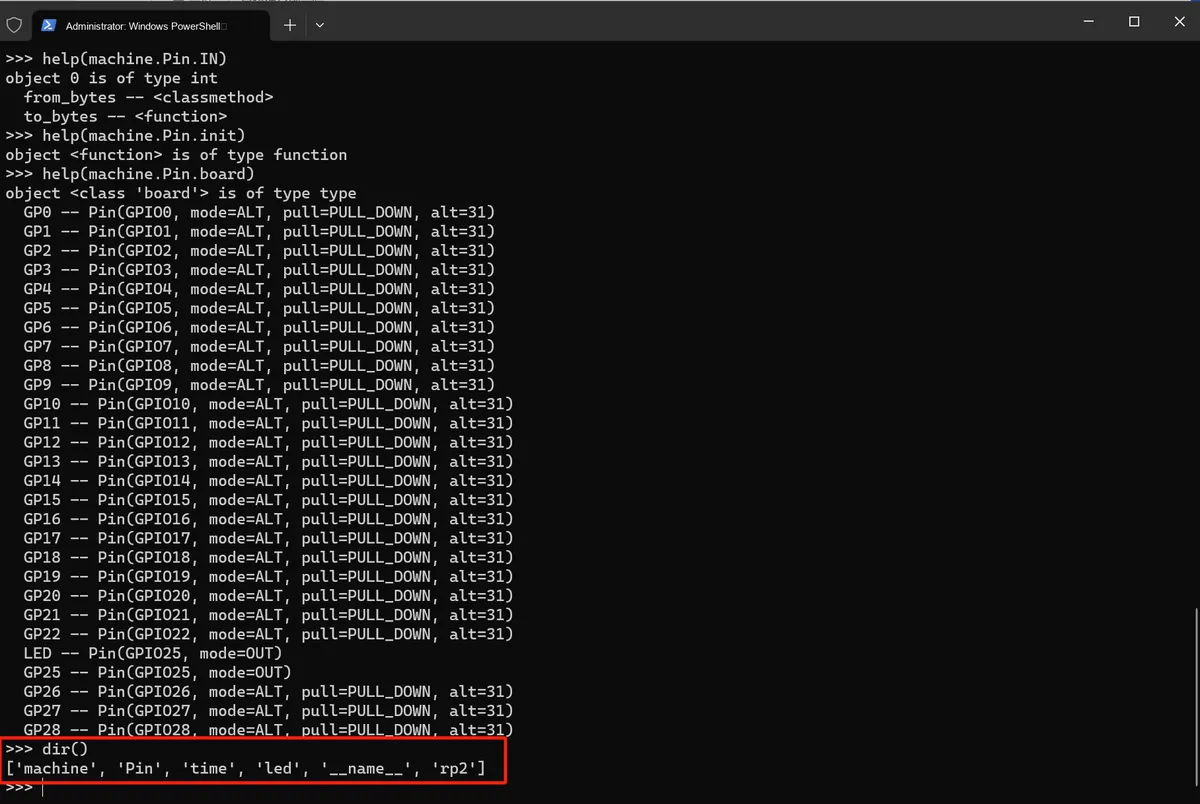
You can also check what variables and functions are inside these modules:
3.1.3 Pasting Long Blocks of Code
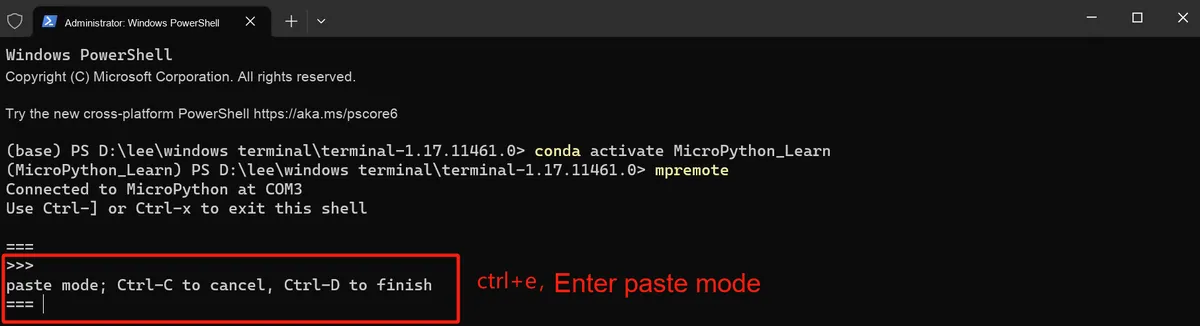
When pasting large blocks of code via the REPL of MicroPython, the auto-indentation function will cause the code to fail to be recognized correctly. In this case, we can use the shortcut key Ctrl+ E to enter paste mode, which disables the auto-indentation function, and the prompt will change from >>> to ===:
We can paste the following code to check the running status:
def foo():
    print('This is a test to show paste mode')
    print('Here is a second line')
foo()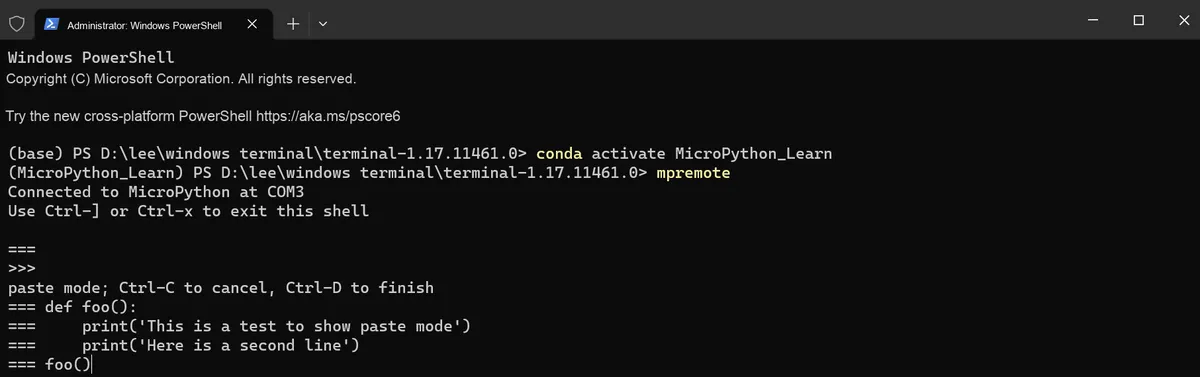
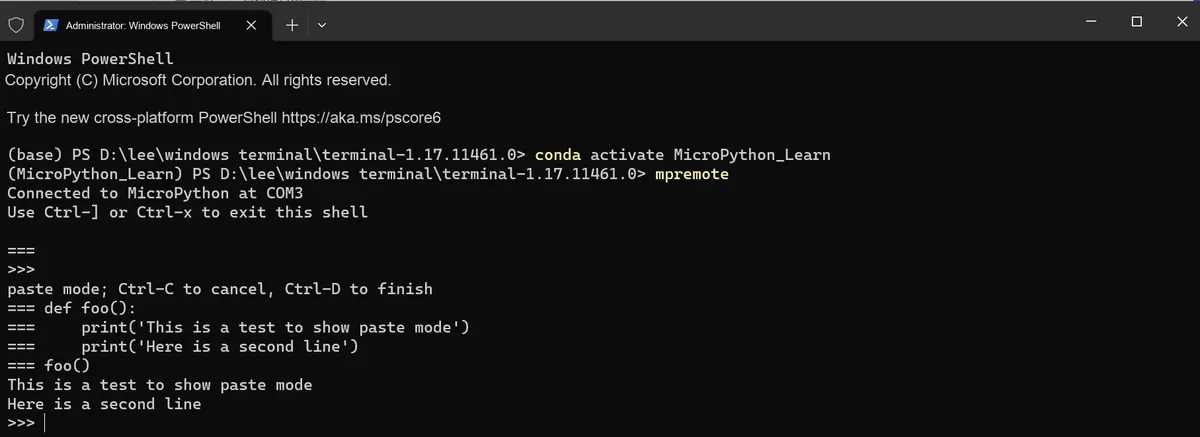
Press the Ctrl+ D shortcut key to exit paste mode, and you will see that the REPL has executed the code we entered:
3.2 Terminal Print Output
We can enter the following code in the REPL to output the string "Hello world" using the Print function:
print("Hello World!")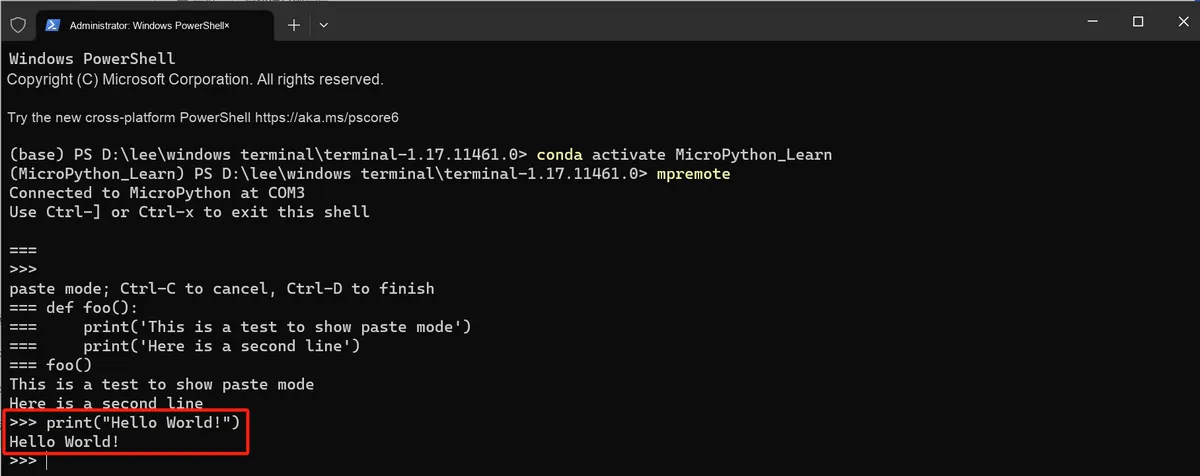
3.3 Driving an LED
The LED on the Raspberry Pi Pico is connected to GPIO pin 25, and we can enter the following code to control the turning off and on of the LED:
from machine import Pin
led = Pin("LED", Pin.OUT)
led.value(1)
led.value(0) 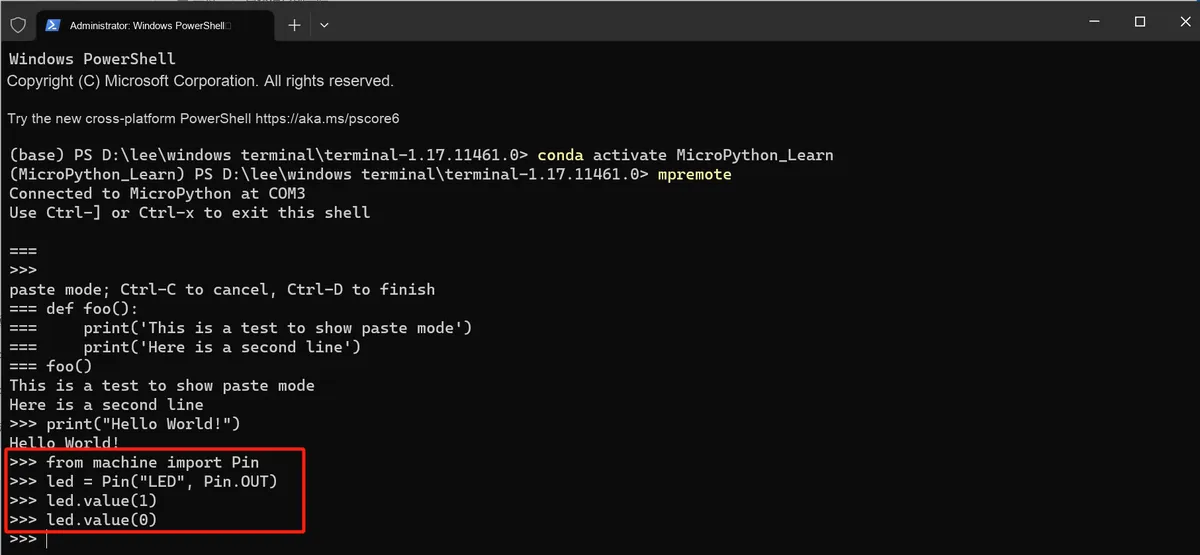
References
- Raspberry Pi Pico Python SDK: A MicroPython environment for RP2040 microcontrollers
Chapter 2. Connecting to the MicroPython REPL
- *Getting Started with MicroPython*
- MicroPython Interactive Interpreter Mode http://www.86x.org/en/latet/reference/repl.html#paste-mode
- MicroPython Chinese Tutorial V2.0 https://www.micropython.org.cn/forum/index.php
Version Record
Version Number | Modifier | Time | Content |
v1.0.0 | Li Zisheng | 2025/09/16 | Document initialized, based on MicroPython version V1.23.0. |
v1.1.0 | Li Zisheng | 2025/12/05 | Figure captions have been added. |