
Contents
1. Module Introduction
The piranha LED module is a familiar "old friend" for beginner electronics experiments — it resembles a tiny "piranha", features high brightness and fast response, and is especially ideal for hands-on practice. Whether you simply want it to turn on and off, blink continuously, or gradually brighten and dim like a breathing rhythm, all these effects can be easily achieved with the block-based coding we have learned.
This module mainly uses three types of blocks, which exactly correspond to different control requirements:
- Digital output block: Controls the LED to be either "on" or "off"(only two states available);
- PWM Output Configuration/Adjustment Block: Adjusts LED brightness (gradual transition from dim to bright);
- Delay block: Controls the timing rhythm of turning on, turning off, and brightness changes.
In practical projects, it is often used for "status indication" — for example, it stays on when a device is running and flashes when an error occurs, making it one of the most fundamental yet practical electronic modules.
2. Wiring Instructions
To control an LED, the first step is to "wire it correctly"! We connect the Piranha LED light module to the DIO0 interface of the development board, and make sure to note the specific pin correspondence:
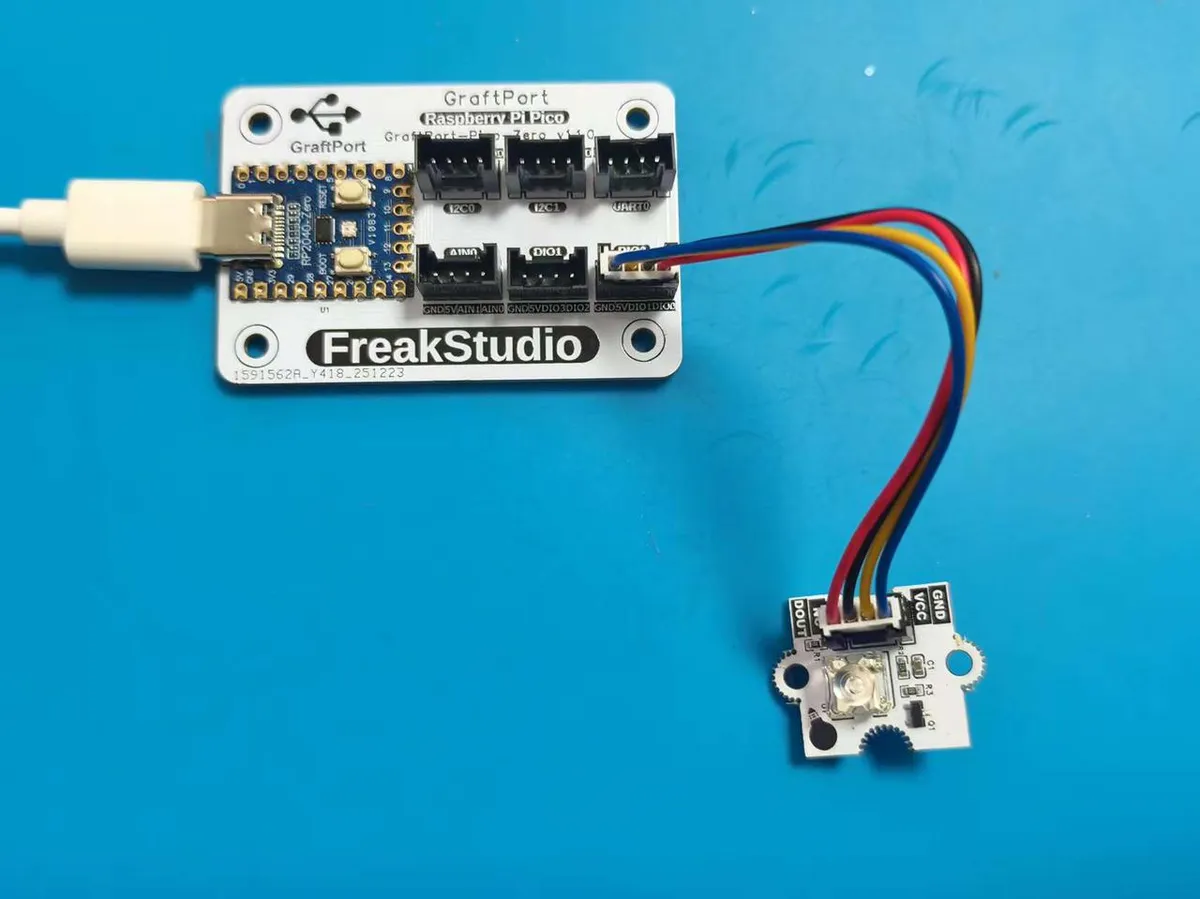
Development Board Pins | Module Pins | Description |
Pin 7 |
| Level output/PWM output pins on the MCU |
Pin 8 |
| Do not use |
3. Practical Examples
3.1 Example 1: Controlling the On/Off State of an LED
Dear students, the small lights in our daily lives (such as flashlights and desk lamps) always turn "on" or "off" following our instructions — so, is it possible to make the LED on the development board obey our commands as well?
The experiment of " LED on and off" in this section will guide you to use graphical blocks to piece together simple control logic, then see how these "blocks" are converted into "code instructions" that the development board can understand, and finally make the LED "turn on for 4 seconds and then turn off" according to the time we set.
The graphical program is as follows:
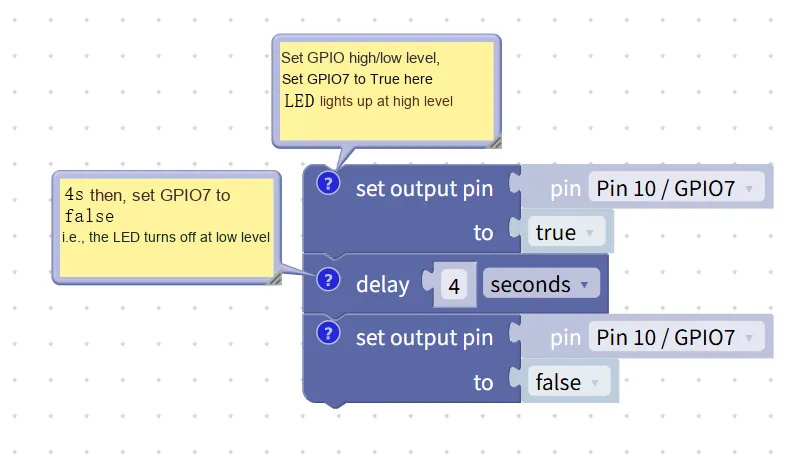
We use "graphical building blocks" to piece together LED control logic:
- First select the "Set Pin" block, set
GPIO7(corresponding toPin 10) to high level →the LEDturns on; - Then select the "wait" block and set it to wait for 4 seconds;
- Finally, select the "Set Pin" block and set
GPIO7to low level →LEDturns off.
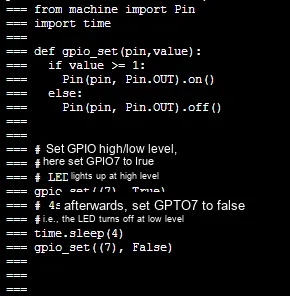
The graphical blocks will be converted into the following MicroPython code to let the development board understand our requirements:
XML files can be directly imported into Blockly:
Control LED on and off.xml 2 KB
3.2 Example 2: Controlling LED Light Flashing
Make the LED on the development board blink continuously like a little star — "turn on for 1 second, then off for 1 second" on repeat~
The graphical program is as follows:
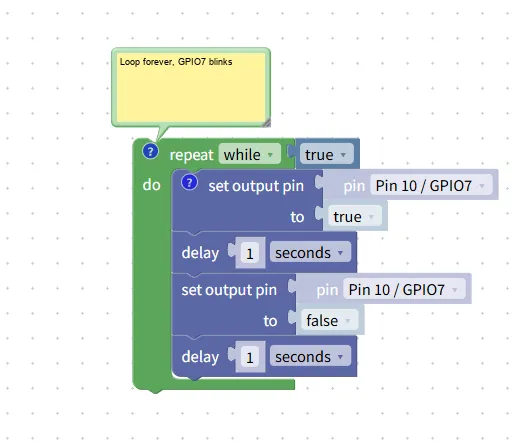
We use "graphical building blocks" to piece together the logic of LED blinking:
- Select the "Loop Block": locate the
repeat while trueblock (it means "repeatedly execute the following actions nonstop"); - Add the "light-up block": place the
set output pinblock in the loop, setpintoPin 10/GPIO7, settototrue→ this step turns on the LED; - Add a "delay block": place the
delayblock and set it to1 seconds→ to keep the LED on for 1 second; - Add the "turn off light block": place another
set output pinblock,set thepinto Pin 10/GPIO7,and settheto false→ this step turns off the LED; - Add a "delay block": place it last
, set thedelay block to also1 second→ this will turn the LED off for 1 second.
With this cycle, the LED will keep flashing like a blinking eye — turning on for 1 second, then off for 1 second, and repeating this pattern nonstop!
The graphical blocks will be converted into the following MicroPython code to let the development board understand our requirements:
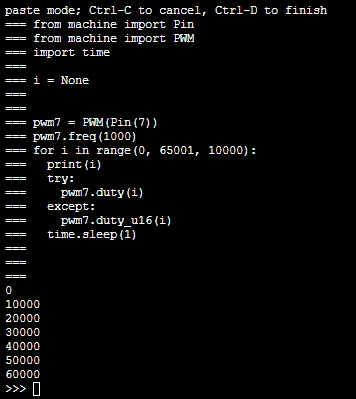
XML file, which can be directly imported into the building blocks:
Piranha light blinking.xml 3 KB
3.3 Example 3: Adjusting LED Brightness Using PWM
Make the LED gradually brighten from dim, just like a "breathing light"(the gradient effect is achieved by controlling the brightness).
This uses the PWM (Pulse Width Modulation) technology: by rapidly switching the LED between "on" and "off" and adjusting the "proportion of on time"(called the "duty cycle"), the LED can be made to appear to have different brightness — the higher the duty cycle, the brighter the LED.
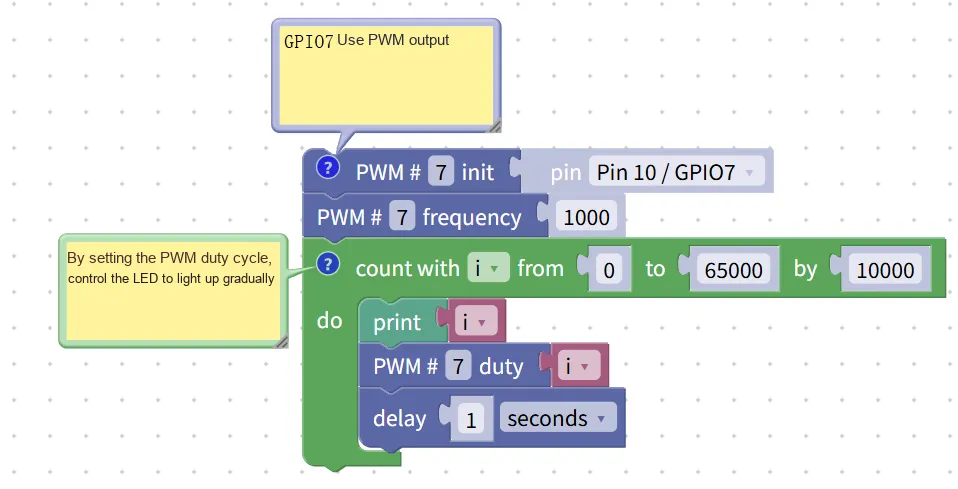
We use building blocks to construct the logic of "brightness gradient":
- Initialize PWM: select the
PWM #7 initblock, and setpintoPin 10/GPIO7→ to enable GPIO7 to output in PWM mode; - Set the PWM frequency: select the
PWM #7 frequencyblock and set it to1000→ this is the switching speed of PWM (1000 switches per second, so no flicker is visible to the human eye); - Cyclically adjust the duty cycle:
- Select
count with iblocks, setfrom 0 to 65000 by 10000→ makeistart from 0, increment by 10000 each time until it reaches 65000; - Add a
PWM #7 dutyblock in the loop, then plug ini→ useito control the PWM duty cycle; - Add
delay 1 secondsblock → Wait 1 second after each brightness adjustment so that we can see the change clearly.
- Select
The graphical blocks will be converted into the following MicroPython code to let the development board understand our requirements:
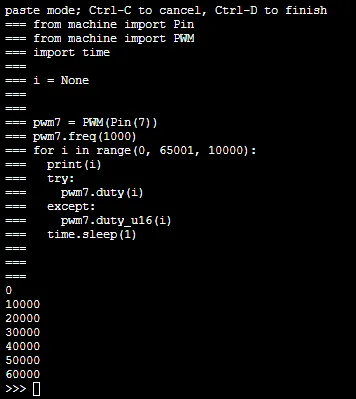
XML files, which can be directly imported into the building blocks: