
Contents
- 1. Basic building blocks related to OLED screens
- 1.1 Screen Initialization Block (Init I2C SSD1306 OLED Display: I2C. .., SDA. .., SCL. ..)
- 1.2 Screen Text Writing Block (Write text on Display: X position …, Y position …, TEXT …)
- 1.3 Display Line Drawing Block(Draw a line on display:Initial X position …,Initial Y position …,Final X position …,Final Y position …)
- 1.4 Rectangle Outline Drawing Block(Draw a rectangle outline on display:Initial X position …,Initial Y position …,Width …,Height …)
- 1.5 Solid Rectangle Drawing Block(Draw a soild rectangle on display:Initial X position …,Initial Y position …,Width …,Height …)
- 1.6 Scroll Control Block(scroll the display…,scroll back or forth…,scroll up or down…)
- 1.7 Display Clear Block (Clear OLED Display)
- 1.8 Full-Screen Filling Block for Display (Fill OLED Display)
- 2. Use the building blocks you have learned to control a real OLED module
- 2.1 Module Introduction
- 2.2 Wiring Instructions
- 2.3 Install the OLED library
- 2.4 Module Example
Young makers, in this section, we will explain the usage of the OLED Display module in a thorough and clear manner — covering everything from initialization and text display to graphic drawing and dynamic effect creation.
Actually, it's not just OLED displays — the usage logic of the vast majority of display modules (such as LCD1602 liquid crystal displays, nixie tube modules, etc.) in graphical programming is "largely similar" to that of OLED displays, with completely interchangeable core concepts, so there's no need to memorize each one by rote!
1. Basic building blocks related to OLED screens
1.1 Screen Initialization Block (Init I2C SSD1306 OLED Display: I2C. .., SDA. .., SCL. ..)
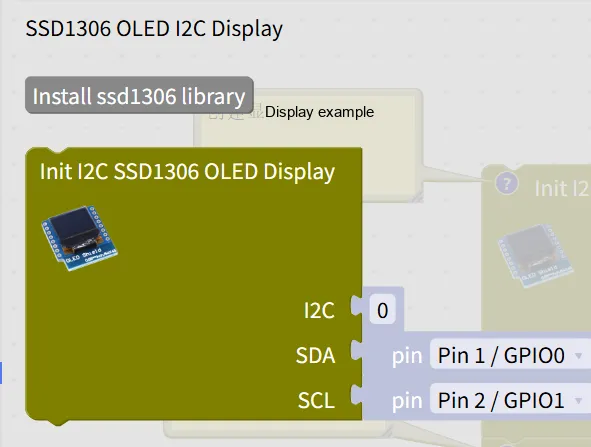
An OLED screen is just like our tablet: it simply won’t work unless it’s powered on. This building block acts as the "power button" for the OLED — it establishes communication between the development board and the screen via the I2C interface. Only when the initialization succeeds will the subsequent display and drawing operations function properly.
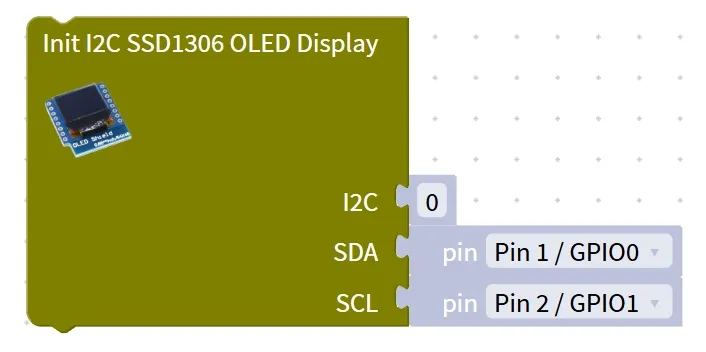
Chinese meaning: Initialize (Init) I2C SSD1306 OLED Display (Display), use the specified I2C interface (I2C), set the data pin (SDA pin).. . and clock pin (SCL pin).. ..
When the program runs to this block, the development board will "handshake" with the OLED screen — establishing a connection via the preset pins. Once the connection succeeds, the screen will still be blank, but it is already ready to receive "display commands"!
Tips
- Do not connect the pins incorrectly! The I2C pins vary across different development boards; for example, ESP32 commonly uses pins 21 (SDA) and 22 (SCL). If connected wrongly, the screen will "freeze up" completely and show no response at all.
- Initialization only needs to be performed once! Just place it at the very beginning of the program; there's no need to initialize repeatedly~
✨ Interactive Mini Quiz
Think about it: If you skip the initialization step and directly use the "write text" block, will anything be displayed on the screen? (Answer: No! A screen that hasn't been turned on cannot receive any instructions~)
1.2 Screen Text Writing Block (Write text on Display: X position …, Y position …, TEXT …)
Before learning how to write content, let’s first figure out: what are X/Y coordinates? The "position" on an OLED screen is represented by coordinates, just like the seat numbers in a classroom —
- X coordinate: horizontal position, counted from left to right (e. g. 0 is the leftmost, 127 is the rightmost, corresponding to a screen with 128 resolution);
- Y coordinate: the vertical position, counted from top to bottom (for example, 0 is the topmost, 63 is the bottommost, corresponding to a screen with 64 resolution). This block is exactly "stick a note on the specified seat", you can write whatever you want!
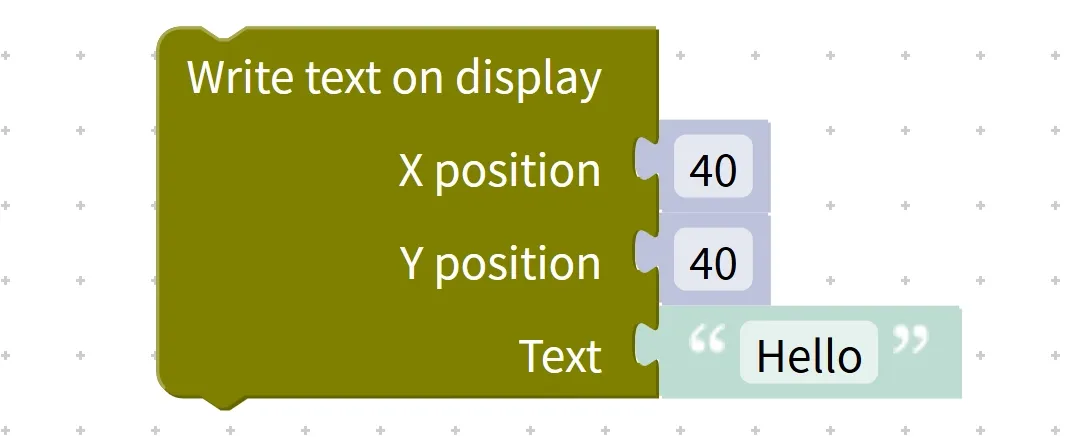
Chinese meaning: Write text on the screen (Write text on Display), set the horizontal position (X position) of the text, set the vertical position (Y position) of the text, and enter the text content to be displayed (TEXT).
When the program runs to this block, the text will immediately appear at the set (X, Y) position; using this block multiple times allows you to display multiple lines of text at different positions~
Tips
- Do not exceed the screen bounds! For this 128×64 OLED display, the X coordinate must not exceed 127, and the Y coordinate must not exceed 63; otherwise, the text will "run off the screen" and fail to display completely.
- Use the Y-coordinate for line breaks! To display text on the second line, just add 10 to the Y-coordinate (e. g., set Y= 10), and the two lines of text won’t overlap~
✨ Interactive Mini Quiz
Quick Quiz: If you want to display "Hello" in the middle of the screen, what approximate values should you set for X and Y? (Answer: X= 40, Y= 25. Try it yourself to see if it’s centered~)
1.3 Display Line Drawing Block (Draw a line on display: Initial X position …, Initial Y position …, Final X position …, Final Y position …)
First, let's clarify: the "starting point" and "end point" of a straight line
Drawing a straight line is just like what we do on a notebook — first set the starting point (Initial X, Y), then set the end point (Final X, Y), and connect the two points to get a line! You can draw horizontal lines, vertical lines and diagonal lines~
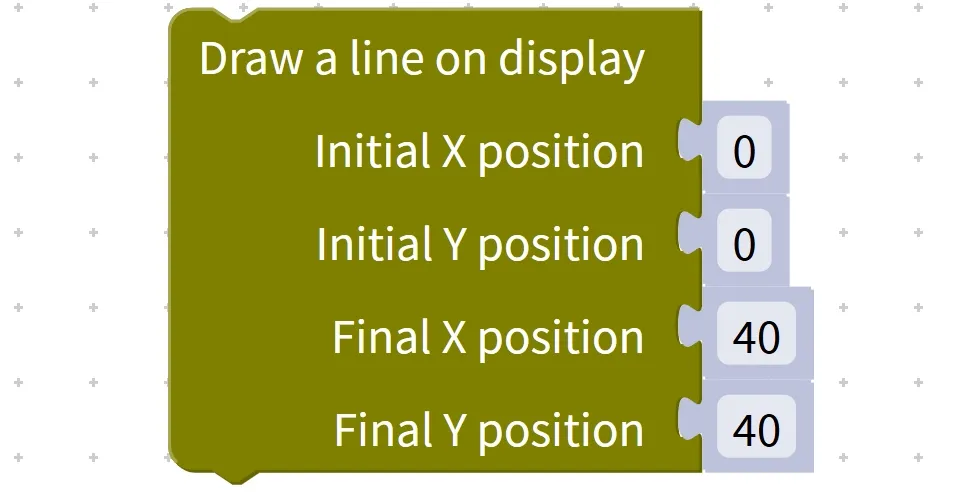
Chinese meaning: draw a line on the display (Draw a line on display), set the initial X-coordinate (Initial X position), set the initial Y-coordinate (Initial Y position), set the final X-coordinate (Final X position), set the final Y-coordinate (Final Y position).
When the program runs to this block, the system will automatically connect the start point and the end point to draw a straight line; the line will remain on the screen until the screen is cleared or a new drawing is started.
Tips
- Pro Tip for Drawing Horizontal Lines: The Y-coordinates of the start point and end point are identical (e. g., Initial Y = 10, Final Y = 10);
- Pro Tip for Drawing Vertical Lines: The X-coordinates of the start point and end point are identical (e. g., Initial X = 60, Final X = 60)~
✨ Interactive Mini Quiz
Try it out: How to draw a horizontal line from (10,20) to (100,20)? (Answer: Initial X= 10, Initial Y= 20, Final X= 100, Final Y= 20~)
1.4 Rectangle Outline Drawing Block (Draw a rectangle outline on display: Initial X position …, Initial Y position …, Width …, Height …)
First, let's figure out: How to draw a hollow rectangle?
This block draws a hollow rectangle with only the border, just like the square frame we draw with a ruler ——
- First set the starting point at the top-left corner (Initial X, Y);
- Then set the width (how long it extends horizontally) and the height (how tall it extends vertically), and the box will appear right away!
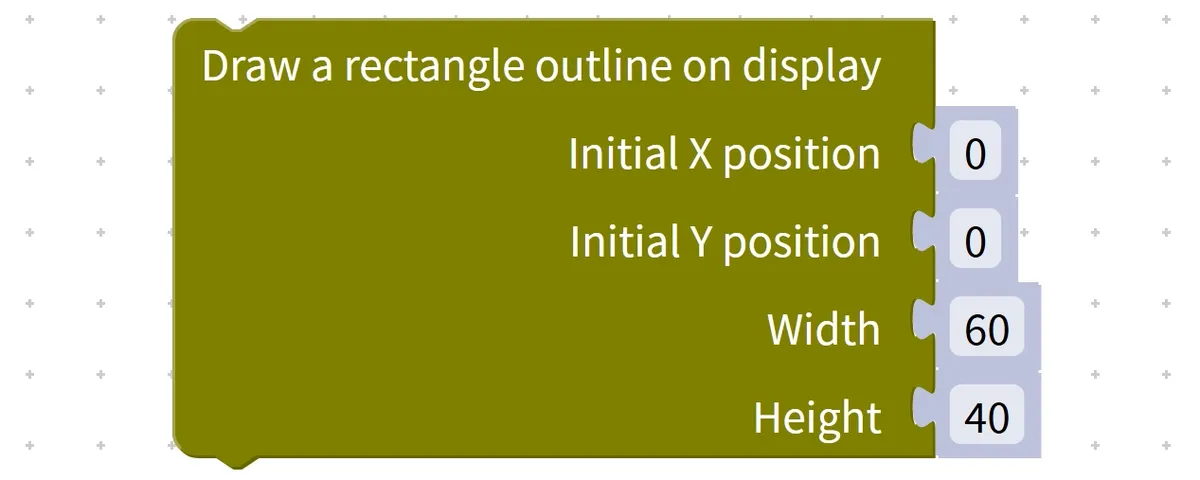
Chinese meaning: draw a rectangle outline on the display (Draw a rectangle outline on display), set the initial X-coordinate (Initial X position), set the initial Y-coordinate (Initial Y position), set the rectangle width (Width), set the rectangle height (Height).
Interactive Quiz
Think about it: What are the coordinates of the bottom-right corner of this hollow rectangle? (Answer: X = 30 + 60 = 90, Y = 20 + 30 = 50, so it's (90,50)~)
1.5 Solid Rectangle Drawing Block (Draw a soild rectangle on display: Initial X position …, Initial Y position …, Width …, Height …)
First, understand the difference between solid and hollow
Unlike the "rectangle outline", this block draws a solid rectangle with a filled interior, just like a box colored in with markers — perfect for callout boxes, background blocks, and highlighting key content~
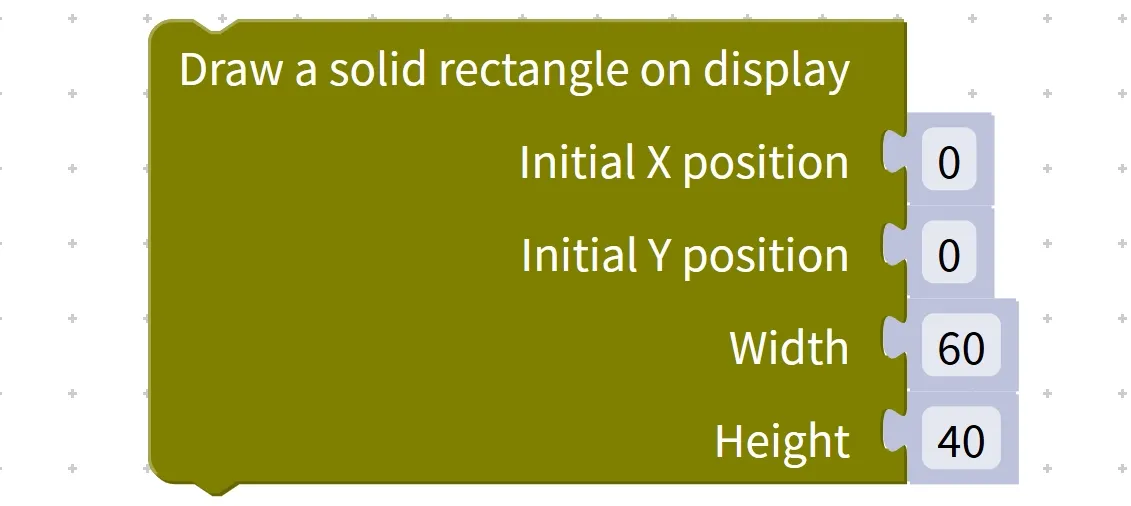
Chinese meaning: draw a solid rectangle on the display (Draw a solid rectangle on display), set the initial X-coordinate (Initial X position), set the initial Y-coordinate (Initial Y position), set the rectangle width (Width), set the rectangle height (Height).
After the program is executed, it will draw a solid rectangle of the specified size with the starting point as the top-left corner; the entire area of the box will be lit up with no blank space left.
Tips
A solid rectangle will "cover" the content beneath it! If you write text first and then draw a solid rectangle, the text will be blocked by the block~
1.6 Scroll Control Block (scroll the display…, scroll back or forth…, scroll up or down…)
First, get this straight: scrolling means making content "move"
When the text is too long to fit on the screen, this block lets the content scroll left / right / up / down, just like the electronic signboards in shopping malls — perfect for displaying long sentences and multi-line data!
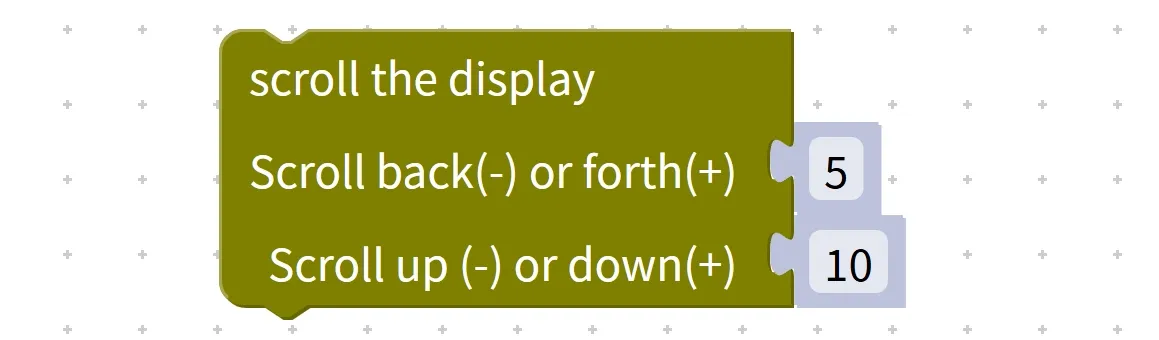
Chinese meaning: scroll the content on the display (scroll the display), select the horizontal scrolling direction (scroll back or forth), select the vertical scrolling direction (scroll up or down).
After the program is executed, all content on the screen will scroll continuously in the set direction; the scrolling will keep going until a new display operation or screen clearing is performed.
Tips
Short text scrolling has no effect! The scrolling effect will only be noticeable when the text length exceeds the screen width (e. g., for a screen with 128 resolution, the text exceeds 128 pixels)~
✨ Interactive Mini Quiz
How to set the text to scroll downwards like a waterfall? (Answer: scroll back or forth N/A, scroll up or down down~)
1.7 Display Clear Block (Clear OLED Display)
First, get this straight: clearing means "wiping the blackboard"
Want to replace what's displayed on the screen? This block is exactly the digital whiteboard eraser — it clears all text, lines and graphics with one click, restoring the screen to blank to get it ready for displaying new content~

Chinese meaning: Clear the OLED display (Clear OLED Display).
When the program runs to this block, all pixels on the screen will be "turned off", making the screen go blank instantly; the original content cannot be retrieved after being cleared, so you'll need to rewrite it~
Interactive Quiz
Quick response quiz: After clearing the screen, do you need to reinitialize it if you want to display content again? (Answer: No need! Just initialize it once, and you can directly write new text~)
1.8 Full-Screen Filling Block for Display (Fill OLED Display)
First, get this straight: full-screen fill-in means "screen on"
This block is the opposite operation of "clear" — clear turns the screen completely dark, while fill turns the screen completely bright, lighting up every pixel to turn the entire screen into a solid block~

Chinese meaning: Fill OLED Display (Fill OLED Display).
After the program is executed, every pixel on the screen will be lit up, presenting a solid full-screen effect; this state will persist until the screen is cleared or a new drawing operation is performed~
Tips
Full-screen filling consumes a lot of power! Do not use this function for a long time for battery-powered projects~
2. Use the building blocks you have learned to control a real OLED module
Young creators, in the last section we got to know the 8 core building blocks of OLED, and in this section we will put these building blocks into practice — to control the real 0.96-inch SSD1306 OLED module! From displaying text and drawing hollow shapes to creating dynamic Progress Bar, we will turn your OLED screen from "blank" to "awesome" step by step, and let you personally experience the joy of "controlling hardware with code"~
2.1 Module Introduction
We are using a 0.96-inch SSD1306 OLED display module, which acts like a "mini TV" for the development board —
- Core Parameters: Resolution: 128×64 pixels (128 horizontal dots and 64 vertical dots), featuring high brightness and strong contrast, which is clearly visible without backlight;
- Features: Compact in size and low in power consumption, it is especially suitable for beginners to practice with;
- Purpose: It can display text, numbers, and simple graphics. In practical projects, it is often used to display sensor data (such as temperature) and system status (such as "Running"), making it an "entry-level magic tool" for data visualization.
To master this module, you mainly need to rely on the coordination of four types of building blocks:
- OLED initialization block: "establish communication" with the screen (mandatory first step);
- Show Text / Number Blocks: Make the screen "speak";
- Display graphic blocks: draw lines, rectangles, and create simple interfaces;
- Clear Screen / Refresh Block: Clears old content and updates the new display.
By combining these building blocks, users can achieve a variety of effects ranging from the most basic "displaying text" to the advanced "real-time data display and graphic drawing", allowing students to intuitively see the results of program control and deepen their understanding of digital output and data processing of microcontrollers.
2.2 Wiring Instructions
To make the OLED screen work as expected, first connect the wires correctly! We will connect the module to the I2C0 interface of the development board, and please keep the following pin correspondence in mind:
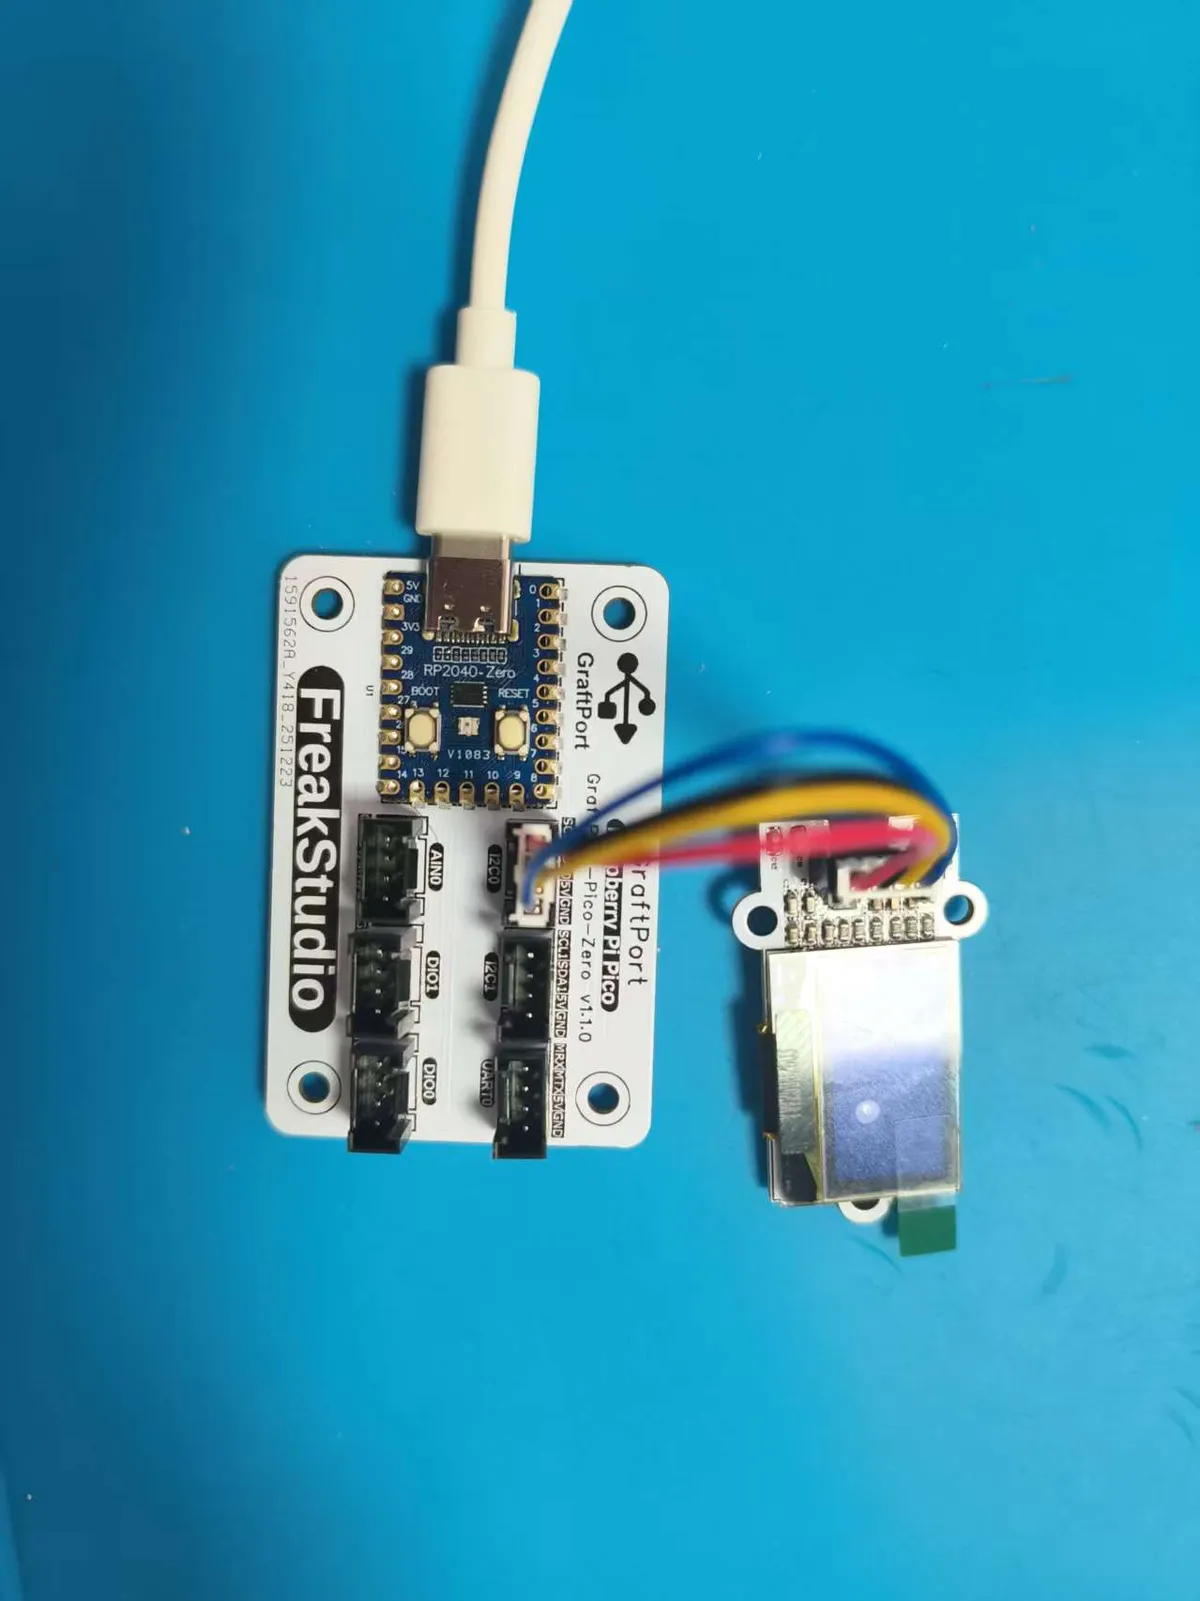
Development Board Pins | Module Pins | Description |
Pin 4 |
|
|
Pin 5 |
|
|
2.3 Install the OLED library
Before programming and controlling an OLED screen, you must first complete the installation of the ssd1306 driver library, which is the core library file for driving OLED screens. Without this library, you will not be able to call any OLED-related commands or functions, nor achieve screen display. Therefore, this step is a prerequisite and must be completed.
Step 1: Locate the installation entry for the library file
In the operation interface of Bipes graphical programming, locate and click the corresponding "Install ssd1306 library" installation button on the page, and clicking this button will initiate the installation request for the ssd1306 library.
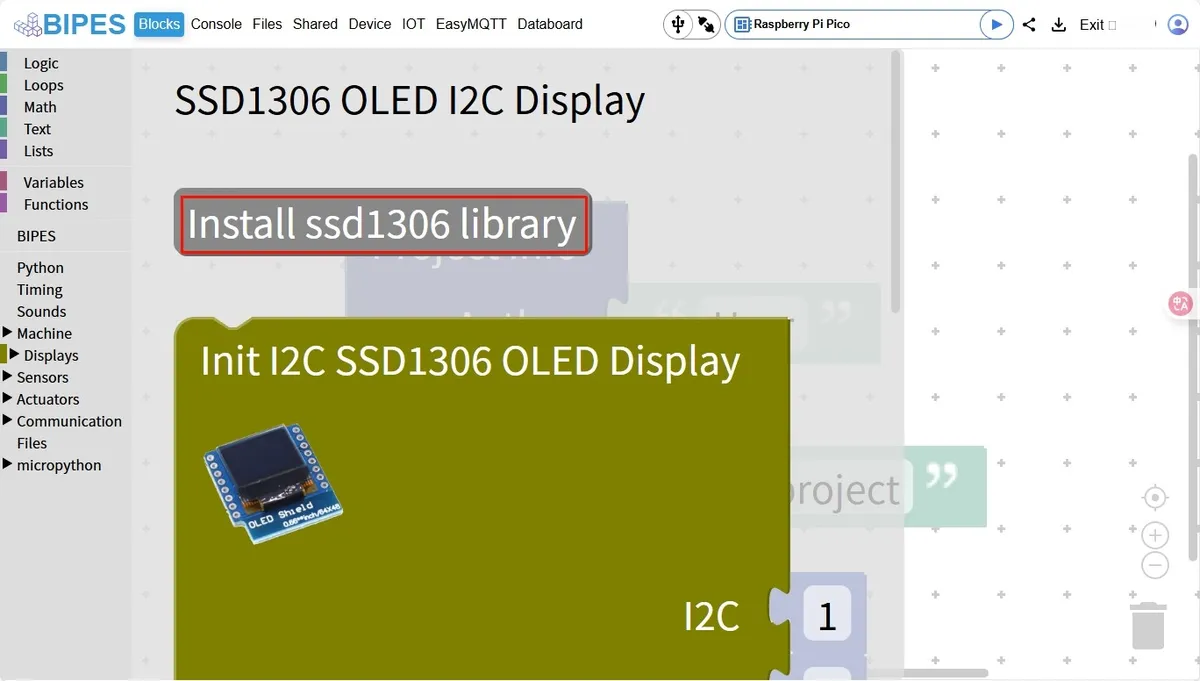
Step 2: Confirm the installation operation
After clicking the install button, a pop-up window confirming the installation will appear on the page. At this point, directly click the 「Confirm」 button to start the download and installation process of the library files.
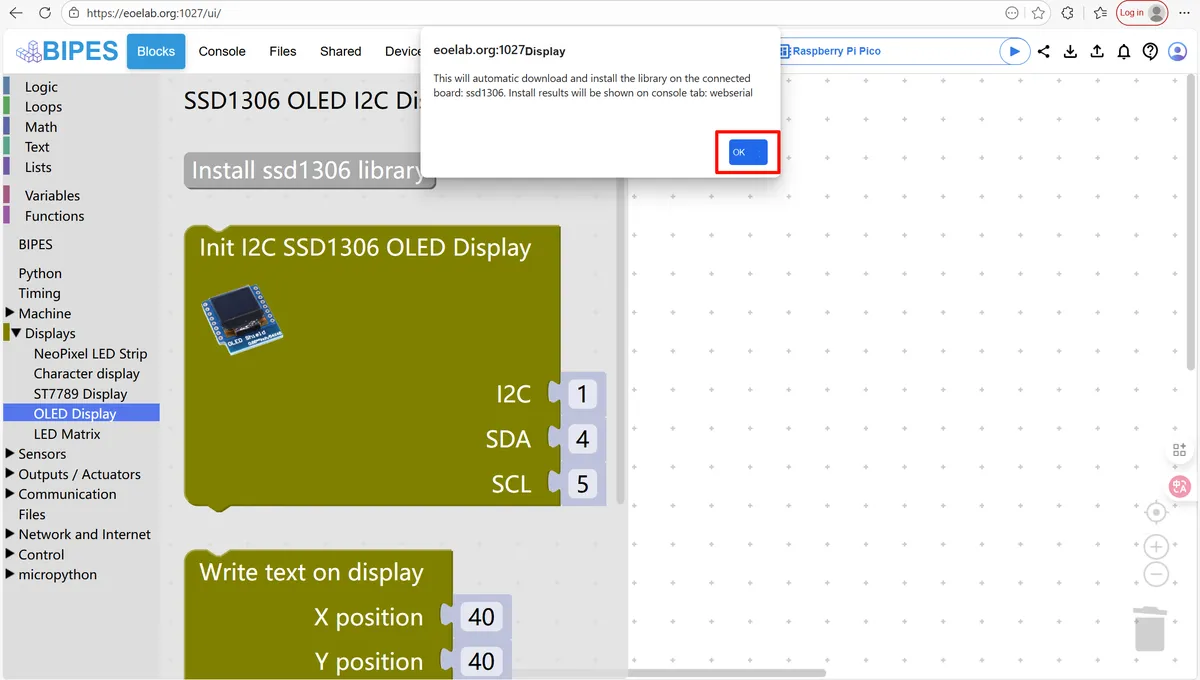
Step 3: Check the status prompts during installation
After confirming the installation, no further operations are required — just wait patiently. At this point, a blue progress prompt box will pop up in a prominent position on the Bipes page, with the following prompt content:[1:22:06] Installing library, check console: webserial
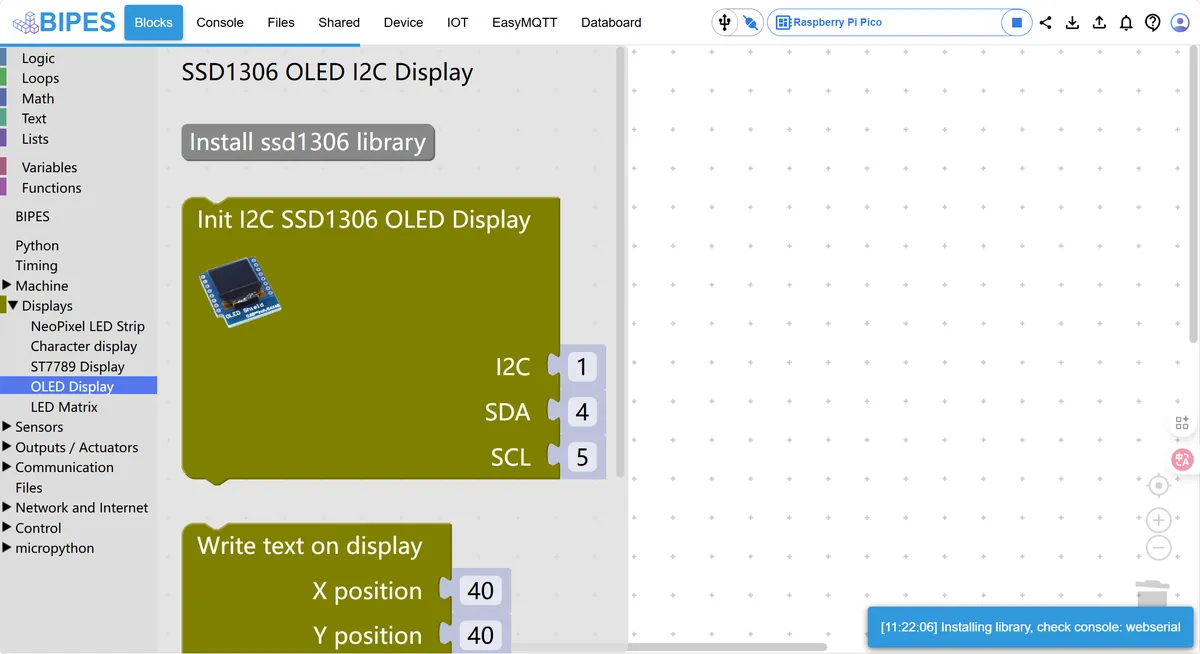
Step 4: Verify that the library file is installed successfully
After waiting for a few seconds, the installation process will complete automatically. At this point, we only need to check the Console panel located at the bottom of the programming interface. If you can see the corresponding installation completion log output in the Console, it means that the ssd1306 driver library has been installed successfully. So far, all the preparation work for the OLED screen library files has been completed.
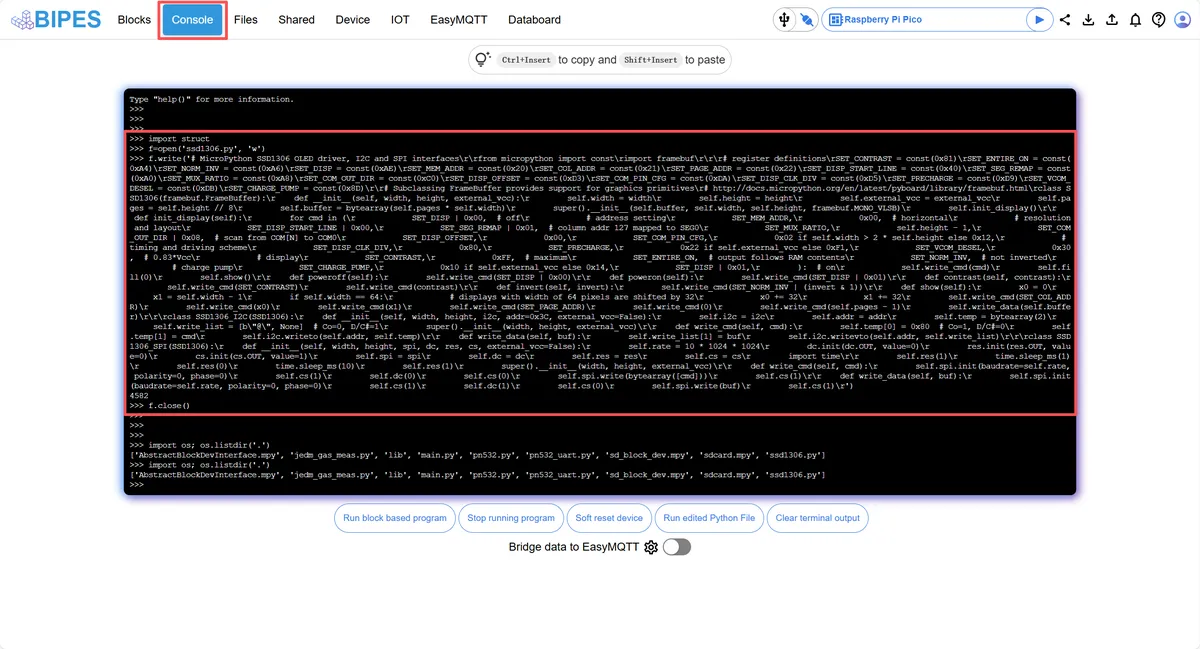
Tip: The library file only needs to be installed once. After successful installation, you do not need to reinstall it when writing OLED-related programs later, and you can directly call all OLED-related block instructions.
2.4 Module Example
2.4.1 Example 1: Text Display on OLED Module
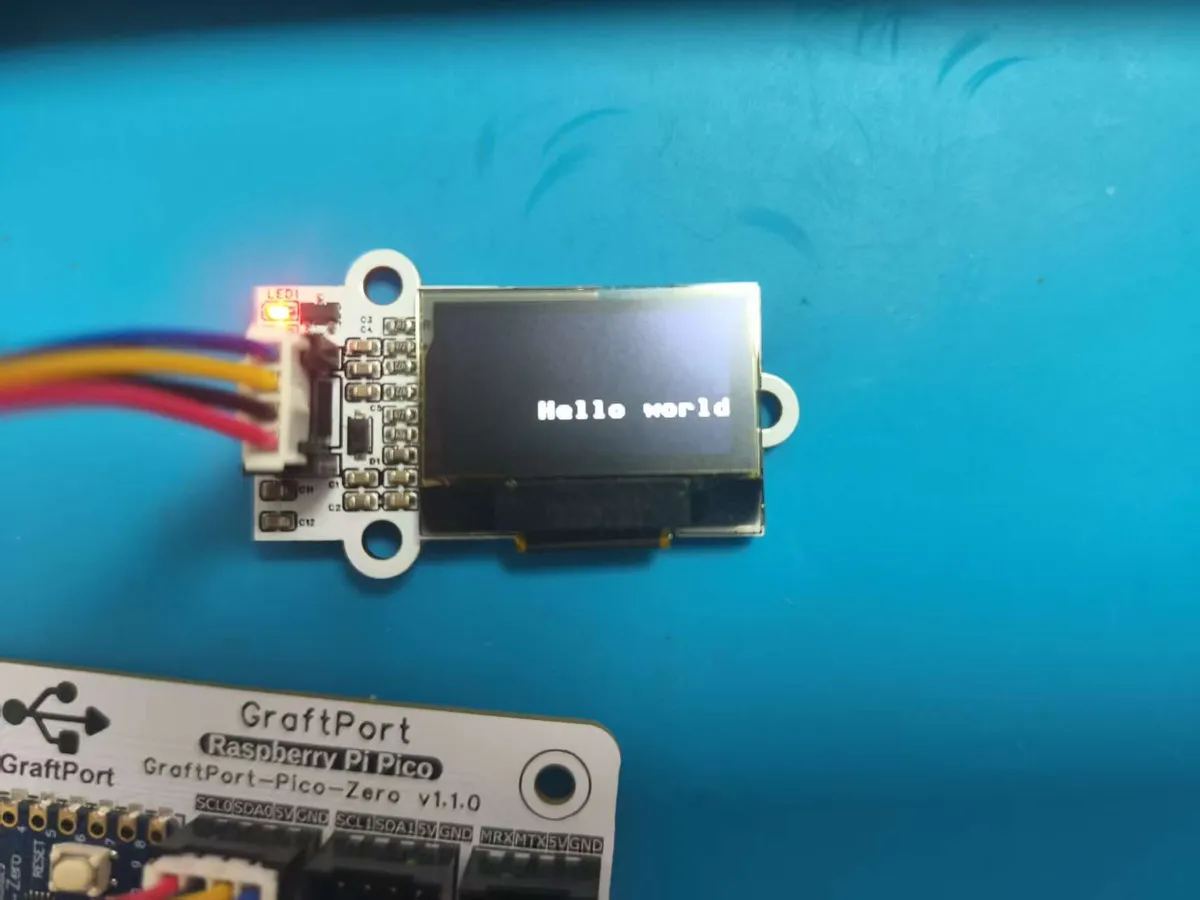
Experiment Objective: Make the OLED screen display "Hello world" at a specified position, and master the most basic text output function, which is the most commonly used feature of OLED~
Core Principle: The development board and the OLED "communicate" via I2C: first, initialize to establish a connection, then send the command "display Hello world" to the screen through SDA/SCL, and the screen will display the text according to the coordinates!
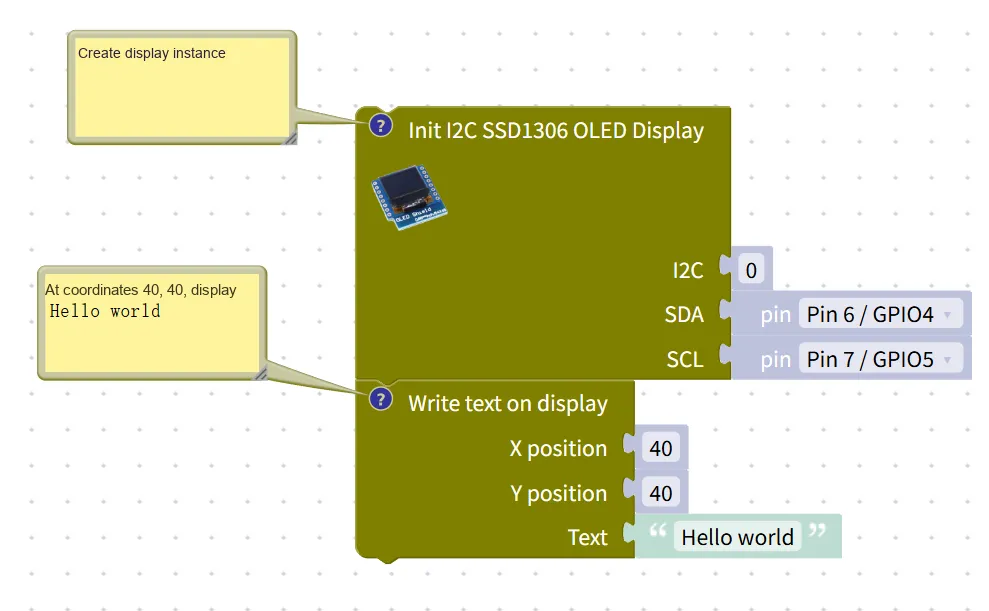
Building Block Assembly Steps (Step-by-Step Guide for Beginners)
- Initialize the display screen:
- Select
Init I2C SSD1306 OLED Displayblock and configure the following settings:I2Cis0;SDAselectPin 6/GPIO4(data line pin);SCLselectPin 7/GPIO5(clock line pin); this step establishes a "communication connection" between the development board and the OLED screen.
- Select
- Display Text:
- Select
Write text on displaythe block and configure it as follows:X positionis40(the horizontal position of the text on the screen);Y positionis40(the vertical position of the text on the screen);Textfill in"Hello world"(the content to be displayed).
- Select
Experimental Effect: After the OLED screen is powered on, the text "Hello world" is clearly displayed in the center, with sharp fonts and no ghosting~
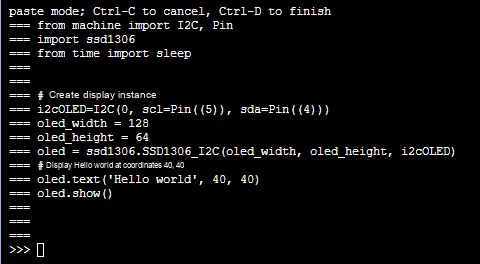
Tips
If the text is not displayed:
① Check ssd1306 library is installed or not;
② Are the pins connected reversely? (Do not mix up SDA to pin 4 and SCL to pin 5);
③ Is the coordinate out of the range? ~
✨ Interactive Mini Quiz
To display "Hello world" right in the center of the screen, what values should be set for X and Y? (Answer: X=(128 - width of "Hello world")/2 ≈ 30, Y=(64-8)/2 ≈ 28, give it a try yourself~)
xml files can be directly imported into the blocks:
oled.xml 2 KB
2.4.2 Example 2: Drawing Hollow Graphics with OLED Module
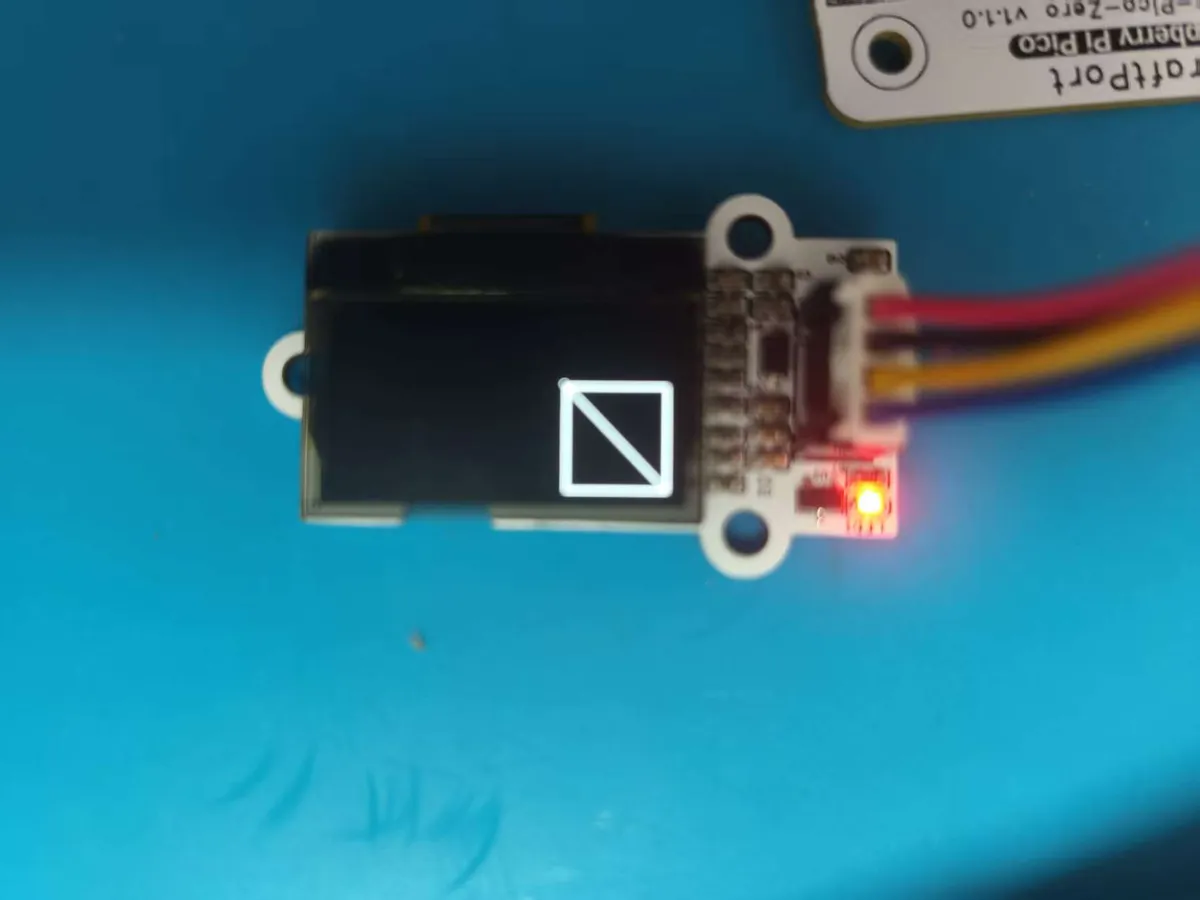
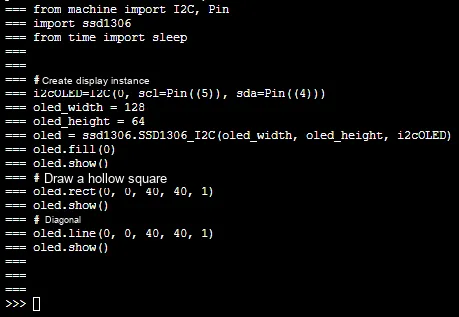
Experiment Objective: Draw a hollow square on the OLED screen, then draw a diagonal line inside it, and learn to combine and draw basic shapes~
Core Logic: First clear the screen (to avoid interference from old content), then draw in the order of "outline first, then lines" to ensure the graphics are neat and uncluttered.
Building Block Assembly Steps:
- Display Screen Initialization Module
Init I2C SSD1306 OLED Display: Initialize the OLED display (I2C pinsGPIO4(SDA),GPIO5(SCL)) to establish display communication.
- Clear Screen Module
Clear OLED Display: Clear the screen to prevent residual content from interfering with the drawing of new graphics.
- Draw a hollow square Drag in the block "Draw a rectangle outline on display" and configure the following settings:
- Initial X = 0, Initial Y = 0 (the top-left corner of the square is at the top-left corner of the screen);
- Width= 40, Height= 40 (the width and height of the square are both 40, making it a perfect square block).
- Draw a diagonal line Drag in the "Draw a line on display" block and configure the following settings:
- Initial X = 0, Initial Y = 0 (the starting point coincides with the top-left corner of the square);
- Final X= 40, Final Y= 40 (the end point coincides with the bottom-right corner of the square) → it happens to be the diagonal.
Experimental effect: A 40×40 hollow square appears in the top-left corner of the OLED screen, with a diagonal line running from the top-left to the bottom-right inside it; the edges of the graphic are neat and free of burrs~
Interactive Quiz
I want to draw another diagonal line in the square (from (0,40) to (40,0)). How should I set the parameters of the block for drawing lines? (Answer: Initial X= 0, Initial Y= 40, Final X= 40, Final Y= 0~)
xml files can be directly imported into the building blocks:
oled draw hollow shapes.xml 3 KB
2.4.3 Example 3: Drawing a Progress Bar on the OLED Module
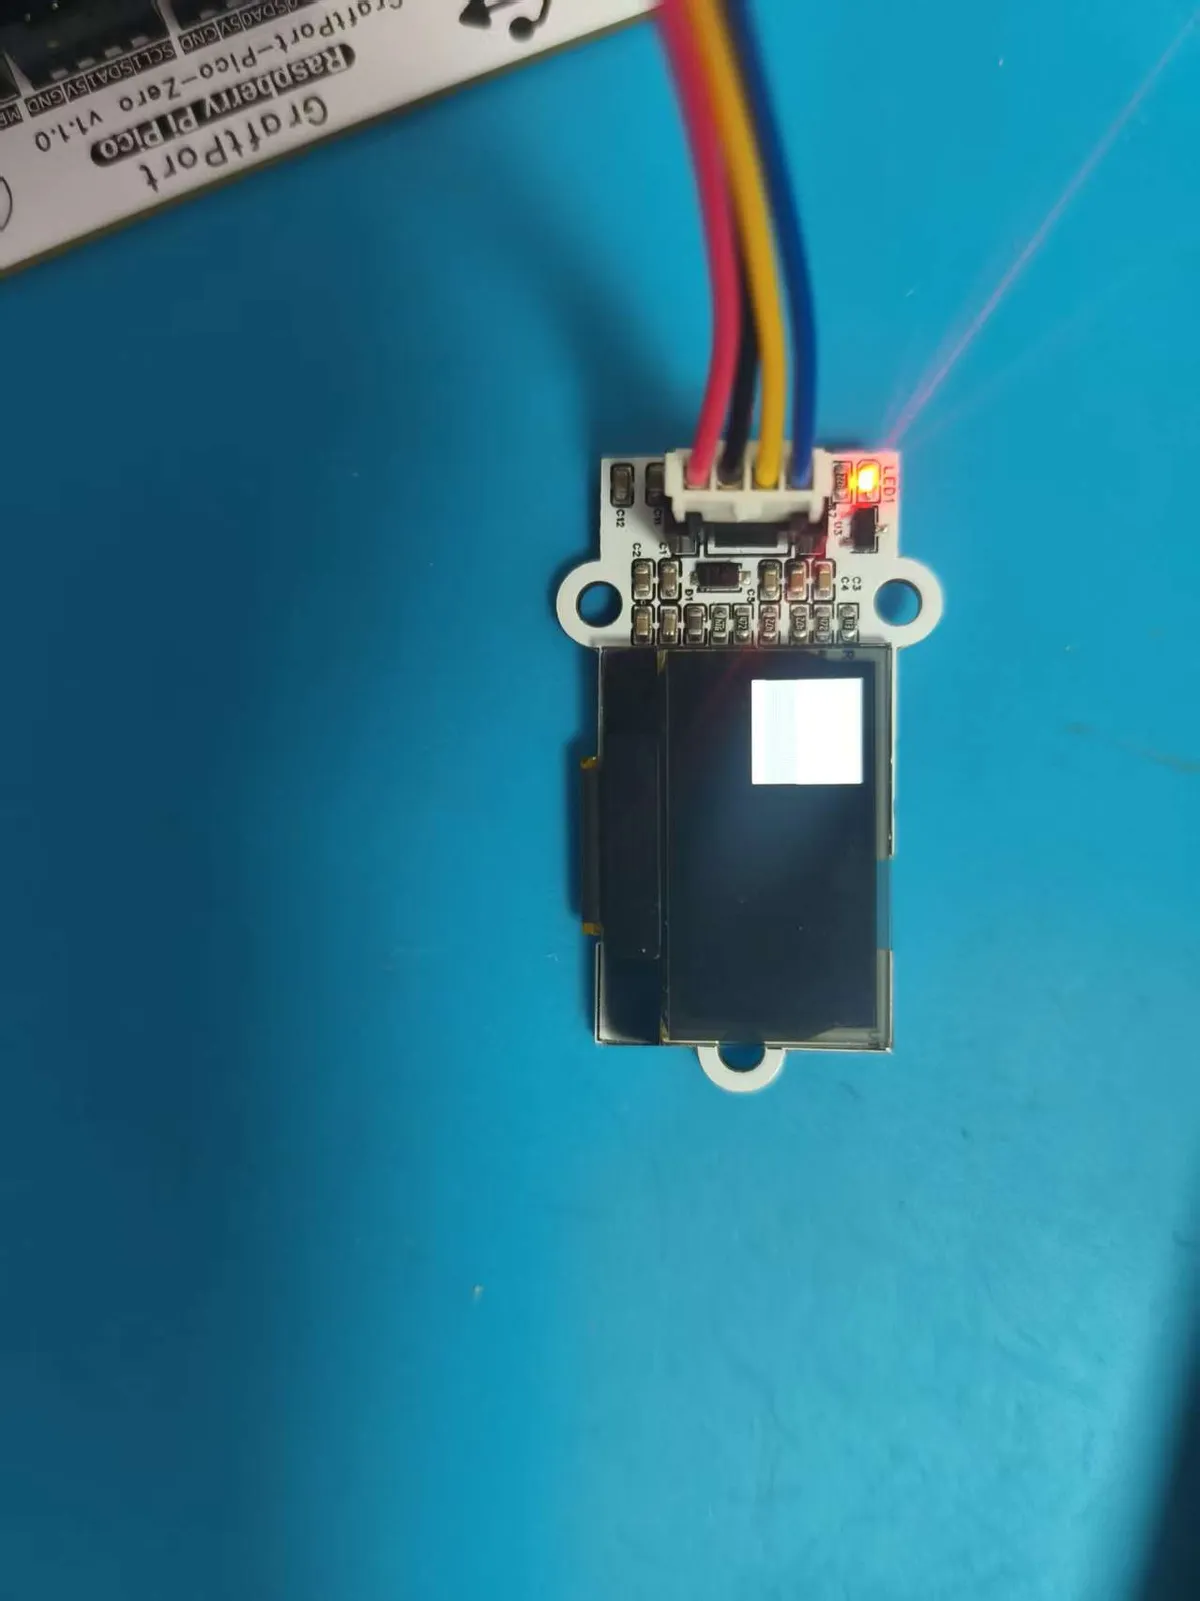
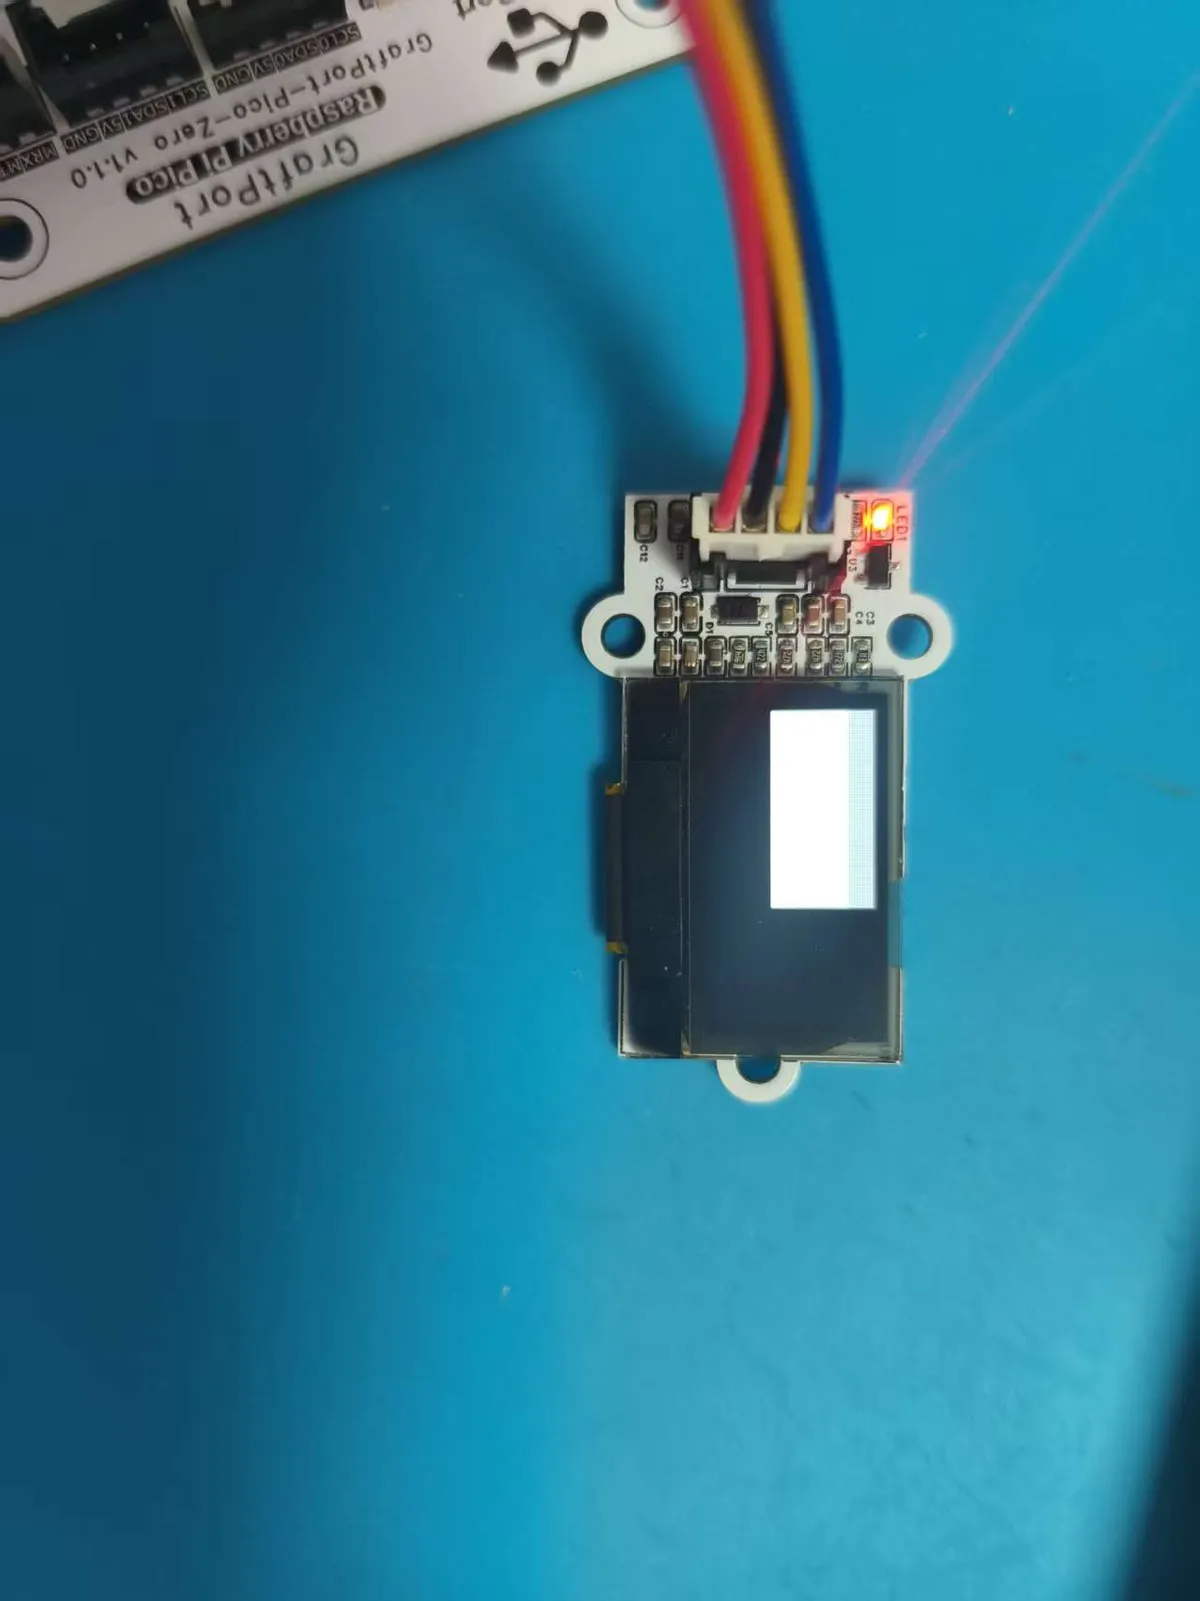
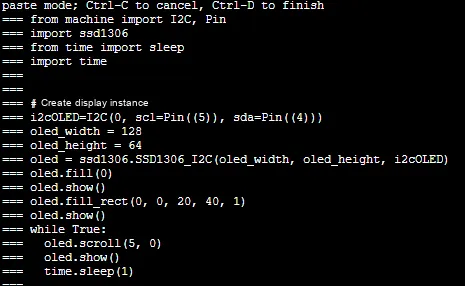
Experiment Objective: Draw a solid rectangle, make it scroll horizontally on the screen to simulate the dynamic effect of "Progress Bar loading", and master the combined application of static drawing and dynamic scrolling~
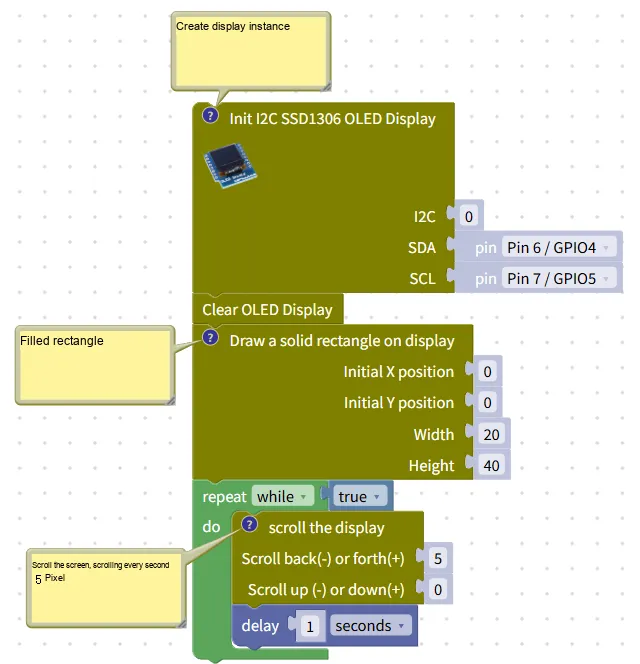
Building Block Assembly Steps:
- Initialization Section
- Import
ssd1306(OLED driver library),I2C(communication interface),time(delay function); - Create an OLED instance (screen size: 128×64) via the I2C interface (SCL connected to GPIO5, SDA connected to GPIO4);
- Execute screen clearing (
oled.fill (0)), then display content, next draw a solid rectangle with top-left coordinates (0,0), width 20 and height 40, and finally refresh the display.
- Import
- Looping Scroll Section
- Enter an infinite loop and execute horizontal scrolling to the right (step size 5) with no vertical scrolling (step size 0), set a scrolling interval of 1 second, and refresh the display after each scroll.
Experimental Effect: A solid 20×40 rectangle first appears on the OLED screen, then this rectangle moves a certain distance to the right every 1 second. After moving out of the right side of the screen, it reappears from the left side and scrolls in a loop, just like the Progress Bar for video loading~
Tips
Want to make the Progress Bar "load faster"? Just change the delay from 1 second to 0.5 seconds; want to make the Progress Bar thicker? Simply adjust the Width from 20 to 30~
xml files can be directly imported into blocks:
Progress bar.xml 4 KB