
Contents
- 1. Pull a "whisper telephone line"
- 1.1 Questions about daily life scenarios
- 1.2 Understanding UART in a Nutshell
- 2. Understand the "Communication Rules" of UART
- 2.1 Baud Rate
- 2.2 TX/RX Pins
- 2.3 Data Format
- 3. Comprehensive Analysis of UART Blocks
- 3.1 Initialization Block (Init UART Serial Port): Set the "speech rate" and the position of the "mouth/ear" for the telephone line
- 3.2 Data Sending Block (Send data to UART): Sends out the content (text/numbers) you want to transmit
- 3.3 Data Reading Block (Read data to UART): Listen for messages sent by the peer (received byte by byte)
- 3.4 Single-line Reading Block (Read one line from UART): Receives messages in units of "a single sentence"
- 3.5 Full Read Block (Read all data from UART): Receives all unread messages at one time
- 3.6 New Data Detection Block (Check to see if the uart has data): Check whether there are any new messages in the "telephone line"
As we already know, communication refers to enabling devices to "talk" to each other. In this section, we will first get to know one of the most intuitive and easiest-to-understand communication methods —— UART (Universal Asynchronous Receiver/Transmitter) serial communication, which acts like a "private whisper telephone line" between devices.
1. Pull a "whisper telephone line"
Before we start the operation, let's first talk about a very familiar scenario in daily life.
1.1 Questions about daily life scenarios
Consider this question: when you and your deskmate pass secret notes in class, why can only the two of you understand what's written on them?
The reason is actually very simple:
- The note is only passed between the two of you.
- The content has not been seen by others
- You write one sentence, and he reads one sentence.
This is a form of one-to-one information transmission. In fact, the communication between many electronic devices is very similar to passing notes.
1.2 Understanding UART in a Nutshell
UART (Universal Asynchronous Receiver/Transmitter, serial communication) can be understood in this way: it is just like a dedicated telephone line between you and your deskmate, which only supports one-to-one communication, being simple and private.
It has several very important characteristics:
- Connect only one device at a time
- The information is sent sequentially in order
- You send a message, and the other party receives it one by one.
In many beginner projects, serial communication is the first communication method to be used.
Young Maker's Observation: Now take a look at the devices around you and think about which ones are more suitable for this "one-on-one chat" approach?
Examples: computers and development boards, two Arduinos, sensors and main control boards, etc.
2. Understand the "Communication Rules" of UART
2.1 Baud Rate
The baud rate is just like the "speaking rate" of speech:
- Too fast: The other party may not understand you
- Too slow: low information transmission efficiency
In programming, when setting the baud rate, we must ensure that the sender and the receiver use the same baud rate, otherwise communication errors will occur.
Interactive Mini Exercise: If two people speak at different rates (baud rate mismatch), what will happen?
Answer: The content received by the other party may be garbled or partially missing, just like mishearing a whisper from your deskmate.
2.2 TX/RX Pins
TX acts as your "mouth", responsible for transmitting information;RX acts as your "ears", responsible for receiving information.
Pro Tip: Always connect the TX pin to the other device's RX pin, and the RX pin to the other device's TX pin — otherwise it's like talking to a wall, and no one will receive your data correctly.
2.3 Data Format
Data in UART communication is transmitted in bytes, and each byte typically consists of:
- Start bit: Notifies the communication counterpart that "I am starting to transmit data"
- Data bit: the actual value or character
- Parity Bit (Optional): Verify whether the data is correct
- Stop bit: signals to the communication counterpart "I have finished transmitting"
Young creators’ understanding: Just like when writing a note, you write "Start" at the beginning, "End" at the end, and the content in between, to make sure the recipient can understand it.
3. Comprehensive Analysis of UART Blocks
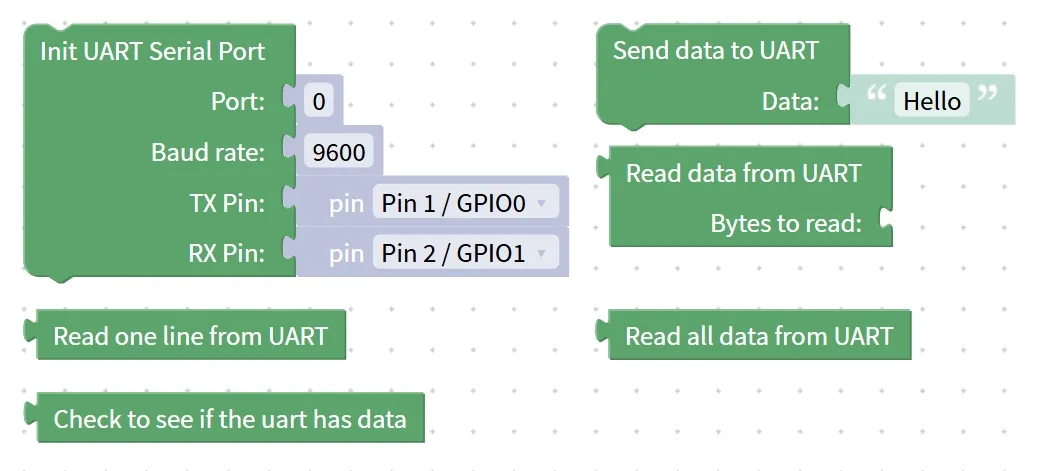
3.1 Initialization Block (Init UART Serial Port): Set the "speech rate" and the position of the "mouth/ear" for the telephone line
Young makers, if you want your development board to "chat" with your computer and sensors, the first step is to set rules for this "phone line" — the UART serial port — and that's exactly what the initialization block does! It's just like when you and your classmates use walkie-talkies: you have to tune to the same "channel" and set the same "speaking rate" first, otherwise you'll each be talking your own way and won't understand a word the other says~
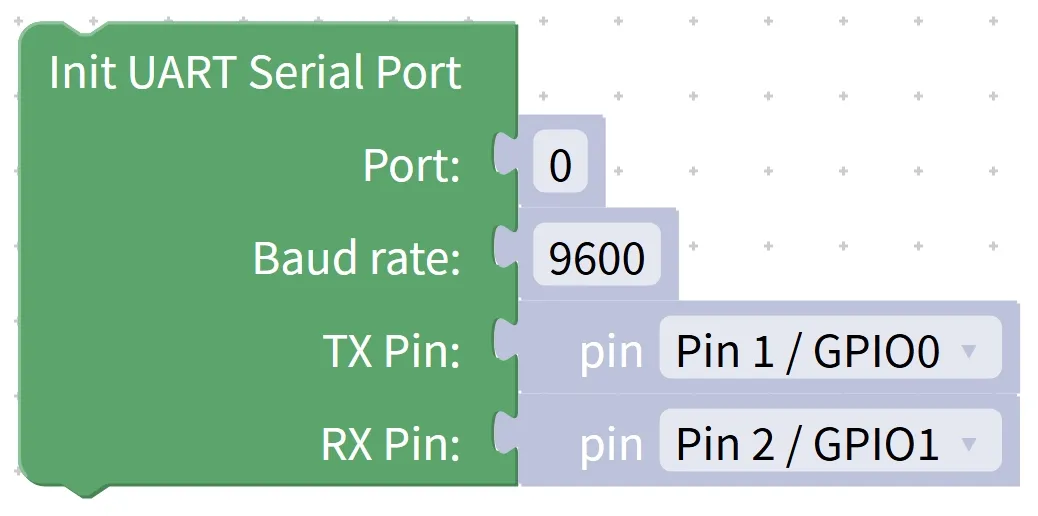
Chinese Meaning: Initialize the UART serial port (Init UART Serial Port), set the pins and baud rate (communication speed) used for communication, so as to get ready for subsequent data transmission and reception.
Core Features:
- Must be used at the very beginning of the program: the initialization block must run first to ensure that the subsequent data sending block takes effect;
- Specify communication pins: inform the development board which two pins are responsible for transmitting (TX) and receiving (RX);
- Set the baud rate: This parameter determines the speed of information transmission, and it must be consistent between the transmitting end and the receiving end.
Example in daily life:
- Adjust your headset before making a call: Only when you put on the headset properly can your voice be heard by the other party;
- Adjust your speaking pace: if you speak too fast or too slow, others may not be able to hear you clearly;
- Match the connections correctly: If the phone line is plugged into the wrong port, no one will hear you no matter how clear your voice is.
Practical Example 1: Initialize the Computer's Serial Port
- Requirement: The development board sends messages to the computer via UART
- Step 1: Place an initialization block at the very beginning of the program, set the TX pin to 1, the RX pin to 0, and the baud rate to 9600;
- Step 2: The subsequent data sending block can normally send text or numbers;
- Logic description: The initialization block tells the development board "which pin to use for communication and what the baud rate is", just like you need to get a call connected before you can have a smooth conversation.
Practical Example 2: Initializing Another Development Board
- Requirement: Two development boards communicate with each other via UART
- Step 1: Place an initialization block on both boards, with TX connected to RX and RX connected to TX, and ensure the baud rates are the same;
- Step 2: Subsequent data blocks can send messages to each other;
- Logic explanation: The initialization block is like setting the "headphone/microphone position + speech rate", so that both parties can understand each other.
Quick Reminder
- The initialization block can only be used once at the very beginning of a program, and repeated use may cause confusion;
- Make sure the TX and RX pins are connected correctly; otherwise, data transmission/reception will fail.
- The baud rates must match; otherwise, the data will be garbled.
✨ Exclusive Mini Interaction
- Quick Response Quiz 1: What is the core function of the initialization block? (Answer: Configure the pins and baud rate for serial communication to prepare for data transmission/reception)
- Think about it: What will happen if you send data directly without placing the initialization block first? (Answer: Most likely, the data will fail to be sent, or the receiver will not understand it.)
- Scenario judgment: If the baud rates of the two boards are different, what will happen to the data sent by the sending block? (Answer: The received data will be garbled or lost)
Summary:
- Initialization block: Specify the pins and baud rate for UART communication, which is the first step of serial communication;
- Must be used at the very beginning of the program to ensure that subsequent data sending blocks can take effect;
- This is just like adjusting the headset and speaking pace before making a phone call — without initialization, normal communication cannot be achieved.
3.2 Data Sending Block (Send data to UART): Sends out the content (text/numbers) you want to transmit
Young creators, once you have initialized the "telephone line", you can start speaking! The data sending block is used to make the development board transmit the content you want to send via UART. You can send text, numbers, or send the data read by the sensor to a computer or another development board through this "telephone line".
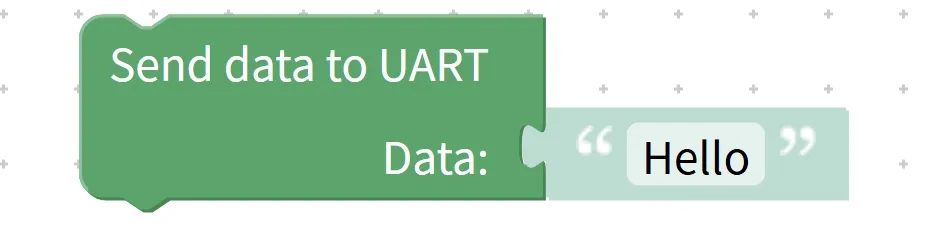
Chinese meaning: Send the specified data (text or numbers) to an external device or another development board via the UART serial port.
Core Features:
- Must be used after the initialization block, otherwise it cannot be sent out;
- Flexible data types for transmission: text, numbers or variable values can all be transmitted;
- Real-time transmission: When the block is running, data will be sent immediately via the specified pin.
Practical Examples:
- Making a phone call to pass a message: You need to get the call connected first before you can convey what you want to say to the other party;
- Write a letter and send it out: You have finished writing the letter (the data), but if you do not put it into an envelope (the sending block), others will not receive it;
- Microphone Relay: Only when you input your message into the microphone (the send block) can your voice be transmitted to others.
Practical Example 1: Send a sentence to the computer's serial port
- Requirement: Make the computer display
"Hello, UART!" - Step 1: First place the UART initialization block, and set the TX/RX pins and baud rate;
- Step 2: Place the send data block and enter the text
"Hello, UART!"; - Step 3: Run the program and open the computer's serial port monitor to check the results;
- Logic description: When the sending block transmits the text "via the telephone line", the computer will be able to display it.
Practical Example 2: Sending Sensor Data
- Requirement: Send the value of the temperature sensor every 1 second
- Step 1: Initialize the UART;
- Step 2: Read the value of the temperature sensor and put it into the data block to be sent;
- Step 3: Execute in a loop, sending once every 1 second;
- Logic Description: The development board sends real-time data to the receiving end to facilitate monitoring and recording.
Quick Reminder
- Initialize first, then send; the order must not be reversed.
- Make sure the TX and RX pins are connected correctly; otherwise, the receiver will not be able to receive data properly.
- The baud rate must match so that the transmitted data can be correctly interpreted by the receiving party;
- Do not send data too fast, otherwise the recipient may fail to process it in time and lose data.
✨ Exclusive Mini Interaction
- Quick Response 1: What is the function of the "Send Data" block? (Answer: Send text or numbers via UART)
- Think about it: What will happen if the "send block" is used before initialization? (Answer: There is a high probability that the sending will fail and the recipient will not receive it.)
- Scenario Judgment: When sending temperature data, if the baud rate does not match that of the receiving end, what will happen? (Answer: The received data will be garbled or lost.)
- Small challenge: Try changing the data sent from text to the value of the temperature sensor, and observe the changes in the serial port window.
Summary
- Data sending block: responsible for sending text or numbers via UART, which is the core step of "speaking";
- It must be used after initializing the building block, and ensure that TX/RX and baud rate match;
- Just as you can only speak after a call is connected, the sending block cannot function without prior initialization.
3.3 Data Reading Block (Read data to UART): Listen for messages sent by the peer (received byte by byte)
Young makers, if a development board wants to communicate with external devices, it must not only be able to "speak" but also know how to "listen"! The data reading block is the "ear" of the development board, responsible for receiving data sent via UART, reading one byte (the smallest unit of information) at a time, and then passing it to the program for processing.

Chinese meaning: Read the received data (received byte by byte) via the UART serial port for the program to perform judgment, display or further processing.
Core Features:
- Must be used after UART initialization, otherwise data reception will fail;
- Byte-wise reading: One byte of data is obtained at a time, and the program needs to combine multi-byte information on its own;
- Real-time reception: When the block is running, the received data will be returned to the program immediately.
Practical Examples:
- Telephone Listening Comprehension: The other party speaks one sentence at a time, and you listen accordingly, making sure to understand every single word of each sentence;
- Receiving and opening a letter: A letter is sent line by line and word by word, and you have to unpack each line to grasp its content;
- Microphone Message Delivery: The sounds picked up by the ear are transmitted to the brain one by one, so that the full meaning can be comprehended.
Practical Example 1: Reading Data from Computer Serial Port
- Requirement: Receive and display the information sent from the computer
- Step 1: Initialize the UART, and configure the TX/RX pins and baud rate;
- Step 2: Use the data reading block to read one byte;
- Step 3: Display the read data on the onboard screen or serial monitor via the display block;
- Logic description: The data reading block captures "each byte" from the serial port, and the program can perform different processing according to the received content.
Practical Example 2: Reading Data Sent by a Sensor or Another Board
- Requirement: Another development board sends temperature values, and after receiving them, this development board determines whether the temperature is excessively high.
- Step 1: Initialize the UART;
- Step 2: Repeatedly use the data reading block to obtain each byte and combine them into a complete value;
- Step 3: Determine whether the temperature exceeds the threshold, and decide whether to turn on the warning light;
- Logic Description: The development board uses its "ears" to receive data in real time, then makes decisions and performs actions.
Quick Reminder
- Initialize the UART first, then read the data — the sequence is critical;
- Read by byte: If the data to be sent is very long, the program needs to read and combine it in a loop;
- The TX/RX pins and baud rate must match, otherwise the received data may be garbled or lost;
- Reading the building blocks will not block the program for too long, but attention should be paid to the frequency of cyclic reading to avoid missing data.
✨ Exclusive Mini Interaction
- Quick Response Quiz 1: What is the function of the data reading block? (Answer: Receive the data sent via UART for program processing)
- Think about it: If the sender sends the number 65, which corresponds to the character 'A', how would you display it in a program? (Answer: Read one byte, then display it using the display block.)
- Scenario Judgment: When transmitting multi-byte information consecutively with one byte read each time, how to combine them into a complete message? (Answer: Use loop reading to concatenate the bytes one by one into a string or a number)
- Small Challenge: Try to read the text sent by the computer, then determine whether it contains a specific character, and if so, turn on the LED.
Summary
- Data reading block: the "ear" of the development board, which receives data sent from external devices in bytes;
- It must be used after UART initialization, and ensure that the TX/RX pins and baud rate match;
- When the data reading block and the sending block are used in combination, a complete serial port chat can be realized, and the development board can both "speak" and "listen".
3.4 Single-line Reading Block (Read one line from UART): Receives messages in units of "a single sentence"
Young makers, after the development board gets its "ears", it can not only receive information byte by byte, but also understand what others are saying in terms of "a complete sentence"! The single-line reading block acts as the "sentence receiver" of the development board: it reads an entire line of message at a time, and passes the whole line to the program only when it encounters a line break (Enter).

Chinese meaning: Read the received data line by line through the UART serial port (terminate when a line break is encountered), which facilitates the program to obtain the complete information at one time for processing.
Core Features:
- Receive by line: each time obtain the complete content from the start up to the line break;
- Must be used after UART initialization;
- Flexible data types: capable of reading text, numbers or combined information;
Example in daily life:
- On the phone, wait until a full sentence finishes before processing it: wait until you hear the complete sentence before responding;
- Open the letter and read it paragraph by paragraph: you can only grasp the full meaning after finishing each complete paragraph.
- The teacher instructs: First listen to the complete sentence, then take notes or answer the questions.
Practical Example 1: Read a line of text sent by a computer
- Requirement: The computer sends
"Hello, UART!", and the development board receives the complete message in a single read. - Step 1: Initialize the UART, and configure the TX/RX pins and baud rate;
- Step 2: Use the single-line reading block to read the entire line of the message;
- Step 3: Display the received content via the display block;
- Logic Description: The development board receives information in units of "sentences" to avoid the trouble of program processing caused by byte splitting.
Practical Example 2: Reading Sensor Information or Commands
- Requirement: The computer sends
"TEMP: 25", the development board receives the entire line at a time, and then judges the temperature - Step 1: Initialize the UART;
- Step 2: Use the single-line reading block to read the entire line;
- Step 3: Parse the information (e. g., extract numbers) and control the LED or buzzer;
- Logic description: Reading an entire line at a time makes program processing more convenient and avoids byte-by-byte concatenation.
Quick Reminder
- Initialize the UART before using it — the order is critical;
- Each line must end with a newline character; otherwise, the block will keep waiting and the program will pause;
- The TX/RX pins and baud rate must match, otherwise reception may fail or garbled data may occur;
- Suitable for sending relatively complete commands or text, not suitable for high-speed continuous byte data.
✨ Exclusive Mini Interaction
- Quick Response Quiz 1: What is the difference between the single-line reading block and the byte-by-byte reading block? (Answer: The single-line reading block retrieves an entire line at a time, while the byte-by-byte reading block retrieves one byte at a time.)
- Think about it: If the sender doesn't have a newline character, what will happen to the single-line reading block? (Answer: It will keep waiting and the program will pause.)
- Scenario Judgment: The computer sends three commands, each ending with a newline character. How can the development board read one command at a time? (Answer: Call the single-line reading block in a loop to receive one complete command each time)
- Small challenge: Try sending a line of
"LED ON"to make the onboard LED light up once it's received.
Summary:
- Single-line reading block: the "one-line receiver" of the development board, which obtains an entire line of data at a time to facilitate processing commands or text information;
- It must be used after UART initialization, and ensure that the TX/RX pins and baud rate match;
- It ends when a line break is encountered, reading an entire line at a time to avoid the hassle of byte-by-byte concatenation and simplify serial port data processing.
3.5 Full Read Block (Read all data from UART): Receives all unread messages at one time
Young makers, the "ears" of the development board can not only listen byte by byte and line by line, but also "listen to all the words in one breath"! The full-read block is the "full listener" of the development board, which receives all unread data in the serial port at one time, making it convenient for the program to process a large amount of information in a single run.

Chinese Meaning: Read all unread data in the current buffer at one time via the UART serial port, including text, numbers or commands, for unified processing by the program.
Core Features:
- Fetch all unread data at once without the need for cyclic reading byte by byte or line by line;
- Must be used after UART initialization;
- Suitable for processing large volumes of information, especially multiple messages sent in succession;
- The buffer is cleared after reading to avoid reading the same data repeatedly.
Example in daily life:
- Turn on the radio and listen to an entire broadcast segment : to obtain the complete content in one go without pausing to listen word by word;
- Open your inbox and take out all the messages at once: process multiple pieces of information in one go without missing any;
- Clear all files on your desktop in one go : Get all your materials at once for easy centralized organization.
Practical Example 1: Read all data sent by the computer at one time
- Requirement: The computer sends multiple lines of information continuously, and the development board receives them at one time
- Step 1: Initialize the UART, and configure the TX/RX pins and baud rate;
- Step 2: Use the full-read block to obtain all unread messages;
- Step 3: Perform unified processing or display via display blocks or variable storage;
- Logic description: The full-read block extracts all data in the serial port buffer at one time, so the program does not need to splice data byte by byte or line by line.
Practical Example 2: Receiving Continuous Sensor Data
- Requirement: The sensor transmits multiple data including temperature, humidity and light intensity
- Step 1: Initialize the UART;
- Step 2: Repeatedly use the full-read block to obtain all unread data each time;
- Step 3: Parse each piece of data, update the display or judge the alarm conditions;
- Logic Description: The full-read block is suitable for processing multiple pieces of information sent continuously at high speed to avoid omissions.
Quick Reminder
- Initialize the UART before using it — the sequence is critical;
- Read all unread messages at one time, and the buffer will be cleared after reading;
- The TX/RX pins and baud rate must match, otherwise the received data may be garbled or lost;
- Not suitable for fine-grained control requiring byte-by-byte processing, as message boundaries may otherwise be indistinguishable.
✨ Exclusive Mini Interaction
- Quick Response 1: What is the core function of the "read all" block? (Answer: Obtain all unread data in the serial port buffer at one time)
- Think about it: If three commands are sent consecutively, how will the full-read block receive them? (Answer: All three commands will be obtained into the program at one time.)
- Scenario Judgment: When a large amount of data is sent continuously, what problems may occur if the full-reading block is used? (Answer: Too much data at one time, leading to slow processing or a laggy program)
- Small challenge: Try to use the full-read block to read the multi-line temperature data sent by the computer, and then calculate the average value.
Summary
- Full Read Block: The "full listener" of the development board, which receives all unread data in the serial port at one time;
- It must be used after UART initialization, and ensure that the TX/RX pins and baud rate match;
- It is suitable for processing large batches of continuously sent information, and can obtain the data at one time to avoid repeated reading byte by byte or line by line.
3.6 New Data Detection Block (Check to see if the uart has data): Check whether there are any new messages in the "telephone line"
Young makers, if you want your development board to listen to the messages coming through the "phone line", it first needs to know if someone is calling. The new data detection block acts as the development board's "ear detector", helping you check whether there is any new unread data in the UART serial port, so you won't waste your effort.

Chinese meaning: Check whether there is new data in the buffer of the UART serial port; if yes, return true; if no, return false for the program to decide whether to perform a read operation.
Core Features:
- Check only, no reading: The block will not retrieve data and will only inform you whether there is a new message;
- Real-time detection: It can be called frequently in a loop to check the serial port status at any time;
- Returns a boolean value:
trueindicates that data is present, andfalseindicates that no data is available;
Example in daily life:
- Has the phone rung yet: First wait for the phone to ring, then go answer it;
- Is there any new mail in the inbox?: First check if there are any letters in the mailbox, then decide whether to go and collect them;
- New message notification for chat apps: A little red dot lights up on the screen to indicate a new message, and you tap into it to check.
Practical Example 1: Cyclically check for new messages
- Requirement: Read only when there are new messages
- Step 1: Initialize the UART, and configure the TX/RX pins and baud rate;
- Step 2: Use the new data detection block in the loop to determine whether there is data;
- Step 3: If it returns
true, use the data reading block to obtain the message; - Logic description: The development board first detects whether there is a message before deciding to read, so as to avoid errors caused by reading empty data.
Practical Example 2: Smart LED Reminder
- Requirement: When there is new data from the serial port, turn on the onboard LED for indication
- Step 1: Initialize the UART;
- Step 2: Continuously detect whether there is data in the UART;
- Step 3: If there is new data, set the output pin to turn on the LED; otherwise, keep it off.
- Logic Description: The development board "listens for the ringtone first" before taking action, so as to utilize resources in a reasonable manner.
Quick Reminder
- Initialize the UART before using it — the sequence is critical;
- Detection only, no reading, the data remains in the buffer and needs to be retrieved using the reading block;
- Suitable for use in loops to determine in real time whether there is new data;
- The return value is a Boolean: which can be used directly in condition control blocks, such as the "if. .. then. .." block.
✨ Exclusive Mini Interaction
- Quick Response 1: What is the core function of the new data detection block? (Answer: Check whether there is a new message on the serial port and return
trueorfalse) - Think about it: What will happen if data is detected but not read? (Answer: The data will remain in the buffer and still be available for the next read operation.)
- Scenario Judgment: When the block for new UART data returns
falsewhile frequently checking the UART in a loop, what should the program do? (Answer: Continue the loop to check and wait for new data) - Small challenge: Use new data to test the block-controlled LED prompt, which only lights up when there is a new message and turns off automatically after the message is read.
Summary:
- New Data Detection Block: The "ear detector" of the development board, which first checks for new messages before deciding whether to read them;
- It must be used after UART initialization, and ensure that the TX/RX pins and baud rate match;
- Returns a Boolean value
true/false, which is suitable for judging message status in loops to improve program efficiency.