
Young makers, in the last session we completed the simple project of "Button-controlled LED", and this time we’re stepping up the difficulty — let’s make a temperature and humidity environment monitoring display! We’ll use the DHT11 to collect temperature and humidity data, display the readings in real time on an OLED screen, and even add an early warning function, which perfectly replicates the "thermohygrometer" we use in daily life. By mastering this project, you’ll grasp the complete integrated logic of "sensor data collection + display output + conditional alert"~
1. Case Introduction
Modules used:
- Core Acquisition: DHT11 Temperature and Humidity Sensor (responsible for "sensing" ambient temperature and humidity);
- Core output: 0.96-inch SSD1306 OLED display (responsible for "displaying" temperature and humidity data);
- Optional add-ons: LED indicator / buzzer (for "early warning" of extreme temperature and humidity).
Creative Gameplay:
This case delivers two core functions and is extremely practical:
- Real-time Display: The OLED screen continuously refreshes the current ambient temperature (℃) and humidity (% RH) to visually present the environmental status;
- Threshold Alarm (Optional): Set temperature/humidity thresholds (e. g., temperature > 30°C, humidity > 70%). When the threshold is exceeded, the OLED will display a warning message, and the LED will flash while the buzzer sounds.
Core Learning Points:
- Data reading and verification of the digital sensor (DHT11);
- Text display, coordinate control and screen clearing operations of OLED display screens;
- Conditional judgment based on temperature and humidity values (
if…do…); - The complete project workflow of "collection → processing → display → early warning";
- Hardware timing requirements (DHT11 collects data at 2-second intervals) and display optimization.
2. Wiring Instructions
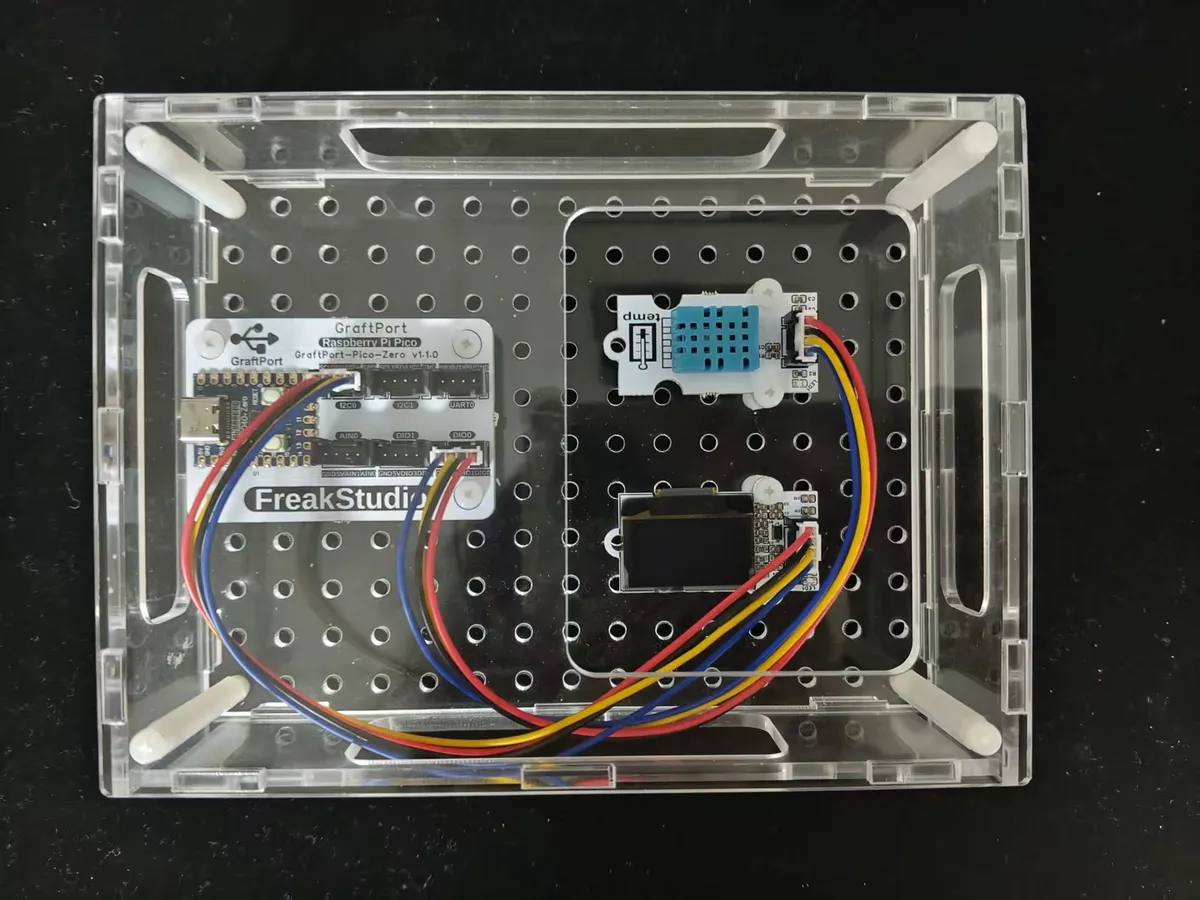
This case requires connecting two core modules. Just follow the corresponding relationship below to connect them properly, and even beginners can get it right on the first try:
- 0.96-inch SSD1306 OLED Module (Connected to I2C0 Interface)
Development Board Pins | Module Pins | Description |
Pin 4 |
|
|
Pin 5 |
|
|
- DHT11 Temperature and Humidity Sensor (connected to DIO0 interface)
Development Board Pins | Module Pins | Description |
Pin 7 |
| 1-Wire communication pin |
Pin 8 |
| - |
3. Program Description
The core of this case lies in the workflow of "temperature and humidity collection → data processing → OLED display → threshold-based early warning", and we will break it down by functional modules to explain it step by step:
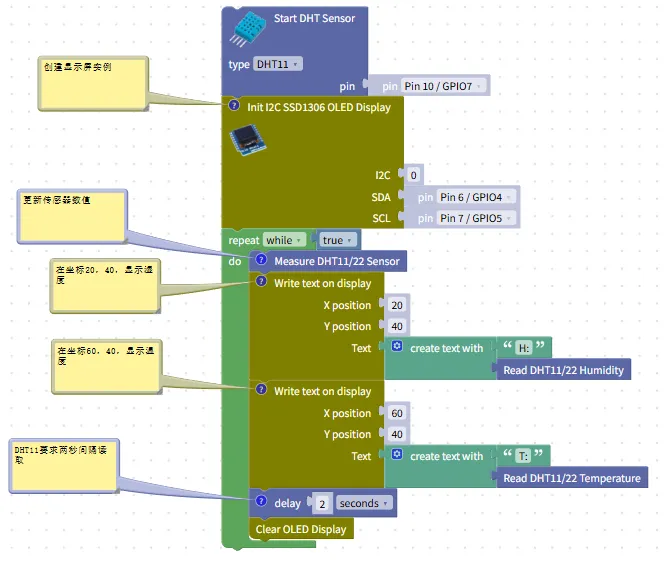
- Hardware Initialization Module
Start DHT Sensor: Initialize the DHT11 sensor (pinPin 10/GPIO7) for temperature and humidity collection;Init I2C SSD1306 OLED Display: Initialize the OLED display (I2C pinsGPIO4(SDA),GPIO5(SCL)) to establish display communication.
- Infinite Loop Module (
repeat while true)- Function: Continuously execute the "acquisition → display" process to realize real-time update of temperature and humidity.
- Data Acquisition Module
Measure DHT11/22 Sensor: Trigger the DHT11 to collect current temperature and humidity data.
- Display Control Module
Write text on display: Display the humidity label ("H:") and the collected humidity value at the specified coordinates on the OLED (e. g.,X= 20, Y= 40);- Another group
Write text on display: AtX= 60, Y= 40, display the temperature label ("T:") and the collected temperature value; Clear OLED Display: Clears the screen before each update to avoid overlapping displayed content.
- Delay Module
delay 2 seconds: meets the hardware requirement of "at least 2-second interval between acquisitions" specified for DHT11 to ensure data accuracy.
After running the program:
- OLED screen clearly displays:
- Cover the DHT11 with your hand, when the temperature rises to 31°C → the OLED displays "High Temperature Warning!" at the bottom, and the LED turns on;
- Remove your hand, the temperature returns to 25°C → the warning text disappears and the LED turns off;
- The data is refreshed every 2 seconds, with no overlapping content or garbled characters on the screen, ensuring stable and accurate data.
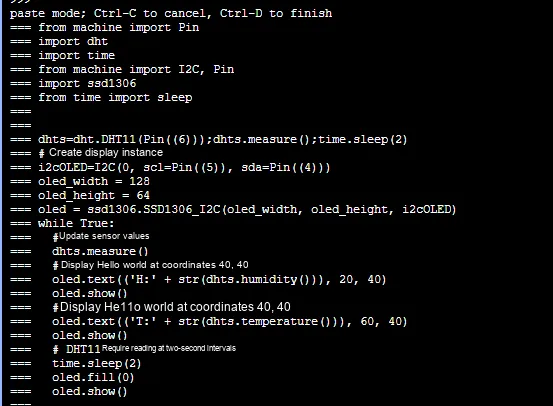
A Beginner's Guide to Avoiding Common Pitfalls
- Is the OLED screen not turning on?
- Check whether SDA/SCL is connected to GPIO4/GPIO5, and verify whether the pins of the initialization block match;
- Confirm that the OLED module is properly powered (3.3V); if there is no power supply, the screen will not respond at all.
- Temperature and Humidity Display 0?
- Check whether the DIO pin of the DHT11 is connected to GPIO7, and verify whether the type of the initialization block is set to DHT11;
- Don't forget to add a 2-second delay, otherwise the DHT11 data reading will fail. This step is mandatory!
- Is the displayed text overlapping?
- Since the screen is not cleared before each display, you must first combine the "Clear OLED Display" block before displaying new data.
✨ Interactive Mini Quiz
- Think about this: If you set the X coordinate of OLED display to 0 and the Y coordinate to 0, where will the text be displayed on the screen? (Answer: The top-left corner of the screen, which is the starting position)
- Try it: Change the alert threshold to "Temperature > 28°C, Humidity < 30%(low humidity alert)". Can you modify the code / blocks to implement this?
xml files can be directly imported into the building blocks: