
Contents
1. Introduction
In the previous section, we explained in detail how to control the OLED module via the I2C protocol, including how to manually implement both hardware and software I2C operations to send commands for character display; we also gained an in-depth understanding of the communication mechanism and display principle of OLED. However, although this low-level operation can help us master the details and facilitate development, it has low efficiency in actual development, with complex code that is difficult to maintain.
In this lesson, we will further extend from low-level control to using the ready-made OLED driver library functions. With these library functions, we can get rid of the tedious low-level communication and focus our energy on the implementation of high-level functions.
2. Basic Preparation
2.1 Hardware Connection
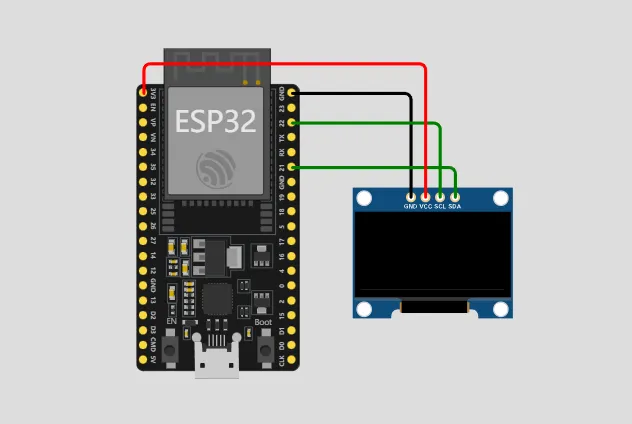
2.2 Software Preparation
We need to reference the following three library files.
#include <Wire.h>
#include <Adafruit_SSD1306.h>
#include <Adafruit_GFX.h>
First, let me introduce the basic functions of these three libraries:
Wire.h : I2C Communication Library
- This library is the built-in I2C (Two Wire Interface) communication library of Arduino, which is used for data interaction with I2C devices such as OLED screens, sensors and the like.
- Core Function: In this project, the SSD1306 OLED screen is controlled via the I2C protocol.
<Adafruit_GFX.h>: Graphics Processing Library
- This library is a general-purpose graphics library provided by Adafruit, which is compatible with various screens (including OLED, TFT, etc.).
- Core function: It handles the display of text and graphics, such as font settings, line drawing, graphic rendering, etc.
<Adafruit_SSD1306.h>: SSD1306 driver library
- This is a library developed by Adafruit specifically for the SSD1306 chip, dedicated to controlling OLED screens.
- Core Functions: Provides direct control functions for OLED hardware, such as screen initialization, screen refreshing, command sending, etc.
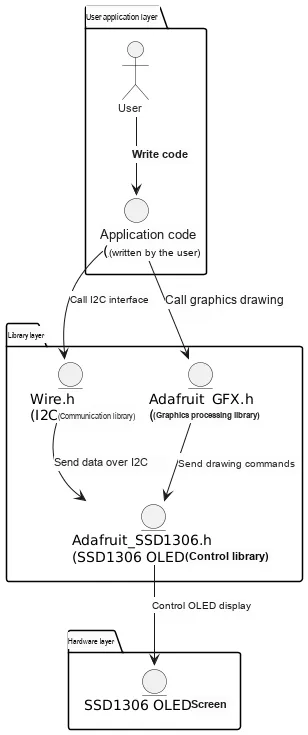
According to the diagram, how does our code make the OLED screen display content step by step?
- User Application Layer
- Users write code to call
Adafruit_GFX.hto draw text and graphics.- The code tells the library: I want to display "Hello, OLED!", or draw a circle.
- Library Layer
Adafruit_GFX.hprocesses these drawing requests and generates the corresponding pixel data.Adafruit_SSD1306.his responsible for converting these data into commands that the SSD1306 OLED can understand.Wire.htransmits commands via I2C to the OLED hardware.- Hardware Layer
- After receiving the command, the SSD1306 OLED screen eventually lights up the corresponding pixels on the screen to display the graphics or text we want.
3. The OLED screen displays the character '1'
In the previous content, we introduced how to directly communicate with the OLED via hardware I2C, which requires manually writing the I2C read and write processes to send control commands and data, and the procedure is rather complicated.
Now, we use the SSD1306 library provided by Adafruit to simplify the development process. This library encapsulates functions such as OLED initialization, drawing, and text display, allowing us to use the OLED screen more efficiently.
The following code demonstrates how to implement character display on an OLED screen via library functions.
#include <Wire.h>
#include <Adafruit_GFX.h>
#include <Adafruit_SSD1306.h>

#define OLED_WIDTH 128
#define OLED_HEIGHT 64
#define OLED_ADDR   0x3C

Adafruit_SSD1306 display(OLED_WIDTH, OLED_HEIGHT, &Wire, -1);

void setup() {
  // Initialize serial port
  Serial.begin(9600);

  // Initialize the OLED display
  if (!display.begin(SSD1306_SWITCHCAPVCC, OLED_ADDR)) {
    Serial.println(F("SSD1306 allocation failed"));
    for (;;); // If initialization fails, stop execution
  }

  // Clear the display buffer
  display.clearDisplay();

  // Display character '1' at (0, 0)
  display.setTextSize(1);      // Set font size
  display.setTextColor(WHITE); // Set text color
  display.setCursor(0, 0);    // Set cursor position
  display.print('1');         // Output character '1'

  // Push the buffer contents to the display
  display.display();
}

void loop() {
  // No need to do anything in the loop
}
4. Text Display Function
4.1 Display Static Characters
An OLED screen can use the setCursor () function to set the position for text display, and then use the print () or println () method to display characters or strings.
Set the text display position via setCursor ()
setCursor (x, y)- Set the text position
Function: Used to specify the starting position of text, affecting the output positions of print () and println ().
Syntax: display.setCursor(x, y);
Parameters: The coordinate unit is pixels, and the specific range depends on the screen resolution.
x(int): the horizontal coordinate (from left to right) of the text, ranging from0 to screen width - 1(0 to 127).y(int): the vertical coordinate of the text (from top to bottom), ranging from0 to screen height - 1(0 to 63).
Return value: None.
Example: display.setCursor (10,20); // Text starts displaying at position (10,20)
Use print () and println () to display text
print (text)- Display text (no line break)
Function: at the current cursor position display text continuously without automatic line wrapping.
Syntax: display.print (value);
Parameter: value (variant type): can be a string, a character, an integer, a floating-point number, as well as binary, octal, and hexadecimal data.
Return value: None.
Example:display.print ("Hello "); // Display a stringdisplay.print (123); // Display an integer display.print (3.14); // Display a floating-point number display.print (255, HEX); // Display hexadecimal FF
println (): After displaying a line of text, the cursor will automatically move to the next line.
Function: displays text at the current cursor position and wraps to a new line, moving the cursor to the next line (y axis increases).
Syntax: display.println (value);
Parameters: value, supports the same content as print ()(strings, numbers, etc.).
Return value: None.
Example:
display.setCursor(0, 0);display.println("Line1"); // Automatically wraps to the next line after displaydisplay.println("Line2");
display.println(123);display.println(3.14);
4.2 Example: Display the character '1' at three positions on the OLED
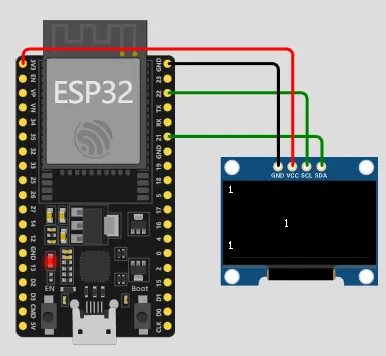
#include <Wire.h>
#include <Adafruit_GFX.h>
#include <Adafruit_SSD1306.h>

#define OLED_WIDTH 128
#define OLED_HEIGHT 64
#define OLED_ADDR   0x3C

Adafruit_SSD1306 display(OLED_WIDTH, OLED_HEIGHT, &Wire, -1);

void setup() {
  // Initialize serial port
  Serial.begin(9600);

  // Initialize the OLED display
  if (!display.begin(SSD1306_SWITCHCAPVCC, OLED_ADDR)) {
    Serial.println(F("SSD1306 allocation failed"));
    for (;;); // If initialization fails, stop execution
  }

  // Clear the display buffer
  display.clearDisplay();

  // Set cursor position and display text
  display.setTextSize(1);      // Set font size
  display.setTextColor(WHITE); // Set text color

  display.setCursor(0, 0);     // Top-left corner
  display.print("1");

  display.setCursor(50, 30);   // Center position
  display.print("1");

  display.setCursor(0, 50);    // Bottom-left corner
  display.print("1");

  // Push the buffer contents to the display
  display.display();
}

void loop() {
  // No need to do anything in the loop
}
4.2.1 Adjust Text Style
Font size: setTextSize ()
Use the setTextSize () function to set the font size. The parameter of this function is an integer value that represents the font size. 1 indicates the default size, 2 indicates double the default size, and so on.
setTextSize (size)- Set the font size
Function: Adjust the text size. The default value is 1; the larger the value, the larger the font size.
Syntax: display.setTextSize (size);
Parameters: size (int): Font zoom factor, default 1 (1x size).
Return value: None.
Example:
display.setTextSize (2); // Font scaled up by 2x display.print ("Big Text");
Font color: setTextColor ()
You can use setTextColor () to set the font color. Two colors are generally supported: WHITE (white) and BLACK (black). For OLED displays, WHITE renders the text color, while BLACK is used to clear the character area.
setTextColor (color)- Set the text color
Function: Set the text color; OLED screens typically support white, black, and inverted color modes.
Syntax:
display.setTextColor(color);display.setTextColor(color, background);
Parameters:
color(int):WHITE(default, white text)BLACK(black text)INVERSE(Color Inversion)
background(optional): the background color (WHITEorBLACK).
Return value: None.
Example:
display.setTextColor(WHITE); // White textdisplay.print("White Text");display.setTextColor(BLACK, WHITE); // Black text on white backgrounddisplay.print("Inverted");
4.2.2 Example: Changing the Font Size and Color of OLED Display
Some OLED screens only support monochrome display!!! I’ll take white as an example here:
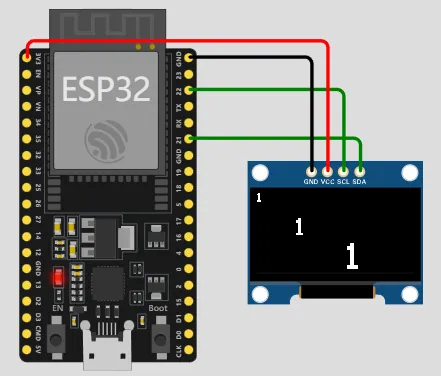
#include <Wire.h>
#include <Adafruit_GFX.h>
#include <Adafruit_SSD1306.h>

#define OLED_WIDTH 128
#define OLED_HEIGHT 64
#define OLED_ADDR   0x3C

Adafruit_SSD1306 display(OLED_WIDTH, OLED_HEIGHT, &Wire, -1);

void setup() {
  Serial.begin(9600);

  // Initialize the OLED display
  if (!display.begin(SSD1306_SWITCHCAPVCC, OLED_ADDR)) {
    Serial.println(F("SSD1306 allocation failed"));
    for (;;); // If initialization fails, stop execution
  }

  display.clearDisplay();

  // Display the first "1", font size 1, color white
  display.setTextSize(1);       // Font size 1
  display.setTextColor(WHITE);  // Font color: white
  display.setCursor(0, 0);     // Top-left corner
  display.print("1");

  // Display the second "1", font size 2, color white
  display.setTextSize(2);       // Font size 2
  display.setTextColor(WHITE);  // Font color: white
  display.setCursor(30, 20);    // Set position
  display.print("1");

  // Display the third "1", font size 3, color white
  display.setTextSize(3);       // Font size 3
  display.setTextColor(WHITE);    // Font color: white
  display.setCursor(70, 40);    // Set position
  display.print("1");

  display.display();  // Update screen content
}

void loop() {
  // No need to do anything in the loop
}
5. Dynamic Text Display
5.1 Text Scrolling Effect
#include <Wire.h>
#include <Adafruit_GFX.h>
#include <Adafruit_SSD1306.h>

#define OLED_WIDTH 128
#define OLED_HEIGHT 64
#define OLED_ADDR   0x3C

Adafruit_SSD1306 display(OLED_WIDTH, OLED_HEIGHT, &Wire, -1);

String text = "Hello, world! "; // Text to scroll
int textWidth;  // Store the text width

void setup() {
  Serial.begin(9600);

  // Initialize the OLED display
  if (!display.begin(SSD1306_SWITCHCAPVCC, OLED_ADDR)) {
    Serial.println(F("SSD1306 allocation failed"));
    for (;;); // If initialization fails, stop execution
  }

  display.clearDisplay();
  textWidth = text.length() * 6;  // Estimate text width (each character is 6 pixels wide)
}

void loop() {
  // Clear the screen and reset the cursor position
  display.clearDisplay();

  // Set text style
  display.setTextSize(1);
  display.setTextColor(WHITE);

  // Scroll from right to left
  for (int i = OLED_WIDTH; i > -textWidth; i--) {
    // Clear the screen before each scroll step so the text does not overlap
    display.clearDisplay();

    // Set cursor position
    display.setCursor(i, OLED_HEIGHT / 2);
    display.print(text);  // Display text

    // Update the display
    display.display();

    delay(10);  // Delay to control scroll speed
  }
}
5.2 Real-time Dynamic Data Display
It displays information such as sensor data or timers in real time by dynamically updating the screen.
5.3 Example: Display Counter
#include <Wire.h>
#include <Adafruit_GFX.h>
#include <Adafruit_SSD1306.h>

#define OLED_WIDTH 128
#define OLED_HEIGHT 64
#define OLED_ADDR   0x3C

Adafruit_SSD1306 display(OLED_WIDTH, OLED_HEIGHT, &Wire, -1);

unsigned long lastMillis = 0;  // Last update time
unsigned int counter = 0;      // Timer variable

void setup() {
  Serial.begin(9600);

  // Initialize the OLED display
  if (!display.begin(SSD1306_SWITCHCAPVCC, OLED_ADDR)) {
    Serial.println(F("SSD1306 allocation failed"));
    for (;;); // If initialization fails, stop execution
  }

  display.clearDisplay();
}

void loop() {
  // Update the time every second
  if (millis() - lastMillis >= 1000) {
    lastMillis = millis();
    counter++;  // Increment timer by 1

    // Clear the screen and update the display
    display.clearDisplay();

    // Set text style
    display.setTextSize(1);
    display.setTextColor(WHITE);
    display.setCursor(20, 30);  // Set display position

    // Display the current timer value
    display.print("Counter: ");
    display.print(counter);

    // Update the display
    display.display();
  }
}
5.4 Example: Progress Bar Display
We can combine multiple graphical elements to design a simple graphical interface, such as drawing a loading Progress Bar. Below is a simple example of a Progress Bar that shows the loading process from 0% to 100%.
#include <Wire.h>
#include <Adafruit_GFX.h>
#include <Adafruit_SSD1306.h>

#define OLED_WIDTH 128
#define OLED_HEIGHT 64
#define OLED_ADDR   0x3C

Adafruit_SSD1306 display(OLED_WIDTH, OLED_HEIGHT, &Wire, -1);

void setup() {
  Serial.begin(9600);

  // Initialize the OLED display
  if (!display.begin(SSD1306_SWITCHCAPVCC, OLED_ADDR)) {
    Serial.println(F("SSD1306 allocation failed"));
    for (;;); // If initialization fails, stop execution
  }

  display.clearDisplay();  // Clear the screen
}

void loop() {
  for (int progress = 0; progress <= 100; progress++) {
    display.clearDisplay();  // Clear the screen before each refresh

    // Draw the progress bar background
    display.drawRect(10, 30, 108, 20, WHITE);  // Draw a hollow rectangle as the progress bar background

    // Calculate the current progress bar width
    int progressWidth = map(progress, 0, 100, 0, 108);

    // Draw the filled progress bar
    display.fillRect(10, 30, progressWidth, 20, WHITE);  // Fill the progress bar

    // Display the progress percentage
    display.setTextSize(1);
    display.setTextColor(WHITE);
    display.setCursor(10, 5);
    display.print("Loading: ");
    display.print(progress);
    display.print("%");

    display.display();  // Update the screen display

    delay(100);  // Delay to simulate the loading process
  }
}
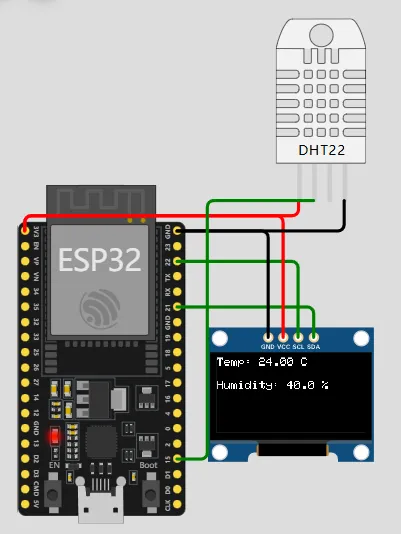
5.5 Example: Displaying the Value of a Temperature and Humidity Sensor
#include <Wire.h>
#include <Adafruit_GFX.h>
#include <Adafruit_SSD1306.h>
#include "DHTesp.h"

#define OLED_WIDTH 128
#define OLED_HEIGHT 64
#define OLED_ADDR   0x3C
const int DHT_PIN = 15;  // Pin the DHT sensor is connected to

Adafruit_SSD1306 display(OLED_WIDTH, OLED_HEIGHT, &Wire, -1);
DHTesp dhtSensor;

void setup() {
  Serial.begin(9600);

  // Initialize the OLED display
  if (!display.begin(SSD1306_SWITCHCAPVCC, OLED_ADDR)) {
    Serial.println(F("SSD1306 allocation failed"));
    for (;;); // If initialization fails, stop execution
  }

  display.clearDisplay();  // Clear the screen

  dhtSensor.setup(DHT_PIN, DHTesp::DHT22);  // Initialize the DHT22 sensor
}

void loop() {
  TempAndHumidity data = dhtSensor.getTempAndHumidity();  // Get temperature and humidity data

  // Print data to the serial port
  Serial.println("Temp: " + String(data.temperature, 2) + "°C");
  Serial.println("Humidity: " + String(data.humidity, 1) + "%");
  Serial.println("---");

  // Display temperature and humidity data on the OLED screen
  display.clearDisplay();  // Clear the screen
  display.setTextSize(1);  // Set font size
  display.setTextColor(WHITE);  // Set font color to white
  display.setCursor(0, 0);  // Set cursor to the top-left corner

  // Display temperature data
  display.print("Temp: ");
  display.print(data.temperature, 2);  // Show 2 decimal places
  display.print(" C");

  // Display humidity data
  display.setCursor(0, 20);  // Move cursor to the next line
  display.print("Humidity: ");
  display.print(data.humidity, 1);  // Show 1 decimal place
  display.print(" %");

  display.display();  // Update the screen display

  delay(2000);  // Wait 2 seconds before the next reading
}
6. Graphic Display Function
6.1 Basic Geometric Drawing
6.1.1 Point
drawPixel () drawPixel (x, y, color) is used to draw a single point, where (x, y) represents the coordinates of the point, and color specifies the color of the point.
display.drawPixel(10, 10, WHITE); // Draw a white point at coordinates (10, 10)6.1.2 Lines
drawLine () drawLine (x0, y0, x1, y1, color) is used to draw a line from (x0, y0) to (x1, y1), where color specifies the color of the line.
display.drawLine(10, 10, 100, 10, WHITE); // Draw a horizontal line from (10, 10) to (100, 10)6.1.3 Rectangle
drawRect () drawRect (x, y, w, h, color) is used to draw a rectangle.(x, y) specifies the coordinates of the top-left corner of the rectangle, w and h represent the width and height of the rectangle respectively, and color defines the border color of the rectangle.
display.drawRect(10, 10, 50, 30, WHITE); // Draw a rectangle with top-left corner at (10, 10), width 50, height 306.1.4 Circle
drawCircle () drawCircle (x, y, radius, color) is used to draw a circle, where (x, y) specifies the coordinates of the center of the circle, radius defines the radius of the circle, color sets the border color of the circle.
display.drawCircle(60, 30, 20, WHITE); // Draw a circle centered at (60, 30) with radius 206.1.5 Triangles
drawTriangle () drawTriangle (x0, y0, x1, y1, x2, y2, color) is used to draw a triangle, and the coordinates of the three vertices of the triangle are (x0, y0),(x1, y1) and (x2, y2) respectively, where color specifies the border color of the triangle.
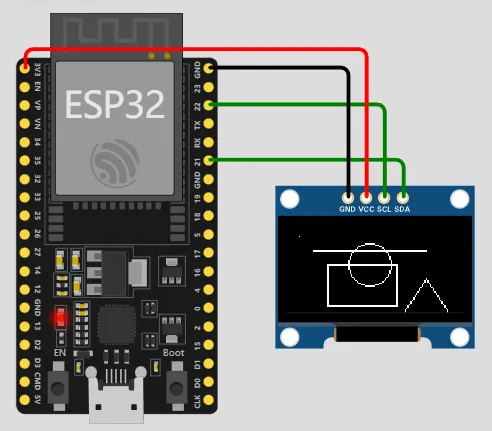
display.drawTriangle(10, 10, 50, 50, 90, 10, WHITE); // Draw a triangle6.1.6 Example: Combined Graphic Display
#include <Wire.h>
#include <Adafruit_GFX.h>
#include <Adafruit_SSD1306.h>

#define OLED_WIDTH 128
#define OLED_HEIGHT 64
#define OLED_ADDR   0x3C

Adafruit_SSD1306 display(OLED_WIDTH, OLED_HEIGHT, &Wire, -1);

void setup() {
  Serial.begin(9600);

  // Initialize the OLED display
  if (!display.begin(SSD1306_SWITCHCAPVCC, OLED_ADDR)) {
    Serial.println(F("SSD1306 allocation failed"));
    for (;;); // If initialization fails, stop execution
  }

  display.clearDisplay();  // Clear the screen

  // Draw a point
  display.drawPixel(10, 10, WHITE);  // Draw a white point at (10, 10)

  // Draw a line
  display.drawLine(20, 20, 100, 20, WHITE);  // Draw a horizontal line from (20, 20) to (100, 20)

  // Draw a rectangle
  display.drawRect(30, 30, 50, 30, WHITE);  // Draw a rectangle with top-left corner at (30, 30), width 50, height 30

  // Draw a circle
  display.drawCircle(60, 30, 15, WHITE);  // Draw a circle centered at (60, 30) with radius 15

  // Draw a triangle
  display.drawTriangle(100, 40, 120, 70, 80, 70, WHITE);  // Draw a triangle with vertices at (100, 40), (120, 70), (80, 70)

  display.display();  // Update the display content
}

void loop() {
  // No need to do anything in loop
}
6.2 Filled Shape Drawing
6.2.1 Filled Rectangle
Filled Rectangle: fillRect () fillRect (x, y, w, h, color) is used to draw a filled rectangle.(x, y) specifies the coordinates of the top-left corner of the rectangle, w and h represent the width and height of the rectangle respectively, and color defines the fill color of the rectangle.
display.fillRect(10, 10, 50, 30, WHITE); // Draw a filled rectangle6.2.1 Filling Circles
Filled circle: fillCircle () fillCircle (x, y, radius, color) is used to draw a filled circle, where (x, y) is the coordinate of the center of the circle, radius is the radius, and color is the fill color of the circle.
display.fillRect(10, 10, 50, 30, WHITE); // Draw a filled rectangle6.2.2 Filled Triangle
fillTriangle () fillTriangle (x0, y0, x1, y1, x2, y2, color) is used to draw a filled triangle, where the coordinates of the three vertices of the triangle are (x0, y0),(x1, y1) and (x2, y2) respectively, and color specifies the fill color of the triangle.
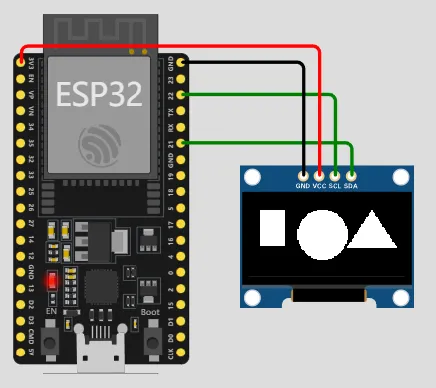
display.fillTriangle(10, 10, 50, 50, 90, 10, WHITE); // Draw a filled triangle6.2.3 Example: Display of Filled Combined Graphics
#include <Wire.h>
#include <Adafruit_GFX.h>
#include <Adafruit_SSD1306.h>

#define OLED_WIDTH 128
#define OLED_HEIGHT 64
#define OLED_ADDR   0x3C

Adafruit_SSD1306 display(OLED_WIDTH, OLED_HEIGHT, &Wire, -1);

void setup() {
  Serial.begin(9600);

  // Initialize the OLED display
  if (!display.begin(SSD1306_SWITCHCAPVCC, OLED_ADDR)) {
    Serial.println(F("SSD1306 allocation failed"));
    for (;;); // If initialization fails, stop execution
  }

  display.clearDisplay();  // Clear the screen

  // Draw a filled rectangle
  display.fillRect(10, 10, 20, 30, WHITE);  // Draw a filled rectangle at (10, 10), width 50, height 30, fill color white

  // Draw a filled circle
  display.fillCircle(60, 30, 20, WHITE);  // Draw a filled circle at (60, 30) with radius 20, fill color white

  // Draw a filled triangle
  display.fillTriangle(100, 10, 120, 40, 80, 40, WHITE);  // Draw a filled triangle with vertices (100, 10), (120, 40), (80, 40)

  display.display();  // Update the display content
}

void loop() {
  // No need to do anything in loop
}
7. Custom Image Display
7.1 Modulo Operation Steps
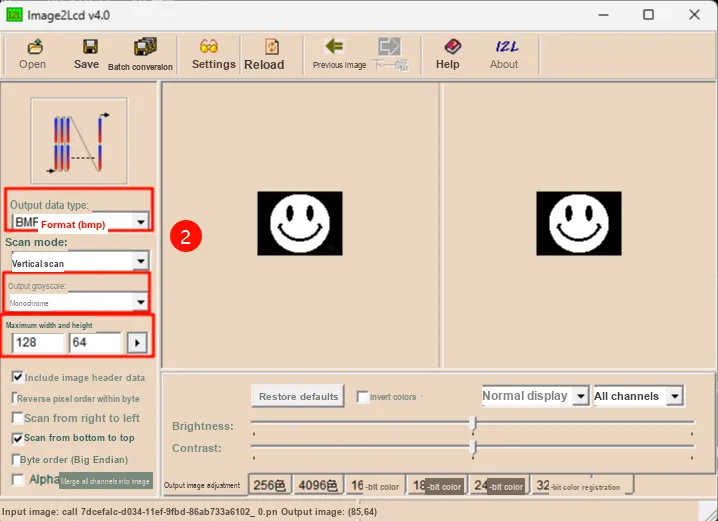
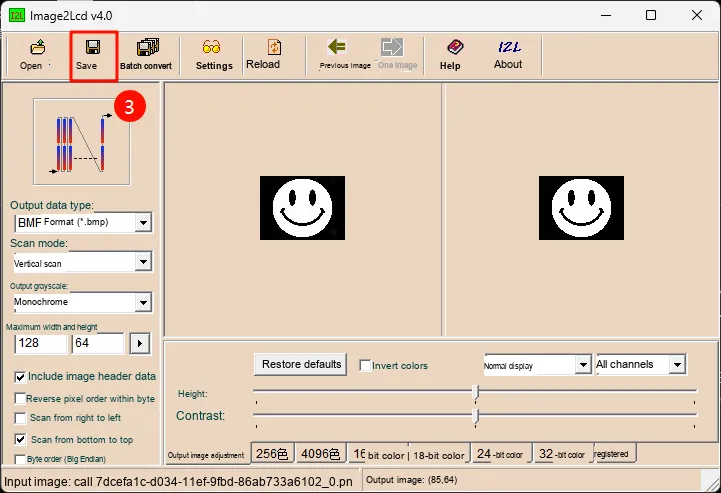
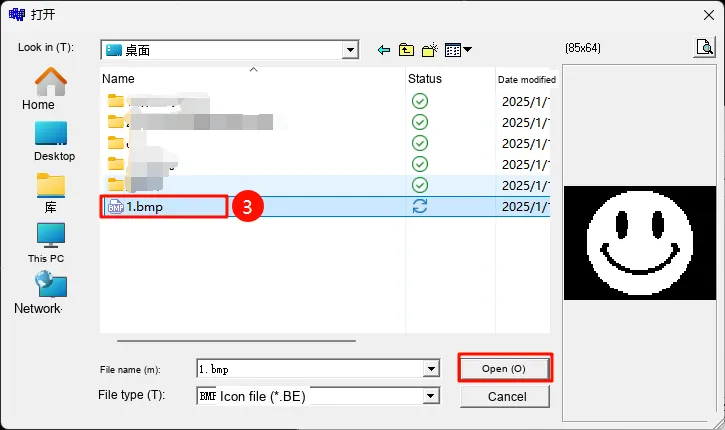
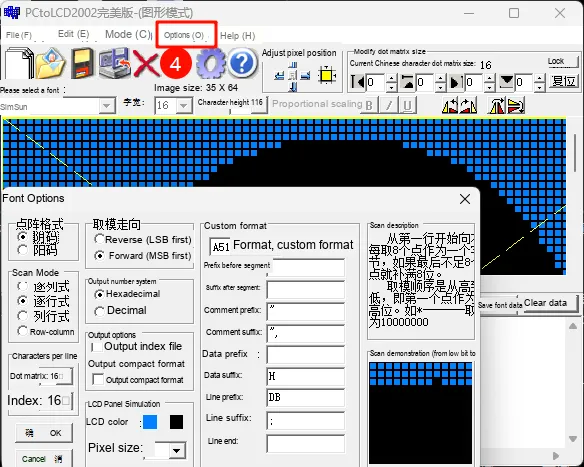
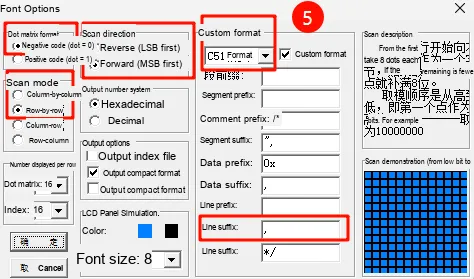
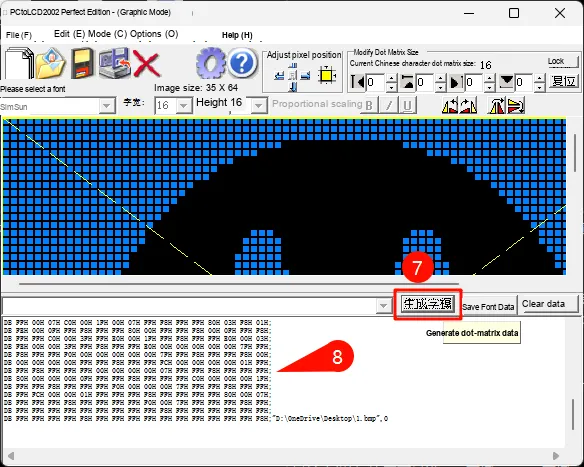
First, convert a selected image to. bmp format, set it to "monochrome", and configure its maximum width and height to "128*64".
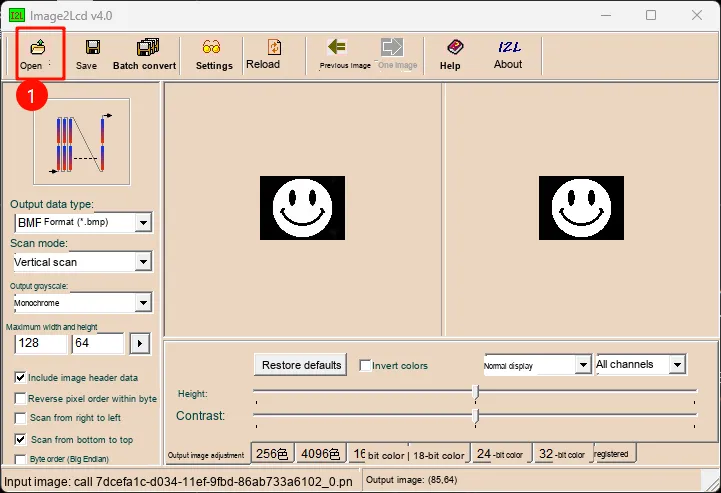

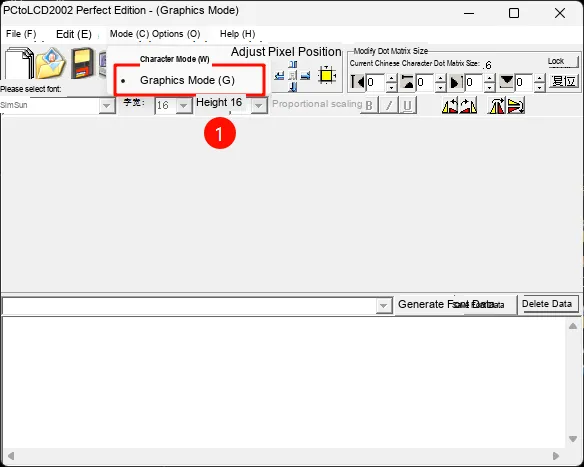
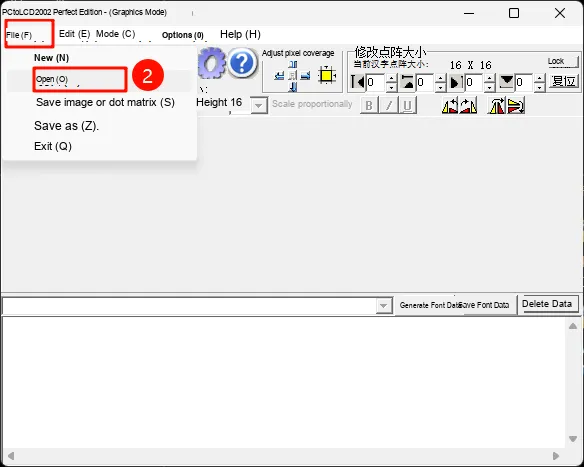
Perform font and image data extraction in the font extraction software to obtain the image data
7.2 Display Image
drawBitmap (x, y, bitmap, w, h, color) function to display images on the screen.
x, yare the starting coordinates of the bitmap.bitmapis the bitmap data of the image.w, hare the width and height of the image respectively.colorrefers to the color of the image (usually white or black, depending on the inverted color of the display).- Load and display images via
drawBitmap (). - How to convert an image into a bitmap format recognizable by OLED (using tools such as Image2cpp).
7.3 Example: Displaying a Smiley Face
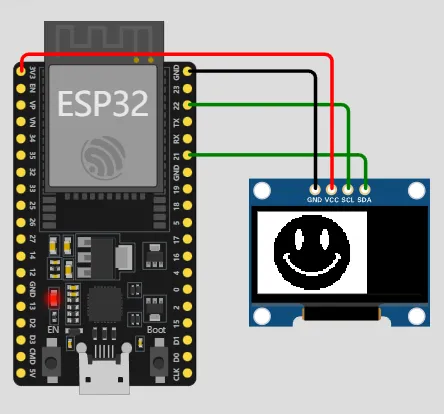
Smiley Face - Wokwi ESP32, STM32, Arduino Simulator
#include <Wire.h>
#include <Adafruit_GFX.h>
#include <Adafruit_SSD1306.h>

#define OLED_WIDTH 128
#define OLED_HEIGHT 64
#define OLED_ADDR 0x3C

Adafruit_SSD1306 display(OLED_WIDTH, OLED_HEIGHT, &Wire, -1);

// Randomly generated image byte data
const uint8_t randomBitmap[] PROGMEM = {

0xFF,0xFF,0xFF,0xFF,0xFF,0xFF,0xFF,0xFF,0xFF,0xFF,0xF8,0xFF,0xFF,0xFF,0xFF,0xFF,
0xFF,0xFF,0xFF,0xFF,0xFF,0xF8,0xFF,0xFF,0xFF,0xFF,0xFF,0xFF,0xFF,0xFF,0xFF,0xFF,
0xF8,0xFF,0xFF,0xFF,0xFF,0xE0,0x00,0x3F,0xFF,0xFF,0xFF,0xF8,0xFF,0xFF,0xFF,0xFF,
0x00,0x00,0x07,0xFF,0xFF,0xFF,0xF8,0xFF,0xFF,0xFF,0xF8,0x00,0x00,0x00,0xFF,0xFF,
0xFF,0xF8,0xFF,0xFF,0xFF,0xE0,0x00,0x00,0x00,0x3F,0xFF,0xFF,0xF8,0xFF,0xFF,0xFF,
0xC0,0x00,0x00,0x00,0x1F,0xFF,0xFF,0xF8,0xFF,0xFF,0xFF,0x00,0x00,0x00,0x00,0x07,
0xFF,0xFF,0xF8,0xFF,0xFF,0xFE,0x00,0x00,0x00,0x00,0x03,0xFF,0xFF,0xF8,0xFF,0xFF,
0xFC,0x00,0x00,0x00,0x00,0x01,0xFF,0xFF,0xF8,0xFF,0xFF,0xF8,0x00,0x00,0x00,0x00,
0x00,0xFF,0xFF,0xF8,0xFF,0xFF,0xF0,0x00,0x00,0x00,0x00,0x00,0x7F,0xFF,0xF8,0xFF,
0xFF,0xE0,0x00,0x00,0x00,0x00,0x00,0x3F,0xFF,0xF8,0xFF,0xFF,0xC0,0x01,0xC0,0x00,
0x1C,0x00,0x1F,0xFF,0xF8,0xFF,0xFF,0xC0,0x03,0xE0,0x00,0x3E,0x00,0x1F,0xFF,0xF8,
0xFF,0xFF,0x80,0x03,0xE0,0x00,0x3E,0x00,0x0F,0xFF,0xF8,0xFF,0xFF,0x00,0x07,0xE0,
0x00,0x3E,0x00,0x07,0xFF,0xF8,0xFF,0xFF,0x00,0x07,0xE0,0x00,0x7F,0x00,0x07,0xFF,
0xF8,0xFF,0xFE,0x00,0x07,0xF0,0x00,0x7F,0x00,0x03,0xFF,0xF8,0xFF,0xFE,0x00,0x07,
0xF0,0x00,0x7F,0x00,0x03,0xFF,0xF8,0xFF,0xFC,0x00,0x07,0xF0,0x00,0x7F,0x00,0x03,
0xFF,0xF8,0xFF,0xFC,0x00,0x07,0xF0,0x00,0x7F,0x00,0x01,0xFF,0xF8,0xFF,0xFC,0x00,
0x07,0xF0,0x00,0x7F,0x00,0x01,0xFF,0xF8,0xFF,0xF8,0x00,0x07,0xE0,0x00,0x7F,0x00,
0x01,0xFF,0xF8,0xFF,0xF8,0x00,0x07,0xE0,0x00,0x3F,0x00,0x00,0xFF,0xF8,0xFF,0xF8,
0x00,0x03,0xE0,0x00,0x3E,0x00,0x00,0xFF,0xF8,0xFF,0xF8,0x00,0x03,0xE0,0x00,0x3E,
0x00,0x00,0xFF,0xF8,0xFF,0xF8,0x00,0x03,0xC0,0x00,0x1C,0x00,0x00,0xFF,0xF8,0xFF,
0xF8,0x00,0x01,0x80,0x00,0x08,0x00,0x00,0xFF,0xF8,0xFF,0xF8,0x00,0x00,0x00,0x00,
0x00,0x00,0x00,0xFF,0xF8,0xFF,0xF8,0x00,0x00,0x00,0x00,0x00,0x00,0x00,0xFF,0xF8,
0xFF,0xF8,0x03,0x80,0x00,0x00,0x00,0x0E,0x00,0xFF,0xF8,0xFF,0xF8,0x07,0x80,0x00,
0x00,0x00,0x0F,0x00,0xFF,0xF8,0xFF,0xF8,0x07,0x00,0x00,0x00,0x00,0x07,0x00,0xFF,
0xF8,0xFF,0xF8,0x0F,0x00,0x00,0x00,0x00,0x07,0x80,0xFF,0xF8,0xFF,0xF8,0x0F,0x00,
0x00,0x00,0x00,0x07,0x80,0xFF,0xF8,0xFF,0xF8,0x03,0x80,0x00,0x00,0x00,0x0E,0x00,
0xFF,0xF8,0xFF,0xF8,0x03,0x80,0x00,0x00,0x00,0x1E,0x00,0xFF,0xF8,0xFF,0xFC,0x01,
0xC0,0x00,0x00,0x00,0x1C,0x01,0xFF,0xF8,0xFF,0xFC,0x00,0xE0,0x00,0x00,0x00,0x38,
0x01,0xFF,0xF8,0xFF,0xFC,0x00,0xF0,0x00,0x00,0x00,0x70,0x01,0xFF,0xF8,0xFF,0xFE,
0x00,0x78,0x00,0x00,0x00,0xF0,0x03,0xFF,0xF8,0xFF,0xFE,0x00,0x3E,0x00,0x00,0x03,
0xE0,0x03,0xFF,0xF8,0xFF,0xFF,0x00,0x1F,0x00,0x00,0x07,0x80,0x07,0xFF,0xF8,0xFF,
0xFF,0x00,0x07,0xC0,0x00,0x1F,0x00,0x07,0xFF,0xF8,0xFF,0xFF,0x80,0x03,0xF8,0x01,
0xFE,0x00,0x0F,0xFF,0xF8,0xFF,0xFF,0x80,0x00,0xFF,0xFF,0xF8,0x00,0x0F,0xFF,0xF8,
0xFF,0xFF,0xC0,0x00,0x3F,0xFF,0xE0,0x00,0x1F,0xFF,0xF8,0xFF,0xFF,0xE0,0x00,0x03,
0xFE,0x00,0x00,0x3F,0xFF,0xF8,0xFF,0xFF,0xE0,0x00,0x00,0x00,0x00,0x00,0x7F,0xFF,
0xF8,0xFF,0xFF,0xF0,0x00,0x00,0x00,0x00,0x00,0x7F,0xFF,0xF8,0xFF,0xFF,0xF8,0x00,
0x00,0x00,0x00,0x00,0xFF,0xFF,0xF8,0xFF,0xFF,0xFC,0x00,0x00,0x00,0x00,0x01,0xFF,
0xFF,0xF8,0xFF,0xFF,0xFF,0x00,0x00,0x00,0x00,0x07,0xFF,0xFF,0xF8,0xFF,0xFF,0xFF,
0x80,0x00,0x00,0x00,0x0F,0xFF,0xFF,0xF8,0xFF,0xFF,0xFF,0xC0,0x00,0x00,0x00,0x1F,
0xFF,0xFF,0xF8,0xFF,0xFF,0xFF,0xF0,0x00,0x00,0x00,0x7F,0xFF,0xFF,0xF8,0xFF,0xFF,
0xFF,0xFC,0x00,0x00,0x01,0xFF,0xFF,0xFF,0xF8,0xFF,0xFF,0xFF,0xFF,0x80,0x00,0x07,
0xFF,0xFF,0xFF,0xF8,0xFF,0xFF,0xFF,0xFF,0xF0,0x00,0x7F,0xFF,0xFF,0xFF,0xF8,0xFF,
0xFF,0xFF,0xFF,0xFF,0xFF,0xFF,0xFF,0xFF,0xFF,0xF8,0xFF,0xFF,0xFF,0xFF,0xFF,0xFF,
0xFF,0xFF,0xFF,0xFF,0xF8,0xFF,0xFF,0xFF,0xFF,0xFF,0xFF,0xFF,0xFF,0xFF,0xFF,0xF8,
};

void setup() {
  Serial.begin(9600);

  // Initialize the OLED display
  if (!display.begin(SSD1306_SWITCHCAPVCC, OLED_ADDR)) {
    Serial.println(F("SSD1306 allocation failed"));
    for (;;); // If initialization fails, stop execution
  }

  display.clearDisplay();  // Clear the screen

  // Draw a random image
  display.drawBitmap(0, 0, randomBitmap, 85, 64, WHITE);  // Draw a random image
  display.display();  // Update the screen
}

void loop() {
  // No need to do anything in loop
}
8. Summary of This Chapter
This chapter starts with using the ready-made OLED driver library, guiding everyone to transition from the tedious operations of low-level I²C control to the application of efficient and maintainable library functions.We first introduced the hardware connection and software preparation, including the functions of three core libraries: Wire.h, Adafruit_GFX.h and Adafruit_SSD1306.h: Wire is used for I²C communication, Adafruit_GFX is responsible for text and graphics rendering, and Adafruit_SSD1306 encapsulates the initialization, refresh and command transmission for OLED screens.Through library functions, users only need to call the high-level interfaces for text display and graphics rendering to complete complex display tasks without concerning themselves with the underlying communication details.
In the character display section, we explained the usage of setCursor (), print () and println (), and realized the display of static text at different positions and in different styles by setting the font size (setTextSize) and color (setTextColor). Meanwhile, this chapter also introduces the display methods of dynamic text, including text scrolling effects, real-time data update, as well as counter and Progress Bar display, enabling readers to master how to dynamically present screen content as time changes.
Next, we learned about the graphics display function, covering basic geometric elements (points, lines, rectangles, circles, triangles), filled shapes (fillRect, fillCircle, fillTriangle), and combined graphic display. We systematically mastered the methods of drawing static and filled graphics, laying a foundation for interface design and graphic interaction.Finally, this chapter introduces the display process of custom images, including obtaining the font matrix of monochrome images, generating bitmap data, and using the drawBitmap () function to render images on the screen, enabling readers to implement simple graphical user interfaces or display emoticons and icons.
Through learning this chapter, readers not only understand the display principle of OLED and the I²C communication mechanism, but also master the efficient usage methods of library functions, and can flexibly realize the display of characters, graphics and dynamic data, laying a solid foundation for the subsequent development of richer OLED interfaces and interactive functions.