
1. function
1.1 What Is a function
A function is a block of code encapsulated to perform a specific task, which facilitates repeated invocation, makes the code structure clearer, the logic more straightforward, and the readability better.
In Arduino programming, setup () and loop () are functions by themselves. In addition, we can also define custom functions to accomplish specific tasks.
1.2 Basic Structure of Function
//Define a function
return_type function_name(parameter_type1 parameter_name1, parameter_type2 parameter_name2...)
{
  //Function body - the code inside the function
  return return_value;
}

//Calculate the sum of one number and another
//Actual function example
int add(int a, int b)
{
  return a + b;
}

int add(int a, int b)
{
  int result = a + b;
  return result;
}
1.2.1 Return Type
This tells the compiler what data type this function will eventually "return".
For example:
int: returns an integerfloat: returns a number with a decimal partbool: returns true or falsevoid: if a function does not return any value, usevoid
1.2.2 Function Name
This is the name you give to this function yourself. Just like a variable name, a meaningful naming allows people to tell at a glance what this function does.
Example: add means "addition", blinkLED means "make the LED blink"
6.2.3 Parameter List
Written in parentheses, they are the input information received by the function. Multiple parameters are separated by commas.
Example:
int add(int a, int b)Here, a and b are the two integers input to the add function.
1.2.3 Function Body
What is written inside the curly braces{}is the code that will be executed when the function is called. You can write variables, calculations, conditional judgments, and other code here.
1.2.4 return Statement (Optional)
If a function has a return value, use return to return the result.
If it is a void type function, there is no need to write return, or write return;to indicate ending the function early.
1.2.5 Practical Example
int add(int a, int b) {
  int result = a + b;
  return result;
}
This function means: "I have defined a function named add that can accept two integers a and b, calculate their sum, and return the result. "
1.3 Function Calls
The so-called "calling a function" means to make that function run when a certain function is needed for a bit, and we can just continue using the example we just mentioned.
1.3.1 Define a function
This code defines a function named add, which takes two integers as parameters and returns their sum.
int add(int a, int b) {
  int result = a + b;
  return result;
}
1.3.2 Declare a function
In Arduino or C/C++, the compiler will report an error if you call a function when it does not yet know what the function looks like (i. e., it has not encountered the function definition yet).
So there are generally two solutions:
Method 1: Define first, then call
If you write the function before calling it, there is no need to declare it.
int add(int a, int b)
{
  return a + b;
}

void setup() {
  int result = add(2, 3);  // OK, because add has already been defined
}
Method 2: Declare first, then call, and finally define
If you want to place the definition of a function later (for example, to keep the structure clear), you need to "declare" it in advance first.
int add(int a, int b);  // Function declaration

void setup() {
  int result = add(4, 5);  // Can be called
}

// Function definition
int add(int a, int b)
{
  return a + b;
}
A function declaration only requires writing one line of "function introduction" to inform the compiler: "I will define such a function later, including its name, the parameters it accepts, the return type. .." so as to avoid compile errors.
Let's analyze how function declaration is implemented in the above code, which is mainly done through the following line of code:
int add(int a, int b);This is the declaration of the add function, which means:
- The function name is
add - There are two parameters, both of which are of integer type.
- finally returns an integer
Note: What follows here is a semicolon ;, with no function body (curly braces).
1.4 Function Call Examples
void setup() {
  Serial.begin(9600);

  int sum = add(3, 5);    // Call the add function, passing arguments 3 and 5
  Serial.println(sum);    // Output result 8
}
Here:
add (3,5): indicates calling the function with the two parameters 3 and 5 passed in.- The returned result is 8, which is then assigned to the variable
sum. Serial.println (sum): Print the output.
The biggest advantage of a function is —— write once, use multiple times:
int a = add(10, 20);   // The result is 30
int b = add(7, 8);     // The result is 15
So we only need to write one add function, and then we can use it in many places, pass in different data, and get different results.
In a nutshell:
Defining a function is to encapsulate functionality, and calling a function is to reuse functionality.
2. Control Statements
The charm of programming lies in the fact that you can "control" the execution flow of a program, just like making decisions in real life — "take an umbrella if it rains, otherwise ride a bike". Control statements are what endow programs with the capabilities of "decision-making" and "repeated execution".
In Arduino, the common control statements mainly include: conditional statements and loop statements.
2.1 Conditional Statements (if / else)
Let the program decide whether to execute a certain segment of code based on the "condition".
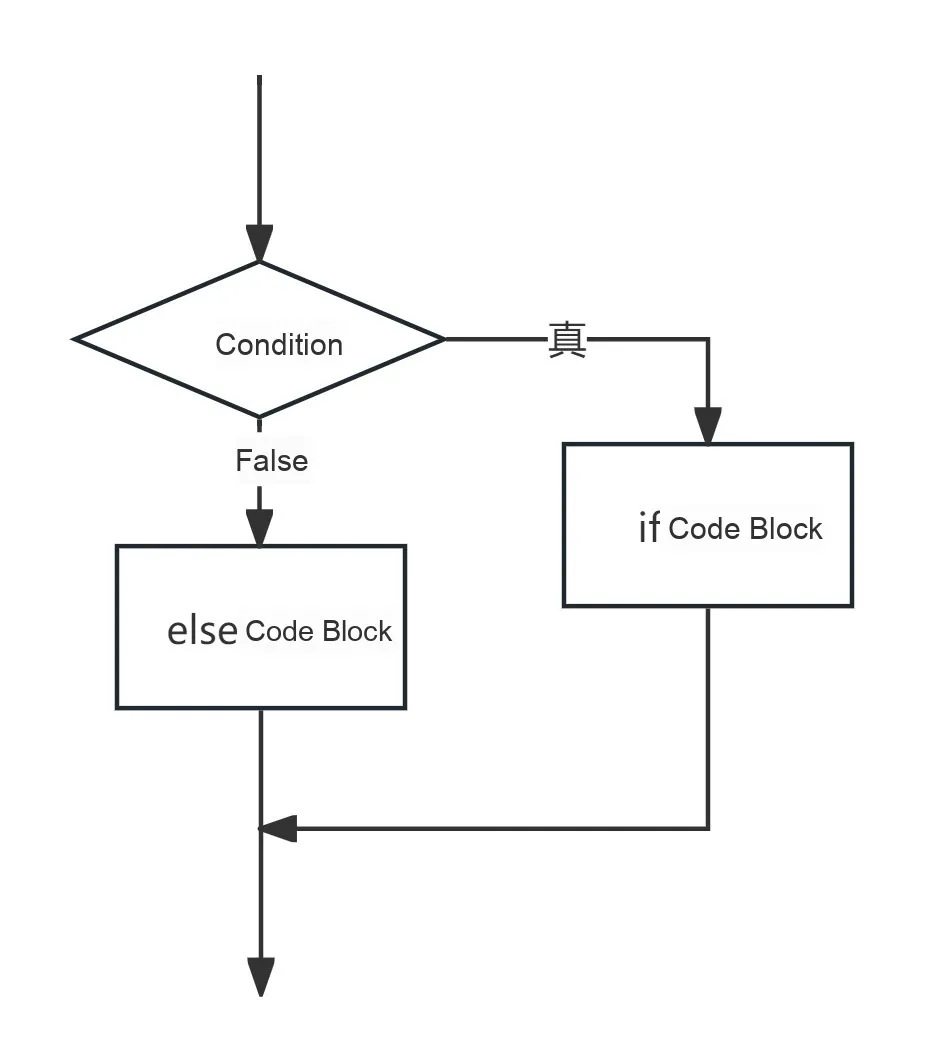
2.1.1 if Statement Basic Structure
if (condition)if (condition) elseif (condition 1) else if (condition 2) else
//Form 1
if (condition)
 {
   // Code to run when the if condition is true
 }

//Form 2
if (condition)
{
  // Code to run when the if condition is true
}
else
{
  // Code to run when the if condition is false
}

//Form 3
if (condition1)
{
  // Code to run when if condition 1 is true
}
else if (condition2)
{
  // code to run if condition 2 is true
}
else
{
  // if none of the above conditions are true, run the code here
}
wherein condition is a conditional expression, and if the value of this conditional expression is true, the Code Block in the curly braces will be executed.
If you need to execute code when the condition is not satisfied, you can add the else statement;
You can add an else statement followed by an if statement when you want to implement multiple conditional judgments.
2.1.2 Practical Example
if (temperature > 30)
{
  // if the temperature is greater than 30, run the code here
  Serial.println("热");
}
else
{
  // Otherwise execute here
  Serial.println("OK");
}
When the program is running, it will first determine what the current temperature is:
- If the temperature
temperatureexceeds 30 degrees, output "hot" - If it does not exceed the limit, output "OK"
2.2 Multi-branch Judgment (switch)
When you need to perform different processing based on multiple possible values of a variable, switch is clearer.
switch function and if else function have the same function, both can implement multi-branch processing, but if else function needs to be scanned line by line, while switch function directly enters the corresponding branch, which is more efficient.
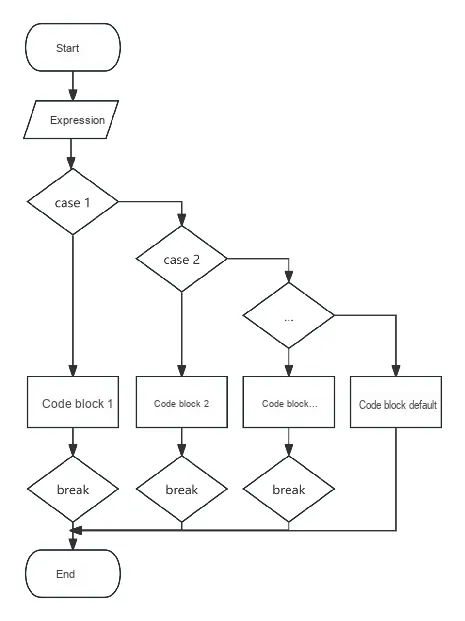
2.2.1 switch Statement Basic Structure
switch (表达式)
{
  case 1:
    // Block 1
    break;

  case 2:
    // Block 2
    break;

  case n:
    // Block n
    break;

  default:
    // Default block
}
Let's analyze the switch statement:
An expressionis typically an integer or a character variable.- Each
caserepresents a possible value. The break statement is used to exit a switch statement to prevent the subsequent code from being executed.(This is very important!)defaultis optional, similar toelse, and is executed when none of thecaseclauses match.
2.2.2 Practical Example: Selecting Modes Based on Button Values
int mode = 2;

void setup() {
  Serial.begin(9600);
}

void loop() {
  switch (mode) {
    case 1:
      Serial.println("模式1:灯常亮");
      break;

    case 2:
      Serial.println("模式2:灯闪烁");
      break;

    case 3:
      Serial.println("模式3:灯关闭");
      break;

    default:
      Serial.println("未知模式!");
  }

  delay(2000);  // wait 2 seconds before printing again
}
Note:
- If
modeis 2, the output will be "Mode 2: The lamp flashes"; - If there is no
breakstatement, the program will continue to execute the nextcase, which is usually not what we expect; - Therefore, be sure not to forget to add
break! defaultis a fallback option. For example, when an invalid mode value is entered, it outputs "Unknown mode!".
Mini Exercise:
Try modifying the code above:
- Add a new mode
case 4, and output: "Mode 4: Automatic Sensing"; - Change
modeto an initial value that outputs the newly added mode information; - Reflection: What will happen to the program if you don't write
break?
2.3 Loop Statements
In programming, sometimes we need to execute a block of code repeatedly, such as making an LED blink 10 times or continuously reading the value of a sensor. In such scenarios, it is appropriate to use loop statements.
The function of a loop statement is as follows:
As long as a certain condition is met, a certain segment of code will be executed repeatedly until the condition is no longer satisfied.
Common loop statements include the while loop and the for loop.
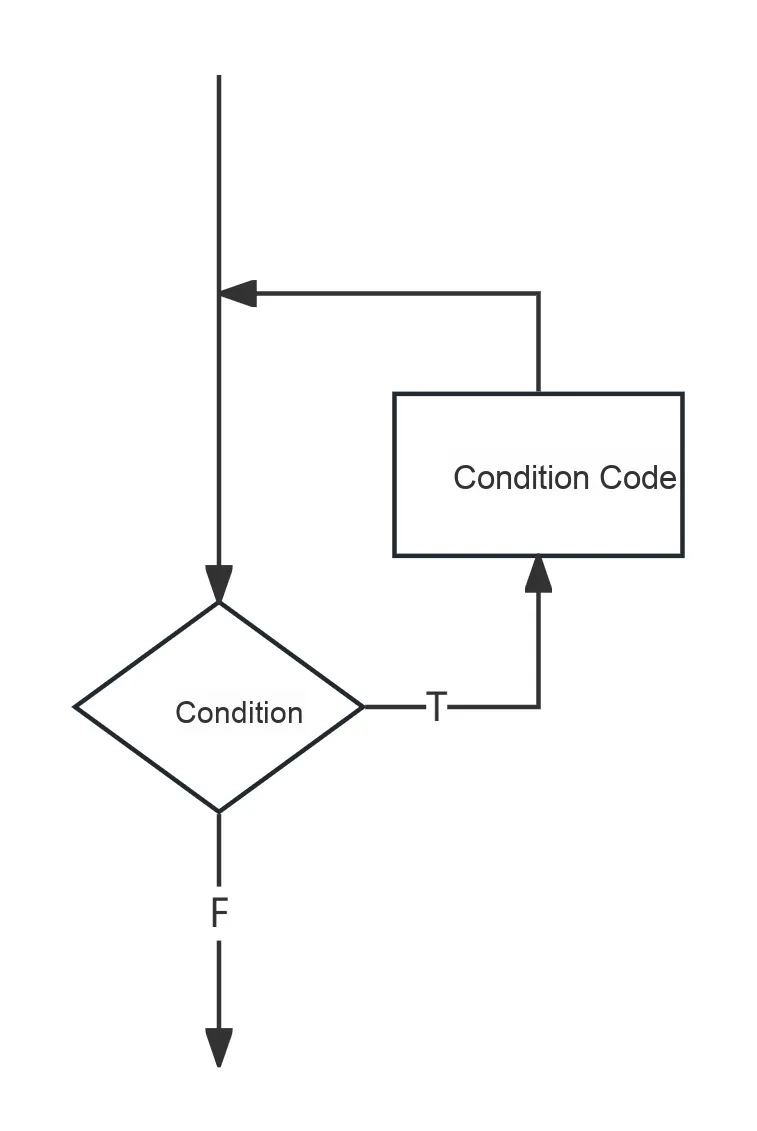
2.3.1 while Loop
while loop has the following structure:
while (条件)
{
  // code to run while the condition is true
}
It first checks the condition; if the condition evaluates to true, it executes the code inside the curly braces, then checks the condition again, executes the code again. .. and stops only when the condition becomes false. It is suitable for scenarios with "unknown number of loops", such as waiting for a button to be pressed.
Example: Print numbers from 1 to 5
int i = 1;

void setup() {
  Serial.begin(9600);

  while (i <= 5) {
    Serial.print("当前数字:");
    Serial.println(i);
    i = i + 1;  // don't forget to increment i, otherwise it will loop forever
  }
}

void loop() {
  // empty, do nothing
}
2.3.2 for loop
for loop has the following structure:
for (初始化; 条件; 更新语句)
{
  // code to run while the condition is true
}
It accomplishes variable initialization, condition judgment, and variable update all in one line, making it more compact and suitable for scenarios where the number of loops is known.
Example: Print numbers from 1 to 5 (for version)
void setup() {
  Serial.begin(9600);

  for (int i = 1; i <= 5; i++) {
    Serial.print("第 ");
    Serial.print(i);
    Serial.println(" 次循环");
  }
}

void loop() {
}
2.3.3 Mini Exercise
- Use a
whileloop to decrement a variable from 10 down to 1 and print it out each time; - Use a
forloop to control an LED to blink 5 times per second (assuming the LED is connected to pin 13); - Think:
forloops can be written aswhileloops? Try to rewrite it.
3. Notes
When writing code, we are not just writing for the "computer", but more importantly for ourselves and others. To help others understand our code, and to avoid being completely confused when we revisit it ourselves in the future, we add some explanatory text in the code — this is what we call comments.
📌 Function of Comments:
- Explain the purpose or logic of the code
- Temporarily disable certain lines of code to prevent them from running
- Make code more readable and easier to maintain
Arduino (C/C++) supports two comment styles: single-line comments and multi-line comments.
3.1 Single-line Comment //
Start with //, followed by the description. Only comment on this line.
// single-line commentExample:
int ledPin = 13; // connect the LED to pin 133.2 Multi-line Comments /*. .. */
Start with /* and end with */ to comment out multiple lines of content.
/*
  This is a multi-line comment
  describing what this program does:
  ……
*/
3.3 Practical Example
The function of this program segment is: to make an LED connected to pin 13 turn on for one second, then turn off for one second, and repeat this cycle continuously.
int ledPin = 13;  // LED is connected to pin 13

void setup() {
  pinMode(ledPin, OUTPUT);  // Set the pin to output mode
}

void loop() {
  digitalWrite(ledPin, HIGH);  // Turn on the LED
  delay(1000);                 // delay 1 second
  digitalWrite(ledPin, LOW);   // Turn off the LED
  delay(1000);                 // delay 1 second
}
This code clearly explains the purpose of each line through comments and its function. This is also the most important purpose of writing comments:
👉 Ensure that future you or other people can understand what the code does just by reading it, without having to guess again.
Mini Exercise:
- Use single-line comments to explain the function of each line of code, and complete a program that lights up an LED.
- Use multi-line comments to describe the functionality of the program you wrote (e. g., LED blinking, reading temperature sensors, etc.).
- Find a piece of old code without comments and try to add clear comments to explain it.
4. Summary of This Chapter
In this chapter, we have learned about Arduino 's basic syntax:
First, we use variables and constants to store and manipulate data: the value of a variable can change as the program runs, while a constant remains fixed throughout. We then use operators to perform mathematical or logical operations on these data, combining them into expressions, so that we can implement various calculations and logical judgments. Through the use of function, we can achieve code Modularization, avoid redundancy, and improve maintainability. Meanwhile, control statements (such as conditional judgments and loops) determine the execution flow of the program, enabling our code to flexibly respond to different scenarios and inputs.Throughout the entire development process, comments help us document our train of thought and improve code readability as well as team collaboration efficiency.
Mastering these basic syntax rules is not only the first step to communicate with hardware, but also a solid starting point for realizing creative projects.