
Contents
1. Introduction: Step into the World of Arduino Programming
Before we start Arduino programming, let's first get familiar with a few basic concepts. Programming refers to using instructions to tell a computer what to do; it is the process of converting human ideas into a language that computers can understand.
Programming languages are tools for communication between humans and computers. Different programming languages are just like different natural languages in the world, each with its own syntax and rules, but all aiming to make computers work in accordance with human instructions. Common programming languages include C, C++, Python, Java and so on.
The Arduino programming language is a simplified version based on C/C++. It retains powerful functions while greatly simplifying hardware control, allowing us to quickly turn our ideas into reality, such as lighting up an LED, controlling a motor, or even building a smart home system.
In the following learning process, we will start with the most basic program structures, and gradually explore how to control hardware through code to unlock the infinite potential of the ESP32.
2. Arduino Program Structure
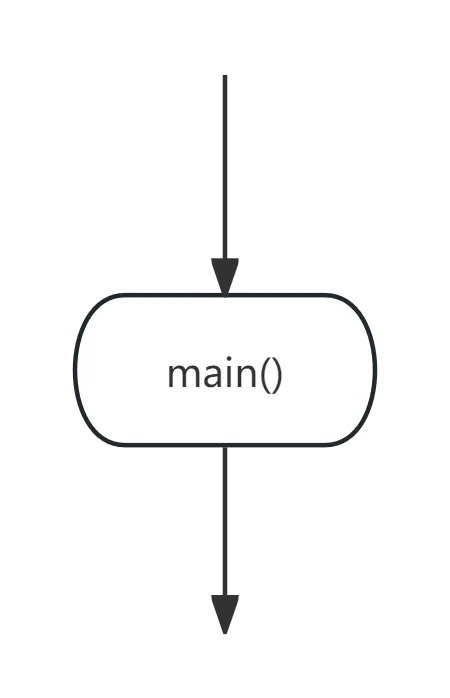
If you have ever used the C/C++ language, you will find that program execution starts from the main () function, then executes line by line in the order of the code until it ends. In an Arduino program, however, there is no main () main function, and the program structure consists of two main parts: the setup () and loop () functions.
void setup()
{
  // Add setup code here; it runs only once:
}

void loop()
{
  // Add loop code here; it runs repeatedly:
}
3. Operation Mode of Arduino Programs
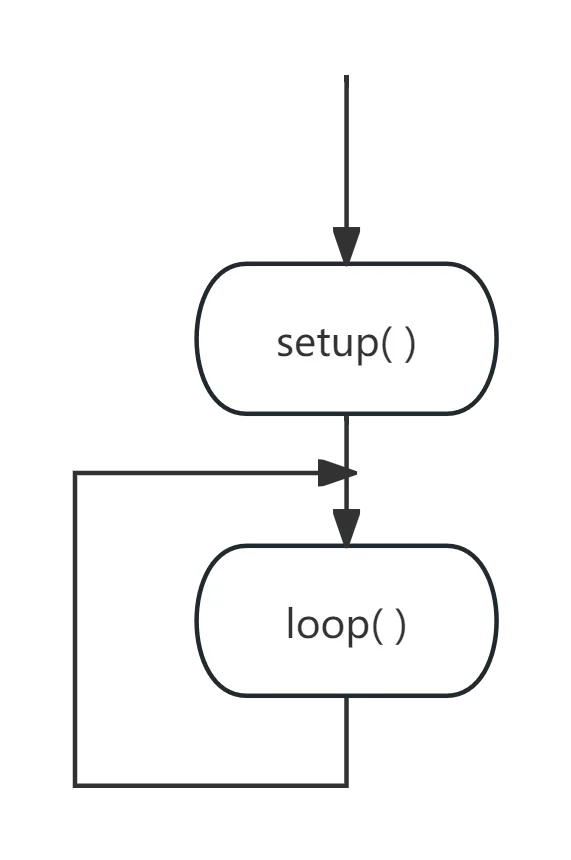
After the ESP32 is powered on or reset, the setup () function is called once when the program starts. The setup function only runs once each time the Arduino board is powered on or reset. Following the setup () function, the loop () function executes your program repeatedly. It continuously runs the statements inside it, and this section of the code will keep executing in a loop until the system is powered off and terminated.
4. Load the first program
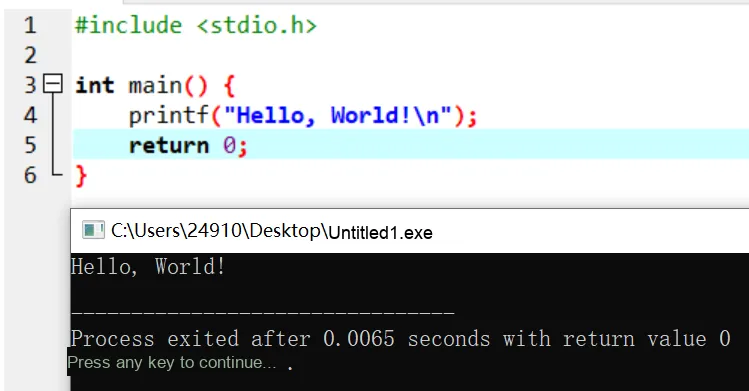
4.1 "Hello World!" in C Language
When learning the C programming language, 99.99% of people kick off their journey by writing the simple "Hello, World" print program to step into the door of C language. When it comes to learning microcontrollers, however, we usually start with an LED blinking program, using the flashing of lights to replace the "Hello, World" of C language!
#include <stdio.h>

int main() {
    printf("Hello, World!\n");
    return 0;
}
4.2 ESP32 Says Hello to the World
When we learn about single-chip microcontrollers, we usually start with a LED lighting program as the introductory exercise, using the blinking of lights to replace the "Hello World" program in C language.
void setup() {
    pinMode(13, OUTPUT); // Set the pin to output mode

}
void loop()
{
    digitalWrite(13, HIGH);// Turn on the LED
    delay(500);// Delay 500 ms
    digitalWrite(13, LOW);// Turn off the LED
    delay(500);// Delay 500 ms
}
5. In-depth Thinking Behind Code Execution
Let's delve into a profound question next: how exactly does well-written code drive the ESP32 to operate step by step?
In fact, the ESP32 cannot directly understand the Arduino code we write, because it only recognizes binary — that is, the machine language composed of 0s and 1s. At the hardware level, these 0s and 1s correspond to low level (0V) and high level (3.3V). The code we write needs to go through a series of conversions before it can finally drive the hardware to execute instructions.

Why binary?
Compared with other numeral systems, the binary system is more suitable for electronic circuits, as it only needs to distinguish between two signal states: 0 (low level) and 1 (high level).
We need to know that the original invention of the computer was not intended for watching videos or playing games as we do today, but for numerical calculation.
Early computers (such as ENIAC) once attempted to adopt the decimal system for computation, but serious problems were soon exposed:
- High hardware complexity :
ENIAC mainly used vacuum tubes as its computing units. If the decimal system were adopted, it would be necessary to represent the 10 digits from 0 to 9. This means the circuit would need to handle 10 different voltage states, making control extremely difficult. - Error and Cost Issues:
Since the voltage regulation of analog signals is not perfect, errors tend to occur in decimal arithmetic. Meanwhile, designing more complex decimal circuits translates to higher manufacturing costs. - Low reliability and poor anti-interference capability :
In real-world environments, electronic signals are subject to interference from factors such as noise and temperature fluctuations. Decimal systems require precise differentiation of 10 distinct voltage levels, and even a minor deviation can lead to calculation errors, whereas binary systems only need to distinguish between two states (high/low level), enabling more reliable operation.
In contrast, the "high and low voltage levels" in binary systems are far easier to distinguish accurately, endowing them with much stronger anti-interference capability. For this reason, binary has naturally gradually evolved into the core method for internal data processing in computers.
5.1 From Humans to Computers: Writing Code
We use programming languages like Arduino to "communicate" with computers. By writing code, we translate our requirements (for example, controlling an LED to blink) into instructions that computers can understand.
5.2 Translation Inside the Computer: Compile Code
Arduino code cannot be directly understood by the ESP32. For the ESP32 to execute our instructions, these codes must first be converted into a form that it can recognize binary language. This task is accomplished by the compiler.
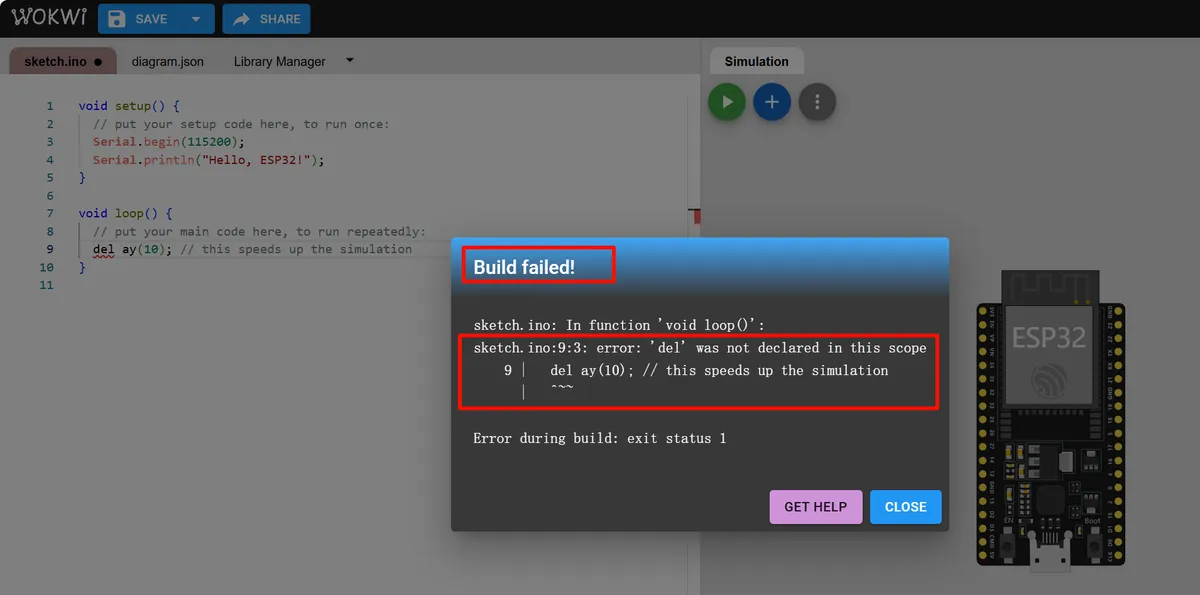
Furthermore, the compile process is not merely translation; it also checks the correctness of the code. If there are errors in the code, the compiler will feed them back to us so that we can fix them.
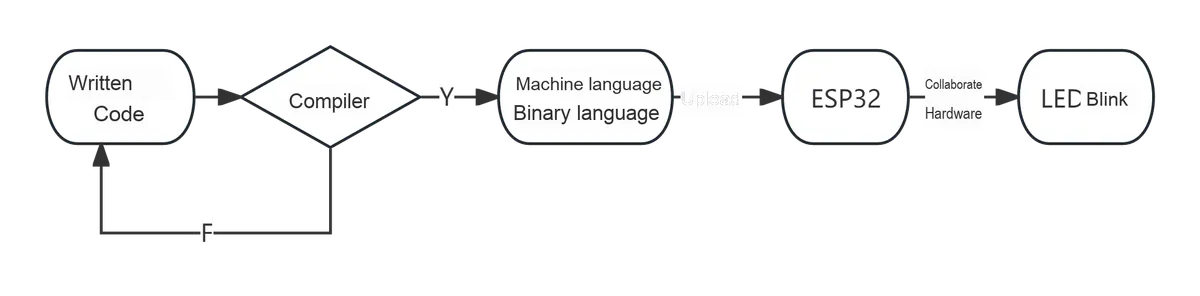
For example, if we omit a certain symbol or write a wrong command in the code, the compiler will report an error immediately, point out the specific problem and prompt us to modify it. For instance, if you forget to add a semicolon (;) at the end of a line of code, the compiler will give an error message for you to check and correct it.
Only when the code is completely correct can the compiler successfully compile and generate the binary file, which is exactly what we ultimately need to upload to the ESP32.
5.3 Computer to ESP32: Uploading Programs
Once the code successfully passes compile, the generated binary files are ready to be uploaded to the ESP32. In practice, we connect the computer to the ESP32 via a data cable to transfer these binary files to the ESP32.
5.4 ESP32 Instruction Execution Line by Line: Collaboration Between hardware and Code
The ESP32 executes the instructions in the binary file one by one, and each instruction drives the internal electronic circuits of the ESP32 to perform the corresponding operation. Essentially, these instructions control the on-off states of the transistors inside the chip, which in turn affects the behavior of the circuits and implements the functions we have set.
For example, the ESP32 will, according to the digitalWrite (LED_PIN, HIGH) instruction, set the pin connected to the LED to a high level, thus turning on the LED. Behind this process, the LED is driven to emit light by controlling the change of voltage, and finally the effect we set is achieved.
Ultimately, the fact that the LED lamp can blink in the rhythm we set is the result of the collaborative work of hardware and code.
The code is responsible for issuing control instructions, which are transmitted via electrical signals to the internal electronic circuits of the ESP32. The hardware then performs actual voltage control based on these signals, such as setting GPIO pins to high or low level, thereby controlling the on/off state of the LED.
6. Summary of This Chapter
4. Getting to Know the Arduino Programming Language.pdf 54 KB
In this chapter, we have learned the basics of programming languages together, and understood that programming is essentially using code to tell a computer what to do. Then we introduced the two core functions of an Arduino program — setup () and loop (), which are responsible for program initialization and continuous operation respectively. setup () executes once when the device is powered on or reset, and is used to configure hardware;loop () runs continuously in a loop during the device's operation, handling the main logic.
By writing and running a small program to light up an LED, we experienced the whole process from code writing, compile, uploading to the ESP32, to the final response from the hardware. Finally, we also briefly explained how the code transforms from human-readable instructions into binary signals that the ESP32 can execute.
Next, we will delve into the syntax of Arduino, so that you can write more flexible and powerful programs to give full play to the capabilities of the ESP32.