
Contents
- Introduction
- 1. Module Introduction
- 2. Introduction to Main Chips
- 2.1 Chip Overview
- 2.2 Pin Definitions
- 2.4 Performance Parameters
- 2.7 Communication Interfaces and Related Protocols
- III. Circuit Engineering
- 3.1 Circuit Source Project
- 3.2 Module Usage Instructions
- 3.3 Application Experiment
- 4. Driver
- 5. BOM & Recommended Alternatives
- 6. Change History
- VII. Related Materials
Introduction
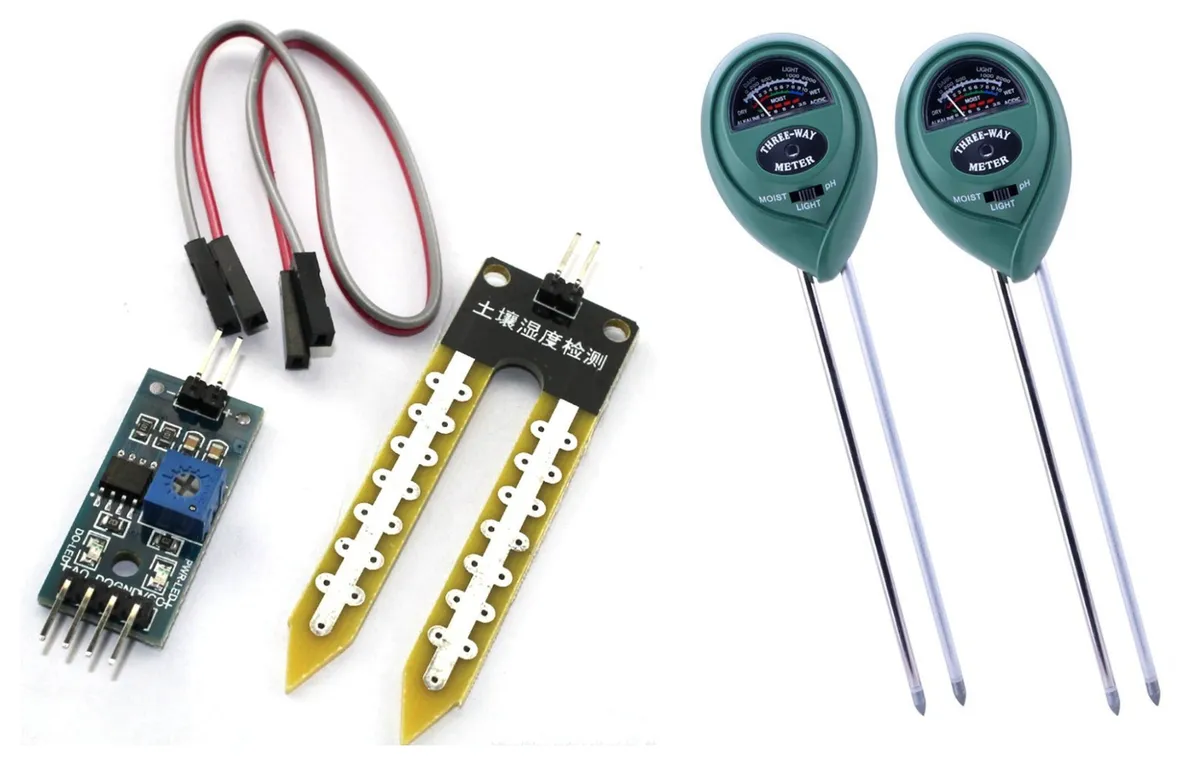
Have you ever had such troubles: the potted plants you grow always rot at the roots or die of drought due to improper watering, and the home garden can only rely on "intuition" to judge the amount of water to be applied? Traditional soil moisture content detection solutions are either needle-type resistance sensors that are prone to corrosion and data drift, or professional equipment that is costly and requires complex calibration, making it difficult to popularize in civilian and small-scale scenarios.
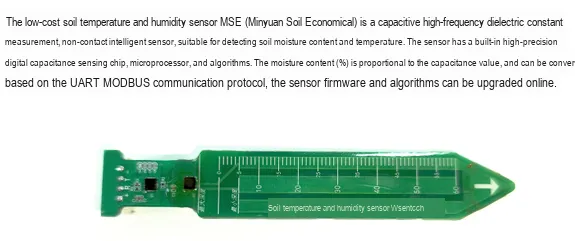
The low-cost soil temperature and humidity sensor MSE launched by Minyuan is a capacitive intelligent detection module that solves these pain points. It uses high-frequency capacitive sensing technology to achieve low-cost and high-precision detection of soil moisture content and temperature, providing reliable soil sensing solutions for various scenarios from household potted plants to small-scale agriculture.
For a long time, soil moisture content detection has been facing the industry challenges of "inaccuracy, easy damage, and high cost":
- Resistive needle sensor: It relies on soil conductivity to determine moisture content, is highly susceptible to soil salinity and temperature, and has large data errors; metal electrodes buried in soil for a long time will also be corroded and oxidized, and will malfunction before long.
- Professional capacitive solution: Although it has high accuracy, it is costly and requires a complex calibration process, making it unsuitable for large-scale use in scenarios such as ordinary flower pots and small farms.
- Low-cost non-contact solutions: Most can only perform surface inspections and cannot penetrate the soil to sense the real internal humidity, with extremely low data reference value.
The emergence of MSE precisely fills the gaps in these solutions with low-cost capacitive sensing technology.
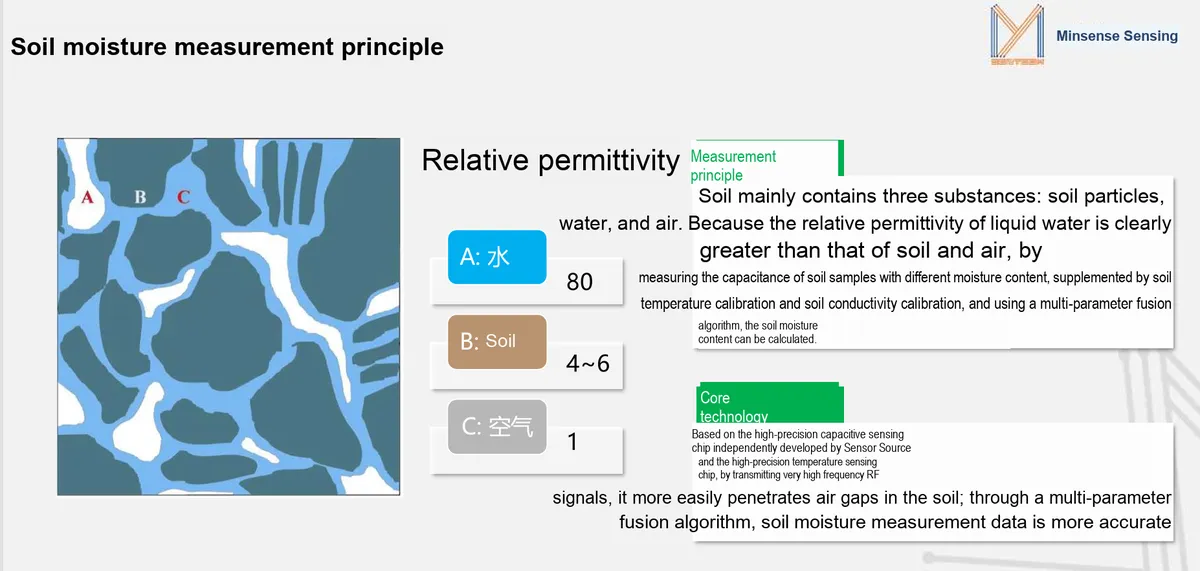
As a soil temperature and humidity sensor specifically designed for popularization scenarios, MSE's advantages perfectly match the needs of civilian and small-scale agriculture:
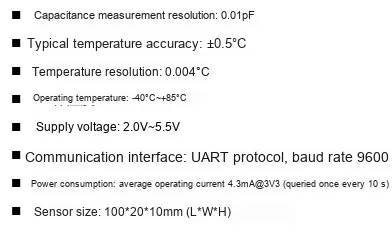
- ✅ High precision + strong anti-interference, stable and reliable data:Based on the principle of capacitive high-frequency dielectric constant measurement, the moisture content is proportional to the capacitance value, with a capacitance resolution as high as 0.01 pF; built-in temperature compensation algorithm can offset the influence of temperature on capacitance measurement, combined with various filtering algorithms, the output moisture content and temperature data are not affected by soil salinity and impurities, and can also be fitted and converted according to different soil characteristics to adapt to various soil types.
- ✅ Low cost + easy integration, compatible with multiple types of devices: The module adopts a highly integrated design, significantly reducing the cost threshold; it supports the MODBUS Communication Protocol based on UART, enabling online firmware and algorithm upgrades, and is compatible with different application scenarios; with a power supply voltage of 2.0~5.5V and an average power consumption of only 4.3mA@3V (query once every 10 seconds), the low-power design is very suitable for battery-powered devices, and its compact size also facilitates embedding in scenarios such as flower pots and irrigation equipment.
- ✅ Wide temperature range, durability + maintenance-free, longer service life: Operating temperature range from -40°C to +85°C, suitable for different environments such as balconies, outdoors, greenhouses, etc.; capacitive non-contact sensing method avoids direct contact between electrodes and soil, fundamentally solving corrosion and oxidation problems, requiring no frequent maintenance, and with a service life far exceeding that of traditional needle sensors.
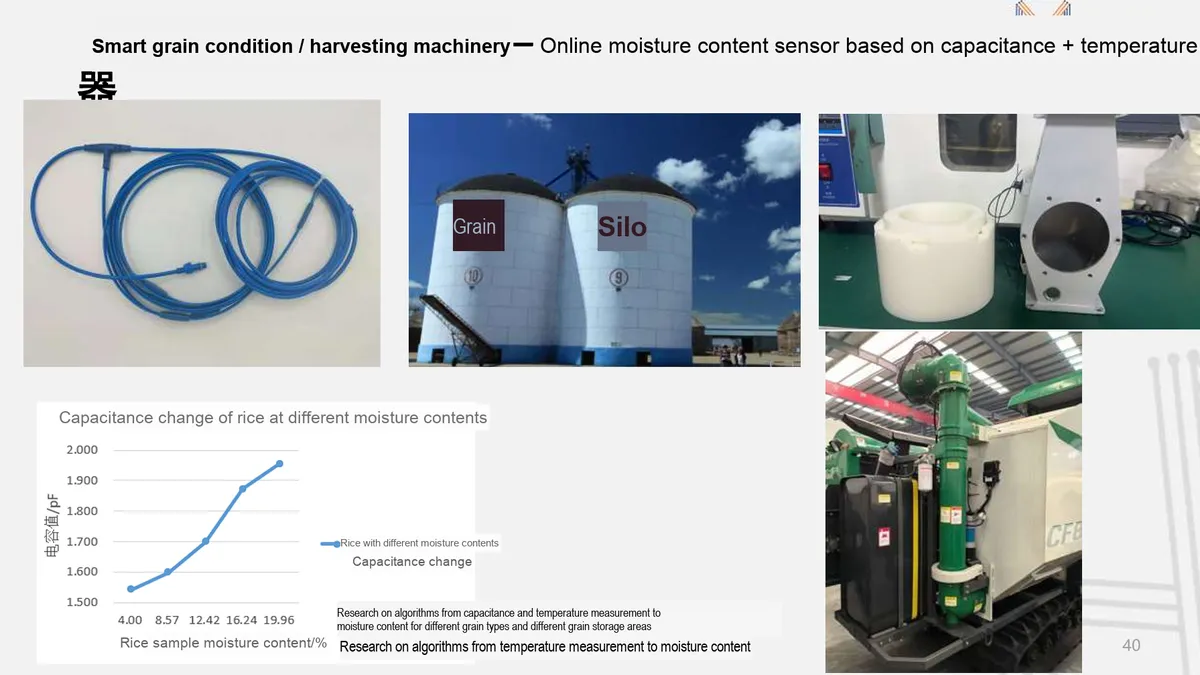
Many people struggle to grow green plants well, and the core issue is their inability to accurately judge soil moisture. As shown in the figure, MSE can be directly inserted into the soil of flower pots to detect moisture content and temperature in real time, and remind users to water through the device or APP, precisely matching the water needs of green plants; its low-cost design also supports batch use in multiple flower pots, making it an ideal choice for smart home green plant maintenance equipment, completely bidding farewell to the "mystery of watering".
In home gardens, small farms, or balcony gardens, MSE can be deployed in batches in the soil to monitor soil moisture content in real time, and work with automatic irrigation systems to achieve on-demand watering - not only avoiding the blindness of manual watering but also saving water resources; the non-contact and durable design can also adapt to complex environments such as outdoors and greenhouses, eliminating the need for frequent maintenance, and making refined care of small-scale agriculture no longer rely on manual experience.
In scenarios such as community greening and park landscapes, MSE can serve as a low-cost soil sensing node, be deployed in batches in green plant soil, monitor moisture content in real time, provide data support for garden maintenance, and reduce the cost of manual inspections; at the same time, it is adaptable to different soil types and environments, achieving an upgrade from "manual inspection" to "Data drive" for refined maintenance.
1. Module Introduction
2. Introduction to Main Chips
2.1 Chip Overview
The sensor is embedded with a high-precision digital capacitive sensing chip, a microprocessor, and an algorithm. The moisture content % is proportional to the capacitance value, which can be converted through fitting based on different soil characteristics.
2.2 Pin Definitions
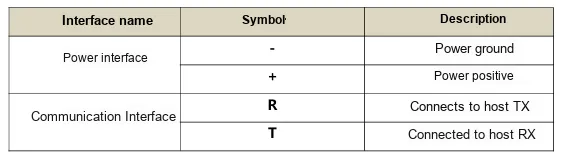
2.4 Performance Parameters
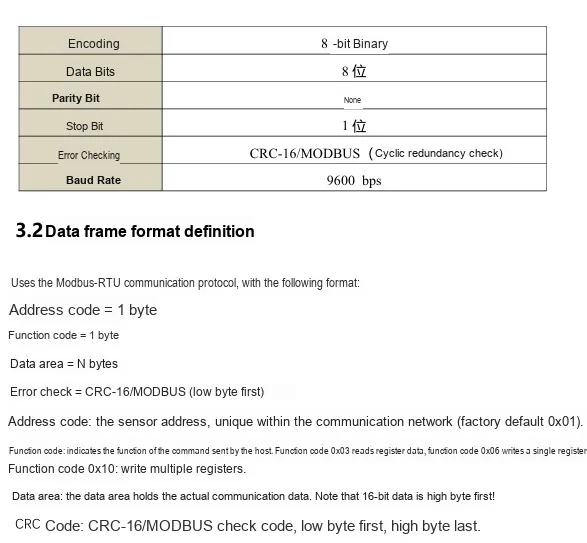
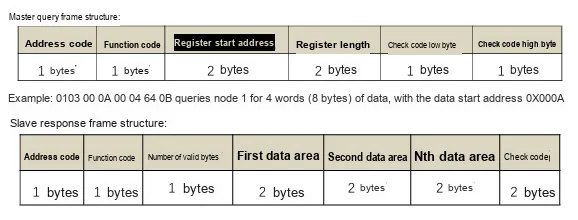
2.7 Communication Interfaces and Related Protocols
III. Circuit Engineering
3.1 Circuit Source Project
To obtain the circuit source project, please check the link below:
https://www.mysentech.com/productinfo/3096406.html
3.2 Module Usage Instructions
3.2.1 Module Test Environment Setup and Precautions
Here, we need to first confirm that the serial port data is stable and free of garbled characters, then insert the probe into dry soil and wet soil respectively to observe whether the moisture content value changes linearly with soil humidity; we can also use the palm / ice water to test the change in temperature readings to quickly verify that the temperature and humidity detection function is normal.
Avoid using excessive force when inserting the probe into the soil to prevent damage to the electrodes; the power supply voltage must not exceed 5.5V; do not soak the probe in water for an extended period, and dry it after testing. Calibration should be performed based on the actual soil being used, as the differences in the capacitance characteristics of different soils can affect the accuracy of the readings.
3.2.2 Usage of Modbus Poll
Modbus Poll is a general-purpose Modbus master station debugging tool that is compatible with all capacitive sensors in this series that support the Modbus-RTU protocol. It can quickly achieve serial communication debugging between sensors and computers, real-time data reading, and log export, and is a general-purpose upper computer tool for verifying sensor functions and collecting test data. The software supports Modbus RTU/ASCII/TCP/IP protocols, is compatible with various register types and data formats, and its operation process is universal for all sensors in the series.
Before use, you need to complete the software installation and activation first. You can download the installation package through official channels. When opening it for the first time, you can try it for 30 days, or you can enter the registration code to activate it permanently. After connecting the sensor to the computer via hardware, open the software and click "Connection" - "Connect". In the pop-up window, configure the serial port parameters (Port Number, Baud Rate, Data Bits / Parity Bits / Stop Bits; sensors in this series default to 9600 Baud, 8N1 format, with the specific details subject to the corresponding model specification). After confirmation, you can establish a communication connection.
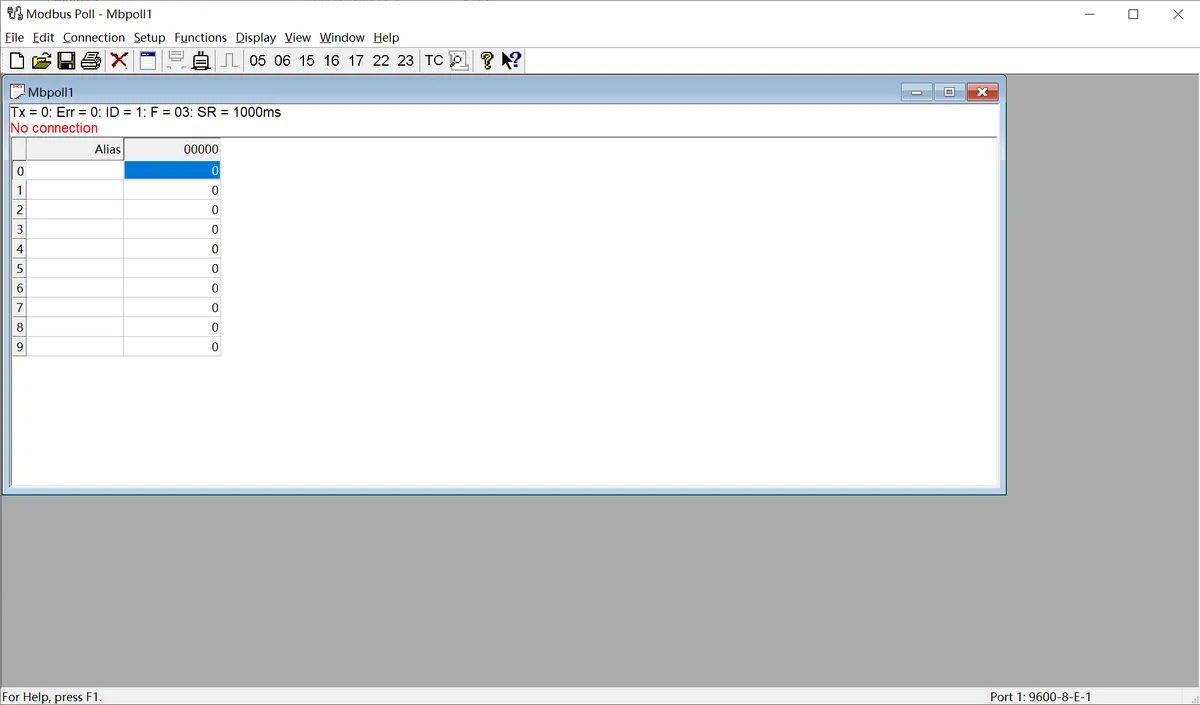
The following is a description of the general operating procedure:
- Serial Connection Configuration: After connecting the sensor to the computer via a USB-to-serial module, open the Modbus Poll software, click on the menu bar "Connection" - "Connect", select the COM Port Number corresponding to the sensor in the pop-up window, and configure the serial port parameters that match the sensor (Baud Rate, Data Bits, Parity, Stop Bits; sensors in this series default to 9600 Baud, 8N1 format). After confirmation, the communication connection can be established.
- Import Sensor Configuration File: The software supports importing the corresponding
.mbppre-configured files for each sensor model. The register address, data format, and alias definition have been pre-set in the file, eliminating the need for manual register configuration. Simply open the corresponding sensor's.mbpfile in the software, and all parameters will be automatically loaded. After a successful connection, the real-time detection data of the sensor (such as dust/rain/frost thickness values, status flags, etc.) will be directly displayed. - Data Logging (Optional): If you need to save test data, you can configure logging rules through the "Setup" - "Excel Log" function, which supports logging data at fixed intervals or every time data is updated, and allows you to set an upper limit on the number of records, facilitating subsequent analysis and verification of sensor data.
The above are the general basic operations of the host computer. For the pre-configured files, specific register definitions, and special configuration details of the .mbp of different sensor models, please refer to the content in "VII. Related Materials".
3.3 Application Experiment
Here, we use the GraftPort-RP2040 development board for testing, and the low-cost soil temperature and humidity sensor MSE uses the UART interface to communicate with the main controller.
Here, we first use the HY2.0-4P connection cable to connect the module through the XH2.54-4P to HY2.0-4P interface module to the GraftPort-RP2040 development board's UART0 interface:
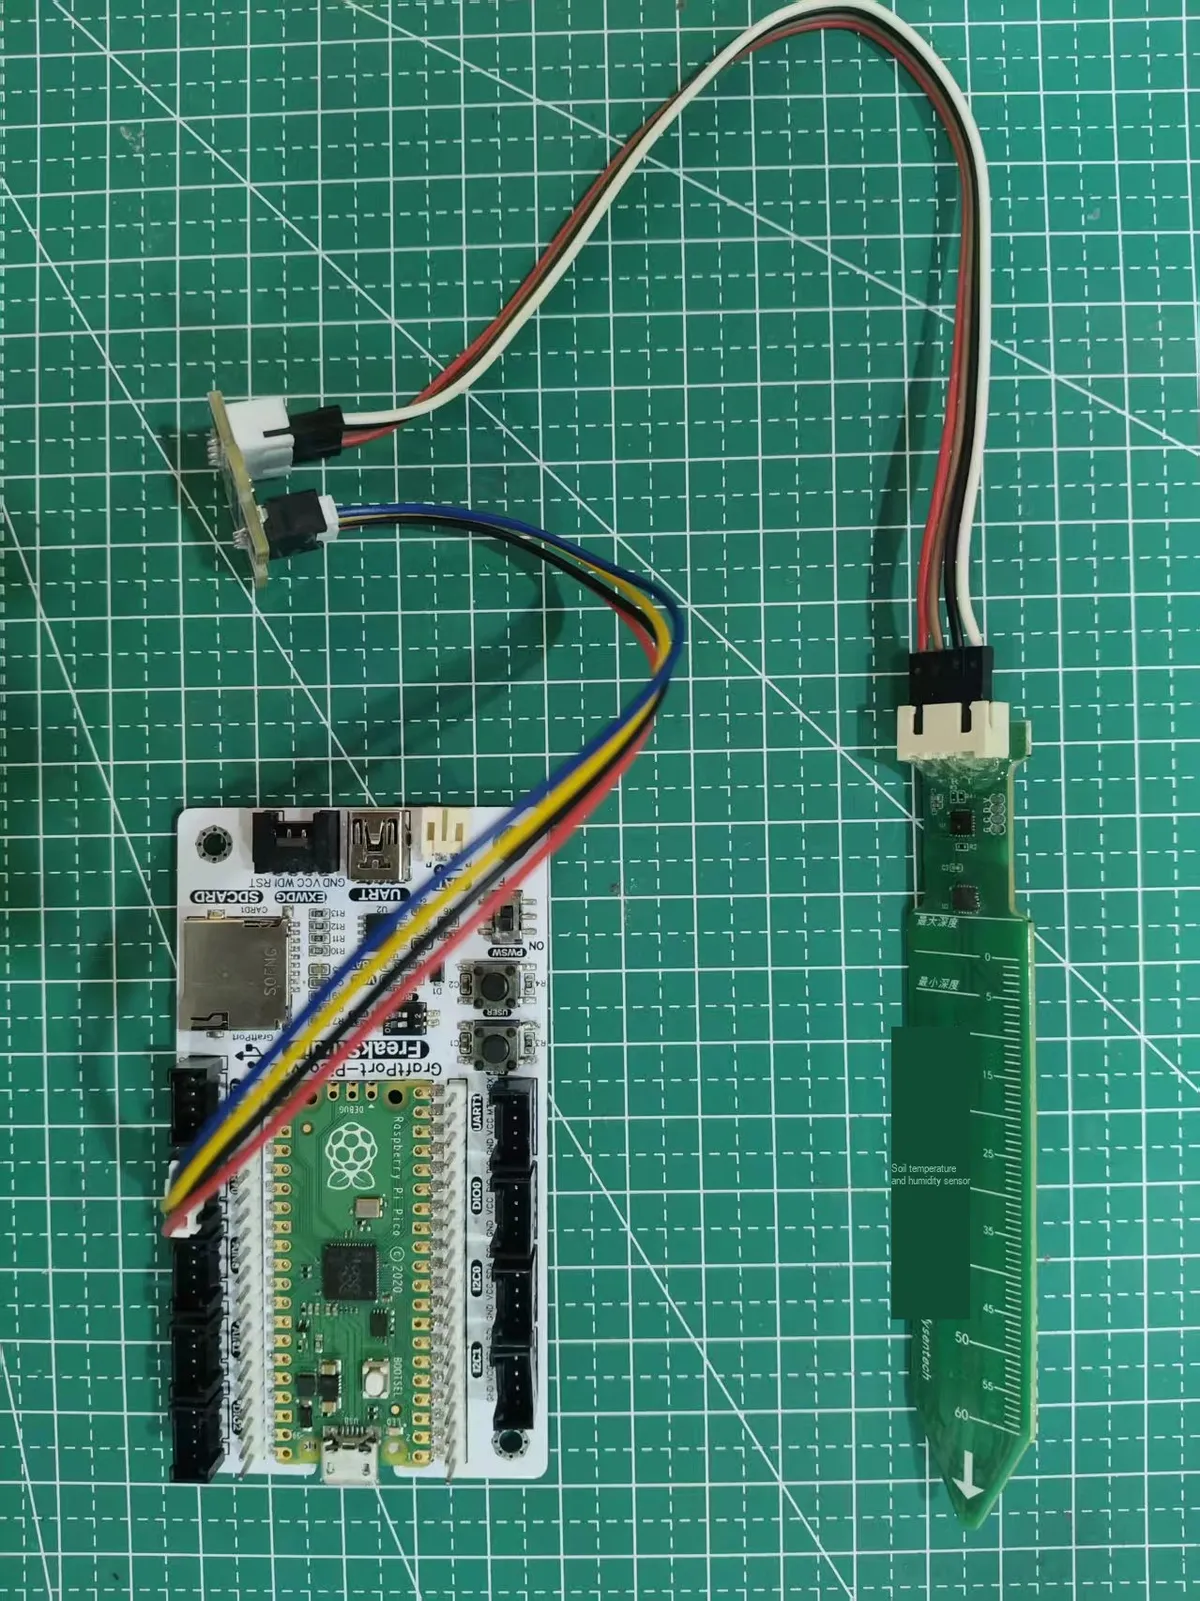
This figure shows the UART wiring method between the MSE soil temperature and humidity sensor and the development board.
Then insert the module into the soil:
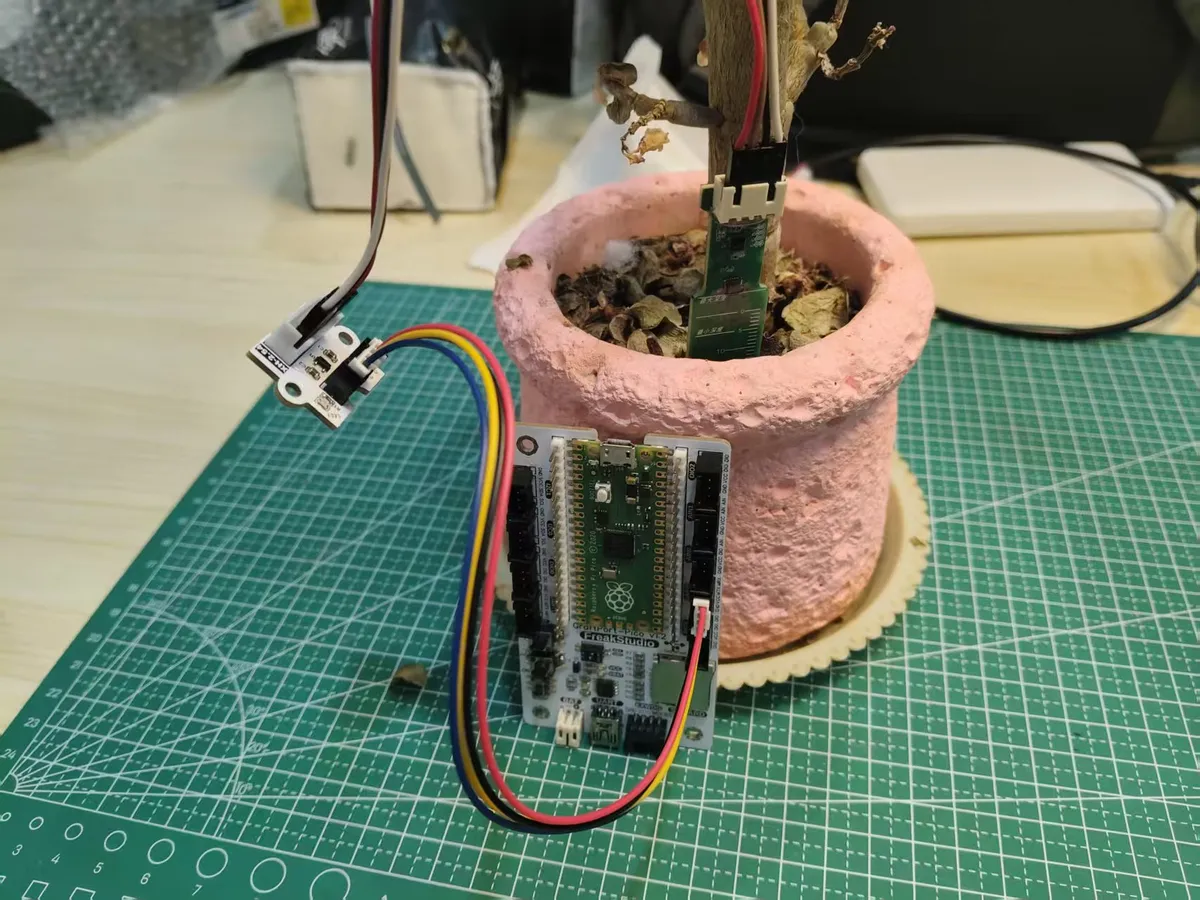
Module connections are shown in the following table:
Development Board Pins | Module Pin | Description |
Pin 16 |
|
|
Pin 17 |
|
|
Here, we need to search for relevant driver packages on uPyPI: https://upypi.net/zh/
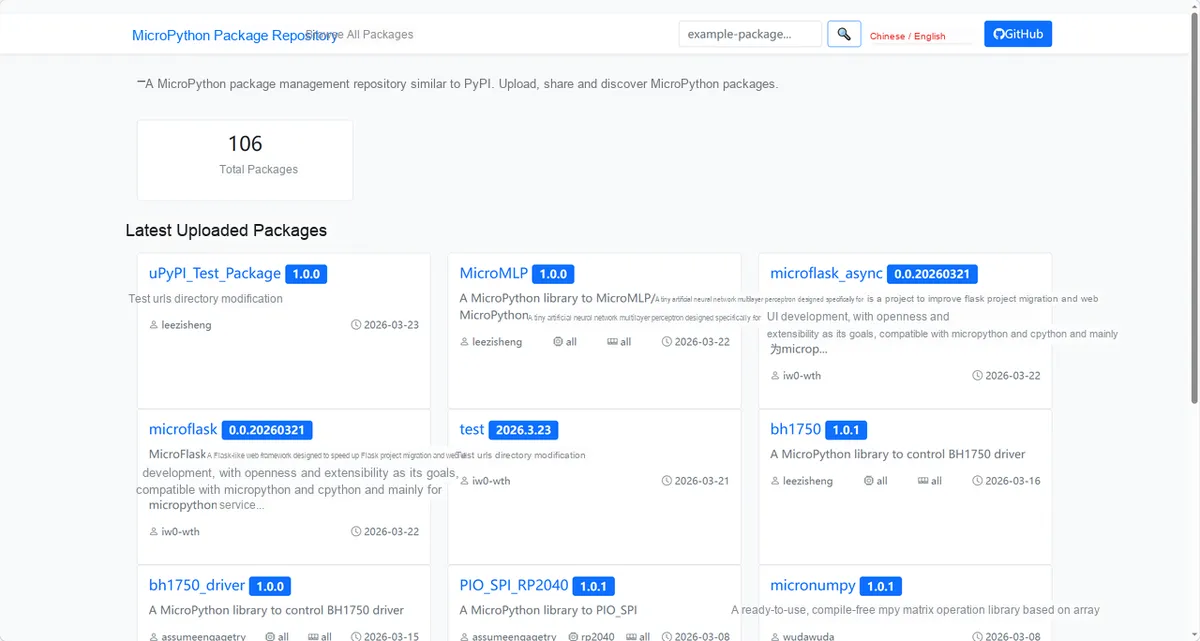
This diagram demonstrates the operation process of searching for the MSE driver package in the uPyPI platform.
Enter mse_soil_sensor_driver to search, and the display is as follows:
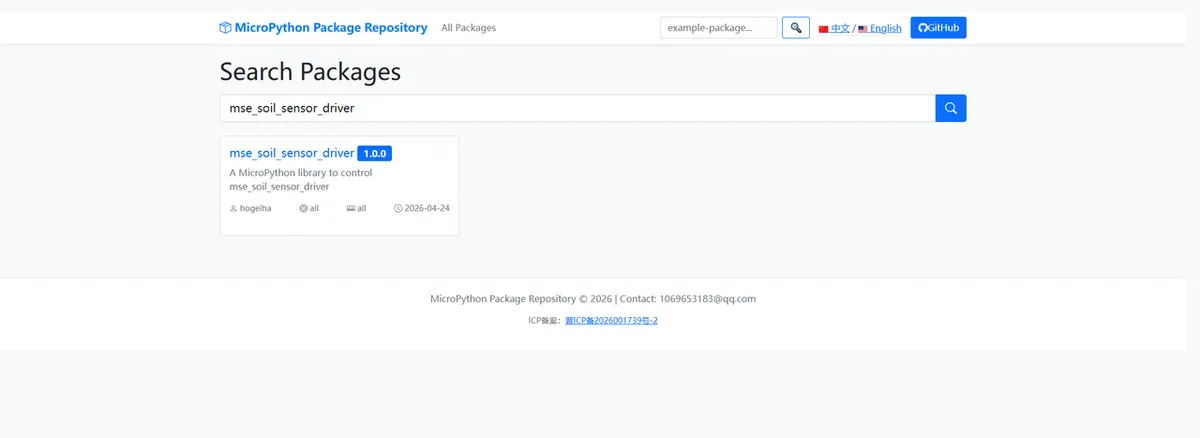
This figure shows the search results page for mse_soil_sensor_driver .
Click to copy the local installation command:
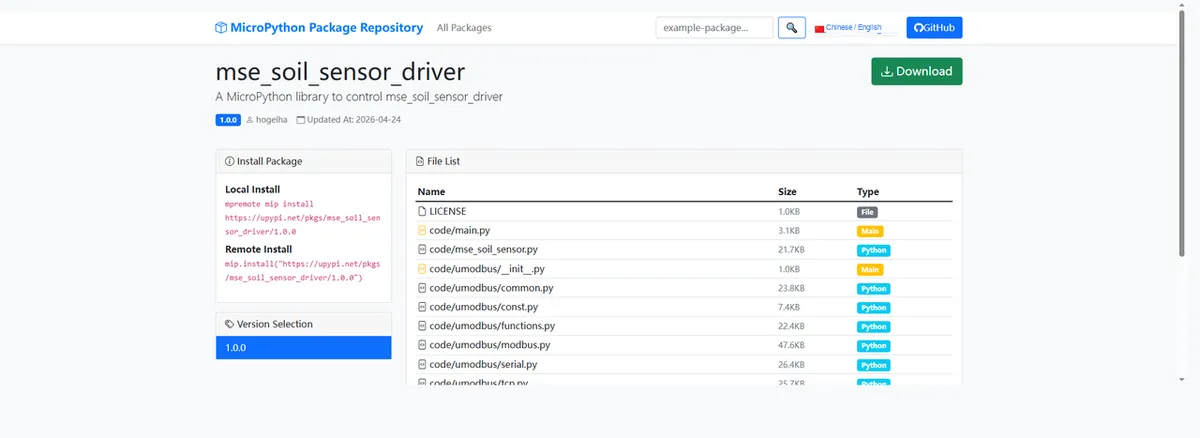
This figure shows the interface for copying the MSE driver installation command, facilitating local import.
Import module driver library code via mip tool, the following are the usage instructions for mpremote tool:
mpremote mip install https://upypi.net/pkgs/mse_soil_sensor_driver/1.0.0After importing the low-cost soil temperature and humidity sensor MSE-MicroPython driver code , copy the following main.py code into our project:
# Python env   : MicroPython v1.23.0
# -*- coding: utf-8 -*-
# @Time    : 2026/4/3 AM 10:30
# @Author  : hogeiha
# @File    : main.py
# @Description : MSE soil temperature and humidity sensor data reading and configuration example program

# ======================================== Import Modules =========================================

import time
from mse_soil_sensor import MSESoilSensor

# ======================================== Global Variables ============================================

# ======================================== Functions ============================================

def read_all():
    """
    Read and print all sensor register data

    Args:
        None

    Raises:
        None

    Notes:
        Call all read-only methods in the driver class and print the formatted results to the console.

    ==========================================
    Read and print all sensor register data

    Args:
        None

    Raises:
        None

    Notes:
        Call all read-only methods of driver class and format output to console.
    """
    # Print data separator line
    print("=" * 50)
    # Print slave address
    print(f"Sensor data (Addr: {sensor.read_node_address()})")
    # Print temperature value
    print(f"Temperature        : {sensor.read_temperature()} C")
    # Print capacitance value
    print(f"Capacitance        : {sensor.read_capacitance()} pF")
    # Print capacitance center value
    print(f"Capacitance center : {sensor.read_cap_center()} pF")
    # Print capacitance range
    print(f"Capacitance range  : {sensor.read_cap_range()} pF")
    # Print filter count
    print(f"Filter count       : {sensor.read_filter_count()}")
    # Print averaging window size
    print(f"Average window     : {sensor.read_avg_window_size()}")
    # Print temperature compensation coefficient A
    print(f"Temp comp A        : {sensor.read_temp_comp_A()}")
    # Print temperature compensation coefficient B
    print(f"Temp comp B        : {sensor.read_temp_comp_B()}")
    # Print hardware version
    print(f"Hardware version   : {sensor.read_hw_version()}")
    # Print firmware version
    print(f"Firmware version   : {sensor.read_firmware_version()}")
    # Print device UID
    print(f"Device UID         : {sensor.read_device_uid()}")
    # Print the ending separator line
    print("=" * 50)

# ======================================== Custom Classes ============================================

# ======================================== Initialization configuration ===========================================

# Wait 3 seconds to ensure the serial port is stable
time.sleep(3)
# Print startup message
print("FreakStudio: MSE soil sensor test start")

# Create the sensor instance
sensor = MSESoilSensor(slave_addr=1, baudrate=9600, uart_id=0, tx_pin=16, rx_pin=17)

# ========================================  Main Program  ============================================

# Check whether running as the main program
if __name__ == "__main__":
    # sensor.write_filter_count(20)      # Set filter count
    # sensor.write_temp_comp_A(0.5)      # Set temperature compensation A
    # Write temperature compensation coefficient B
    sensor.write_temp_comp_B(0.5)

    # Main loop: read all data every 2 seconds
    while True:
        read_all()
        time.sleep(2)
Burn the code, open the terminal, and the output is as follows:
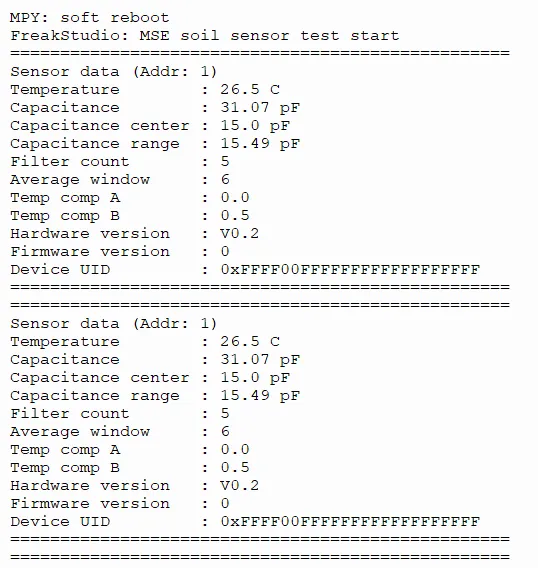
This figure shows the real-time output effect of the MSE module, which can be used to verify the data reading results of temperature, humidity, capacitance, etc.
4. Driver
mse_soil_sensor_driver.zip 46 KB
5. BOM & Recommended Alternatives
None
6. Change History
Document Version | Modification Date | Modifier | Modified Content |
v1.0 | 2026-04-24 | Hou Junhan | Initialize Document |
v1.1 | 2026-05-20 | Li Zisheng | Add Introduction, 3.2.2 Usage of Modbus Poll |
VII. Related Materials
MSE Low-Cost Soil Temperature and Humidity Sensor Product Manual-MSE202410 (1).pdf 864 KB
Modbus+Poll.rar 1.8 MB