
Contents
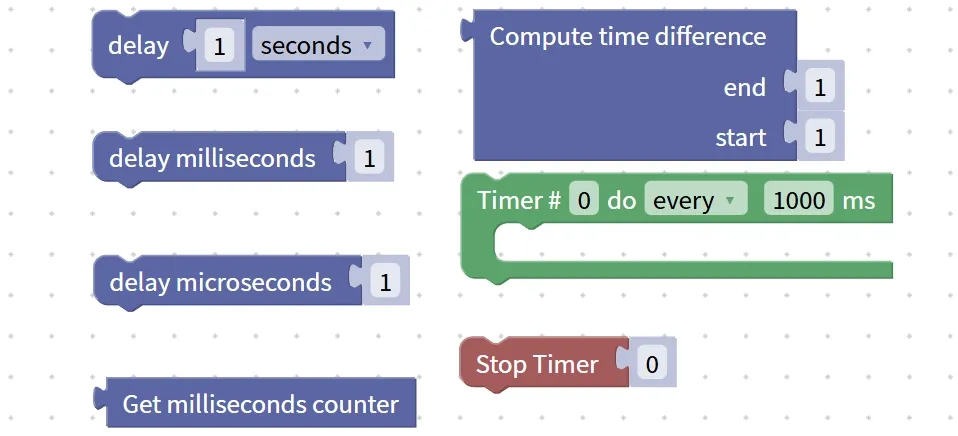
- 1. Delay Block (delay … seconds/milliseconds/microseconds)
- 2. Millisecond Counter Block (get milliseconds counter)
- 3. Time Difference Calculation Block (Compute time difference: end. .., start. ..)
- 4. Timer Loop Block (Timer # … do every … ms)
- 5. Timer Stop Block (stop timer)
- 6. Deep Sleep Block (deep sleep)
Have you ever had such experiences: when dancing to music, you’ll mess up if you can’t step in time with the beat; when building with blocks, if you rush to stack them up before the glue dries, the blocks will topple over — everything you do requires a proper "rhythm", and the same principle applies to program execution!
Without time control, all operations in the program will be "squeezed together": you want the light to turn on then off, but it turns off right after lighting up, making it impossible to see; you want a single keypress to trigger only one response, yet a light tap on the button causes the program to execute more than ten times repeatedly; you want the sensor to collect data once every 5 seconds, but the data gushes out like a waterfall, completely unreadable.
And time-based blocks are the "exclusive metronomes" installed for a program! They can precisely control the sequence of program execution and waiting duration, and also enable specified operations to run repeatedly at fixed intervals. Simply put, with time blocks, we can make the program "stop when it should, run when it should, and repeat when it should" without any chaotic mess.
When a program controls peripheral devices, it must not be flustered and disorganized — for example, if you make an LED light up and then turn it off immediately without a pause, we simply won't be able to see the blinking effect at all! The time module acts as the "metronome" of the program, with two core functions:
- Delay Pause: Make the program "pause for a while". For example,
delay 1000 millisecondsmeans making the program wait for 1 second before proceeding to the next step. Functions like an LED blinking "on for 1 second, off for 1 second" are entirely realized through delay; - Scheduled Trigger: Enables the program to "execute tasks at specified times" — for example, reading sensor data every 5 seconds, eliminating the need for constant repeated detection and saving the processing resources of the development board.
Next, let’s unlock these magical building blocks that set the "tempo" for your program one by one. Starting from the simple "make the program pause for a while" to the advanced "do things in timed loops", we’ll get your program running at exactly the rhythm you want step by step!
Tips
Time control is a fundamental skill for hardware programming! Whether you're making a blinking light, a timer, or a smart toy, you first need to learn to use time blocks to set the rhythm, otherwise the program will be "all messed up"~
💡 Pro Tip for Newbies:
- The common units for latency are milliseconds (ms) and seconds (s), where 1 second = 1000 milliseconds.
- Short delays (20-50 milliseconds) can be used for "debouncing" — for example, adding a short delay after a key is pressed to prevent accidental multiple triggers caused by shaky fingers;
- A loop without delay will "run too fast". For example, if you blink an LED without adding a delay, what the eye sees is just a constantly lit LED!
✨ Interactive Quick Question
- Think about it: What things in your life require you to "do them in a regular rhythm"? For example, "drink water every 2 hours", try to come up with an example~
- Quick Response: If there is no time block, can you make the light turn on for 1 second and then turn off? (Answer: It's very difficult! Without a delay, the light turns on and off so fast that we can't even see it at all~)
1. Delay Block (delay … seconds/milliseconds/microseconds)
Young creators, the first time block you’re going to unlock is super simple — it’s the delay block! It’s just like “waiting for the glue to dry” when you’re doing crafts, or the “10-minute break” between classes: it makes the program “pause for a bit” as you request, and only continues running once the set time is up, making it the most basic tool for controlling the rhythm of your program~
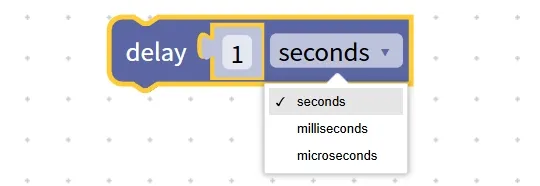


The core function of the delay block is to make the program "pause execution": when the program runs to this block, it will immediately halt all subsequent operations, remain idle for exactly the duration we set, and will not resume executing the following blocks until the set time elapses.
It is also extremely flexible, with three optional time units to precisely control the waiting duration:
- Second (seconds): The most commonly used unit! One second roughly corresponds to the time it takes to count "one, two", and it is suitable for waits that are perceptible to the naked eye (e. g., a light stays on for 1 second, text is displayed for 2 seconds);
- Milliseconds: 1 second = 1000 milliseconds, which is suitable for finer control (e. g., making the buzzer beep for 500 milliseconds, namely half a second);
- Microseconds: 1 millisecond = 1000 microseconds. This unit is extremely small and is generally used to control ultra-fast hardware operations (such as communicating with sensors), so beginners rarely need to use it for the time being~
Chinese meaning: Let the program delay ( delay ) the specified length of time, you can wait by seconds ( seconds ) , milliseconds ( milliseconds ) or microseconds ( microseconds ) , the program continues to run after waiting.
Operation logic: Just like a teacher saying "Take a one-minute break now, and we'll resume class in one minute" — when a program encounters a delay block, it first "pauses" for the set duration, and will not execute the subsequent instructions until the pause ends, performing no additional operations during the delay period.
Task: Make the program display "Start" first, then display "Continue execution" after a 1-second delay
显示 "开始"
延时 1 秒
显示 "继续执行"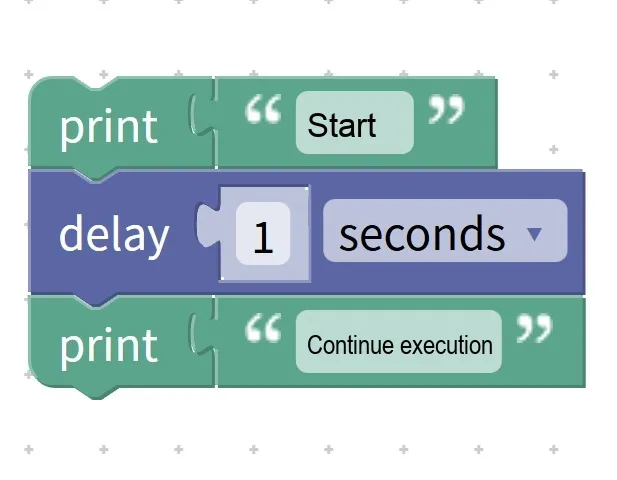
Execution Result: After the program runs, the word "Start" will pop up on the screen first, then wait quietly for 1 second (you can count "one"), and after the 1 second ends, the screen will display "Continue Execution"~
Tips
- The delay block will "block the program": during the delay, the program does nothing but wait for the time to elapse — for example, if you set a "5-second delay", the program will not respond to button presses or update the display during those 5 seconds, it just waits idly;
- Choose the right time unit: Beginners are recommended to prioritize "seconds", which can be clearly perceived by the naked eye; if a shorter waiting time (e. g., half a second) is required, "0.5 seconds" or "500 milliseconds" will work equally well;
- Avoid setting an excessively long delay: for example, if you set a "10-second delay", the program will freeze for 10 seconds, which leads to a poor user experience~
✨ Interactive Quick Question
- Think about it: If you want the LED to blink in a repeating cycle of "on for 1 second, off for 1 second", how should you use the delay block? (Answer: Turn on the LED + delay for 1 second + turn off the LED + delay for 1 second~)
- Quick response quiz: How many milliseconds are there in 1 second? (Answer: 1000 milliseconds!)
- True or False: If a delay block is set to "delay for 2 seconds", will the program execute other operations simultaneously during those 2 seconds? (Answer: No! The program only waits during the delay period and does nothing else~)
- Try it out: Write a program by yourself, and use the delay block to make the screen display "1", "2", "3" in sequence, switching to the next number after each one is displayed for 1 second.
2. Millisecond Counter Block (get milliseconds counter)
Young creators, the delay block makes the program "pause for a rest", while the millisecond counter block is like installing a constantly running "electronic stopwatch" for the program! It won't suspend the program, but only tells us in real time "how many milliseconds have passed since the program started", and it's a core tool for timing and calculating time differences~

The core function of this block is to obtain the real-time timing value:
- It is just like the stopwatch we use in PE classes: the moment the program starts running, it silently "counts up" — 1 millisecond, 2 milliseconds, 3 milliseconds. .. and the value keeps increasing nonstop;
- 1 second = 1000 milliseconds, so after the program runs for 1 second, the value it returns is 1000, and after running for 3 seconds, the returned value is 3000;
- Most importantly, the program will not pause when you call it! For example, you can use it to keep track of time while making the LED blink at the same time, and these two tasks will not interfere with each other at all.
It is often used for the following purposes:
- Record the start / end time of a certain operation;
- Determine whether a certain action has exceeded the specified time (for example, a key has been pressed for more than 2 seconds);
- Calculate the interval between two time points.
Get ( get ) the program running process of the current milliseconds count value ( milliseconds counter ) , used to indicate the time has elapsed.
Task: Record the start time of the program, and display a prompt once the runtime exceeds 3 seconds
设 开始时间 为 get milliseconds counter
如果 (get milliseconds counter − 开始时间) ≥ 3000
    显示 "已经过去 3 秒"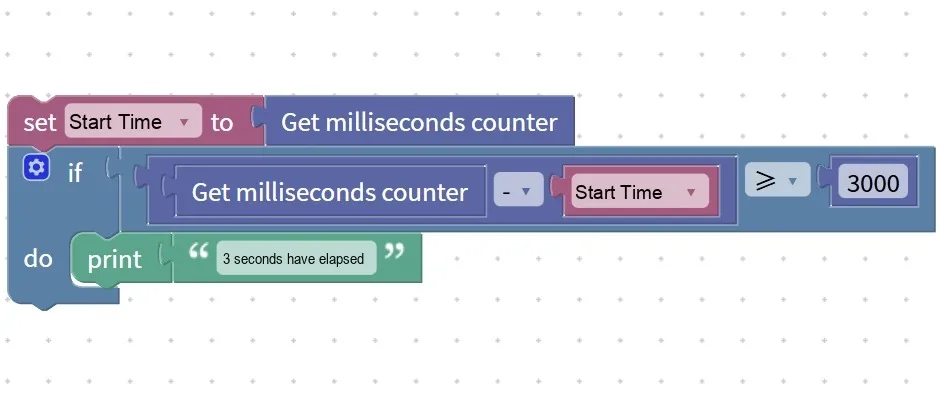
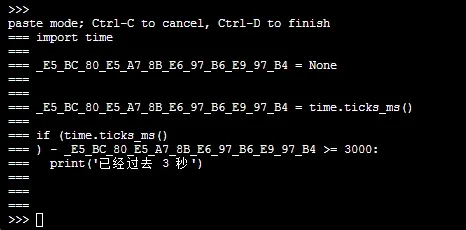
Execution result: When the program first starts running, the time difference is less than 3000, so nothing will be displayed; once it has been running for more than 3 seconds, the message "3 seconds have passed" will immediately pop up on the screen~
Tips
- The value of the millisecond counter only increases and never decreases; the longer the program runs, the larger the value becomes, and it will not be cleared (unless the program is restarted).
- Newbies, don’t get hung up on microsecond-level precision — millisecond-level is more than enough to start with. We can’t even perceive a 1-millisecond time difference with the naked eye at all~
✨ Interactive Quick Question
- Think about it: If the program has been running for 5 minutes and 30 seconds, what value will the millisecond counter return? (Hint: 5 minutes = 300 seconds, 5 minutes and 30 seconds = 330 seconds, answer: 330×1000= 330000 milliseconds~)
- Quick Quiz: Will the millisecond counter block pause the program? (Answer: No! It only reports the time and won't hold up the program's execution~)
3. Time Difference Calculation Block (Compute time difference: end. .., start. ..)
With the millisecond counter serving as this "stopwatch", we also need a tool that can quickly calculate "how much time has elapsed" — and that's exactly what the time difference calculation block is! As the perfect companion to the millisecond counter, it automatically computes the duration between two timestamps, eliminating the need for manual subtraction and making things incredibly hassle-free~
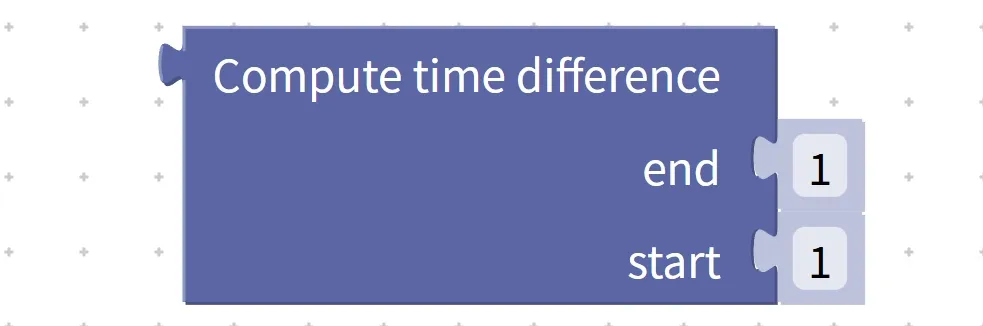
The core function of this block is to calculate the difference between two time points:
- It requires two "raw materials": the start time (e. g., the number of milliseconds when the operation starts) and the end time (e. g., the number of milliseconds when the operation is completed);
- It automatically performs subtraction: end time minus start time, and the returned result is exactly how many milliseconds this operation took;
- Also, the program will not be paused: the result will be returned immediately after the difference is calculated, and the program will continue running.
It is often used to do the following things:
- Measure the execution speed of a program segment (for example, how long it takes to perform 100 additions);
- Accurately determine whether a certain operation has timed out (for example, trigger an alarm if the sensor data acquisition takes more than 5 seconds);
- Calculate the time interval between two keystrokes.
Calculate ( Compute ) the difference between two time points ( time difference ) , the end time ( end ) minus the start time ( start ) , return the elapsed time.
Task: Measure how many milliseconds the operation of "display text + delay for 1 second" takes
设 开始时间 为 get milliseconds counter
执行 一些操作
设 结束时间 为 get milliseconds counter
设 时间差 为 Compute time difference: end 结束时间, start 开始时间
显示 时间差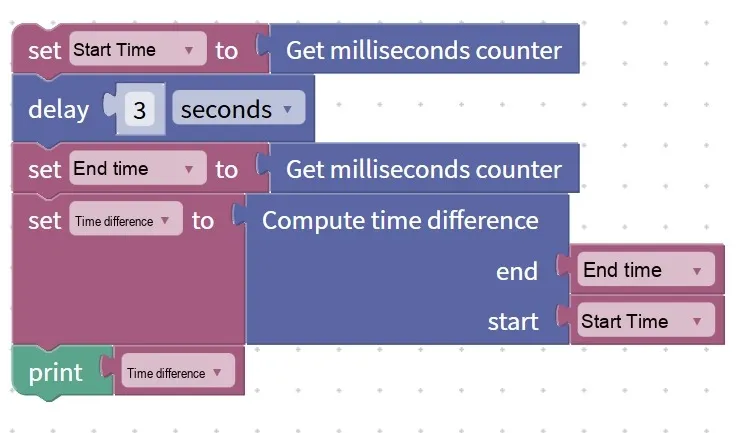
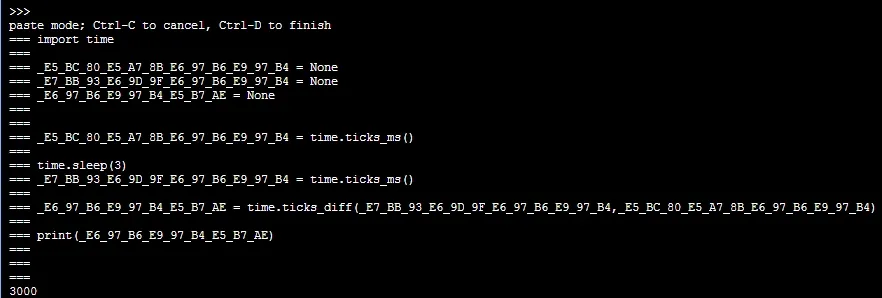
Execution result: The screen will display the number of milliseconds taken for the operation, which is approximately 1000 milliseconds. Since there is a 1-second delay, the time taken to display the text is almost negligible~
Tips
- Do NOT reverse the order of the entered "start time" and "end time"! It must be "end time - start time"; reversing them will result in a negative number, which can easily cause errors in the program;
- If you want to convert the result to seconds, you can divide the returned value by 1000 (e. g., 3000 milliseconds = 3 seconds). Beginners can use a variable for the calculation:
seconds = time difference / 1000~
✨ Interactive Quick Question
- Think about it: If the start time is 1500 milliseconds and the end time is 4800 milliseconds, what value will the time difference block return? (Answer: 4800-1500= 3300 milliseconds~)
- True or False: Can the time difference calculation block directly use "seconds" as the unit? (Answer: No! It can only calculate the number of milliseconds, and you need to convert it to seconds by yourself~)
- Try it: Use these two blocks to measure the total time it takes to "make the LED blink 3 times", and check whether the actual duration matches the delay you set.
4. Timer Loop Block (Timer # … do every … ms)
Young creators, the delay block we learned earlier means "wait a while before acting", the millisecond counter is for "keeping track of time", but the timed loop block is even more powerful — it lets the program "automatically perform an action at regular intervals", just like how we "drink water every 2 hours" or "wake up at 7 o'clock every day". No manual triggering is needed, making it perfect for periodic tasks!

The core function of this block is to create a "background loop timer":
- Assign a number to the timer (e. g. Timer 1, Timer 2), set a time interval (e. g. 2000 milliseconds = 2 seconds), and then place the operation to be repeated inside the block;
- After the program runs, this timer will work silently in the "background": at set intervals, it will automatically execute the operations inside it, and it will not delay the main program from doing other things at all (this is the biggest difference from the delay block!);
- Multiple timers can be started simultaneously: for example, Timer 1 is responsible for "flashing the light every 2 seconds", and Timer 2 is responsible for "collecting temperature every 5 seconds", both of which run independently without interfering with each other.
It is often used to do these things:
- The LED flashes at regular intervals (turns on/off once every 1 second);
- Collect sensor data at regular intervals (measure the temperature once every 1 minute);
- Refresh the screen display periodically (update the values every 500 milliseconds).
Chinese meaning: Create a timer (Timer #), and every (every) specified number of milliseconds (ms) repeatedly execute (do) the operations inside the block once.
Specific example: Make the program display a "flashing prompt" once every 2000 milliseconds (2 seconds).
定时器 1 每 2000 ms 执行一次
    显示 "闪烁提示"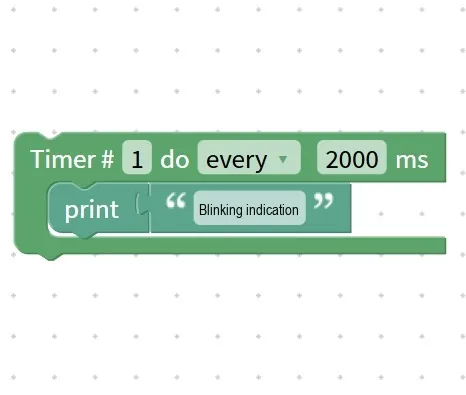
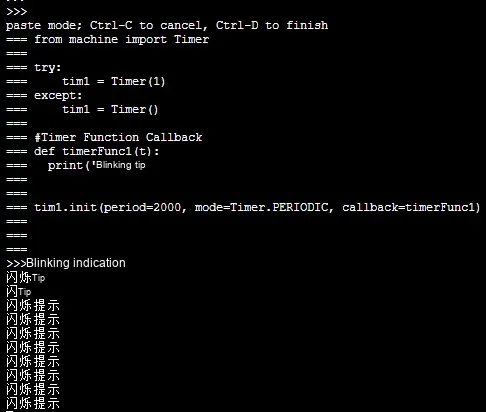
Execution Result: After the program starts running, you don’t need to interfere with it. The screen will automatically display the "flashing reminder" once every 2 seconds, repeating continuously — even if the main program is performing other operations (such as displaying "main program running"), this reminder will still pop up on schedule!
Tips
- Do not use duplicate timer IDs! For example, never create two Timer 1 instances at the same time, otherwise the program will get confused and fail to identify which one to execute.
- Setting the time interval to "0" won't work! The timer will execute operations frantically, causing the program to freeze. Beginners are advised to start with a value of 100 milliseconds or higher;
- Remember to stop unused timers in time! Otherwise, they will keep running in the background and waste your device's battery power~
✨ Interactive Quick Question
- Think about it: If you want the mini fan to "spin for 1 second every 5 seconds", how should you set the timed loop block? (Answer: Create Timer 1 with an interval of 5000 milliseconds, and put "start fan + delay 1 second + stop fan" inside it~)
- Quick Response Quiz: What is the biggest difference between the timed loop block and the delay block? (Answer: The timed loop runs in the background and does not block the main program; the delay block will pause the main program~)
5. Timer Stop Block (stop timer)
With the timed loop block that enables the program to "clock in automatically", there should naturally be a tool to make it "clock out" — the timer stop block! It can precisely stop the timer of the specified number, immediately terminate periodic operations, and you no longer have to worry about the program "working in an infinite loop"~
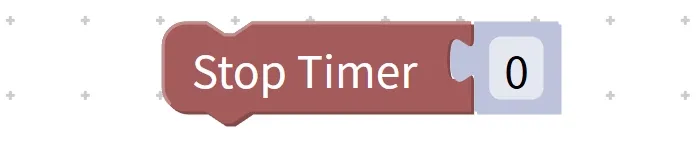
The core function of this block is to terminate the timer with the specified ID:
- It only recognizes the "timer number"(for example,
Timer 1,Timer 2); whichever number you input, the corresponding timer will be stopped; - After being stopped, the cyclic operation of this timer will be terminated immediately and will no longer be executed in the background;
- Does not affect other timers and the main program: for example, when stopping
Timer 1,Timer 2will continue to run, and the main program will also be unaffected.
It is often used to do the following things:
- Press the button to stop the lamp from flashing (pressing the button will stop the corresponding timer);
- Schedule the periodic task to stop (e. g., make the timer automatically stop after running for 5 seconds);
- Terminate data collection when the specified condition is met (for example, stop scheduled collection when the temperature exceeds 30°C).
Stop ( stop ) the specified number of timers ( timer ) , terminate the periodic operation of the timer.
Specific example: Let Timer 1 display "Running" every 1 second, and stop it after 5 seconds.
Timer #1 每 1000 毫秒执行:
    显示 "正在运行"
延时 5 秒
停止 Timer #1
Execution result: In the first 5 seconds, the screen displays "Running" once every 1 second; after 5 seconds, Timer 1 is stopped, the prompt will no longer be displayed, and the screen only shows "Timer 1 has stopped"~
Tips
- When stopping a timer, make sure to enter the correct number! For example, if you want to stop Timer 2, do not enter Timer 1 by mistake, otherwise you will stop the wrong timer or the operation will have no effect;
- Stopping a non-existent timer will not throw an error! For example, if Timer 3 has not been created in the program, executing the "Stop Timer 3" command will only make the program ignore this operation instead of crashing~
✨ Interactive Quick Question
- Think about it: If you want the "buzzer that beeps once every 1 second" to stop after pressing a button, how should you write the program? (Answer: First create Timer 1 to control the buzzer, then add the "stop Timer 1" command in the button trigger logic~)
- Judge for yourself: After stopping Timer 1, will the main program stop as well? (Answer: No! The timer and the main program run independently, so stopping the timer won’t affect the main program~)
6. Deep Sleep Block (deep sleep)
Young makers, all the previous blocks are designed to make the program "perform tasks in a rhythmic manner", while the deep sleep block is used to let the device "take a long rest" — it can turn off most functions of the development board and put it into an ultra-low power state, which is especially ideal for small projects powered by batteries, such as smart flower pots and outdoor temperature and humidity meters!

Chinese meaning: put the device into deep sleep (deep sleep) state, suspend the running of the current program to reduce power consumption until it is woken up.
The core function of this block is to put the device into deep sleep mode:
- When this block is executed, the program will immediately pause all operations, and the device will turn off most functions such as the screen, sensors, and timers, retaining only the most basic wake-up function;
- Extremely low power consumption: saves over 90% power compared to normal operation, enabling longer battery life;
- Program restart after wake-up: The device will not resume operation from the point where it entered sleep, but will re-execute the program from the beginning (for example, if it was displaying "Step 3" before going to sleep, it will start from "Step 1" after wake-up).
It is often used to do the following things:
- Battery-powered projects (such as regular temperature collection, where the device goes to sleep after collection and wakes up to collect again);
- Devices that are not used for a long time (for example, putting the device to sleep when idle and waking it up by pressing a button);
- Low-power IoT devices (e. g., those that upload data once every hour and remain in sleep mode the rest of the time).
Tips
- Remember to save important data before sleep, such as collected temperature and key press records; otherwise, the data will be lost when the program restarts after wake-up.
- The wake-up mode must be set in advance! For example, set it to "button wake-up" or "scheduled wake-up"; otherwise, the device will stay in sleep mode permanently and cannot be restarted.
- Novices, do not use it casually! If no wake-up mode is set, the device may fail to wake up after sleeping, and you will need to power it on again~
✨ Interactive Quick Question
- Think about it: For a flower pot project that "collects soil moisture once every hour", how should the deep sleep block be used? (Answer: After collecting the moisture, let the device go into deep sleep for 3600000 milliseconds (1 hour), and it will automatically wake up to collect again when the time is up~)
- Quick Quiz: After the device enters deep sleep, will the program resume running right from where it left off? (Answer: No! The program will restart from the very beginning after the device is woken up~)