
Contents
1. Introduction
In the previous chapter, we learned to collect functions into library files to make the code more concise. This is an approach of Procedural Programming: using functions to divide work and collaborate, solving problems step by step. However, in more complex projects, function encapsulation alone is still not enough. So in this chapter, we will learn a more advanced idea — Object Oriented Programming (OOP), which manages code through "classes" and "objects" and writes them into class library files.
2. Reflections from Procedure Oriented to Object Oriented
Writing programs is actually similar to "arranging work". Different ways of thinking will lead to drastically different coding styles. Procedural programming and Object Oriented are two distinct programming mindsets; in the beginner stage, we commonly use the procedural approach; but as projects grow increasingly complex, we need to gradually transition to the Object Oriented mindset. Let's first take a look at the differences between these two approaches.
method | Treatment method | Code Organization | Applicable Scenarios |
Procedure-oriented | Focus on steps and execute tasks step by step | A large amount of | Suitable for simple, one-off tasks |
Object Oriented | Object-oriented, managing attributes and behaviors | Encapsulate functions through classes and objects, and implement Modularization management | Suitable for complex and scalable systems |
2.1 Procedural-Oriented: Executing Operations Step by Step
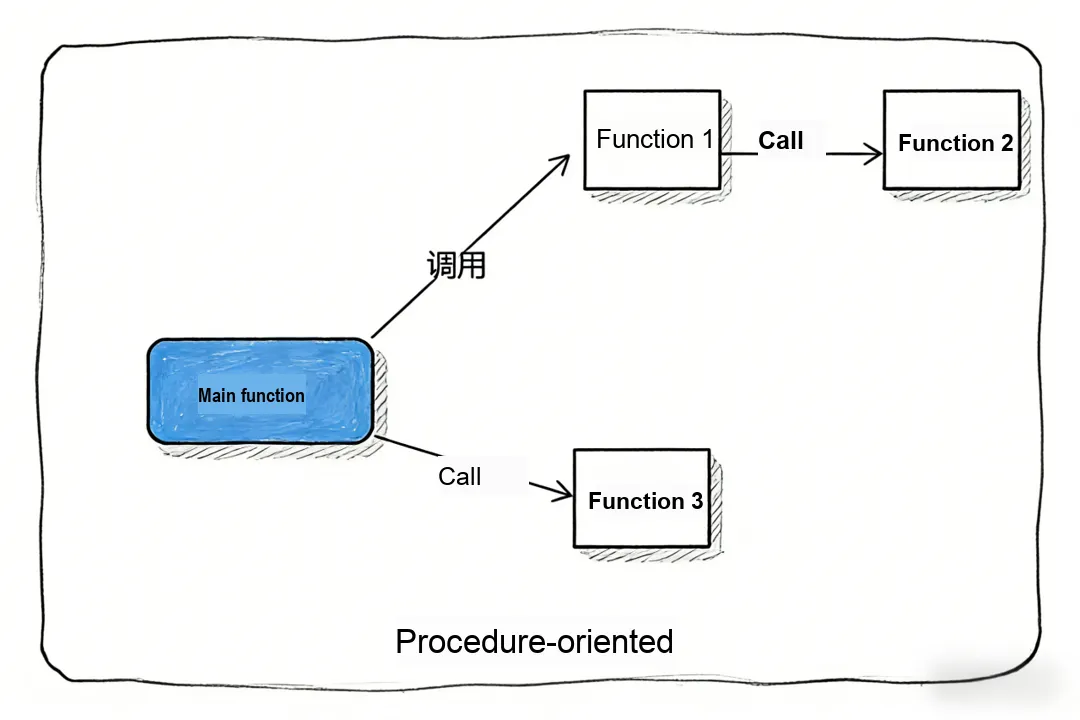
Procedural programming centers on steps: it breaks down the task to be completed into a series of operations, then implements them step by step with functions and calls them in sequence.
Taking "putting an elephant into a refrigerator" as an example, when adopting a process-oriented approach, we need three steps:
- Open the refrigerator door
- Put the elephant in
- Close the refrigerator door
This approach is simple and intuitive, but problems arise as requirements increase:
- Refrigerators of different models may have different door opening methods;
- Check whether the refrigerator is full;
- Not only elephants, but also giraffes, pandas and other animals may be released.
In procedural programming, these changes are usually handled by a large number of if-else statements. The result is that:
- Every time a new scenario is added, the existing code has to be modified, leading to high maintenance costs;
- All functions are centralized in the main program, so a single change may affect the overall logic;
- Similar operations need to be written repeatedly, resulting in poor code reusability.
Therefore, procedural programming becomes cumbersome and hard to extend as a project grows more complex, which is why we need to introduce Object Oriented programming.
2.2 Object Oriented: Let Objects Handle Tasks Themselves
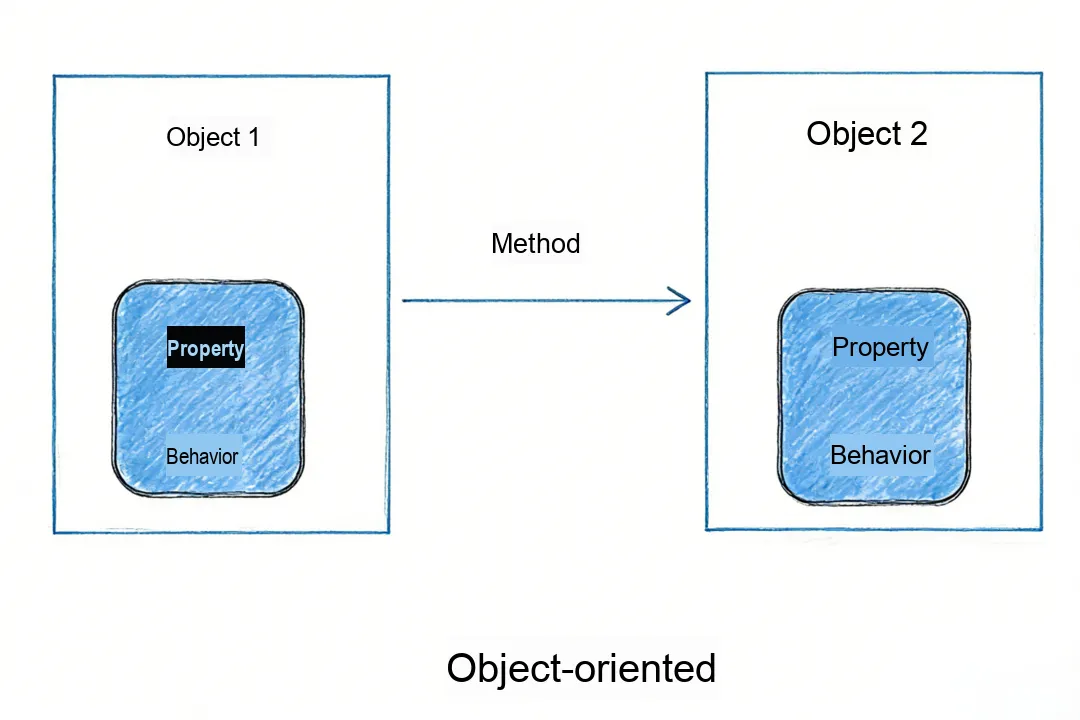
Object Oriented Programming (OOP) centers on objects, encapsulating data and operations together. Objects are created from classes, which define what properties (data) and methods (functions) an object will have.
Continuing the previous example, if we use the Object Oriented approach:
- A refrigerator is an object that knows for itself how to open its door, close its door, and whether there is still space to hold additional items;
- Animals are another category of objects, and different animal species have distinct characteristics.
The main program only needs to call the methods of the object without concerning itself with the internal details. For example:
Fridge fridge;
Elephant elephant;

fridge.open();
fridge.put(elephant);
fridge.close();
Compared with process-oriented programming, Object Oriented makes code more Modularization and is more suitable for complex and scalable projects.
3. Fundamentals of Classes and Class Libraries
3.2 Classes and Objects
In Object Oriented programming, we usually define a class first and then create objects based on the class.
To understand how library functions work, we first need to clarify the difference and relationship between classes and objects.
Class: A class is an abstract description of a group of things and serves as a template for objects. A class defines the attributes (member variables) and behaviors (member functions) of objects.
Object: An object is an instantiation of a class. We can think of a class as a mold, and an object as the concrete entity produced from this mold.
3.3 Components of the Class
In Object Oriented programming, we usually define a class first, and we define the attributes of the class and implement its methods through member variables and member functions.
In Object Oriented programming, a class serves as a template for objects, and the interior of a class mainly consists of member variables and member functions; in addition, there are also constructors and destructors that are used for the initialization and cleanup of objects. Understanding these components is extremely critical for us to write class library files.
3.3.1 Member Variables (Attributes)
A member variable is the data in a class, namely the state or attribute of an object. It is similar to the ordinary variables we have learned before, but it belongs to the object itself, and each object has its own independent data.
- Concept: Used to describe the "state" or "characteristics" of an object.
- Analogy: A person has attributes like name, age, and height, while a sensor has attributes such as pin number, measurement range, and current reading.
- Features: Each object stores its own data without interfering with others.
In a class, member variables are usually prefixed with access modifiers, the most common of which are private and public:
- private: private, which cannot be directly accessed from outside and can only be operated via the member function inside the class.
- public: public, meaning it can be directly accessed from outside.
For example, if you are creating an ultrasonic ranging module, when we wrote functions before, we might use the trigPin and echoPin variables.
Within a class, these two variables serve as member variables of objects, and each object has its own copy of the data. In this way, even if there are multiple ultrasonic objects, their pin information will not interfere with each other.
Member variables enable objects to have their own state, allowing each object to work independently.
class Ultrasonic {
  private:           // Private member variables, usable only inside the class
    int trigPin;      // Member variable: trigger pin
    int echoPin;      // Member variable: echo pin
};
Here, trigPin and echoPin are private member variables. Each ultrasonic object has its own pin information, which cannot be modified directly from outside and can only be manipulated via the function provided by the class.
3.3.2 Member Functions (Methods)
A member function is an operation encapsulated in a class, that is, what an object can do, and it is used to process the data of the object. It is similar to the ordinary function we learned before, but there is an important difference: a member function can directly access the member variables inside an object without the need for external parameter passing.
Concept: Defines what an object can do.
Analogy: Humans can "speak", cars can "drive", and sensors can "measure".
Features: When a function is written inside a class, it belongs to the "functionality" of that class.
Member functions are usually placed in the public section so that external programs can call them. For example, after creating an object, you can directly use the object's methods to manipulate its own data without concerning yourself with how the variables are stored inside the class.
Continuing with the example of the ultrasonic module, we can write the ranging function as a member function, and directly use the object's trigPin and echoPin to measure the distance. In this way, the function and the data it processes are grouped together, and the main program only needs to call the object's method to complete the ranging function without caring about how the underlying layer is implemented.
Here is a specific code example:
class Ultrasonic {
  private:
    int trigPin;    // Member variable, records the trigger pin
    int echoPin;    // Member variable, records the echo pin

  public:
    Ultrasonic(int tPin, int ePin) {  // Constructor, initializes the pins when the object is created
      trigPin = tPin;
      echoPin = ePin;
    }

    void begin() {                     // Member function: initialize the pin modes
      pinMode(trigPin, OUTPUT);
      pinMode(echoPin, INPUT);
    }

    float measureDistance() {          // Member function: measure distance
      digitalWrite(trigPin, LOW);
      delayMicroseconds(2);
      digitalWrite(trigPin, HIGH);
      delayMicroseconds(10);
      digitalWrite(trigPin, LOW);

      long duration = pulseIn(echoPin, HIGH);
      float distance = duration * 0.0344 / 2;
      return distance;
    }
};
In this class, trigPin and echoPin are placed in the private section, which means these data can only be accessed inside the class to ensure data security. The constructor function Ultrasonic (int tPin, int ePin) is automatically executed when an object is created, and initializes the member variables of the object with the passed parameters. begin () and measureDistance () are member functions, which are placed in the public section, so they can be called in the main program.In particular, measureDistance () can directly use the object's trigPin and echoPin to measure distance without the need for external parameters, which tightly couples the function with the data it operates on.
Using this class in the main program is also very straightforward:
Ultrasonic sensor1(23, 22);  // Create the object sensor1

void setup() {
  Serial.begin(9600);
  sensor1.begin();            // Call the object's member function to initialize the pins
}

void loop() {
  float d = sensor1.measureDistance(); // Call the member function to measure distance
  Serial.println(d);
  delay(1000);
}
In this way, we can clearly see that each object has its own data and functions. The main program does not need to handle specific pin operations or calculation methods, and only needs to call the methods of the object. Meanwhile, if there are multiple sensors, we only need to create multiple objects, each of which independently manages its own state and behavior without interfering with each other. This encapsulation makes the code more Modularization and easier to maintain and extend.
3.3.3 Constructors and Destructors
In Object Oriented programming, a constructor is a very special member function within a class. Its main function is to be executed automatically when an object is created, so as to initialize the member variables of the object.
Unlike ordinary member functions, a constructor does not need to be explicitly called; the system will automatically execute it when you create an object. A constructor can have parameters or have no parameters, depending on how we want to initialize the object.
To summarize: As a special member function, the constructor has several extremely important characteristics:
- No return value: Unlike ordinary functions, constructors have no return type and cannot be written as
void; the system defaults to it returning no value. The sole task of a constructor is to initialize the state of an object, rather than computing a result or returning data. - The function name must match the class name: The name of a constructor must be exactly identical to the class name, so that the compiler can recognize it as a constructor rather than an ordinary member function.
- Automatic execution: The constructor function runs automatically when an object is created, and no explicit invocation is required. Each object executes its own constructor function to complete the initialization process.
- Can have input parameters: A constructor can take parameters, which are used to pass initialization information when creating an object. A parameterized constructor allows multiple objects to be created from the same class, each with a different initial state.
- Additional operations are supported: A constructor can not only initialize variables, but also perform other operations when an object is created, such as printing messages, initializing hardware, allocating resources, etc.
In the example of the ultrasonic module, the constructor function Ultrasonic (int tPin, int ePin) is used to initialize the trigPin and echoPin of each object. When an object is created, the constructor is executed automatically, and we do not need to call it manually.
Ultrasonic sensor1(23, 22); // The constructor runs automaticallyThe destructor is the counterpart of the constructor; it is automatically invoked when the object's lifecycle ends to clean up the resources occupied by the object. It also has no return value, and its name is the same as the class name, but prefixed with ~. In simple Arduino projects, destructors are rarely used, but understanding them is crucial for handling dynamic resources and complex systems in the future.
~Ultrasonic() {
  Serial.println("Ultrasonic sensor destroyed");
}
Constructors and destructors jointly manage the lifecycle of an object: the constructor is responsible for creating and initializing the object, while the destructor takes charge of destroying and cleaning up the object. A constructor has no return value, its name is identical to the class name, it can accept parameters, and it executes automatically, which is a key feature that every beginner in Object Oriented programming must understand.
3.4 Class Instantiation and Usage
A class is merely a template that defines the properties and methods an object should have, but it cannot perform operations directly. For a program to function properly, we need to create objects based on the class, a process referred to as instantiation. Through instantiation, we can generate actual objects capable of storing data and invoking methods, thereby operating the functionality encapsulated within the class.
The usual process is that when instantiating an object, the required parameters are passed to the constructor, and the system will automatically run the constructor to initialize the member variables for the object. The member variables of each object are independent, which means that the data between different objects does not affect each other. After the object is created, we can directly call the member function defined in the class to manipulate the object's data, without repeatedly writing code or passing redundant parameters in the main program.
3.4.1 Creating Objects
When creating an object, you need to use the class name followed by the object name, and pass the parameters required by the constructor as needed. The constructor will run automatically when the object is generated, and is used to initialize the member variables of the object. For example, continue to use the class of the ultrasonic module:
Ultrasonic sensor1(23, 22);
Ultrasonic sensor2(25, 24);
Here, we create two Ultrasonic class objects, sensor1 and sensor2. Each object stores its own trigPin and echoPin data. The constructor function is executed automatically when the object is created, eliminating the need to repeatedly initialize the pins in the main program.
3.4.2 Accessing Members
After an object is created, its member variables and member functions can be accessed via the object name. Member functions can directly manipulate the member variables inside the object, so no additional data needs to be passed when calling them. For example:
void setup() {
  Serial.begin(9600);
  sensor1.begin();  // Initialize the pins of sensor1
  sensor2.begin();  // Initialize the pins of sensor2
}

void loop() {
  float distance1 = sensor1.measureDistance();  // Call sensor1's distance measurement method
  float distance2 = sensor2.measureDistance();  // Call sensor2's distance measurement method

  Serial.print("Sensor1 distance: "); Serial.println(distance1);
  Serial.print("Sensor2 distance: "); Serial.println(distance2);
  delay(1000);
}
When calling a method through an object, the main program only needs to focus on logic control, and does not need to care about how the ranging function operates trigPin and echoPin internally.
3.4.3 Independence of Objects
Each object has its own independent member variable space in memory, which means that multiple objects can be created from the same class, and the data between them does not interfere with each other. Even if sensor1 and sensor2 are instances of the same Ultrasonic class, the trigPin and echoPin they store are independent, and modifying the member variables of one object will not affect the other.
This independence ensures that multiple identical modules, such as multiple sensors and multiple robot components, can be managed simultaneously in complex projects without data confusion or conflicts. Through instantiating objects, Object Oriented programming makes code more Modularization, clearer and easier to maintain.
3.5 From Classes to Class Library Functions
Previously, we have learned how to define classes, instantiate objects, and call object methods in the main program. However, if we write all class code in the main program file, the code will become extremely long as the project grows more complex, making it very inconvenient to read and maintain. To solve this problem, we need to write classes separately in library files, and then call them in the main program via #include, just like using official Arduino libraries. This is the purpose of class libraries: to achieve functional Modularization and encapsulation, making the code clearer and more reusable.
3.5.1 What Is a Class Library File
When we learned about "library functions" earlier, we have already been exposed to library files in their basic form:
- Header File (. h): used to write function declarations;
- Implementation file (. cpp): writes the specific implementation of the function.
The main program only needs to #include the Header File, then it can call the functions in the library without concerning itself with how the underlying code is implemented.
The structure of class library files is almost the same as that of function libraries, which also consists of. h files and. cpp files. Instead of storing simple functions, they contain the definitions and implementations of classes.
- In the. h file, we write the declaration of a class: which member variables it has and which methods are accessible;
- In the. cpp file, we write the implementation of the class: how each method specifically operates.
In this way, the role of the class library is in the same line as the previous function library; the only difference is that the function library centralizes functions, while the class library encapsulates both "data + methods" into classes to form a more complete functional module.
3.5.2 Why should it be placed in the class library file
As projects grow more complex, if we directly put all classes and functions in the same. ino file, the code will still get longer and longer, making it difficult to read and maintain. This is where Libraries come in to help.
The function of a class library is similar to the library functions we have learned before:
- Modularization Management: Implement the functions (such as ultrasonic sensor and steering gear control) separately in library files, and only keep the core logic in the main program.
- Code reuse: The well-written class libraries can be directly used in different projects, eliminating the need to repeatedly write the same code.
- Loose coupling: The main program only calls the interfaces provided by the class library, without concerning itself with the internal implementation details. This way, modifications to the class library will not break the main program.
- Easy to share: Others only need to
#includeyour library to immediately use the functions inside, without having to re-understand or copy your code.
Simply put, a class library is a pre-packaged functional module. It hides the complex implementation behind the scenes, allowing users to complete complex operations just by calling a few simple functions.
3.5.3 Calling Methods of Class Libraries
The way to call a class library is exactly the same as the function libraries we have used before, which is to use the #include statement to include the Header File of the library into the main program. The difference is that function libraries mainly call functions directly, while for a class library, you need to create an object first, and then use the methods encapsulated in the class through the object.
Let's first make a comparison:
——How to call the function library
#include "myFunctions.h"

void setup() {
  initSensor();   // Call the function in the library
}
—— Calling Method of the Class Library
#include "Ultrasonic.h"

Ultrasonic sensor(23, 22);  // Create the object

void setup() {
  sensor.begin();           // Call the object's method
}

void loop() {
  float d = sensor.measureDistance();
  Serial.println(d);
}
It can be seen that there is one extra step for class libraries compared to function libraries: instantiate the object first, this calling method has two notable advantages:
- The main program is more concise: we only need to focus on the logic without having to write complex details.
- Multiple objects can be created: for example, if there are two ultrasonic sensors, they can be instantiated separately without interfering with each other.
Therefore, from the perspective of us users, there is no difference between calling a custom library and calling the built-in libraries of Arduino. Once you learn to write your own libraries, you can directly create objects and call methods just as you normally do when using Arduino's built-in libraries; at the same time, you can also share your libraries with others, allowing them to use our work directly just like using official libraries.
4. Steps for Writing Ultrasonic Library Files
With all that understood, we can now proceed to write the class library file, which can be done in three major steps:
- Write a Header File
. hfile - Write the source file
. cppfile - Write the main program file
. inofile, i. e., how to call it
4.1 Writing Header Files (. h Files)
Step 1: Create a Header File
First, we create a Header File named SR04.h.
Step 2: Class Declaration
Declare the class name, member variables, constructor, member function, etc.
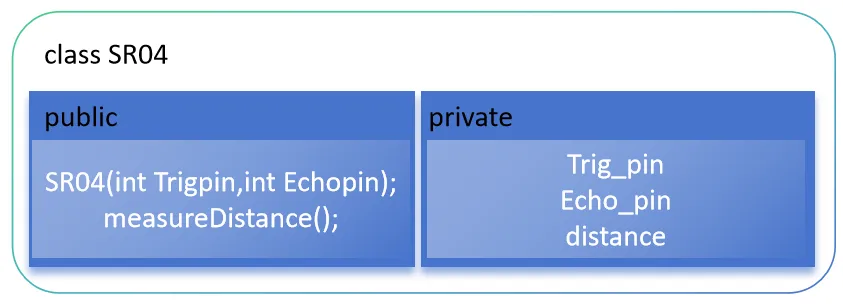
In the Header File, we need to declare the SR04 ultrasonic class, which should contain two member functions and three member variables.
The SR04 () function is a constructor with the same name as the class, which is used to initialize objects; the measureDistance () function is used to acquire and process the information transmitted back by the ultrasonic sensor.
Step 3: Include the required libraries
Include the standard library and other required libraries in the Header File.
Step 4: Prevent Duplicate Inclusion
Use the preprocessor directives #ifndef, #define and #endif to ensure that the Header File is included only once.
The code example is as follows:
#ifndef SR04_H
#define SR04_H

#include <Arduino.h>  // Include the Arduino library

class SR04 {
public:
    SR04(int trigPin, int echoPin); // Constructor declaration
    float measureDistance(); // Method declaration

private:
    int trig_Pin;
    int echo_Pin;
    float distance;
};

#endif
4.2 Write Source Files (. cpp Files)
First, create an SR04.cpp file. Here, we need to write the specific implementation code for the member functions declared in the Header File:
#include "SR04.h"  // Include the header file

// Constructor: initialize the pin numbers and set the pin modes
SR04::SR04(int trigPin, int echoPin) {
    trig_Pin = trigPin;   // Set the trigger pin
    echo_Pin = echoPin;   // Set the echo pin
    pinMode(trig_Pin, OUTPUT);  // Set the trigger pin as output
    pinMode(echo_Pin, INPUT);   // Set the echo pin as input
}

// Measure the distance and return the result (unit: cm)
float SR04::measureDistance() {
    digitalWrite(trig_Pin, LOW);  // Make sure the trigger pin is low first
    delayMicroseconds(2);  // Delay 2 microseconds to make sure the low level is stable
    digitalWrite(trig_Pin, HIGH); // Send a 10-microsecond high pulse
    delayMicroseconds(10);  // Keep high level for 10 microseconds
    digitalWrite(trig_Pin, LOW); // End the trigger signal

    float duration = pulseIn(echo_Pin, HIGH);  // Read the duration of the echo signal
    float distance = duration * 0.0344 / 2;  // Calculate the distance (cm) using the speed-of-sound formula
    return distance;  // Return the calculated distance
}
When defining a member function outside a class declaration, the scope operator "::" must be used to specify that the function acts on the SR04 class
4.3 Write the main program file (. ino file)
Step 1: Include the Header File of the class
#include "SR04.h" enables the main program to access the declarations in the SR04 class, such as constructors, member functions and the like.
This instruction tells the compiler to insert the content of the SR04.h file into the current file when compiling the main program.
#include "SR04.h" // Include the ultrasonic library header fileStep 2: Class instantiation, create an object
We need to create SR04 class instances (i. e., objects) to use its functions. When instantiating a class, we need to initialize the class's properties (such as the sensor's pins) via the constructor function.
SR04 ultrasonic (9,10);statement will invoke the constructor of theSR04class.- A constructor function is used to initialize the properties of an object (in this example,
trigPinandechoPin). ultrasonicisan object of the SR04class, through which you can access the methods and properties within this class.
SR04 ultrasonic(22, 23); // Create an object named ultrasonicStep 3: Call the member function in the class
Once an object is instantiated, you can use the object to call the member functions in the class. For the ultrasonic sensor class SR04, we might call a measureDistance () function to measure the distance.
.(the dot operator) is used to access the members of an object (including properties and methods).
Here, ultrasonic is an object of type SR04, and measureDistance () is a member function of the SR04 class. With ultrasonic.measureDistance (), you use the dot operator to call the measureDistance () function to perform the distance measurement operation.
void setup() {
  Serial.begin(9600);  // Start serial communication
}

void loop() {
  float distance = ultrasonic.measureDistance();  // Call the member function to measure distance
  Serial.println(distance);  // Print the measurement result
  delay(1000);  // Measure once per second
}
Finally, the complete code in the main program file is as follows:
#include "SR04.h"  // Include the header file

// Create an object of type SR04, initializing triggerPin and echoPin
SR04 ultrasonic = SR04(22, 23); // Trigger pin connected to 9, echo pin connected to 10

void setup() {
  // Initialize serial communication
  Serial.begin(9600);
}

void loop() {
  // Call the measureDistance method of the SR04 class to measure the distance
  float distance = ultrasonic.measureDistance();

  // Output the measured distance value
  Serial.print("Distance: ");
  Serial.print(distance);  // Output the distance
  Serial.println(" cm");   // Unit is centimeters

  delay(1000);  // Measure once every 1 second
}
4.4 Open-Source Your Custom-Written Class Library
If the class library you develop is only for your own use, you only need to complete the writing of the Header File and the source files, and then you can directly call them in your project.
However, if you want to open-source the project so that more people can use it conveniently and find it directly in the Arduino Library Manager, you need to follow the steps below:
- Improve the library structure: Ensure the class library has a clear directory structure, including the
srcdirectory for storing source code, theexamplesdirectory for providing sample code, and thelibrary.propertiesfile to describe the basic information of the library. - Add documentation: Write
README.mdto introduce the library's functions, installation methods and usage examples, making it easier for users to get started. - Version Control: Managed via Git and hosted on open-source platforms such as GitHub for maintenance and updates.
- Publish to Arduino Library Manager: Create a version tag on GitHub, then submit it to the official Arduino library index. After the review is approved, users can directly search for and install it in the Arduino IDE.
For specific operations, you can refer to the following article:
Article Link: https://mp.weixin.qq.com/s/0jIkDXaGKFOn2o03wUmUmQ
You can also access our cloud document to view: 250312_Arduino Publishing Third-Party Libraries
5. Summary of This Chapter
In this chapter, we have completed the transition from "procedure-oriented" to "Object Oriented", and learned how to organize and reuse code through class library files. Procedure-oriented programming is intuitive, but it often leads to problems such as code duplication, if-else explosion, and difficult maintenance in complex projects. In contrast, Object Oriented emphasizes that "objects complete tasks on their own", making the code clearer and more Modularization.
We have gained an in-depth understanding of the fundamentals of classes and objects: a class serves as a template, while an object is an instance of a class. The components that make up a class include:
- Member variable: Each object has its own independent data;
- member function: directly operate on the data of an object;
- Constructors and destructors: Automatically perform initialization or cleanup when an object is created or destroyed.
By instantiating objects, we have learned how to use constructors to complete initialization and implement functions by calling member methods. The data of multiple objects do not interfere with each other, which allows the main program to only focus on the logical level without repeatedly dealing with underlying details.
Finally, let’s move on to writing and calling class library files. A class library consists of two parts:. h and. cpp, which are responsible for declaration and implementation respectively. After placing the class in the library files, you can import it via #include and use it just like the built-in Arduino libraries (such as Servo.h). This not only simplifies the main program, but also makes it easier for us to reuse and share the code.
Through the study of this chapter, you have already acquired the ability to implement functional Modularization and encapsulation, which also lays a solid foundation for the subsequent development of more complex projects.