
Your temperature and humidity sensor prints numbers on the laptop. Now you want a small device someone can put on a desk, perhaps with a screen or a status light. The next question is whether those numbers will still describe the room once the electronics are inside a case.
That transition is familiar to first-time hardware builders. In a May 2026 project, a maker started with an ESP32 and DHT22, then added a display and a printed enclosure. It is an application example, not evidence that every assembled sensor reaches its component's advertised accuracy.
On our bench we ran two simple experiments, one with a DHT11 module and one with a DHT22 module, each on a GraftPort-RP2040 controller running MicroPython. This note combines them into a path from a working bench reading to a room-monitor prototype worth testing with users.
Decide what the reading needs to tell someone
A desk display that helps someone notice changing conditions has different requirements from an instrument used to accept or reject stored materials. Decide what a reading should help the user do, how quickly it must update, and what size of error would change that decision. That gives sensor selection a purpose beyond comparing model numbers.
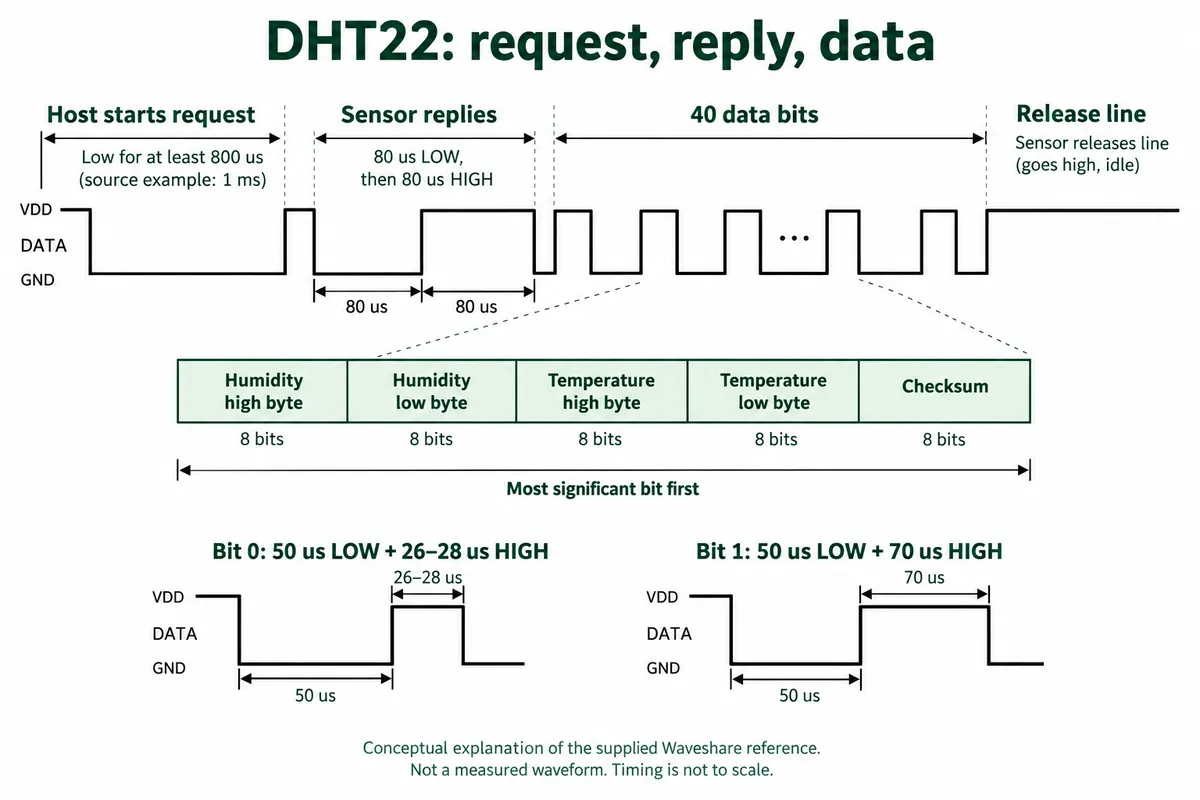
The DHT11 is the basic option and the DHT22 the higher-resolution one. Both use a single data wire, but their messages are encoded differently, so a driver must match the sensor. Neither experiment covered long-term accuracy, a finished enclosure or an environmental qualification test.
Be careful with specification tables copied between documents. One DHT11 summary lists 0 to 50°C and 20 to 90% RH, while the Aosong v1.3 manual revises those ranges to -20 to 60°C and 5 to 95% RH. Those are document-version differences, not a range our test established. Confirm the exact part and its applicable specification before promising an operating range.
Reproduce the connection deliberately
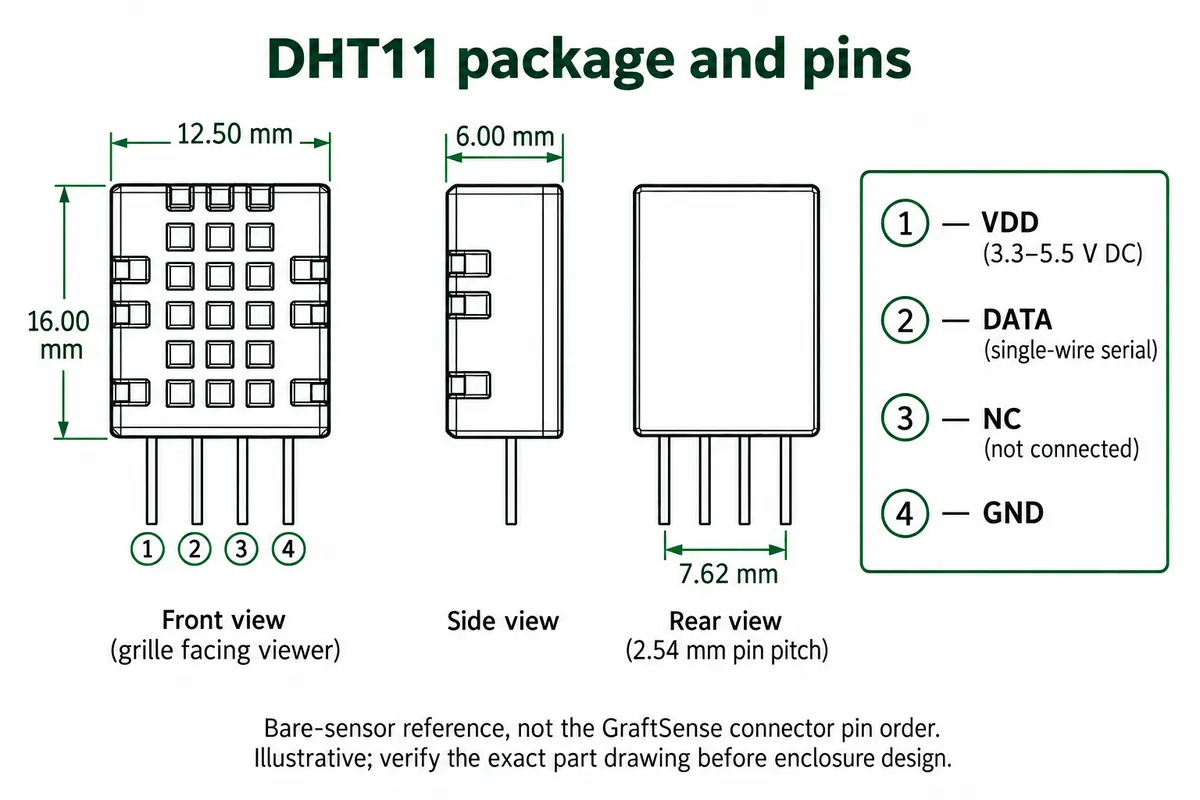
Both setups used the controller's DIO0 connector, a four-pin HY2.0 cable and GPIO6 for data; the neighboring GPIO7 was unused. Check the markings on your own board rather than treating "pin 6" as the sixth physical header position.
Power needs a separate check. The module schematics pull DATA up through 4.7 kΩ to a rail labeled +5V, while the DHT22 board artwork also carries a 3.3V marking. Those records do not establish the actual voltage on our setup. Resolve the module revision and the supply and pull-up voltage against the controller's GPIO limits before copying the connection. A connector that fits says nothing about signal levels.
For enclosure planning, distinguish the sensor body from the complete module. A package drawing describes the bare part. The PCB, connector and cable bend need additional room; a box sized only from the drawing will miss them.
Read one sensor before building the dashboard
The DHT22 test used the firmware's built-in dht module, so confirm that your MicroPython build provides it. The program waited for startup, requested a measurement, printed temperature and relative humidity, reported any read error, and waited two seconds before trying again. The core calls are the standard ones:
import dht
from machine import Pin

d = dht.DHT22(Pin(6))
d.measure()
print(d.temperature(), d.humidity())
Our terminal showed readings around 25.7 to 25.8°C and 51% RH. That demonstrates reported values in this setup, not agreement with a calibrated reference. The MicroPython 1.23 documentation describes these calls and notes that the DHT protocol is not Dallas 1-Wire, despite the similar single-wire connection.
What the driver handles: the controller requests a frame, the sensor replies, and the frame carries humidity, temperature and a checksum. DHT22 values are not simply DHT11 integer and decimal bytes under a different product name.
The second experiment, and its software difference
The DHT11 test used our team's own dht11 driver package rather than the built-in module. In that driver, temperature and humidity are properties, not method calls as in the DHT22 example. Mixing the two interfaces while swapping sensors creates a software problem unrelated to the room conditions.
That test called measure(), read the two properties, printed them and slept for two seconds. Its exception handler silently ignored failures, and the delay sat inside the successful branch. That was acceptable for a quick bench check, not for a device. For a user-facing prototype, log a failed attempt and keep a delay on the error path too. Show "reading unavailable" or the age of the last good sample rather than quietly presenting an old number as new.
The DHT11 terminal record rose from about 24.3°C and 56% RH to 29.4°C and 83% RH while a lighter was brought near the sensor. We ran a similar demonstration with the DHT22. Both are uncontrolled disturbance tests: they cannot establish calibration, response time or the conditions elsewhere in a room. Validate with a controlled comparison against a suitable reference instead.
One more timing detail when adapting the DHT11 driver: its internal 200 ms guard is a software cache interval, not permission to poll the sensor that fast. The Aosong v1.3 manual asks for more than two seconds between reads. Match the schedule to the actual sensor version.
Test the case as part of the measurement
Once readings are stable on the bench, repeat the test in the intended enclosure. Keep a suitable reference nearby, give both devices time to settle, and compare with the display and radio in their normal operating states. Record sensor position, openings and power conditions so a later case change can be compared fairly.
An element14 discussion about a DHT22 case describes a builder whose readings changed when the sensor moved away from the housing. It shows why enclosure work belongs in the experiment; it does not prescribe a universal spacing or offset correction. Airflow through the case and heat from nearby electronics both affect what the sensor reports, so the sensing area needs contact with room air while staying away from avoidable internal heat.
A September 2026 Aqara forum post asks for a neater outdoor solution than a probe cable trapped in a window. Mounting and protection matter to users. Our open-board indoor tests say nothing about weatherproofing; an outdoor version is a separate design and test task.
Give the next prototype a clear acceptance test
For a first room-monitor version, agree on the intended conditions, acceptable disagreement with the reference, update interval and behavior when data stops arriving. Then check the assembled unit against those requirements. A changing terminal value is the first milestone; a useful reading in the final location is the next one.
You can keep the DHT modules for learning and early behavior tests without committing them to the final design. If the required accuracy, environment or maintenance expectations exceed what you can verify, revisit the sensor choice before refining the case around it.