
A desktop toy can play its first tune and still be hard to use. The sound might vanish across a room, turn unpleasant when it gets louder, or change once the speaker goes inside the case. Before choosing a louder amplifier, separate three questions: what signal the software produces, what the amplifier does with it, and what reaches the listener.
On our bench we drove an LM386 amplifier module with an onboard speaker, on a GraftSense carrier, from a Raspberry Pi Pico running MicroPython, and played a sequence of tones. Following that first audio path is useful, and it also shows why a working tone demo is only the beginning of an audio feature.
Start with the sound your product actually needs
For a toy that plays a short success tune, a sequence of electronic notes may be enough. A spoken instruction needs a recording or speech generator as well as a way to play it, and music brings its own expectations. All of these end at a speaker, but they do not start with the same software.
That matters when troubleshooting. In a 2021 All About Circuits thread, an LM386 circuit sounded different with different audio sources, and the builder later reported success with a different amplifier. The useful question for a prototype is broader than which amplifier to buy: which source, level and speaker are being tested together?
Our test generated square-wave tones. It did not decode audio files. The compact carrier combines amplifier and speaker, which makes it a convenient experiment before deciding whether your product needs tones, recorded speech or richer audio.
Follow the signal through the setup
The module documentation specifies a 5 V supply and an LM386 gain of 200. Gain says how much the amplifier multiplies a small input; it does not mean the speaker can deliver any loudness you ask for. Supply, signal level and speaker load still set the limit.
TI's reference circuit shows the main functions: an input level control, the amplifier, and a capacitor between the amplifier output and the speaker. In that reference, a capacitor between pins 1 and 8 selects the higher gain. The TI LM386 data sheet explains the gain arrangements and their operating conditions. That is a generic design example, not the exact circuit on our carrier.
We connected the carrier with a four-wire cable. One detail to settle before repeating it: our wiring table named GP6 while the program used GP26. The connector and the firmware pin have to agree. The carrier's input network should also be checked against the actual board before its schematic is used as a build reference.
Play one note, then a short sequence
The driver we used generates a PWM output: a pin switching repeatedly between high and low, at the note frequency itself in this test. Our program first asked for a 440 Hz note lasting one second, followed by three seconds of silence. The terminal message claimed a three-second note, but the function argument was one second. That kind of mismatch is easy to miss if you judge behavior from printed messages.
The program then played 440, 494, 523, 587, 659, 698 and 784 Hz in order, mostly half a second each with a final one-second note and a short gap between notes. A repeatable pattern is easier to compare across attempts than a single sound. We heard the pitches change, and a phone recorder showed the audio trace moving. That is enough for the tone sequence. It does not tell you how far away someone can hear it, how it sounds in a case, or whether speech would be understandable.
Check that the volume control really changes playback
Next, the program printed volume settings of 20, 40, 60, 80 and 100 percent. That looks like a useful listening comparison, but in our driver the tone function reset the PWM duty cycle to about 50 percent every time it played a note. Duty cycle is the fraction of each cycle spent high. Because that reset happened after the volume call, the five printed settings did not produce five playback levels. Changing duty cycle alone would not give a smooth, calibrated loudness control anyway.
For an early prototype, first make one deliberately quiet, repeatable sound with a properly designed input level control. Then confirm that each requested setting actually changes the signal during playback. Listen from the same position and record the setting with each observation. That tells you whether the control works before you conclude that the amplifier is too weak.
There is a timing consequence too. The driver waited inside the note function. If a toy must keep responding to a button or sensor while a melody plays, that needs its own check, or a playback design that lets other work continue. The simple sequence is a fine demo, but it should not quietly become the whole interaction loop.
Keep the audio path clean as the prototype becomes a product
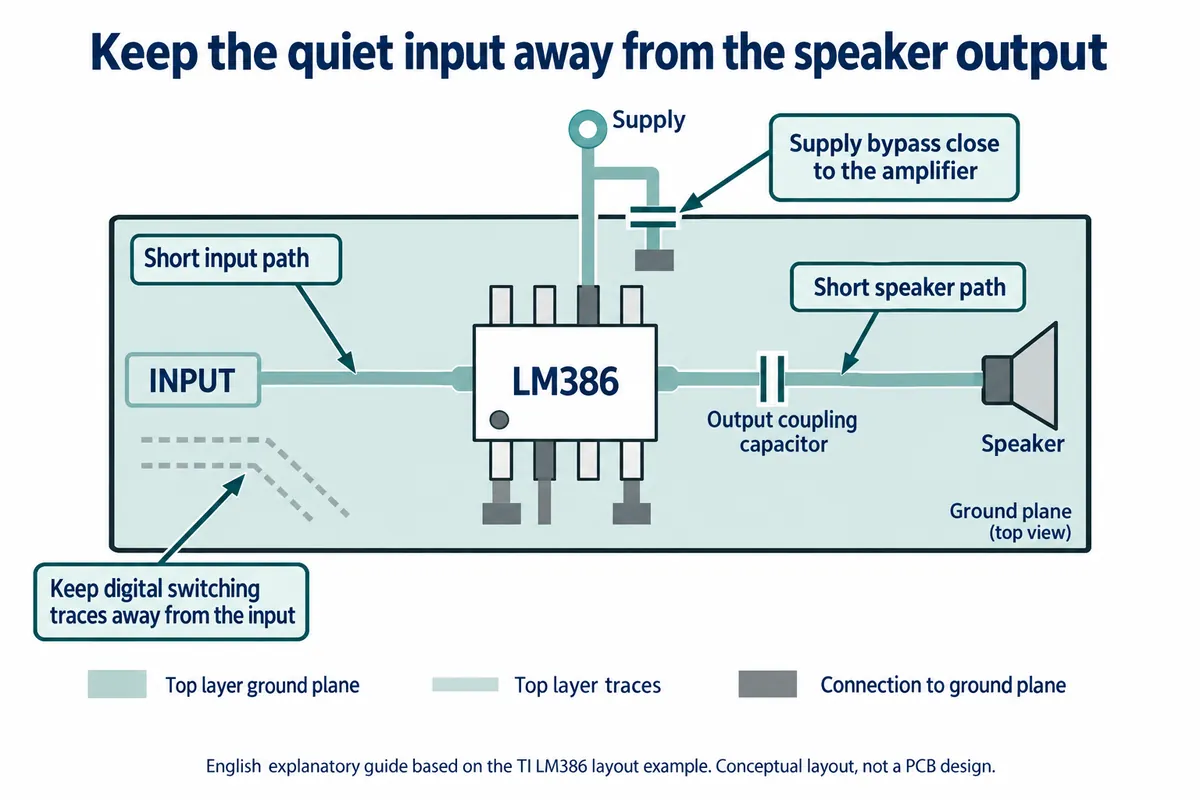
Moving from a bench connection to a compact board changes how input, supply and speaker wiring sit together. TI's layout guidance recommends nearby components, short output traces and separation between analog and digital routing.
Once electrical playback is repeatable, put the speaker in an early version of the intended case. Keep the sound and listening position the same when comparing the open and enclosed assemblies. Check whether a hand covers the opening, whether anything rattles, and whether the sound is still recognizable where the user will be.
The enclosure is part of the sound system. CUI Devices' micro-speaker enclosure guide explains that sound from the front and back of a speaker can cancel where the paths meet, describes the tradeoff between a small rear cavity and cone movement, and stresses secure mounting. The right dimensions depend on the speaker and the product; a generic hole pattern does not replace a listening test.
For a first user trial, write down what must be heard: for example, a short confirmation tune at the intended distance, with the case closed and normal background noise present. If speech is required, test real speech. If music is central, choose and assess a complete audio path instead of extrapolating from a few notes.
Give the next engineer a repeatable starting point
A useful handover includes the exact board and speaker, the supply, the program, a confirmed pin mapping and one repeatable sound, plus a short recording from the intended listening position and a photo of the proposed enclosure. With that, someone can tell whether a problem starts in software, the amplifier input or the physical sound path.
Our test covers the first part: a real assembly and a controlled note sequence. The volume discrepancy is useful too, because it shows why printed settings have to be checked against what the device actually does. Resolve that before buying a bigger amplifier or committing to an enclosure. If you reuse the driver we used, note that it carries a noncommercial license.